More Skills 11 Split Windows and Arrange Windows - Pearson
More Skills 11 Split Windows and Arrange Windows - Pearson More Skills 11 Split Windows and Arrange Windows - Pearson
CHAPTER 1 Word More Skills 11 Split Windows and Arrange Windows Word enables you to split the screen, which lets you look at two different parts of the same document at the same time. This is useful in a long document, for example, when you are writing a summary. You can also view two different documents side by side to make comparisons between the two, use one as a source of information, or even copy text from one document to the other. To complete this document, you will need the following files: w01_Staffing_Memo w01_Shareholders You will save your document as: w01_Staffing_Your_Name w01_Split_Snip_Your_Name w01_Two_Windows_Snip_Your_Name 1. Start Word. Locate and open the file w01_Staffing_Memo. Save the file in your Word Chapter 1 folder as w01_Staffing_Your_Name and then add the file name to the footer. If necessary, turn the formatting marks off. 2. On the Ribbon, click the View tab, and then in the Window group, click the Split button. Compare your screen with Figure 1. A split bar displays near the middle of the document window, with a pointer on the bar. The split bar indicates the location of the border between the windows. View tab Split button Split bar Pointer Figure 1 Microsoft Word | Chapter 1 - Create Documents with Word 2007 More Skills: SKILL 11 | Page 1 of 3 From Skills for Success with Microsoft® Office 2007 by Kris Townsend Copyright © 2009 by Pearson Education, Inc. All rights reserved.
- Page 2 and 3: 3. Move the split bar below the par
CHAPTER 1<br />
Word<br />
<strong>More</strong> <strong>Skills</strong> <strong>11</strong> <strong>Split</strong> <strong>Windows</strong> <strong>and</strong> <strong>Arrange</strong> <strong>Windows</strong><br />
Word enables you to split the screen, which lets you look at two different parts of the same<br />
document at the same time. This is useful in a long document, for example, when you are<br />
writing a summary.<br />
You can also view two different documents side by side to make comparisons between the<br />
two, use one as a source of information, or even copy text from one document to the other.<br />
To complete this document, you will need the following files:<br />
w01_Staffing_Memo<br />
w01_Shareholders<br />
You will save your document as:<br />
w01_Staffing_Your_Name<br />
w01_<strong>Split</strong>_Snip_Your_Name<br />
w01_Two_<strong>Windows</strong>_Snip_Your_Name<br />
1. Start Word. Locate <strong>and</strong> open the file w01_Staffing_Memo. Save the file in your Word<br />
Chapter 1 folder as w01_Staffing_Your_Name <strong>and</strong> then add the file name to the footer.<br />
If necessary, turn the formatting marks off.<br />
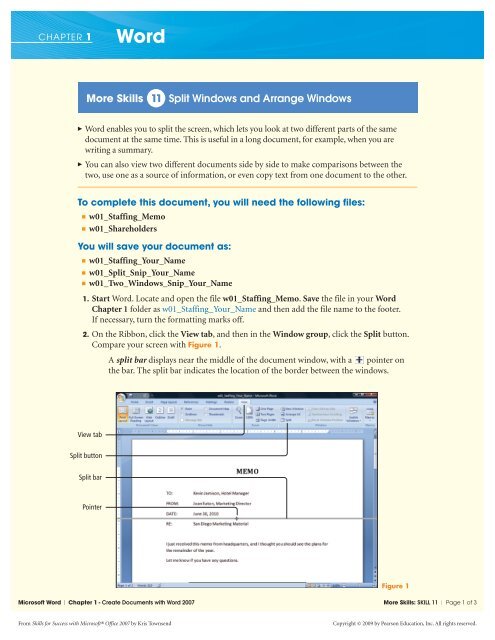
2. On the Ribbon, click the View tab, <strong>and</strong> then in the Window group, click the <strong>Split</strong> button.<br />
Compare your screen with Figure 1.<br />
A split bar displays near the middle of the document window, with a pointer on<br />
the bar. The split bar indicates the location of the border between the windows.<br />
View tab<br />
<strong>Split</strong> button<br />
<strong>Split</strong> bar<br />
Pointer<br />
Figure 1<br />
Microsoft Word | Chapter 1 - Create Documents with Word 2007 <strong>More</strong> <strong>Skills</strong>: SKILL <strong>11</strong> | Page 1 of 3<br />
From <strong>Skills</strong> for Success with Microsoft® Office 2007 by Kris Townsend<br />
Copyright © 2009 by <strong>Pearson</strong> Education, Inc. All rights reserved.
3. Move the split bar below the paragraph that begins DATE, <strong>and</strong> then click one time. Notice<br />
that the document window is divided into two sections, <strong>and</strong> each section has its own ruler.<br />
4. Click anywhere in the lower half of the window, <strong>and</strong> then use the lower vertical scroll bar to<br />
display the bottom of Page 1, as shown in Figure 2.<br />
One document,<br />
two windows<br />
Page 1 footer<br />
Figure 2<br />
5. Display the Start menu ,point to All Programs, click the Accessories folder, <strong>and</strong><br />
then click Snipping Tool. On the Snipping Tool program, click the New button<br />
arrow, <strong>and</strong> then click Full-screen Snip. In the Snipping Tool mark-up window, click<br />
the Save Snip button . In the displayed Save As dialog box, navigate to your<br />
Word Chapter 1 folder. Click in the File name box, <strong>and</strong> then using your own name,<br />
type w01_<strong>Split</strong>_Snip_Your_Name <strong>and</strong> press J. Close the Snipping Tool<br />
mark-up window.<br />
If you do not have the Snipping Tool, which is available in <strong>Windows</strong> Vista Home<br />
Premium edition, press ap, <strong>and</strong> then paste the screen into a Word document.<br />
6. On the View tab, in the Window group, click the Remove <strong>Split</strong> button.<br />
7. From the Office menu , locate <strong>and</strong> open the file w01_Shareholders.<br />
8. On the View tab, in the Window group, click the <strong>Arrange</strong> All button. Notice that both<br />
documents display in their own window, <strong>and</strong> each window has a Ribbon, rulers, <strong>and</strong> scroll<br />
bars, as shown in Figure 3.<br />
Microsoft Word | Chapter 1 - Create Documents with Word 2007 <strong>More</strong> <strong>Skills</strong>: SKILL <strong>11</strong> | Page 2 of 3<br />
From <strong>Skills</strong> for Success with Microsoft® Office 2007 by Kris Townsend<br />
Copyright © 2009 by <strong>Pearson</strong> Education, Inc. All rights reserved.
Ribbons in each window<br />
Two documents open<br />
Figure 3<br />
9. In the w01_Staffing_Your_Name window, scroll to display the file name in the Page 1<br />
footer.<br />
10. Using the technique you used in Step 5, create a Snip called w01_Two_<strong>Windows</strong>_<br />
Snip_Your_Name<br />
<strong>11</strong>. In the w01_Shareholders window, click the Close button . In the w01_Staffing_<br />
Your_Name window, click the Maximize button .<br />
12. Submit the two Snip files as directed, Save your document, <strong>and</strong> then Exit Word.<br />
You have completed <strong>More</strong> <strong>Skills</strong> <strong>11</strong><br />
Microsoft Word | Chapter 1 - Create Documents with Word 2007 <strong>More</strong> <strong>Skills</strong>: SKILL <strong>11</strong> | Page 3 of 3<br />
From <strong>Skills</strong> for Success with Microsoft® Office 2007 by Kris Townsend<br />
Copyright © 2009 by <strong>Pearson</strong> Education, Inc. All rights reserved.


