

Microsoft Excel 2010: Mouse Pointers & Cursor Movements
Microsoft Excel 2010: Mouse Pointers & Cursor Movements
Microsoft Excel 2010: Mouse Pointers & Cursor Movements

You also want an ePaper? Increase the reach of your titles
YUMPU automatically turns print PDFs into web optimized ePapers that Google loves.
<strong>Microsoft</strong> <strong>Excel</strong> <strong>2010</strong>: <strong>Mouse</strong> <strong>Pointers</strong> & <strong>Cursor</strong> <strong>Movements</strong><br />
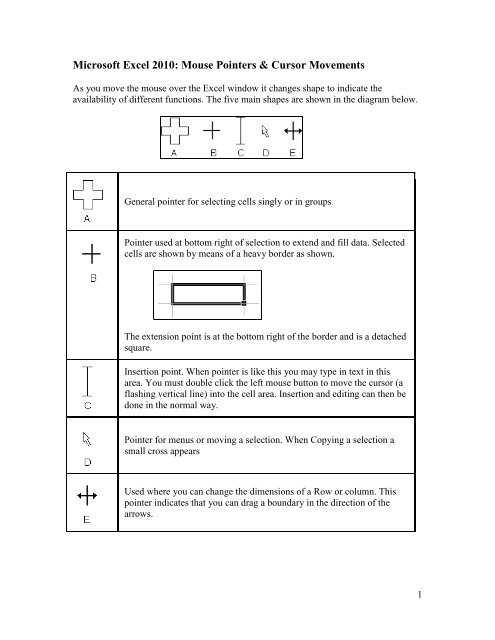
As you move the mouse over the <strong>Excel</strong> window it changes shape to indicate the<br />
availability of different functions. The five main shapes are shown in the diagram below.<br />
General pointer for selecting cells singly or in groups<br />
Pointer used at bottom right of selection to extend and fill data. Selected<br />
cells are shown by means of a heavy border as shown.<br />
The extension point is at the bottom right of the border and is a detached<br />
square.<br />
Insertion point. When pointer is like this you may type in text in this<br />
area. You must double click the left mouse button to move the cursor (a<br />
flashing vertical line) into the cell area. Insertion and editing can then be<br />
done in the normal way.<br />
Pointer for menus or moving a selection. When Copying a selection a<br />
small cross appears<br />
Used where you can change the dimensions of a Row or column. This<br />
pointer indicates that you can drag a boundary in the direction of the<br />
arrows.<br />
1
What do the different mouse pointer shapes mean in <strong>Microsoft</strong> <strong>Excel</strong>?<br />
The mouse pointer changes shape in <strong>Microsoft</strong> <strong>Excel</strong> depending upon the context. The<br />
six shapes are as follows:<br />
Used for selecting cells<br />
The I-beam which indicates the cursor position when editing a cell entry.<br />
The fill handle. Used for copying formula or extending a data series.<br />
To select cells on the worksheet. Selects whole row/column when positioned<br />
on the number/letter heading label.<br />
At borders of column headings. Drag to widen a column.<br />
At borders of row letters. Drag to increase height of row.<br />
2
<strong>Excel</strong> <strong>Cursor</strong> <strong>Movements</strong><br />
To achieve this:<br />
Move the active cell up one row<br />
Move the active cell down one row<br />
Move the active cell left one column<br />
Move the active cell right one column<br />
Move the active cell one screen down<br />
Move the active cell one screen up<br />
Move the active cell to the first cell in the row<br />
Move to the last active cell in a row<br />
Move to cell A1<br />
Move to the intersection of the last active row and<br />
column<br />
If the cursor is currently in a data cell, move in the<br />
direction of the arrow until it encounters an empty<br />
cell; if the cursor is currently in a blank cell, moves<br />
in the direction of the arrow until it encounters a<br />
non-blank cell<br />
Enter a cell address and go directly to it<br />
Do this:<br />
Press key<br />
Press key<br />
Press key<br />
Press key<br />
Press key<br />
Press key<br />
Press key<br />
Press key<br />
Press +<br />
Press +<br />
Press followed by<br />
an arrow key (two<br />
consecutive keystrokes)<br />
Press <br />
To select any range of cells in <strong>Excel</strong><br />
Before formatting any cells in <strong>Excel</strong>, you must first select (highlight) them.<br />
To achieve this:<br />
Select (highlight)<br />
cells using the<br />
keyboard<br />
Select (highlight)<br />
cells using the<br />
mouse<br />
Select nonadjacent<br />
cells<br />
Do this:<br />
Hold the shift key down while using any of the above<br />
commands to move the cursor.<br />
When the mouse is a white plus sign<br />
mouse over the desired cells.<br />
drag the<br />
Select the first range of cells with the mouse, then while<br />
holding the control key down, drag the mouse over each<br />
additional range of cells that you wish to select.<br />
3
<strong>Excel</strong>’s cursor shapes<br />
The cursor in <strong>Excel</strong> takes on a number of different shapes, depending on where you are<br />
on the worksheet.<br />
Shape<br />
Used to:<br />
The Select <strong>Cursor</strong>. Select a cell or range. This is always used to<br />
select data before applying formatting commands.<br />
The Fill Handle. Use this to copy formulas or values. The fill<br />
handle only appears when you are in the lower right corner of the<br />
current selection.<br />
The White Arrow with a smaller 4-headed black arrow. Use this<br />
to drag and drop the selected cell or range. The white arrow only<br />
appears when you are at the edge of the current selection.<br />
The I-Beam. Use this to enter or edit data. The cursor (vertical line<br />
inside the cell) blinks.<br />
The 2-headed arrow (horizontal). Resize column width<br />
The 2-headed arrow (vertical). Resize row height<br />
The Format Painter. Use this to copy cell formats. Click on the<br />
text that is already formatted the way you want it. Then click on the<br />
Format Painter button (on the Home tab, in the Clipboard group).<br />
Click on one cell or drag the cursor over the cells that you want to<br />
format. They will be formatted exactly the same as the cell that you<br />
were in when you clicked on the Format Painter<br />
4