AI Trundle Bed 801.cdr
AI Trundle Bed 801.cdr
AI Trundle Bed 801.cdr

You also want an ePaper? Increase the reach of your titles
YUMPU automatically turns print PDFs into web optimized ePapers that Google loves.
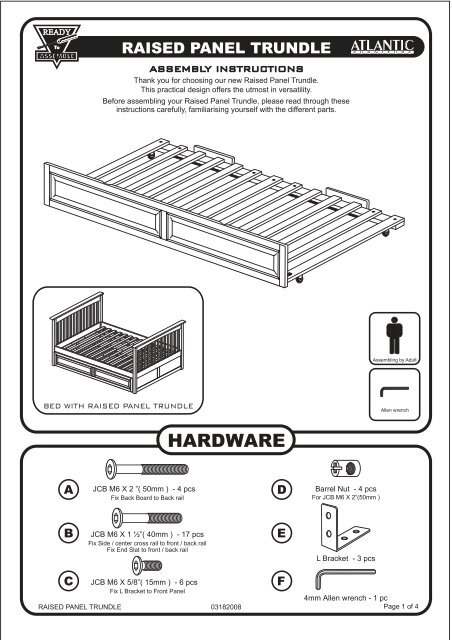
READY<br />
R<strong>AI</strong>SED PANEL TRUNDLE<br />
ASSEMBLY INSTRUCTIONS<br />
Thank you for choosing our new Raised Panel <strong>Trundle</strong>.<br />
This practical design offers the utmost in versatility.<br />
Before assembling your Raised Panel <strong>Trundle</strong>, please read through these<br />
instructions carefully, familiarising yourself with the different parts.<br />
Assembling by Adult<br />
BED WITH R<strong>AI</strong>SED PANEL TRUNDLE<br />
Allen wrench<br />
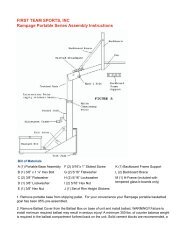
HARDWARE<br />
A<br />
JCB M6 X 2 ”( 50mm ) - 4 pcs<br />
Fix Back Board to Back rail For JCB M6 X 2”(50mm )<br />
D<br />
E<br />
Barrel Nut - 4 pcs<br />
B<br />
JCBM6X1½”(40mm ) - 17 pcs<br />
Fix Side / center cross rail to front / back rail<br />
Fix End Slat to front / back rail<br />
E<br />
L Bracket - 3 pcs<br />
C<br />
JCB M6 X 5/8”( 15mm ) - 6 pcs<br />
Fix L Bracket to Front Panel<br />
R<strong>AI</strong>SED PANEL TRUNDLE 03182008<br />
F<br />
4mm Allen wrench -1pc<br />
Page1of4
A<br />
01<br />
PARTS LIST<br />
HARDWARE 1 BOX 05 RIGHT SIDE CROSS R<strong>AI</strong>L 1 PC<br />
02<br />
FRONT PANEL<br />
1PC<br />
06<br />
LEFT SIDE CROSS R<strong>AI</strong>L<br />
1PC<br />
03<br />
FRONT R<strong>AI</strong>L<br />
1PC<br />
07<br />
CENTER CROSS R<strong>AI</strong>L<br />
1PC<br />
04<br />
BACK R<strong>AI</strong>L<br />
1PC<br />
08<br />
BACK BOARDS<br />
2 PCS<br />
09<br />
SLATS<br />
2 SETS<br />
08<br />
08<br />
06<br />
09<br />
04<br />
03<br />
07<br />
09<br />
02<br />
05<br />
01<br />
STEP 1<br />
A<br />
D<br />
F<br />
08 A<br />
Assembling by Adult<br />
JCB M6 X 2”<br />
Barrel Nut<br />
Allen wrench<br />
08<br />
04<br />
A<br />
08<br />
BOTTOM VIEW<br />
F<br />
D<br />
D<br />
D<br />
Attach the back boards (08) to the back rail (04), using JCB M6 X 2”(A),<br />
and barrel nut (D). Tighten with the Allen wrench (F).<br />
R<strong>AI</strong>SED PANEL TRUNDLE<br />
03182008<br />
04<br />
Page2of4
STEP 2<br />
E<br />
B<br />
F<br />
F<br />
Assembling by Adult<br />
L Bracket<br />
JCBM6X1½”<br />
Allen wrench<br />
B<br />
E<br />
B<br />
05<br />
03<br />
B<br />
E<br />
B<br />
07<br />
B<br />
E<br />
04<br />
B<br />
06<br />
Attach the side/center cross rails (05,06+07) to the front rail (03) and back rail (04), using L bracket (E)<br />
andJCBM6X1½”(B)asshown. Tighten with the Allen wrench (F).<br />
STEP 3<br />
C<br />
F<br />
02<br />
Assembling by Adult<br />
JCB M6 X 5/8”<br />
Allen wrench<br />
F<br />
C<br />
C<br />
C<br />
Attach the front panel (02) to assembled front rail as shown, using JCB M6 X 5/8” (C).<br />
Tighten with the Allen wrench (F).<br />
R<strong>AI</strong>SED PANEL TRUNDLE<br />
03182008<br />
Page3of4
STEP 4<br />
B<br />
F<br />
F<br />
B<br />
Assembling by Adult<br />
JCBM6X1½”<br />
Allen wrench<br />
B<br />
B<br />
B<br />
B<br />
09<br />
B<br />
B<br />
B<br />
09<br />
Lay the slats (09) onto the bed, and fix in place. Using JCB M6 X 1 1/2”(B),<br />
tighten with the Allen wrench (F)<br />
R<strong>AI</strong>SED PANEL TRUNDLE<br />
Congratulations !<br />
Your Raised Panel <strong>Trundle</strong> is now ready for use.<br />
We recommend that you recheck that all screws are tightened,<br />
and that all parts are secure before use and periodically to ensure safety.<br />
03182008<br />
Page4of4