Create successful ePaper yourself
Turn your PDF publications into a flip-book with our unique Google optimized e-Paper software.
QUICK – START GUIDE<br />
BE-STATION - BE-MIX - ETHERNET / WIFI MODE<br />
CONTENTS:<br />
1.) EQUIPMENT<br />
2.) CONNECTIONS<br />
3.) BE-STATION SET-UP<br />
4.) CONSOLE SET-UP<br />
5.) BE-MIX SOFTWARE SET-UP<br />
6.) CONNECT TO THE CONSOLE VIA BE-STATION<br />
7.) BE-MIX FEATURES QUICK - GUIDE<br />
8.) TROUBLE-SHOOTING<br />
9.) FREQUENTLY ASKED QUESTIONS<br />
www.be‐station.eu : info@be‐station.eu
QUICK – START GUIDE<br />
BE-STATION - BE-MIX - ETHERNET / WIFI MODE<br />
1.) Equipment<br />
You will need the following:<br />
1 x <strong>Be</strong>-<strong>St</strong>ation<br />
1 x be-station ac/dc power supply (or 9v batteries installed)<br />
1 x compatible palm os Wifi pda or smartphone<br />
1 x Wireless access point e.g. Linksys WAP54G or similar<br />
1 x SD card with be-mix software<br />
1 x serial key-code for be-mix<br />
1 x standard Ethernet cat5 patch cable<br />
2 x Midi cable<br />
1 x Yamaha digital console<br />
Compatible palm os pda:<br />
• Palm pilot tx, lifedrive<br />
Compatible Yamaha digital consoles:<br />
• Pm5d<br />
• M7cl<br />
• Ls9<br />
• Dm2000 versions 1 and 2<br />
• O2r 96 versions 1 and 2<br />
• O1v 96 versions 1 and 2<br />
www.be‐station.eu : info@be‐station.eu
QUICK – START GUIDE<br />
BE-STATION - BE-MIX - ETHERNET / WIFI MODE<br />
2.) connections<br />
In Ethernet mode the only cable connections to make are the<br />
two midi cables which connect the be-station to the console,<br />
and the cat5 connection between the be-station and the<br />
wireless access point.<br />
the midi-out socket on the console should connect to the<br />
midi-in socket on the be-station.<br />
the midi-in socket on the console should connect to the midiout<br />
socket on the be-station.<br />
use a standard cat5 Ethernet patch cable and not a cat5<br />
‘crossover’ cable to make the connection between the bestation<br />
and the wireless access point.<br />
www.be‐station.eu : info@be‐station.eu
QUICK – START GUIDE<br />
BE-STATION - BE-MIX - ETHERNET / WIFI MODE<br />
3.) be-station set-up<br />
a) connect the ac/dc power supply to the power jack on the<br />
rear of the be-station. Alternatively put one or two 9volt<br />
batteries in the battery compartments. The be-station will run<br />
on one but two batteries simply last longer<br />
b) push the power switch to “external” if you are running<br />
ac/dc or switch to “battery” if you are using batteries.<br />
c) for ALL current applications set the “be-sniffer” switch<br />
to OFF. If it is switched to ON be-mix may operate<br />
inconsistently.<br />
d) When you first switch on the be-station the leds will<br />
light up in a sweeping pattern first from right to left in green<br />
and then back again in red. This is normal.<br />
If the leds run through this sequence twice, in other words<br />
you see each led light up four times in total, then the<br />
internal back-up battery is either missing or dead. If this is<br />
the case then contact your distributer for help or email us<br />
on info@be-station.eu.<br />
e) The be-station will convert between any two of the<br />
protocols listed on the front of the box.<br />
For be-mix in ethernet mode the box should show a green light<br />
next to “ethernet” and also “midi”.<br />
www.be‐station.eu : info@be‐station.eu
QUICK – START GUIDE<br />
BE-STATION - BE-MIX - ETHERNET / WIFI MODE<br />
If this is not the case press and hold one of the “select”<br />
buttons – this will step through the available choices by<br />
moving one of the green leds.<br />
When the moving green led shows the choice you want, let go<br />
of the “select” button and this protocol will be selected.<br />
Repeat this process with the other “select” button if<br />
necessary until you have succeeded in lighting up both<br />
“ethernet” and also “midi”<br />
If the be-station is turned “off” , the next time it is turned on<br />
it will remember the choices you have made with the “select”<br />
buttons.<br />
g) later when you are using your pda or smartphone with<br />
be-mix, and have successfully connected to the be-station,<br />
the green led will turn amber in the “ethernet” section to<br />
show that you have a link between the wireless access point<br />
and the be-station.<br />
H) set your wireless access point to ‘wap’ mode and not<br />
‘repeater’ mode – consult the product manual which came with<br />
your wireless access point to see how this is selected.<br />
Configure the W.A.P. to ip address 10.10.6.20<br />
in be-mix console selection page, choose your console<br />
and specify ‘TCP’ as the connection type. Make sure the ‘host’<br />
is set to 10.10.6.100 (this is the default static ip address of<br />
a be-station), and also that the port is set to ‘23’<br />
www.be‐station.eu : info@be‐station.eu
QUICK – START GUIDE<br />
BE-STATION - BE-MIX - ETHERNET / WIFI MODE<br />
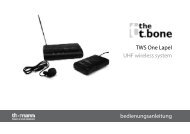
4. Console set-up<br />
a) PM5D<br />
see the screenshot below. Select these settings via the<br />
midi / remote key on the right hand side of the desk.<br />
www.be‐station.eu : info@be‐station.eu
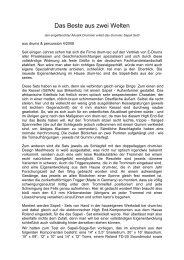
) M7CL<br />
QUICK – START GUIDE<br />
BE-STATION - BE-MIX - ETHERNET / WIFI MODE<br />
see the screenshot below. Select these settings via “setup”<br />
(bottom right of touch screen) then “midi”<br />
www.be‐station.eu : info@be‐station.eu
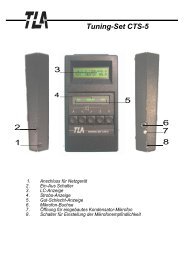
c) LS9<br />
QUICK – START GUIDE<br />
BE-STATION - BE-MIX - ETHERNET / WIFI MODE<br />
see the screenshot below. Select these settings via “misc<br />
setup” then “midi”<br />
www.be‐station.eu : info@be‐station.eu
QUICK – START GUIDE<br />
BE-STATION - BE-MIX - ETHERNET / WIFI MODE<br />
d) DM2000 version 2 / O1V96 / O2R96<br />
www.be‐station.eu : info@be‐station.eu
QUICK – START GUIDE<br />
BE-STATION - BE-MIX - ETHERNET / WIFI MODE<br />
5.) <strong>Be</strong>-Mix Software set-up<br />
a) Serial Key<br />
To use be-mix software you need three things: a copy<br />
of the software, an sd card and a serial key (which is<br />
a hex code).<br />
When you pay for a copy of the software you are<br />
given a serial key code which is specific to the sd<br />
card’s unique memory id.<br />
If you are reading this then you already have<br />
purchased a copy of the software on an sd card (with<br />
the serial key already configured), so you are ready<br />
to go.<br />
You should remember that the sd card acts as a<br />
‘dongle’ which means that even though the palm<br />
device runs the software from internal memory within<br />
the handheld, it still needs to see the sd card in the<br />
slot to allow the program to run.<br />
www.be‐station.eu : info@be‐station.eu
QUICK – START GUIDE<br />
BE-STATION - BE-MIX - ETHERNET / WIFI MODE<br />
b) <strong><strong>St</strong>art</strong> the software<br />
take the sd card and insert it into the sd slot on the<br />
handheld device<br />
The PDA or smartphone should then show you a bemix<br />
icon which you should tap. You will now see the<br />
main screen of be-mix.<br />
Tap the bottom right icon “pref”<br />
then tap “console”. Select the console you wish to<br />
connect to e.g. “M7CL” and if necessary confirm<br />
exact model e.g. 32 or 48 channel. make sure that<br />
“bluetooth” is selected as connection type.<br />
if changing from one console type to another,<br />
highlight the console you want to use and confirm<br />
this choice. Once you have selected your console you<br />
are now ready to connect to the console via the bestation.<br />
www.be‐station.eu : info@be‐station.eu
QUICK – START GUIDE<br />
BE-STATION - BE-MIX - ETHERNET / WIFI MODE<br />
6.) connect to the console via the be-station<br />
a) make sure the console is turned on, and the midi<br />
settings are correct. (see section 4)<br />
b) make sure the midi cables are connected correctly<br />
between the be-station and console- ‘in to out’ and ‘out to in’<br />
c) make sure the be-station is turned on and that both<br />
‘midi’ and ‘ethernet’ options are selected with a ready-to-go<br />
green light next to them.<br />
d) start the software and check that the console type in<br />
‘pref’ – ‘console’ matches the console you are connected to.<br />
e) tap the solid red bar in the top right hand corner of<br />
the main be-mix screen. It will go light red to indicate it is<br />
attempting to connect to the be-station. If your pda has not<br />
already connected to the wireless access point then pu may<br />
well see the pda showing that it is connecting to ‘linksys’ or<br />
whatever the ssid of the w.a.p. is.<br />
<strong>Be</strong>-Mix will then connect with the be-station, this should<br />
happen quickly. The be-station Ethernet green led will turn<br />
amber once the handheld device has connected to the bestation.<br />
The red bar in the top right corner of the main be-mix screen<br />
should now turn half-black (to indicate wifi lock) and halfgreen<br />
to indicate that you are now online to the desk.<br />
www.be‐station.eu : info@be‐station.eu
QUICK – START GUIDE<br />
BE-STATION - BE-MIX - ETHERNET / WIFI MODE<br />
7.) <strong>Be</strong>-Mix features – quick guide<br />
• A: ‘Main’ - Input page<br />
See screenshots below; main input faders, click ‘eq’ to<br />
access input channel peq, if there is a graphic eq<br />
inserted on that channel, then the right-hand tab<br />
allows access to the geq, pan is accessed through the<br />
pan knobs at the bottom of the screen.<br />
Channels can be solo’d and muted. <strong>Be</strong>-Mix follows the<br />
solo mode already selected within the console.<br />
• B: ‘Outs’ - Output Page<br />
See screenshots below; Main output faders, click ‘eq’ to<br />
access output channel peq, if there is a graphic eq<br />
inserted on that output, then the right-hand tab allows<br />
access to the geq<br />
www.be‐station.eu : info@be‐station.eu
QUICK – START GUIDE<br />
BE-STATION - BE-MIX - ETHERNET / WIFI MODE<br />
• C: ‘DCA’ – DCA Page<br />
See screenshot below ; access to the DCA faders:<br />
• D: Sends On Fader Mode;<br />
See screenshot below ; Access to the Mix Busses via<br />
‘sends on fader’ or ‘fader flip’ modes.<br />
• E: ‘Pref’ section:<br />
See screenshots below ; Console choice and selection,<br />
view = deselect to simplify controls available,<br />
Scene = not implemented yet,<br />
License = software and PDA Bluetooth info<br />
www.be‐station.eu : info@be‐station.eu
QUICK – START GUIDE<br />
BE-STATION - BE-MIX - ETHERNET / WIFI MODE<br />
• ‘patch’ Section :<br />
See screenshots below ; input Patch, output Patch,<br />
Insert on inputs, insert on outputs,<br />
direct out, channel link sections,<br />
soon to come = output delays<br />
www.be‐station.eu : info@be‐station.eu
QUICK – START GUIDE<br />
BE-STATION - BE-MIX - ETHERNET / WIFI MODE<br />
• F: Palm ‘Pull Down Menu’<br />
Depending on the specific device this can either be a<br />
hard or soft key , with a symbol like this:<br />
Use this menu to access ‘uninstall’ for upgrading be-mix,<br />
‘quickmixaccess’ for going straight to a specific sends<br />
on fader screen, and ‘help’ for real keyboard<br />
shortcuts info;<br />
www.be‐station.eu : info@be‐station.eu
QUICK – START GUIDE<br />
BE-STATION - BE-MIX - ETHERNET / WIFI MODE<br />
8) TROUBLESHOOTING – Ethernet / Wifi MODE<br />
• Unable to connect to be-station<br />
a) check unit is powered up and has green lights next to<br />
Ethernet and midi leds before you attempt to connect.<br />
b) check your pda has Wifi switched on and has sufficient<br />
battery to power it’s Wifi functions<br />
c) check that the Ethernet cable is a standard patch cable<br />
and not a crossover cable.<br />
d) look at the be-mix screen – top right is the connections<br />
‘bar’ - if half of this is black (see section 6-e) then you are<br />
actually successfully connected to the be-station via<br />
Ethernet, and your problem may lie elsewhere.<br />
• Can connect to be-station with ethernet but can’t get<br />
online to the console<br />
a) check you have two midi cables connected to the midi<br />
ports. <strong>Be</strong>-station ‘in’ to console ‘out’ and vice versa<br />
b) check that you have selected the correct console type<br />
in be-mix via ‘pref’, ‘console’ (see section 5b). If<br />
necessary ‘add’ your console type and then highlight it<br />
before returning to the main page to try again. If you have<br />
selected the wrong console type, it is possible that be-mix<br />
may appear to work, although erratically and with errors.<br />
c) check that the midi settings within the console are<br />
correct for use with be-mix / be-station (see section 4). If<br />
you have incorrect settings it is possible that be-mix may<br />
not work, or may work erratically and with errors.<br />
d) check that the ‘be-sniffer’ switch on the front panel of<br />
be-station is in the ‘off’ position. This is an advanced<br />
function which has not yet been fully implemented. Always<br />
operate the be-station with this switch in the ‘off’ position.<br />
www.be‐station.eu : info@be‐station.eu
QUICK – START GUIDE<br />
BE-STATION - BE-MIX - ETHERNET / WIFI MODE<br />
9) Frequently Asked Questions<br />
• Q : What happens when I walk out of Wifi range while<br />
using be-mix?<br />
a: once you are out of range, any actions you make on<br />
the pda will not affect the console, and there is no buffer<br />
within the pda so no actions will be ‘accumulated’. It is<br />
exactly like unplugging the midi cable from the back of the<br />
console, no further changes are made.<br />
when you first lose Wifi connection, be-mix may<br />
appear to freeze for a short time. This is because it is<br />
attempting to re-establish the link for you. If you only<br />
lose connection for a very short time, it may well be able<br />
to reconnect you automatically.<br />
if this does not happen, be-mix will give you a<br />
message saying something like ‘console unreachable’. to<br />
connect to the console again, you need to go through the<br />
connection procedure again by clicking the red bar top<br />
right of the main be-mix screen.<br />
• Q: if a new version of be-mix is released do I have to<br />
pay for it, or can I upgrade free?<br />
A: standard be-mix upgrades will always be free, and<br />
your serial key will allow you to access the new version<br />
of software which will be available from www.be-mix.com<br />
• Q: is there some way to do a ‘factory reset’ on the bestation?<br />
A: yes, although when you do this you will lose any<br />
settings you have made inside the be-station with the ‘beconfigurator’<br />
program.<br />
to do a factory reset, turn the be-station off.<br />
Press and hold both ‘select’ buttons on the front panel<br />
and turn the be-station back on.<br />
the led’s will begin sweeping from right to left.<br />
You can let go of the select buttons now.<br />
once the led’s have finished sweeping the bestation<br />
will select ‘bluetooth’ and ‘midi’ by default and be<br />
‘out of the factory’ configured once again.<br />
www.be‐station.eu : info@be‐station.eu
QUICK – START GUIDE<br />
BE-STATION - BE-MIX - ETHERNET / WIFI MODE<br />
• Q: How do I upgrade the be-mix software on my palm<br />
device?<br />
A: follow this procedure: first run be-mix and press<br />
the ‘palm pull down menu’ – see section 7F.<br />
then choose ‘uninstall’ and say ‘yes’ to delete application<br />
and do soft restart.<br />
Say ‘no’ to the question ‘delete serial key?’<br />
say ‘no to the question ‘delete application settings?’.<br />
The palm device will then do a soft reset.<br />
Use a card reader to delete the old ‘be-mix.prc’ file which<br />
can be found in palm/launcher folder on the sd card. Now<br />
copy the new file into the same location, put the sd card<br />
back into the palm pda and run be-mix.<br />
Once the software is running choose ‘pref’ then ‘license’<br />
and check that the version number matches the new<br />
download.<br />
see screenshots on the next page:<br />
www.be‐station.eu : info@be‐station.eu
QUICK – START GUIDE<br />
BE-STATION - BE-MIX - ETHERNET / WIFI MODE<br />
YES NO NO<br />
www.be‐station.eu : info@be‐station.eu
QUICK – START GUIDE<br />
BE-STATION - BE-MIX - ETHERNET / WIFI MODE<br />
Q: <strong>Be</strong>-Mix is asking me to enter my serial key and I do not<br />
have a record of it, how do I find out what it is?<br />
A: if you bought a be-station with a serial number beginning<br />
with “be-st-eu” then send an email to info@be-station.eu<br />
telling us what the sd card id is – it will be something like<br />
“<strong>Be</strong>-54”. It is written on the sd card and also is the ‘name’<br />
of the sd card when you read it from a pc or mac.<br />
we will send you an email back with the serial key you need to<br />
enter in the software license page of be-mix.<br />
Q: how many pdas can change parameters on the console at<br />
the same time.<br />
A: currently the limit is Fifteen wifi pdas as well as an<br />
operator who can make changes on the console itself.<br />
Q: be-mix is written for palm devices, can I use anything<br />
else to run it?<br />
A: at the moment the software only runs on palm devices<br />
but in the very near future a version written in windows xp<br />
will be available which will mean that this can be ported to a<br />
windows mobile device, meaning that you may not need to buy a<br />
palm device to run the software. The device must support<br />
Bluetooth to connect to the be-station when in Bluetooth<br />
mode, or wifi if you are using the be-station Ethernet port and<br />
a wireless access point. Check for news on this at either<br />
www.bemix.com or www.be-station.eu<br />
Q: I need advice on how to use be-mix, where can I get this<br />
from?<br />
A: first port of call is to contact the dealer who sold the<br />
device to you.<br />
It is also always worth checking the help files and demo<br />
videos which are available as downloads from www.bestation.eu<br />
www.be‐station.eu : info@be‐station.eu