LANTEK User Manual - Ideal Industries
LANTEK User Manual - Ideal Industries LANTEK User Manual - Ideal Industries
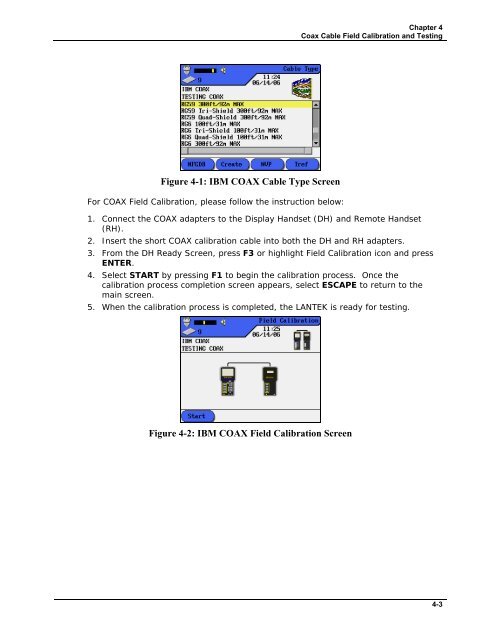
Chapter 4 Coax Cable Field Calibration and Testing Figure 4-1: IBM COAX Cable Type Screen For COAX Field Calibration, please follow the instruction below: 1. Connect the COAX adapters to the Display Handset (DH) and Remote Handset (RH). 2. Insert the short COAX calibration cable into both the DH and RH adapters. 3. From the DH Ready Screen, press F3 or highlight Field Calibration icon and press ENTER. 4. Select START by pressing F1 to begin the calibration process. Once the calibration process completion screen appears, select ESCAPE to return to the main screen. 5. When the calibration process is completed, the LANTEK is ready for testing. Figure 4-2: IBM COAX Field Calibration Screen 4-3
Chapter 4 COAX Cable Field Calibration and Testing TROUBLESHOOTING COAX CABLING Always use high quality connectors and tools to properly terminate COAX network. In case of a cable fail, look for the following cases: ‣ FAULTY TERMINATION - Make sure you have properly separated the center conductor from the shield. ‣ CABLE SHORT - This could occur from improper termination both at near-end and far-end. In case of a SHORT, look for the Resistance value on the tester. A zero (0) – Ohm resistance value will suggest the fault is at the near-end of the cable, while a ~ 20 – Ohm value will suggest the fault is at the far-end. ‣ CABLE OPEN - A common case. To diagnose this situation, look at the cable length measurement. A zero (0) cable length will suggest a fault at the nearend. ‣ USE of TDR to Diagnose Problem - The LANTEK build-in copper TDR is a good tool to identify the location of the fault and distance of the fault. Refer to the TDR operation in this manual for more details. 4-4
- Page 34 and 35: Chapter 2 Test Setup Procedures Tab
- Page 36 and 37: Chapter 2 Test Setup Procedures Sav
- Page 38 and 39: Chapter 2 Test Setup Procedures OTH
- Page 40 and 41: Chapter 2 Test Setup Procedures Edi
- Page 42 and 43: Chapter 2 Test Setup Procedures ACT
- Page 44 and 45: Chapter 3 Structured Cable Field Ca
- Page 46 and 47: Chapter 3 Structured Cable Field Ca
- Page 48 and 49: Chapter 3 Structured Cable Field Ca
- Page 50 and 51: Chapter 3 Structured Cable Field Ca
- Page 52 and 53: Chapter 3 Structured Cable Field Ca
- Page 54 and 55: Chapter 3 Structured Cable Field Ca
- Page 56 and 57: Chapter 3 Structured Cable Field Ca
- Page 58 and 59: Chapter 3 Structured Cable Field Ca
- Page 60 and 61: Chapter 3 Structured Cable Field Ca
- Page 62 and 63: Chapter 3 Structured Cable Field Ca
- Page 64 and 65: Chapter 3 Structured Cable Field Ca
- Page 66 and 67: Chapter 3 Structured Cable Field Ca
- Page 68 and 69: Chapter 3 Structured Cable Field Ca
- Page 70 and 71: Chapter 3 Structured Cable Field Ca
- Page 72 and 73: Chapter 3 Structured Cable Field Ca
- Page 74 and 75: Chapter 3 Structured Cable Field Ca
- Page 76 and 77: Chapter 3 Structured Cable Field Ca
- Page 78 and 79: Chapter 3 Structured Cable Field Ca
- Page 80 and 81: Chapter 3 Structured Cable Field Ca
- Page 82 and 83: CHAPTER 4 COAX CABLE FIELD CALIBRAT
- Page 86 and 87: CHAPTER 5 FIBER OPTICS CABLE FIELD
- Page 88 and 89: Chapter 5 Fiber Optics Cable Field
- Page 90 and 91: Chapter 5 Fiber Optics Cable Field
- Page 92 and 93: Chapter 5 Fiber Optics Cable Field
- Page 94 and 95: Chapter 5 Fiber Optics Cable Field
- Page 96 and 97: Chapter 5 Fiber Optics Cable Field
- Page 98 and 99: Chapter 5 Fiber Optics Cable Field
- Page 100 and 101: Chapter 6 Fiber Optics Diagnostics
- Page 102 and 103: Chapter 6 Fiber Optics Diagnostics
- Page 104 and 105: Chapter 6 Fiber Optics Diagnostics
- Page 106 and 107: Chapter 6 Fiber Optics Diagnostics
- Page 108 and 109: Chapter 6 Fiber Optics Diagnostics
- Page 110 and 111: Chapter 6 Fiber Optics Diagnostics
- Page 112 and 113: CHAPTER 7 LANTEK REPORTER SOFTWARE
- Page 114 and 115: Chapter 7 LANTEK REPORTER Software
- Page 116 and 117: Chapter 7 LANTEK REPORTER Software
- Page 118 and 119: Chapter 7 LANTEK REPORTER Software
- Page 120 and 121: Chapter 7 LANTEK REPORTER Software
- Page 122 and 123: Chapter 7 LANTEK REPORTER Software
- Page 124 and 125: Chapter 7 LANTEK REPORTER Software
- Page 126 and 127: Chapter 7 LANTEK REPORTER Software
- Page 128 and 129: Chapter 7 LANTEK REPORTER Software
- Page 130 and 131: Chapter 7 LANTEK REPORTER Software
- Page 132 and 133: Chapter 7 LANTEK REPORTER Software
Chapter 4<br />
Coax Cable Field Calibration and Testing<br />
Figure 4-1: IBM COAX Cable Type Screen<br />
For COAX Field Calibration, please follow the instruction below:<br />
1. Connect the COAX adapters to the Display Handset (DH) and Remote Handset<br />
(RH).<br />
2. Insert the short COAX calibration cable into both the DH and RH adapters.<br />
3. From the DH Ready Screen, press F3 or highlight Field Calibration icon and press<br />
ENTER.<br />
4. Select START by pressing F1 to begin the calibration process. Once the<br />
calibration process completion screen appears, select ESCAPE to return to the<br />
main screen.<br />
5. When the calibration process is completed, the <strong>LANTEK</strong> is ready for testing.<br />
Figure 4-2: IBM COAX Field Calibration Screen<br />
4-3


