LANTEK User Manual - Ideal Industries
LANTEK User Manual - Ideal Industries LANTEK User Manual - Ideal Industries
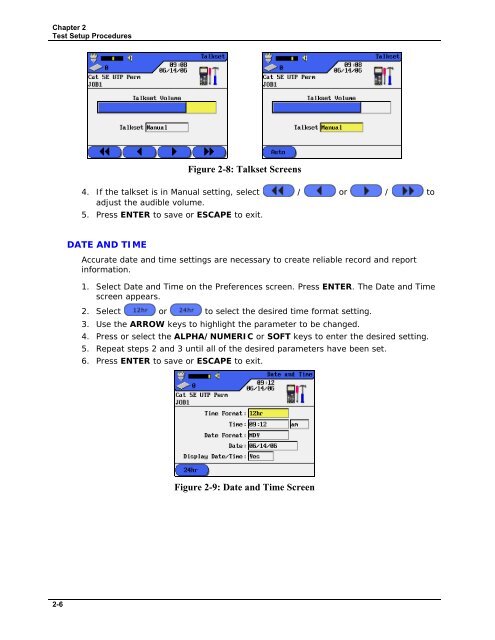
Chapter 2 Test Setup Procedures Figure 2-8: Talkset Screens 4. If the talkset is in Manual setting, select / or / to adjust the audible volume. 5. Press ENTER to save or ESCAPE to exit. DATE AND TIME Accurate date and time settings are necessary to create reliable record and report information. 1. Select Date and Time on the Preferences screen. Press ENTER. The Date and Time screen appears. 2. Select or to select the desired time format setting. 3. Use the ARROW keys to highlight the parameter to be changed. 4. Press or select the ALPHA/NUMERIC or SOFT keys to enter the desired setting. 5. Repeat steps 2 and 3 until all of the desired parameters have been set. 6. Press ENTER to save or ESCAPE to exit. Figure 2-9: Date and Time Screen 2-6
Chapter 2 Test Setup Procedures LANGUAGE The following languages are built into the LANTEK: Chinese Czech Deutsch Dutch English Espanol French Italian Korean Norwegian Polish Portuguese Russian 1. Select Language on the Preferences screen. Press ENTER. The Language screen appears. 2. Select or to select the desired language. 3. Press ENTER to save or ESCAPE to exit. Figure 2-10: Language Screen Note: Press SET-UP keys to quickly access the Language menu. RESTORE DEFAULTS Use this option to reset all unit settings to their factory defaults. 1. From the Preferences screen, press the ARROW keys to highlight Restore Defaults. 2. Press ENTER to restore the unit to the factory default settings. 3. A Warning screen will appear. Select to accept the changes or select to exit this screen without making changes. Figure 2-11: Restore Defaults Warning Screen 2-7
- Page 2 and 3: LANTEK TM CABLE TESTER USER’S GUI
- Page 4 and 5: TABLE OF CONTENTS OPERATIONAL NOTES
- Page 6 and 7: TROUBLESHOOTING 10/100/1000 BASE-T
- Page 8 and 9: Headers and Footers Command .......
- Page 10 and 11: OPERATIONAL NOTES, CAUTIONS, AND WA
- Page 12 and 13: Chapter 1 Your Cable Tester PRODUCT
- Page 14 and 15: Chapter 1 Your Cable Tester Table 1
- Page 16 and 17: Chapter 1 Your Cable Tester Item DH
- Page 18 and 19: Chapter 1 Your Cable Tester HARD AN
- Page 20 and 21: Chapter 1 Your Cable Tester DISPLAY
- Page 22 and 23: Chapter 1 Your Cable Tester OVERVIE
- Page 24 and 25: Chapter 2 Test Setup Procedures AUT
- Page 26 and 27: Chapter 2 Test Setup Procedures TIM
- Page 30 and 31: Chapter 2 Test Setup Procedures PAC
- Page 32 and 33: Chapter 2 Test Setup Procedures TEM
- Page 34 and 35: Chapter 2 Test Setup Procedures Tab
- Page 36 and 37: Chapter 2 Test Setup Procedures Sav
- Page 38 and 39: Chapter 2 Test Setup Procedures OTH
- Page 40 and 41: Chapter 2 Test Setup Procedures Edi
- Page 42 and 43: Chapter 2 Test Setup Procedures ACT
- Page 44 and 45: Chapter 3 Structured Cable Field Ca
- Page 46 and 47: Chapter 3 Structured Cable Field Ca
- Page 48 and 49: Chapter 3 Structured Cable Field Ca
- Page 50 and 51: Chapter 3 Structured Cable Field Ca
- Page 52 and 53: Chapter 3 Structured Cable Field Ca
- Page 54 and 55: Chapter 3 Structured Cable Field Ca
- Page 56 and 57: Chapter 3 Structured Cable Field Ca
- Page 58 and 59: Chapter 3 Structured Cable Field Ca
- Page 60 and 61: Chapter 3 Structured Cable Field Ca
- Page 62 and 63: Chapter 3 Structured Cable Field Ca
- Page 64 and 65: Chapter 3 Structured Cable Field Ca
- Page 66 and 67: Chapter 3 Structured Cable Field Ca
- Page 68 and 69: Chapter 3 Structured Cable Field Ca
- Page 70 and 71: Chapter 3 Structured Cable Field Ca
- Page 72 and 73: Chapter 3 Structured Cable Field Ca
- Page 74 and 75: Chapter 3 Structured Cable Field Ca
- Page 76 and 77: Chapter 3 Structured Cable Field Ca
Chapter 2<br />
Test Setup Procedures<br />
Figure 2-8: Talkset Screens<br />
4. If the talkset is in <strong>Manual</strong> setting, select / or / to<br />
adjust the audible volume.<br />
5. Press ENTER to save or ESCAPE to exit.<br />
DATE AND TIME<br />
Accurate date and time settings are necessary to create reliable record and report<br />
information.<br />
1. Select Date and Time on the Preferences screen. Press ENTER. The Date and Time<br />
screen appears.<br />
2. Select or to select the desired time format setting.<br />
3. Use the ARROW keys to highlight the parameter to be changed.<br />
4. Press or select the ALPHA/NUMERIC or SOFT keys to enter the desired setting.<br />
5. Repeat steps 2 and 3 until all of the desired parameters have been set.<br />
6. Press ENTER to save or ESCAPE to exit.<br />
Figure 2-9: Date and Time Screen<br />
2-6


