Heatlock ESB2, Electric Sprue Bushing
Heatlock ESB2, Electric Sprue Bushing
Heatlock ESB2, Electric Sprue Bushing

Create successful ePaper yourself
Turn your PDF publications into a flip-book with our unique Google optimized e-Paper software.
This <strong>Heatlock</strong> series, below, is currently being replaced by the A1-series of nozzles.<br />
Before you design check availability, stock is gradually decreased.<br />
Spare parts will be available until at least end of 2007 (apart form NPT1 bodies)<br />
1<br />
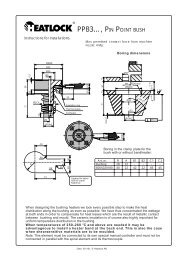
Montering av bussning / <strong>Bushing</strong> Assembly / Einbau von <strong>Heatlock</strong>-Düsen<br />
SE Montera TC enligt figur. SE Montera elementet genom<br />
att försiktigt ”skruva” upp<br />
spiralen något. Trä över<br />
GB<br />
DE<br />
Assemble the TC as in the<br />
drawing.<br />
Einbau von TC nach<br />
Abbildung.<br />
2<br />
elementet på pipan och<br />
släpp efter med verktyget.<br />
Kontrollera att elementet<br />
smiter åt runt pipan och<br />
bottnar mot skallen, samt<br />
att elementet linjerar med<br />
den fasade kanten vid<br />
pipans spets.<br />
3<br />
SE<br />
Sätt på clips för låsning av TC.<br />
Kontrollera höjd enligt figur.<br />
GB Assemble the coilheater<br />
by carefully ”unscrewing”<br />
the coil spring slightly.<br />
Thread the heater over<br />
the pipe and release using<br />
the tool. Check that the<br />
coilheater fits tightly<br />
around the pipe and<br />
touches the head, and<br />
that the coilheater is in<br />
line with the chamfered<br />
edge at the point of the<br />
pipe.<br />
2-3 mm<br />
GB Put on the clip for locking the TC.<br />
Check the height according to the<br />
drawing.<br />
DE Bringen Sie den Sicherungsring<br />
für TC an. Kontrollieren Sie die<br />
Höhe gemäb Abb.<br />
DE Montieren Sie den<br />
Heizkörper durch<br />
vorsichtiges ”nach oben<br />
schrauben” der Spirale.<br />
Ziehen Sie den<br />
Heizkörper über das Rohr<br />
und lockern Sie diesen mit<br />
Hilfe eines Werkzeugs.<br />
Vergewissern Sie sich,<br />
dass der Heizkörper am<br />
Rohr richtig anliegt und<br />
am Kopf richtig ansitzt und<br />
kontrollieren Sie, dass der<br />
Heizkörper entlang der<br />
abgeschrägten Kante am<br />
Ende des Rohrs verläuft.<br />
4a<br />
4b<br />
-20C<br />
SE<br />
Montera hylsa och pipa. Börja med<br />
att kyla ned pipan till -20C,<br />
samtidigt värmer du hylsan till<br />
+125C i ugn. Pressa sedan<br />
hylsan över röret.<br />
SE<br />
Vid demontering. Förankra<br />
bussningen i hållarplattan och<br />
knacka ur pipan ur hylsan med<br />
hjälp av don.<br />
+125C<br />
GB Assemble the sleeve and the<br />
pipe. Begin by cooling the pipe to<br />
-20C, at the same time heat the<br />
sleeve to +125C in an oven.<br />
Then press the sleeve over the<br />
pipe.<br />
GB Disassembly. Anchor the<br />
bushing in the holder plate and<br />
knock out the pipe with the help<br />
of a tool.<br />
DE Montieren Sie Hülse und Rohr.<br />
Beginnen Sie, indem Sie das<br />
Rohr auf - 20C abkühlen,<br />
gleichzeitig erwärmen Sie die<br />
Hülse auf + 125C im Ofen.<br />
Pressen Sie anschliebend die<br />
Hülse über das Rohr.<br />
DE Beim Zerlegen: verankern Sie<br />
die Düse in der Befestigungsplatte<br />
und lösen Sie das Rohr<br />
aus der Hülse mit Hilfe einer<br />
Vorrichtung.<br />
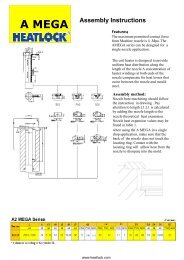
5<br />
SE<br />
Dra åt skruvarna växelvis<br />
ordentligt. Kontrollera att höjden<br />
”A” är samma före och efter<br />
montering.<br />
SE<br />
Denna monteringsanvisning<br />
baseras på att du använder vårt<br />
monteringskit EBPPNP1KIT.<br />
A<br />
GB Tighten the screws in turn, fully.<br />
Check that the height ”A” is the<br />
same before and after assembly.<br />
DE Ziehen Sie die Schrauben<br />
wechseweise sorgfältig an.<br />
Achten Sie darauf, dass die Höhe<br />
”A” vor und nach dem Einbau<br />
identisch ist.<br />
GB This assembly instruction is<br />
based on the use of our assembly<br />
kit EBPPNP1KIT.<br />
DE Diese Einbauanleitung geht von<br />
der Benutzung unseres<br />
Einbaukittes EBPPNP1KIT aus.<br />
<strong>Heatlock</strong> AB © 020925. Notice: latest version always available on our website, www.heatlock.com<br />
Appendix – 30<br />
© LKM <strong>Heatlock</strong> Co Ltd