Heatlock ESB2, Electric Sprue Bushing
Heatlock ESB2, Electric Sprue Bushing
Heatlock ESB2, Electric Sprue Bushing

Create successful ePaper yourself
Turn your PDF publications into a flip-book with our unique Google optimized e-Paper software.
This <strong>Heatlock</strong> series, below, is currently being replaced by the A1-series of nozzles.<br />
Before you design check availability, stock is gradually decreased.<br />
Spare parts will be available until at least end of 2007 (apart form NPT1 bodies)<br />
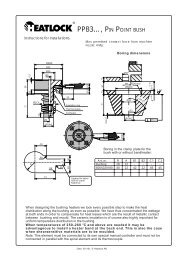
Modification of large sprue bush for pin point gating.<br />
1.Machine main body at front end to a tatal length of 99<br />
resp. 124, 149 and 174 mm. The complete, modified<br />
bushing will have the following L=lengths:<br />
Part.noESB4075201 71mm<br />
ESB4100201 96 mm<br />
ESB4125201 121 mm<br />
ESB4150201 146 mm<br />
2. Spark erode the centre hole as shown above, until<br />
0,6mm is left to the front end.<br />
3.After spark erosion, the tube should be stressannealed<br />
at about 300 ϒC.<br />
4. Because of the hole that already exists in the sprue<br />
bushing, the gate hole of the modified version will be about 3.3 mm, which is a suitable size<br />
for approximately the following shot weights:<br />
low-viscosity plastics 1000 g, medium-viscosity 200g, high-viscosity 40 g<br />
If a larger shot capacity is needed, increase the gate hole to a suitable diameter.<br />
Instructions for changing the coilheater or thermocouple.<br />
Disassembly<br />
1. Unscrew the screws at the rear end.<br />
2. Remove the flange.<br />
3. Take of the lock ring at the front end<br />
4. Take off the spring that keeps thermocouple in place.<br />
5. Take off the tape that keeps heater and thermocouple extensions together.<br />
6. Depending on how hard spiral heater fits the pipe it can either be pulled off or<br />
”unscrewed”. Unscrewing works easily if you push on the spiral heater extension which<br />
will open the spiral while at the same time opening the spiral at the other end with a<br />
suitable tool. The thermocouple must not follow if the spiral element is rotated or pulled<br />
off, since it may break.<br />
Treat thermocouple with great care. The tube is only 1 mm diameter.<br />
Assembly.<br />
To be done in opposite order to disassembly.<br />
If a new thermocouple is to be fitted it must be bent to fit<br />
the bushing. The tip of the thermocouple must be located<br />
where the groove ends, i.e. about half-way along the tube.<br />
Min. bending radius 3 mm.<br />
Tighten the element so that the heating spiral makes<br />
contact with the tube.<br />
If you have any questions about installing the bushing, please get in touch with us.<br />
Appendix – 18<br />
Box 236 S–532 23 Skara Phone: +46 511-13200<br />
e-mail: hot.runner@heatlock.se Fax: +46 511-17285<br />
Homepage: http://www.heatlock.se<br />
Date: 050326, © <strong>Heatlock</strong> AB<br />
<strong>Heatlock</strong> AB 97.06 / ESB4.mont<br />
© LKM <strong>Heatlock</strong> Co Ltd