Heatlock ESB2, Electric Sprue Bushing
Heatlock ESB2, Electric Sprue Bushing
Heatlock ESB2, Electric Sprue Bushing

You also want an ePaper? Increase the reach of your titles
YUMPU automatically turns print PDFs into web optimized ePapers that Google loves.
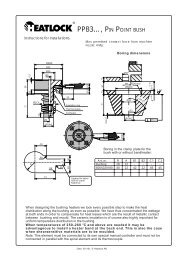
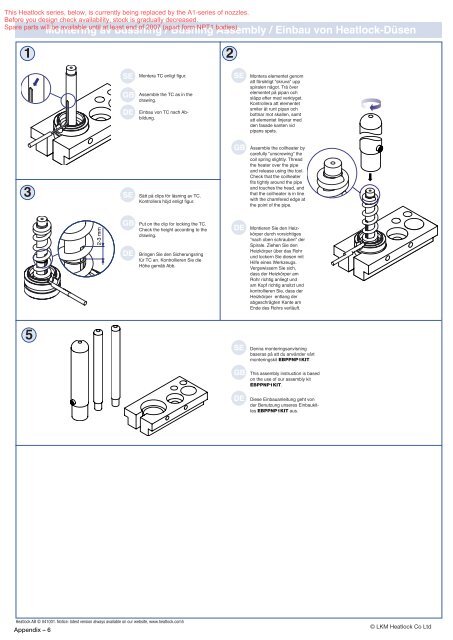
This <strong>Heatlock</strong> series, below, is currently being replaced by the A1-series of nozzles.<br />
Before you design check availability, stock is gradually decreased.<br />
Spare parts will be available until at least end of 2007 (apart form NPT1 bodies)<br />
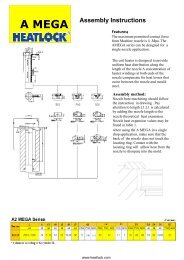
Montering av bussning / <strong>Bushing</strong> Assembly / Einbau von <strong>Heatlock</strong>-Düsen<br />
1<br />
2<br />
SE Montera TC enligt figur. SE Montera elementet genom<br />
att försiktigt ”skruva” upp<br />
spiralen något. Trä över<br />
GB<br />
DE<br />
Assemble the TC as in the<br />
drawing.<br />
Einbau von TC nach Abbildung.<br />
elementet på pipan och<br />
släpp efter med verktyget.<br />
Kontrollera att elementet<br />
smiter åt runt pipan och<br />
bottnar mot skallen, samt<br />
att elementet linjerar med<br />
den fasade kanten vid<br />
pipans spets.<br />
3<br />
SE<br />
Sätt på clips för låsning av TC.<br />
Kontrollera höjd enligt figur.<br />
GB Assemble the coilheater by<br />
carefully ”unscrewing” the<br />
coil spring slightly. Thread<br />
the heater over the pipe<br />
and release using the tool.<br />
Check that the coilheater<br />
fits tightly around the pipe<br />
and touches the head, and<br />
that the coilheater is in line<br />
with the chamfered edge at<br />
the point of the pipe.<br />
2-3 mm<br />
GB Put on the clip for locking the TC.<br />
Check the height according to the<br />
drawing.<br />
DE Bringen Sie den Sicherungsring<br />
für TC an. Kontrollieren Sie die<br />
Höhe gemäb Abb.<br />
DE Montieren Sie den Heizkörper<br />
durch vorsichtiges<br />
”nach oben schrauben” der<br />
Spirale. Ziehen Sie den<br />
Heizkörper über das Rohr<br />
und lockern Sie diesen mit<br />
Hilfe eines Werkzeugs.<br />
Vergewissern Sie sich,<br />
dass der Heizkörper am<br />
Rohr richtig anliegt und<br />
am Kopf richtig ansitzt und<br />
kontrollieren Sie, dass der<br />
Heizkörper entlang der<br />
abgeschrägten Kante am<br />
Ende des Rohrs verläuft.<br />
5<br />
SE<br />
Denna monteringsanvisning<br />
baseras på att du använder vårt<br />
monteringskit .<br />
GB This assembly instruction is based<br />
on the use of our assembly kit<br />
.<br />
DE Diese Einbauanleitung geht von<br />
der Benutzung unseres Einbaukittes<br />
aus.<br />
<br />
Appendix – 6<br />
© LKM <strong>Heatlock</strong> Co Ltd