full instructions - Busse Yachtshop
full instructions - Busse Yachtshop
full instructions - Busse Yachtshop

Create successful ePaper yourself
Turn your PDF publications into a flip-book with our unique Google optimized e-Paper software.
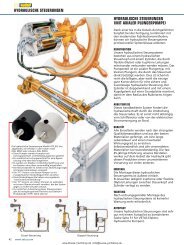
AC circuit breaker<br />
Earth /chassis<br />
boats bonding<br />
12v-20a<br />
AC Power<br />
Pro<br />
Charge ULTRA<br />
Sterling Power<br />
GLOBAL A/C Input & Active Power Factor Correction<br />
Auto Temp Control<br />
Active PFC<br />
Multi Speed Cooling<br />
AUTO CONSERVATION MODES<br />
CHARGER MODE<br />
System self test<br />
OK<br />
Fault<br />
SETUP<br />
ENTER<br />
Progressive DIGITAL software control<br />
1 2 3<br />
Preset 1<br />
To avoid serious<br />
Stand-by<br />
Volts<br />
Fast Charge<br />
Battery Type<br />
Preset 2<br />
Absorption<br />
Amps<br />
Battery Health Program<br />
De-sulphation<br />
Open lead acid<br />
Sealed lead acid<br />
A.G.M<br />
GEL<br />
0% 100%<br />
Charger Output<br />
Lithium Lifep04<br />
Calcium / Custom<br />
Float<br />
Charger information<br />
DC Output Service<br />
DC Low Voltage<br />
DC High Voltage Trip<br />
High Charger temp trip<br />
Check Fan<br />
High current<br />
www.sterling-power.com<br />
RoHS compliant<br />
High voltage a/c Warning Low voltage d/c<br />
Ground / bounding / earthing . This is<br />
extremely important and often overlooked<br />
, there are in effect 3 grounds,<br />
1)the earth wire ( a/c input , the ground ) ,<br />
2) the Chassis / bonding ground ( going to<br />
a vehicle body / boats bonding system,<br />
the bolt on the side of the charger )<br />
3)the d/c negative .<br />
In most installations all these will end up<br />
at the same point, ie the a/c power source<br />
should be connect to the boat/vehicle<br />
chassis ( for safety ).The chassis earth will<br />
also go there, and the d/c neg should also<br />
go ther , in effect bonding the total system<br />
together ensuring any fault to the chassis<br />
will blow a fuse. This could vary for<br />
steel/aluminium boats<br />
Any outputs not being used should be linked<br />
across to one that is, this is not a requirement<br />
for these new models but is good practice as it<br />
helps spread loads etc<br />
D/C - Fuse selection, as per the<br />
diagram each positive output from the<br />
charger to the battery must be fused .<br />
Chose a fuse that is about 20% higher<br />
amperage rating than the maximum<br />
rating of the charger, and round it up,<br />
remember this fuse is primarily<br />
protecting the cables and not the<br />
product, eg. a 20 amp charger would<br />
have about a 25 amp fuse, a 60 amp<br />
charger about a 75 amp fuse. A <strong>full</strong><br />
range of fuses and fuse holders are<br />
avaiable from Sterling<br />
D/C fuse<br />
20% larger<br />
amperage than<br />
charger output<br />
D/C fuse<br />
20% larger<br />
amperage than<br />
charger output<br />
_<br />
_<br />
12 or 24 v battery bank + +<br />
12 or 24 v battery bank 12 or 24 v battery bank +<br />
_<br />
D/C fuse<br />
20% larger<br />
amperage than<br />
charger output<br />
A/C installation / wiring, using ring or captive<br />
spade<br />
connections and a proper crimping tool<br />
attach the a/c cables Live ( line ) Neutral and Earth /<br />
Ground, repeat the procedure for the breaker side of the<br />
install, support the cable every 18 inches/ 0.5 metre. and<br />
protect from sharp edges when passing through bulkheads<br />
and all other openings as per any standards which apply to<br />
the installation<br />
AC Breaker Sizing<br />
Charger Model<br />
The closer to the batteries you fit the charger the better as not only do you save<br />
expensive cable you also get better performance from the charger.<br />
The cable should be properly rated 105 deg C fire resistant. do not use solid cable or<br />
speaker wire<br />
10 amp Length of conductor ( cable ) to and from power source<br />
Distance 3m (10 ft) 5m (15ft) 7m (22ft) 8m (25ft) 9m (30ft)<br />
AWG 14 12 10 10 10<br />
15 amp<br />
Distance 3m (10 ft) 5m (15ft) 7m (22ft) 8m (25ft) 9m (30ft)<br />
AWG 12 10 10 8 8<br />
20 amp<br />
Distance 3m (10 ft) 5m (15ft) 7m (22ft) 8m (25ft) 9m (30ft)<br />
AWG 10 10 8 6 6<br />
30 amp<br />
Distance 3m (10 ft) 5m (15ft) 7m (22ft) 8m (25ft) 9m (30ft)<br />
AWG 10 8 6 6 4<br />
40 amp<br />
Distance 3m (10 ft) 5m (15ft) 7m (22ft) 8m (25ft) 9m (30ft)<br />
AWG 8 6 6 4 4<br />
50 amp<br />
Distance 3m (10 ft) 5m (15ft) 7m (22ft) 8m (25ft) 9m (30ft)<br />
AWG 6 6 6 4 2<br />
60 amp<br />
Distance 3m (10 ft) 5m (15ft) 7m (22ft) 8m (25ft) 9m (30ft)<br />
AWG 6 4 4 2 2<br />
110 Volt<br />
Breaker<br />
220 Volt<br />
Breaker<br />
AC<br />
Conductor<br />
Size<br />
PP1210 – 2 Output 6 Amp 4 Amp 14 AWG<br />
PP1215 – 3 Outputs 7 Amp 5 Amp 14 AWG<br />
PP1220 – 3 Outputs 8 Amp 6 Amp 12 AWG<br />
PP1230 – 3 Outputs 11 Amp 7 Amp 12 AWG<br />
PP1240 – 3 Outputs 14 Amp 8 Amp 10 AWG<br />
PP1250 – 3 Outputs 16 Amp 10 Amp 10 AWG<br />
PP1260 – 3 Outputs 16 Amp 10 Amp 10 AWG<br />
PP2420 – 3 Output 14 Amp 8 Amp 12 AWG<br />
PP2430 – 3 Outputs 14 Amp 8 Amp 10 AWG<br />
www.busse-yachtshop.de | info@busse-yachtshop.de<br />
DC installation<br />
Choosing cable- unlike A/C<br />
conductors, D/C are very sensitive to<br />
voltage drop<br />
the longer the cable runs the larger<br />
the cable thickness needs to be,<br />
ensure only quality fire retardant<br />
cable is used