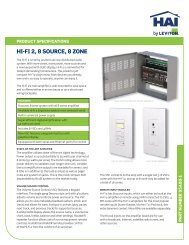
Model 38A00-2 UPB 8-Button Controller
Model 38A00-2 UPB 8-Button Controller
Model 38A00-2 UPB 8-Button Controller

Create successful ePaper yourself
Turn your PDF publications into a flip-book with our unique Google optimized e-Paper software.
HAI <strong>UPB</strong> 8-<strong>Button</strong> House <strong>Controller</strong><br />
Installation and Operating Instructions<br />
For the following <strong>Model</strong>:<br />
<strong>38A00</strong>-2 HAI <strong>UPB</strong> 8-<strong>Button</strong> House <strong>Controller</strong><br />
READ THESE INSTRUCTIONS BEFORE INSTALLING DEVICE<br />
This HAI <strong>UPB</strong> 8-<strong>Button</strong> House <strong>Controller</strong> is intended for installation in accordance with the National Electrical Code and local<br />
regulations. It is recommended that a qualified electrician perform this installation. Retain these instructions for reference.<br />
This product is for indoor use only. Connect only copper or copper clad wire to this device.<br />
Important Notes Prior To Installation<br />
Be sure that all power to the load has been disconnected by turning off the circuit breaker. Installing an HAI <strong>UPB</strong> 8-<strong>Button</strong> House<br />
<strong>Controller</strong> with power on may expose you to dangerous voltage and may damage the device.<br />
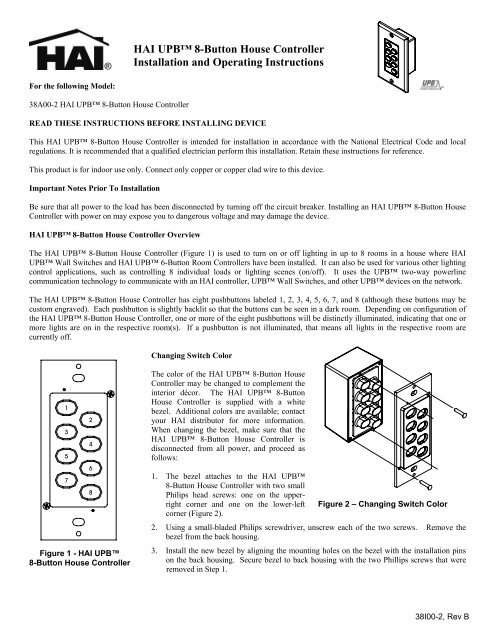
HAI <strong>UPB</strong> 8-<strong>Button</strong> House <strong>Controller</strong> Overview<br />
The HAI <strong>UPB</strong> 8-<strong>Button</strong> House <strong>Controller</strong> (Figure 1) is used to turn on or off lighting in up to 8 rooms in a house where HAI<br />
<strong>UPB</strong> Wall Switches and HAI <strong>UPB</strong> 6-<strong>Button</strong> Room <strong>Controller</strong>s have been installed. It can also be used for various other lighting<br />
control applications, such as controlling 8 individual loads or lighting scenes (on/off). It uses the <strong>UPB</strong> two-way powerline<br />
communication technology to communicate with an HAI controller, <strong>UPB</strong> Wall Switches, and other <strong>UPB</strong> devices on the network.<br />
The HAI <strong>UPB</strong> 8-<strong>Button</strong> House <strong>Controller</strong> has eight pushbuttons labeled 1, 2, 3, 4, 5, 6, 7, and 8 (although these buttons may be<br />
custom engraved). Each pushbutton is slightly backlit so that the buttons can be seen in a dark room. Depending on configuration of<br />
the HAI <strong>UPB</strong> 8-<strong>Button</strong> House <strong>Controller</strong>, one or more of the eight pushbuttons will be distinctly illuminated, indicating that one or<br />
more lights are on in the respective room(s). If a pushbutton is not illuminated, that means all lights in the respective room are<br />
currently off.<br />
Changing Switch Color<br />
1<br />
3<br />
5<br />
7<br />
Figure 1 - HAI <strong>UPB</strong><br />
8-<strong>Button</strong> House <strong>Controller</strong><br />
2<br />
4<br />
6<br />
8<br />
The color of the HAI <strong>UPB</strong> 8-<strong>Button</strong> House<br />
<strong>Controller</strong> may be changed to complement the<br />
interior décor. The HAI <strong>UPB</strong> 8-<strong>Button</strong><br />
House <strong>Controller</strong> is supplied with a white<br />
bezel. Additional colors are available; contact<br />
your HAI distributor for more information.<br />
When changing the bezel, make sure that the<br />
HAI <strong>UPB</strong> 8-<strong>Button</strong> House <strong>Controller</strong> is<br />
disconnected from all power, and proceed as<br />
follows:<br />
1. The bezel attaches to the HAI <strong>UPB</strong><br />
8-<strong>Button</strong> House <strong>Controller</strong> with two small<br />
Philips head screws: one on the upperright<br />
corner and one on the lower-left<br />
corner (Figure 2).<br />
Figure 2 – Changing Switch Color<br />
2. Using a small-bladed Philips screwdriver, unscrew each of the two screws. Remove the<br />
bezel from the back housing.<br />
3. Install the new bezel by aligning the mounting holes on the bezel with the installation pins<br />
on the back housing. Secure bezel to back housing with the two Phillips screws that were<br />
removed in Step 1.<br />
38I00-2, Rev B
INSTALLATION INSTRUCTIONS<br />
1. Be sure that all power at the wall box has been disconnected by turning off the circuit breaker.<br />
2. If applicable, remove the faceplate from the existing device, remove the existing device from the wall box, and disconnect the<br />
wires from the existing device. Identify the “Line” (black) and "Neutral" (white) wires.<br />
3. Remove ¾” of insulation from each of the wires on the HAI <strong>UPB</strong> 8-<strong>Button</strong> House <strong>Controller</strong>. Install the HAI <strong>UPB</strong> 8-<strong>Button</strong><br />
House <strong>Controller</strong> by connecting wires per wiring configuration shown in Figure 3.<br />
4. After all connections have been made, be certain that all wire connectors are firmly attached and there is no exposed copper.<br />
5. Gently place the wires and HAI <strong>UPB</strong> 8-<strong>Button</strong> House <strong>Controller</strong> into the wall box with the “1” pushbutton at the top of device.<br />
Using the supplied screws, attach the HAI <strong>UPB</strong> 8-<strong>Button</strong> House <strong>Controller</strong> to the wall box.<br />
6. Before installing the faceplate, restore power to the circuit for testing.<br />
7. After testing the HAI <strong>UPB</strong> 8-<strong>Button</strong> House <strong>Controller</strong> for proper local operation, install a Decora-style faceplate over the HAI<br />
<strong>UPB</strong> 8-<strong>Button</strong> House <strong>Controller</strong>.<br />
MAIN<br />
CIRCUIT<br />
BREAKER<br />
PANEL<br />
1<br />
3<br />
2<br />
<strong>38A00</strong>-2<br />
8-BUTTON<br />
HOUSE<br />
CONTROLLER<br />
4<br />
5<br />
6<br />
7<br />
8<br />
BLACK<br />
WHITE<br />
120VAC<br />
60Hz<br />
NEUTRAL<br />
LINE<br />
Figure 3 – Wiring Diagram<br />
CONFIGURING THE HAI <strong>UPB</strong> 8-BUTTON HOUSE CONTROLLER<br />
The HAI <strong>UPB</strong> 8-<strong>Button</strong> House <strong>Controller</strong> is designed to control up to 8 rooms of lighting using HAI Lighting Control (HLC) but<br />
also has several configuration options that can be enabled or modified using the <strong>UPB</strong> UPStart configuration software.<br />
Option Factory Default HAI Lighting Control (HLC)<br />
Pushbuttons 1-8 Supper Toggle / Link 013 – Link 020,<br />
respectively<br />
Each pushbutton on the HAI <strong>UPB</strong> 8-<strong>Button</strong> House <strong>Controller</strong> will<br />
toggle the lighting loads in the respective room on and off.<br />
Pushbuttons 1-8<br />
LED Indicators<br />
Each LED Indicator is assigned to its<br />
pushbutton’s Link ID<br />
Each LED Indicator is independent<br />
(multiple LED indicators may be on at<br />
one time).<br />
<strong>UPB</strong> Transmission<br />
Attempts<br />
2 No change<br />
<strong>UPB</strong> ID NID = 255<br />
UID = 096<br />
LED Brightness High No change.<br />
LED Backlighting Enabled No change.<br />
When the room is turned on using the pushbutton, the LED indicator<br />
under the respective pushbutton is illuminated. When the room is<br />
turned off using the pushbutton, the LED indicator under the<br />
respective pushbutton is turned off. Anytime a lighting load in a<br />
room is turned on, the LED indicator under the respective pushbutton<br />
(room) is illuminated. When all loads in a room are turned off, the<br />
LED indicator under the respective pushbutton (room) is turned off.<br />
HAI controller configures Network ID (NID), Unit ID (UID),<br />
Network Password, Network Name, Room Name, Device Name, etc.
HAI <strong>UPB</strong> 8-BUTTON HOUSE CONTROLLER OPERATION<br />
The HAI <strong>UPB</strong> 8-<strong>Button</strong> House <strong>Controller</strong> has many configurable items that can be set using the <strong>UPB</strong> UPStart configuration<br />
software. The following describes the operation of the HAI <strong>UPB</strong> 8-<strong>Button</strong> House <strong>Controller</strong> in its factory default configuration.<br />
Using Pushbuttons to Control Individual Lighting Loads<br />
In its factory default configuration, all 8 pushbuttons are configured to toggle between two different actions each time a pushbutton is<br />
pressed. Likewise the LED indicator behind the pushbutton will toggle when the pushbutton is pressed.<br />
Linking Pushbuttons to HAI <strong>UPB</strong> Wall Switch Dimmer(s)<br />
To configure these actions, the pushbuttons on the HAI <strong>UPB</strong> 8-<strong>Button</strong> House <strong>Controller</strong> must be linked to HAI <strong>UPB</strong> Wall Switch<br />
Dimmer(s) as follows:<br />
Step Operation<br />
1 Use the local Decora-style rocker switch on the HAI <strong>UPB</strong> Wall Switch Dimmer(s) to set the desired level(s).<br />
2 Tap the Decora-style rocker switch on the HAI <strong>UPB</strong> Wall Switch Dimmer(s) five (5) times quickly.<br />
3 The HAI <strong>UPB</strong> Wall Switch Dimmer will flash its lighting load one time and blink its LED blue, to indicate that it is<br />
ready to be linked.<br />
4 Press the pushbutton on the HAI <strong>UPB</strong> 8-<strong>Button</strong> House <strong>Controller</strong> five (5) times quickly.<br />
5 Each HAI <strong>UPB</strong> Wall Switch will flash its lighting load one time to indicate that it is successfully linked to the<br />
pushbutton and that the new light level has been set.<br />
Unlinking Pushbuttons from HAI <strong>UPB</strong> Wall Switch Dimmer(s)<br />
If you accidentally link the wrong pushbutton to the wrong HAI <strong>UPB</strong> Wall Switch Dimmer, you can unlink them as follows:<br />
Step Operation<br />
1 Tap the Decora-style rocker switch on the desired HAI <strong>UPB</strong> Wall Switch Dimmer(s) five (5) times quickly.<br />
2 The HAI <strong>UPB</strong> Wall Switch Dimmer will flash its lighting load one time and blink its LED blue, to indicate that it is<br />
ready to be unlinked.<br />
3 Press the pushbutton on the HAI <strong>UPB</strong> 8-<strong>Button</strong> House <strong>Controller</strong> ten (10) times quickly.<br />
4 Each HAI <strong>UPB</strong> Wall Switch will flash its lighting load one time to indicate that it is successfully unlinked.<br />
Toggling Lighting Loads<br />
After the pushbuttons have been linked, when a pushbutton is pressed while its LED indicator is off, the lighting loads are set to the<br />
preset lighting levels and the LED indicator is turned on. When the pushbutton is pressed again (while its LED indicator is on), the<br />
lighting loads are turn off and the LED indicator is turned off.<br />
Event When LED Indicator is Off When LED Indicator is On<br />
Single-Tap The HAI <strong>UPB</strong> Wall Switch Dimmer(s) that are linked to The HAI <strong>UPB</strong> Wall Switch Dimmer(s) that are<br />
this pushbutton will go to their preset lighting levels. linked to this pushbutton will fade to 0% (off).<br />
The LED indicator under the pushbutton is turned on.<br />
Double-Tap The HAI <strong>UPB</strong> Wall Switch Dimmer(s) that are linked to<br />
this pushbutton will snap to 100% (on).<br />
The LED indicator under the pushbutton is turned on.<br />
Brightening and Dimming Lighting Loads<br />
The LED indicator under the pushbutton is turned off.<br />
The HAI <strong>UPB</strong> Wall Switch Dimmer(s) that are<br />
linked to this pushbutton will snap to 0% (off).<br />
The LED indicator under the pushbutton is turned off.<br />
When a pushbutton is pressed and held while its LED indicator is off, the lights are brightened, until the pushbutton is released. When<br />
the pushbutton is pressed, the lights are dimmed, until the pushbutton is released.<br />
Event When LED Indicator is Off When LED Indicator is On<br />
Hold The HAI <strong>UPB</strong> Wall Switch Dimmer(s) that are linked to The HAI <strong>UPB</strong> Wall Switch Dimmer(s) that are<br />
this pushbutton will brighten.<br />
linked to this pushbutton will dim.<br />
Release<br />
The LED indicator under the pushbutton is turned on.<br />
The HAI <strong>UPB</strong> Wall Switch Dimmer(s) that are linked to<br />
this pushbutton will stop brightening.<br />
The LED indicator under the pushbutton is turned off.<br />
The HAI <strong>UPB</strong> Wall Switch Dimmer(s) that are<br />
linked to this pushbutton will stop dimming.
SETUP MODE<br />
To configure the HAI <strong>UPB</strong> 8-<strong>Button</strong> House <strong>Controller</strong> using an HAI controller or a PC running the <strong>UPB</strong> UPStart configuration<br />
software, it must be put into Setup Mode as follows:<br />
Step Operation<br />
1 Press and hold the “1” and “8” pushbuttons simultaneously for at least 3 seconds.<br />
2 All of the LED indicators will blink to indicate that the HAI <strong>UPB</strong> 8-<strong>Button</strong> House <strong>Controller</strong> is in Setup Mode.<br />
Reset to Factory Default Settings<br />
To reset the HAI <strong>UPB</strong> 8-<strong>Button</strong> House <strong>Controller</strong> to factory default settings:<br />
Step Operation<br />
1 Press and hold the “1” and “8” pushbuttons simultaneously for at least 3 seconds.<br />
2 All of the LED indicators will blink to indicate that the HAI <strong>UPB</strong> 8-<strong>Button</strong> House <strong>Controller</strong> is in Setup Mode.<br />
3 Press and hold the “2” and “7” pushbuttons simultaneously for at least 3 seconds.<br />
4 The LED indicators will stop blinking and the “1” and “8” pushbuttons will illuminate to indicate that it has been reset.<br />
SPECIFICATIONS<br />
<strong>Model</strong> Number <strong>38A00</strong>-2<br />
Number of Backlit Pushbuttons 8<br />
Connections<br />
18 GA<br />
LED Indicators<br />
Yes<br />
Dimensions 4.1 x 1.7 x 1.5<br />
Weight<br />
0.25 lb.<br />
Mounting<br />
Standard J Box<br />
Input Power<br />
120 ± 12 VAC<br />
Input Frequency<br />
60 ± 3 Hz<br />
Operating Temperature -40 °F to 104 °F<br />
Note: It is normal for this switch to make a slight buzzing sound during operation.<br />
LIMITED WARRANTY<br />
HAI warrants this product against defects in material and workmanship, under normal use and service, for a period of two (2) years from the date of<br />
purchase. During the warranty period, HAI will repair or replace, at its sole option, if this product fails due to defect. This warranty does not cover the<br />
cost of removal or reinstallation of any product. This warranty does not cover failure caused by normal wear, damage to the product while in<br />
your possession (other than damage caused by defect or malfunction), or by its improper installation, including failure to follow the written<br />
installation and operation instructions, alterations, misuse, or abuse. The remedies provided for in this warranty are the sole and exclusive<br />
remedies thereof. In no event shall HAI be liable for incidental expenses or consequential loss or damages. For the complete HAI Warranty for USA<br />
policy, see the HAI web site at www.homeauto.com.<br />
Any implied warranties, including warranties of merchantability and fitness for particular use or purpose are limited to a period of two (2)<br />
years from purchase date. This warranty gives you specific legal rights, and you may have other legal rights, which vary from state to state. Some<br />
limitations may not apply to you.<br />
For warranty and repair service within the continental United States, send defective unit carefully packaged, postage prepaid, along with description of<br />
trouble, name, return address, and phone number to: HAI, Repair Department, 4330 Michoud Blvd, New Orleans, LA, 70129. HAI will pay return<br />
shipping charges via normal ground service.<br />
Outside of the continental United States: Contact an Authorized Distributor for repair/replacement instructions.