NSG 9000-6G - Harmonic Inc
NSG 9000-6G - Harmonic Inc NSG 9000-6G - Harmonic Inc
Chapter 3 Configuring Platform Parameters Configuring ISA indication required by the ISA and the RCAS protocols. This message is sent to the SRM due to the following: Provisioning a service Alarm is raised on the session A redundancy switch over the session source Session is missing from the output Report PMT Section (QuerySessionInfo) - when selected, in QuerySessionInfo, the PMT packet data is sent to the ISA server. Out Of Band Mini Carousel - applies to ISA-SDV. Select, in case, the mini carousel is transmitted to the set-top-box out-of-band and not through the video network. When you enable this parameter, the device does not raise the alarm Service Missing for mini carousel sessions. NOTE: The following parameter applies to SDV sessions that are either shell/bind sessions or create sessions with port 0 or a port higher than 8 only. SDV Load-Sharing Ports- applies to ISA-SDV sessions. The input port in the provisioning message is not indicated. The edgeQAM attempts to receive the input stream via the input ports indicated in the SDV Load-Sharing Ports box. The default port is GbE port 1. You can configure up to four GbE input ports to handle up to four Gigabytes of SDV traffic. The NSG manages the traffic between the selected input ports. The NSG sends the sessions to the input port for SDV session with less traffic. If SDV ports are equally loaded with traffic, the device sends the traffic to the ports according to the sequential order of the port numbers. NOTE: GbE input port that is selected as an SDV-load sharing port, cannot be a backup port. NOTE: To view the actual input port, select Applications > SDV > ISA Active Sessions. 3.16.2 Defining Virtual ISA Units To enable the ISA server to handle the full capacity of QAM-RFs of the edgQAM, use the virtual IPs for ISA feature. This feature creates virtual IPs only for the use of the ISA server. To create virtual ISA IPs, do the following: • Create virtual IPs for ISA - requires to define: Eth1 Virtual IPs - You can add virtual IPs to ETh1 only. You can add up to 10 Eth1 virtual IPs. Eth1 virtual IPs should be on a subnet other than Eth2 subnet. GbE Virtual IPs - You can add GbE virtual IPs to any of the active GbE ports. You can add up to 10 GbE virtual IPs. The physical GbE port is automatically added as one of the available virtual port IPs and you cannot remove it. • Associate virtual devices with ISA 3.16.2.1 Creating Virtual IPs for ISA To create Eth1 virtual IP 1. Open the web client of the device. 2. Select the Platform tab. 3. In Back Panel View, select Eth1. © 2012 Harmonic Inc. 64 NSG 9000-6G, Version 2.7, Rev B
Chapter 3 Configuring Platform Parameters Configuring ISA 4. In Eth1 Properties, select the Virtual IPs (ISA) tab. Select ETh1 Select ISA Virtual IPs tab Add Virtual IP 5. Click Add Virtual IP. 6. In the table enter the following: Eth1 Virtual IP - enter the required Eth1 virtual IP. Virtual IP should be different than the physical Eth1 IP address and on a subnet other than Eth2. IP Mask - enter a subnet mask. 7. In Status, view the status of the Eth1 virtual IP: In Use - the virtual IP is currently in use No in Use - the virtual IP is currently not in use To create virtual GbE IP 1. Open the web client of the device. 2. Select the Platform tab. 3. In Back Panel View, select the required GbE port. © 2012 Harmonic Inc. 65 NSG 9000-6G, Version 2.7, Rev B
- Page 13 and 14: Chapter 2 Getting Started 2.1 Initi
- Page 15 and 16: Chapter 2 Getting Started Full Devi
- Page 17 and 18: Chapter 2 Getting Started Guideline
- Page 19 and 20: Chapter 2 Getting Started Guideline
- Page 21 and 22: Chapter 3 Configuring Platform Para
- Page 23 and 24: Chapter 3 Configuring Platform Para
- Page 25 and 26: Chapter 3 Configuring Platform Para
- Page 27 and 28: Chapter 3 Configuring Platform Para
- Page 29 and 30: Chapter 3 Configuring Platform Para
- Page 31 and 32: Chapter 3 Configuring Platform Para
- Page 33 and 34: Chapter 3 Configuring Platform Para
- Page 35 and 36: Chapter 3 Configuring Platform Para
- Page 37 and 38: Chapter 3 Configuring Platform Para
- Page 39 and 40: Chapter 3 Configuring Platform Para
- Page 41 and 42: Chapter 3 Configuring Platform Para
- Page 43 and 44: Chapter 3 Configuring Platform Para
- Page 45 and 46: Chapter 3 Configuring Platform Para
- Page 47 and 48: Chapter 3 Configuring Platform Para
- Page 49 and 50: Chapter 3 Configuring Platform Para
- Page 51 and 52: Chapter 3 Configuring Platform Para
- Page 53 and 54: Chapter 3 Configuring Platform Para
- Page 55 and 56: Chapter 3 Configuring Platform Para
- Page 57 and 58: Chapter 3 Configuring Platform Para
- Page 59 and 60: Chapter 3 Configuring Platform Para
- Page 61 and 62: Chapter 3 Configuring Platform Para
- Page 63: Chapter 3 Configuring Platform Para
- Page 67 and 68: Chapter 3 Configuring Platform Para
- Page 69 and 70: Chapter 3 Configuring Platform Para
- Page 71 and 72: Chapter 3 Configuring Platform Para
- Page 73 and 74: Chapter 3 Configuring Platform Para
- Page 75 and 76: Chapter 4 Configuring Applications
- Page 77 and 78: Chapter 4 Configuring Applications
- Page 79 and 80: Chapter 4 Configuring Applications
- Page 81 and 82: Chapter 4 Configuring Applications
- Page 83 and 84: Chapter 4 Configuring Applications
- Page 85 and 86: Chapter 4 Configuring Applications
- Page 87 and 88: Chapter 4 Configuring Applications
- Page 89 and 90: Chapter 4 Configuring Applications
- Page 91 and 92: Chapter 4 Configuring Applications
- Page 93 and 94: Chapter 4 Configuring Applications
- Page 95 and 96: Chapter 4 Configuring Applications
- Page 97 and 98: Chapter 4 Configuring Applications
- Page 99 and 100: Chapter 4 Configuring Applications
- Page 101 and 102: Chapter 5 Conditional Access System
- Page 103 and 104: Chapter 5 Conditional Access System
- Page 105 and 106: Chapter 5 Conditional Access System
- Page 107 and 108: Chapter 5 Conditional Access System
- Page 109 and 110: Chapter 6 Monitoring and Troublesho
- Page 111 and 112: Chapter 6 Monitoring and Troublesho
- Page 113 and 114: Chapter 6 Monitoring and Troublesho
Chapter 3 Configuring Platform Parameters<br />
Configuring ISA<br />
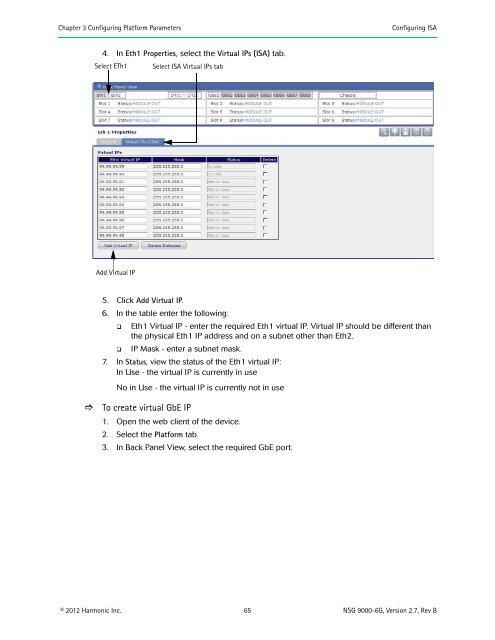
4. In Eth1 Properties, select the Virtual IPs (ISA) tab.<br />
Select ETh1<br />
Select ISA Virtual IPs tab<br />
Add Virtual IP<br />
5. Click Add Virtual IP.<br />
6. In the table enter the following:<br />
<br />
<br />
Eth1 Virtual IP - enter the required Eth1 virtual IP. Virtual IP should be different than<br />
the physical Eth1 IP address and on a subnet other than Eth2.<br />
IP Mask - enter a subnet mask.<br />
7. In Status, view the status of the Eth1 virtual IP:<br />
In Use - the virtual IP is currently in use<br />
No in Use - the virtual IP is currently not in use<br />
<br />
To create virtual GbE IP<br />
1. Open the web client of the device.<br />
2. Select the Platform tab.<br />
3. In Back Panel View, select the required GbE port.<br />
© 2012 <strong>Harmonic</strong> <strong>Inc</strong>. 65 <strong>NSG</strong> <strong>9000</strong>-<strong>6G</strong>, Version 2.7, Rev B


