NSG 9000-6G - Harmonic Inc
NSG 9000-6G - Harmonic Inc NSG 9000-6G - Harmonic Inc
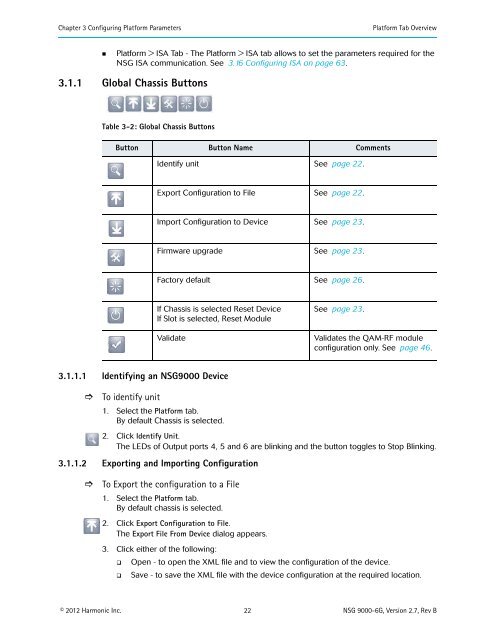
Chapter 3 Configuring Platform Parameters Platform Tab Overview • Platform > ISA Tab - The Platform > ISA tab allows to set the parameters required for the NSG ISA communication. See 3.16 Configuring ISA on page 63. 3.1.1 Global Chassis Buttons Table 3-2: Global Chassis Buttons Button Button Name Comments Identify unit See page 22. Export Configuration to File See page 22. Import Configuration to Device See page 23. Firmware upgrade See page 23. Factory default See page 26. If Chassis is selected Reset Device If Slot is selected, Reset Module Validate See page 23. Validates the QAM-RF module configuration only. See page 46. 3.1.1.1 Identifying an NSG9000 Device To identify unit 1. Select the Platform tab. By default Chassis is selected. 2. Click Identify Unit. The LEDs of Output ports 4, 5 and 6 are blinking and the button toggles to Stop Blinking. 3.1.1.2 Exporting and Importing Configuration To Export the configuration to a File 1. Select the Platform tab. By default chassis is selected. 2. Click Export Configuration to File. The Export File From Device dialog appears. 3. Click either of the following: Open - to open the XML file and to view the configuration of the device. Save - to save the XML file with the device configuration at the required location. © 2012 Harmonic Inc. 22 NSG 9000-6G, Version 2.7, Rev B
Chapter 3 Configuring Platform Parameters Firmware Upgrade To import configuration 1. Select the Platform tab. By default chassis is selected. 2. Click Import Configuration to Device. The Import File To Device dialog appears. 3. To locate the required XML file previously exported, click Browse. 4. To import, click Import. Wait until a message notifying you of a successful import appears. 5. For the device to run with the newly imported configuration, reset the device. 3.1.1.3 Clearing Configuration To clear configuration and Revert to Factory Defaults 1. Select the Platform tab. By default chassis is selected. 2. Click Factory Default. The following message appears: This action will clear configuration and reset the device. Are you sure? 3. To confirm the action, click OK. The device configuration is removed and device boots up with factory defaults. 3.1.1.4 Resetting an NSG9000 Device To reset the device 1. Select the Platform tab. By default chassis is selected. 2. Click Reset Unit. 3. Click Ok to confirm the action. The reset process takes place. 3.1.1.5 Resetting a QAM-RF Module To reset a QAM-RF module 1. Select the Platform tab. 2. Select the required slot/QAM-RF module. 3. Click Reset Module. 4. Click Ok to confirm the action. The reset process takes place. 3.2 Firmware Upgrade NSG 9000-6G ships with firmware and the web client installed. However, Harmonic periodically releases firmware updates. To find out if the provided firmware meets your needs or must be updated, contact Harmonic Technical Support. © 2012 Harmonic Inc. 23 NSG 9000-6G, Version 2.7, Rev B
- Page 1 and 2: NSG 9000-6G Narrowcast Services Gat
- Page 3 and 4: Documentation Conventions This manu
- Page 5 and 6: Table of Contents 3.12.4 Configurin
- Page 7 and 8: Table of Contents Appendix D Contro
- Page 9 and 10: Chapter 1 Features and Specificatio
- Page 11 and 12: Chapter 1 Features and Specificatio
- Page 13 and 14: Chapter 2 Getting Started 2.1 Initi
- Page 15 and 16: Chapter 2 Getting Started Full Devi
- Page 17 and 18: Chapter 2 Getting Started Guideline
- Page 19 and 20: Chapter 2 Getting Started Guideline
- Page 21: Chapter 3 Configuring Platform Para
- Page 25 and 26: Chapter 3 Configuring Platform Para
- Page 27 and 28: Chapter 3 Configuring Platform Para
- Page 29 and 30: Chapter 3 Configuring Platform Para
- Page 31 and 32: Chapter 3 Configuring Platform Para
- Page 33 and 34: Chapter 3 Configuring Platform Para
- Page 35 and 36: Chapter 3 Configuring Platform Para
- Page 37 and 38: Chapter 3 Configuring Platform Para
- Page 39 and 40: Chapter 3 Configuring Platform Para
- Page 41 and 42: Chapter 3 Configuring Platform Para
- Page 43 and 44: Chapter 3 Configuring Platform Para
- Page 45 and 46: Chapter 3 Configuring Platform Para
- Page 47 and 48: Chapter 3 Configuring Platform Para
- Page 49 and 50: Chapter 3 Configuring Platform Para
- Page 51 and 52: Chapter 3 Configuring Platform Para
- Page 53 and 54: Chapter 3 Configuring Platform Para
- Page 55 and 56: Chapter 3 Configuring Platform Para
- Page 57 and 58: Chapter 3 Configuring Platform Para
- Page 59 and 60: Chapter 3 Configuring Platform Para
- Page 61 and 62: Chapter 3 Configuring Platform Para
- Page 63 and 64: Chapter 3 Configuring Platform Para
- Page 65 and 66: Chapter 3 Configuring Platform Para
- Page 67 and 68: Chapter 3 Configuring Platform Para
- Page 69 and 70: Chapter 3 Configuring Platform Para
- Page 71 and 72: Chapter 3 Configuring Platform Para
Chapter 3 Configuring Platform Parameters<br />
Platform Tab Overview<br />
• Platform > ISA Tab - The Platform > ISA tab allows to set the parameters required for the<br />
<strong>NSG</strong> ISA communication. See 3.16 Configuring ISA on page 63.<br />
3.1.1 Global Chassis Buttons<br />
Table 3-2: Global Chassis Buttons<br />
Button Button Name Comments<br />
Identify unit See page 22.<br />
Export Configuration to File See page 22.<br />
Import Configuration to Device See page 23.<br />
Firmware upgrade See page 23.<br />
Factory default See page 26.<br />
If Chassis is selected Reset Device<br />
If Slot is selected, Reset Module<br />
Validate<br />
See page 23.<br />
Validates the QAM-RF module<br />
configuration only. See page 46.<br />
3.1.1.1 Identifying an <strong>NSG</strong><strong>9000</strong> Device<br />
<br />
To identify unit<br />
1. Select the Platform tab.<br />
By default Chassis is selected.<br />
2. Click Identify Unit.<br />
The LEDs of Output ports 4, 5 and 6 are blinking and the button toggles to Stop Blinking.<br />
3.1.1.2 Exporting and Importing Configuration<br />
<br />
To Export the configuration to a File<br />
1. Select the Platform tab.<br />
By default chassis is selected.<br />
2. Click Export Configuration to File.<br />
The Export File From Device dialog appears.<br />
3. Click either of the following:<br />
<br />
<br />
Open - to open the XML file and to view the configuration of the device.<br />
Save - to save the XML file with the device configuration at the required location.<br />
© 2012 <strong>Harmonic</strong> <strong>Inc</strong>. 22 <strong>NSG</strong> <strong>9000</strong>-<strong>6G</strong>, Version 2.7, Rev B


