101-Disc Changer Compact Disc - Radio Shack
101-Disc Changer Compact Disc - Radio Shack
101-Disc Changer Compact Disc - Radio Shack

Create successful ePaper yourself
Turn your PDF publications into a flip-book with our unique Google optimized e-Paper software.
CD•DECK<br />
SYNCHRO<br />
Preparation<br />
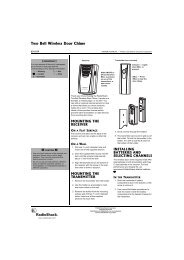
Connecting the CD <strong>Changer</strong><br />
to Your Receiver or Amplifier<br />
Note: If you place the CD changer too<br />
near other audio components or their<br />
wires, you might hear a hum when you<br />
play a CD. Move the components or<br />
their wires to eliminate the hum.<br />
Caution: Do not connect the CD changer to AC power until you complete all<br />
other connections.<br />
1. Select a location for your CD changer that is near your receiver or amplifier<br />
and a standard AC outlet.<br />
Caution: Do not place the CD changer on top of the receiver or amplifier<br />
or on any other component that gets hot.<br />
2. Plug one end of the supplied audio cable into the CD changer’s L (left)<br />
and R (right) LINE OUT jacks, matching the red plug to the red R LINE OUT<br />
jack and the white plug to the white L LINE OUT jack.<br />
Receiver/Amplifier<br />
IN<br />
CONTROL<br />
OUT<br />
CD <strong>Changer</strong><br />
INPUT<br />
PHONO CD<br />
L L<br />
VCR/<br />
LD<br />
TAPE/DCC<br />
REC PLAY<br />
L<br />
TAPE 2<br />
__<br />
REC PLAY<br />
L<br />
R<br />
L<br />
CONTROL<br />
LINE OUT<br />
DIGITAL OUT<br />
R<br />
R<br />
R<br />
R<br />
OUT<br />
OPTICAL<br />
R L<br />
L R<br />
3. Plug the other end of the audio cable into the receiver’s or amplifier’s left<br />
and right CD, AUX, or TAPE input jacks.<br />
Caution: Do not connect the CD changer to the receiver’s or amplifier’s<br />
PHONO inputs.<br />
Connecting to Another<br />
Digital Audio Product<br />
Note: Be sure to leave the dust cap in<br />
place when you are not using the jack.<br />
Connecting Power<br />
Note: Do not connect the CD<br />
changer’s power cord to an amplifier<br />
or other switched outlet. The CD<br />
changer loses memorized settings<br />
when power is removed.<br />
You can connect the CD changer to another digital audio product such as a digital<br />
recorder. You need an optical cable (Cat. No. 42-2466, available by special<br />
order through your local <strong>Radio</strong><strong>Shack</strong> store) for this connection. To make the<br />
connection, remove the protective dust cap from the digital jacks, and connect<br />
the optical cable to the jacks.<br />
After you have connected the CD changer to your receiver or amplifier, plug the<br />
CD changer’s power cord into a standard AC outlet.<br />
Caution: To prevent electric shock, the plug’s blades are polarized and fit only<br />
one way. If the plug does not fit easily, turn it over and try again. Do not force the<br />
plug into any AC outlet.<br />
Connecting to a Cassette<br />
Deck’s Synchro Jack<br />
The Synchro-Record feature lets you easily copy CDs to cassette tapes. If you<br />
have a cassette deck that has a CD-DECK SYNCHRO jack (such as many Optimus<br />
Professional Series cassette decks), the CD changer can automatically<br />
start and stop with the cassette deck. Connect the CD-deck synchro-cord, supplied<br />
with the cassette deck, to the CD changer’s and cassette deck’s CD-DECK<br />
SYNCHRO jacks.<br />
For details on connection and operation, refer to the cassette deck’s owner’s<br />
manual.<br />
5