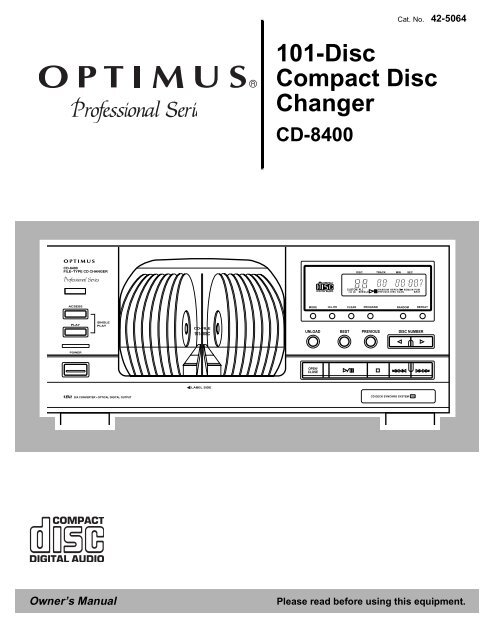
101-Disc Changer Compact Disc - Radio Shack
101-Disc Changer Compact Disc - Radio Shack
101-Disc Changer Compact Disc - Radio Shack

You also want an ePaper? Increase the reach of your titles
YUMPU automatically turns print PDFs into web optimized ePapers that Google loves.
<strong>101</strong>-<strong>Disc</strong><br />
<strong>Compact</strong> <strong>Disc</strong><br />
<strong>Changer</strong><br />
CD-8400<br />
Cat. No. 42-5064<br />
CD-8400<br />
FILE–TYPE CD CHANGER<br />
DISC TRACK MIN SEC<br />
CUSTOM ALL<br />
I II III SINGLE<br />
RANDOM REPEAT 1 REMAIN PGM<br />
PREVIOUS DISC SCAN BEST<br />
ACSESS<br />
MODE HI-LITE CLEAR PROGRAM RANDOM REPEAT<br />
PLAY<br />
SINGLE<br />
PLAY<br />
CD-FILE<br />
<strong>101</strong>-DISC<br />
UNLOAD BEST PREVIOUS DISC NUMBER<br />
POWER<br />
OPEN/<br />
CLOSE<br />
LABEL SIDE<br />
1Bit D/A CONVERTER • OPTICAL DIGITAL OUTPUT<br />
CD DECK SYNCHRO SYSTEM OSR<br />
Owner’s Manual<br />
Please read before using this equipment.
Features<br />
Your Optimus CD-8400 <strong>101</strong>-<strong>Disc</strong> <strong>Compact</strong> <strong>Disc</strong> Automatic <strong>Changer</strong> is the next<br />
step in CD changer technology. It lets you load up to <strong>101</strong> CDs. This lets you<br />
select up to 100 CDs for continuous play and gives you more musical variety<br />
without your having to continually remove and load CDs. You can also load a<br />
single CD for easy, one-time play.<br />
The CD-8400’s advanced design makes the CD changer simple to operate. Be<br />
sure to pay attention to the “Special Features” section of this manual so you can<br />
understand and take advantage of everything the CD-8400 can do.<br />
Your CD-8400’s features include:<br />
Multiple <strong>Compact</strong> <strong>Disc</strong> Racks<br />
Plus Single Play<br />
Sequence Programming<br />
Remote Control<br />
Custom Playback<br />
Random Play<br />
Repeat Play<br />
Digital Output<br />
Best Selection Memory<br />
Previous Playback<br />
Hi-Lite Scan<br />
Audible Search<br />
Automatic Search Music System<br />
Memory-Hold Function<br />
Synchro Record<br />
1-Bit DAC<br />
Let you load up to 100 CDs for continuous or programmed play, plus a single<br />
CD for easy, one-time play.<br />
Lets you program up to 36 selections (a single track or an entire CD) to play in<br />
any order you choose.<br />
Lets you control the CD changer from a distance.<br />
Lets you assign loaded CDs into any of three custom CD groups, and play only<br />
the CDs assigned to the group.<br />
Randomly selects and plays all tracks on a single CD, on CDs in a custom CD<br />
group, or on all CDs.<br />
Automatically repeats a single track, all tracks on a single CD, all tracks in a<br />
custom CD group, all tracks on all loaded CDs, or a programmed sequence.<br />
Lets you connect your CD changer to another digital device.<br />
Lets you save up to 20 of your favorite tracks for one-touch playback.<br />
Plays 10 seconds from each of the 20 most recently played CDs to help you<br />
locate a CD you want to listen to again.<br />
Helps you locate a CD or track by playing 10 seconds from the first track of<br />
each CD, or 10 seconds from each track on all CDs.<br />
Helps you locate a particular section of the music by playing the CD rapidly in<br />
either direction.<br />
Lets you easily locate and play any track on a CD.<br />
Remembers which CD is playing when you turn off the CD-8400 and begins<br />
playing from the first track of that CD when you turn it back on.<br />
Lets you synchronize recording when you connect the CD changer to a compatible<br />
cassette deck.<br />
Uses the latest in digital-to-analog conversion circuitry to accurately reproduce<br />
all sound levels with virtually no distortion.<br />
We recommend you record the CD-8400’s serial number here. The<br />
serial number is on the CD-8400’s back panel.<br />
Serial Number: __________________________________________<br />
© 1998 Tandy Corporation.<br />
All Rights Reserved.<br />
Optimus and <strong>Radio</strong><strong>Shack</strong> are registered trademarks used by Tandy Corporation.<br />
2
IMPORTANT SAFETY INSTRUCTIONS<br />
Caution: Do not load anything other than 3- or 5-inch<br />
CDs into the CD changer.<br />
The CD-8400 is made and tested to meet exacting<br />
safety standards. It meets UL and FCC requirements<br />
and complies with the safety performance standards of<br />
the U.S. Department of Health and Human Services.<br />
Warnings:<br />
• This system employs a laser light beam. Only a<br />
qualified service person should remove the cover or<br />
attempt to service this device, due to possible eye<br />
injury.<br />
• The use of controls, adjustments, or procedures<br />
other than those specified herein might result in hazardous<br />
radiation exposure.<br />
• Most material on compact discs and prerecorded<br />
tape is copyrighted. The unauthorized duplication of<br />
copyrighted material is a violation of the copyright<br />
laws of most countries and such duplication may<br />
result in fines and/or imprisonment. Note, however,<br />
in the United States, it is not a violation of U.S. copyright<br />
laws for a consumer to use an audio recording<br />
device to duplicate musical recordings for noncommercial<br />
(personal) use.<br />
WARNING: To reduce the risk of fire or<br />
shock hazard, do not expose this product<br />
to rain or moisture.<br />
CAUTION<br />
RISK OF ELECTRIC SHOCK.<br />
DO NOT OPEN.<br />
CAUTION: TO REDUCE THE RISK OF ELEC-<br />
TRIC SHOCK, DO NOT REMOVE COVER OR<br />
BACK. NO USER-SERVICEABLE PARTS INSIDE.<br />
REFER SERVICING TO QUALIFIED PERSON-<br />
NEL.<br />
!<br />
This symbol is intended to alert you to the<br />
presence of uninsulated dangerous voltage<br />
within the product’s enclosure that might be<br />
of sufficient magnitude to constitute a risk<br />
of electric shock. Do not open the product’s<br />
case.<br />
This symbol is intended to inform you that<br />
important operating and maintenance instructions<br />
are included in the literature accompanying<br />
this product.<br />
This equipment complies with the limits for a Class B<br />
digital device as specified in Part 15 of FCC Rules.<br />
These limits provide reasonable protection against<br />
radio and TV interference in a residential area. However,<br />
your equipment might cause TV or radio interference<br />
even when it is operating properly. To eliminate<br />
interference, you can try one or more of the following<br />
corrective measures:<br />
• Reorient or relocate the receiving antenna.<br />
• Increase the distance between the equipment and<br />
the radio or TV.<br />
• Use outlets on different electrical circuits for the<br />
equipment and the radio or TV.<br />
Consult your local <strong>Radio</strong><strong>Shack</strong> store or an experienced<br />
radio/TV technician if the problem still exists.<br />
You must use shielded interface cables with this equipment.<br />
!<br />
Careful attention is devoted to quality standards in the manufacture of your CD changer, and<br />
safety is a major factor in its design. However, safety is also your responsibility.<br />
This section lists important information that will help you properly use and enjoy your CD changer<br />
and accessories. Read all the included safety and operating instructions before using your CD<br />
changer. Follow them closely, and retain them for future reference.<br />
Heed Warnings — Follow all warnings on the product and in the operating instructions.<br />
Cleaning — Unplug this product from the wall outlet before cleaning. Use only a damp cloth for<br />
cleaning. Do not use liquid or aerosol cleaners.<br />
Attachments — Do not use attachments/accessories not recommended by the product manufacturer,<br />
as they might create a hazard.<br />
Water and Moisture — Do not use this product near water (for example, near a bathtub, washbowl,<br />
kitchen sink, or laundry tub; in a wet basement; or near a swimming pool).<br />
Accessories — Do not place this product on an unstable cart, stand, tripod, bracket, or table. The<br />
product may fall, causing serious injury to a child or adult, and serious damage to the product. Use<br />
only with a cart, stand, tripod, bracket, or table recommended by the manufacturer or sold with the<br />
product. Follow the manufacturer's instructions for mounting, and use a recommended mounting<br />
accessory.<br />
Carts — Move the product on a cart carefully. Quick stops, excessive force, and<br />
uneven surfaces may cause the product/cart to overturn.<br />
Ventilation — Slots and openings in the cabinet provide ventilation, ensure reliable<br />
operation, and protect from overheating. Do not block or cover these openings,<br />
and do not place the product on a bed, sofa, rug, or other similar surface. Do<br />
not place the product in a built-in bookcase or rack unless it provides proper ventilation<br />
as specified by the manufacturer.<br />
Power Sources — Operate this product using only the power source indicated on its marking<br />
label. If you are not sure of your home's power type, consult your product dealer or local power<br />
company.<br />
Polarization — This product is equipped with a polarized AC line plug (a plug having one blade<br />
wider than the other). This plug will fit in the power outlet only one way. This is a safety feature. If<br />
you cannot insert the plug fully into the outlet, try reversing the plug. If the plug still doesn't fit, contact<br />
your electrician to replace your obsolete outlet. Do not defeat the safety purpose of the polarized<br />
plug. If you need an extension, use a polarized cord.<br />
Power-Cord Protection — Route power-supply cords so they are not likely to be walked on or<br />
pinched by items placed on or against them, paying particular attention to cords at plugs, convenience<br />
receptacles, and the point where they exit from the product.<br />
Nonuse Periods — Unplug the CD changer’s power cord when you will not use it for extended<br />
periods.<br />
Lightning — For added protection for this product during a lightning storm, or when it is left unattended<br />
and unused for long periods of time, unplug it from the wall outlet and disconnect the<br />
antenna or cable system. This will prevent damage to the product due to lightning and power-line<br />
surges.<br />
Overloading — Do not overload wall outlets, extension cords, or integral convenience receptacles,<br />
as this can result in a risk of fire or electric shock.<br />
Objects and Liquids — Never push objects of any kind into this product through openings, as<br />
they may touch dangerous voltage points or short out parts that could result in a fire or electric<br />
shock. Never spill liquid of any kind on the product.<br />
Servicing — Do not attempt to service this product yourself, as opening or removing covers may<br />
expose you to dangerous voltage or other hazards. Refer all servicing to qualified service personnel.<br />
Damage Requiring Service — Unplug this product from the wall outlet and refer servicing to<br />
qualified service personnel under the following conditions:<br />
• When the power-supply cord or plug is damaged.<br />
• If liquid has been spilled or objects have fallen into the product.<br />
• If the product has been exposed to rain or water.<br />
• If the product does not operate normally by following the operating instructions. Adjust only<br />
those controls that are covered by the operating instructions, as an improper adjustment of<br />
other controls may result in damage and will often require extensive work by a qualified technician<br />
to restore the product to normal operation.<br />
• If the product has been dropped or damaged in any way.<br />
• When the product exhibits a distinct change in performance.<br />
Replacement Parts — When replacement parts are required, be sure the service technician uses<br />
replacement parts specified by the manufacturer or having the same characteristics as the original<br />
part. Unauthorized substitutions may result in fire, electric shock, or other hazards.<br />
Safety Check — Upon completion of service or repairs to this product, ask the service technician<br />
to perform safety checks to determine that the product is in proper operating condition.<br />
Wall or Ceiling Mount — The product should be mounted to a wall or ceiling only as recommended<br />
by the manufacturer.<br />
Heat — The product should be situated away from heat sources such as radiators, heat registers,<br />
stoves, or other products (including amplifiers) that produce heat.<br />
3
Contents<br />
Preparation . . . . . . . . . . . . . . . . . . . . . . . . . . . . . . . . . . . . . . . . . . . . . . . . . . . . . . . . . . . . . . . . . . . . . . . 5<br />
Connecting the CD <strong>Changer</strong> to Your Receiver or Amplifier . . . . . . . . . . . . . . . . . . . . . . . . . . . . . . . . . . . . . . . 5<br />
Connecting to Another Digital Audio Product . . . . . . . . . . . . . . . . . . . . . . . . . . . . . . . . . . . . . . . . . . . . . . . . . . 5<br />
Connecting Power . . . . . . . . . . . . . . . . . . . . . . . . . . . . . . . . . . . . . . . . . . . . . . . . . . . . . . . . . . . . . . . . . . . . . . 5<br />
Connecting to a Cassette Deck’s Synchro Jack . . . . . . . . . . . . . . . . . . . . . . . . . . . . . . . . . . . . . . . . . . . . . . . 5<br />
Installing the Remote Control’s Batteries . . . . . . . . . . . . . . . . . . . . . . . . . . . . . . . . . . . . . . . . . . . . . . . . . . . . . 6<br />
Using a Receiver’s Remote Control with the CD <strong>Changer</strong> . . . . . . . . . . . . . . . . . . . . . . . . . . . . . . . . . . . . . . . 6<br />
Basic Operation . . . . . . . . . . . . . . . . . . . . . . . . . . . . . . . . . . . . . . . . . . . . . . . . . . . . . . . . . . . . . . . . . . . . 7<br />
Using the Remote Control . . . . . . . . . . . . . . . . . . . . . . . . . . . . . . . . . . . . . . . . . . . . . . . . . . . . . . . . . . . . . . . . 7<br />
Loading CDs in the Rack . . . . . . . . . . . . . . . . . . . . . . . . . . . . . . . . . . . . . . . . . . . . . . . . . . . . . . . . . . . . . . . . . 7<br />
Loading a CD in the Single Play Slot . . . . . . . . . . . . . . . . . . . . . . . . . . . . . . . . . . . . . . . . . . . . . . . . . . . . . . . . 8<br />
Using the Demo . . . . . . . . . . . . . . . . . . . . . . . . . . . . . . . . . . . . . . . . . . . . . . . . . . . . . . . . . . . . . . . . . . . . . . . . 8<br />
Playing CDs . . . . . . . . . . . . . . . . . . . . . . . . . . . . . . . . . . . . . . . . . . . . . . . . . . . . . . . . . . . . . . . . . . . . . . . . . . . 9<br />
Checking the Time Remaining and Elapsed on a CD . . . . . . . . . . . . . . . . . . . . . . . . . . . . . . . . . . . . . . . . . . 10<br />
Special Features . . . . . . . . . . . . . . . . . . . . . . . . . . . . . . . . . . . . . . . . . . . . . . . . . . . . . . . . . . . . . . . . . . 11<br />
Quickly Selecting Tracks . . . . . . . . . . . . . . . . . . . . . . . . . . . . . . . . . . . . . . . . . . . . . . . . . . . . . . . . . . . . . . . . 11<br />
Searching for a Section of a Track . . . . . . . . . . . . . . . . . . . . . . . . . . . . . . . . . . . . . . . . . . . . . . . . . . . . . . . . . 11<br />
Assigning CDs to a Custom CD Group . . . . . . . . . . . . . . . . . . . . . . . . . . . . . . . . . . . . . . . . . . . . . . . . . . . . . 11<br />
Storing Your Best Tracks . . . . . . . . . . . . . . . . . . . . . . . . . . . . . . . . . . . . . . . . . . . . . . . . . . . . . . . . . . . . . . . . 12<br />
Scanning Previous CDs . . . . . . . . . . . . . . . . . . . . . . . . . . . . . . . . . . . . . . . . . . . . . . . . . . . . . . . . . . . . . . . . . 12<br />
Using Hi-Lite Scan . . . . . . . . . . . . . . . . . . . . . . . . . . . . . . . . . . . . . . . . . . . . . . . . . . . . . . . . . . . . . . . . . . . . . 12<br />
Repeating Tracks, CDs, and Sequences . . . . . . . . . . . . . . . . . . . . . . . . . . . . . . . . . . . . . . . . . . . . . . . . . . . . 13<br />
Playing Tracks in Random Order . . . . . . . . . . . . . . . . . . . . . . . . . . . . . . . . . . . . . . . . . . . . . . . . . . . . . . . . . . 13<br />
Programming a Sequence . . . . . . . . . . . . . . . . . . . . . . . . . . . . . . . . . . . . . . . . . . . . . . . . . . . . . . . . . . . . . . . 14<br />
Troubleshooting . . . . . . . . . . . . . . . . . . . . . . . . . . . . . . . . . . . . . . . . . . . . . . . . . . . . . . . . . . . . . . . . . . 16<br />
Self-Diagnostics . . . . . . . . . . . . . . . . . . . . . . . . . . . . . . . . . . . . . . . . . . . . . . . . . . . . . . . . . . . . . . . . . . . . . . . 17<br />
Care and Maintenance . . . . . . . . . . . . . . . . . . . . . . . . . . . . . . . . . . . . . . . . . . . . . . . . . . . . . . . . . . . . . 18<br />
CD Care Tips . . . . . . . . . . . . . . . . . . . . . . . . . . . . . . . . . . . . . . . . . . . . . . . . . . . . . . . . . . . . . . . . . . . . . . . . . 18<br />
Specifications . . . . . . . . . . . . . . . . . . . . . . . . . . . . . . . . . . . . . . . . . . . . . . . . . . . . . . . . . . . . . . . . . . . . 19<br />
4
CD•DECK<br />
SYNCHRO<br />
Preparation<br />
Connecting the CD <strong>Changer</strong><br />
to Your Receiver or Amplifier<br />
Note: If you place the CD changer too<br />
near other audio components or their<br />
wires, you might hear a hum when you<br />
play a CD. Move the components or<br />
their wires to eliminate the hum.<br />
Caution: Do not connect the CD changer to AC power until you complete all<br />
other connections.<br />
1. Select a location for your CD changer that is near your receiver or amplifier<br />
and a standard AC outlet.<br />
Caution: Do not place the CD changer on top of the receiver or amplifier<br />
or on any other component that gets hot.<br />
2. Plug one end of the supplied audio cable into the CD changer’s L (left)<br />
and R (right) LINE OUT jacks, matching the red plug to the red R LINE OUT<br />
jack and the white plug to the white L LINE OUT jack.<br />
Receiver/Amplifier<br />
IN<br />
CONTROL<br />
OUT<br />
CD <strong>Changer</strong><br />
INPUT<br />
PHONO CD<br />
L L<br />
VCR/<br />
LD<br />
TAPE/DCC<br />
REC PLAY<br />
L<br />
TAPE 2<br />
__<br />
REC PLAY<br />
L<br />
R<br />
L<br />
CONTROL<br />
LINE OUT<br />
DIGITAL OUT<br />
R<br />
R<br />
R<br />
R<br />
OUT<br />
OPTICAL<br />
R L<br />
L R<br />
3. Plug the other end of the audio cable into the receiver’s or amplifier’s left<br />
and right CD, AUX, or TAPE input jacks.<br />
Caution: Do not connect the CD changer to the receiver’s or amplifier’s<br />
PHONO inputs.<br />
Connecting to Another<br />
Digital Audio Product<br />
Note: Be sure to leave the dust cap in<br />
place when you are not using the jack.<br />
Connecting Power<br />
Note: Do not connect the CD<br />
changer’s power cord to an amplifier<br />
or other switched outlet. The CD<br />
changer loses memorized settings<br />
when power is removed.<br />
You can connect the CD changer to another digital audio product such as a digital<br />
recorder. You need an optical cable (Cat. No. 42-2466, available by special<br />
order through your local <strong>Radio</strong><strong>Shack</strong> store) for this connection. To make the<br />
connection, remove the protective dust cap from the digital jacks, and connect<br />
the optical cable to the jacks.<br />
After you have connected the CD changer to your receiver or amplifier, plug the<br />
CD changer’s power cord into a standard AC outlet.<br />
Caution: To prevent electric shock, the plug’s blades are polarized and fit only<br />
one way. If the plug does not fit easily, turn it over and try again. Do not force the<br />
plug into any AC outlet.<br />
Connecting to a Cassette<br />
Deck’s Synchro Jack<br />
The Synchro-Record feature lets you easily copy CDs to cassette tapes. If you<br />
have a cassette deck that has a CD-DECK SYNCHRO jack (such as many Optimus<br />
Professional Series cassette decks), the CD changer can automatically<br />
start and stop with the cassette deck. Connect the CD-deck synchro-cord, supplied<br />
with the cassette deck, to the CD changer’s and cassette deck’s CD-DECK<br />
SYNCHRO jacks.<br />
For details on connection and operation, refer to the cassette deck’s owner’s<br />
manual.<br />
5
Preparation<br />
Installing the Remote<br />
Control’s Batteries<br />
Your CD changer’s remote control requires two AA batteries (not supplied) for<br />
power. We recommend alkaline batteries (<strong>Radio</strong><strong>Shack</strong> Cat. No. 23-552).<br />
1. Press in the battery compartment cover’s latch and lift off the cover.<br />
2. Put two fresh AA batteries into the compartment as indicated by the polarity<br />
symbols (+ and –) marked inside.<br />
3. Replace the cover.<br />
Cautions:<br />
• Use only fresh batteries of the required size and recommended type.<br />
• Do not mix old and new batteries, different types of batteries (standard,<br />
alkaline, or rechargeable), or rechargeable batteries of different capacities.<br />
• Always remove old or weak batteries. Batteries can leak chemicals that<br />
can damage electronic circuits.<br />
• If you do not plan to use the remote control for a month or more, remove<br />
and store the batteries.<br />
Note: If the remote’s range is reduced, replace the batteries immediately.<br />
Using a Receiver’s Remote<br />
Control with the CD <strong>Changer</strong><br />
If your receiver/amplifier (such as most Optimus Professional Series receiver/<br />
amplifiers) has an OSR mark, the receiver/amplifier’s remote can control some<br />
of the CD changer’s functions.<br />
Plug one end of the supplied control cable into the CD changer’s CONTROL IN<br />
jack. Plug the other end of the cable into the receiver/amplifier’s CONTROL OUT<br />
jack.<br />
Notes:<br />
• This connection disables the CD changer’s infrared sensor. Aim the<br />
remote control at the receiver/amplifier’s infrared sensor.<br />
• You must also connect audio cables to your receiver for the receiver’s<br />
remote control to operate your CD changer.<br />
For details on connection and operation, refer to the receiver/amplifier’s owner’s<br />
manual.<br />
6
Basic Operation<br />
Warning: To protect your hearing, set the volume on your receiver or amplifier<br />
to its lowest level before you load and play a CD.<br />
Caution: Do not set the volume on your receiver or amplifier too high while<br />
playing soft or quiet portions of a music program. Due to the CD changer’s wide<br />
dynamic range, the speakers might be damaged if the music program includes<br />
a sudden loud passage.<br />
Using the Remote Control<br />
Note: The remote operates the CD<br />
changer from up to 23 feet away and<br />
within 30° of the front of the CD<br />
changer.<br />
Many of the CD changer’s buttons also have a corresponding button on the<br />
remote control, and you can use either the CD changer or the remote control to<br />
control the function.<br />
To use the remote control, point it at the infrared sensor on the left side of the<br />
front panel and press the control button.<br />
When the remote control’s operating distance reduces or if the remote control<br />
stops working, replace the batteries.<br />
Loading CDs in the Rack<br />
Note: Always handle CDs by their<br />
edges. Fingerprints and scratches on<br />
a CD’s surface can prevent the laser<br />
beam from correctly reading the digital<br />
information. For more information, see<br />
“CD Care Tips” on Page 18.<br />
The multi-disc rack holds 100 CDs. The disc slots are numbered in clockwise<br />
order, from 1 to 100, and can hold either 3-inch or 5-inch CDs.<br />
Follow these steps to load up to 100 CDs in the slots.<br />
1. Press POWER to turn on the CD changer. If necessary, repeatedly press<br />
DISC NUMBER (or DISC on the remote) so the slot number you<br />
want appears on the display.<br />
UNLOAD BEST PREVIOUS DISC NUMBER<br />
OPEN/<br />
CLOSE<br />
DISC<br />
ASMS<br />
RANDOM<br />
CD DECK SYNCHRO SYSTEM OSR<br />
2. Press UNLOAD to open the rack cover.<br />
UNLOAD BEST PREVIOUS DISC NUMBER<br />
OPEN/<br />
CLOSE<br />
CD DECK SYNCHRO SYSTEM OSR<br />
7
Basic Operation<br />
3. Hold the CD vertically and insert it into the CD slot, label side to the left.<br />
Notes:<br />
• You can use OPEN/CLOSE to open<br />
the rack cover and remove the disc if<br />
the disc to remove is already at the<br />
front of the rack. The display shows<br />
HOLD while the rack cover is open.<br />
• You can open the rack cover even<br />
while a disc is playing. Hold down<br />
OPEN/CLOSE until the display shows<br />
OPEN. The rack cover opens and the<br />
display shows HOLD. In this case,<br />
the rack does not rotate and you cannot<br />
use UNLOAD, SINGLE PLAY/<br />
ACCESS, or DISC NUMBER .<br />
Loading a CD in the<br />
Single Play Slot<br />
4. To load more CDs, repeatedly press DISC NUMBER (or DISC on<br />
the remote) so the desired rack number appears on the display. Then<br />
repeat Step 3.<br />
5. When you finish loading the desired CDs, press OPEN/CLOSE to close the<br />
rack cover.<br />
To remove a CD, select the slot number of the disc you want to remove, then<br />
press UNLOAD. The rack rotates the selected disc slot to the front. When the<br />
rack cover opens, remove the selected CD. Press OPEN/CLOSE to close the<br />
rack cover.<br />
Cautions:<br />
• Do not try to manually open the rack cover; only use OPEN/CLOSE.<br />
• Do not load anything other than 5-inch or 3-inch CDs into the slots. This<br />
could damage the CD changer.<br />
• Do not use an adapter for 3-inch CDs. Also, avoid placing 3-inch CDs<br />
between 5-inch CDs as this makes it hard to remove the 3-inch CDs.<br />
• The CD changer does not play with the rack cover open.<br />
The single play slot lets you easily load a single CD. To load a CD in the single<br />
play slot, press SINGLE PLAY/ACCESS. The CD changer turns on if it was turned<br />
off, and rotates the rack so the single play slot comes to the loading position.<br />
Insert the CD with its label to the left. Then press SINGLE PLAY/PLAY to start<br />
playing.<br />
To remove a CD from the single play slot, press SINGLE PLAY/ACCESS. The<br />
rack rotates the single play slot to the front. When the rack cover opens, remove<br />
the CD.<br />
The single play slot is numbered as “0” and is located between discs 100 and 1.<br />
You can access this slot by pressing DISC NUMBER when the display shows<br />
100, or DISC NUMBER when the display shows 1. You can also reach to the<br />
single play slot by pressing 0 on the remote control. The display shows the disc<br />
number as P0.<br />
Using the Demo<br />
The demo showcases the features of your CD-8400 and its display. To turn on<br />
the demo, press within 1 second of turning on the CD changer. To turn<br />
off the demo, press any button.<br />
8
Basic Operation<br />
Playing CDs<br />
To select a CD, enter its number on the remote control, then press DISC SET<br />
within 5 seconds. You can also use DISC NUMBER (or DISC on the<br />
remote) to step through the disc numbers until you reach the desired CD. (Hold<br />
down either button for a rapid search.)<br />
If the position you select does not have a CD, the CD changer displays<br />
no dISC and plays the next CD.<br />
To select a disc in the single play slot, repeatedly press DISC NUMBER until<br />
the changer displays P0.<br />
Notes: With a custom CD group<br />
selected:<br />
• When you press DISC NUMBER<br />
during play, the changer scans only<br />
through the CD slots within the custom<br />
CD group.<br />
• If you select a slot that is not in the<br />
custom CD group using the remote<br />
control’s number buttons, no dISC<br />
appears for about 3 seconds. (See<br />
“Assigning CDs to a Custom CD<br />
Group” on Page 11.)<br />
• If a CD in the custom CD group is<br />
not loaded, no dISC appears on<br />
the display for about 3 seconds, the<br />
disc number is erased from memory,<br />
and play continues from the next<br />
CD.<br />
Follow these steps to play CDs.<br />
Note: Be sure the CD changer’s rack cover is closed — playback does not<br />
begin if the rack cover is open.<br />
1. Turn on your receiver/amplifier and select the audio input (CD, AUX, or<br />
TAPE) to which you connected your CD changer.<br />
2. Press POWER to turn on the CD changer. The CD changer returns to the<br />
first track of the last CD you played.<br />
3. While the CD changer is stopped, repeatedly press MODE until the play<br />
mode you want appears on the display.<br />
ALL — Plays all the loaded CDs.<br />
SINGLE — Plays only the selected CD.<br />
CUSTOM I, II, or III— Plays only the CDs that belong to the custom<br />
CD group (see “Assigning CDs to a Custom CD Group” on Page 11).<br />
You can switch between ALL and SINGLE during play, but you can<br />
select custom play only when the CD changer is stopped.<br />
Note: You can also select and play a CD in the single play slot by pressing<br />
0 then DISC SET on the remote control.<br />
4. Press ( on the remote control) to begin play from Track 1 on <strong>Disc</strong> 1<br />
(or the last CD you played) and have all tracks and CDs play in order. The<br />
CD changer stops after it plays the highest-numbered CD you loaded.<br />
The changer displays the disc, track number, and the currently playing<br />
track’s elapsed play time.<br />
If a slot does not contain a CD, the CD changer displays no diSC next to<br />
the disc number as it skips to the next slot.<br />
The CD changer memorizes which slots contain CDs, then it skips empty<br />
slots on subsequent play passes. Opening the rack cover (to load/unload<br />
CDs, for example) resets this memory.<br />
5. To temporarily stop play, press ( on the remote control). The display<br />
shows . Press again (or press or on the remote control) to<br />
resume play.<br />
6. The CD changer automatically stops play at the end of the last track on<br />
the highest numbered CD. To stop play sooner, press . The CD changer<br />
returns to the first track on the last-played CD.<br />
Note: A sudden shock or jolt while a CD is playing might suddenly change the<br />
CD’s rotation speed or make the CD changer skip the current track. This might<br />
momentarily mute or distort the sound. This is not a malfunction.<br />
9
Basic Operation<br />
Checking the Time Remaining<br />
and Elapsed on a CD<br />
The display normally shows the current CD and track numbers, and the current<br />
track’s elapsed play time.<br />
Press TIME on the remote control once during play to display the current track’s<br />
remaining time. Press TIME again to display the current CD’s remaining time.<br />
Press TIME again to display the current CD’s total elapsed time.<br />
During programmed play, pressing TIME twice displays the total programmed<br />
time and the number of the programmed track playing (see “Programming a<br />
Sequence” on Page 14). During best selection play, pressing TIME twice displays<br />
the number of tracks stored in the best selection memory (see “Storing<br />
Your Best Tracks” on Page 12).<br />
Notes:<br />
• The CD changer does not display the current CD’s total remaining time<br />
during programmed, random, or best selection play.<br />
• The CD changer might not display the remaining time for tracks numbered<br />
greater than 24 on a CD.<br />
10
Special Features<br />
Quickly Selecting Tracks When the CD changer is stopped or paused, press or (or<br />
or on the remote control) until the CD changer displays the desired track’s<br />
number. Or, enter the track number using the remote control’s number buttons,<br />
then press TRACK SET within 5 seconds.<br />
If you use this feature while a CD plays, the CD changer stops playing the current<br />
track and skips to the next or previous track.<br />
Searching for a Section<br />
of a Track<br />
To rapidly search forward or backward for a track section while a CD plays, hold<br />
down or on the front panel ( or on the remote control).<br />
The display shows the elapsed time to help you locate the desired section, and<br />
the CD plays at a lower volume and higher speed than normal. Release the button<br />
to resume normal play.<br />
You can also search a track when a CD is paused. The searching speed is<br />
faster, the display shows only the minutes, and you do not hear the CD play.<br />
Note: You cannot search past the end (End appears on the display) or the<br />
beginning of a CD.<br />
Assigning CDs to a<br />
Custom CD Group<br />
Note: To change the CDs assigned to<br />
a custom CD group, you must clear all<br />
the entries and enter the desired CDs<br />
again.<br />
You can assign any loaded CD into a custom CD group. This lets you group<br />
your favorite CDs together for more convenient playback.<br />
Follow these steps to assign CDs to a group.<br />
1. While the CD changer is stopped, repeatedly press MODE until CUSTOM<br />
and the number of the desired group light. (If any discs have been<br />
assigned to the group, the lowest disc number appears on the display.<br />
Press CLEAR to clear the group.)<br />
2. Select a CD for storing into the group.<br />
• If you use DISC NUMBER , simply wait until the display blinks. The<br />
disc number is automatically stored in memory.<br />
• If you use the remote control’s number buttons, press DISC SET to<br />
store the disc number in memory.<br />
3. Repeat Step 2 to store all the CDs you want.<br />
Notes:<br />
• The custom group memory is kept even after you turn off the CD changer.<br />
• The changer keeps the CDs stored in custom group memory for up to 2<br />
days in the event of a power loss.<br />
Checking the Custom Group Contents<br />
With the CD changer stopped, repeatedly press MODE so CUSTOM and the<br />
number of the desired group light. Then repeatedly press TIME so C and the<br />
custom group number appear on the display. Then repeatedly press DISC<br />
NUMBER . The programmed disc numbers appear in order as you press DISC<br />
NUMBER .<br />
11
Special Features<br />
Erasing All the CDs from a Custom Group<br />
With the CD changer stopped, repeatedly press MODE so CUSTOM and the<br />
number of the desired group light. Then press CLEAR. (You cannot partially<br />
erase a custom group memory.)<br />
Storing Your Best Tracks<br />
You can save up to 20 of the tracks you like best in a special best memory, and<br />
then replay them at any time. To save a track in best memory, just press BEST<br />
while that track is playing. BEST flashes three times. To play the tracks you<br />
have saved in best memory, press BEST while the changer is stopped. The CD<br />
changer plays in the reverse order; the last track you saved plays first.<br />
Notes:<br />
• The changer only remembers the last 20 tracks you stored in best memory.<br />
• You cannot store the same track twice in succession.<br />
• You cannot save a track from a CD that is in the single play slot into best<br />
memory.<br />
• To clear a track from best memory, press CLEAR while that track is playing.<br />
• The best memory is kept even after you turn off the CD changer.<br />
• The changer keeps the tracks in best memory for up to 2 days in the<br />
event of a power loss.<br />
Scanning Previous CDs<br />
The CD changer remembers the 20 most recently played CDs and lets you<br />
review and replay them in reverse order.<br />
To review the CDs, press PREVIOUS. PREVIOUS SCAN flashes and the<br />
changer plays 10 seconds of the first track of each of the last 20 CDs you<br />
played, starting at 1 minute into the first track on each CD. To listen to an entire<br />
CD and cancel the previous scan function, press .<br />
To stop the previous scan function, press .<br />
Notes:<br />
• If a track is less than 1 minute long, previous scan starts at the beginning<br />
of the track.<br />
• A CD in the single play slot is not included in the previous scan memory.<br />
Neither are any CDs played using random play, hi-lite scan, programmed<br />
play, and best selection.<br />
• The previous scan memory remains stored even after you turn off the CD<br />
changer.<br />
• The changer keeps the CDs stored in previous scan memory for up to 2<br />
days in the event of a power loss.<br />
Using Hi-Lite Scan<br />
To listen to 10 seconds from each CD, press HI-LITE while the changer is<br />
stopped or during normal play. DISC SCAN flashes and the changer plays 10<br />
seconds from each CD, starting at 1 minute into the first track.<br />
To listen to 10 seconds from every track on all CDs, press HI-LITE twice<br />
while the changer is stopped or during normal, programmed, or favorite track<br />
play. SCAN flashes and the changer plays 10 seconds from each track, starting<br />
at 1 minute into each track.<br />
12
Special Features<br />
To stop scanning, either press to start play at the current track or press to<br />
stop play.<br />
Notes:<br />
• If the track is less than 1 minute long, hi-lite scan starts at the beginning of<br />
the track.<br />
• You can use and to skip forward and backward.<br />
• You can use repeat during hi-lite scan (see “Repeating Tracks, CDs, and<br />
Sequences”).<br />
Repeating Tracks, CDs,<br />
and Sequences<br />
Your CD changer can repeat a single track, a single CD, all loaded CDs, a custom<br />
CD group, or a programmed sequence.<br />
To repeat a single track, before or during play of a track you want to repeat,<br />
press REPEAT on the remote control. REPEAT 1 appears on the display. If<br />
the CD changer is stopped, press . At the end of the track, the CD changer<br />
replays the track.<br />
To repeat a single CD, before or during play, repeatedly press MODE until<br />
SINGLE appears on the display, then press REPEAT twice. REPEAT appears<br />
on the display. If the CD changer is stopped, press . When the CD changer<br />
reaches the end of the CD, it replays the CD.<br />
To repeat all CDs, before or during play, repeatedly press MODE until ALL<br />
appears on the display, then press REPEAT twice. REPEAT appears on the display.<br />
If the CD changer is stopped, press . When the CD changer reaches the<br />
end of the last CD, it replays all loaded CDs in order.<br />
To repeat CDs in a custom group, before play, repeatedly press MODE until<br />
CUSTOM and the number of the desired group appear on the display, then press<br />
REPEAT twice. REPEAT appears on the display. If the CD changer is stopped,<br />
press . When the CD changer reaches the end of the last CD, it replays all<br />
CDs in the group in order.<br />
To cancel repeat play, press REPEAT until neither REPEAT1 nor REPEAT<br />
appears on the display, or press .<br />
Playing Tracks in<br />
Random Order<br />
With play stopped, press RANDOM. RANDOM appears on the display, and random<br />
play starts in the selected play mode.<br />
SINGLE — randomly plays all of the current CD’s tracks. Once all the CD’s<br />
tracks have played, the CD changer stops.<br />
ALL — selects a track from a CD and plays the track, then repeatedly selects<br />
another CD and plays another track. When the CD changer finishes playing 100<br />
selections (or as many as possible from the CDs that are loaded), it stops.<br />
CUSTOM — selects a track from a CD in a custom CD group and plays the<br />
track, then repeatedly selects another CD in the same group and plays another<br />
track. When the CD changer finishes playing 100 selections (or as many as<br />
possible from the CDs that are loaded), it stops.<br />
13
Special Features<br />
To cancel random play and continue normal play, select a disc other than the<br />
one currently playing, either by pressing DISC NUMBER or by using the<br />
remote control’s number buttons, then pressing DISC SET. To stop random play,<br />
press .<br />
Notes:<br />
• During play, press RANDOM to skip the track currently playing and<br />
advance to the next random selection.<br />
• You can switch between the ALL or SINGLE modes during random play.<br />
• If the CD changer does not have 100 CDs loaded, the CD changer might<br />
select the same track or CD more than once.<br />
• You can use repeat during random play.<br />
• If you start random play during programmed play, the program’s contents<br />
are erased and the CD changer starts ALL random play.<br />
Programming a Sequence<br />
You can program up to 36 selections from all loaded CDs to play in any order<br />
you choose. A selection can be a single track or an entire CD.<br />
Follow these steps to program a sequence.<br />
1. Press to cancel the current function.<br />
2. Press PGM on the remote control (or PROGRAM on the front panel). PGM<br />
appears on the display.<br />
3. Select the CD that contains the first track you want to program using the<br />
remote control’s number buttons and DISC SET. The selected CD’s number<br />
and AL appear.<br />
You can also use DISC NUMBER (or DISC on the remote) and<br />
press PGM to select a CD. The disc number and AL appear. If you do not<br />
select a track within about 2 seconds, the entire CD is automatically<br />
stored.<br />
If you program an entire CD, skip to Step 5.<br />
4. Select the track you want to program using the remote control’s number<br />
buttons and TRACK SET. The displayed track and disc numbers are stored<br />
in the first memory position.<br />
You can also use or then press PGM (or PROGRAM) to select a<br />
track.<br />
5. Repeat Steps 3 and 4 for each track or CD you want to program, up to 36<br />
selections.<br />
6. Press / . The CD changer plays the sequence.<br />
Notes:<br />
• If you try to program a non-existent CD or track (for example track 10<br />
when that CD has only nine tracks), the CD changer ignores the entry.<br />
• Press or to move forward or backward through the programmed<br />
sequence while the sequence plays.<br />
After the CD changer plays the last track in the programmed sequence, it stops,<br />
but the programmed sequence is still in memory. Press PGM then to restart<br />
programmed play.<br />
To clear the sequence, see “Clearing a Programmed Sequence” on Page 15.<br />
14
Special Features<br />
Programming a Sequence While a CD is Playing<br />
While the CD changer is playing, you can program a sequence of tracks, but not<br />
an entire CD. Press PGM during play, then select the CD and track using the<br />
remote control’s number buttons and DISC SET/TRACK SET, and press PGM.<br />
When the current track finishes playing or you press , programmed play starts.<br />
Or, you can store the track currently being played directly into memory. While<br />
the track is playing, press PGM once to enter the program mode, then press<br />
PGM again to store the current track. You might find this feature convenient to<br />
use along with hi-lite scan.<br />
Erasing a Programmed Selection<br />
In the program mode (when PGM appears on the display), press CLEAR to erase<br />
the last-stored selection (track or CD). The new last-stored selection appears on<br />
the display until you press / (or on the remote control).<br />
Note: You cannot erase a selection that is currently playing or that has already<br />
played.<br />
Clearing a Programmed Sequence<br />
Turning off the CD changer does not clear the programmed sequence. To clear<br />
the sequence, do any of the following:<br />
• Press when the CD is stopped.<br />
• Start best selection play.<br />
• Select ALL, SINGLE, CUSTOM, previous scan, or play the CD in the single<br />
play slot while programming a sequence.<br />
• Press RANDOM while programming a sequence.<br />
Storing a Pause within a Programmed Sequence for<br />
Recording to Cassette<br />
When you record a programmed sequence onto a cassette tape, you can program<br />
a pause to occur after the last selection you plan to record on the first side<br />
of the tape (so you can turn the tape over).<br />
To store a pause, press on the remote in Step 3 of “Programming a<br />
Sequence” on Page 14. PA appears on the display.<br />
During play, when the CD changer pauses and displays / , turn over the tape<br />
and press to resume recording.<br />
Notes:<br />
• You cannot program a pause as the first or last selection.<br />
• You cannot program two pauses in a row.<br />
15
Troubleshooting<br />
If your CD changer is not working as it should, these suggestions might help you solve the problem. If the CD changer still does<br />
not operate properly, take it to your local <strong>Radio</strong><strong>Shack</strong> store for assistance.<br />
Symptom Possible Cause Suggestion<br />
Playback stops abruptly, or the CD<br />
changer pauses or stops during playback.<br />
No sound.<br />
Sound is noisy or distorted.<br />
A CD is loaded backwards.<br />
CD is dirty or scratched.<br />
The CD changer is not correctly connected.<br />
The receiver/amplifier is not set to the<br />
correct input.<br />
The receiver/amplifier’s volume is set<br />
too low.<br />
A CD is loaded backwards.<br />
The CD changer is not correctly connected.<br />
Interference from another electronic<br />
device.<br />
Load the CD with the label side to the<br />
left.<br />
Clean the CD (see “CD Care Tips” on<br />
Page 18).<br />
Recheck all connections.<br />
Check the receiver/amplifier’s input setting.<br />
Turn up the receiver/amplifier’s volume.<br />
Load the CD with the label side to the<br />
left.<br />
Recheck all connections.<br />
Turn off nearby appliances, or use a different<br />
AC outlet for the appliance.<br />
CD skips. CD is dirty or damaged. Clean or repair the CD (see “CD Care<br />
Tips” on Page 18) or try a different CD.<br />
Remote control does not work. Too far from the CD changer. Move closer to the CD changer.<br />
Another device’s cable is plugged into Use the other device’s remote control.<br />
the CONTROL IN jack.<br />
Weak batteries.<br />
Replace the batteries.<br />
Receiver remote control does not work. The control cable is not plugged in. Properly plug in the control cable.<br />
Audio cables are not plugged in. Properly plug in audio cables.<br />
16
Troubleshooting<br />
Self-Diagnostics<br />
The CD-8400 has a self-diagnostic function. When the CD changer detects an abnormal condition, it displays an error number<br />
on the display. If this happens, try the suggestion shown. If the error number still appears, take the CD changer to your local<br />
<strong>Radio</strong><strong>Shack</strong> store for assistance.<br />
Symptom Possible Cause Suggestion<br />
U1 The disc is not loaded properly. Load the CD with the label side to the left.<br />
The CD might be dirty. Clean the CD.<br />
Check to see if there is a foreign object in the slot.<br />
U2 Mechanism operation error. Check to see if there is a foreign object in the slot.<br />
Unplug the power cord and plug it in again.<br />
U3 Rack cover error. Check to see if the rack cover is blocked by anything.<br />
Unplug the power cord and plug it in again.<br />
17
Care and Maintenance<br />
Your Optimus CD-8400 <strong>101</strong>-<strong>Disc</strong> <strong>Compact</strong> <strong>Disc</strong> <strong>Changer</strong> is an example of<br />
superior design and craftsmanship. The following suggestions will help you care<br />
for the CD changer so you can enjoy it for years.<br />
Keep the CD changer dry. If it gets wet, wipe it dry immediately. Liquids can contain<br />
minerals that can corrode electronic circuits.<br />
Handle the CD changer gently and carefully. Dropping it can damage the circuit<br />
boards and case and can cause it to work improperly.<br />
Use and store the CD changer only in normal temperature environments. Temperature<br />
extremes can shorten the life of electronic devices, damage batteries<br />
in the remote control, and distort or melt plastic parts.<br />
Keep the CD changer away from dust and dirt, which can cause premature<br />
wear of parts.<br />
Wipe the CD changer with a damp cloth occasionally to keep it looking new. Do<br />
not use harsh chemicals, cleaning solvents, or strong detergents to clean the<br />
CD changer.<br />
Modifying or tampering with the CD changer’s internal parts can cause a malfunction<br />
and might invalidate your CD changer’s warranty. If your CD changer is<br />
not working as it should, take it to your local <strong>Radio</strong><strong>Shack</strong> store for assistance.<br />
CD Care Tips<br />
Even though a CD is very durable, you should handle it with care.<br />
• Keep the CD inside the CD changer or in its protective case or sleeve<br />
when you are not playing it.<br />
• Handle a CD by its edges to avoid fingerprints which can prevent the CD<br />
changer’s laser beam from accurately reading the CD. Your local<br />
<strong>Radio</strong><strong>Shack</strong> store sells a suitable CD cleaner kit.<br />
• Do not write on either side of the CD, particularly the non-label side. (Signals<br />
are read from the non-label side.)<br />
• Keep the CD dry. A water drop can act as a lens and affect the laser<br />
beam’s focus.<br />
If a CD skips or the CD changer displays Υ1 when you try to play it, it might be<br />
scratched. Your local <strong>Radio</strong><strong>Shack</strong> store sells a Scratch ’n Fix kit (Cat. No. 42-<br />
127) that might help remove the scratch and stop the skip. See also “Troubleshooting”<br />
on Page 16.<br />
18
Specifications<br />
Audio Frequency Response . . . . . . . . . . . . . . . . . . . . . . . . . . . . . 2–20,000 Hz<br />
Wow and Flutter . . . . . . . . . . . . . Limit of Measurement (0.001% or less, EIAJ)<br />
<strong>Disc</strong> Diameter . . . . . . . . . . . . . . . . . . . . . . . . . . . . . . . . . . . . . . . . 3- and 5-inch<br />
Power Requirements . . . . . . . . . . . . . . . . . . . . . . . . . . . . . . . 120 V AC, 60 Hz<br />
Power Consumption . . . . . . . . . . . . . . . . . . . . . . . . . . . . . . . . . . . . . . 12 Watts<br />
Size (HWD) . . . . . . . . . . . . . . . . . . . . . . . . . . . . . 7 1 /2 × 16 9 /16 × 15 13 /16 Inches<br />
(190 × 420 × 402 mm)<br />
Weight . . . . . . . . . . . . . . . . . . . . . . . . . . . . . . . . . . . . . . . . . . . . . . . . 14 lbs 5oz<br />
(6.5 kg)<br />
Specifications are typical; individual units might vary. Specifications are subject<br />
to change and improvement without notice.<br />
19
Limited One-Year Warranty<br />
This product is warranted by <strong>Radio</strong><strong>Shack</strong> against manufacturing defects in material and workmanship<br />
under normal use for one (1) year from the date of purchase from <strong>Radio</strong><strong>Shack</strong> company-owned<br />
stores and authorized <strong>Radio</strong><strong>Shack</strong> franchisees and dealers. EXCEPT AS PROVIDED HEREIN, <strong>Radio</strong><strong>Shack</strong><br />
MAKES NO EXPRESS WARRANTIES AND ANY IMPLIED WARRANTIES, INCLUDING<br />
THOSE OF MERCHANTABILITY AND FITNESS FOR A PARTICULAR PURPOSE, ARE LIMITED<br />
IN DURATION TO THE DURATION OF THE WRITTEN LIMITED WARRANTIES CONTAINED<br />
HEREIN. EXCEPT AS PROVIDED HEREIN, <strong>Radio</strong><strong>Shack</strong> SHALL HAVE NO LIABILITY OR RE-<br />
SPONSIBILITY TO CUSTOMER OR ANY OTHER PERSON OR ENTITY WITH RESPECT TO ANY<br />
LIABILITY, LOSS OR DAMAGE CAUSED DIRECTLY OR INDIRECTLY BY USE OR PERFOR-<br />
MANCE OF THE PRODUCT OR ARISING OUT OF ANY BREACH OF THIS WARRANTY, IN-<br />
CLUDING, BUT NOT LIMITED TO, ANY DAMAGES RESULTING FROM INCONVENIENCE, LOSS<br />
OF TIME, DATA, PROPERTY, REVENUE, OR PROFIT OR ANY INDIRECT, SPECIAL, INCIDEN-<br />
TAL, OR CONSEQUENTIAL DAMAGES, EVEN IF <strong>Radio</strong><strong>Shack</strong> HAS BEEN ADVISED OF THE<br />
POSSIBILITY OF SUCH DAMAGES.<br />
Some states do not allow the limitations on how long an implied warranty lasts or the exclusion of incidental<br />
or consequential damages, so the above limitations or exclusions may not apply to you.<br />
In the event of a product defect during the warranty period, take the product and the <strong>Radio</strong><strong>Shack</strong><br />
sales receipt as proof of purchase date to any <strong>Radio</strong><strong>Shack</strong> store. <strong>Radio</strong><strong>Shack</strong> will, at its option, unless<br />
otherwise provided by law: (a) correct the defect by product repair without charge for parts and<br />
labor; (b) replace the product with one of the same or similar design; or (c) refund the purchase<br />
price. All replaced parts and products, and products on which a refund is made, become the property<br />
of <strong>Radio</strong><strong>Shack</strong>. New or reconditioned parts and products may be used in the performance of<br />
warranty service. Repaired or replaced parts and products are warranted for the remainder of the<br />
original warranty period. You will be charged for repair or replacement of the product made after the<br />
expiration of the warranty period.<br />
This warranty does not cover: (a) damage or failure caused by or attributable to acts of God, abuse,<br />
accident, misuse, improper or abnormal usage, failure to follow instructions, improper installation or<br />
maintenance, alteration, lightning or other incidence of excess voltage or current; (b) any repairs<br />
other than those provided by a <strong>Radio</strong><strong>Shack</strong> Authorized Service Facility; (c) consumables such as<br />
fuses or batteries; (d) cosmetic damage; (e) transportation, shipping or insurance costs; or (f) costs<br />
of product removal, installation, set-up service adjustment or reinstallation.<br />
This warranty gives you specific legal rights, and you may also have other rights which vary from<br />
state to state.<br />
<strong>Radio</strong><strong>Shack</strong> Customer Relations, Dept. W, 100 Throckmorton St., Suite 600, Fort Worth, TX 76102<br />
We Service What We Sell 3/97<br />
7A8<br />
<strong>Radio</strong><strong>Shack</strong><br />
A Division of Tandy Corporation<br />
Fort Worth, Texas 76102<br />
<br />
Printed in Japan