18 Cubic Foot Professional Grade Lawn Sweeper - Ohio Steel ...
18 Cubic Foot Professional Grade Lawn Sweeper - Ohio Steel ...
18 Cubic Foot Professional Grade Lawn Sweeper - Ohio Steel ...

You also want an ePaper? Increase the reach of your titles
YUMPU automatically turns print PDFs into web optimized ePapers that Google loves.
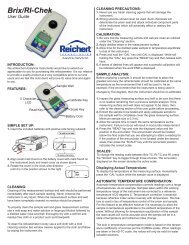
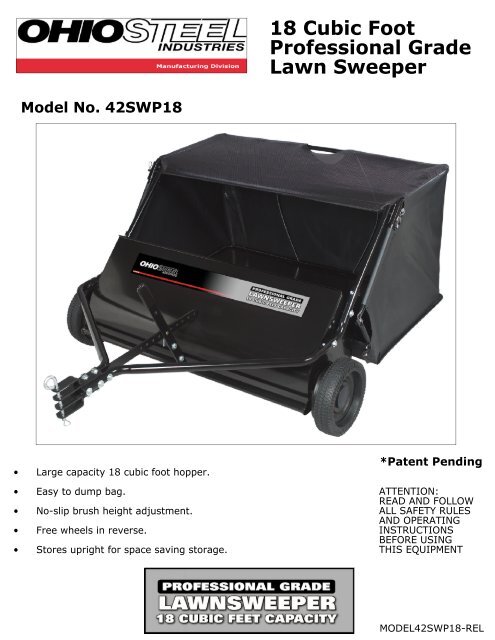
<strong>18</strong> <strong>Cubic</strong> <strong>Foot</strong><br />
<strong>Professional</strong> <strong>Grade</strong><br />
<strong>Lawn</strong> <strong>Sweeper</strong><br />
Model No. 42SWP<strong>18</strong><br />
• Large capacity <strong>18</strong> cubic foot hopper.<br />
• Easy to dump bag.<br />
• No-slip brush height adjustment.<br />
• Free wheels in reverse.<br />
• Stores upright for space saving storage.<br />
*Patent Pending<br />
ATTENTION:<br />
READ AND FOLLOW<br />
ALL SAFETY RULES<br />
AND OPERATING<br />
INSTRUCTIONS<br />
BEFORE USING<br />
THIS EQUIPMENT<br />
MODEL42SWP<strong>18</strong>-REL
Before using your sweeper<br />
• Make sure brushes are clean and free of any debris.<br />
•<br />
•<br />
Visually inspect sweeper for obvious damage.<br />
Use supplied hairpin cotter with hitch pin provided.<br />
• Remove foreign objects from yard before using sweeper.<br />
Bag height and brush adjustment<br />
• Adjust clevis up or down to make sure that the bag clears the ground when attached to tractor.<br />
•<br />
•<br />
Brushes set too low for conditions will cause unnecessary wear. For best performance operate<br />
sweeper with brushes 1/2" down into the grass.<br />
When sweeping heavy or wet materials start with a higher setting, lowering with each pass.<br />
• To adjust the height of the brushes, remove clevis pin and move lever forward or backward<br />
to achieve desired brush height. Insert clevis pin and lock in place with hairpin cotter.<br />
Using your sweeper<br />
• For best results, use sweeper when conditions are dry.<br />
•<br />
•<br />
•<br />
•<br />
•<br />
•<br />
•<br />
Use caution when backing, jackknifing lawn sweeper can cause damage to the unit.<br />
Do not over fill the sweeper hopper.<br />
Do not fasten the rope to any part of your body.<br />
Do not fasten the rope to any clothing.<br />
Do not hold onto rope while pulling the sweeper.<br />
Always secure the rope to the tractor to ensure rope will not get tangled in wheels or brushes.<br />
The faster the tractors speed the further the material is thrown into the hopper. Operate at a<br />
speed that will throw material to the back of the hopper.<br />
• Depending on conditions it may be necessary to adjust sweeping speed to achieve best results.<br />
Dumping the sweeper<br />
• If desired, the sweeper can be dumped from the tractor by pulling the rope forward.<br />
•<br />
<strong>Sweeper</strong> can also be dumped by grasping hopper frame and swinging up, away from hopper.<br />
• Always dump contents of hopper after each use.<br />
Storing the sweeper<br />
• Before storing, clean both the sweeper and hopper bag to prevent rust to steel parts and mildew<br />
to cloth parts.<br />
•<br />
•<br />
•<br />
Store sweeper away from excessive heat to prevent damage to sweeper brushes and hopper bag.<br />
To remove the hopper bag, pull the two clevis pins from the hopper bag tubes and slide out.<br />
Hopper bag can be collapsed for storage by removing the rear hopper support rods and folding<br />
frame down.<br />
• Do not store unit on brushes, permanent damage could occur.<br />
Maintenance<br />
• To increase the life of the sweeper, clean after each use.<br />
•<br />
•<br />
•<br />
Inspect sweeper for worn or damaged parts after each use.<br />
Inspect and remove any materials that may have wrapped around the brushes or the ends of<br />
the brush axle.<br />
Should rust appear on sweeper, sand area and paint with an enamel paint.<br />
•<br />
Periodically check all fasteners for tightness.<br />
Page 2.
Bolt Bag Contents<br />
Carton Contents<br />
9<br />
53<br />
BB<br />
1<br />
52<br />
50<br />
4<br />
54<br />
16<br />
51<br />
49<br />
REF NO PART NO QTY DESCRIPTION<br />
16 42SWP-16 2 #7 HAIR PIN COTTER<br />
49 42SWP-49 6 3/8" FLAT WASHER<br />
50 42SWP-50 7 3/8" NYLON LOCKNUT<br />
51 42SWP-51 1 3/8" CLEVIS PIN<br />
52 42SWP-52 2 3/8" X 2-3/4" HEX BOLT<br />
53 42SWP-53 2 3/8" X 1" HEX BOLT<br />
54 42SWP-54 3 3/8" X 3-1/2" HEX BOLT<br />
Tools Suggested for Assembly<br />
1/2" open end wrenches and/or sockets.<br />
9/16" open end wrenches and/or sockets.<br />
Adjustable wrench or pliers.<br />
45<br />
5A<br />
5B<br />
REF. NO. PART NO. QTY. DESCRIPTION<br />
1 42SWP<strong>18</strong>-01 1 SWEEPER ASSEMBLY<br />
3 42SWP-3 1 LEVER HANDLE<br />
4 42SWP-4 1 HEIGHT ADJ PLATE<br />
5A 42SWP-5A 2 CLEVIS BAR FLAT<br />
5B 42SWP-5B 2 CLEVIS BAR BENT<br />
9 42SWP-9 1 NYLON ROPE<br />
45 42SWP-45 2 HITCH TUBE<br />
BB* 42SWP-BB 1 BAG/FRAME PARTS<br />
* see page 9 for bag frame parts.<br />
Safety Instruction<br />
Read tractor and lawn sweeper instruction<br />
manuals and know how to properly operate<br />
equipment before using this attachment.<br />
Do not carry passengers on sweeper.<br />
Never exceed load capacity of hopper.<br />
Never attach hopper rope to any part of your<br />
body or clothing.<br />
Never hold rope while towing lawn sweeper.<br />
Always keep rope away from brushes and all<br />
rotating parts.<br />
When operating on slopes use lowest ground<br />
speed.<br />
Vehicle braking and stability may be affected<br />
with the addition of the lawn sweeper,<br />
especially when traveling down a slope.<br />
3<br />
Page 3.
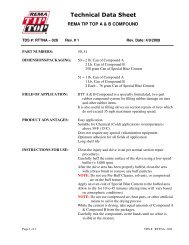
Hitch Assembly to Hopper Assembly<br />
46<br />
45<br />
4<br />
50<br />
49<br />
49<br />
54<br />
45<br />
2<br />
NOTE: MAKE SURE HEIGHT ADJUSTMENT PLATE (4) IS ABOVE HEIGHT<br />
ADJUSTMENT TUBE (2) WHEN ASSEMBLING.<br />
Step 1. Add hitch tubes (45) to the hitch mount tubes by pressing button and sliding into position.<br />
NOTE: TO REMOVE HITCH ASSEMBLY, MAKE SURE SWEEPER IS IN HIGHEST<br />
POSITION TO BE ABLE TO DEPRESS BOTH SNAP BUTTONS.<br />
Step 2. Insert two 3/8" x 3-1/2" hex bolts (54) with washers (49) into front two holes of hitch<br />
tubes (45). Secure with flat washers (49) and nylon locknuts (50).<br />
NOTE: DO NOT TIGHTEN UNTIL CLEVIS BARS ARE INSTALLED.<br />
Step 3. Add height adjustment plate (4) between hitch tubes and insert one 3/8"-16 x 3-1/2"<br />
hex bolt (54). Secure flat washer (49) and nylon locknuts (50).<br />
Page 4.
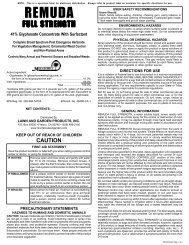
Height Strap & Clevis Assembly<br />
50<br />
3<br />
51<br />
53<br />
4<br />
52<br />
5B<br />
5A<br />
54<br />
5A<br />
5B<br />
50<br />
Step 4. Attach clevis pieces (5A & 5B) as shown in the detail view making sure to insert clevis<br />
bolts (52) between hitch bolts (54) as shown.<br />
Step 5. Attach height adjustment lever (3) to height adjustment bar (2) with two 3/8" x 1" hex<br />
bolts (53) and 3/8" nylon locknuts (50).<br />
Step 6. Pin height adjustment plate (4) to height adjustment lever (3) with 3/8" clevis pin (51)<br />
and lock in place with hairpin cotter (16).<br />
Page 5.
Hopper Bag and Frame Assembly<br />
32<br />
30<br />
TOP ASSEMBLY<br />
32<br />
31<br />
BOTTOM ASSEMBLY<br />
41<br />
36 42<br />
40<br />
28<br />
41<br />
PIVOT ROD<br />
POCKET<br />
16<br />
29<br />
36<br />
44<br />
40<br />
44<br />
42<br />
16<br />
38<br />
16<br />
39<br />
HOPPER BAG<br />
BAR POCKET<br />
38 39<br />
Step 6. Build bottom assembly. Connect bottom left tube (28), center tube (32), and bottom right<br />
tube (29). Slide hopper bag bar (33) into the pocket provided on front bottom of the bag.<br />
Insert bottom assembly into hopper bag. Connect the bag, bar and tubes by inserting<br />
clevis pins (39) thru grommet on bag, bag bar, and tube. Lock it in place with hairpin<br />
cotter (16). Repeat on other side.<br />
Step 7. Build top assembly. Connect top left tube (30), center tube (32), and top right tube (31).<br />
Insert top assembly in to hopper bag. Connect top and bottom tube assemblies with<br />
clevis pin (38) and hairpin cotter as shown.<br />
Step 8. Slide pivot rod (34) thru pivot rod plate (36) hole in side<br />
of frame tube (30), another pivot rod plate (36), hopper<br />
connect tube (44), and thru pocket in top front of bag,<br />
add another hopper connect tube (44), pivot rod plate<br />
(36) frame tube (31), pivot rod plate (36) and center.<br />
Add flat washer (42) to each side and lock in place with<br />
hairpin cotter (16). Bolt pivot rod plates (36) together<br />
with 5/16 carriage bolts (40) and nylon locknut (41).<br />
Step 9. Open bag and insert the 3/16" dia rods (35) into the<br />
holes at the rear top and rear bottom of the steel<br />
bag frame. Secure bag to frame with velcro tab.<br />
35<br />
Page 6.
Putting the Bag onto the <strong>Sweeper</strong><br />
43<br />
46<br />
16<br />
44<br />
43<br />
44<br />
45<br />
46<br />
Step 10. Insert hopper connect tubes (44) into hitch mount tubes (46) as shown and lock in<br />
place with 3/8" clevis pins (43).<br />
Page 7.
3<br />
14<br />
11<br />
10<br />
16<br />
1<br />
12<br />
50<br />
51<br />
24<br />
7R<br />
53<br />
26<br />
26<br />
10S<br />
4<br />
46 49<br />
24<br />
15<br />
50<br />
52<br />
24<br />
20<br />
48<br />
21 19 17<br />
5B<br />
20X<br />
5A<br />
5B<br />
16<br />
50<br />
49<br />
54<br />
45<br />
2<br />
25<br />
26<br />
59<br />
23<br />
58<br />
59<br />
8<br />
<strong>Sweeper</strong> Repair Parts List 42SWP<strong>18</strong> 56 55 6 6B<br />
23<br />
REF NO PART NO QTY DESCRIPTION REF NO PART NO QTY DESCRIPTION<br />
1 42SWP-1 1 SWEEPER ASSEMBLY 20 42SWP-20 2 5/8" RETAINING RING<br />
2 42SWP-2 1 HEIGHT ADJUSTMENT 20X 42SWP-20X 2 5/8" "E" STYLE RETAINING RING<br />
3 42SWP-3 1 LEVER HANDLE 21 42SWP-21 4 5/8" FLAT WASHER<br />
4 42SWP-4 1 HEIGHT ADJ PLATE 23 42SWP-23 4 3/4" FLAT WASHER<br />
5A 42SWP-5A 2 CLEVIS PLATE FLAT 24 42SWP-24 20 1/4"-20 X 1" HEX BOLT<br />
5B 42SWP-5B 2 CLEVIS PLATE BENT 25 42SWP-25 8 1/4" FLAT WASHER<br />
6 42SWP-6 2 WHEEL 26 42SWP-26 20 1/4"-20 LOCK NUT<br />
6B 42SWP-6B 4 WHEEL BUSHING 45 42SWP-45 2 HITCH TUBE<br />
7L 42SWP-7L 1 DUST COVER - LEFT 46 42SWP-46 2 HITCH MOUNT TUBE<br />
7R 42SWP-7R 1 DUST COVER - RIGHT 48 42SWP-48 4 3/8"-16 X 2" HEX BOLT<br />
8 42SWP-8 2 HUB CAP 49 42SWP-49 10 3/8" FLAT WASHER<br />
10 42SWP<strong>18</strong>-10 1 AXLE PIPE 50 42SWP-50 11 3/8" NYLON LOCKNUT<br />
10S 42SWP-10S 2 AXLE ROD STUB 51 42SWP-51 1 3/8" x 1/2" CLEVIS PIN<br />
11 42SWP-11 4 BRUSH HOLDER - DOUBLE 52 42SWP-52 2 3/8"-16 X 2-3/4" HEX BOLT<br />
12 42SWP-12 8 BRUSH HOLDER - SINGLE 53 42SWP-53 2 3/8"-16 X 1" HEX BOLT<br />
14 42SWP<strong>18</strong>-14 4 BRUSH 54 42SWP-54 3 3/8"-16 X 3-1/2" HEX BOLT<br />
15 42SWP-15A 1 HITCH PIN LONG 55 42SWP-55 2 AXLE BEARING<br />
16 42SWP-16 2 HAIR PIN #7 56 42SWP-56 2 BEARING HOUSING<br />
17 42SWP-17 1 PINION GEAR - LEFT 57 42SWP-57 1 HANDLE SLEEVE - NOT SHOWN<br />
<strong>18</strong> 42SWP-<strong>18</strong> 1 PINION GEAR - RIGHT 58 42SWP-58 2 WHEEL AXLE<br />
19 42SWP-19 2 DOWEL PIN 59 42SWP-59 4 COTTER PIN<br />
Page 8.
32<br />
TOP ASSEMBLY<br />
30<br />
31<br />
29<br />
32<br />
28<br />
BOTTOM ASSEMBLY<br />
47<br />
41<br />
36<br />
40<br />
42<br />
34<br />
35<br />
36<br />
41<br />
16<br />
44<br />
43<br />
40<br />
44<br />
38<br />
16<br />
16<br />
27<br />
16<br />
39<br />
33<br />
42<br />
38<br />
39<br />
Hopper Repair Parts List 42SWP<strong>18</strong><br />
REF NO PART NO QTY DESCRIPTION REF NO PART NO QTY DESCRIPTION<br />
9 42SWP-9 1 NYLON ROPE - NOT SHOWN 35 42SWP<strong>18</strong>- 35 2 REAR BAG SUPPORT ROD<br />
16 42SWP-16 8 HAIR PIN COTTER 36 42SWP-36 4 PIVOT ROD PLATE<br />
27 42SWP<strong>18</strong>-27 1 HOPPER BAG 38 42SWP-38 2 CLEVIS PIN 3/8" X 1/2"<br />
28 42SWP-28 1 FRAME BOTTOM LEFT 39 42SWP-39 2 CLEVIS PIN 1/4" X 1 1/4"<br />
29 42SWP-29 1 FRAME BOTTOM RIGHT 40 42SWP-40 4 5/16"-<strong>18</strong> X 3/4" CARRIAGE<br />
30 42SWP<strong>18</strong>-30 1 FRAME TOP LEFT 41 42SWP-41 4 5/16"-<strong>18</strong> NYLON LOCKNUT<br />
31 42SWP<strong>18</strong>-31 1 FRAME TOP RIGHT 42 42SWP-42 2 3/8" FLAT WASHER<br />
32 42SWP-32 2 FRAME TUBE CENTER 43 42SWP-43 2 CLEVIS PIN 3/8" X 1 1/2"<br />
33 42SWP<strong>18</strong>-33 1 HOPPER BAG BAR 44 42SWP-44 2 HOPPER CONNECT TUBE<br />
34 42SWP<strong>18</strong>-34 1 PIVOT ROD 47 42SWP-47 2 POLY END CAP<br />
Page 9.
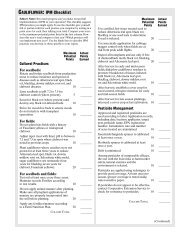
TOP EDGE OF SHEET = 11"<br />
C<br />
10"<br />
B<br />
9"<br />
B<br />
A<br />
B<br />
C<br />
8"<br />
A<br />
7"<br />
A = 7" TO 8"<br />
B = 8" TO 10"<br />
rear hitch hole<br />
C = 10" TO 11"<br />
With the tractor / riding mower on a flat, level surface; position<br />
this sheet at the rear hitch hole of tractor and measure the<br />
height from the ground to the top surface of hitch hole plate.<br />
Using the diagram at the right to determine the set of holes<br />
you will use to bolt the clevis weldment to the hitch.<br />
REAR OF TRACTOR<br />
C<br />
B<br />
B<br />
A<br />
BOTTOM EDGE OF SHEET TO GROUND
QUICK REFERENCE GUIDE<br />
DETERMINING SWEEPER BRUSH HEIGHT<br />
For optimal performance:<br />
• Mow grass while sweeping, especially when leaves are present.<br />
• Set brush height 1/2" down into the grass. A common<br />
misconception is that the lower the brush setting the better it<br />
will sweep, when in fact a brush setting too low will cause<br />
unnecessary drag on brushes.<br />
• Sweep when conditions are dry. When sweeping heavy amounts<br />
of debris start with a HIGHER setting, LOWERING with each pass.<br />
• Operate at a speed that will throw the material into the back of the<br />
hopper, speed will have to be adjusted depending upon the<br />
materials being swept.<br />
lowest brush<br />
setting<br />
BRUSH HEIGHT ADJUSTMENTS:<br />
highest brush<br />
setting<br />
Low settings: on ground to 1"<br />
above ground. Smooth surfaces such<br />
as driveways parking lots, and<br />
sidewalks.<br />
Medium settings: 1" to 2" above<br />
ground. Mowed lawns under normal<br />
conditions or light leaves.<br />
High settings: 2" to 3" above<br />
ground. For high grass, heavy leaves,<br />
or heavy grass clippings.<br />
NOTE: having the brushes set too low causes wheel slippage. For maximum<br />
performance operate sweeper with brushes adjusted as high as possible.