High Speed DC Circuit Breaker - G E Power Controls
High Speed DC Circuit Breaker - G E Power Controls
High Speed DC Circuit Breaker - G E Power Controls

Create successful ePaper yourself
Turn your PDF publications into a flip-book with our unique Google optimized e-Paper software.
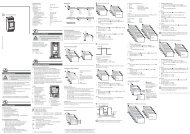
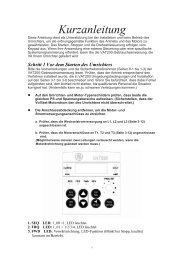
6.2.5 Adjusting the auxiliary switches<br />
1 2 3<br />
1. OPEN the breaker.<br />
2. Disconnect power supply, and pull out all the<br />
plugs from control box’s terminals.<br />
3. In case of NEKO control unit inside, wait 1 minute<br />
until capacity will discharge.<br />
• Adjustment of the switches is required in case of incorrect<br />
position signalization. This might happen due<br />
to not simultaneous activation of the switches, by actuating<br />
plate (6) [Fig. 56-3], dashed line.<br />
• In case of only 3 or 5 switches, installed in centre of<br />
the block, it shall not occur (breaker after 2003).<br />
• In case of 10 switches or when switches are mounted<br />
at the far left position, it might be needed (breaker before<br />
2003). In most cases, only far left or far right<br />
mounted switches might need to be re-adjusted.<br />
• Check all the switches signalization to establish, which<br />
of these need to be re-adjusted (left or right side).<br />
• OPEN the breaker.<br />
• [Fig. 56-1] Loosen four screws (2). Move the front cover<br />
(1) slowly down. The auxiliary switch block (3) is accessible<br />
now, in the bottom compartment.<br />
• [Fig. 56-2] Loosen screws (4) on the side, which needs<br />
to be re-adjusted. Turn the proper (left or right) adjusting<br />
screw (5) clockwise, until all missing signals switch<br />
over.<br />
Warning! Too much turning in, may effect with full<br />
pressing of the switches’ pin and its breakdown.<br />
• [Fig. 56-1] Check the correct signalization of all<br />
switches at the connecting plug terminations X4, X5! If<br />
necessary re-adjust the switches from other side.<br />
• Now tighten solid the screws 4.<br />
• [Fig. 56-1] Close the control box with front cover (1) by<br />
fixing the four screws (2). Pay attention, that no cables<br />
will be crushed between box and front plate.<br />
• CLOSE the breaker several times. Check if the auxiliary<br />
contacts are switching over correctly.<br />
• Finally check the electrically functions in the “TESTposition”<br />
of the draw-out version after installing the<br />
breaker into the substation.<br />
If re-adjustment does not help, please contact GE Service<br />
Team. It might be required to install switch block again or<br />
to move switches to centre of the block for better performance.<br />
Fig. 56-1 Control box with auxiliary switch block<br />
5<br />
4<br />
Fig. 56-2 Auxiliary switch block<br />
Gerapid in position „ON“:<br />
Main contacts closed.<br />
Aux. switches not actuated<br />
Gerapid in position „OFF“:<br />
Main contacts open.<br />
Auxiliary switches actuated<br />
Fig. 56-3 Actuating plate for auxiliary switch block<br />
6<br />
3<br />
6<br />
46 Design and specifications are subject to change without notice 01/2008