High Speed DC Circuit Breaker - G E Power Controls
High Speed DC Circuit Breaker - G E Power Controls
High Speed DC Circuit Breaker - G E Power Controls

You also want an ePaper? Increase the reach of your titles
YUMPU automatically turns print PDFs into web optimized ePapers that Google loves.
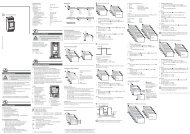
6.2.2. Maintenance of contact system (before 11/2003)<br />
Pay attention to the warnings, Section 1!<br />
This section is valid for breakers manufactured before<br />
11/2003.<br />
This section refers to maintenance works A, B, C from Table<br />
4.<br />
A) Remove the arc chute and adapter<br />
• See 6.2.1-A/B.<br />
C) Changing the protective walls and arc runners<br />
• [Fig. 48]. Pull out two protective walls (3).<br />
• [Fig. 51-2]. Loosen screws (6a) with tool (SW4) and take<br />
out front wall (6).<br />
• [Fig. 51-2]. Loosen screw (5a) with tool (SW5).<br />
• [Fig. 51-1]. Take out the front arc runner as it’s shown.<br />
• [Fig. 51-2]. Take out the back arc runner (4) by loosen<br />
two screws (4a) with tool (SW5). Don’t remove the protective<br />
cap (4b).<br />
• [Fig. 51-2]. Install new front-arc runner (5) and new<br />
back-arc runner (4). Tighten it using torque of 10Nm<br />
[88lbf*in].<br />
• [Fig. 51-2]. Install front wall (6) and adjust it by positioning<br />
the protective wall (3) [Fig. 48]. Tighten it using<br />
torque of 10Nm [88lbf*in]<br />
• [Fig. 48]. Put in two new protective walls (3).<br />
4<br />
4b<br />
5<br />
4a<br />
5a<br />
6<br />
6a<br />
Fig. 51-1 Taking out the front arc runner of old design<br />
Fig. 51-2 Changing pre-arcing contact<br />
42 Design and specifications are subject to change without notice 01/2008