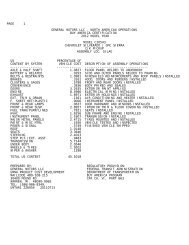
2013 Tahoe Technical Guide (pdf) - GM Fleet
2013 Tahoe Technical Guide (pdf) - GM Fleet
2013 Tahoe Technical Guide (pdf) - GM Fleet

You also want an ePaper? Increase the reach of your titles
YUMPU automatically turns print PDFs into web optimized ePapers that Google loves.
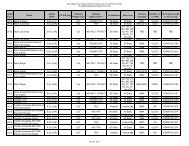
<strong>Tahoe</strong> PPV & 5W4 special equipment - OPTIONAL | 25<br />
AMF - Package of 6 transmitters<br />
With Remote<br />
Start and<br />
Liftglass<br />
(Without<br />
Remote<br />
Similar)<br />
With Remote<br />
Start and<br />
Power Liftgate<br />
and Liftglass<br />
(Without<br />
Remote Start<br />
Similar)<br />
Relearn Remote Key<br />
To access this DIC display, the vehicle must be in PARK. This display allows you to<br />
match the remote keyless entry transmitter to your vehicle. To match a remote<br />
keyless entry transmitter to your vehicle, do the following:<br />
1. Press the trip odometer reset stem until PRESS THE RELEARN REMOTE KEY displays.<br />
2. Press and hold the trip reset stem for 3 seeconds. The message REMOTE KEY<br />
LEARNING ACTIVE will display.<br />
3. Press and hold the LOCK and UNLOCK buttons on the first transmitter at the same<br />
time for approximately 15 seconds. A beep will sound indicating that the<br />
transmitter is matched.<br />
4. To match additional transmitters at this time, repeat Step 3. Each vehicle can have<br />
a maximum of eight transmitters matched to it.<br />
5. To exit the program mode, turn the key to the LOCK position.<br />
NOTE: A maximum of 8 keys may be learned for a vehicle immobilizer (Passkey III+)<br />
with a random key code. Vehicles with the fleet key option (RPO 6E2 or 6E8) may have<br />
an unlimited number of keys learned for the particular option fleet key and must be<br />
learned using one of the original "master" keys. When programming the RPO AMF<br />
additional 6 remote transmitters, the original 2 transmitters delivered with a vehicle<br />
must also be reprogrammed at the same time. A maximum of 8 remote transmitters<br />
can be programmed for a single vehicle.<br />
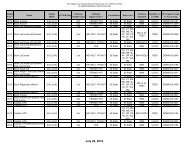
6B2 Handles – Rear Door<br />
Inoperative<br />
Inside rear door handles are disconnected. Rear doors can only be opened from<br />
the outside.<br />
6N5 SWITCHES – REar Window<br />
Inoperative<br />
Rear door window switches are inoperable. Rear door power regulators are<br />
operable only from driver position switches.<br />
6N6 Locks – Rear Door<br />
Inoperative<br />
Wiring provisions for emergency<br />
vehicle roof lamp - OPTION TRW<br />
Rear door locking rods are disabled. Rear door locks are inoperable at rear doors,<br />
but operate from driver position.<br />
Stabilitrak control<br />
Battery power is supplied through a 30-amp fuse to a wiring harness located in the<br />
roof. Power is controlled with a switch located in the overhead console. The<br />
customer or vehicle upfitter must complete the installation to an added accessory<br />
such as an emergency beacon lamp.<br />
Maximum rated electrical load is 21-amp (250-watts). The added electrical<br />
requirements must not exceed 21-amp (250-watts). Running the accessory for long<br />
periods of time with the engine off may run the battery down.<br />
A. 25.39-inches (645 mm)<br />
B. 17.32-inches (440 mm)<br />
C. 3.94-inches (100 mm) square<br />
D. Roof centerline<br />
E. Roof edge<br />
NOTE: For wiring diagram see page 26<br />
OFF<br />
The Stabilitrak stability control system control button is located below the air<br />
conditioning fan control See pages 3 or 15 of this manual for an operation<br />
description of the stability control system or see your Owner's Manual.<br />
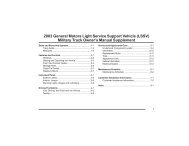
<strong>2013</strong> Chevrolet Municipal Vehicles <strong>Technical</strong> Manual