GC GRADIA - GC Europe
GC GRADIA - GC Europe GC GRADIA - GC Europe
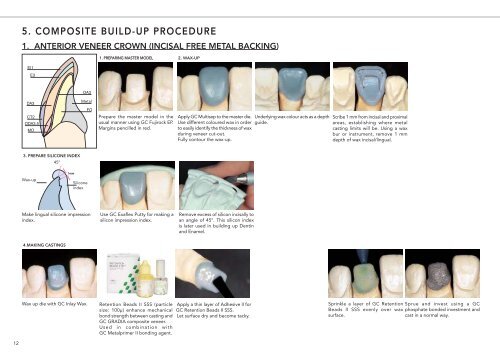
5. COMPOSITE BUILD-UP PROCEDURE 1. ANTERIOR VENEER CROWN (INCISAL FREE METAL BACKING) 1. PREPARING MASTER MODEL 2. WAX-UP EI1 E3 OA3 DA3 CT2 ODA3.5 MO Metal FO Prepare the master model in the usual manner using GC Fujirock EP. Margins pencilled in red. Apply GC Multisep to the master die. Use different coloured wax in order to easily identify the thickness of wax during veneer cut-out. Fully contour the wax-up. Underlying wax colour acts as a depth guide. Scribe 1 mm from incisal and proximal areas, establishing where metal casting limits will be. Using a wax bur or instrument, remove 1 mm depth of wax incisal/lingual. 3. PREPARE SILICONE INDEX 45° Wax-up 1mm Silicone index Make lingual silicone impression index. Use GC Exaflex Putty for making a silicon impression index. Remove excess of silicon incisally to an angle of 45°. This silicon index is later used in building up Dentin and Enamel. 4.MAKING CASTINGS Wax up die with GC Inlay Wax. Retention Beads II SSS (particle size: 100μ) enhance mechanical bond strength between casting and GC GRADIA composite veneer. Used in combination with GC Metalprimer II bonding agent. Apply a thin layer of Adhesive II for GC Retention Beads II SSS. Let surface dry and become tacky. Sprinkle a layer of GC Retention Sprue and invest using a GC Beads II SSS evenly over wax phosphate bonded investment and surface. cast in a normal way. 12
Chart 1 – Curing time for Opaque pastes GC LABOLIGHT LV-II, III 1 minute GC LABOLIGHT LV-I 3 minutes 5. PREPARE CASTING MO OA3 Metal FO Remove beads within 0,5 mm from margin area with a carbide bur. Finish and polish metal casting in a usual manner. Sandblast metal surface that requires application of GC METALPRIMER II with clean 50μ aluminium oxide. Blow surface with clean, dry air and immediately apply GC METALPRIMER II. Note: There will be no change in surface look after coating. GC METALPRIMER II is a metal adhesive primer with monomer containing thiophosphoric metacrylate (MEPS). Note: GC METALPRIMER II is very volatile. Replace bottle cap immediately after use. 6. FOUNDATION OPAQUE (FO) Note: Remove any Opaque remaining on nozzle syringe tip with tissue paper. Apply GC METALPRIMER II, one or twice FOUNDATION OPAQUE shade serves by using a clean brush. Allow drying for as foundation of all shades. a few seconds. Dispense FOUNDATION OPAQUE Immediately start to apply FOUNDATION OPAQUE to avoid contamination of the into disposable pallet and shield with bonding surface. light protective cover. Apply layer of FOUNDATION - For best results, light cure Opaques OPAQUE about 100μ thickness with with GC LABOLIGHT LV-III: see chart flat brush. 1 above Note: If Opaque gets too thick, stir - Refer to curing depth of with brush to restore fluidity. Opaque chart on page 28. 7. MARGIN OPAQUE (MO) 8. OPAQUE (O) For deeper, richer cervical colours, apply MARGIN OPAQUE in 1 mm width cervically using a round brush. MARGIN OPAQUE, if applied after Opaque layer of the tooth shade, may create a whitish line showing through final composite layer. To entire surface, apply two thin coats First layer of OPAQUE (O) using a flat brush. Avoid to use a too thick layer, the curing process might turn out to be insufficient. Second layer Light cure: chart 1 Light cure: chart 1 Light cure: chart 1 13
- Page 1 and 2: Technical Manual GC GRADIA Total Ae
- Page 3 and 4: INTRODUCTION Light-cured composites
- Page 5 and 6: ■ HALO ENAMEL (HE): 1 shade Frame
- Page 7 and 8: 3. GC GRADIA CHARACTERISTICS 1. NAT
- Page 9 and 10: 3. EXCELLENT HANDLING CHARACTERISTI
- Page 11 and 12: 4. CLINICAL PROCEDURE Determine whe
- Page 13: REMOVAL OF THE TEMPORARY RESTORATIO
- Page 17 and 18: Chart 2 - Curing time for Dentin/En
- Page 19 and 20: 2. COMPOSITE BUILD-UP PROCEDURE Cha
- Page 21 and 22: Chart 2 - Curing time for Dentin/En
- Page 23 and 24: 9. COMPLETED INLAY Example of clini
- Page 25 and 26: Chart 3 - Final curing time GC LABO
- Page 27 and 28: Chart 1 - Curing time for Opaque pa
- Page 29 and 30: 14. COMPLETED CROWN Completed GC GR
- Page 31 and 32: 7. PACKAGING ■ GC GRADIA MASTER S
- Page 33 and 34: 9. QUESTIONS & ANSWERS Q1. After sa
- Page 35 and 36: 10. PRECAUTIONS 1. For use by denta
5. COMPOSITE BUILD-UP PROCEDURE<br />
1. ANTERIOR VENEER CROWN (INCISAL FREE METAL BACKING)<br />
1. PREPARING MASTER MODEL 2. WAX-UP<br />
EI1<br />
E3<br />
OA3<br />
DA3<br />
CT2<br />
ODA3.5<br />
MO<br />
Metal<br />
FO<br />
Prepare the master model in the<br />
usual manner using <strong>GC</strong> Fujirock EP.<br />
Margins pencilled in red.<br />
Apply <strong>GC</strong> Multisep to the master die.<br />
Use different coloured wax in order<br />
to easily identify the thickness of wax<br />
during veneer cut-out.<br />
Fully contour the wax-up.<br />
Underlying wax colour acts as a depth<br />
guide.<br />
Scribe 1 mm from incisal and proximal<br />
areas, establishing where metal<br />
casting limits will be. Using a wax<br />
bur or instrument, remove 1 mm<br />
depth of wax incisal/lingual.<br />
3. PREPARE SILICONE INDEX<br />
45°<br />
Wax-up<br />
1mm<br />
Silicone<br />
index<br />
Make lingual silicone impression<br />
index.<br />
Use <strong>GC</strong> Exaflex Putty for making a<br />
silicon impression index.<br />
Remove excess of silicon incisally to<br />
an angle of 45°. This silicon index<br />
is later used in building up Dentin<br />
and Enamel.<br />
4.MAKING CASTINGS<br />
Wax up die with <strong>GC</strong> Inlay Wax.<br />
Retention Beads II SSS (particle<br />
size: 100μ) enhance mechanical<br />
bond strength between casting and<br />
<strong>GC</strong> <strong>GRADIA</strong> composite veneer.<br />
Used in combination with<br />
<strong>GC</strong> Metalprimer II bonding agent.<br />
Apply a thin layer of Adhesive II for<br />
<strong>GC</strong> Retention Beads II SSS.<br />
Let surface dry and become tacky.<br />
Sprinkle a layer of <strong>GC</strong> Retention Sprue and invest using a <strong>GC</strong><br />
Beads II SSS evenly over wax phosphate bonded investment and<br />
surface.<br />
cast in a normal way.<br />
12


