CW Kalenji 300 Coded - Oxylane.net
CW Kalenji 300 Coded - Oxylane.net
CW Kalenji 300 Coded - Oxylane.net

You also want an ePaper? Increase the reach of your titles
YUMPU automatically turns print PDFs into web optimized ePapers that Google loves.
<strong>CW</strong> <strong>Kalenji</strong> <strong>300</strong> <strong>Coded</strong>
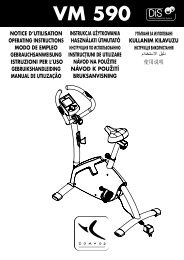
EN: Fitting procedure<br />
FR : Procédure d’installation<br />
ES : Procedimiento de instalación<br />
DE : Installationsverfahren<br />
IT : Procedura d’installazione<br />
NL : Installatieprocedure<br />
PT : Procedimento de instalação<br />
SCHEMA 1<br />
PL : Procedura instalacji<br />
HU : Telepítési eljárás<br />
RU : Порядок установки<br />
RO : Procedura de instalare<br />
CS : Instalační proces<br />
SV : Installationsanvisningar<br />
BG : Начин на поставяне<br />
TR : Kurulum prosedürü<br />
AR :<br />
ZH :<br />
ZT :<br />
50 cm*<br />
*19.68 inchs<br />
EN: Reception area<br />
SCHEMA 2<br />
*19.68 inchs<br />
**39.36 inchs<br />
50 cm*<br />
50 cm* 50 cm*<br />
E<br />
F<br />
E<br />
D<br />
IT<br />
N<br />
P<br />
2<br />
FR : Cône de réception<br />
ES : Cono de recepción<br />
DE : Empfangsbereich<br />
IT : Cono di ricezione<br />
NL : Ontvangstbereik<br />
PT : Zona de recepção<br />
PL : Strefa odbioru<br />
HU : Kúp alakú adatvételi sáv<br />
RU : Радиус действия<br />
100 cm**<br />
RO : Con de recepţie<br />
CS : Přijímací kužel<br />
SV : Mottagningszon<br />
BG : Рецепторна зона<br />
TR : Sinyal alış konisi (bölgesi)<br />
AR :<br />
ZH :<br />
ZT :
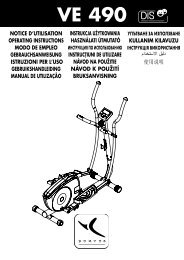
D : LIGHT<br />
A: STR/STP<br />
C : MODE<br />
B : VIEW<br />
EN: Navigation diagram<br />
FR : Schéma de navigation<br />
ES : Esquema de navegación<br />
DE : Navigationsschema<br />
IT : Schema di navigazione<br />
NL : Navigatieschema<br />
PT : Esquema de navegação<br />
SCHEMA 3<br />
PL : Strefa odbioru<br />
HU : Navigáció vázlata<br />
RU : Схема управления<br />
RO : Schema de navigaţie<br />
CS : Navigační schéma<br />
SV : Navigeringskarta<br />
BG : Схема на навигация<br />
TR : Navigasyon şeması<br />
AR :<br />
ZH : 浏 览 图 解<br />
ZT :<br />
3
EN : Press once / FR : Appuyez 1 fois / ES : Pulse 1 vez<br />
/ DE : 1 mal drücken / IT : Premere 1 volta / NL : 1<br />
keer drukken / PT : Prima 1 vez / PL: Naciśnij 1 raz<br />
/ HU : Nyomja meg egyszer / RU : Нажать 1 раз /<br />
RO : Apăsaţi 1 dată / CS : Stiskněte 1x / SV: Tryck en<br />
gång / BG : Натистене 1 път / TR : 1 kere basın /<br />
AR : / ZH : / ZT :<br />
E<br />
F<br />
E<br />
D<br />
IT<br />
N<br />
P<br />
EN : Hold for 3 sec / FR : Appuyez 3 sec / ES : Pulse 3 seg<br />
/ DE : 3 Sek. lang drücken IT : Tenere premuto per 3<br />
sec / NL : 3 seconden drukken / PT : Prima durante<br />
3 segundos / PL : Przyciskaj przez 3 sekundy /<br />
HU : Tartsa lenyomva 3 mpig / RU : Удерживать 3<br />
сек / RO : Apăsaţi 3 sec / CS : Stiskněte po dobu 3<br />
vteřin / SV : Tryck tre sekunder / BG : Натиснете 3<br />
сек / TR : 3 saniye basın / AR : /<br />
ZH : / ZT :<br />
3 sec<br />
EN : Press + or - to set and to confirm / FR :<br />
Appuyez sur - ou + pour régler et pour valider<br />
/ ES : Pulse + o – para regular y para validar /<br />
DE : Drücken Sie zum Einstellen auf + oder – und zum<br />
Bestätigen auf / IT : Premere + o – per regolare e<br />
per confermare / NL : Druk op + of – om in te<br />
stellen en op om te bevestigen / PT : Prima + ou<br />
– para ajustar e para validar / PL : Naciśnij + lub –<br />
aby ustawić oraz zatwierdzić / HU : ANyomja meg<br />
a + vagy –gombot a beállításhoz és a gombot az<br />
érvényesítéshez / RU : Нажать на + или – для<br />
настройки и подтверждения / RO : Apăsaţi pe<br />
+ sau - pentru reglare şi pentru validare / CS :<br />
Stiskněte + nebo – pro nastavení a pro potvrzení<br />
/ SV : Tryck på + eller – för att ställa in och för att<br />
godkänna / BG : За регулиране натиснете + или –<br />
,за потвърждение натиснете / TR : Ayarlamak<br />
için + veya -’ye, onaylamak için ’ye basın / AR :<br />
/ ZH :<br />
/ ZT :<br />
E<br />
F<br />
E<br />
D<br />
IT<br />
N<br />
P<br />
4
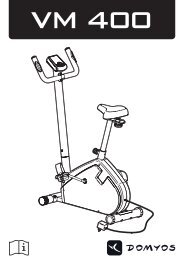
EN: Conditions of use<br />
FR : Conditions d'utilisation<br />
ES : Condiciones de uso<br />
DE : Nutzungsbedingungen<br />
IT : Condizioni di utilizzo<br />
NL : Gebruiksomstandigheden<br />
PT : Condições de utilização<br />
PL : Warunki określające użytkowanie<br />
HU : Használati feltételek<br />
RU : Условия эксплуатации<br />
RO : Condiţii de utilizare<br />
CS : Podmínky užívání<br />
SV : Anvisningar för användning<br />
BG : Условия за ползване<br />
TR : Kullanım koşulları<br />
AR :<br />
ZH :<br />
ZT :<br />
5ATM<br />
1ATM<br />
EN: Changing the batteries<br />
FR : Changement de piles<br />
ES : Cambio de pilas<br />
DE : Batterienwechsel<br />
IT : Sostituzione delle pile<br />
NL : Vervangen van de batterijen<br />
PT : Substituição das pilhas<br />
SCHEMA 4<br />
PL : Wymiana baterii<br />
HU : Elemcsere<br />
RU : Замена элементов питания<br />
RO : Schimbarea bateriilor<br />
CS : Výměna baterií<br />
SV : Batteribyte<br />
BG : Смяна на батериите<br />
TR : Pil değiştirme<br />
AR :<br />
ZH :<br />
ZT :<br />
5
EN<br />
If you regularly run or want to progress through training, this product<br />
is for you. This product has been designed to be comfortable,<br />
adapt to all body types and for easy use during exercise.<br />
1/ Device and navigation diagram<br />
A : STR/STOP :<br />
Start/stop the stopwatch. Activate or<br />
deactivate a function.<br />
D<br />
A<br />
B : VIEW :<br />
Change the information on the second<br />
line. Scroll down settings values, reset<br />
stopwatch.<br />
C<br />
B<br />
C : MODE : Navigate between modes (time,<br />
cardio, calories, data, settings).<br />
D : LIGHT :<br />
Activate backlighting.<br />
Navigation system: The navigation diagram is at the beginning of the manual (diagram 3).<br />
Five main modes: press MODE to change between modes.<br />
- TIME : permanently displays the time and date.<br />
- CARDIO : training mode with heart rate as the main data item.<br />
- CALORIES : training mode with calories burned as the main data item.<br />
- DATA : training report from your last workout.<br />
- SETTINGS : all the device's settings: height, weight, target zone, etc.<br />
In cardio, calories, data and settings modes, press VIEW to scroll through the various data<br />
items.<br />
2/ Use / Precautions for use<br />
This heart rate monitor is made up of a watch and a chest strap. The watch is designed to be worn<br />
on the wrist or placed on a bicycle holder during various sporting, physical activities in a temperate<br />
climate. The chest strap has a 32 channel coded transmitter. You must be inside the reception area<br />
(diagram 2).<br />
User limitations / precautions for use:<br />
All precautions for use and restrictions are listed page 3 of these instructions.<br />
WARNING!!!<br />
This equipment is designed for sports and leisure use. It is not a medical monitoring device.<br />
The information provided by this equipment or manual are only used by way of example and must<br />
only be used to monitor a medical disorder after consulting and obtaining agreement from your<br />
doctor.<br />
6
n<br />
te<br />
a<br />
e.<br />
st<br />
ur<br />
t<br />
e,<br />
Similarly, athletes in good health must take into account the fact that determining your maximum<br />
heart rate and personal training zones are vital elements in designing an effective and risk-free<br />
training programme.<br />
EN<br />
or<br />
We recommend that you seek advice from your doctor or health adviser to set your maximum heart<br />
rate, your upper and lower heart rate limits and the frequency and duration of exercise suitable for<br />
your age, physical condition and desired results.<br />
Finally, as a result of possible disturbance caused by the radio transmission system, we do not<br />
recommend that users of heart stimulators use a heart rate monitor which uses this form of<br />
technology.<br />
Not observing these precautions may put your life at risk.<br />
d<br />
t<br />
e,<br />
3/ The chest strap<br />
Fitting the chest strap<br />
The installation process for the strap is explained at the start of these instructions (diagram 1).<br />
The chest strap serves as a sensor and transmitter. It measures the differences of potential created by<br />
the heartbeat on the surface of the skin. It transmits<br />
this information to the watch by radio signal. The<br />
quality and accuracy of its measurements and<br />
comfort during use depend on it being correctly<br />
positioned. As shown in the diagram, the sensors are<br />
black rubber surfaces either side of the central part.<br />
When correctly placed, the strap sends heart rate information to the watch. Located in the reception<br />
cone (diagram 2), the watch displays the heart rate and other information (target zone, exercise<br />
intensity... ) to optimise your fitness and training.<br />
ta<br />
Avoid positioning the sensors in overly hairy areas. In cold and dry climates,<br />
the strap may need several minutes to work properly. This is perfectly<br />
normal as the sensors need a film of sweat to ensure contact with the skin.<br />
When measurements start, the watch may indicate very high values for<br />
around 20 seconds. This is due to the initialisation of the algorithm. It will<br />
display correct values following initialisation. Take care when inserting the<br />
elastic strap binding into the hole designed to house the strap. Hold the pin<br />
while passing your finger behind the strap.<br />
7
EN<br />
4/ Time mode ( TIME )<br />
- Using the time mode<br />
The time is displayed on the main line and the date is displayed on the second line<br />
in the format selected in SETTINGS mode.<br />
- Setting the time, date and 12/24 hour mode.<br />
Changes are made in the SETTINGS mode.<br />
5 / Cardio mode (CARDIO)<br />
“You can display your heart rate data either in beats per minute (bpm) or percentages of maximum<br />
rate (%) You can choose which in the SETTINGS mode (HR Unit)”<br />
Display of readings as beats per minute (bpm)<br />
Training<br />
stopwatch<br />
Instant<br />
calories<br />
burned<br />
Target zone<br />
in beats per<br />
minute (bpm)<br />
Total<br />
calorie<br />
expenditure<br />
Display readings as a percentage of maximum heart rate (%)<br />
Exercise<br />
stopwatch<br />
Instant<br />
calorie<br />
expenditure<br />
Target zones<br />
in percentage<br />
of maximum<br />
heart rate (%)<br />
Total calorie<br />
expenditure<br />
8<br />
5.1/ Using cardio mode and main information<br />
The main information in this mode is the heart rate.<br />
IMPORTANT:<br />
• To get heart rate information, you must be wearing the strap. (Don’t forget to moisten it first.) If it is<br />
correctly fitted it will automatically emit the heart rate signal. For more information on fitting the<br />
strap, see diagram 1 or paragraph 3.
• Before using the cardio mode, we also advise you to check that you have entered the correct<br />
figures (your height, weight, target zone) in the SETTINGS mode (see chapter relating to this).<br />
If not, the values given by the watch may be incorrect.<br />
When entering CARDIO mode, the watch will search for a signal.<br />
EN<br />
It will automatically receive the signal if it is within range of the strap. If this is the case, the symbol<br />
(heart) on top left of screen will flash and the heart rate will be displayed on the main line.<br />
“If the signal is not found, the watch will display “NO SIGNAL”.<br />
If the link is broken for more than five minutes, the display changes to ---.<br />
To reactivate the search for a signal, press the “MODE” button for three seconds<br />
5.2/ Secondary information display<br />
You can change the secondary information on the second line by pressing VIEW.<br />
5.2.1/ Training stopwatch<br />
This is the standard display when entering cardio mode. Press START/STOP to start the stopwatch.<br />
Then press START/STOP again to stop it. Hold down VIEW for three seconds to reset it.<br />
is<br />
e<br />
NB: 1. The stopwatch can only be started or stopped when it is displayed on the screen.<br />
9
EN<br />
2. When the user changes mode while the stopwatch is running, a symbol is displayed in all<br />
other modes.<br />
3. The stopwatch can measure a duration from 0 to 23h 59min 59s.<br />
4. When the user starts the stopwatch for the new session, they erase data stored in the memory in<br />
DATA mode from the previous session (see DATA mode).<br />
5.2.2/ Instant Calorie Expenditure<br />
The following display relates to the current calorie expenditure rate. This value is given in Kcal/hour.<br />
It expresses the speed at which you expend energy.<br />
5.2.3/ Total calories burned<br />
The following display relates to energy that you have expended since beginning exercising, from<br />
when you started the stopwatch. This value is given in Kcal. This figure takes into account all body<br />
energy expended, particularly your basal metabolic rate.<br />
5.2.4/ Heart rate target zone (Beats per minute or percentage of maximum<br />
rate)<br />
A target zone is a heart rate zone in which you wish to exercise. The watch will sound an alarm if<br />
your heart beats faster than the upper limit or slower than the lower limit. On the second line you will<br />
be able to read the minimum and maximum value, as well as ON/OFF, showing if it is activated or<br />
not. This target zone is set in SETTINGS mode. See the relevant section for more information.<br />
The target zone is displayed in beats per minute but you can change it to the percentage of<br />
maximum heart rate. To do this, see Chapter 8 Settings: Setting heart rate display.<br />
NB: 1. The target zone is active when it is set to ON (change in SETTINGS) and that the exercise<br />
stopwatch is started.<br />
2. If you go over the Upper limit 2 beeps every 10 seconds will sound and the symbol (▲) will<br />
be displayed on the watch screen.<br />
If you go over the Lower limit 1 beeps every 10 seconds will sound and the symbol (▼) will be<br />
displayed on the watch screen.<br />
3. You can use the upper or lower limit only by entering unattainable limits (ex 30 bpm<br />
for lower limit).<br />
6/ Calories mode (CALORIES)<br />
6.1/ Using calories mode<br />
This mode is a real innovation in workout management. You can measure your instant energy<br />
expenditure and use the figure to control your pace. This value has the advantage of being much<br />
easier to compare with the energy provided by food. Little by little you will learn how fast you need<br />
to run to work off the muffin you ate for breakfast, or how long it will be before you need to eat a<br />
cereal bar if you continue at this pace.<br />
10
Instant<br />
heart rate<br />
EN<br />
Target zone in<br />
kilocalories per<br />
hour (kcal/h)<br />
Grams<br />
of fat<br />
consumed<br />
Instant<br />
calorie<br />
expenditure<br />
6.2/ Main information display:<br />
In this mode the main data item is instant energy expenditure, given in kilocalories per hour.<br />
Instant energy expenditure values are calculated using heart rate and other settings according to<br />
certain rules. Both modes – CALORIES and CARDIO – therefore function in very similar ways.<br />
IMPORTANT:<br />
• For instant energy expenditure information, you must wear your strap (do not forget to moisten it).<br />
If it is correctly fitted it will automatically emit a heart rate signal. For more information on fitting<br />
the strap, see diagram 1 and chapter 5.1 relating to the detection of the signal.<br />
• It is particularly important, for the information displayed to be reliable, to check before using the<br />
CALORIES mode, that you have entered the correct information (your weight, target zones) in the<br />
SETTINGS mode (see chapter). If not, the values given by the watch may be incorrect.<br />
The wider public confuses “calories” and “kilocalories” despite there being a<br />
factor of 1000 between them. For example: it is commonly thought that “100g<br />
of chocolate equals 550 calories” whereas in fact 100g of chocolate equals<br />
550 kilocalories. We therefore give energy values in kilocalories, so that they can<br />
be understood easily and above all so that they can be directly compared with<br />
the units used by the food industry.<br />
6.3/ Secondary information display<br />
You can change secondary information in the second line by pressing VIEW. Press START/STOP<br />
to start the stopwatch. Then press START/STOP again to stop it. Hold down VIEW for 3 seconds to<br />
reset it.<br />
11
EN<br />
NB: 1. The stopwatch can only be started or stopped when it is displayed on the screen.<br />
2. When the user changes mode while the stopwatch is running, a symbol is displayed in all<br />
other modes.<br />
3. The stopwatch can measure a duration from 0 to 23h 59min 59s.<br />
4. When the user starts the stopwatch for his or her new workout, the data stored in DATA mode<br />
from the last workout is deleted (see DATA mode).<br />
6.3.1/ Instant heart rate<br />
The following display concerns current heart rate. Heart rate is displayed in beats per minute<br />
(bpm).<br />
6.3.2/ Total calories burned<br />
The following display relates to energy that you have expended since beginning exercising, from<br />
when you started the stopwatch. This value is given in Kcal. This figure takes into account all body<br />
energy expended, particularly your basal metabolic rate<br />
6.3.3/ Grams of fat consumed<br />
The following display concerns the fat which you have actually lost during your workout in grams<br />
(g). During long periods of exercise, the body mainly provides energy to the muscles from two<br />
sources:<br />
- Sugars (rapidly usable energy for relatively short, intense workouts; stores amount to a few dozen<br />
minutes at most).<br />
- Fats (more difficult to use but stored in generally almost unlimited quantities). The body will use fats<br />
for basic tasks (temperature regulation or very long low-level workouts).<br />
The watch knows these physiological rules and, depending on the intensity and duration of your<br />
workout, will tell you the number of grams of fat that providing this type of energy has consumed.<br />
If you aim to lose weight, we advise you to maximise fat-based energy consumption by<br />
performing long-lasting low-level workouts.<br />
6.3.4/ Target zone in kilocalories per hour (kcal/h)<br />
This function is also new. It means you can manage your training better, using energy expenditure<br />
as the main parameter. A target zone is an energy expenditure zone in which you want to perform<br />
your workout. The watch will alert you if your workout is too intense, and you are tiring yourself out<br />
by drawing too heavily on your sugar reserves, or, conversely, your workout is too light (to consume<br />
fats effectively, for example). On the second line of the display you can read off the desired instant<br />
minimum and maximum energy expenditure values, and an ON/OFF indicator which shows<br />
whether or not it is activated. This target zone is set in SETTINGS mode. See the corresponding<br />
section for more information.<br />
12
NB:<br />
1. If the Target zone is activated, if you go over the upper limit an alarm will sound, 2 beeps every<br />
10 seconds. If you go over the lower limit the alarm will beep once every second.<br />
2. You can use the upper or lower limit only by entering an unattainable value for either.<br />
3. The target zone is activated when it is ON and the exercise stopwatch is started.<br />
EN<br />
7 / Exercise report mode (DATA)<br />
Data storage rules:<br />
The report is reset when the training stopwatch is started for the first time: if a user goes in to DATA<br />
mode at that time, he or she will see NO DATA. The data is stored in the memory when the user<br />
stops the stopwatch: if the user goes into DATA mode he or she will then see the training report for<br />
the workout just ended.<br />
You can view the training report “during” the training session. To do this, press the<br />
START/STOP quickly twice to stop the stopwatch for a fraction of a second. The interim<br />
report will then be stored until the user presses START/STOP again. The interim report<br />
cannot be saved and will be replaced by the final report at the end of exercise 1.<br />
13
EN<br />
Exercise report<br />
In DATA mode, go from one information screen to the next by pressing VIEW. Data<br />
mode enables you to view a full report at the end of the sports session.<br />
The first screen displays the date of the session recorded.<br />
then the duration of the session (hours, minutes, seconds),<br />
then the average heart rate (AVG HR) and the maximum heart rate<br />
(MAX HR) during exercise. By default the data is displayed in beats<br />
per minute, the acronym bpm appears on the screen, but you can<br />
also display them in percentage of maximum heart rate (bpm no<br />
longer appears), see chapter 8: Setting heart rate display.<br />
then the average and maximum rate of energy expenditure<br />
(AVG CAL) and (MAX CAL) in kilocalories per hour during exercise.<br />
The time spent in the target zone in hours, minutes, seconds<br />
The value is 0 if the target zone has been deactivated.<br />
The total number of kilocalories burned over the course of the workout.<br />
The number of grams of fat burned during the workout.<br />
Return to first screen.<br />
14
8/ Settings mode (SETTINGS)<br />
EN<br />
The general principal for adjusting settings is to select the one you wish to change by pressing VIEW<br />
several times, then enter adjustment mode by pressing START/STOP, then increase or decrease the<br />
figure by pressing MODE or VIEW and then validate by pressing START/STOP.<br />
Practical information:<br />
- When setting, the VIEW button increases values, while the MODE button decreases them.<br />
- For faster setting, you can press down on VIEW or MODE, the values will be scrolled<br />
through faster.<br />
- If no button is pressed for several seconds during settings, the watch automatically exits<br />
settings mode.<br />
The different adjustable settings:<br />
Setting the system of units<br />
VIEW<br />
You can use the watch with Anglo-Saxon<br />
units (weight in pounds, height in inches,<br />
time display in 12 hour mode with AM and<br />
PM, and date in YY-MM-DD order) or with<br />
European units (weight in kg, height in cm,<br />
time in 24 hour display, and date in DD-MM-<br />
YY order.<br />
Setting the time<br />
Setting the date<br />
15
EN<br />
You can’t set the seconds to a precise value, only reset them to 0 when you confirm by pressing<br />
STR/STP.<br />
Setting the alarm<br />
VIEW<br />
You can switch the button tone (ON) or<br />
(OFF).<br />
VIEW<br />
ON/OFF<br />
ON/OFF<br />
Setting your personal information<br />
Setting your age (in years).<br />
-<br />
+<br />
-<br />
+<br />
Setting your height (the unit is displayed<br />
according to the system used: cm (centimetres)<br />
or inches.<br />
-<br />
+<br />
Setting your weight (the unit is displayed<br />
according to the system used: kg (kilograms)<br />
or lb (pounds).<br />
Your gender (male (M) or female (F)).<br />
VIEW<br />
-<br />
Men/<br />
Women<br />
+<br />
Men/<br />
Women<br />
Setting the target zone<br />
When you enter target zone settings mode, the type of target zone is displayed:<br />
16
Either the target zone is deactivated (ZONE: OFF), or it is activated and is displayed in beats per<br />
minute (BPM) or maximum heart rate (%) or calorie expenditure (CAL).<br />
Modifying the lower and upper values in one of the three display modes will automatically convert<br />
the values in the other two modes.<br />
If you wish to change the target zone mode used, select it with STR/STP, then change it by pressing<br />
VIEW.<br />
The watch will show the selected mode and the zone values alternatively.<br />
The heart rate target zone is used in cardio mode only. To enter the values in the target zone in<br />
percentages of maximum heart rate, select %, to enter the values in the target zone in beats per<br />
minute, select BPM.<br />
Select the unit (Bpm or % max HR) that you are most familiar with to enter your values.<br />
The calories per hour target zone is used in the Calories mode only.<br />
To enter the Calories per hour target zone values, select CAL. Then confirm with STR/STP. The target<br />
zone will then be (ON).<br />
You can then select the (LOW ZONE) (scroll through the values using VIEW (+) and MODE (-) then<br />
validate with START/STOP) and then the (HI ZONE).<br />
EN<br />
VIEW<br />
17
Ma<br />
22<br />
EN<br />
Setting your resting heart rate<br />
Your resting heart rate is used to calculate the grams of fat burned during the workout. To determine<br />
it, after waking up, stay lying down. Measure your heart rate after a few minutes; try to remain as<br />
calm as possible. Repeat the procedure on several consecutive days and take the average of<br />
these values.<br />
3 SE<br />
It is entered in the same way as the<br />
other settings (STR/STP)to select it, VIEW<br />
and MODE to adjust value, STR/STP to<br />
validate).<br />
3 SE<br />
Entering maximum heart rate<br />
The maximum heart rate is the highest heart rate that you can reach when exercising. By default<br />
it is 220-AGE<br />
Enter it in the same way as for other<br />
settings (STR/STP to select it, VIEW and<br />
MODE to adjust its value, STR/STP to confirm<br />
its value).<br />
Setting heart rate display<br />
This setting enables you to display your hear rate and target zone figures, either in beats<br />
per minute, or percentages of maximum heart rate. You can use the unit that is most convenient<br />
to you.<br />
When entering cardio mode, the display of heart rate as a percentage of maximum rate is shown<br />
by the following temporary screen:<br />
18
9/ Resetting the watch<br />
EN<br />
3 SEC<br />
3 SEC<br />
All segments are displayed for a short time and the watch will be<br />
restarted.<br />
3 SEC<br />
3 SEC<br />
10/ Training principles<br />
For reasons of effectiveness and safety, it is essential that you are aware of some training-specific<br />
physiological guidelines. The advice we give below is an indication for healthy, sporty people with<br />
no medical disorders. We strongly recommend that you seek advice from your doctor for more<br />
precise information on training zones. Know your limits and do not exceed them!<br />
Heart<br />
rate<br />
200<br />
Max HR =<br />
220 - age<br />
Resistance<br />
Endurance<br />
Values to be aware of<br />
To optimise the benefits of your physical<br />
training, you must first know your maximum<br />
heart rate (max HR) in beats per minute<br />
(bpm). Your max HR can be estimated using<br />
the following formula: Max HR = 220 - your age<br />
A test should enable you to get a correct<br />
figure.<br />
After warming up correctly, run up a hill, accelerating progressively until you reach your maximum<br />
speed. You can finish your warm-up with a 400m lap, then do another one at a moderate pace and<br />
a third one faster, accelerating as much as possible in the last 100m. The heart rate retained is that<br />
displayed when you pass the finish line.<br />
Do not begin this type of exercise without previously seeing your doctor and speaking with them<br />
about the type of exercise you wish to start. It represents your capacity for effort. This figure is then<br />
used to work out a training plan with target zones.<br />
Training zones<br />
During a fitness programme, several training zones will give specific results which correspond to<br />
different objectives. Depending on the intensity of the exercise, the percentage energy produced<br />
by burning sugar and burning fat will change.<br />
- In the endurance zone (70 to 80%max HR) the sports person works on long distances and general<br />
endurance. It’s the pace at which you can run for more than an hour. Burning energy using a<br />
proportion of fat which increases according to the length of your workout.<br />
19
EN<br />
- In the resistance zone (80 to 90%max HR) the sports person strengthens their heart and muscles,<br />
their speed over medium distance and endurance in full effort. It’s the pace at which you run<br />
5 to 10km in competition. This pace is no longer comfortable and you get tired. Energy combustion<br />
uses sugars almost exclusively, especially if you can’t keep up this pace for more than half an hour.<br />
E.g.: A 30-year-old athlete training using aerobic endurance to increase their resistance to effort<br />
and improve their half marathon time. The most effective training area for her objective will be the<br />
resistance zone.<br />
11/ Troubleshooting<br />
11.1/ Abnormal heart rate<br />
You have noticed large fluctuations in your heart rate.<br />
Check that the strap is in place and the sensors have been moistened (diagram 1, page 1)<br />
Interferences in the environment due to electromag<strong>net</strong>ic disturbance can make heartbeat<br />
readings temporarily unstable or inaccurate. This often occurs close to high voltage lines, railway<br />
power lines, traffic lights, televisions, car engines, some motorised sports equipment, cell phones,<br />
computer screens, microwave ovens and when you pass through electric safety gates.<br />
There are other causes for altered heartbeat readings:<br />
- Clothes that chafe on the strap or are full of static electricity.<br />
- Very hairy chests.<br />
- Dirt on the strap.<br />
If heartbeat readings are unstable, first check that none of the causes above are responsible for<br />
the problem.<br />
11.2/ Detecting the strap<br />
If the does not flash:<br />
- Move the strap closer to the watch.<br />
- Adjust the position of the strap and moistening the sensors further.<br />
- Check that the batteries are working, especially in the strap.<br />
- In CARDIO or CALORY mode Synchronise the watch by holding down the MODE button.<br />
( see Chapter 5.1)<br />
If the link with the strap is broken temporarily, a heart rate of 0 is displayed on the<br />
main line.<br />
If the link is broken for more than five minutes, the display changes to ---.<br />
To reactivate the signal search, hold down MODE for 3 sec or exit CARDIO mode<br />
by pressing MODE then return to CARDIO mode. The search will begin again.<br />
( see Chapter 5.1).<br />
20
11.3/ Advice on use for people fitted with a coronary stent<br />
A coronary stent can affect the transmission of the heartbeat from the strap to the watch, we<br />
advise you wear the strap above pectoral muscles.<br />
EN<br />
11.4/ Abnormal flashing of the display or malfunctions<br />
The battery is probably flat, it must be changed.<br />
12/ Technical characteristics<br />
Watches<br />
Heart rate<br />
monitor strap<br />
Waterproofing 5 ATM 1 ATM<br />
Autonomy depends on the<br />
use of the product during<br />
sport (with strap)<br />
1 hour / week 20 months 32 months<br />
4 hours / week 15 months 10 months<br />
Authorised rate bracket<br />
Heart rate target zone<br />
Heart rate<br />
Communications protocol<br />
30 - 230 beats per minute<br />
30 - 230 beats per minute<br />
5.3 Khz coded 5.3 Khz coded<br />
Transmission range<br />
1 m in use 0.5 m in<br />
detection mode<br />
1 m in use 0.5 m<br />
in detection mode<br />
Temperature range -10°C to 50°C -10°C to 50°C<br />
Batteries report 2032 report 2032<br />
Weight 48 g 64 g<br />
13/ Limited warranty<br />
OXYLANE guarantees to the initial purchaser of this item that it is exempt from all faults linked<br />
to materials and manufacture. This product is guaranteed for two years from the purchase date.<br />
Please keep your receipt as proof of purchase.<br />
The warranty does not cover:<br />
• damage resulting from misuse, from a failure to respect the precautions for use, from accidents,<br />
from improper maintenance or from commercial use of the product.<br />
• damage resulting from repairs carried out by persons not authorised by OXYLANE.<br />
• batteries or casings which are cracked or broken or which show signs of impacts.<br />
• During the warranty period, the item will either be repaired free of charge by an authorised repair<br />
service or replaced free of charge (depending on the distributor) .<br />
• The warranty does not cover the elastic strap, which is subject to wear and tear.<br />
21
EN<br />
14/ Batteries<br />
Watch<br />
Please note: if you note that the display is flashing unusually or doesn’t<br />
appear to be working correctly, this usually means that the battery<br />
is low and needs to be replaced. To change the battery: contact the<br />
retail outlet where you bought your product. If you change it yourself,<br />
you risk damaging the seal and impairing the waterproof design as<br />
well as voiding your warranty. Battery life is influenced by the length of<br />
time it is stored in the shop and the way in which you use the product.<br />
Chest strap<br />
If the heart rate values become incoherent or the heart signal reception does not respond<br />
normally when the watch is inside the reception area, you may need to change the battery in<br />
the chest strap. You can change the strap battery yourself without the need for specialist tools<br />
(diagram 4). If you have any problems, contact your retailer.<br />
Take batteries and broken electronic products to an authorised<br />
collection area for recycling.<br />
15/ Contact us<br />
We are here to listen to any feedback or information you may have concerning the quality,<br />
functioning or use of our products: www.kalenji.com<br />
We will reply as soon as possible.<br />
22