other snow safety essentials from backcountry access
other snow safety essentials from backcountry access other snow safety essentials from backcountry access
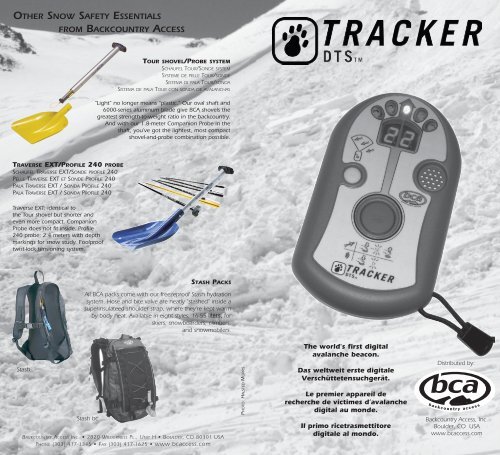
OTHER SNOW SAFETY ESSENTIALS FROM BACKCOUNTRY ACCESS TOUR SHOVEL/PROBE SYSTEM SCHAUFEL TOUR/SONDE SYSTEM SYSTEME DE PELLE TOUR/SONDE SISTEMA DI PALA TOUR/SONDA SISTEMA DE PALA TOUR CON SONDA DE AVALANCHAS "Light" no longer means "plastic." Our oval shaft and 6000-series aluminum blade give BCA shovels the greatest strength-to-weight ratio in the backcountry. And with our 1.8-meter Companion Probe in the shaft, you've got the lightest, most compact shovel-and-probe combination possible. TRAVERSE EXT/PROFILE 240 PROBE SCHAUFEL TRAVERSE EXT/SONDE PROFILE 240 PELLE TRAVERSE EXT ET SONDE PROFILE 240 PALA TRAVERSE EXT / SONDA PROFILE 240 PALA TRAVERSE EXT / SONDA PROFILE 240 Traverse EXT: identical to the Tour shovel but shorter and even more compact. Companion Probe does not fit inside. Profile 240 probe: 2.4 meters with depth markings for snow study. Foolproof twist-lock tensioning system. STASH PACKS All BCA packs come with our freezeproof Stash hydration system. Hose and bite valve are neatly "stashed" inside a superinsulateed shoulder strap, where they're kept warm by body heat. Available in eight styles, 16-55 liters, for skiers, snowboarders, climbers, and snowmobilers. The world's first digital avalanche beacon. Stash Stash bc BACKCOUNTRY ACCESS INC. • 2820 WILDERNESS PL., UNIT H • BOULDER, CO 80301 USA PHONE (303) 417-1345 • FAX (303) 417-1625 • www.bcaccess.com PHOTO: HALSTED MORRIS Das weltweit erste digitale Verschüttetensuchgerät. Le premier appareil de recherche de victimes d’avalanche digital au monde. Il primo ricetrasmettitore digitale al mondo. Distributed by: Backcountry Access, Inc. Boulder, CO USA www.bcaccess.com
- Page 2 and 3: OPERATING ELEMENTS BEDIENUNGSELEMEN
- Page 4 and 5: Quick Reference Familiarization PRI
- Page 6 and 7: OPTIONS D % a t S E A R C H st a rt
- Page 8 and 9: Operating Instructions Operating In
- Page 10: Technical Information Kurzreferenz
OTHER SNOW SAFETY ESSENTIALS<br />
FROM BACKCOUNTRY ACCESS<br />
TOUR SHOVEL/PROBE SYSTEM<br />
SCHAUFEL TOUR/SONDE SYSTEM<br />
SYSTEME DE PELLE TOUR/SONDE<br />
SISTEMA DI PALA TOUR/SONDA<br />
SISTEMA DE PALA TOUR CON SONDA DE AVALANCHAS<br />
"Light" no longer means "plastic." Our oval shaft and<br />
6000-series aluminum blade give BCA shovels the<br />
greatest strength-to-weight ratio in the <strong>backcountry</strong>.<br />
And with our 1.8-meter Companion Probe in the<br />
shaft, you've got the lightest, most compact<br />
shovel-and-probe combination possible.<br />
TRAVERSE EXT/PROFILE 240 PROBE<br />
SCHAUFEL TRAVERSE EXT/SONDE PROFILE 240<br />
PELLE TRAVERSE EXT ET SONDE PROFILE 240<br />
PALA TRAVERSE EXT / SONDA PROFILE 240<br />
PALA TRAVERSE EXT / SONDA PROFILE 240<br />
Traverse EXT: identical to<br />
the Tour shovel but shorter and<br />
even more compact. Companion<br />
Probe does not fit inside. Profile<br />
240 probe: 2.4 meters with depth<br />
markings for <strong>snow</strong> study. Foolproof<br />
twist-lock tensioning system.<br />
STASH PACKS<br />
All BCA packs come with our freezeproof Stash hydration<br />
system. Hose and bite valve are neatly "stashed" inside a<br />
superinsulateed shoulder strap, where they're kept warm<br />
by body heat. Available in eight styles, 16-55 liters, for<br />
skiers, <strong>snow</strong>boarders, climbers,<br />
and <strong>snow</strong>mobilers.<br />
The world's first digital<br />
avalanche beacon.<br />
Stash<br />
Stash bc<br />
BACKCOUNTRY ACCESS INC. • 2820 WILDERNESS PL., UNIT H • BOULDER, CO 80301 USA<br />
PHONE (303) 417-1345 • FAX (303) 417-1625 • www.bc<strong>access</strong>.com<br />
PHOTO: HALSTED MORRIS<br />
Das weltweit erste digitale<br />
Verschüttetensuchgerät.<br />
Le premier appareil de<br />
recherche de victimes d’avalanche<br />
digital au monde.<br />
Il primo ricetrasmettitore<br />
digitale al mondo.<br />
Distributed by:<br />
Backcountry Access, Inc.<br />
Boulder, CO USA<br />
www.bc<strong>access</strong>.com
OPERATING ELEMENTS<br />
BEDIENUNGSELEMENTE<br />
FONCTIONNEMENT ET AFFICHAGE<br />
COMPONENTI<br />
ELEMENTOS DE USO<br />
Warranty Information<br />
Limited Warranty<br />
Rescue Technology, the manufacturer, expressly warrants the workmanship<br />
and components of the Tracker DTS for five years after the<br />
date of retail purchase. All parts will be either repaired or replaced free<br />
of charge, including labor, by the manufacturer. This warranty does not<br />
cover damage to the product caused by improper use or excessive wear<br />
and tear. Direct all warranty claims to your retailer or distributor. Direction All claims Lights<br />
must include proof of purchase and a return authorization Richtungsanzeige<br />
number. To<br />
Affichage de la direction<br />
ensure warranty protection, please return the enclosed warranty registration<br />
card.<br />
Spie luminose di direzione<br />
Luces direccionales<br />
Options Button<br />
Optionenschalter<br />
Bouton options<br />
Pulsante opzioni<br />
Boton de opciones<br />
6<br />
Garantiebeschränkung<br />
Distance Indicator/Battery Power Display<br />
Der Distanzanzeige/Batterieladungsanzeig<br />
Hersteller Rescue Technology, garantiert während fünf Jahren<br />
Indicateur ab Kaufdatum de distance/Témoin für Verarbeitungs de und batterie Materialfehler. Alle Teile werden<br />
Indicatore repariert di distanza/Display oder durch den del Hersteller livello batteria gratis ersetzt. Die Garantie erstreckt<br />
sich Indicator nicht auf de distancia/Estado Schäden durch Abnützung de bateriaoder fehlerhafte Bedienung. Alle<br />
Garantieansprüche sind zu richten an die Verkaufstelle oder an die jeweilige<br />
Landesvertretung.<br />
Loudspeaker<br />
Lautsprecher<br />
Haut-parleur<br />
Altoparlante<br />
Garantie<br />
Le fabricant, Rescue Technology, garantit le Tracker DTS trois ans<br />
Altavoz<br />
pièces et main d'oeuvre à partir de la date d'achat. Toute pièce sera<br />
réparée ou remplacée gratuitement, main d'oeuvre comprise, par le fabricant.<br />
Cette garantie ne couvre pas les dégâts résultants d'une mauvaise<br />
utilisation. Toute réclamation devra être adressée à votre détaillant ou<br />
distributeur. Toute réclamation devra Search/Transmit être accompagnée Button de la preuve<br />
Sende-/Empfangsschalter<br />
d'achat et d'un numéro de SAV.<br />
Sélecteur mode recherche/émission<br />
Pulsante ricerca/trasmissione<br />
Limitazioni della Garanzia Boton de busqueda/transmisión<br />
Il costruttore, Rescue Technology, garantisce espressamente la corretta<br />
costruzione ed i componenti del Tracker DTS per tre anni dalla data<br />
di acquisto presso il dettagliante. Le parti saranno riparate o sostituite<br />
gratuitamente - ore di manodopera incluse - presso il costruttore. La presente<br />
garanzia non copre Transmit i danni Light al prodotto derivanti da uso improprio,<br />
usura eccessiva o Sendekontrolllampe<br />
squarcio. Inviate qualsiasi richiesta di intervento in<br />
garanzia al vostro dettagliante Témoin d’émission o distributore. Tutte le richieste devono<br />
comprendere Spia luminosa una prova di di trasmissione acquisto e lo specifico numero di autorizzazione.<br />
Indicador de transmisión<br />
Lanyard<br />
Fangschnur<br />
Lanière<br />
Lacciolo<br />
Acollador<br />
8<br />
Garantía Limitada<br />
El fabricante, Rescue Technology, garantia la fabricanción y los<br />
componentes del Tracker DTS por un período de tres años a partir de<br />
la fecha de compra. El fabricante se compromete a reparar o cambiar<br />
todas las piezas sin costo, incluyendo la mano de obra. Esta garantia<br />
no cubre los daños causados por el uso inadecusdo o desgaste excesivo.<br />
Todas las reclamaciones deberán incluir la prueba de compra así<br />
como el número de autorización de devolución.
Quick Reference<br />
Rescue Technology, Inc.<br />
Model No.: Tracker DTS<br />
FCC ID:<br />
OUNDTS1<br />
This device complies with part 15 of the FCC Rules.<br />
Operation is subject to the following two conditions:<br />
(1) This device may not cause harmful interference, and<br />
(2) this device must accept any interference received, including<br />
interference that may cause undesired operation.<br />
This quick reference page is an introduction to proper use of the Tracker<br />
DTS. For more detailed information, read the entire manual and consult<br />
our website: www.bc<strong>access</strong>.com.<br />
Basic functions<br />
On/off -- Push and turn the on/off switch on the back of the<br />
Tracker to the "on" position. It performs a self-diagnostic check,<br />
displays battery power in percent, and enters transmit mode.<br />
Change batteries before they reach zero percent.<br />
Search mode -- Push the red search/transmit button, hold until<br />
"SE" is displayed, then quickly release.<br />
ENGLISH<br />
Note:<br />
This equipment has been tested and found to comply with the limits for a<br />
Class B digital device, pursuant to part 15 of the FCC Rules. These<br />
limits are designed to provide reasonable protection against harmful<br />
interference in a residential installation. This equipment generates,<br />
uses and can radiate radio frequency energy and, if not installed and<br />
used in accordance with the instructions, may cause harmful interference<br />
to radio communications. However, there is no guarantee that<br />
interference will not occur in a particular installation. If this<br />
equipment does cause harmful interference to radio or television<br />
reception, which can be determined by turning the equipment off and on,<br />
the user is encouraged to try to correct the interference by one or more<br />
of the following measures:<br />
• Reorient or relocate the receiving antenna.<br />
• Increase the separation between the equipment and receiver.<br />
• Connect the equipment into an outlet on a circuit different <strong>from</strong> that<br />
to which the receiver is connected.<br />
• Consult the dealer or an experienced radio/TV technician for help.<br />
Caution:<br />
Any changes or modifications not expressly approved by the party<br />
responsible for compliance could void the user’s authority to operate<br />
this device.<br />
Designed, assembled and tested in the USA.<br />
Return to transmit -- Press the search/transmit button until "tr"<br />
is displayed.<br />
Searching with the Tracker DTS<br />
The objective for beginners is to find the strongest signal (lowest<br />
distance reading) and immediately begin probing the area.<br />
In the event of a burial, switch your Tracker (and all <strong>other</strong> beacons)<br />
to search mode. "SE" will flash in the distance window<br />
until a signal is captured.<br />
Primary/signal search: If there is a "last seen point," start your<br />
signal search there, and search downhill. Otherwise, start your<br />
signal search at the top of the slide path. Allow a maximum of 20<br />
meters between searchers or between switchbacks if only one<br />
searcher. Slowly rotate your Tracker back and forth and vertically<br />
until you engage the signal.<br />
Secondary search: Once a signal is engaged, align the Tracker<br />
so that any of the center three lights are flashing and move<br />
quickly in the direction the Tracker is pointing. Your direction of<br />
travel might be straight or slightly curved. Make sure the number<br />
in the distance display is decreasing. If it is increasing, turn 180<br />
degrees. Inside ten meters, move slowly and try to keep the center<br />
search light engaged.<br />
Pinpoint search: Within three meters, use your beacon close<br />
to the <strong>snow</strong> surface and look for the smallest distance reading.<br />
Ignore sudden fluctuations in distance and direction; the<br />
strongest signal is often just past these fluctuation points. Begin<br />
probing at the smallest reading (strongest signal).<br />
4<br />
5
Quick Reference<br />
Familiarization<br />
PRIMARY<br />
SEARCH<br />
>40m<br />
SECONDARY<br />
SEARCH<br />
3–40m<br />
PINPOINT<br />
SEARCH<br />
< 3m<br />
Single Burial Search<br />
Objective: Locate signal<br />
•If no "last seen point," search entire debris pile<br />
•Rotate Tracker horizontally/vertically<br />
•Max 20m between searchers or switchbacks<br />
Objective: Move quickly to 10m,<br />
slowly to 3m<br />
•Keep flashing light within center 3 windows<br />
•Move quickly in direction Tracker is pointing<br />
•Make sure distance is decreasing<br />
•Slow down at 10m<br />
Objective: Locate smallest distance reading<br />
(strongest signal)<br />
•Use Tracker close to <strong>snow</strong> surface<br />
•Ignore fluctuations in distance and direction<br />
•Begin probing at lowest distance<br />
•Use Tracker in hole during deep excavations<br />
Multiple Burial Search<br />
If the Tracker displays more than one signal, follow the one<br />
with the lowest distance reading. Once you are within about ten<br />
meters, the Tracker will isolate that signal. Turn off the first beacon<br />
once it is found. If you can’t turn it off, and don’t see a second<br />
signal, stay in SE mode. Take three steps back and circle the first<br />
victim. Repeat up to three times (nine steps). If no signal is found,<br />
return to the point at which you abandoned the primary search<br />
and continue the search <strong>from</strong> there. For advanced multiple burial<br />
searching, read the entire manual or see our website.<br />
Thank you for choosing the Tracker DTS, the world's first<br />
digital avalanche beacon, and the first beacon with a highprecision<br />
dual antenna system. Regardless of the transceiver,<br />
no avalanche beacon can save lives without a fully trained<br />
user. Practice frequently with your Tracker before going into<br />
the <strong>backcountry</strong>. Learn and understand the inherent dangers<br />
of <strong>backcountry</strong> travel. Become educated in avalanche hazard<br />
evaluation, route selection, and self-rescue. Always carry an<br />
avalanche beacon, probe, and shovel—and always travel with<br />
a partner.<br />
Make sure all rescue equipment is functioning properly before<br />
venturing into the <strong>backcountry</strong>. Perform a beacon trailhead test<br />
every time you use your Tracker. Check that all transceivers<br />
transmit and receive properly—and that all receive a signal at<br />
minimum distance of ten meters.<br />
This owner’s manual covers the basic techniques required to<br />
use the Tracker DTS effectively. To increase your efficiency,<br />
please refer to the advanced techniques described on our<br />
website: www.bc<strong>access</strong>.com. Here you will also find important<br />
resources for obtaining avalanche education and updates on<br />
regional avalanche conditions.<br />
To ensure warranty protection and periodic technical updates,<br />
please return the enclosed warranty registration card.<br />
FAMILIARIZATION<br />
Adjustment/Fitting<br />
Figure A Harness<br />
ENGLISH<br />
<br />
<br />
Shoulder<br />
Strap<br />
<br />
(grey)<br />
<br />
<br />
<br />
6<br />
DAV Safety Research<br />
<br />
<br />
<br />
Waist Strap<br />
<br />
(black)<br />
Lanyard<br />
Waist Attachment<br />
Buckle <br />
7
Familiarization<br />
Familiarization<br />
The Tracker DTS can be worn with or without its harness. The<br />
manufacturer recommends securing it with the harness.<br />
When worn with a harness, the Tracker DTS should be worn<br />
underneath your outer garments, as shown in Figure A. The<br />
concave side should be snug against your lower left rib cage.<br />
To search, remove Tracker <strong>from</strong> pouch, but keep lanyard<br />
attached to your body. If using without harness, keep Tracker in<br />
a secure pocket, preferably in your pants or <strong>other</strong> garment that<br />
won't be removed. When searching, secure Tracker to your wrist<br />
with the lanyard.<br />
Startup/Testing<br />
Turn on the Tracker DTS by depressing and then turning the on/<br />
off switch (1) clockwise (see inside front cover). When turned on,<br />
the Tracker runs through a brief diagnostic test of all LED's, then<br />
indicates the remaining battery life in the battery power display/<br />
distance indicator (2). A reading of 95 to 99 percent indicates<br />
fully charged batteries. After the diagnostics, the Tracker will<br />
enter transmit mode (tr). The flashing transmit light (3) confirms<br />
the unit is in transmit mode.<br />
Power Supply<br />
The Tracker DTS operates with three AAA alkaline batteries. Use<br />
only high-quality alkaline batteries of identical age and brand. Do<br />
not use rechargeables.<br />
Note that the battery level percentage is approximate, depending<br />
on battery manufacturer and operating temperature. The Tracker<br />
will operate safely down to and below a zero battery power display.<br />
The manufacturer suggests, however, that you replace your<br />
batteries frequently, well before this occurs.<br />
If the Tracker is subjected to excessive moisture, open the battery<br />
door (4) to help allow the unit to dry. To prevent corrosion of<br />
contacts, remove batteries during extended periods of inactivity.<br />
Search/Transmit<br />
To enter search mode, push the search/transmit button (5) for<br />
at least one second, but for no longer than two seconds. During<br />
this time, the distance indicator (2) will display two dashes<br />
(“– –”). Release your thumb when the display changes <strong>from</strong><br />
“– –” to “SE” and the Tracker sounds a series of three beeps.<br />
If the button is released before or after this time, it will remain in<br />
transmit mode.<br />
8<br />
The Tracker can be switched instantly <strong>from</strong> search (SE) to<br />
transmit (tr) mode at any time by simply pushing the search/<br />
transmit button.<br />
Options<br />
Auto-Revert System<br />
At startup, the user can engage the Tracker’s auto-revert <strong>safety</strong><br />
feature by pressing the options button (6) while pressing and<br />
turning the on/off switch. With auto-revert engaged, the Tracker<br />
will revert to transmit mode after five minutes in search mode.<br />
If auto-revert is engaged, “Ar” will be shown in the power display<br />
after the diagnostic testing. If auto-revert is not engaged, “nr” will<br />
be displayed.<br />
If auto-revert has been engaged, then after five minutes in<br />
search mode, an alarm will sound for ten seconds and "Ar" will<br />
flash repeatedly in the distance indicator. To remain in search<br />
mode, press the search/transmit button or the options button<br />
at any time during the ten-second alarm period. If ten seconds<br />
elapses, “tr” will appear and the Tracker will revert to transmit<br />
mode.<br />
If auto-revert is not engaged, the Tracker will sound a short<br />
alarm every ten minutes to remind the user that he or she is in<br />
search mode.<br />
Special Mode<br />
Special (SP) mode is a feature designed to assist searchers<br />
in the event of a multiple burial. It can help searchers isolate<br />
individual signals when searching for more than one transmitter<br />
at a time. In search (SE) mode, the Tracker only displays<br />
the strongest signal (once the searcher is within about teen<br />
meters). In special (SP) mode, however, it will display all signals,<br />
regardless of their strength—providing they are within special<br />
mode’s reduced search window (Figure E, page 11). In special<br />
mode, the search area is reduced <strong>from</strong> 180 degrees—front and<br />
back—to about 75 degrees: signals will only be displayed if they<br />
are captured within the center three directional lights.<br />
Special mode can only be entered while the user is in search<br />
mode. To enter SP mode, press the options button (6). Release<br />
the button when "SP" appears in the display window. When<br />
signals are detected in this mode, they are displayed for a<br />
shorter time than in SE mode.<br />
9<br />
ENGLISH
OPTIONS<br />
D<br />
%<br />
a t<br />
S<br />
E<br />
A<br />
R<br />
C<br />
H<br />
st a rt<br />
u p<br />
TRANSMIT<br />
Operating Instructions<br />
Operating Instructions<br />
Mute Mode<br />
To mute the sound while in search mode, push the options button<br />
(6) for three seconds until “LO” is displayed, then release. To<br />
turn the speaker back on, perform the same operation. “L1” will<br />
be displayed, indicating the speaker is back on.<br />
OPERATING INSTRUCTIONS<br />
Searching<br />
The Tracker DTS operates using the 457 kHz international<br />
standard frequency. It is fully compatible with all avalanche<br />
transceivers adhering to this standard. Do not use with 457kHz<br />
transceivers designed for firefighter rescue.<br />
The search process includes three phases: the signal (or primary)<br />
search, the fine (or secondary) search, and the pinpoint<br />
search.<br />
Signal/Primary Search<br />
The signal search refers to the process of establishing a search<br />
pattern and looking for a signal. The search pattern will be<br />
defined by the victim’s last seen area, the size of the slide, and<br />
the number of searchers. Refer to Figures B and C, below, to<br />
establish a primary search pattern. If the slide is less than 20<br />
meters wide, the primary search path will be directly down the<br />
center. If the victim’s last seen area is well defined, the primary<br />
search will follow a direct path down the fall line <strong>from</strong> this point.<br />
10<br />
Figure B Primary Search<br />
One searcher/Slide wider than 20 meters<br />
10m<br />
10m<br />
Area last seen<br />
20m<br />
20m<br />
20m<br />
10m<br />
Figure C Primary Search<br />
Multiple searchers/Slide wider than 20 meters<br />
10m<br />
Area last seen<br />
20m<br />
20m<br />
10m<br />
Direction<br />
of search<br />
path<br />
Figure D<br />
Primary/Signal search<br />
Rotate the Tracker slowly<br />
in your hand, but move<br />
rapidly down the search<br />
path. Do not abandon<br />
your search path until you<br />
have captured a strong,<br />
steady signal. Ignore irregular<br />
signals, which can<br />
sometimes be caused by<br />
electrical interference.<br />
Prior to the primary search, be sure that all transceivers are<br />
turned to search mode. Rotate the Tracker slowly back and forth<br />
on a horizontal and vertical plane (Figure D) while moving in<br />
the direction as defined by your primary search pattern. While<br />
searching, be aware of <strong>other</strong> physical clues, such as equipment<br />
or extremities protruding <strong>from</strong> the <strong>snow</strong> surface. When no signal<br />
is detected, “SE” will flash in the distance indicator. Once a<br />
signal is detected consistently, mark this spot and begin the fine<br />
search.<br />
Secondary/Fine Search<br />
The secondary search (also referred to as the fine search) is the<br />
portion of the search <strong>from</strong> where you have detected a steady<br />
signal to where you are close to the victim.<br />
Once the signal is consistently detected, rotate the Tracker<br />
slowly on a horizontal plane until the center direction light (7)<br />
is blinking. The Tracker is now pointed in the direction of the<br />
strongest signal, or your direction of travel (Figure E). The four<br />
lights (7) on either side of center tell you which way to rotate<br />
the Tracker to engage the center light. The distance indicator<br />
Figure E<br />
Windows<br />
The Tracker is very sensitive. Slight<br />
movement in any direction will actuate<br />
a different search light. Rotate it<br />
very slowly so as not to “skip” over<br />
the center search light window.<br />
In special (SP) mode, signals<br />
are only displayed if they fall<br />
within the center three<br />
windows.<br />
Direction of<br />
strongest signal<br />
B a tt e r y<br />
I S T A N C E<br />
11<br />
ENGLISH
Operating Instructions<br />
Operating Instructions<br />
(2) tells you, in approximate meters, how far you must travel<br />
(1 meter = 1.1 yards or 3.3 feet). If the number on the distance<br />
indicator is increasing, you are on the same axis as the victim’s<br />
signal, but moving in the opposite direction. Turn 180 degrees,<br />
engage the center search light again, and continue your search<br />
in the direction the Tracker is pointing. This is preferable to walking<br />
backwards, in which case the Tracker will often flash “SE”<br />
rather than show a direction and distance. If you are stationary,<br />
but the distance is significantly changing, you are probably<br />
detecting the signal of an<strong>other</strong> rescuer. Make sure all rescuers<br />
are in search mode before continuing.<br />
Move your beacon very slowly along the surface of the <strong>snow</strong><br />
during the final three meters of the pinpoint search. It can be<br />
helpful to tilt the front of the Tracker down, although it is not<br />
necessary. Ignore sudden fluctuations in distance and direction,<br />
often followed by no distance reading and/or "SE" in the<br />
distance indicator. This means you are very close. The lowest<br />
reading will be near this point.<br />
Figure G<br />
Pinpoint Search<br />
Bird’s-eye<br />
view<br />
ENGLISH<br />
Figure F<br />
Flux lines<br />
You may find that, while following the directional lights, your<br />
route follows an arc. This is because the Tracker DTS performs<br />
the fine search using the "flux (or induction) line" method (see<br />
Figure F). It follows the shape of the electromagnetic signal, or<br />
flux line pattern, coming <strong>from</strong> the transmitting beacon’s antenna.<br />
The distance displayed is the distance to be traveled along that<br />
flux line, not the straight-line distance <strong>from</strong> you to the victim.<br />
Pinpoint Search<br />
The pinpoint search is the final part of the beacon search, which<br />
is performed on foot with the beacon positioned at or near the<br />
<strong>snow</strong> surface. The objective of the pinpoint search is to locate<br />
where the signal is strongest and to reduce the area to be<br />
probed.<br />
12<br />
The Tracker follows the shape<br />
of the electromagnetic flux<br />
lines coming <strong>from</strong> the transmitting<br />
beacon’s antenna.<br />
Your path during the fine<br />
search will be either<br />
straight (point A)<br />
or curved (point B),<br />
depending on the<br />
orientation of your<br />
beacon when the<br />
signal is first captured.<br />
Note: the Tracker’s transmitting<br />
antenna (10) is oriented<br />
at a 45-degree angle to the<br />
long axis of its case,<br />
as shown.<br />
Cross-section<br />
view<br />
Transmitting Beacon<br />
Bracketing: From the point where you have located the smallest<br />
reading, it can be helpful to "bracket" at 90-degree angles to the left<br />
and then to the right in search of a lower reading (bird’s-eye view).<br />
Pinpointing on a line: You will encounter a “spike” reading where<br />
the vertical aspect of the flux pattern is perpendicular to the searching<br />
beacon (cross-section view). This is indicated by a suddenly<br />
weaker signal (higher distance reading) and fluctuations or loss of<br />
directional lights, and/or “SE” in the display. Search past the spike for<br />
a lower distance reading along the line you’ve been travelling. If you<br />
do not deviate <strong>from</strong> this line, it is not necessary to bracket.<br />
From the point where you have located the smallest reading, it<br />
can be helpful to "bracket" at 90-degree angles to the left and<br />
then to the right in search of a lower reading (Figure G, bird’seye<br />
view). Repeat if necessary along both axes. Begin probing<br />
at the lowest distance reading, in an expanding spiral pattern.<br />
ADVANCED TECHNIQUE: PINPOINTING ON A LINE<br />
Until the Tracker is very close, it will point you in the general<br />
direction of the buried beacon. Once you are within less than<br />
13
Operating Instructions<br />
Operating Instructions<br />
approximately three meters, however, there is a "spike" reading<br />
where the distance and direction lights fluctuate and the distance<br />
display might flash "SE". At this point, the searching Tracker is<br />
temporarily perpendicular to the vertical aspect of the flux pattern<br />
of the buried beacon (Figure G, cross-section view). If you<br />
draw a line in the <strong>snow</strong> or place a long object on the <strong>snow</strong> in<br />
the direction you were pointing just before the spike, you can<br />
limit your pinpoint search to that line. Known as "pinpointing on<br />
a line," this technique performed properly is the most efficient<br />
method for pinpointing with the Tracker.<br />
In most cases, the buried beacon will be oriented roughly horizontal,<br />
there will be two “spikes,” and the lowest reading will<br />
be between them, as shown in Figure G. If the transmitter is<br />
buried vertically, there will be only one spike and a low reading<br />
on either side. In either case, probe at the lowest reading along<br />
the flux line.<br />
Probing/Digging<br />
At the point where the distance has reached a minimum, probe<br />
the area. Your probe should enter the <strong>snow</strong> perpendicular to the<br />
slope surface. Once you have confirmed the victim’s location,<br />
leave the probe in the <strong>snow</strong> and begin digging. To monitor your<br />
progress during a deeper burial, continue to use the Tracker<br />
inside the hole. Upon reaching the victim, first uncover his or her<br />
face. In the event of multiple burials, turn off the victim's beacon<br />
(if possible) before continuing the search for the next victim.<br />
Multiple Burials<br />
Multiple beacon searches are more difficult and complex than<br />
single searches. They require practice and an understanding of<br />
flux lines. A thorough understanding of the Tracker’s special (SP)<br />
mode can also greatly increase the efficiency of the multiple<br />
search, though it is not necessary.<br />
If you begin to receive more than one set of signal data, you<br />
probably have a multiple burial. Stay in search (SE) mode, and<br />
focus on the closest distance reading, attempting to engage that<br />
signal in the center search light. If you are roughly the same distance<br />
<strong>from</strong> both transmitters, the Tracker will often flash “SE”.<br />
14<br />
Once you are significantly closer to one signal—and within about<br />
ten meters of it—the Tracker DTS (in SE mode) will “lock” onto<br />
that signal and mask out the <strong>other</strong>s. Once you are locked in, the<br />
Tracker will behave very similar to how it does in a single beacon<br />
search. Pay attention to the readings you last received <strong>from</strong><br />
the <strong>other</strong> beacon; they will give you an indication of where to go<br />
after finding the closest one.<br />
Once you have located the first beacon (beacon 1), turn it off.<br />
If this is not possible, you might already have a good idea of<br />
where beacon 2 is located. In that case, move in that direction<br />
until the Tracker isolates that signal. If you do not have an idea<br />
of where to look next, then remain in SE mode and take three<br />
steps away <strong>from</strong> the found victim. Walk in a circle of this radius<br />
around the victim, attempting to acquire an<strong>other</strong> signal in SE<br />
mode. If no signal is acquired, take an<strong>other</strong> three steps back<br />
and repeat up to a maximum of three circles (nine steps). If a<br />
new signal is acquired, pinpoint by bracketing. If no signal is<br />
acquired, return to the point where you abandoned the primary<br />
search and continue the search (in SE mode) <strong>from</strong> there.<br />
ADVANCED TECHNIQUE: SPECIAL MODE<br />
For greater efficiency in multiple burials—especially when victims<br />
are close together—use special (SP) mode. This mode<br />
enables the Tracker to display the distance and direction of signals<br />
<strong>other</strong> than those of the closest beacon. It also reduces the<br />
Tracker’s search “window” to the center three directional lights,<br />
enabling the searcher to mask out beacon 1 and differentiate<br />
<br />
<br />
DAV Safety Research<br />
<br />
<br />
<br />
<br />
<br />
<br />
<br />
<br />
<br />
<br />
<br />
<br />
15<br />
ENGLISH
Operating Instructions<br />
Operating Instructions<br />
it <strong>from</strong> beacon 2. SP mode is used to determine approximately<br />
what direction and distance to go to get closer to beacon 2.<br />
Once you are closer, always switch back to SE mode.<br />
At the lowest possible distance reading, re-engage beacon 1 in<br />
your center search light. With the center search light engaged,<br />
switch the Tracker to SP mode (Figure I). Then rotate—do not<br />
sweep—the Tracker slowly until an<strong>other</strong> signal is detected (beacon<br />
2), most likely with a larger distance reading. If the Tracker<br />
is rotated more than about 40 degrees away <strong>from</strong> the flux line of<br />
beacon 1, that signal will disappear, allowing you to focus on the<br />
signal <strong>from</strong> beacon 2. This “filtering” process can often simplify<br />
multiple searches.<br />
If no <strong>other</strong> signal is captured in SP mode,stand up and try again<br />
at chest height. If still no <strong>other</strong> signal is detected, take three<br />
steps back and repeat.<br />
Figure I<br />
Multiple burials/<br />
Special mode<br />
Only travel far enough in<br />
SP mode to confirm the<br />
distance is decreasing and<br />
which way the flux line is<br />
trending. At this point, a<br />
good rule of thumb is to<br />
ignore further readings and<br />
swiftly travel at least 3/4 of<br />
the distance displayed. Then<br />
lock in beacon 2 by switching<br />
back to search mode.<br />
Once you have located an<strong>other</strong> signal, begin to move in that<br />
direction. If the distance consistently decreases, you are going<br />
in the right direction. Travel far enough in SP mode to confirm<br />
the distance is decreasing and which way the flux line is trending.<br />
If the flux line is curving sharply, continue in SP mode until<br />
it becomes straighter. If more than one signal is being displayed<br />
and it becomes unclear which one to pursue, continue in the<br />
direction you have been searching. Always switch back to SE<br />
mode when you think you are getting closer to beacon 2 than<br />
beacon 1.<br />
<br />
<br />
Revert to search mode and perform a primary search of the<br />
remaining unchecked areas within the debris pile. Resume your<br />
primary search at the point where it was originally abandoned.<br />
Three or more victims<br />
If more than two beacons are buried, multiple burials become<br />
extremely complex with any transceiver, especially if the beacons<br />
are very close together.<br />
Primary search<br />
If the searcher has reason to believe there are several signals in<br />
close proximity to each <strong>other</strong>, it can be very effective to reduce<br />
the search strip width accordingly, <strong>from</strong> 20 meters to less than<br />
5 meters.<br />
Secondary search<br />
In close-proximity situations, it is important to go into SP mode<br />
as close as possible to the found beacon. This will create a<br />
more noticeable difference in the distance readings for each<br />
transmitter. Place the Tracker, as close as possible to the <strong>snow</strong><br />
surface. Avoid entering SP mode at the spike signal.<br />
In situations where many beacons are buried all within a small<br />
area, it can be difficult to "pinpoint on a line." This is because<br />
you will be starting the search for each beacon <strong>from</strong> a very close<br />
distance; therefore the flux lines will probably be curved and<br />
overlapping. Often it is simpler to pinpoint using the bracketing<br />
method.<br />
For more details on multiple burials, please refer to our website:<br />
www.bc<strong>access</strong>.com.<br />
ENGLISH<br />
If after finding a victim, no further signals are detected in SP<br />
mode, continue the search if there are still missing victims.<br />
16 17
Technical Information<br />
Kurzreferenz<br />
TECHNICAL SPECIFICATIONS<br />
• Frequency: 457 kHz<br />
• Batteries: Three AAA/LR03 alkaline batteries; do not use rechargeables.<br />
• Battery life: minimum 1 hour in search mode after 200 hours in transmit<br />
mode (approximately 250 hours in transmit only or 50 hours in search<br />
only)<br />
• Receive range: up to 50 meters (with Tracker DTS transmitting)<br />
• Weight: 12.8 ounces (363 grams), including strap and batteries; 8.6<br />
ounces (245 grams) without strap and batteries<br />
• Size: 5-3/4” x 3-1/4” x 1-1/4” (14cm x 8cm x 3cm)<br />
• Minimum temperature range (at 66.7 percent battery power):<br />
transmit mode: -10°C to +40°C (14°F to 104°F);<br />
search mode: -20°C to +40°C (-4°F to 104°F)<br />
• U.S. Patent number 6,167,249 & 6,484,021 B1<br />
Do not place cellular phones, communication radios, or any <strong>other</strong> electronic<br />
equipment within 6" (15 cm) of the Tracker DTS while performing a transceiver<br />
search. In receive mode, irregular readings and decreased range<br />
can be caused by these and <strong>other</strong> sources of electrical interference, such<br />
as power lines, electrical storms, and electrical generating equipment. In<br />
transmit mode, the Tracker DTS can tolerate equipment touching end-to-end<br />
or as close as 1" (2.5 cm) if stacked horizontally.<br />
Conforms to the R&TTE harmonized version of the EN 300 718 and meets<br />
or exceeds the requirements of Articles 3.1, 3.2, and 3.3.<br />
FCC ID: OUNDTS1<br />
CANADA: 35811021823<br />
Grundfunktionen<br />
On/off: Drücken Sie und drehen Sie den on/off Schalter auf der<br />
Rückseite des Trackers in Position „on". Es folgt ein Selbstcheck<br />
, der Batteriefüllstand in % wird angezeigt (99 – 95 % = volle<br />
Batterien). Tauschen Sie die Batterien bevor Sie 0 % erreichen.<br />
Empfehlung bei ca 20 %. Nach dem Selbsttest wechselt der Tracker<br />
mit der Anzeige „tr" („transmit" = „senden") in den Sendemodus. Von<br />
nun an blinkt die Sendekontrolllampe (3).<br />
Schalten in den Suchmodus: Drücken Sie den roten Knopf bis<br />
„SE" im Display aufscheint, nach „SE" sofort loslassen.<br />
Rückschalten in den Sendemodus: Kurzes drücken des roten<br />
Knopfes, „tr" für transmit (senden) im Display. Sendekontrolle (3)<br />
blinkt.<br />
Die Suche mit dem Tracker DTS<br />
Das Ziel für Einsteiger ist es, den Punkt der geringsten Entfernung zu<br />
finden und dort mit der Sondierung zu beginnen.<br />
Schalten Sie Ihren Tracker (und alle anderen Geräte!!!) in den<br />
Suchmodus (SE). Bis zum Empfang eines Signals blinkt „SE"<br />
(„search" = „suchen") im Display.<br />
Primärsuche: Gibt es einen „Verschwindepunkt" starten Sie Ihre<br />
Signalsuche abwärts von diesem Punkt.<br />
Bestimmen Sie Ihr Suchmuster abhängig von der Anzahl der zur<br />
Verfügung stehenden Personen (Abb. B + C). Schwenken Sie den<br />
Tracker horizontal und vertikal. (Abb. D)<br />
Grobsuche: Empfangen Sie ein Signal, drehen Sie sich mit dem<br />
Tracker bis die Mittelleuchte (Pfeil) zentriert ist. Bewegen Sie sich<br />
zügig in die vom Tracker angezeigte Richtung. Beobachten Sie die<br />
Entfernungsanzeige im Diaplay, und vergewissern Sie sich, dass die<br />
Anzeige abnimmt. Steigt die Entfernungsanzeige an, drehen Sie sich<br />
180° und setzen Sie die Suche fort. Werden Sie unterhalb von 10 m<br />
langsamer und achten Sie auf die Zentrierung der Mittelleuchte. Die<br />
Suchrichtung verläuft nun gerade od. leicht gebogen.<br />
DEUTSCH<br />
Feinsuche / Punktortung: Im Nahbereich von ca. 3 m führen Sie<br />
Ihr Gerät langsamer, nahe an der Schneeoberfläche in Suchrichtung<br />
weiter. Achten Sie auf die kleinste Entfernungsanzeige. Ignorieren<br />
Sie plötzlich springende Distanz- und Richtungsanzeigen. Das<br />
stärkste Signal liegt meist in diesem Bereich. Beginnen Sie mit dem<br />
Sondieren oder Ausgraben am Punkt der kleinsten Anzeige.<br />
Für professionelles Punktorten lesen Sie bitte die komplette<br />
Betriebsanleitung oder besuchen Sie unsere Website.<br />
18<br />
19


