Instruction Manual 2MP Webcam with Headset - Medion
Instruction Manual 2MP Webcam with Headset - Medion
Instruction Manual 2MP Webcam with Headset - Medion

Create successful ePaper yourself
Turn your PDF publications into a flip-book with our unique Google optimized e-Paper software.
<strong>2MP</strong> <strong>Webcam</strong><br />
<strong>with</strong> <strong>Headset</strong><br />
MEDION ® P86004 (MD 86061)<br />
<strong>Instruction</strong> <strong>Manual</strong><br />
N11652
Contents<br />
What Your 1 Year Warranty Means .............................................. 4<br />
Safety <strong>Instruction</strong>s ........................................................................ 4<br />
Applications .................................................................................. 5<br />
Electromagnetic Compatibility ................................................... 5<br />
Connections ............................................................................... 5<br />
Repairs ...................................................................................... 5<br />
Cleaning .................................................................................... 6<br />
Backup .......................................................................................... 6<br />
Package Contents ......................................................................... 6<br />
System Requirements................................................................... 7<br />
View ................................................................................................ 7<br />
Setup............................................................................................... 9<br />
Installing the Software .................................................................. 9<br />
Connecting the <strong>Webcam</strong> to the PC ............................................ 11<br />
Setting up the Camera ............................................................... 11<br />
Connecting the Stereo <strong>Headset</strong> to the PC ................................. 12<br />
Troubleshooting .......................................................................... 12<br />
Technical Support ...................................................................... 13<br />
Disposal ....................................................................................... 13<br />
Technical Specifications ............................................................ 14<br />
Copyright © 2009<br />
All rights reserved.<br />
This manual is protected by copyright.<br />
<strong>Medion</strong>® is the owner of this copyright.<br />
Trademarks:<br />
MS-DOS® and Windows® are registered trademarks of the Microsoft® corporation.<br />
Pentium® is a registered trademark of Intel®.<br />
Other trademarks are the property of their respective owners.<br />
Subject to technical and optical changes as well as printing errors.<br />
After Sales Support TEL: 1 300 884 987 WEB Support: www.medion.com.au<br />
3
4<br />
What Your 1 Year Warranty Means<br />
Great care has gone into the manufacture of this product and it<br />
should therefore provide you <strong>with</strong> years of good service when used<br />
properly. In the event of product failure <strong>with</strong>in its intended use over<br />
the course of the first year after the date of purchase, we will remedy<br />
the problem as quickly as possible once it has been brought to<br />
our attention. In the unlikely event of such an occurrence, or if you<br />
require any information about the product please contact us via our<br />
after sales support services, details of which can be found in this<br />
manual and on the product itself.<br />
Safety <strong>Instruction</strong>s<br />
Please read this instruction manual thoroughly and<br />
please pay special attention to the safety instructions,<br />
before using the device for the first time. This<br />
device may only be used as described in the instruction<br />
manual.<br />
In the event that you transfer ownership of these<br />
devices, please provide these instructions to the new<br />
owner.<br />
� Never allow children to use electronic devices unsupervised.<br />
Children may not always correctly identify potential hazards.<br />
� Keep your device away from sources of moisture.<br />
� Place and operate the unit on a stable, even surface which is<br />
vibration-free to avoid it falling off.<br />
� Never open the device's housing! You could receive an electric<br />
shock!<br />
After Sales Support TEL: 1 300 884 987 WEB Support: www.medion.com.au
Applications<br />
This product is intended for private use only.<br />
Electromagnetic Compatibility<br />
� When connecting additional or other components ensure that<br />
Guidelines for Electro-Magnetic Compatibility (EMC) are observed.<br />
� Keep the device at a distance of at least one metre from high<br />
frequencies and magnetic sources of interference (television,<br />
loudspeaker boxes, mobile telephones etc.) to avoid malfunctioning<br />
and data loss.<br />
� Only use a screened USB cable for connecting the webcam to<br />
your PC.<br />
Connections<br />
� Position the cables so that nobody is able to step on them or<br />
trip over them.<br />
� Do not place any objects on the cables to avoid damaging<br />
them.<br />
Repairs<br />
� Please contact the MEDION Help Desk on 1 300 884 987 if<br />
you have technical problems <strong>with</strong> the device.<br />
� Ensure that defective devices or damaged mains cables are<br />
repaired immediately by a specialist workshop or contact your<br />
<strong>Medion</strong> Help Desk to reduce risks.<br />
After Sales Support TEL: 1 300 884 987 WEB Support: www.medion.com.au<br />
5
6<br />
Cleaning<br />
� Please make sure the webcam, particularly the lens, does not<br />
get dirty.<br />
� Use a damp cloth to clean the webcam and stereo headset.<br />
� To clean, do not use solvents, corrosive or aerosol detergents.<br />
Backup<br />
Note<br />
Always backup your data onto an external storage device<br />
(e.g. CD-R, external hard drives) after it has been changed<br />
or updated. We do not accept any liability for claims for<br />
compensation arising from loss of data or any damages<br />
incurred.<br />
Package Contents<br />
Please check your purchase to ensure all items are included and<br />
contact us <strong>with</strong>in 7 days of purchase if any of the following components<br />
are missing:<br />
� <strong>Webcam</strong> (<strong>with</strong> Integrated USB Cable)<br />
� Stereo <strong>Headset</strong> (<strong>with</strong> Integrated Cable <strong>with</strong> Green and Pink<br />
3.5mm Jacks)<br />
� Software CD<br />
� <strong>Instruction</strong> <strong>Manual</strong><br />
� Warranty Certificate<br />
� Warranty Sticker<br />
Important<br />
You need to enter the following serial numbers when installing<br />
the software included:<br />
YK36941782K88364<br />
After Sales Support TEL: 1 300 884 987 WEB Support: www.medion.com.au
System Requirements<br />
� Operating system Microsoft Windows XP/Vista/7<br />
� Processor 1.6 GHz processor or faster<br />
� Installation CD-ROM/DVD-drive<br />
� Disk storage 200 MB or more free fixed disk storage<br />
� Connection USB, microphone and headphones connection<br />
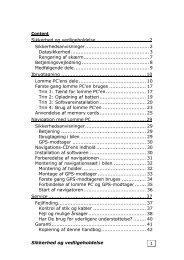
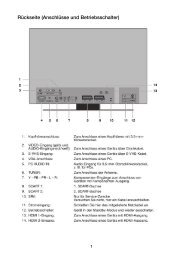
View<br />
1 Snapshot button(using YouCam 3)<br />
2 Power light<br />
3 Lens<br />
4 Microphone<br />
5 Connection cable<br />
6 Fold-out camera base<br />
After Sales Support TEL: 1 300 884 987 WEB Support: www.medion.com.au<br />
7
8<br />
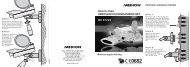
1 Ear pad<br />
2 Microphone<br />
3 Connection cable<br />
After Sales Support TEL: 1 300 884 987 WEB Support: www.medion.com.au
Setup<br />
Installing the Software<br />
Caution!<br />
Important files may be changed or overwritten when<br />
you are installing programs or drivers.<br />
Before installing the program make a backup of your<br />
original files which you will be able to access later if<br />
problems occur after installing the software.<br />
Note<br />
Install the software before connecting the webcam and stereo<br />
headset.<br />
You must install the supplied software as the webcam can<br />
only be operated in conjunction <strong>with</strong> this software.<br />
Note<br />
A dialogue box will appear if your system is set up to install<br />
signed software/drivers (released by Microsoft) only. The<br />
wording in the box will differ from system to system. Example:<br />
“The driver you wish to install did not pass the test”.<br />
This does not indicate that the driver is faulty, but merely<br />
points out that there is no Microsoft signature. You can skip<br />
this screen. Click “Next” to install the driver.<br />
� Place the CD in the drive. The installation menu will start automatically.<br />
After Sales Support TEL: 1 300 884 987 WEB Support: www.medion.com.au<br />
9
10<br />
Note<br />
If installation does not start automatically, the Autorun feature<br />
is deactivated.<br />
<strong>Manual</strong> installation <strong>with</strong>out Autorun:<br />
� Click “Start” and select the “Run” feature.<br />
� Now enter the name (letter) of the CD-ROM drive followed<br />
by a colon and "\autorun\demo32.exe".<br />
� Confirm <strong>with</strong> “OK”.<br />
� The installation menu will suggest the following items for installation:<br />
- PC camera driver (hardware driver)<br />
- Cyberlink YouCam 3 (camera software)<br />
� Install the hardware driver and the camera software in sequence.<br />
Follow the instructions on the screen.<br />
� Restart your computer.<br />
Note<br />
To use the image processing program, please read the<br />
corresponding online help manual. Click the question mark<br />
in the program to call up the online help.<br />
After Sales Support TEL: 1 300 884 987 WEB Support: www.medion.com.au
11<br />
Connecting the <strong>Webcam</strong> to the PC<br />
Connect your webcam to your computer as follows:<br />
The driver software must already be installed.<br />
� Switch on the computer and all peripheral devices (monitor,<br />
printer modem, etc.) and wait until operating system has finished<br />
booting.<br />
� Insert the end of the USB cable (�) into<br />
one of your computer’s empty USB ports �<br />
(�).<br />
�<br />
� Windows® will recognise that new hardware<br />
has been connected and will complete<br />
the installation.<br />
Note<br />
Never unplug the connection cable from the computer while<br />
the camera is running. This could cause the software to<br />
crash.<br />
Setting up the Camera<br />
The webcam provides the best viewing angle when mounted on<br />
the monitor. Experiment until you find the best position.<br />
Please note the following:<br />
� The ideal angle is achieved by setting up the webcam in the<br />
centre of the monitor.<br />
� You can also set up the camera on a table or hold it in your<br />
hand.<br />
You can turn the camera body on the base to<br />
achieve the desired angle.<br />
After Sales Support TEL: 1 300 884 987 WEB Support: www.medion.com.au
12<br />
Connecting the Stereo <strong>Headset</strong> to the PC<br />
You can connect the headset while the computer is running.<br />
� Insert the 3.5 mm pink jack into the microphone input on your<br />
sound card.<br />
� Insert the 3.5 mm green jack into the output socket on the<br />
sound card.<br />
Using headphone/earphones at high volume can result in permanent<br />
hearing damage. Before pressing play, set the volume to the<br />
lowest setting. Start playback and increase the volume to a comfortable<br />
level. Changes to the basic equaliser settings can also<br />
damage your hearing permanently.<br />
Using headphones/earphones to listen to a device at<br />
high volumes for an extended period can damage<br />
your hearing.<br />
Troubleshooting<br />
The image display on the monitor is not clear.<br />
� The lens is dirty or smeared.<br />
The camera is not recognised.<br />
� Check all cable connections.<br />
There is no sound from the headset.<br />
� Check all cable connections.<br />
� The volume is too low.<br />
After Sales Support TEL: 1 300 884 987 WEB Support: www.medion.com.au
Technical Support<br />
Both webcam and headset have been vigorously tested in our<br />
laboratories in conjunction <strong>with</strong> a wide variety of devices and peripherals.<br />
However, the drivers will need to be updated from time to<br />
time. This is because there may be compatibility problems <strong>with</strong><br />
other components which were not tested (programs, devices).<br />
To make sure you have the latest software version for your camera<br />
we recommend downloading it from www.medion.com.au. Go to<br />
Service & Support then Drivers & Software and enter the serial<br />
number of your device, which is on the back of the unit or on the<br />
packaging.<br />
Disposal<br />
Device<br />
At the end of its life, the device should not be disposed<br />
of in household rubbish. Enquire about the options for<br />
environmentally friendly disposal.<br />
Packaging<br />
Your device has been packaged to protect it against<br />
transportation damage. The packaging is made of environmentally<br />
friendly material which can be recycled.<br />
After Sales Support TEL: 1 300 884 987 WEB Support: www.medion.com.au<br />
13
14<br />
Technical Specifications<br />
<strong>Webcam</strong><br />
Port USB 2.0<br />
Sensor 2.0M CMOS sensor<br />
1600 x 1200 pixels<br />
Power supply 5 Volt (USB)<br />
Software compatibility Windows XP /Vista/7<br />
Stereo <strong>Headset</strong><br />
Port: 3.5 mm jack (green, pink)<br />
After Sales Support TEL: 1 300 884 987 WEB Support: www.medion.com.au
11/09<br />
MEDION Australia Pty Ltd<br />
St. Leonards, NSW 2065<br />
Australia<br />
MEDION Help Desk: 1300 884 987<br />
E-Mail: australia@medion.com<br />
www.medion.com.au