Download (446 KB) - FULCRUM Wheels
Download (446 KB) - FULCRUM Wheels
Download (446 KB) - FULCRUM Wheels

Create successful ePaper yourself
Turn your PDF publications into a flip-book with our unique Google optimized e-Paper software.
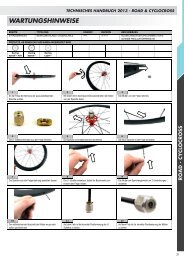
MAINTENANCE<br />
TECHNICAL MANUAL 2013 - OFF-ROAD<br />
GROUP TYPE OPERATION REVISION DESCRIPTION<br />
MTB WHEELS INDUSTRIAL BEARINGS MECHANISM 003 0/2011 SPOKE REPLACEMENT RED METAL 3 / RED FIRE /<br />
RED ZONE / RED HEAT FRONT AND REAR WHEEL<br />
PRODUCTS ON WHICH THE PROCEDURE IS APPLIED<br />
Red Fire<br />
Red Metal<br />
3<br />
Red Zone Red Heat<br />
Red Power<br />
XL/29<br />
XL<br />
Red Power<br />
SL / 29<br />
SL<br />
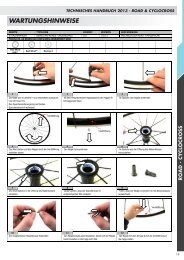
1 2 3<br />
Locate the spoke to be replaced. Use the special wrench to loosen the nipple. When round head spokes are being loosened, they<br />
tend to spin around. Use the special holder tool to hold<br />
the spoke still during the operation.<br />
4 5 6<br />
When the nipple is loosened, proceed manually to<br />
extract the spoke from the flange of the hub.<br />
If it is necessary to replace the nipple as well, to<br />
extract it from the rim you first have to disassemble<br />
the valve. Loosen the closure cap.<br />
7 8 9<br />
Loosen the sealing ring.<br />
Extract the valve. Remove the nipple from the valve hole of the rim. Tighten the magnet-attracting insert on the nipple.<br />
10 11 12<br />
Completely tighten the insert on the nipple to prevent<br />
it from sliding out while being drawn inside the rim.<br />
VALVE HOLE<br />
Insert the nipple with the insert inside the rim through<br />
the valve hole.<br />
Using the special magnet, pull the nipple inside the<br />
rim up to the hole of the spoke to be replaced.<br />
OFF-ROAD<br />
15
16<br />
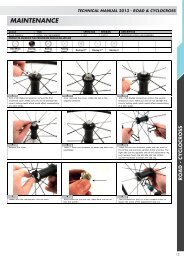
MAINTENANCE<br />
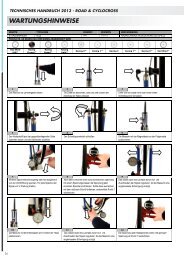
13 14 15<br />
TECHNICAL MANUAL 2013 - OFF-ROAD<br />
Bring the nipple out from the hole of the rim. Loosen the magnet-attracting insert from the nipple. Insert the new spoke inside the flange of the hub.<br />
16 17 18<br />
Manually tighten the spoke on the nipple. Tighten the nipple with the wrench, holding the spoke<br />
still with the holder, until an adequate tension is<br />
reached.<br />
19 20 21<br />
Insert the valve on the rim. Tighten the sealing ring. Tighten the closure cap.<br />
After tensioning, apply threadlocker between the<br />
nipple and the spoke.