MAX S400 HD PLUS_EN_v1.1.indd - FTE Maximal
MAX S400 HD PLUS_EN_v1.1.indd - FTE Maximal
MAX S400 HD PLUS_EN_v1.1.indd - FTE Maximal

You also want an ePaper? Increase the reach of your titles
YUMPU automatically turns print PDFs into web optimized ePapers that Google loves.
<strong>MAX</strong> <strong>S400</strong> <strong>HD</strong> <strong>PLUS</strong>
<strong>EN</strong>GLISH<br />
The lightning fl ash with arrowhead<br />
symbol, within an equilateral triangle,<br />
is intended to alert the user to<br />
“dangerous voltage” and to prevent<br />
from a risk of electric shock.<br />
QUICK INSTALLATION GUIDE<br />
WARNING: To reduce the risk of<br />
electric shock, don’t open the cabinet.<br />
Refer servicing to qualifi ed personnel<br />
only.<br />
Warning:<br />
-The apparatus shall not be exposed to dripping or splashing and that no objects fi lled with liquids, such as vases,<br />
shall be placed on the apparatus.<br />
- Do not place naked fl ame sources, such as lighted candles on the apparatus; otherwise, there is the danger of<br />
fi re.<br />
- The unit should be connected to a power supply only of the type described in the operating instructions or as<br />
marked on the unit. If you are not sure of the type of power supply (for example: 120 or 230V) to your home, consult<br />
your local dealer or local power company.<br />
- Do not open the cabinet or touch any parts in the inner mechanism. Consult your local dealer for technical service<br />
if the opening is required.<br />
- The mains plug is used as the disconnect device, the disconnect device shall remain readily operable.<br />
- Take attention to the environmental aspects of battery disposal. The battery of remote control should not be<br />
exposed excessive heat such as sunshine, fi re or the like.<br />
- Maintenance man must use the appointed screw in the rear plate.<br />
- Ensure a minimum distance of 5 cm around the apparatus for suffi cient ventilation.<br />
- Ensure that the ventilation is not impeded by covering the ventilation openings with items such as newspapers,<br />
table-cloths, curtains, etc.<br />
- Use the apparatus only in moderate climates (not in tropical climates).<br />
- Do not open the cabinet to avoid the unit direct exposure to radiation.<br />
Unit Cleaning: After the unit power is turned off, you can clean the cabinet, panel and remote control with a soft<br />
cloth lightly moistened with a mild detergent solution.<br />
Attachments: Never add any attachments and/or equipment without the manufacturer consent; as such additions<br />
may result in the risk of fi re, electric shock or other personal injury.<br />
Locating: Slots and openings in the cabinet are provided for ventilation to protect it from overheating. Do not block<br />
these openings or allow them to be blocked by placing the STB on a bed, sofa or other similar surface, nor should it<br />
be placed over a radiator or heat register.<br />
Power-Cord Protection: Place the power-supply cord out of the way, where it will not be walked on. Please take<br />
special attentions to cords at plugs, convenience receptacles and the point where they exit from the unit.<br />
Object and Liquid Entry: Never put objects of any kind into this STB through openings, as they may touch<br />
dangerous voltage points or short-out parts that could result in a fi re or electric shock. Never spill any liquid on the<br />
STB.<br />
Note: Moisture may be formed inside the unit in the following conditions:<br />
When the unit is suddenly moved from a cold environment or an air-condition room to a warm place.<br />
Immediately after a heater has been turned on.<br />
In a steamy or very humid room.<br />
If the moisture forms inside the unit, it may not operate properly. To correct this problem, turn on the power and wait<br />
about two hours for the moisture to evaporate.<br />
Parts Replacement: When the unit parts need to be replaced, user should make sure the service technician use the<br />
replacement parts specifi ed by the manufacturer or having the same characteristics as the original part. Unauthorized<br />
replacement may put the unit in the risk of fi re, electric shock or other hazards.<br />
Safety Check: After all the maintenances and repairs are done, user is required to request the service technician to<br />
conduct the overall safety check to ensure the machine is in the proper condition.<br />
PAG. 2<br />
The exclamation point within an<br />
equilateral triangle is intended<br />
to alert the user to important<br />
operating and maintenance<br />
(servicing).<br />
Danger of explosion if battery is incorrectly replaced. Replace only with the same or equivalent type.<br />
rev 1.1
ev 1.1<br />
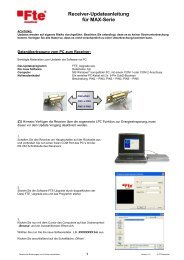
Example 1 – Basic System<br />
QUICK INSTALLATION GUIDE<br />
QUICK INSTALLATION GUIDE<br />
Follow next steps for the correct installation of this receiver.<br />
STEP 1: OUTPUT VIDEO CONFIGURATION<br />
In order to correctly visualise the reception signal on TV, you must confi gure the mode of the video<br />
output.<br />
By pressing the [V-FORMAT] key you can confi gure the output format. Options: (By source / By<br />
Native TV / 480i / 480p / 576i / 576p / 720p_50 / 720p_60/ 1080i_50 / 1080i_60 / 1080p_50<br />
/ 1080p_60).<br />
STEP 2: CONNECTIONS<br />
The coaxial cable, with satellite signal, must be connected to the “IF IN” connector. The “TV<br />
SCART” or “<strong>HD</strong>MI” connectors must be connector to the TV set.<br />
Depending on the type of installation, the receiver should be connected and confi gured following<br />
next examples.<br />
PAG. 3<br />
Example 2 – DISEqC switches<br />
<strong>EN</strong>GLISH
<strong>EN</strong>GLISH<br />
QUICK INSTALLATION GUIDE<br />
Example 3 – Combined with terrestrial Example 4 – Motorized system<br />
IMAGE 1<br />
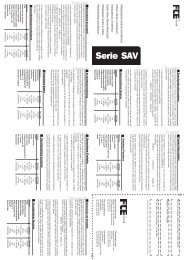
STEP 3: BASIC CONFIGURATION OF THE<br />
RECEIVER<br />
The receiver includes an installation assistant (Quick Setup)<br />
that will help you to setup the different parameters.<br />
When the receiver is turned on at fi rst time (using the button<br />
at the rear panel of the receiver), the next menu is shown on<br />
the TV (Image 1):<br />
The receiver is programmed with all the channels of Astra<br />
(at position 1 of the DISEqC), Hotbird (at position 2 of<br />
the DISEqC), Hispasat (at position 3 of the DISEqC) and<br />
Turksat (at position 4 of the DISEqC). If your installation<br />
is different to this case, please follow installation steps to<br />
search the channels.<br />
In order to move through the different options of this menu,<br />
please use the keys [ ] of your remote control. If a<br />
“Short circuit on the LNB” message is shown on the TV,<br />
please check the connections before continuing the<br />
installation.<br />
Language: press [ ] to select languages. The selection<br />
of languages include: English, German, French, Spanish,<br />
Italian, Portuguese, Turkish, Polish, Russian, Arabic, Farsi.<br />
First Audio: Some channels offer more than one audio<br />
language. This function allows you to set the preferred audio<br />
language for those channels using [ ]. If a channel<br />
offers the same audio language as the “First Audio” you<br />
set the system will play this audio language as default. If<br />
the channel does not offer this audio language then the<br />
system will compare the offered languages with the second<br />
audio language. The selections of audio languages include:<br />
English, German, French, Spanish, Italian, Portuguese,<br />
Turkish, Polish, Russian, Arabic, Farsi.<br />
PAG. 4<br />
rev 1.1
ev 1.1<br />
IMAGE 2<br />
QUICK INSTALLATION GUIDE<br />
Second Audio: If the channel has no audio language that<br />
corresponds with “First Audio” but with “Second Audio” the<br />
system will play the second audio language as default. If no<br />
audio language corresponds with the “Second Audio” then<br />
the default language of the current channel will be played<br />
instead. The selections of audio languages include: English,<br />
German, French, Spanish, Italian, Portuguese, Turkish,<br />
Polish, Russian, Arabic, Farsi.<br />
Teletext: Some channels offer more than one language. This<br />
function allows you to set the preferred language for those<br />
channels using [ ]. The selections of languages include:<br />
English, German, French, Spanish, Italian, Portuguese,<br />
Turkish, Polish, Russian, Arabic, Farsi.<br />
Region: select your country using keys.<br />
LNB Power: Here you can set the power output to the<br />
LNB. If your receiver is connected to the LNB directly then<br />
you need to set the LNB Power to “On”. If your receiver<br />
is connected to a multi switch (SMATV signal distribution<br />
system) then it may be that you don’t need to provide the<br />
power to the LNB. But since this is depending on the kind of<br />
installed distribution system we recommend you to contact<br />
your installer or to refer to the user manual of this system to<br />
get the correct information.<br />
Satellite List: This option shows all the stored satellites. This<br />
list can be modifi ed.<br />
Press [OK] to open the satellite list. Then press [<br />
] to move the highlight and press [OK] to mark/unmark<br />
and [EXIT] to fi nish the selection. You can select several<br />
satellites in this menu.<br />
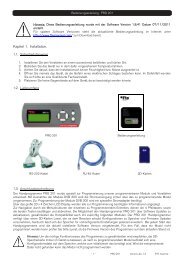
Single search: You can edit the following items (Image 2):<br />
1. Satellite: Press [ ] to switch Satellites or press [OK]<br />
to enter satellite list to select directly.<br />
2. In the “FTA Only” item, press [ to select to scan<br />
only free channels or even scrambled channels. If you select<br />
“Yes” it will scan free channels only.<br />
3. In “Scan Channel” item, press [ ] to select to scan<br />
TV + Radio Channels, or just TV channels or just Radio<br />
channels.<br />
4. In “Scan Mode” item you can select “Auto Scan” to blind<br />
scan or “Preset Scan” to scan all preset transponders.<br />
5. Move the highlight to “Search” and press [OK] button<br />
to start scanning. Bars are showing the progress of the<br />
PAG. 5<br />
<strong>EN</strong>GLISH
<strong>EN</strong>GLISH<br />
IMAGE 3<br />
QUICK INSTALLATION GUIDE<br />
channel scanning in the lower part of the window and the<br />
found channels are listed.<br />
You can stop the scan with [Exit] and save the so far found<br />
channels.<br />
Press [Exit] to exit this menu. A window to confi rm the<br />
changes will appear.<br />
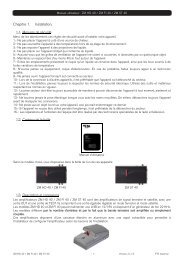
Multi search: You can edit the following items (Image 3):<br />
1. On “Satellite” item press [OK] to open the satellite<br />
list. At the bottom of the screen you can see the selected<br />
satellites. The system will use DiSEqC1.0/1.1, DiSEqC1.2<br />
and USALS functions to search the marked satellites and<br />
scan channels.<br />
2. On “FTA Only” item, press [ ] to select scanning of<br />
all channels or just scanning of free channels. If you select<br />
“Yes” it will scan free channels only.<br />
3. On “Scan Channel” item, press [ ] to select the<br />
scanning range from TV + Radio Channels, only TV channels<br />
or only Radio channels.<br />
4. On “Scan Mode” item, you can select “Auto Scan”<br />
to make a blind scan or “Preset Scan” to scan all preset<br />
transponders of the selected satellites.<br />
5. Select “Search” and press [OK] to start scanning. In the<br />
lower part of the window the progress of scanning and the<br />
found channels are displayed.<br />
6. Press [Exit] to cancel or fi nish the scanning and saving<br />
the found channels.<br />
Main Menu: Selecting this option, the main menu will appear<br />
on the TV.<br />
PAG. 6<br />
rev 1.1
ev 1.1<br />
IMAGE 4<br />
QUICK INSTALLATION GUIDE<br />
STEP 4: TIME CONFIGURATION<br />
It is recommended to setup the clock before starting to<br />
enjoy the receiver, because correct time maybe is required<br />
by some applications. Please complete following options:<br />
Press the [Menu] key of the remote control for appearing the<br />
main menu. Select the “System Setup” option and confi rm<br />
pressing [OK].<br />
Once in the “System Setup” option, please select “Local<br />
Time setting” option and press [OK]. Select “Time” option<br />
and press [OK]. Image 4 is watched on the TV. For setting<br />
up the time, please complete:<br />
1. Region: select your country using keys.<br />
2. GMT Usage: this option will allow you to select if the date<br />
and time will be introduced manually (GMT Usage: Off) or<br />
if you wish to introduce the offset respect GMT manually<br />
(GMT Usage: On).<br />
3. GMT Offset: If GMT Usage is On, the offset respect GMT<br />
has to be confi gured depending on your region or country.<br />
Use the [ ] keys to choose the offset. Remember that<br />
the offset values are between -12:00 and +12:00<br />
4. Summer: this option is only available when “USE GMT”<br />
is enabled. Use [ ] to switch on/off the summer<br />
timetable.<br />
5. Date / Time: In order to introduce manually the time and<br />
date. Before these values can be modifi ed, the automatic<br />
control of GMT has to be turned off.<br />
NOTE: If the current channel provides the correct time<br />
information, you will see the current time after you entered<br />
“Time” menu. If the channel doesn’t provide time information,<br />
you have to input the date and time information manually.<br />
The most channels support the time signal.<br />
6. Press [Exit] to exit the menu.<br />
PAG. 7<br />
<strong>EN</strong>GLISH
<strong>EN</strong>GLISH<br />
Edit Channel<br />
QUICK INSTALLATION GUIDE<br />
TV Channel List: This option shows the list of TV stored channels.<br />
Radio Channel List: This option shows the list of Radio stored channels.<br />
Delete All: This option deletes all TV and Radio stored channels.<br />
System Setup<br />
Language: This option allows choosing the language of the menus.<br />
TV System: This option allows choosing the video Standard and other parameters<br />
of the screen.<br />
Display setting<br />
Local Time Setting: Time setting menu.<br />
Timer Setting: Timer setting menu.<br />
Parental Lock: In this option, user can lock the access to the menu and change the<br />
password of the receiver.<br />
OSD Setting: This option allows confi guring the subtitles of the channel<br />
information.<br />
Favourite Channel List Name: It allows changing the name of the favourite groups.<br />
Other: Turns on or off the LNB power or enable / disable Low Power Consumption<br />
mode.<br />
Game<br />
Othello<br />
Sudoku<br />
PAG. 8<br />
rev 1.1
ev 1.1<br />
Installation<br />
Antenna connection<br />
QUICK INSTALLATION GUIDE<br />
Satellite List: This option shows all the stored satellites. This list can be<br />
modifi ed.<br />
Antenna setup<br />
Single Search: Once the antenna is confi gured, this option allows search for the<br />
channels of one satellite.<br />
Multi Search: Once the antenna is confi gured, this option allows search for the<br />
channels of various satellites.<br />
TP List: This option shows all the stored TP. This list can be modifi ed.<br />
Tools<br />
Information: Shows all the technical information for the selected channel.<br />
Factory Default: This option resets the receiver and loads the factory default<br />
values.<br />
Software upgrade: For updating your receiver through RS232, USB or satellite<br />
(OTA).<br />
REC<br />
Media Player<br />
<strong>HD</strong>D Information: You can see the capacity of the hard disk.<br />
PVR Setting: It allows selecting the disk partition and formatting it. *<br />
Remove USB device safely: Allows remove USB device of safety way.<br />
* This function will only be available in models with PVR ready functionability<br />
PAG. 9<br />
<strong>EN</strong>GLISH
<strong>EN</strong>GLISH<br />
INDEX<br />
1. Panel & Remote Control Description<br />
1.1. Front panel description…….......................................…………………………12<br />
1.2. Rear panel description…...............................................…………………………..12<br />
1.3. Remote Control Description…...............................................…………………………..13<br />
2. Basic Operations<br />
2.1. Standby ……………………..............................................…………………………………...14<br />
2.2. PR + / PR -…...............................................…………………….…………………………..14<br />
2.3. Vol+/Vol-…......................................……………………………………………………….14<br />
2.4. Channel Number…………...........................……………………………………………………14<br />
2.5. TV/RADIO…………........................…………………………………………………….14<br />
2.6. Channel List…………………….........................…………………………………...14<br />
2.7. Audio Track / Mode…...........................……………………………………………….14<br />
2.8. EPG…………………...............................…………………………………………...14<br />
2.9. SAT…………………...............................…………………………………………...15<br />
2.10. Subtitles…………………...............................…………………………………………...15<br />
2.11. Exit….................................……………………………………………………..15<br />
2.12. Menu……………………...................................…………………………………..15<br />
2.13. Mute……………............................................………………………………………..15<br />
2.14. Back…..............................................………………………………………...15<br />
2.15. Information……..................................…………………………………………...15<br />
2.16. TTX …………..................................................……………………………………..16<br />
2.17. Favourites………....................................………………………………………………...16<br />
2.18. Fast recordings……............................……………………………………………………………16<br />
2.19. Timeshift………....................................………………………………………………...16<br />
2.20. Find………………................................…………………………………………………17<br />
2.21. Video Format...........……………………………………………………………………...17<br />
2.22. Sleep.............……………………………………………………………………...17<br />
3. Edit Channel<br />
3.1. TV Channel List…………....................……………………………………………..18<br />
3.1.1. Favourite………...............................………………………………….……………18<br />
3.1.2. Move.……………..............................………… …………………………….…………18<br />
3.1.3. Edit Channel.........................…………………………………………….19<br />
3.1.3.1 Sort...............…........................................…………….…...19<br />
3.1.3.2 Delete….......................…………………………………..…………..19<br />
3.1.3.3 Edit..….................................………………………… …….……….19<br />
3.1.4 Skip............................................…………………...………………………...19<br />
3.1.5. Lock......................................………………………… …………………….………..19<br />
3.2. Radio Channel List……..................................……………………………………......20<br />
3.3 Delete All…....................…...............……………………………………………….20<br />
4. Installation<br />
4.1. Antenna Connection……......................……………………..…………………..21<br />
4.2. Satellite List………….............................………………………...………………...21<br />
4.3. Antenna Setup.........……......................……………………..…………………..22<br />
4.4. Single Search………........…......................……………………..…………………..23<br />
4.5. Multi Search………...........................…………...………..…………………….23<br />
PAG. 10<br />
rev 1.1
ev 1.1<br />
INDEX<br />
4.6. TP List……………..........................………………………..………………...24<br />
5. System Setup<br />
5.1. Language………………….............………………………...…………………...25<br />
5.2. TV System……………..............…………………………..…………………...25<br />
5.3. Display setting………....................………………………...………………26<br />
5.4. Local Time Setting ………....................………………………...………………26<br />
5.5. Timer Setting....................................................................................27<br />
5.6. Parental Lock……………………............................…………………………….27<br />
5.7. OSD Setting………………………..............................……………………………..28<br />
5.8. Favorite..........………………………………….....................……………………..28<br />
5.9. Other................………………………………….....................……………………..29<br />
5.9.1. LNB Power..........................................................................................29<br />
5.9.2. Channel Play Type...................................................................................29<br />
5.9.3. Channel Change.........................................................................................29<br />
5.9.4.AutoStandby.................................................................................................29<br />
5.9.5.Clock in Standby...........................................................................................29<br />
6. Tools<br />
6.1. Information…………………………...................................………………………….30<br />
6.2. Load factory default………………………………………..………………..............................30<br />
6.3. Software upgrade by USB…………………......................……………………...30<br />
7. Game<br />
7.1. Othello...................................................................................................................32<br />
7.2. Sudoku..................................................................................................................32<br />
8. Rec & Media<br />
8.1. Media Player…………………………...................................………………………….33<br />
8.1.1. Adding a new file to the list.................................................................................34<br />
8.1.2. Sort file....................................................................................34<br />
8.1.3. Edit....................................................................................34<br />
8.1.3.1. Rename files.............................................................................34<br />
8.1.3.2. Copy files.............................................................................34<br />
8.1.3.3. Delete files.............................................................................35<br />
8.1.3.4. New foders.......................................................................35<br />
8.1.4. Audio player............................................................................................35<br />
8.1.5. Picture viewer................................................................................35<br />
8.1.5.1. Configure the Slide show............................................................35<br />
8.1.5.2. Multiview..................................................................35<br />
8.1.6. Video player................................................................................36<br />
8.1.7.How to reproduce a recording...............................................................36<br />
8.1.7.1. How to rename a recording..................................................................36<br />
8.1.7.2. How to block a recording................................................................36<br />
8.1.7.3. How to delete a recording.................................................................36<br />
8.2. <strong>HD</strong>D information...................................................................................................................36<br />
8.3. PVR setting..................................................................................................................37<br />
8.4.Safely remove storage device…..................................................………………………….37<br />
9. Technical Features...............................................................................................................38<br />
PAG. 11<br />
<strong>EN</strong>GLISH
<strong>EN</strong>GLISH<br />
PANEL & REMOTE CONTROL DESCRIPTION<br />
This user’s guide is adapted to the version v.1.13B4-NR dated 21/11/2011. For future<br />
software updates, you can download the user’s guide from the following website:<br />
http://www.ftemaximal.com<br />
1. PANEL & REMOTE CONTROL DESCRIPTION<br />
1 2 3 4 5<br />
1.1. FRONT PANEL DESCRIPTION<br />
1. IR-S<strong>EN</strong>SOR: Reception sensor for the IR remote control signals.<br />
2. DISPLAY: 4 Digits to display the program numbers.<br />
3. STAND BY LED: Shows the state of the receiver.<br />
4. LOCK LED: Indicates a suffi cient signal level at the ANT IN input.<br />
5. BUTTONS: These buttons allow controlling some functions of the receiver.<br />
1<br />
1.2. REAR PANEL DESCRIPTION<br />
1. IF IN: Satellite input.<br />
2. TV SCART: Output SCART for the connection to a TV set.<br />
3. AC IN: Mains input cable.<br />
4. <strong>HD</strong>MI: <strong>HD</strong>MI output for connecting to a TV<br />
5. S/PDIF: Coaxial output for digital audio (AC3).<br />
6. USB: USB Connector 2.0<br />
7. RS-232<br />
2<br />
PAG. 12<br />
4 5 6 7<br />
3<br />
rev 1.1
ev 1.1<br />
1<br />
6<br />
PANEL & REMOTE CONTROL DESCRIPTION<br />
1.3. REMOTE CONTROL DESCRIPTION<br />
2<br />
3<br />
4<br />
9<br />
10<br />
12<br />
11<br />
13 14<br />
15<br />
16<br />
19<br />
20<br />
21<br />
28 29<br />
5<br />
7<br />
8<br />
17<br />
18<br />
22<br />
23<br />
24 25<br />
26 27<br />
1. Standby: Switches receiver ON or in stand-by-mode.<br />
2. TV/AV: It activates/deactivates the visualization of the<br />
receiver in the Scart output.<br />
3. (Mute): Switches audio on and off.<br />
4. Info: Shows channel information with signal bar.<br />
5. Sleep: It opens the Sleep Timer menu<br />
6. Numeric keys: For direct typing values and names.<br />
7. EPG: Shows the EPG information.<br />
8. Pause: If you press it once, you will stop the image, and<br />
it will come back to normal mode when you press it again.<br />
9. PAGE+/PAGE-: Moves cursor in block steps or pages.<br />
10. TV/Radio: Switches between TV and Radio channels.<br />
11. PR (Back): Watch the last viewed channel.<br />
12. PR+/-: Changes channel up and down.<br />
13. (Vol+/Vol-): Adjusts audio volume up and<br />
down.<br />
14. OK/LIST: Confi rms selections or opens channel list.<br />
15. Menu: Opens the main menu.<br />
16. Exit: Exit menus or stop operations.<br />
17. Record: Quick start for recording. *<br />
18. SHIFT: TimeShift function. *<br />
19. Colour Keys: Controls menu options.<br />
20. Find: To fi nd channel by their names.<br />
21. V-Format: It changes the video output mode in Tv<br />
mode.<br />
22. TXT: Opens and closes teletext and subtitles.<br />
23. (Audio): Opens audio menu.<br />
24. (FAST): Backward / Forward fast buttons for<br />
recording and TimeShift. *<br />
25. (SLOW): Backward / Forward slow buttons for<br />
recording and TimeShift. *<br />
26. (Play): Start button for recording and TimeShift. *<br />
27. (Stop): Stop button for recording and TimeShift. *<br />
28. SAT: Satellite List<br />
29. FAV: Opens favourite channel list.<br />
* This function will only be available in models with<br />
PVR ready functionability<br />
PAG. 13<br />
<strong>EN</strong>GLISH
<strong>EN</strong>GLISH<br />
OSD 1<br />
OSD 2<br />
OSD 3<br />
BASIC OPERATIONS<br />
2. HOTKEY<br />
2.1 STANDBY<br />
1.Press [Power] button to switch from TV mode to Standby<br />
mode.<br />
2.In Standby mode press [Power] button again to switch back<br />
to TV mode. The last active channel will be showed.<br />
3.To switch off the STB complete press the main power<br />
button.<br />
2.2 PR+/PR-<br />
In TV mode press [Channel Up/Channel Down] to change<br />
channel.<br />
2.3 VOL+/VOL-<br />
In TV mode, press [Volume Up/Volume Down] to adjust volume.<br />
2.4 NUMBER<br />
In TV mode you can enter the channel number directly with<br />
your remote control unit and confi rm the number with the OK<br />
button to change to the desired channel.<br />
2.5 TV/RADIO<br />
In TV mode, press [TV/RADIO] to switch to Radio mode. In<br />
Radio mode press [TV/RADIO] again to switch back to TV<br />
mode.<br />
2.6 CHANNEL LIST<br />
1. In full screen, press [OK/List] key can enter “Channel<br />
List”, please refer to TV Channel List for detail information<br />
(OSD 1).<br />
2.7 AUDIO<br />
1.In TV mode, press the [Audio] button to open the Audio<br />
Mode window. (OSD 2)<br />
2.8 EPG<br />
1.The STB has an Electronic Program Guide (EPG) to help<br />
you navigate channels through all the possible viewing<br />
options. The EPG supplies information such as channel listings<br />
and starting and ending times for all available channels.<br />
Press [EPG] key to display EPG screen. (OSD 3)<br />
2.Press [EXIT] key can play the current channel in full<br />
screen.<br />
PAG. 14<br />
rev 1.1
ev 1.1<br />
OSD 4<br />
OSD 5<br />
OSD 6<br />
OSD 7<br />
BASIC OPERATIONS<br />
3.Press number key [OK] can display the current channel<br />
detail information. The window is like below.<br />
4.We should press green button if we wish to program a<br />
timing of the selected event. The timing window will be opened<br />
automatically and this way we will be able to confi rm<br />
the programming of the event. We should press Exit if we<br />
wish to come back to channel list (OSD 4).<br />
5.With the key [Red], you will get new options that will allow<br />
you to move through the EPG on the most comfortable way,<br />
moving event by event, by sites or by days.<br />
6.To close the EPG menu press [Exit].<br />
2.9 SAT<br />
Press [SAT] button to open the SAT list. After selecting a<br />
satellite the channel list will be reduced to the channels of this<br />
satellite. (OSD 5)<br />
2.10 SUBTITLES<br />
In TV mode, press [TXT] button for activating/deactivating<br />
the channel subtitles,depending on the provider information<br />
(OSD6)<br />
2.11 EXIT<br />
[Exit] key can exit current menu.<br />
2.12 M<strong>EN</strong>U<br />
[Menu] key can enter the menu or exit current menu.<br />
2.13 MUTE<br />
1.Press the [Mute] button to mute the sound. On the screen<br />
an icon will be displayed to indicate the muted sound.<br />
2.Press the [Mute] button again to restore the sound.<br />
2.14 BACK<br />
Pressing the [BACK] button allows you to toggle between the<br />
actual and the last selected channel.<br />
2.15 INFORMATION<br />
In TV mode, press [INFO] button can open information<br />
screen.<br />
1.Press number key [INFO]] can display the current channel<br />
detail information. The window is like below.<br />
PAG. 15<br />
<strong>EN</strong>GLISH
<strong>EN</strong>GLISH<br />
OSD 8<br />
OSD 9<br />
OSD 10<br />
OSD 11<br />
BASIC OPERATIONS<br />
2.We should press [Yellow] button if we wish to program a<br />
timing of the selected event. The timing window will be opened<br />
automatically and this way we will be able to confi rm<br />
the programming of the event. We should press Exit if we<br />
wish to come back to channel list. (OSD 7)<br />
2.16 TELETEXT<br />
1.Press [TXT] button in TV mode to open the teletext page.<br />
This service is depending on the support of the channel<br />
provider.<br />
2.If the channel does not support teletext information, it will<br />
show “No Teletext Data” on the screen (OSD 8).<br />
2.17 FAVOURITES<br />
1. In TV mode press the [Favourite] button to display the<br />
Favourite Group window on the screen as the picture beside<br />
shows (OSD 9).<br />
2. In the Favourite Group window you can select the desired<br />
favourite channel with [ ] and confi rm it with [OK] to<br />
switch to it. In bigger groups you can navigate with [ ].<br />
3. With [ ] you can select different Favourite Group.<br />
4. Press [Exit] to close the Favourite Group window.<br />
2.18. FAST RECORDING *<br />
To start the recording (OSD 10).<br />
1. If you would like to record a programme immediately, press<br />
the Key [Record]. In order to stop a recording before the<br />
ending of the programmed length, press the [Stop]-Key.<br />
2. Press the key [Record] during the recording in order to set<br />
the duration.<br />
3.Press the key [Stop] again to end the recording manually.<br />
2.19. TIMESHIFT *<br />
In order to activate this Timeshif option, please access to PVR<br />
confi guration menu.From the moment the user access to the<br />
channel, the receiver keeps all the channel information in a<br />
buffer (OSD 11).All the information is on the hard disk, for this<br />
reason it is possible to play, pause, fast forward and reward.<br />
1. Pressing the button [] several times, you can<br />
settle the speed of forward. Options: 2x, 4x, 8x, 16x or 24x.<br />
2. By pressing the key [>] or [< ] several times you can adjust<br />
the forward or return speed to move very slowly. Options:<br />
1/2x, 1/4x and 1/8x.<br />
3. Using the key [Shift] you can see the time difference<br />
between your reproduction and the real time. If you press the<br />
key [Shift] again you will see the list of the recordings that<br />
have been made.<br />
PAG. 16<br />
rev 1.1
ev 1.1<br />
BASIC OPERATIONS<br />
4. In order to leave the Time Shift option, press the key [stop]<br />
to equal the difference between the reproduction time with the<br />
real one.<br />
2.20. FIND<br />
1. Press [FIND] key can open the “Find” window.<br />
2. After input each character, the program list on the left<br />
will search the channel according your input, and list the<br />
matched channel.<br />
3. Press [Blue] key can close “Find” window.<br />
2.21. VIDEO FORMAT<br />
In Tv mode, press [RES] key in order to confi gure the output<br />
format of your receiver.<br />
2.22. SLEEP<br />
In TV mode, press [SLEEP] button if you want shut down the<br />
receiver automatically, you can choose here the time for the<br />
sleep timer.<br />
Selection: 10, 30, 60, 90, 120 or Off<br />
Please change it with the [SLEEP] button.<br />
* This function will only be available in models with PVR<br />
ready functionability<br />
PAG. 17<br />
<strong>EN</strong>GLISH
<strong>EN</strong>GLISH<br />
OSD 12<br />
OSD 13<br />
OSD 14<br />
OSD 15<br />
CHANNEL<br />
PAG. 18<br />
3. EDIT CHANNEL<br />
Press [Menu] in the TV mode to enter the main menu (OSD<br />
12).<br />
1. Press [ ] to select the Edit Channel item.<br />
2. Press [OK] to enter the selected item.<br />
3. Press [ ] to select the wanted menu item.<br />
4. Press [OK] to enter the selected item among.<br />
- TV Channel List<br />
- Radio Channel List<br />
- Delete All<br />
3.1. TV CHANNEL LIST<br />
If you enter the Channel List menu a window like the one<br />
besides will open (OSD 13).<br />
1. You can move the highlighted channel with [ ] and<br />
press [OK] to preview the highlighted program in the preview<br />
window.<br />
2. You can enter directly the number of the desired channel with<br />
the remote control. The selection will select that channel, but it<br />
will not be previewed until you confi rm with [OK] button.<br />
3. Press [ ] on the RCU to jump between the channels<br />
by pages.<br />
4. Press [ ] to switch the Program Group.<br />
5. The colour buttons offer further functions to manage the<br />
channel list.<br />
3.1.1. FAVOURITE<br />
1. Press [FAV] and [OK] to open the Favourite window (OSD 14).<br />
2. You can select between 8 favourites groups with [ ].<br />
Press [OK] to assign the channel to a Favourite group.<br />
3. Press [OK] again in order to assign channel to Favourites.<br />
4. Press [Exit] button to return to the TV Channel List. The<br />
channels of Favourites Groups are indicated with a favourite<br />
icon behind the name.<br />
3.1.2. MOVE<br />
1. To move/change channels: Pushing the [Yellow] button and<br />
then [OK] button, you will see a picture like OSD 15. You will be<br />
able to move or change the position of the channels:<br />
2. Move the channel to the desired position with [ ].<br />
3. Press [OK] to confi rm the position.<br />
rev 1.1
ev 1.1<br />
OSD 16<br />
OSD 17<br />
OSD 18<br />
OSD 19<br />
CHANNEL<br />
3.1.3. EDIT CHANNEL<br />
1. Press [Blue] button to open the “Edit” window.<br />
2. You can Delete, Sort, and Edit the channel (OSD 16).<br />
3. Press [Exit] to leave the Channel Editing. The system will ask<br />
you to confi rm the saving of the changes you made.<br />
3.1.3.1. SORT<br />
1. Press [Red] to open the Sort window (OSD 17). Press [<br />
] to select and [OK] to confi rm your choice.<br />
2. The ways of sorting are:<br />
- Name (A-Z): Sorting in Alphabetical Order, ignoring “$” symbol.<br />
- Name (Z-A): Sorting in Alphabetical Order, ignoring “$” symbol.<br />
- FTA: Sort channel by free and scrambled sequence. Free<br />
channels will be listed fi rst and scrambled channels behind<br />
in the channel list.<br />
- Lock: Unlocked channels are listed fi rst end locked channels<br />
at the end.<br />
3.1.3.2 DELETE<br />
In Channel Edit menu press [Blue] button to mark a channel<br />
for deleting.<br />
Marked channels (OSD 18) will be deleted after you confi rm to<br />
save the changes when you leave this menu.<br />
3.1.3.3 EDIT<br />
In “Channel Edit” menu, press [Green] button and [OK] key to<br />
enter edit box like OSD 19:<br />
After modifi cation, pressing [Yelloy] button can save the modifi<br />
ed value and exit “Edit” mode.<br />
3.1.4. SKIP<br />
In TV Channel List menu, press [Green] button and press [OK]<br />
key to place a Skip icon behind the name of the highlighted<br />
channel. Marked channels (OSD 20) will be skipped when you<br />
change channels in TV mode after you confi rm to save the<br />
changes when you leave this menu.<br />
3.1.5. LOCK<br />
In TV Channel List menu, press [Red] button and then [OK] to<br />
place a Lock icon behind the name of the highlighted channel.<br />
Marked channels (OSD 21) will be locked and displayed only<br />
after password has been entered if you confi rm to save the<br />
changes when you leave this menu.<br />
PAG. 19<br />
<strong>EN</strong>GLISH
<strong>EN</strong>GLISH<br />
OSD 20<br />
OSD 21<br />
OSD 22<br />
OSD 23<br />
CHANNEL<br />
3.2. RADIO CHANNEL LIST<br />
Basically the operation of “Radio Channel List” is same as “TV<br />
Channel List”, except that in the small channel window a static<br />
background will be displayed (OSD 22).<br />
3.3. DELETE ALL<br />
A safety question will show up where you have to confi rm fi rst.<br />
Select “Yes” to delete all channels or “No” to cancel and confi rm<br />
with [OK] (OSD 23).<br />
Pressing [Exit] will exit the function directly without saving.<br />
? FREQU<strong>EN</strong>TLY ASKED QUESTION<br />
Q: IF I incautiously delete all channels, what should I do?<br />
A: There are two ways to restore:<br />
- To re-search all channels at the “Installation” menu.<br />
- Use “Factory Default” function to restore all channels in the<br />
“Tools” menu. The receiver will load the factory channels.<br />
PAG. 20<br />
rev 1.1
ev 1.1<br />
OSD 24<br />
OSD 25<br />
OSD 26<br />
OSD 27<br />
INSTALLATION<br />
PAG. 21<br />
4. INSTALLATION<br />
Press [Menu] in the TV mode to enter the main menu (OSD<br />
24).<br />
1. Press [ ] to select the Installation item.<br />
2. Press [OK] to enter the selected item.<br />
3. Press [ ] to select the wanted menu item.<br />
4. Press [OK] to enter the selected item among.<br />
- Antenna Connection<br />
- Satellite List<br />
- Antenna Setup<br />
- Single Satellite Search<br />
- Multi Satellite Search<br />
- TP List<br />
4.1. ANT<strong>EN</strong>NA CONNECTION<br />
When you enter the “Antenna connection” menu you can see a<br />
window like the one beside (OSD 25).<br />
LNB: Press the arrows [ ] on the remote to select the<br />
“Motorized Antenna” option in case you have an installation<br />
with an engine. If you do not have an engine, choose “Fixed<br />
Antenna”.<br />
4.2. SATELLITE LIST<br />
When you enter the “Satellite List” menu you can see a window<br />
like the one beside (OSD 26):<br />
1. Move through the satellite list using [ ] and mark/<br />
unmark the satellites that you want pressing [OK]<br />
2. Press [Red] button to enter edit satellite menu (OSD 27).<br />
You can edit the satellite’s name and its longitude. Once you<br />
have edited the satellite, select “Save” option and confi rm with<br />
[Yellow] button. If you prefer to exit without saving the changes<br />
press [Blue] button.<br />
3. Press [Green] button to open the “Add satellite” window.<br />
You can edit the satellite’s name and its longitude. Once you<br />
have edited the satellite, select “Save” option and confi rm with<br />
[Yellow] button. If you prefer to exit without saving the changes<br />
press [Blue] button.<br />
4. After pressing [Blue] button you will be asked “Are you sure<br />
to delete?”. Select “Yes” to delete the marked satellite. Select<br />
“No” to cancel the operation.<br />
5. Press [Exit] to save the changes and go to the previous<br />
window.<br />
<strong>EN</strong>GLISH
<strong>EN</strong>GLISH<br />
OSD 28<br />
OSD 29<br />
OSD 30<br />
INSTALLATION<br />
4.3. ANT<strong>EN</strong>NA SETUP<br />
Depending on how the “Antenna Connexion” section is<br />
confi gured, it will allow confi guring different parameters:<br />
• (Fixed Antenna) (OSD 28):<br />
- Satellite: Press [ ] to switch Satellites or press [OK] to<br />
enter satellite list to select directly.<br />
- LNB frequency: Use [ ] in order to change among<br />
“Universal”, a specifi c “Polarity and Band”, “Unicable” or a<br />
specifi c frequency of the local oscillator.<br />
Note: If you have an Unicable installation that allows you to<br />
distribute a satellite signal through a unique cable up to 8<br />
receivers as maximum, in this menu option you can confi gure<br />
the receiver. If you select “Unicable”, press the [green] button<br />
to select a center frequency to the receiver and press the [red<br />
button to choose the frequency of a channel.<br />
- On “Transponder” item use [ ] to select the desired<br />
transponder.<br />
- DiSEqC1.0: Use [ ] to switch the options of DiSEqC<br />
switches.<br />
- DiSEqC1.1: Use [ ] to switch the options of DiSEqC1.1<br />
switches.<br />
- 22K: Use [ ] to switch “ON” and “Off”. The 22 kHz signal<br />
is used in KU Universal LNBs to change between low<br />
band and high band. After choosing LNB type “Universal”<br />
you cannot modify 22K.<br />
- Toneburst (0/12V): Press [ ] to switch this function<br />
“On” or “Off”.<br />
- Polarity: Press [ ] to switch between “Auto / H / V”.<br />
• (Motorized Antenna) (OSD 29):<br />
- LNB type: Use [ ] in order to change among “Universal”<br />
, “Unicable” or a specifi c frequency of the local oscillator.<br />
Note: If you have an Unicable installation that allows you to<br />
distribute a satellite signal through a unique cable up to 8<br />
receivers as maximum, in this menu option you can confi gure<br />
the receiver. If you select “Unicable”, press the [green] button<br />
to select a center frequency to the receiver and press the [red<br />
button to choose the frequency of a channel.<br />
- Motor Type: Press [ ] to select between DiSEqC1.2 and<br />
USALS”.<br />
- Local Longitude: Geographic length of your position<br />
(USALS).<br />
- Local Latitude: Geographic latitude of your position<br />
(USALS).<br />
- Delete all: Deletes all the satellite positions saved.<br />
- Motor Setting: It allows confi guring all the engine positions.<br />
- Limit Setup: It allows confi guring the East and West position<br />
of the engine.<br />
Press [Exit] to save the changes.<br />
PAG. 22<br />
rev 1.1
ev 1.1<br />
OSD 31<br />
OSD 32<br />
OSD 33<br />
OSD 34<br />
INSTALLATION<br />
4.4. SINGLE SEARCH<br />
When you enter the “Single Satellite Search” menu you can see<br />
a window like OSD 30:<br />
You can edit the following items:<br />
1. Satellite: Press [ ] to switch Satellites or press [OK] to<br />
enter satellite list to select directly.<br />
2. In the “FTA Only” item, press [ to select to scan only<br />
free channels or even scrambled channels. If you select “Yes” it<br />
will scan free channels only.<br />
3. In “Scan Channel” item, press [ ] to select to scan TV<br />
+ Radio Channels, just TV channels or just Radio channels.<br />
4. Network Search: If you select this option as “No”, the receiver<br />
will search the selected Satellite. In case you select “Yes”, the<br />
NIT (Network Identifi cation) will be identifi ed and the receiver<br />
will automatically search all the TP of this network.<br />
5. In “Scan Mode” item you can select “Auto Scan” to blind<br />
scan or “Preset Scan” to scan all preset transponders.<br />
6. Move the highlight to “Search” and press [OK] button to<br />
start scanning. Bars are showing the progress of the channel<br />
scanning in the lower part of the window and the found channels<br />
are listed. You can stop the scan with [Exit] and save the so far<br />
found channels (OSD 31).<br />
4.5. MULTI SEARCH<br />
Entering in this menu, you can make a search in all the<br />
satellites of the list confi gured in the “Satellites list” option. The<br />
confi guration options are the same as in the individual search<br />
section.<br />
After selecting Antenna Setup another window will be opened<br />
(OSD 32).<br />
You can edit the following items:<br />
1. Satellite: Press [OK] to enter satellite list.<br />
2. In the “FTA Only” item, press [ to select to scan only<br />
free channels or even scrambled channels. If you select “Yes” it<br />
will scan free channels only.<br />
3. In “Scan Channel” item, press [ ] to select to scan TV<br />
+ Radio Channels, just TV channels or just Radio channels.<br />
4. Network Search: If you select this option as “No”, the receiver<br />
will search the selected Satellite. In case you select “Yes”, the<br />
NIT (Network Identifi cation) will be identifi ed and the receiver<br />
will automatically search all the TP of this network.<br />
5. In “Scan Mode” item you can select “Auto Scan” to blind<br />
scan or “Preset Scan” to scan all preset transponders.<br />
6. Move the highlight to “Search” and press [OK] button to<br />
start scanning. Bars are showing the progress of the channel<br />
scanning in the lower part of the window and the found channels<br />
are listed. You can stop the scan with [Exit] and save the so far<br />
found channels (OSD 33).<br />
PAG. 23<br />
<strong>EN</strong>GLISH
<strong>EN</strong>GLISH<br />
OSD 35<br />
OSD 36<br />
OSD 37<br />
OSD 38<br />
INSTALLATION<br />
4.6. TP LIST<br />
When you open the “TP List” menu you will see a window like<br />
the one beside (OSD 34).<br />
1. Press [ ] to change the marked satellite. Press [<br />
] to change the marked TP.<br />
2. Press [Red] button to open the “Edit TP” menu (OSD 36). Here<br />
you can edit the Transponder’s data like frequency, polarity and<br />
Symbol Rate. In this window, the search of the channels of the TP<br />
can be done selecting the “Search” option and pressing [OK].<br />
3. Press [Green] button to open the “Add TP” menu (OSD<br />
35). Here you can add a new TP and setup its parameters like<br />
frequency, polarity and Symbol Rate.<br />
4. Press [Yellow] button will open a dialog box asking you to<br />
confi rm the deletion of the current TP (OSD 37). If you select<br />
“Yes” all the related channels will be deleted. If you select “No”<br />
the operation will be cancelled.<br />
5. Press the key [Blue] to make a searching of the selected TP.<br />
When selecting this option a new window will appear, here you<br />
will be able to confi gure the following parameters (OSD 38):<br />
- On “FTA Only” item, press [ ] to select scanning of all<br />
channels or just scanning of free channels. If you select “Yes” it<br />
will scan free channels only.<br />
- On “Scan Channel” item, press [ ] to select the scanning<br />
range from TV + Radio Channels, only TV channels or only<br />
Radio channels.<br />
- Network Search: If you select this option as “No”, the receiver<br />
will search the selected TP. In case you select “Yes”, the NIT<br />
(Network Identifi cation) will be identifi ed and the receiver will<br />
automatically search all the TP of this network.<br />
6. Press [OK] to start scanning.<br />
7. On the “TP Scan” item, press [Exit] to cancel the scanning<br />
and saving the found channels.<br />
PAG. 24<br />
rev 1.1
ev 1.1<br />
OSD 39<br />
OSD 40<br />
OSD 41<br />
SYSTEM SETUP<br />
PAG. 25<br />
5. SYSTEM SETUP<br />
Press [Menu] in the TV mode to enter the main menu .<br />
1. Press [ ] to select the System Setup item.<br />
2. Press [OK] to enter the selected item.<br />
In the System Setup menu (OSD 39):<br />
3. Press [ ] to select the wanted menu item.<br />
4. Press [OK] to enter the selected item among.<br />
- OSD Language<br />
- TV System<br />
- Display Setting<br />
- Local Time Setting<br />
- Timer Setting<br />
- Parental Lock<br />
- OSD setting<br />
- Favorite<br />
- Other<br />
5.1. OSD LANGUAGE<br />
When you enter to “Language” menu, you will see the screen<br />
like below (OSD 40):<br />
1.OSD Language: press [ ] key to select languages, the<br />
selections of languages include: English, French, German,<br />
Italian, Spanish, Portuguese, Polish, Russian, Turkish, Arabic<br />
and Farsi.<br />
2. First Audio: Some channels offer more than one audio<br />
language. This function allows you to set the preferred audio<br />
language for those channels using [ ]. If a channel offers<br />
the same audio language as the “First Audio” you set the<br />
system will play this audio language as default. If the channel<br />
does not offer this audio language then the system will compare<br />
the offered languages with the second audio language.<br />
3. Second Audio: If the channel has no audio language that<br />
corresponds with “First Audio” but with “Second Audio” the<br />
system will play the second audio language as default. If no<br />
audio language corresponds with the “Second Audio” then<br />
the default language of the current channel will be played<br />
instead.<br />
4. Teletext: You can choose the predetermined language of<br />
the teletex using the keys [ ].<br />
5. Press [Exit] to return back from “Language” menu.<br />
5.2. TV SYSTEM<br />
When you enter to “TV System” menu, you will see the screen<br />
like below (OSD 31):<br />
1. Display Mode is used to switch the display mode. You can<br />
<strong>EN</strong>GLISH
<strong>EN</strong>GLISH<br />
OSD 42<br />
OSD 43<br />
SYSTEM SETUP<br />
select from By source / By Native TV / 480i / 480p / 576i<br />
/ 576p / 720p_50 / 720p_60/ 1080i_50 / 1080i_60 /<br />
1080p_50 / 1080p_60 in YUV mode and 480i / 576i in<br />
RGB mode. Press [ ] to select the desired mode.<br />
2. Aspect Mode is used for switching the screen aspect ratio<br />
mode. Now we provide below options: 4:3 PS / 4:3 LB /<br />
16:9 / AUTO. You can press [ ] key to select each mode<br />
circularly.<br />
3. In video output you can choose, by the means of [ ]<br />
keys, the video output mode: RGB / YUV. We recommend<br />
selecting YUV mode when the connection is made<br />
by <strong>HD</strong>MI, if on the contrary it is made by scart cable, we<br />
recommend selecting RGB mode.<br />
4. Digital Audio Out: It will allow you to select the type of<br />
audio digital output. Options: LPCM Out / BitStream Out.<br />
If you connect this output to a device with Dolby digital,<br />
select BitStream Out option.<br />
5. Press [Exit] key to draw back from “TV System” menu.<br />
5.3. DISPLAY SETTING<br />
When you enter to “Display Setting” menu, you will see<br />
window like below (OSD 32):<br />
This menu will allow you to set the features of the image.<br />
Options:<br />
1.Brightness: 0-100%<br />
2.Contrast: 0-100%<br />
3.Saturation: 0-100%<br />
4.Hue: 0-100%<br />
5.Sharpness: 0-9<br />
5.4. LOCAL TIME SETTINGS<br />
When you enter to “Local Time Setting” menu, you will see<br />
window like below (OSD 43):<br />
1. Region is used for selecting the country which you are in.<br />
You can press [ ] key to select each mode circularly.<br />
2. GMT Usage: This item is use for open the usage of GMT.<br />
You can press [ t] keys to switch “Off / On”. If, on the<br />
contrary, you want it to be automatic according to the time<br />
you get from the signal (GMT: Region / Set by user).<br />
3. The “GMT Offset” item is valid only when the setting of<br />
“GMT Usage” is “Off”. You can press [ ] keys to switch<br />
“GMT Offset” value, and the range is “-12:00 ~ +12:00”,<br />
increase each half hour progressively.<br />
4. Summer Time: this option is only available when “GMT<br />
Usage” is enabled. Use [ ] to switch On/Off the summer<br />
timetable.<br />
PAG. 26<br />
rev 1.1
ev 1.1<br />
OSD 44<br />
OSD 45<br />
OSD 46<br />
SYSTEM SETUP<br />
5. “Date” and “Time” items are valid only when the setting of<br />
“GMT Usage” is “Off”. You can press [ ] keys to moving<br />
highlight and use number keys to input directly.<br />
6. Press [Exit] key to return back from ”TV System” menu.<br />
5.5. TIMER SETTING<br />
When you enter “Timer Setting”, you will see the window like<br />
OSD 44. You can press [ ] keys to set Timer number,<br />
and there are 8 timers in total. When you press [OK] key you<br />
will see a screen like beside (OSD 45):<br />
1. Current time information will display on the fi rst column; if<br />
the current time is incorrect, please modify the time information<br />
in “Time” item.<br />
2. Timer Mode: There are several modes for Timer to setting,<br />
include Off, Once, Daily.<br />
3. Timer Type: You can choose between “DVR Recorder” *<br />
/“Radio Recorder” * (so you can program a recording of a<br />
TV or a Radio channel), “Reproduce Channel” / “Reproduce<br />
Radio” (that way, you will assign the alarm function to a concrete<br />
TV or Radio channel)<br />
4. Wake up Channel: press [OK] key to enter channel list and<br />
select channel that you want to setting.<br />
5. Wake up Date: use number keys to input your wakeup<br />
date.<br />
6. Wake up Time: use number keys to input your wakeup<br />
time. Once the time’s up, no matter what the system is in<br />
standby mode or in playing mode, the system will automatically<br />
switch to the channel you want and start to play.<br />
7. Duration: Please introduce the duration of the timing.<br />
8. PS Record: In this option you can select betwenn PS or<br />
ts format.<br />
9. Press [Exit] can exit the current menu.<br />
* This function will only be available in models with PVR<br />
ready functionability<br />
5.6. PAR<strong>EN</strong>TAL LOCK<br />
You can set a password for anyone who wishes to operate in<br />
the “Installation” menu. And you can also set the password<br />
for the lock channels. (How to set the lock channel please<br />
refer to LOCK) Here will show you how to setting and how to<br />
revising the password.<br />
In “Parental Lock” function, press [OK] key, there will pop an<br />
dialogue for you to input the password. The default password<br />
is “0000”. When you input the correct password, you will see<br />
a screen like below(OSD 46):<br />
PAG. 27<br />
<strong>EN</strong>GLISH
<strong>EN</strong>GLISH<br />
OSD 47<br />
OSD 48<br />
SYSTEM SETUP<br />
1. Menu Lock determining that when user wish to enter<br />
“Installation” menu, whether have to input Password or not.<br />
If the setting of “Menu Lock” is “Yes” which means user<br />
have to key in password, set “No” means unlock.<br />
2. Channel Lock determining that when user wish to play the<br />
lock channels, whether have to input the password or not.<br />
If the setting is “Yes”, play the channels with lock mark will<br />
show up a dialogue on the screen and ask for the password.<br />
If the setting of “Channel Lock ”is “No”, the Lock<br />
function will invalid.<br />
3. New Password is used for revising password; you can input<br />
the new password in this item by using number keys directly.<br />
After you fi lled in 4 digital numbers, the highlight will auto<br />
skip to Confi rm Password and ask you to input the new<br />
password again. If the password is correct, the screen will<br />
show up a message of “Change password successfully”.<br />
After fi nish saving and draw back to “System Setup” menu,<br />
the revising is complete.<br />
4.Press [Exit] key to draw back from the “Parental Lock”<br />
menu.<br />
5.7. OSD SETTING<br />
When you input to “OSD Setting” menu, you will see a screen<br />
like below (OSD 47):<br />
1. Subtitle display: Select this option for activating /<br />
desactivating the channel subtitles.<br />
2. OSD Timeout: If you confi gure this option you will be able<br />
to change OSD time of information of the channel that is<br />
tuned in every moment.<br />
3. OSD Transparency: Besides the setting of “OSD Menu<br />
Style”, you also can set the transparency of OSD. You can<br />
press [Left/Right] key to select the values. There are 5 levels<br />
of transparency, 10%, 20%, 30%, and 40% and “NO”<br />
(means no transparency function).<br />
4. Press [Exit] key to draw back from the “OSD Setting”<br />
menu.<br />
5.8. FAVORITE<br />
In this menu, user is able to change the name of the Favourite<br />
Groups. Press [OK] to enter this menu and you will see a<br />
screen like beside (OSD 48).<br />
To change the name of the Favourites Groups:<br />
1. Press [ ] and select a Favorite Group.<br />
2. Press [Ok] button to edit the name of the Group.<br />
3. Once the name is correct, confi rm pressing [Blue] button.<br />
4. Select “Exit” to leave this menu.<br />
PAG. 28<br />
rev 1.1
ev 1.1<br />
OSD 49<br />
SYSTEM SETUP<br />
5.9. OTHER<br />
When you select “Other” you will see a screen like OSD 49:<br />
5.9.1. LNB POWER<br />
Here you can set the power output to the LNB. If your receiver<br />
is connected to the LNB directly then you need to set the<br />
LNB Power to “On”. If your receiver is connected to a multi<br />
switch (SMATV signal distribution system) then it may be that<br />
you don’t need to provide the power to the LNB. But since<br />
this is depending on the kind of installed distribution system we<br />
recommend you to contact your installer or to refer to the user<br />
manual of this system to get the correct information.<br />
You also just can change this setting and check if you still can<br />
receive the channels. If the LNB Power is off and you still can<br />
see all channels then we recommend this setting.<br />
5.9.2. CHANNEL PLAY TYPE<br />
In this option you will be able to choose which type of channels<br />
the receiver shown every time it starts. Press [ ] in order<br />
to select among All, Free or Scrambled.<br />
5.9.3. CHANNEL CHANGE<br />
From this option you will be able to select the effect that will<br />
be shown in the screen every time you change the channel.<br />
Press [ ] in order to select between “Black screen” or<br />
“Freeze” (it will show the frozen image of the cannel you were<br />
watching).<br />
5.9.4. AUTO STANDBY<br />
This option will allow you to activate or deactivate the automatic<br />
Standby option. Options: On, Off.<br />
-On: The receiver will be in standby mode automatically after<br />
3 hours, as long as during this time no commands have been<br />
sent to the receiver through the remote control or buttons of<br />
the front panel, and no programmed timers are run.<br />
-Off: Auto standby function gets deactivated.<br />
Use [ ] in order to turn this option on/off.<br />
5.9.5. CLOCK IN STANDBY<br />
If you wish to see the current time in the display while the<br />
receiver is in standby mode, you should confi gure this option<br />
“On”.<br />
PAG. 29<br />
<strong>EN</strong>GLISH
<strong>EN</strong>GLISH<br />
OSD 50<br />
OSD 51<br />
OSD 52<br />
OSD 53<br />
TOOLS<br />
PAG. 30<br />
6.TOOLS<br />
Press [Menu] in the TV mode to enter the main menu.<br />
1. Press [ ] to select the Tools item.<br />
2. Press [OK] to enter the selected item.<br />
In the Tools menu (OSD 50):<br />
3. Press [ ] to select the wanted menu item.<br />
4. Press [OK] to enter the selected item among.<br />
- Information<br />
- Load Factory Default<br />
- Software Upgrade by USB<br />
6.1 INFORMATION<br />
1. When you enter to “Information” menu, you will see a screen<br />
like above (OSD 51). The screen displays some parameters<br />
of information of current channel, and this function<br />
same as the function [Information] in the full screen play<br />
mode.<br />
2. Press [Exit] key to draw back from “Tools” menu.<br />
6.2 LOAD FACTORY DEFAULT<br />
When you press [OK] on the “Factory Setting” item:<br />
1. A warning message will be displayed like the one beside<br />
(OSD 52).<br />
2. If you select “Yes” then all changes you made will be reset<br />
to default values. Make sure you really want to do this!<br />
3. Press [Exit] in both steps will close the window without<br />
resetting the receiver.<br />
6.3 SOFTWARE UPGRADE BY USB<br />
This option allows updating the software of the receiver with<br />
the received data from a USB 2.0 memory device. To do<br />
it, connect a USB 2.0 memory device to the receiver and<br />
accede to this menu option (OSD 53).<br />
The last software version to be loaded must be placed at the<br />
root path of your USB device.<br />
1. Upgrade mode: Select with [ ] , the mode of upgrading.<br />
2. Update fi le: Select with [ ] the name of the fi le to be<br />
loaded.<br />
3. Select “Start” and press [OK]. An alert message appears<br />
indicating not to take out the memory device during the<br />
loadiing process.<br />
rev 1.1
ev 1.1<br />
TOOLS<br />
4. Once the fi le has been loaded, it requires the conformity<br />
to end the upgrading process, writing into the receiver<br />
the upgrading. Select “Yes” and press [OK] to upgrade the<br />
receiver. In case during the reading of the fi le, it is corrupted<br />
or it would be a not appropriated for this model of receiver,<br />
an alert messagewould appear “Error reading the USB<br />
disk”.<br />
5. After pressing [OK] the receiver will write into the Flash<br />
memory, and it will reboot to end the upgrading process.<br />
For further information about the upgrading of the receivers,<br />
please visit http://www.ftemaximal.com, in the chapter about<br />
upgrading receivers.<br />
PAG. 31<br />
<strong>EN</strong>GLISH
<strong>EN</strong>GLISH<br />
OSD 54<br />
OSD 55<br />
OSD 56<br />
GAMES<br />
PAG. 32<br />
7.GAMES<br />
When you enter “Game” menu (OSD 54), you will see two<br />
games including Othello and Sudoku.<br />
7.1 OTHELLO<br />
1. Moving highlight to “Setup” and press [Left/Right] keys to<br />
select the game level (degree of diffi culty) (OSD 55).<br />
2. Moving highlight to “Start” and press [OK] key to start the<br />
game.<br />
3. Moving highlight to [Exit] keys and press [OK] key to draw<br />
back from the game.<br />
4. Start on the game:<br />
• [ /[ ] use these arrow keys to guide chessman.<br />
• [OK] — set chessman.<br />
• [Exit] — Quit game and draw back to “Game” menu.<br />
7.2 SUDOKU<br />
1. Moving highlight to “Setup” and press [Left/Right] keys to<br />
select the game level (degree of diffi culty) (OSD 56).<br />
2. Moving highlight to “Start” and press [OK] key to start the<br />
game.<br />
3. Select the option “Replay” and press [OK] in order to start<br />
again the same game.<br />
4. Select the option “Solve” and press [OK] in order to see the<br />
solution of the game.<br />
5. Moving highlight to [Exit] keys and press [OK] key to draw<br />
back from the game.<br />
6. Use the keys , , to guide the pointer.<br />
7. Use the numeric keypad in order to add a number in every<br />
square.<br />
8. [Exit] — Quit game and draw back to “Game” menu.<br />
rev 1.1
ev 1.1<br />
Recorded fi les<br />
Options<br />
OSD 57<br />
REC<br />
PAG. 33<br />
8. REC & MEDIA<br />
Press the key [Menu] on the remote control to go to the main<br />
menu (OSD 57).<br />
1. Press the arrows on the remote control [ ] to select<br />
the option REC<br />
2. Press [Ok] to enter the submenu REC<br />
3. Press the keys on the remote control[ ] to move to<br />
the different options on the menu.<br />
4. Press [Ok] to go to the selected option on the submenu.<br />
- Media Player<br />
- <strong>HD</strong>D Information<br />
- PVR Setting *<br />
- Safely Remove Storage Device<br />
8.1. MEDIA PLAYER<br />
In this menu option you can accede and manage the contents<br />
of the <strong>HD</strong>D previously copied from your computer.<br />
You also can create playlists of music or pictures (OSD 58).<br />
You can move through the different type of fi les (Image,<br />
video, recordings * and music) by pressing the key [0] of your<br />
remote.<br />
Press [Menu] button to Exit.<br />
* This function will only be available in models with PVR<br />
ready functionability<br />
OSD 58<br />
Preview window of<br />
the selected fi le<br />
Information about<br />
the selected fi le.<br />
- PLAYLIST<br />
These lists are created adding the fi les you want to the previous<br />
lists. You can create 2 lists:<br />
- Picture List<br />
- Music List<br />
<strong>EN</strong>GLISH
<strong>EN</strong>GLISH<br />
OSD 59<br />
OSD 60<br />
OSD 61<br />
REC<br />
In order to open the Play list, you have to go the Music or Image<br />
menu. Press [Red button] in order to open the Play list.<br />
In order to open the play list, please press [OK] and select<br />
which fi le you wish to open (OSD 59).<br />
1. Press [Red button] in any fi le from a list in order to move it to<br />
the position you wish.<br />
2. Press [Green button] on any fi le from one list to delete the<br />
fi le.<br />
3. Press [Yellow button] on any fi le from one list to delete all<br />
the fi les contained.<br />
4. Press the keys [ ] to move along the fi les and press<br />
[OK] to enter and exit of the folders or open a fi le or playlist.<br />
8.1.1.ADDING A NEW FILE TO THE LIST<br />
1. Go over the fi le you want to add to your customized playlist<br />
and press the [Green] button.<br />
2. In order to add all the fi les to the Play list, press [Yellow<br />
button].<br />
8.1.2.SORT FILE<br />
1. Press the [red] key to open the Sort window (OSD 60).<br />
Press [ ] to select and [OK] to confi rm your choice.<br />
2. The ways of sorting are:<br />
- Default: Sorting by scanning result.<br />
- Name (A-Z): Sorting in Alphabetical Order, ignoring “$” symbol.<br />
- Schedule: It organizes the fi les, placing the most recent ones<br />
fi rst.<br />
- Size: It organizes the fi les, placing the smallest ones fi rst.<br />
- Favourites: It organizes the fi les, placing the favourites fi rst.<br />
8.1.3. EDIT<br />
Select the option “Edit” by pressing the key [Blue], When<br />
you get to this option in the menu you will be able to rename,copy,<br />
delete and create new folders.<br />
8.1.3.1. R<strong>EN</strong>AME FILES<br />
1. Press the key [Red] to rename a fi le (OSD 61).<br />
2. Press OK [Yellow] to go out and modify the name.<br />
3. Press the [Exit] key to leave. A window will ask for confi rmation<br />
to save the changes.<br />
8.1.3.2. COPY FILES<br />
1. Press the key [Green] over the fi le you wish to copy in order<br />
to get to the “Copy” menu<br />
PAG. 34<br />
rev 1.1
ev 1.1<br />
OSD 63<br />
OSD 64<br />
OSD 65<br />
OSD 66<br />
REC<br />
2. Select the route where you wish to copy the fi le and press<br />
the key [Green] in order to do so.<br />
3. Press the key [Exit] to exit.<br />
8.1.3.3. DELETE FILES<br />
1. In order to delete one or more fi les, press the key [Yellow]<br />
over the fi le you wish to delete (if you want to delete several<br />
fi les, select them one by one).<br />
2. A mark will appear after the name of the fi le<br />
3. The marked fi les will be deleted after you get out from this<br />
menu<br />
8.1.3.4. NEW FOLDERS<br />
1. Press the key [Blue] in the route you wish to create a new<br />
folder (OSD 63).<br />
2. Once you have assigned a name to the folder, press option<br />
“OK” [Yellow] to go out of the menu.<br />
8.1.4.AUDIO PLAYER<br />
1. Press [OK] over the.MP3 fi le or list of .MP3 fi les you want<br />
to play.<br />
2. A Player will be opened as it is shown in the picture.<br />
-[2]: It changes among the different ways of replay: random,<br />
list or single.<br />
8.1.5.PICTURE VIEWER<br />
1. Press [OK] over the fi le .JPG that you want to show.<br />
2. The selected image will be shown in the screen and the<br />
reproduction of the images will start in slide show way.<br />
3. You can rotate the picture with the buttons [ ]. (OSD 64)<br />
8.1.5.1. CONFIGURE THE SLIDE SHOW<br />
*Only available for the picture playlist (OSD 65).<br />
This function allows you to confi gure the “slide show”, therefore,<br />
1. Select setup option, press [2].<br />
2. A new window will appear where you should confi gure some<br />
parameters:<br />
- Time of viewing each picture on the screen.<br />
- Repeat: When the playlist fi nishes, it starts again.<br />
8.1.5.2. MULTIVIEW<br />
This function allows visualizing 9 images at the same time.<br />
1. Select multiview mode, press [3] (OSD 66).<br />
Press [OK] over the image fi le you want to see in full screen.<br />
PAG. 35<br />
<strong>EN</strong>GLISH
<strong>EN</strong>GLISH<br />
OSD 67<br />
OSD 68<br />
OSD 69<br />
OSD 70<br />
REC<br />
8.1.6. VIDEO PLAYER<br />
1.Press the button [OK] over a video fi le (OSD 67).<br />
2. The fi le will be played on the screen.<br />
3. Press the key [Exit] to exit.<br />
8.1.7. HOW TO REPRODUCE A RECORDING *<br />
If you want to reproduce a recording, you only have to select it<br />
and press the key [OK].<br />
8.1.7.1. HOW TO R<strong>EN</strong>AME A RECORDING *<br />
1. Press the key [Red] to rename a recording.<br />
2. A window will appear where you can change the name of<br />
the record (OSD 68). Press OK [Yellow] to go out and modify<br />
the name.<br />
3. Press the [Exit] key to leave. A window will ask for confi rmation<br />
to save the changes.<br />
8.1.7.2. HOW TO BLOCK A RECORDING *<br />
With this function it is possible to block a recording so it is necessary<br />
to introduce a password to watch it.<br />
1. If you want to block a recording, select it and press the<br />
[Green] key.<br />
2. A window appears and asks for the password. If it has not<br />
been modifi ed, it is by default the code “0000”.<br />
3. The blocked channel is marked with an icon (OSD 69).<br />
4. In order that the blockade of channels work, it is necessary<br />
that the blocking option is activated in the menu of “Blockade<br />
with password”.<br />
5. Press the key [Exit] to leave.<br />
8.1.7.3. HOW TO DELETE A RECORDING *<br />
1. To delete one or more recordings, press the [Blue] key on<br />
the recording you want to delete (if you want to delete several<br />
recordings, select them one by one).<br />
2. A mark will appear on the name of the channel (OSD 70).<br />
3. The marked recordings will be deleted once you exit the<br />
menu.<br />
8.2. <strong>HD</strong>D INFORMATION<br />
In the <strong>HD</strong>D information submenu you can see the capacity<br />
of the hard disk. You also see the free space available (OSD<br />
71).1. Press the key [Yellow] and a new window will appear,<br />
where you will have to choose the kind of format that you want<br />
to assign to the partition. Options: FAT or NTFS . Press [OK]<br />
over one of the options (OSD 72). The hard disk will be formatted<br />
and it will lose all the recordings in the memory.<br />
PAG. 36<br />
rev 1.1
ev 1.1<br />
OSD 71<br />
OSD 72<br />
OSD 73<br />
OSD 74<br />
REC<br />
NOTE: There is no turning back for this process. After the<br />
selection of one of these options, the data will be deleted.<br />
2. Press the key [Blue] to assign space in the disk according to<br />
the action you wish to do (OSD 73). Options:<br />
- REC & TMS: It assigns half of the free space in the disk to<br />
making timeshift and the other half for making recordings.<br />
- REC: It assigns the whole free space for recordings.<br />
- TMS: It assigns the whole free space for timeshift.<br />
8.3. PVR SETTING *<br />
In this menu you will be able to confi gure the Timeshift activation<br />
and the recording format (OSD 74).<br />
1. You can confi gure the Timeshift in two ways:<br />
On: From the moment the user access to the channel, the<br />
receiver keeps all the channel information in a buffer.<br />
Off: the receiver will no store any channel information. If the<br />
users makes a Pause the image will stop, but when he wants<br />
to continue watching the program it will be running in the current<br />
moment.<br />
2. With this option you can settle the jump marks forward and<br />
reward.<br />
On a current reproduction, press the keys [||] to<br />
make a jump of a certain period of time on the reproduction.<br />
This period is confi gurable and the jumps can be: 30s, 1, 5,<br />
10 and 30 minutes.<br />
If they are confi gured every 10 minutes, each time that you<br />
press this key, it will jump automatically 10 minutes forward/<br />
reward on the reproduction.<br />
3. In the “Timeshift recording” option we can select between<br />
two options:<br />
-On: It allows the running of the Timeshift while recording a<br />
channel.<br />
- Off: The Timeshift option gets disabled while recording.<br />
8.4. SAFELY REMOVE STORAGE DEVICE<br />
In “Tools” menu, select “Safely Remove Storage Device”,<br />
press “OK”, to disconnect USB device of receiver.<br />
* This function will only be available in models with PVR<br />
ready functionability<br />
PAG. 37<br />
<strong>EN</strong>GLISH
<strong>EN</strong>GLISH<br />
Video<br />
Decoding<br />
Bit rate<br />
Output<br />
Aspect ratio<br />
Active pixel (Scart)<br />
Active pixel (<strong>HD</strong>MI)<br />
Output connectors<br />
Audio<br />
Decoding<br />
Mode<br />
Bit rate<br />
Output connectors<br />
Demodulator<br />
Demodulation<br />
Bit rate<br />
Outer code<br />
Inner code<br />
Energy dispersion<br />
Input Signal<br />
Frequency<br />
Input Level<br />
Band Width<br />
Input connector<br />
LNB control<br />
LNB supply<br />
Polarized control<br />
DiSEqC control<br />
Miscellanous<br />
USB Connector<br />
Media Formats (With a hard disk connected to<br />
USB 2.0 port.)<br />
TECHNICAL SPECIFICATIONS<br />
MPEG-2 SD&<strong>HD</strong>, MPEG4 AVC SD&<strong>HD</strong>/H.264<br />
Máx. 20 Mbps<br />
PAL<br />
4:3 PS, 4:3 LB, 16:9, Auto<br />
480i / 576i<br />
By source / By Native TV / 480i / 480p / 576i / 576p / 720p_<br />
50 / 720p_60/ 1080i_50 / 1080i_60 / 1080p_50 / 1080p_60<br />
<strong>HD</strong>MI / Scart<br />
MPEG-2/MPEG-1 layer I, II, III / AAC / Dolby Digital<br />
Mono, Dual, Stereo, Joint stereo<br />
Max. 384kbps<br />
<strong>HD</strong>MI / Scart / Coaxial SPDIF<br />
QPSK, 8PSK<br />
SCPC / MCPC<br />
RS ( 204, 188, 8 )<br />
ALL DVB rates<br />
DVB-S & DVB-S2 recommendation<br />
950 - 2150MHz<br />
-65dBm - 25dBm<br />
36 MHz<br />
F-Type connector<br />
13/18V (400mA max.) with short circuit protection<br />
13/18V (vertical/horizontal) Polarization<br />
DiSEqC1.0, DiSEqC1.1 and DiSEqC 1.2<br />
2.0<br />
Image: .JPG / .BMP// Audio: .MP3 / .OGG / .WAV<br />
Record * : .TS / .PS<br />
Vídeo: .AVI (MPEG1/ MPEG2 /H.264/ Xvid / DviX )<br />
.MKV (MPEG1/ MPEG2 /H.264/ Xvid / DviX)<br />
.MP4 (H.264) // .MOV (H.264)<br />
Supply voltage<br />
175~250 VAC 50~60 Hz<br />
Powe consumption<br />
Max. 30 Watt<br />
Standby consumption (LPC Mode)
ev 1.1<br />
PART OF THE DECLARATION OF CONFORMITY CE<br />
“WE , <strong>FTE</strong> <strong>MAX</strong>IMAL, DECLARE THAT THE PRODUCT<br />
<strong>MAX</strong> <strong>S400</strong> <strong>HD</strong> <strong>PLUS</strong><br />
IS IN CONFORMITY WITH FOLLOWING DIRECTIVES<br />
LOW VOLTAGE DIRECTIVE 2006/95/EC<br />
EMC DIRECTIVE 2004/108/EC”<br />
PAG. 39<br />
<strong>EN</strong>GLISH
ESPAÑA<br />
Mogoda, 110<br />
Pol. Industrial Can Salvatella<br />
08210 Barberà del Vallès<br />
(Barcelona) España<br />
Tel. 00 34 93 729 27 00<br />
Fax. 00 34 93 729 30 73<br />
ftemaximal@ftemaximal.com<br />
www.ftemaximal.com<br />
DEUTSCHLAND<br />
BCN Distribuciones S.A. Unipersonal<br />
Niederlassung Deutschland<br />
Auf der Höhe, 8<br />
44536 Lünen<br />
Deutschland<br />
Tel. 00 49 (0) 23 18 78 5 - 01<br />
Fax. 00 49 (0) 23 18 78 5 - 200<br />
info@ftemaximal.de<br />
www.ftemaximal.de<br />
FRANCE<br />
16 ZAE Les Mouilles<br />
74570 Groisy<br />
Tel. 00 33 450 68 80 17<br />
Fax. 00 33 450 68 84 68<br />
sav@ftemaximal.fr<br />
www.ftemaximal.com<br />
PORTUGAL<br />
Rua José Carlos Ary dos Santos<br />
A-das-Lebres (Loures)<br />
2670-791 Santo Antão do Tojal<br />
Tel. 00 351 219 83 87 00<br />
Fax. 00 351 219 83 87 09<br />
ftemaximal@ftemaximal.pt<br />
www.ftemaximal.com<br />
ITALIA<br />
Via Edison, 29<br />
42040 Calerno di<br />
Sant’Ilario d’Enza (RE)<br />
Tel. 00 39 05 22 90 97 01<br />
Fax. 00 39 05 22 90 97 48<br />
fte@fte.it<br />
www.ftemaximal.com<br />
UNITED ARAB EMIRATES<br />
P.O.Box 262442<br />
Jebel Ali Free Zone<br />
Warehouse FZS5AB03<br />
Dubai<br />
Tel. 00 971 4 886 5700<br />
Fax. 00 971 4 886 5701<br />
www.ftemaximal.ae