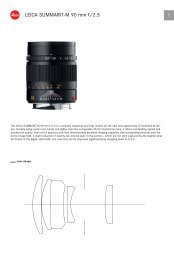
Holga DSLR Lens for Nikon - Freestyle Photographic Supplies
Holga DSLR Lens for Nikon - Freestyle Photographic Supplies
Holga DSLR Lens for Nikon - Freestyle Photographic Supplies

You also want an ePaper? Increase the reach of your titles
YUMPU automatically turns print PDFs into web optimized ePapers that Google loves.
1.<br />
Introduction<br />
HOLGA<br />
Adapter <strong>Lens</strong><br />
HL.N<br />
<strong>for</strong> <strong>Nikon</strong> nigifal SLR CaDcrrs--<br />
The installation of the HL-N Adapter lrns to a <strong>Nikon</strong> camera will bring about the<br />
characteristics of pictures taken with <strong>Holga</strong> 120 cameras to the pictures to be taken with<br />
the <strong>Nikon</strong> camera.<br />
Enjoy!<br />
Parts of the <strong>Lens</strong><br />
3. Installation and Removal<br />
3.1. Installation<br />
Focus Ring<br />
White Mark<br />
Base Ring<br />
Lrns<br />
Fig.l<br />
<strong>Lens</strong> Cap<br />
White Mark on Body of Camera<br />
kns Release<br />
Burron<br />
r@,---ra-<br />
l[.ens Mountine Hole<br />
Fig.2
(a) Mount the Adapter <strong>Lens</strong> over the lrns Mounting Hole on the camera,<br />
matching the White Mark on the Base Ring to the white mark on the body of<br />
the camera. See Fig. 2.<br />
(b) Turn the Base Ring of the lens in the counter-clockwise direction gently until<br />
a "click" sound is heard, indicating that the lens has been secured in place.<br />
Installation is completed.<br />
3.2. Removal<br />
4, Focusing<br />
(a) Press down the <strong>Lens</strong> Release Button.<br />
(b) Turn the Base Ring of the Adapter <strong>Lens</strong> in the clockwise direction until the<br />
White Mark on the Base Ring matches that on the body of the camera.<br />
(c) Remove the lens.<br />
The lens has approximate focusing ability. Focusing is carried out with the help of four<br />
different markings on the Focus Ring ofthe lens as follows -<br />
Fig.3<br />
White Mark on Base Ring<br />
(a) The four markings on the Focus Ring indicate the following distances -<br />
Marking Distance<br />
o 0.7 tn<br />
8"8 2.0 m<br />
trtrffi<br />
A<br />
6.0 m<br />
lom<br />
(b) Judge the distance ofthe object from the camera and tum the Focus Ring until the<br />
White Mark is pointing at a position appropriate <strong>for</strong> the distance as per the table
above. It is possible to set the Focus Ring with the White Mark pointing at a<br />
position between any two of the above distance markings when the distance is in<br />
between those indicated by the two markings concerned.<br />
5. Shooting Pictures<br />
Take following steps -<br />
(a) Remove the <strong>Lens</strong> Cap.<br />
(b) Set the camera to the Manual Mode.<br />
(c) Judge the lighting condition of the environment and set the aperture. Find the best<br />
setting through trial and error.<br />
(d) Set the Focus Ring according to the distance ofthe object.<br />
(e) Press the shutter to take the shot.<br />
6. Some Suggestions<br />
(a) When taking pictures indoor or in environments where illumination is insufficient,<br />
use lhe flash light.<br />
(b) If the exposure of the picture takeJs too much or insufficient, better results can be<br />
obtained by adjusting the shutter speed and/or the exposure value of the camera.<br />
(c) Always check to make sure that the lens cap has been removed be<strong>for</strong>e taking a<br />
picture.<br />
(d) lT:i.: "t<br />
to shoot a picture in a direction with the sun or light source behind the<br />
(e) Always depress the shutter release button gently so as not tojerk the camera.<br />
(0 Never take pictures with the object at less than 0.7 meter from the camera.<br />
(g) Always use professional lens cleaning paper or very soft fabric to clean the lens.<br />
7. Opfional Accessories <strong>for</strong> Use Together<br />
Once a <strong>Nikon</strong> camera is installed with this HL-N Adapter [rns, the possibilities of using<br />
a whole range of special effect lenses and filters (available <strong>for</strong> purchase separately) as<br />
described below are open, just like in the case of original <strong>Holga</strong> 120 cameras.<br />
7.1. Special Image Effect <strong>Lens</strong>es/Filters
7.1.1. <strong>Lens</strong> & Filter Holder (LFII-1201I35) - This is <strong>for</strong> attaching to the bezel<br />
of the Adapter trns HL-N to enable the camera to take on the special<br />
image effect filters and lenses described below.<br />
Fig.4<br />
lrns & Filter Holder<br />
7.1.2. Color Filters (CFS-120/f3t - Color filters are <strong>for</strong> altering the color<br />
temperatures of the object and the background to enhance the artistic effect<br />
of the picture. There are four different filters available to bring about the<br />
following effects -<br />
Blue<br />
Red<br />
Yellow<br />
Quintuple Image<br />
Soecial Imase Effect<br />
Gns/Filter "<br />
Horizontal Triple tmages<br />
'bI<br />
Ds\<br />
((X' *v\<br />
To raise the color temperature e.g. to simulate beautiful<br />
moon light when taking pictures in the country side.<br />
To reduce the absorption of blue and green lights.<br />
To reduce the absorption of blue light to correct the<br />
sensitivity of full color films to lights in the blue to<br />
purple range.<br />
Light Orange To lower the color temperature to remove the cold tone<br />
in flash light to accomplish warmer light source effects.<br />
7.1.3. Soft Surround <strong>Lens</strong>es (SSFS-1201135) - These lenses have a clear<br />
circular area in the middle and the remaining areas frosted. They are <strong>for</strong><br />
standing out the object to be taken to make the theme of the picture more<br />
prominent. Four colors - blue, red, orange and grey are available <strong>for</strong><br />
selection.<br />
7.1.4. Split-Image <strong>Lens</strong>es (SILS-120/135) - There are fourtypes as follows -<br />
= 5 images will result, just like five<br />
exposures.<br />
= 3 images lined up horizontally.
Triangular Triple Images = 3 images in the three vertices of a<br />
triangle.<br />
7.1.5. Color Gradation Filters (CGFS-1201135) - This is a set of 4 filters. Half<br />
of each filter is colored and the other half clear. The colored half of the<br />
filter is a gradation of the color from full intensity to total clearness when<br />
moving from the edge towards the intersection with the clear half. These<br />
filters can be used to emphasize the color of the object to be photographed,<br />
stand out a blue sky or suppress overly bright exposures. The four colors<br />
available are red, yellow, blue and grey.<br />
7.1.6. Dual Color Filters (DCFS-120/135) - These are filters with one half in<br />
one color and the other half another. They are good <strong>for</strong> generating special<br />
color effects. There are six filters in a set in the color combinations of<br />
red/yellow, red/blue, redlgey, yellow/blue, yellow/grey and blue/grey<br />
respectively.<br />
7.2. Special Focal Effect <strong>Lens</strong>es<br />
The following special focal effect lenses are also available -<br />
7.2.1. Tele <strong>Lens</strong> (HT-25) - The installation of this lens will increase the focal<br />
length and reduce the lens angle, resulting in telescopic effects to create a<br />
bigger image on the film. The magnification power of this lens is 2.5X.<br />
When using this lens, the focus of the Adapter <strong>Lens</strong> must be set at A .<br />
7.2.2. Wide <strong>Lens</strong> (HW-25) - The installation of this lens will reduce the focal<br />
length and increase the lens angle, enabling the image to cover a wider<br />
area.<br />
When using this lens, the focus of the Adapter <strong>Lens</strong> must be set at A .<br />
7.2.3. Close-Up <strong>Lens</strong> Set (CLS-l) - There are three lenses in the set <strong>for</strong><br />
taking pictures of objects at distances of roughly 120mm, 250mm and<br />
500mm respectively to bring about close-up image effects.<br />
7.2.4. Macro <strong>Lens</strong> Set (MLS-I) - There are two lenses in the set <strong>for</strong> taking<br />
pictures at really close distances of roughly 60mm and 30mm respectively<br />
<strong>for</strong> macro photography.