
Create successful ePaper yourself
Turn your PDF publications into a flip-book with our unique Google optimized e-Paper software.
1<br />
A<br />
B<br />
C<br />
D<br />
E<br />
F<br />
G<br />
H<br />
I<br />
J<br />
K<br />
L<br />
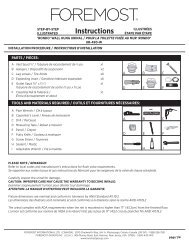
TOOLS & MATERIALS REQUIRED / OUTILS ET FOURNITURES NÈCESSAIRES:<br />
Adjustable Wrench / Clé à molette<br />
Carpenter's Level / Niveau de menuiserie<br />
Drill / Perceuse<br />
Hacksaw / Scie à métaux<br />
Jig Saw / Scie sauteuse<br />
Lavatory Water Supply Kit / Nécessaire d'arrivée d'eapour lavabo<br />
Measuring Tape / Ruban à mesurer<br />
Pencil / Crayon<br />
Putty Knife / Couteau à mastiquer<br />
Screw Driver / Tournevis<br />
Silicone Adhesive or Plumber's Putty / Silicone pour salle de bamastic de plomberie<br />
Wrench / Clé<br />
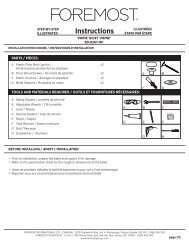
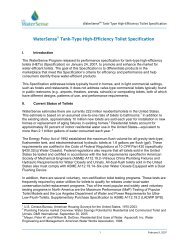
Locate the proper place on the vanity top that the drop-in basin will be installed.<br />
Make sure that there is enough room under the vanity top for the faucet water supply lines,<br />
drain assembly and bottom of drop-in basin. Spacing on back of drop-in to backsplash of<br />
vanity should have enough distance to accommodate desired faucet. (See Figure 1)<br />
Situez l'endroit sur le dessus du meuble-lavabo où vous souhaitez encastrer le<br />
lavabo. Assurez-vous qu'il y a susamment d'espace sous le dessus du meuble-lavabo<br />
pour loger les conduites d'arrivée, le renvoi et la profondeur du lavabo. Prévoyez assez<br />
d'espace entre l'arrière du lavabo et le dosseret du meuble-lavabo pour poser le robinet<br />
choisi. (Figure 1)<br />
2<br />
The outside diameter of the drop-in hole should be cut to accommodate the drop-in<br />
basin, please refer to the template. Trace the cut-out line from the template onto the vanity<br />
(this will be the cut-outline). (See figure 2) Make sure that the cut out line is centered<br />
on the vanity.<br />
Le diamètre extérieur du trou d'encastrement devrait être coupé pour accueillir l'évier<br />
intégré. Veuillez vous reporter au modèle. Tracez la découpe à partir du modèle sur la<br />
\vanité (cette ligne sera la ligne de découpe). (Reportez-vous à la figure 2) Assurez-vous<br />
que la découpe est centrée sur la vanité.<br />
3<br />
STEP-BY-STEP<br />
ILLUSTRATED<br />
<strong>Instructions</strong><br />
DROP-IN BASIN / LAVABO ENACASTRÉ<br />
INSTALLATION PROCEDURE / INSTRUCTIONS D'INSTALLATION<br />
Confirm that the mark on the vanity lines up with the drop-in basin. Then make a<br />
clearance hole anywhere near the cut-out line on the inside and then cut out the portion<br />
within the cut-out line. (See Figure 3)<br />
Confirmez que la marque faite sur le meuble est bien alignée avec le lavabo.<br />
Percez ensuite un trou de dégagement à un endroit quelconque près de la ligne de<br />
découpage à l'intérieur du diamètre, puis découpez l'encastrement en suivant la ligne de<br />
découpage. (Figure 3)<br />
ILLUSTRÉES<br />
ÉTAPE PAR ÈTAPE<br />
A B<br />
D E F<br />
G H I<br />
J K L<br />
FIG 1<br />
FIG 3<br />
FIG 2<br />
7<br />
FOREMOST INTERNATIONAL LTD. (CANADA): 5970 Chedworth Way, Unit A, Mississauga, Ontario Canada L5R 3V5 - Toll Free: 1-888-256-7551<br />
FOREMOST INTERNATIONAL INC. (U.S.A.): 906 Murray Road, East Hanover, New Jersey, USA 07936 - Toll Free: 1-800-443-1410<br />
WEBSITE: www.foremostgroups.com<br />
STEPS /<br />
ÈTAPES<br />
C<br />
Page 1/4
4<br />
5<br />
STEP-BY-STEP<br />
ILLUSTRATED<br />
<strong>Instructions</strong><br />
DROP-IN BASIN / LAVABO ENACASTRÉ<br />
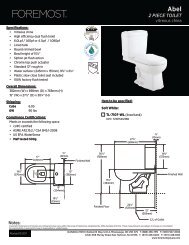
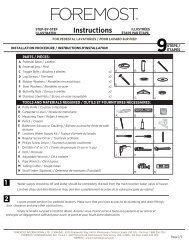
After confirming that the drop-in basin fits into place, turn drop-in basin upside<br />
down and apply a generous portion of Silicone Adhesive or Plumber's Putty on the<br />
underside of the rim close to the edge. (See Figure 5)<br />
Après avoir vérifié le bon ajustement du lavabo encastré, retournez le lavabo à<br />
l'envers et appliquez une bonne couche d'adhésif silicone ou de mastic de plomberie<br />
sur le dessous du rebord, le long du pourtour. (Figure 5)<br />
6<br />
After Silicone Adhesive or Plumber's Putty has been applied, carefully place<br />
drop-in basin into place and press down firmly and trim any excess sealant or putty o.<br />
Une fois l'adhésif silicone ou le mastic de plomberie appliqué, déposez avec<br />
précaution le lavabo dans l'encastrement et appuyez fermement pour faire adhérer.<br />
Enlevez aussitôt tout excédent de silicone ou de mastic.<br />
7<br />
INSTALLATION PROCEDURE / INSTRUCTIONS D'INSTALLATION<br />
Place the drop-in basin into place. Check to make sure that the drop-in basin is<br />
centered on the vanity top and there is enough space for it to fit into place.<br />
(See Figure 4)<br />
Déposez le lavabo encastré dans l'ouverture. Vérifiez si le lavabo est bien<br />
centré sur le dessus du meuble et s'il y a assez d'espace pour reposer bien à plat.<br />
(Figure 4)<br />
Allow silicone or putty to dry for 24 hours before the installation of the faucet<br />
and lavatory/water supply lines.<br />
Laissez l'adhésif silicone ou le mastic sécher pendant 24 heures avant de<br />
procéder à l'installation du robinet et des conduites d'arrivée au lavabo.<br />
ILLUSTRÉES<br />
ÉTAPE PAR ÈTAPE<br />
FOREMOST INTERNATIONAL LTD. (CANADA): 5970 Chedworth Way, Unit A, Mississauga, Ontario Canada L5R 3V5 - Toll Free: 1-888-256-7551<br />
FOREMOST INTERNATIONAL INC. (U.S.A.): 906 Murray Road, East Hanover, New Jersey, USA 07936 - Toll Free: 1-800-443-1410<br />
WEBSITE: www.foremostgroups.com<br />
FIG 4<br />
FIG 5<br />
7<br />
STEPS /<br />
ÈTAPES<br />
Page 2/4
1<br />
2<br />
STEP-BY-STEP<br />
ILLUSTRATED<br />
PARTS / PIÈCES:<br />
<strong>Instructions</strong><br />
INSTALLATION PROCEDURE / INSTRUCTIONS D'INSTALLATION<br />
ILLUSTRÉES<br />
ÉTAPE PAR ÈTAPE<br />
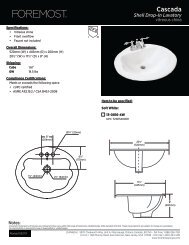
FOR PEDESTAL LAVATORIES / POUR LAVABO SUR PIED<br />
A Pedestal Basin / Lavabo<br />
B Pedestal Leg / Pied<br />
C Toggle Bolts / Boulons à ailettes x2 A B C<br />
D Lag Screws / Tire-fond x2<br />
E<br />
F<br />
Rubber Washers / Rondelles en caoutchouc<br />
Steel Washers / Rondelles en acier<br />
x2<br />
x2<br />
D E F<br />
G Butterfly Nuts / Écrous à oreilles x2<br />
H Stainless Steel Nuts / Écrous en acier inoxydable x2<br />
G H<br />
A<br />
TOOLS AND MATERIALS REQUIRED / OUTILS ET FOURNITURES NÈCESSAIRES:<br />
Putty Knife / Couteau à mastiquer<br />
B Carpenter’s Level / Niveau de menuiserie<br />
C Measuring Tape / Ruban à mesurer<br />
A B C<br />
D Pencil / Crayon<br />
E Bathroom Silicone or Caulking / Silicone ou bouche-fente de salle<br />
de bains<br />
D E F<br />
F Lavatory Water Supply Kit / Tuyaux d’arrivée du lavabo<br />
G<br />
H<br />
Regular Screw Driver / Tournevis ordinaire<br />
Philips Screw Driver / Tournevis à pointe cruciforme<br />
G H I<br />
I Drill Bits (⅝” or ⅛”) / Forets de perceuse (⅝ po or ⅛ po)<br />
J<br />
K<br />
Drill / Perceuse<br />
Adjustable Wrench / Clé à molette<br />
J<br />
K<br />
L<br />
L Pipe Wrench / Clé à tuyaux<br />
M Tubing Cutter / Coupe-tubes<br />
N Stud Finder (Optional) / Détecteur de montants (Facultatif)<br />
M N<br />
Water supply should be o and water should be completely drained from the main location water valve of faucet.<br />
L'entrée d'eau doit être éteinte et l'eau doit être complètement écoulée de la valve principale du robinet.<br />
Locate proper position for pedestal lavatory. Make sure that you have access to all plumbing and drain fittings,<br />
door clearance and any other obstructions.<br />
Situez le lavabo sur pied à l’endroit désiré. Assurez-vous d’avoir accès à toute la tuyauterie et au renvoi et<br />
prévoyez un dégagement susant pour ouvrir la porte et pour toute autre obstruction.<br />
FOREMOST INTERNATIONAL LTD. (CANADA): 5970 Chedworth Way, Unit A, Mississauga, Ontario Canada L5R 3V5 - Toll Free: 1-888-256-7551<br />
FOREMOST INTERNATIONAL INC. (U.S.A.): 906 Murray Road, East Hanover, New Jersey, USA 07936 - Toll Free: 1-800-443-1410<br />
WEBSITE: www.foremostgroups.com<br />
9STEPS /<br />
ÈTAPES<br />
Page 1/5
4<br />
On marked location on the wall, drill holes with a ⅝” drill bit<br />
if the pedestal will not be attached onto a stud. If pedestal will be<br />
mounted onto a stud, then drill holes with a ⅛” drill bit.<br />
À l’endroit marqué, percez des trous avec le foret de ⅝ po<br />
si le lavabo n’est pas fixé dans un montant. Si le lavabo est fixé sur<br />
un montant, percez des trous avec le foret de ⅛ po.<br />
5<br />
Carefully remove pedestal basin from pedestal leg and<br />
install faucet and pop-up assembly as per the manufacturers<br />
installation instructions.<br />
Enlevez délicatement le lavabo du pied et posez le robinet<br />
et la bonde mécanique conformément aux instructions du fabric.<br />
6<br />
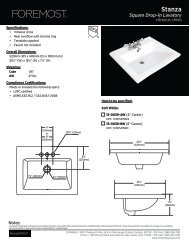
STEP-BY-STEP<br />
ILLUSTRATED<br />
<strong>Instructions</strong><br />
FOR PEDESTAL LAVATORIES / POUR LAVABO SUR PIED<br />
INSTALLATION PROCEDURE / INSTRUCTIONS D'INSTALLATION<br />
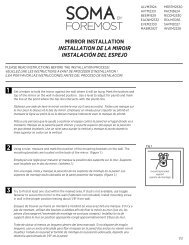
3 Place pedestal basin on pedestal leg and move into the<br />
desired position against the wall. Make sure that the pedestal<br />
basin is levelled on the pedestal leg. With a pencil, mark the<br />
location of the pedestal basin support holes on the wall. (Fig.1)<br />
Déposez le lavabo sur le pied et placez l’ensemble à<br />
l’endroit désiré contre le mur. Veillez à ce que le lavabo soit bien<br />
d’aplomb sur le pied. Avec un crayon, faites une marque sur le<br />
mur pour indiquer l’endroit des trous de support du lavabo. (Fig.1)<br />
If instalIing directly onto the wall without a stud, use<br />
toggle bolts. Push toggle bolts through the backside of the<br />
pedestal basin. Place rubber washer, steel washer and hex nut<br />
loosely on the end of the bolt, in this direct order. Then place the<br />
pedestal basin on the pedestal leg. Then place the complete unit<br />
into the desired position on the wall at the same time pushing the<br />
toggle bolts through the pre-drilled holes on the wall. (Fig.2A)<br />
OR<br />
If instalIing directly onto a stud, use lag screws. Place the<br />
pedestal basin on the pedestal leg. Then place the complete unit<br />
in the desired position on the wall. Place metal washer and rubber<br />
washer onto the lag screw (in this direct order) and at the same<br />
time fastening the pedestal basin directly onto the stud by screwing<br />
the lag screw into the stud. (Fig.2B)<br />
Si vous posez le lavabo directement sur le mur creux,<br />
employez les boulons à ailettes comme fixations. Introduisez les<br />
boulons à travers les ouvertures à l’arrière du lavabo. Mettez<br />
une rondelle en caoutchouc, une rondelle en acier un écrou<br />
hexagonal sur l’extrémité du boulon dans cet ordre précis.<br />
Déposez ensuite le lavabo sur pied et placez-l’ensemble contre le<br />
mur tout en introduisant le boulons à ailettes dans les trous déjà<br />
precés sur le mur. (Fig.2A)<br />
WALL /<br />
MUR<br />
BUTTERFLY<br />
NUT /<br />
ÉCROUS A<br />
OREILLES<br />
RUBBER WASHER /<br />
RONDELLES EN CAOUTCHOUC<br />
STEEL WASHER /<br />
RONDELLES EN ACIER<br />
STAINLESS STEEL NUT /<br />
ÉCROUS EN ACIER<br />
INOXYDABLE<br />
STUD /<br />
MONTANT<br />
TOGGLE BOLT /<br />
BOULONS À AILETTES<br />
WALL /<br />
MUR<br />
RUBBER WASHER /<br />
RONDELLES EN CAOUTCHOUC<br />
STEEL WASHER /<br />
RONDELLES EN ACIER<br />
LAG SCREW /<br />
TIRE-FOND<br />
ILLUSTRÉES<br />
ÉTAPE PAR ÈTAPE<br />
BASIN / LAVABO<br />
BASIN / LAVABO<br />
Fig.1<br />
Fig.2A<br />
Fig.2B<br />
FOREMOST INTERNATIONAL LTD. (CANADA): 5970 Chedworth Way, Unit A, Mississauga, Ontario Canada L5R 3V5 - Toll Free: 1-888-256-7551<br />
FOREMOST INTERNATIONAL INC. (U.S.A.): 906 Murray Road, East Hanover, New Jersey, USA 07936 - Toll Free: 1-800-443-1410<br />
WEBSITE: www.foremostgroups.com<br />
9STEPS /<br />
ÈTAPES<br />
Page 2/5
STEP-BY-STEP<br />
ILLUSTRATED<br />
6 OU<br />
Si vous fixez le lavabo dans un montant, utilisez les tire-fonds.<br />
Déposez le lavabo sur le pied et placez l’ensemble à l’endroit désiré<br />
contre le mur. Mettez une rondelle métalliique et une rondelle en<br />
caoutchouc sur le tire-fonds (dans cet ordre précis) puis fixez le<br />
lavabo sure le mur en vissant le tire-fonds dans le montant avec<br />
un tournevis. (Fig.2B)<br />
7 Tighten hex nut (stud application) or toggle bolt (wall<br />
application) until pedestal basin is snug against the wall.<br />
Caution: Do not over tighten as this could break porcelain.<br />
Please Note: Pedestal leg should be supporting the pedestal top,<br />
since mounting lips are not designed to hold the weight of the<br />
pedestal top.<br />
Serrez l’écrou hexagonal (fixation sur montant) ou le boulon<br />
à ailettes (fixation sur mur creux) jusqu’à ce que le lavabo soit bien<br />
calé contre le mur.<br />
Mise en garde: Ne serrez pas excessivement car cela pourrait faire<br />
fendre la porcelaine.<br />
A noter: Le pied doit servir d’appui au lavabo, puisque les rebords<br />
de montage ne sont pas conçus pour supporter seuls le poids du<br />
lavabo.<br />
8 Apply a neat bead of bathroom silicone or caulking between<br />
the pedestal basin and the wall and where the pedestal basin connects<br />
onto the pedestal leg (Fig.3)<br />
Appliquez un cordon uniforme de silicone ou de bouched-fente<br />
entre le lavabo et le mur et à l’endroit où le lavabo s’appuye sur le pied.<br />
(Fig.3)<br />
9 Complete any final plumbing connections such as lavatory supply kit<br />
Complétez l’installation de plomberie telle que la pose des tuyaux d’arrivée.<br />
CARE AND MAINTENANCE / SOINS ET ENTRETIEN:<br />
<strong>Instructions</strong><br />
INSTALLATION PROCEDURE / INSTRUCTIONS D'INSTALLATION<br />
ILLUSTRÉES<br />
ÉTAPE PAR ÈTAPE<br />
FOR PEDESTAL LAVATORIES / POUR LAVABO SUR PIED<br />
Wipe the outside of the pedestal with a non-abrasive cleaner and a soft towel. Make sure that the complete surface is<br />
cleaned and dried.<br />
NOTE: IMPROPER CARE MAY CAUSE THE WARRANTY TO BECOME INVALID<br />
Essuyez l’extérieur du lavabo sur pied avec un nettoyant non abrasif et une serviette douche. Assuez-vous que la surface<br />
entière du sanitaire est propre et sèche.<br />
REMARQUE: LE MAUVAIS ENTRETIEN DU PRODUIT POURRAIT INVALIDER LA GARANTIE.<br />
FOREMOST INTERNATIONAL LTD. (CANADA): 5970 Chedworth Way, Unit A, Mississauga, Ontario Canada L5R 3V5 - Toll Free: 1-888-256-7551<br />
FOREMOST INTERNATIONAL INC. (U.S.A.): 906 Murray Road, East Hanover, New Jersey, USA 07936 - Toll Free: 1-800-443-1410<br />
WEBSITE: www.foremostgroups.com<br />
FIG.3<br />
9STEPS /<br />
ÈTAPES<br />
Page 3/5
STEP-BY-STEP<br />
ILLUSTRATED<br />
<strong>Instructions</strong><br />
TWO PIECE DUAL FLUSH TOILET<br />
TOILETTE À DOUBLE CHASSE D'EAU, DEUX PIÈCES<br />
INSTALLATION PROCEDURE / INSTRUCTIONS D'INSTALLATION<br />
PARTS / PIÈCES:<br />
A Push Button Set / Ensemble de bouton-poussoir<br />
B Complete Dual Flush Valve / Robinet de chasse complet<br />
C Complete Fill Valve / Robinet de chasse double complet<br />
D Rubber Bolt Washers / Rondelles de boulons en caoutchouc<br />
E Brass Washers / Rondelles en laiton<br />
F Brass Tank Bolts / Boulons de réservoir en laiton<br />
G Brass Nuts / Écrous en laiton<br />
H Oval Washers / Rondelles ovales<br />
I Wing Nuts / Écrous à oreilles<br />
J Large Rubber Sealing Gasket /Gros joint d'étanchéité en caoutchouc<br />
K Plastic Cap Covers & Washers / Rondelles et capuchons en plastique<br />
L Toilet Seat / Siège de toilette<br />
TOOLS AND MATERIALS REQUIRED / OUTILS ET FOURNITURES NÈCESSAIRES:<br />
A Sealing Ring (3/4" Rubber or 11/16" Wax)<br />
Anneau d'étanchéité (3/4 po en caoutchouc ou 11/16 po en cire)<br />
x1<br />
B Floor Flange (May already be installed if replacing existing toilet)<br />
Bride de fixation (déjà en place dans le cas du remplacement<br />
d'une toilette)<br />
x1<br />
A B C<br />
C Closet Bolts / Boulons de cuvette<br />
x2<br />
D Plastic Closet Bolt Washers / Rondelles en plastique pour<br />
boulons de cuvette<br />
x2<br />
D E F<br />
E Metal Washers / Rondelle métallique<br />
x2<br />
F Tightening Nuts / Écrous de serrage<br />
x2<br />
G H I<br />
G Water Supply Kit / (Not needed if replacing existing toilet)<br />
Nécessaire d'arrivée d'eau / (déjà en place dans le cas du<br />
x1<br />
remplacement d'une toilette)<br />
H Adjustable Wrench / Clé à molette<br />
I Flathead Screwdriver / Tournevis à lame plate<br />
J K<br />
L<br />
J Level / Niveau<br />
K Nut Driver or Socket Set / Tournevis à douille ou jeu de douilles<br />
L Putty Knife / Couteau à mastic<br />
M Tape Measure / Ruban à mesurer<br />
M<br />
x1<br />
x1<br />
x1<br />
x2<br />
x4<br />
x2<br />
x2<br />
x2<br />
x2<br />
x1<br />
x2<br />
x1<br />
A B C<br />
D E F<br />
G<br />
J<br />
ILLUSTRÉES<br />
ÉTAPE PAR ÈTAPE<br />
13<br />
H I<br />
K L<br />
STEPS /<br />
ÈTAPES<br />
FOREMOST INTERNATIONAL LTD. (CANADA): 5970 Chedworth Way, Unit A, Mississauga, Ontario Canada L5R 3V5 - Toll Free: 1-888-256-7551<br />
FOREMOST INTERNATIONAL INC. (U.S.A.): 906 Murray Road, East Hanover, New Jersey, USA 07936 - Toll Free: 1-800-443-1410<br />
WEBSITE: www.foremostgroups.com<br />
Page 1/8
1<br />
2<br />
REMOVING YOUR OLD TOILET / DÉMONTAGE DE LA TOILETTE USAGÉE<br />
Turn o the water supply.<br />
Fermez l'arrivée d'eau.<br />
Flush the toilet to empty the tank. Remove any water left in the tank or bowl.<br />
Actionnez la chasse d'eau pour vider le réservoir. Videz complètementl'eau qui<br />
reste dans la cuvette ou dans le réservoir.<br />
3<br />
4<br />
5<br />
Disconnect the supply line from the tank.<br />
Démontez la conduite d'arrivée du réservoir.<br />
Remove decorative caps. Unscrew nuts that attach the toilet to the floor.<br />
Enlevez les capuchons décoratifs. Dévissez les écrous qui fixent la cuvette au plancher.<br />
Remove toilet.<br />
Enlevez la toilette.<br />
INSTALLATION PROCEDURE / INSTRUCTIONS D'INSTALLATION<br />
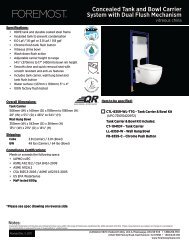
1 Make sure the water supply valve is shut o before installation.<br />
Assurez-vous que le robinet d'arrivée est bien fermé avant de procéder.<br />
2<br />
Remove old closet bolts from closet flange. Clean any old wax, putty, etc. from base area.<br />
Enlevez les vieux boulons de fixation de la bride de fixation. Débarrassez la bride et le<br />
plancher de toute trace de cire, de mastic, de saleté.<br />
3<br />
STEP-BY-STEP<br />
ILLUSTRATED<br />
<strong>Instructions</strong><br />
TWO PIECE DUAL FLUSH TOILET<br />
TOILETTE À DOUBLE CHASSE D'EAU, DEUX PIÈCES<br />
ILLUSTRÉES<br />
ÉTAPE PAR ÈTAPE<br />
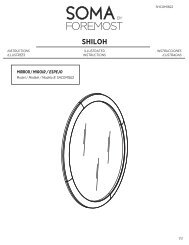
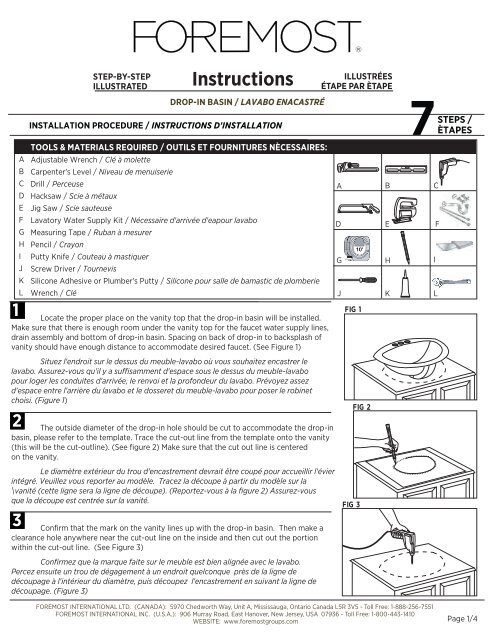
Install new closet bolts into closet flange. (See Figure 1)You can pre-cut the closet bolts to<br />
the desired length to put on the bolt cap by doing the following: Temporarily install closet bolts and<br />
set the toilet and place the washers and nuts onto the bolts. Then mark the length needed. Take<br />
toilet out of the place and remove the closet bolts. Cut the closet bolts to the length and then turn<br />
the toilet on its side onto a soft surface to avoid scratches on the finish.<br />
Introduisez les boulons de fixation neufs dans la bride de fixation. (Figure 1). Les boulons<br />
de fixation peuvent être coupés au préalable à la longueur voulue, de la façon suivante. Posez<br />
temporairement les boulons de fixation, déposez la cuvette dessus, puis mettez les rondelles et<br />
les écrous sur les boulons. Marquez la longueur voulue. Enlevez la cuvette et les boulons. Couper<br />
les vis du cabinet à la longueur désirée et tourner la toilette sur le côté, de préférence sur une surface<br />
non rugeuse afin d’éviter les éraflures sur le fini.<br />
FIG 1<br />
13STEPS /<br />
ÈTAPES<br />
FOREMOST INTERNATIONAL LTD. (CANADA): 5970 Chedworth Way, Unit A, Mississauga, Ontario Canada L5R 3V5 - Toll Free: 1-888-256-7551<br />
FOREMOST INTERNATIONAL INC. (U.S.A.): 906 Murray Road, East Hanover, New Jersey, USA 07936 - Toll Free: 1-800-443-1410<br />
WEBSITE: www.foremostgroups.com<br />
Page 2/8
4<br />
5<br />
REMOVING YOUR OLD TOILET / DÉMONTAGE DE LA TOILETTE USAGÉE<br />
Place a new wax ring around the waste flange of toilet bowl. (See Figure 2)<br />
Mettez un nouvel anneau de cire sur la bride de vidage de la cuvette. (Figure 2).<br />
Lower the toilet onto the closet bolts, so the bolts project through mounting holes in base<br />
of toilet. (See Figure 3) Using a rocking motion, press the bowl down to position the toilet onto<br />
the flange.<br />
Déposez la cuvette sur les boulons de fixation de façon à ce que les boulons sortent<br />
des trous de fixation situés sur le socle de la cuvette. (Figure 3). D'un mouvement de va-et-vient,<br />
faites délicatement basculer la cuvette pour la placer sur la bride de fixation.<br />
6<br />
Install plastic cap washers, followed by metal washers and nuts onto the closet-bolts.<br />
(See Figure 4) Tighten the bolts alternately until toilet is firmly seated on the floor<br />
CAUTION: DO NOT OVERTIGHTEN NUTS<br />
Posez tour à tour les rondelles de capuchons en plastique, les rondelles métalliques et<br />
les écrous sur les boulons de cuvette. (Figure 4). Serrez les boulons en alternant jusqu'à ce<br />
que la cuvette soit solidement fixée au plancher.<br />
MISE EN GARDE : NE PAS TROP SERRER LES ECROUS<br />
7<br />
8<br />
Install the flange bolt caps. (See Figure 4)<br />
Posez les capuchons sur les boulons de fixation. (Figure 4)<br />
Insert tank bolts inside the tank. Use the rubber washers supplied to create a seal. (See Figure 5)<br />
Introduisez les boulons du réservoir dans le réservoir. Utilisez les rondelles en caoutchouc pour<br />
créer un joint étanche. (Figure 5).<br />
9<br />
Install the brass nut and brass washers on the bolts under the tank. Tighten the nuts until the<br />
rubber washers in the tank create a proper and secure seal.<br />
Posez les écrous en laiton et les rondelles en laiton sur les boulons sous le réservoir.<br />
Serrez les écrous jusqu'à ce que les rondelles situées à l'intérieur assurent l'étanchéité del'assemblage.<br />
10<br />
Attach the large rubber sealing gasket to the center drain hole under the tank. (See Figure 6)<br />
Fixez le gros joint d'étanchéité en caoutchouc dans le trou de vidage central sous le<br />
réservoir. (Figure 6).<br />
11<br />
STEP-BY-STEP<br />
ILLUSTRATED<br />
<strong>Instructions</strong><br />
TWO PIECE DUAL FLUSH TOILET<br />
TOILETTE À DOUBLE CHASSE D'EAU, DEUX PIÈCES<br />
Gently place the tank on the bowl with the bolts protruding out underneath. Then tighten<br />
with metal oval washers and wing nuts, tighten enough that the tank sits flat on the bowl.<br />
Déposez délicatement le réservoir sur la cuvette en introduisant les boulons dans les trous.<br />
Serrez avec les rondelles ovales et les écrous à oreilles, susamment pour que le réservoir repose<br />
bien à plat sur la cuvette.<br />
ILLUSTRÉES<br />
ÉTAPE PAR ÈTAPE<br />
13STEPS /<br />
ÈTAPES<br />
FOREMOST INTERNATIONAL LTD. (CANADA): 5970 Chedworth Way, Unit A, Mississauga, Ontario Canada L5R 3V5 - Toll Free: 1-888-256-7551<br />
FOREMOST INTERNATIONAL INC. (U.S.A.): 906 Murray Road, East Hanover, New Jersey, USA 07936 - Toll Free: 1-800-443-1410<br />
WEBSITE: www.foremostgroups.com<br />
FIG 2<br />
FIG 3<br />
FIG 4<br />
FIG 5<br />
FIG 6<br />
Page 3/8
1 2<br />
1 3<br />
Re-connect water supply line to the tank. Tighten coupling nut and turn the water on<br />
and observe for leaks.<br />
Raccorder l'alimentation en eau au réservoir. Serrer l'écrou de raccord et ouvrirl'alimentation<br />
en eau. S'assurer qu'il n'y a aucune fuite.<br />
1<br />
2<br />
3<br />
<strong>Instructions</strong><br />
STEP-BY-STEP<br />
ILLUSTRÉES<br />
ILLUSTRATED<br />
ÉTAPE PAR ÈTAPE<br />
TWO PIECE DUAL FLUSH TOILET<br />
13<br />
TOILETTE À DOUBLE CHASSE D'EAU, DEUX PIÈCES<br />
STEPS<br />
REMOVING YOUR OLD TOILET / DÉMONTAGE DE LA TOILETTE USAGÉE<br />
Make sure that the toilet tank is parallel to the wall and straight on the bowl.<br />
CAUTION: DO NOT OVERTIGHTEN NUTS, SEVERE DAMAGE MAY OCCUR.<br />
Assurez-vous que le réservoir est bien parallèle au mur arrière et aligné sur la cuvette.<br />
MISE EN GARDE : SERRER EXCESSIVEMENT LES ÉCROUS POURRAIT CAUSER DESDOMMAGES GRAVES.<br />
INSTALLATION OF PUSH BUTTON / INSTALLATION DU BOUTON-POUSSOIR<br />
Unscrew the tightening nut which is attached to the handle mechanism.<br />
Dévissez l'écrou de serrage qui est attaché au mécanisme de la poignée<br />
Insert the push button body through the tank lid hole. Tighten with the<br />
large nut supplied. (See Figure 7)<br />
Inéserer le corps du bouton –poussoir dans le trou situé sur le couvercledu réservoir.<br />
Serrez avec le gros écrou fourni. (Voir figure 7)<br />
Adjust threaded rods using locknuts so that the rods are positioned just over and<br />
slightly touching the top of the half flush and full flush mechanism. Notethat the half flush is<br />
on the left, green tab and the full flush is on the right, whitetab. (See Figure 8)<br />
NOTE: All <strong>Foremost</strong> toilets come preset and do not need to be adjusted.<br />
Ajustez les tiges filetées à l'aide des contre-écrous de sorte que les tigestouchent<br />
légèrement le dessus du mécanisme à double action. Notez que lemécanisme à action réduite<br />
est du côté gauche (l'étiquette verte) et le mécanismeà pleine action est sur la droite<br />
(l’étiquette blanche).(Voir Figure 8)<br />
NOTEZ BIEN: Toute les toilettes <strong>Foremost</strong> arrivent pré-assemblées etn’ont aucun besoin d’ajustement.<br />
FOREMOST INTERNATIONAL LTD. (CANADA): 5970 Chedworth Way, Unit A, Mississauga, Ontario Canada L5R 3V5 - Toll Free: 1-888-256-7551<br />
FOREMOST INTERNATIONAL INC. (U.S.A.): 906 Murray Road, East Hanover, New Jersey, USA 07936 - Toll Free: 1-800-443-1410<br />
WEBSITE: www.foremostgroups.com<br />
FIG 7<br />
FIG 8<br />
/<br />
ÈTAPES<br />
Page 4/8
1<br />
2<br />
3<br />
4<br />
STEP-BY-STEP<br />
ILLUSTRATED<br />
INSTALLING YOUR TOILET SEAT / POSE DU SIÈGE DE TOILETTE<br />
Place the seat on the toilet, aligning the holes of the seat with the holes in the back<br />
of the toilet bowl.<br />
Placez le siège sur la cuvette, en alignant les trous du siège sur les trous situés<br />
àl'arrière de la cuvette.<br />
Place washers onto the screws then insert the screw through the holes and secure it<br />
with the nut from the bottom of the toilet, with the nut's tapered end on top.(Fig.9)<br />
Introduisez les vis dans les trous et fixez-les avec les écrous par dessus la cuvette,<br />
le bord elé de l'écrou orienté vers le haut. (Fig. 9)<br />
Secure nut from the bottom of toilet, use a regular screwdriver to tighten the fit.(fig. 10)<br />
CAUTION: DO NOT OVERTIGHTEN THE SCREW AS IT MAY CAUSE DAMAGE ON SEAT.<br />
Fixez l'écrou par dessous la cuvette et servez-vous d'un tournevis ordinaire pourbien<br />
serrer. (Fig. 10)<br />
MISE EN GARDE : SERRER EXCESSIVEMENT LA VIS POURRAIT ENDOMMAGERLE SIÈGE.<br />
Push the decorative cap down.<br />
<strong>Instructions</strong><br />
TWO PIECE DUAL FLUSH TOILET<br />
TOILETTE À DOUBLE CHASSE D'EAU, DEUX PIÈCES<br />
Enfoncez le capuchon décoratif pour cacher la tête de la vis.<br />
ILLUSTRÉES<br />
ÉTAPE PAR ÈTAPE<br />
Parts<br />
Pièces<br />
13 STEPS<br />
Adjustable<br />
Washer<br />
Rondelle<br />
ajustable<br />
Fig. 9<br />
Hinge Cover<br />
Couvercle<br />
de penture<br />
Bolt<br />
Boulon<br />
/<br />
ÈTAPES<br />
Hinge Cover<br />
Couvercle de penture<br />
Adjustable Washer<br />
Rondelle ajustable<br />
Fig. 10<br />
Toilet<br />
Toilette<br />
Bolt<br />
Boulon<br />
Washer<br />
Rondelle<br />
Nut<br />
Écrou<br />
Toilet Seat<br />
Siège de<br />
toilette<br />
Toilet Hole<br />
Trou detoilette<br />
Hinge Cover<br />
Couvercle de penture<br />
Bolt<br />
Boulon Washer<br />
Rondelle<br />
Nut<br />
Écrou<br />
FOREMOST INTERNATIONAL LTD. (CANADA): 5970 Chedworth Way, Unit A, Mississauga, Ontario Canada L5R 3V5 - Toll Free: 1-888-256-7551<br />
FOREMOST INTERNATIONAL INC. (U.S.A.): 906 Murray Road, East Hanover, New Jersey, USA 07936 - Toll Free: 1-800-443-1410<br />
WEBSITE: www.foremostgroups.com<br />
Page 5/8
1<br />
2<br />
STEP-BY-STEP<br />
ILLUSTRATED<br />
INSTALLATION PROCEDURE / INSTRUCTIONS D'INSTALLATION<br />
WATER LEVEL ADJUSTMENTS (If Required) / RÉGLADES DU NIVEAU D'EAU (Si requise)<br />
Turn the fill valve counter clockwise and adjust it to proper height. Turn it clockwise to lock<br />
it. (See Figure 11)<br />
Faire pivoter le robinet de remplissage vers la gauche et l'ajusterà la hauteur appropriée.<br />
Le faire tourner vers la droite pour le verrouiller. (Figure 11)<br />
Hold the threaded rod and turn it clockwise to increase the water level inside the tank. Turn<br />
it counter clockwise to lower the water level inside the tank.<br />
Tenir la tige filetée et la faire tourner vers la droite pour augmenter le niveau d'eau à<br />
l'intérieur du réservoir et faire tourner vers la gauche pour le baisser.<br />
Please Note: the factory has preset water level and consumption volumes. Adjusting these settings could aect the<br />
performance of the toilet.<br />
Veuillez noter : Le niveau d'eau et le volume de consommation sont réglés en usine. Un réglage ultérieur de cesparamètres<br />
pourrait nuire au bon fonctionnement de la toilette.<br />
TROUBLE SHOOTING / DÉPANNAGE<br />
<strong>Instructions</strong><br />
TWO PIECE DUAL FLUSH TOILET<br />
TOILETTE À DOUBLE CHASSE D'EAU, DEUX PIÈCES<br />
REPAIR PARTS:<br />
Fill Valve w/Float<br />
Dual Flush Valve w/Flush Seal<br />
Large Rubber Gasket<br />
Tank Lever<br />
Toilet Seat<br />
ILLUSTRÉES<br />
ÉTAPE PAR ÈTAPE<br />
Problem: Poor Flush, the water level is below water line mark.<br />
Solution: The shut-o valve is not completely open; verify that the shut-o valve opens fully. The water supply line can be twisted,<br />
ensure that it is sitting in the tank properly<br />
Problem: Continuous water running, may occur if the flush seal is not completely closed.<br />
Solution: Verify if there is any obstruction with the flush seal.<br />
Problème: La chasse est insusante, le niveau de l'eau reste sous la marque de niveau.<br />
Solution: Le robinet d'arrêt n'est peut-être pas complètement ouvert: vérifiez si le obinet d'arrêt est ouvert à fond. La additionnels<br />
sont situés sur le côté et au bas du robinet de chasse.<br />
Problème: Écoulement d’eau continu. Peut survenir si le joint d'étanchéité de chasse d'eau n'est pas bien fermé.<br />
Solution: Vérifier s'il y a une obstruction au niveau du joint d'étanchéité.<br />
Wipe the outside of the toilet gently with a damp cloth and blot dry with a soft towel. Make sure that the complete surfaceis<br />
cleaned and completely dry.<br />
NOTE: IMPROPER CARE MAY CAUSE THE WARRANTY TO BECOME INVAILD.<br />
Essuyez l'extérieur de la toilette délicatement avec un linge humide et séchez en épongeant avec une serviettedouce<br />
et sèche. Assurez-vous de bien nettoyer toute la surface et de la sécher à fond.<br />
N.B. : LE MAUVAIS ENTRETIEN DU PRODUIT POURRAIT INVALIDER SA GARANTIE.<br />
FIG 11<br />
PIÈCES DE RECHANGE:<br />
Robinet de remplissage avec<br />
Robinet de chasse double<br />
complet avec joint d'étanchéité<br />
Gros joint d'étanchéité en<br />
caoutchouce<br />
Levier de chasse<br />
Siège de toilette<br />
FOREMOST INTERNATIONAL LTD. (CANADA): 5970 Chedworth Way, Unit A, Mississauga, Ontario Canada L5R 3V5 - Toll Free: 1-888-256-7551<br />
FOREMOST INTERNATIONAL INC. (U.S.A.): 906 Murray Road, East Hanover, New Jersey, USA 07936 - Toll Free: 1-800-443-1410<br />
WEBSITE: www.foremostgroups.com<br />
Threaded<br />
Rod<br />
Tige<br />
filetée<br />
Page 6/8
LIMITED WARRANTY<br />
<strong>Foremost</strong>® warrant its products to be free from defects in material or workmanship for 5 years (Vitreous China)<br />
and 1 year (Parts and Fittings) from the date of purchase of the product by the original purchaser.<br />
If inspection of this plumbing product, within 5 years (china product) or 1 year (parts and fittings) after its initial<br />
purchase, confirms that it is defective in materials or workmanship, <strong>Foremost</strong>® will repair or at its option, exchange<br />
the product for a similar model. <strong>Foremost</strong>® provides no warranties or guarantees beyond those in this Limited<br />
Warranty.<br />
This limited warranty applies only to the original purchaser and installation of these products. All for de-installation<br />
and re-installation and transportation costs or charges incidental to warranty services are to be borne by the owner.<br />
In no event will <strong>Foremost</strong>® be liable for the cost of repair or replacement of any installation materials, including but<br />
not limited to, tiles, marble etc. <strong>Foremost</strong>® will not be responsible for and this warranty does not cover and specifically<br />
excludes any liability to the purchaser or any third party for consequential or incidental damages, all of which are<br />
hereby expressly disclaimed, or the extension beyond the duration of this warranty of any implied warranties,<br />
including those of merchantability or fitness for an intended purpose.<br />
This warranty does not apply to local building code compliance. Since local building codes vary considerably, the<br />
purchaser of this product should check with a local building or plumbing contractor to insure local code compliance<br />
before installation. <strong>Foremost</strong>® shall not be responsible or liable for any failure or damage to its toilet tank trim, plumbing<br />
fittings, or china products caused by the use of either chloramines or high concentration of chlorine, lime/iron sediments<br />
and/or other minerals not removed from public water during the treatment of public water supplies or caused by toilet<br />
tank type cleaners containing chlorine, calcium hypochlorite, and /or other chemicals.<br />
This warranty is void if the product has been moved from its initial place of installation; if it has been subjected to<br />
faulty maintenance, abuse, misuse, accident or other damages; if it was not installed in accordance with <strong>Foremost</strong>’s®<br />
instructions; or if it has been modified in a manner inconsistent with the product as shipped by <strong>Foremost</strong>®.<br />
Note: Some states or provinces do not allow the limitations on an implied warranty, and some states/provinces do<br />
not allow exclusions or limitations regarding incidental or consequential damages, so the above limitations may not<br />
apply to you. This warranty gives you specific legal rights, and you may have other rights, which vary from state to<br />
state or province to province. No person is authorized to change, add to, or creates any warranty or obligation other<br />
than that set forth herein.<br />
FOREMOST INTERNATIONAL LTD. (CANADA): 5970 Chedworth Way, Unit A, Mississauga, Ontario Canada L5R 3V5 - Toll Free: 1-888-256-7551<br />
FOREMOST GROUPS, INC. (U.S.A.): 906 Murray Road, East Hanover, New Jersey, USA 07936 - Toll Free: 1-800-443-1410<br />
www.foremostgroups.com<br />
Page 7/8
GARANTIE RESTREINTE<br />
MD <strong>Foremost</strong> garantit que ses produits ne comportent aucun défaut dans le matériel ou la qualité de l’exécution pour<br />
une période de 5 ans (porcelaine vitrifiée) et 1 an (pièces et accessoires) à compter de la date d’achat du produit par<br />
le premier acheteur.<br />
Dans l’éventualité, où une inspection de ce produit de plomberie, en l’espace de 5 ans (porcelaine vitrifiée) ou<br />
1 an (pièces et accessoires), suivant la date initiale d’achat, démontre qu’il y a un défaut dans le matériel ou la<br />
qualité de l’exécution, <strong>Foremost</strong>’s engage à réparer ou selon son choix, remplacer le produit par un produit similaire.<br />
MD<br />
Cette garantie restreinte s’applique uniquement au premier acheteur et à l’installation de ces produits. Tous les coûts<br />
reliés au démontage et à la réinstallation, les frais de transport ou coûts imprévus pour garantir les services, sont à<br />
MD<br />
la charge du premier acheteur. D’aucune façon, <strong>Foremost</strong> ne sera tenu responsable pour les frais de remplacement<br />
MD<br />
de tout matériel d’installation, incluant, mais ne se limitant pas aux tuiles, marbre, etc. <strong>Foremost</strong> n’est pas responsable<br />
pour et cette garantie ne couvre pas et exclut particulièrement, toute responsabilité envers l’acheteur ou tout autre<br />
tierce partie pour des dommages indirects ou imprévus qui par la présente, sont déchargés de toute responsabilité<br />
ou la prolongation, au-delà de la durée de cette garantie ou toute autre garantie implicite, incluant celle de qualité<br />
marchande ou raccorderie à des fins prévues.<br />
Cette garantie ne s’applique pas au règlement des codes du bâtiment. Étant donné, que les codes du bâtiment<br />
varientde façon considérable, l’acheteur de ce produit doit s’assurer auprès d’un entrepreneur local ou en plomberie,<br />
de la conformité des règlements à respecter avant l’installation.<br />
MD<br />
<strong>Foremost</strong> ne doit aucunement être tenu responsable pour toutes défaillances ou dommages au réservoir de<br />
toilette, raccords de plomberie, porcelaine vitrifiée, causés par l’utilisation, soit de chloramines ou une concentration<br />
élevée de chlore, sédiments ferrifères/chaux et/ou autres minéraux non retirés de l’eau publique, au cours du traitement<br />
de l’approvisionnement de l’eau publique. Ainsi, que traitement de l’approvisionnement de l’eau publique. Ainsi, que les<br />
dommages, causés par certains types de nettoyants pour réservoir de toilette, contenant du chlore, hypochlorite de<br />
calcium et/ou autres produits chimiques.<br />
Cette garantie est nulle si le produit a été déplacé de son emplacement original ou sujet à un entretien défectueux,<br />
abus, mauvais usage, accident ou autres dommages. De même, si l’installation n’est pas conforme aux directives de<br />
<strong>Foremost</strong> ou si le produit a été modifié de façon incompatible avec le produit, tel qu’il a été livré par<br />
MD <strong>Foremost</strong> Groups, Inc.<br />
REMARQUE: Certains états ou provinces n’accordent aucune restriction ou garantie implicite et certains<br />
états/provinces n’accordent aucune exclusion ou restriction concernant les dommages indirects ou imprévus. Ainsi,<br />
les restrictions ci-dessus ne s’appliquent pas nécessairement à vous. Cette garantie vous donne des droits légaux<br />
particuliers et d’autres droits qui peuvent varier d’un état à l’autre ou d’une province à l’autre. Personne n’est autorisé à<br />
modifier, ajouter ou concevoir une responsabilité ou garantie autres que celles invoquées par la présente.<br />
FOREMOST INTERNATIONAL LTD. (CANADA): 5970 Chedworth Way, Unit A, Mississauga, Ontario Canada L5R 3V5 - Toll Free: 1-888-256-7551<br />
FOREMOST GROUPS, INC. (U.S.A.): 906 Murray Road, East Hanover, New Jersey, USA 07936 - Toll Free: 1-800-443-1410<br />
www.foremostgroups.com<br />
Page 8/8