Download (13.4 MB) - FULCRUM Wheels
Download (13.4 MB) - FULCRUM Wheels
Download (13.4 MB) - FULCRUM Wheels

You also want an ePaper? Increase the reach of your titles
YUMPU automatically turns print PDFs into web optimized ePapers that Google loves.
14<br />
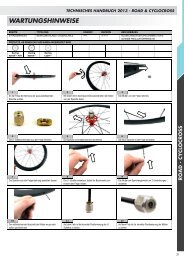
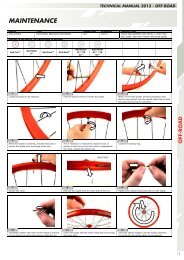
TECHNICAL MANUAL 2013 - ROAD & CYCLOCROSS<br />
MAINTENANCE<br />
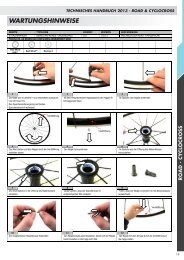
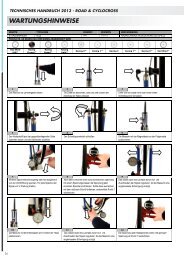
10 11 12<br />
The indication that the adjustment ring nut will be<br />
loosened will be when the slot in the nut has a visible<br />
gap. Do not remove the screw from the adjustment<br />
ring nut.<br />
Holding the axle stationary, rotate the adjustment ring<br />
nut counter-clockwise to remove the adjustment ring<br />
nut.<br />
After removing the adjustment ring nut, you will see<br />
the cone and adjustment cone that we will remove in<br />
the next stage.<br />
13 14 15<br />
Push the axle into the hub body until it reaches the<br />
other side.<br />
The axle will easily come out from the opposite side. Remove the cone and the adjustment cone.<br />
16 17 18<br />
Protect all the components so that they do not get<br />
dirty to prevent any issues during reassembly.<br />
Remove the cone from the axle.<br />
►To replace the spokes see OPERATION 003<br />
►To replace the cones/cups, carry on until the end of<br />
the procedure.<br />
Remove the grease shield by using a small standard<br />
screwdriver. Repeat on the opposite side.<br />
19 20 21<br />
Make sure you do not damage the components. With a small screwdriver remove the bearing retaining<br />
ring making sure you do not damage it. Incorrect<br />
handling may cause the bearings to detach from the<br />
ring.<br />
Remove the cups using the special cup pulling tool.