RBC20-60 Blast Chiller
RBC20-60 Blast Chiller
RBC20-60 Blast Chiller

You also want an ePaper? Increase the reach of your titles
YUMPU automatically turns print PDFs into web optimized ePapers that Google loves.
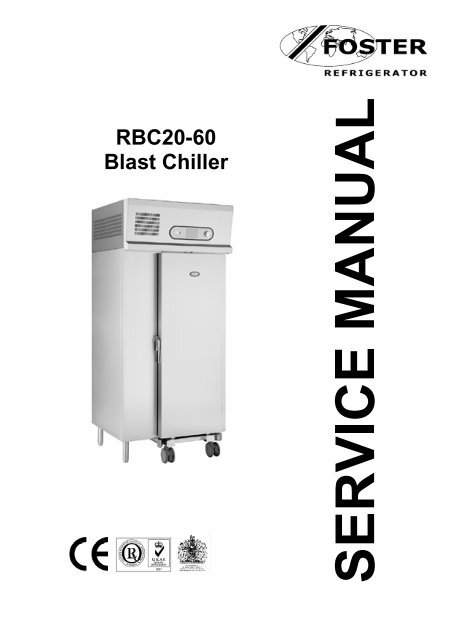
<strong>RBC20</strong>-<strong>60</strong><br />
<strong>Blast</strong> <strong>Chiller</strong>
Contents Page<br />
Introduction 1 to 2<br />
Model Details 2<br />
Controller Technical Detail 2<br />
Parts List 2<br />
Operating Instructions 3 to 6<br />
Electrical Connections 7<br />
Service Information 7 to 19<br />
Diagnostics 8<br />
Function Test 8<br />
Passcode 8<br />
Profiles 9<br />
Parameter Access 9<br />
Parameters 9 to 11<br />
Parameter Definitions 11 to 18<br />
Alarms and Warnings 18<br />
Foot Print Test Operation 19<br />
Probes 19<br />
Technical Data 20 to 22<br />
Wiring Diagrams 23 to<br />
Introduction.<br />
Cook Chill Operation.<br />
<strong>Blast</strong> chilling is a process to reduce the temperature of cooked food by swiftly arresting the cooking process, locking in its<br />
colour, flavour, texture and nutritional value. Department of health guidelines state that to safely blast chill food the<br />
temperature must be reduced from +70°c to +3°c within 90 minutes.<br />
Pre Chill<br />
Pre chilling ensures the correct cabinet temperature in the unit before chilling commences therefore improving the chilling<br />
performance.<br />
Soft Chilling.<br />
Soft chilling is the process of rapid but gentle chilling of food.<br />
This cycle brings down the food temperature to +3°c in no more than 90 minutes without the air or food temperature going<br />
below 0°c.<br />
This prevents large ice crystals forming therefore maintaining the texture, consistency and appearance of food such as<br />
vegetables, rice, pasta, custard and fruit with no dehydration or cell damage.<br />
Hard Chilling.<br />
Hard chilling is the process of general purpose chilling.<br />
This cycle brings down the food temperature to +3°c in no more than 90 minutes and is ideal for chilling meat pies,<br />
lasagne, pasta and individually portioned meals. The air temperature for this process goes down to -15°c for the first 70%<br />
of the cycle, to extract the maximum amount of heat from the product quickly. The air temperature then increases to +3°c<br />
for the final 30% of the time to reduce surface damage and ensure quality.<br />
Hard Chill Max.<br />
Hard chill max brings down the food temperature to +3°c in no more than 90 minutes and is used for chilling high density<br />
or high fat content food such as meat joints, stews or packaged products.<br />
The air temperature during the cycle is allowed to go down to -20°c.<br />
After either a pre-designated time has elapsed or product temperature has been achieved, the air temperature is allowed<br />
to rise to the ‘hold’ value with the temperature being maintained at this level indefinitely.<br />
Surface Protection.<br />
Removing the heat energy from food product as rapidly as possible by the combination of powerful refrigeration and<br />
evaporator fans moving large volumes of cooled air can cause damage to the food product. The food product could have<br />
a form of ‘Frost Burn’ caused by the fast moving air feeling cooler than the actual air temperature ‘Wind Chill Effect’. This<br />
may lead to product discoloration, dehydration, localised freezing and spoilage of the food product.<br />
Surface protection overcomes this by reducing the evaporation operation, and hence the air speed at pre-determined<br />
stages in the cycle to ensure that this does not happen. This is a discreet function and happens automatically without any<br />
intervention from the operator. To enable the surface protection; and determine at what stage it would be activated values<br />
are set in the service operating parameters.<br />
Longer Term Storage – ‘Hold’ Mode (Conservation)<br />
Upon the completion of the blast chilling cycle the controller will automatically enter the ‘Hold’ mode. This will either be<br />
because the selection set time has elapsed or the product core temperature has been achieved. When the hold period<br />
commences an alarm will sound for a period denoted in the service operating parameters.<br />
1
The controller will determine the temperature to be maintained during the hold phase based on the chilling cycle that has<br />
been completed. If a soft or hard chill has taken place the controller will maintain an air temperature of 2°c.<br />
The hold mode is principally intended as a temporary storage facility offering the operator flexibility until the product can<br />
be unloaded into a longer term storage units at the correct storage temperature. On occasion this hold period may<br />
become extended to operate overnight or to provide emergency refrigeration backup. In such instances defrosting would<br />
automatically occur as necessary.<br />
Model Details.<br />
The RBC 20-<strong>60</strong> is capable of blast chilling <strong>60</strong>kg of product from +70°c to +3°c in 90 minutes with entry temperature up to<br />
90°c<br />
The cabinet is compatible with the Rational 20 rack GN 1/1 201 trolley.<br />
Refrigerant used is R404A.<br />
The <strong>RBC20</strong>-<strong>60</strong> has two separate refrigeration systems comprising, two condensing units, a twin circuit condenser and a<br />
twin circuit evaporator. (See pages 20 and 21 for assembly details and page 22 for schematic dual circuit refrigeration<br />
layout).<br />
The <strong>RBC20</strong>-<strong>60</strong>R has the same refrigeration systems but the condensing units are remotely sited.<br />
Refrigerant control is by expansion valve to control the correct amount of refrigerant required to meet the demand of the<br />
evaporator. (See page 21 for assembly detail).<br />
The parameter ‘Capacity Enable’ is set to ‘ON’ to allow for both condensing units to be running during the chill cycle<br />
therefore maximising the heat extraction from the product. During the ‘HOLD’ mode with the ‘Capacity Enable’ set to ‘ON’<br />
one compressor will control the temperature throughout unless the temperature exceeds the capacity control limit.<br />
A 1½” BSP drain outlet is fitted in to the base of the cabinet for connection to external drain.<br />
The cabinet is delivered with the legs secured to the base of the cabinet.<br />
Controller Technical Detail<br />
The FCC controller is a three-piece unit made up of the Front Display and Dial Shaft Encoder, Mother Board plus<br />
Evaporator, Food and Air temperature probes. The front display PCB and the CPU/ Switching PCB unit are<br />
interconnected by a ribbon cable. The membrane attached to the front provides an IP rating of IP54 providing a scratch<br />
free wipe clean finish.<br />
The control dial is the method by which the controller is accessed for all requirements. It has three planes of movement,<br />
clockwise, anticlockwise and inwards.<br />
The control dial allows the operator/ engineer to move forward and backwards through various menu selections shown on<br />
the display, and enter a desired programme. The control system will then respond appropriately either commencing the<br />
operating cycle or allowing further configuration.<br />
Part numbers<br />
Item Description Part Number<br />
Controller Mother Board 00-555395<br />
Controller Shaft Encoder 00-555396<br />
Controller LCD Display 00-555394<br />
Air Probe P1 NTC type. 2.5m 00-555397<br />
Evaporator Probe P2 NTC type. 2.5m 00-555397<br />
Food Probe 5M Length 00-555663<br />
Compressor x 2 TAJ4519ZH T 400/50 00-555885<br />
Condenser Coil BC<strong>60</strong>13/122 01-257300-01<br />
Condenser Fan Assembly S4E300-BP26-30 00-555886<br />
Sight Glass 3/8" 15483015<br />
Drier 00-555388<br />
Solenoid Valve EVR6 32F5219+0 15451215<br />
Liquid Receiver 00-555579<br />
LP Switch 2.5 Bar 0.5 Bar Diff 00-555387<br />
HP Switch 28 Bar – 3 Bar Diff 00-555386<br />
High Pressure Thermostat KP5 Auto Re-set (set at 18 BAR with a 3 BAR diff.) 15452109<br />
Evaporator Coil BC<strong>60</strong>13/121 01-256400-01<br />
Expansion Valve Valve Body TES2-NL68Z34300/68 15450386<br />
Orifice NO 02 68-2092/68-2072 15451104<br />
Expansion Valve Solder Adaptor 68-2 15450910<br />
Evaporator Fan Motor W4E420-CP02-66788-4-7320 00-555375<br />
hinge Edgemount 00-555880<br />
Door Gasket 1406x546MM 01-256387-01<br />
Door Switch Circular (Reed Type) 00-555829<br />
Door Switch Magnet Circular 00-555828<br />
Door Handle Edgemount Latch Kit 00-555881<br />
2
<strong>Blast</strong> Chill & Shock Freeze Operating Instructions.<br />
Standard Operation<br />
When mains electrical power is first applied to the controller it will carry out a self-test function,<br />
for approximately 3 seconds. During this period the display will show.<br />
On completion of the self test, the controller will revert to the last chill program that was run<br />
(Pre-chill, Soft Chill, Hard Chill, Hard Chill Max, Shock Freeze, Professional 1, Professional 2,<br />
or Professional 3). The availability of these is dependent on how the controller has been<br />
configured.<br />
The example shows the controller in Hard Chill mode with the previous and next programs<br />
indicated at the top of the display. To change the program rotate the dial, either clockwise or<br />
anticlockwise to select the type of program you require.(for guidelines refer to page 7)<br />
To initiate the program just press and release the dial for the program to start.<br />
The program starts with the screen on the left being displayed for 2 minutes. After which the<br />
intelligent probe determines if the cycle is controlled by time, displayed by the screen in the<br />
middle, or by temperature as displayed by the screen on the right.<br />
On completion of the program the controller will cause the blast chiller to enter the Hold Mode,<br />
as displayed on the left. An alarm will sound, press and release the dial to cancel the alarm, if<br />
the alarm is not cancelled the blast chiller will still enter the Hold Mode with the periodical<br />
sounding of the alarm. To cancel press and release the dial.<br />
To stop the blast chiller during operation, press and hold the dial for 2 seconds, the display returns to the program<br />
selection screen.<br />
At any time when the blast chiller is operational the dial can be rotated to give information on<br />
the status of the particular mode of operation.<br />
The display will remain for 10 seconds and then revert to the normal operating screen<br />
automatically.<br />
3
Pre Chill<br />
This program is used to Pre Chill the cabinet prior to the first cycle. This is done with the<br />
<strong>Blast</strong> <strong>Chiller</strong> empty and is a short time based program of about 20 minutes.<br />
It is generally recognised as the correct method of preparing for a blast chill cycle.<br />
The program is selected by rotating the dial until the display shows, press and release the dial<br />
to start the program.<br />
Defrost.<br />
Defrosting is not normally required but if there is an ice build up on the coil inside the cabinet a manual defrost can be<br />
selected. Rotate the dial until the Defrost screen, below left, is displayed.<br />
Press and release the dial to start the defrost.<br />
During defrost the screens will alternate between the middle and right hand screens.<br />
Defrost will last 20 minutes and when completed the alarm will sound. Press the dial to acknowledged or if not wait until it<br />
comes to the end of the alarm period, the alarm will stop and the display will revert to the previous screen.<br />
Further Operational Features.<br />
Chill time adjustment. (All programs excluding Professional 1, 2 or 3)<br />
Whilst in the pre-programmed selection screen press and hold the dial for 2 seconds, the information screen will be<br />
displayed, below left. Press and release the dial to move to the time set, see below right. Rotate the dial clockwise to<br />
increase the time, anticlockwise to decrease. Once the time has been selected, press and release the dial and ‘CHILL<br />
TEMP’ will be highlighted.<br />
On completion press and hold the dial for 2 seconds to return to the program selection screen, to continue press and<br />
release the dial for the program to start.<br />
On completion of the program the time changes will revert to the default settings.<br />
Chill / Hold temperature adjustments. (Professional 1, 2 or 3 only)<br />
Professional 1, 2 and 3, if configured, are programs that can be used to tailor the chill time and temperature to suit<br />
specific product requirements.<br />
Adjust the ‘CHILL TIME’ as above. With the ‘CHILL TEMP’ highlighted, below second from the left, press and release the<br />
dial to move to the temp set, below second from the right. Rotate the dial clockwise to increase the time, anticlockwise to<br />
decrease. Once the time has been selected, press and release the dial and ‘HOLD TEMP’ will be highlighted. Follow the<br />
procedure for changing chill temp to change the hold temp.<br />
On completion press and hold the dial for 2 seconds to return to the program selection screen, to continue press and<br />
release the dial for the program to start.<br />
The chill time and chill / hold temperature adjusted settings are retained for professional 1, 2 and 3 programs and will not<br />
revert to the default.<br />
4
Information<br />
Whilst in the program selection screen press and hold the dial for 2 seconds, the information<br />
screen will be displayed. Rotate the dial until ‘INFORMATION’ is highlighted. Press and<br />
release the dial to display the screen showing the last run cycle. The information relates to<br />
date, program run, start time, start temperature and end temperature.<br />
HACCP settings.<br />
Whilst in the program selection screen press and hold the dial for 2 seconds, the information screen will be displayed.<br />
Rotate the dial until ‘HACCP SETTINGS’ is highlighted. Press and release the dial to access the HACCP option screen.<br />
Press and release the dial to move to the selection screen for long or short reports, rotate the dial to select which option,<br />
once selected press and release the dial to confirm.<br />
Press and release the dial to move to the selection screen for the print sample, select 3 or 5 minute selection rate.<br />
On completion press and hold the dial for 2 seconds to return to the program selection screen.<br />
Print Data.<br />
Whilst in the program selection screen press and hold the dial for 2 seconds, the information screen will be displayed.<br />
Rotate the dial until ‘PRINT DATA’ is highlighted. If using a hand held printer switch the printer on now. Point the printer at<br />
the infra red download sensor (optional), located in display area, press and release the dial to download the print data.<br />
On completion press and hold the dial for 2 seconds to return to the program selection screen.<br />
Set time and date.<br />
Whilst in the program selection screen press and hold the dial for 2 seconds, the information screen will be displayed,<br />
below left. Rotate the dial until ‘SET TIME/DATE’ is highlighted. Press and release the dial to access the service screen,<br />
below right. Press and release the dial to move to the displayed time in hours and minutes, rotate the dial to alter the time,<br />
once the correct time has been achieved press and release the dial to move to ‘DAY’. If it is necessary to change the day,<br />
month and year change the settings using the same procedure for setting the time.<br />
On completion press and hold the dial for 2 seconds to return to the program selection screen.<br />
Changing Text Language.<br />
Whilst in the program selection screen press and hold the dial for 2 seconds, the<br />
information screen will be displayed continue pressing the dial for a further 2 seconds to<br />
display the ‘SERVICE MENU’. LANGUAGE will be highlighted, press and release the dial,<br />
‘ENG’ (English) will be highlighted. Rotate the dial to change the language. Select the<br />
preferred language, press and release the dial to confirm.<br />
Screen Saver<br />
The screen saver screen is displayed if the machine is not used for 20 minutes, providing power is connected to it. It<br />
shows a series of ‘Z’ indicating sleep mode. Pressing and releasing the dial or opening the door will awaken the unit, the<br />
program selection screen will be displayed.<br />
Alarms and Warnings<br />
Air Probe: If this alarm occurs it will remain in the program selected until it is completed, however no further<br />
operation will be possible. Call your Foster Authorised Service Company.<br />
Evap Probe: If this alarm occurs it will remain in the program selected until it is completed, however no further<br />
operation will be possible. Call your Foster Authorised Service Company.<br />
Food Probe: If this alarm occurs it will automatically change to a timed program until it is completed, however no<br />
further operation will be possible. Call your Foster Authorised Service Company.<br />
Door Open: The display will continue to show the alarm message until the door is closed. If this does not cancel the<br />
alarm call your Foster Authorised Service Company.<br />
5
High Temperature: This alarm will only occur in the hold mode only. Probe the product to determine it is at the correct<br />
temperature. If it is at the correct temperature place in a storage refrigerator or freezer and call your<br />
Foster Authorised Service Company. If the product temperature is above the guidelines check the chill<br />
time selected or the weight of product being chilled does not exceed the specification for the Cabinet.<br />
HP Switch: Causes for this alarm could be:<br />
Does the product temperature exceed 90°c. Has too much product been placed in the cabinet. Is the<br />
airflow restricted. Does the condenser filter require cleaning. If the problem persists call your Foster<br />
Authorised Service Company.<br />
Power Fail: If the power fails for up to five minutes the unit will re-start on the resumption of the power supply without<br />
affecting the selected cycle. Longer than five minutes and the controller will enter the hold mode. To<br />
check the cycle operation look in the information screen to check the cycle time.<br />
To re-start press and release the dial, the screen will return to the hold screen. Press and hold the<br />
dial for two seconds the display returns to the program selection.<br />
There are Three main programmes RBC 20-<strong>60</strong> <strong>Blast</strong> <strong>Chiller</strong>.<br />
Soft Chill- for the safe chilling of delicate products such as gateaux and patisserie items, and high water content items<br />
such as vegetables, rice and pasta.<br />
Hard Chill- For general purpose chilling. The Hard Chill cycle is ideal for chilling ‘standard products’ such as meat pies,<br />
lasagne, individually portioned meals etc. Providing surface protection for the later part of the program.<br />
Hard Chill Max- For high density and high fat content products such as meat joints, stews and sous vide.<br />
Guide for <strong>Blast</strong> Chilling.<br />
Food Type Includes<br />
6<br />
<strong>Blast</strong> Chill<br />
Programme<br />
required<br />
Time required<br />
to <strong>Blast</strong> Chill<br />
(Minutes)<br />
Meat Beef, pork, lamb, poultry & mince Hard 40 - 90<br />
Fish<br />
Prepared<br />
dishes<br />
Vegetables &<br />
Pulses<br />
Fried, poached or baked – haddock, plaice, salmon, cod<br />
fillets etc<br />
Soft 30 - 90<br />
Stews & casseroles, lasagne, risotto, shepherds pie Hard 50 - 90<br />
Steamed or roasted veg, rice and potatoes etc. Soft 30 - 90<br />
Fruit Stewed and cooked fruits. Soft <strong>60</strong> – 90<br />
Bakery Cakes Hard 30 – 90<br />
Bakery Pastries Hard <strong>60</strong> – 90<br />
Desserts Fruit Based desserts & egg based flans. Soft 30 – 90<br />
Desserts Sponge puddings and dense desserts such as cheesecake. Hard 30 – 90<br />
NOTE: All times listed should be used as a guide only, and will depend on type, size and quantity.
Electrical Connections.<br />
Inputs.<br />
L - Mains ‘Live’ supply (115V 230V, 50Hz / <strong>60</strong>Hz). 4 terminals.<br />
N - Mains ‘Neutral’ supply – 16 terminals.<br />
E - Protective Earth – 16 terminals.<br />
DOOR - Door Switching connection (not voltage carrying).<br />
DOOR2 - Safety door switch connection (not voltage carrying).<br />
HP - High Pressure switch connection (not voltage carrying).<br />
TA - Air probe connection.<br />
TE - Evaporator probe connection.<br />
FP1 - Food/ product temperature connection.<br />
FP2 - Additional second food / product temperature probe connection.<br />
FP3 - Additional third food / product temperature probe connection.<br />
Outputs.<br />
C1 - Condensing system switched relay (30A/ 8A) – normally open (NO) output – 3 terminals.<br />
F1 - Evaporator fan 1 switch relay (8A/ 4A) – normally open (NO) output – 3 terminals.<br />
F2 - Evaporator fan 2 switch relay (8A/ 4A) – normally open (NO) output – 3 terminals.<br />
D1 - Defrost system switched relay (8A/ 4A) – normally open (NO) output – 3 terminals.<br />
S1 - UV light system switched relay (8A/ 4A) – normally open (NO) output 2 terminals.<br />
A1 - Alarm relay (8A/ 4A) normally closed (NC) – 1 terminal, normally open (NO) 2 terminals.<br />
P1 - Capacity relay (8A/ 4A) normally closed (NC) – 1 terminal, normally open (NO) 2 terminals.<br />
Display Power - Man Machine socket 2 – way connection.<br />
Display Data - Man Machine RJ54 Type 4 – way connection.<br />
Logger - 4 – way RS 485 connections.<br />
Service Information<br />
Refer to the operating instructions on page 4 for operating instructions.<br />
When mains electrical power is first applied to the controller it will carry out a self test function, for approximately 3<br />
seconds, to ensure that there are good connections between the component parts. During this period the display will<br />
show.<br />
The information displayed in the centre of the screen refers to which of the profiles the controller is set for.<br />
The software version relates to the software release. The number relates to the major operating changes or model<br />
variants. The letter relates to the minor operating changes that may have been made from the original, such as parameter<br />
settings.<br />
On completion of the self test the controller will revert to the last chill program that was run (Pre-chill, Soft Chill, Hard Chill,<br />
Hard Chill Max, Shock Freeze, Professional 1, Professional 2, or Professional 3). The availability of these is dependent on<br />
how the controller has been configured. The example below shows the controller in Hard Chill.<br />
Press and hold the dial for 5 seconds.<br />
Firstly the display will display the information page, below left, continue pressing until the ‘SERVICE’ screen is displayed,<br />
below right. For changes to language see page 5.<br />
7
Diagnostics<br />
Rotate the dial until you reach ‘Diagnostics’, below left, press and release the dial to highlight the component. In this<br />
program you can test each of the major components on the machine in sequence, 1- COMPRESSOR, 2-FAN1, 3-FAN2,<br />
4- DEFROST, 5- ALARM, 6- CCAP (Capacity Control), 7- UV-L (UV light if fitted), ESC (escape). Rotate the dial until the<br />
relay output is highlighted, once selected press and the dial to test the relay, the relay will remain energised for as long as<br />
it is pressed. On completion of the test you must rotate the dial until you highlight ‘ESC’ press and release the dial to<br />
move to the next program.<br />
Function Test<br />
Rotate the dial until you reach ‘FOOTPRINT’, see below, press and release the dial to initiate the controller function self<br />
test.<br />
This allows for the engineer to test the operation of the machine without having to wait for a full program to run. The test<br />
lasts for ten minutes and should be carried out with the cabinet / room empty. Each of the relays will be energised to<br />
simulate the chill process. Relay 1-COMPRESSOR, Relay 2-FAN1, Relay 3-FAN2, Relay 4-DEFROST, Relay 5-ALARM,<br />
Relay 6-CCAP (Capacity Control), and Relay 7- UV-L will all be switched on and of automatically in a pre determined<br />
manner to simulate program operation (whether they are connected or not).<br />
The test is based around an algorithm built into the software. Prior to starting the program it is advisable to place a probe,<br />
in the centre of the cabinet/room, attached to an independent measuring device to check the air temperature as the air,<br />
coil and food probes are not active during this program. The temperature achieved will depend on the model. The air<br />
temperature should be checked 5 to 6 minutes into the program. The temperature achieved should be the minimum<br />
temperature and can be checked against the model type found in the parameter table on page 9. (For further information<br />
go to page 19).<br />
Once the test is completed the display reverts to the last chill program and not to the service parameters.<br />
Passcode.<br />
Rotate the dial until you reach ‘PASSCODE’, below left, press and release the dial to highlight the code, below right.<br />
Rotate the dial until you reach the code ‘131’. Once achieved press and release the dial to acknowledge.<br />
8
Profiles.<br />
You are now in the program profiles. The controller has 9 operating programs – Pre Chill, Soft Chill, Hard Chill, Hard Chill<br />
Max, Shock Freeze, Professional 1, Professional 2, Professional 3, Defrost and 2 optional programs – UV Sanitisation<br />
and Information. These programs are all available depending upon which of the profiles are selected, see below.<br />
To change the profile rotate the dial to select program, press and release the dial to accept the change. The 3 chevrons in<br />
the box opposite the selected program confirm the change.<br />
The default operating profile for the <strong>RBC20</strong>-<strong>60</strong> and <strong>RBC20</strong>-<strong>60</strong>R is ‘LE CHEF’.<br />
The table identifies which programs are available from the profile with ‘LE CHEF’ highlighted.<br />
PROGRAMS<br />
PROFILES<br />
SIMPLE SIMPLE + CHEF CHEF+ LE CHEF EXPERT EXPERT+<br />
PRE CHILL <br />
SOFT CHILL <br />
HARD CHILL <br />
HARD CHILL MAX <br />
SHOCK FREEZE <br />
PROFESSIONAL 1 <br />
PROFESSIONAL 2 <br />
PROFESSIONAL 3 <br />
DEFROST <br />
UV SANITISATION OPTIONAL OPTIONAL OPTIONAL OPTIONAL OPTIONAL OPTIONAL OPTIONAL<br />
INFORMATION OPTIONAL OPTIONAL OPTIONAL OPTIONAL OPTIONAL OPTIONAL OPTIONAL<br />
Parameter Access.<br />
From the profile screen once the selection has been made press and release the dial to access the parameter list. The<br />
screen will display the parameters as shown in the screen below left. To access the system parameters rotate the dial<br />
anticlockwise see below right.<br />
Selection is made by pressing and releasing the dial.<br />
The table below contains the complete parameter list and includes the selectable range and default values.<br />
Parameters<br />
PARAMETER<br />
DESCRIPTION VALUE MINIMUM MAXIMUM DEFAULT<br />
PO1<br />
PRE-CHILL<br />
AIR TEMP °C -15 15 -10<br />
PO2 CHILL TIME MINUTES 5 <strong>60</strong> 15<br />
PO3 HOLD TEMP<br />
SOFT-CHILL<br />
°C -10 15 3<br />
PO4 AIR TEMP °C -10 15 1<br />
PO5 CHILL TIME MINUTES 5 480 90<br />
PO6 CHILL TEMP °C -5 15 3<br />
PO7 HOLD TEMP<br />
HARD CHILL<br />
°C -5 15 3<br />
PO8 AIR TEMP °C -20 15 -15<br />
PO9 CHILL TIME MINUTES 5 480 90<br />
P10 CHILL TEMP °C -15 15 3<br />
P11 HOLD TEMP °C -15 15 3<br />
P12 CHANGE TIME % 5 95 80<br />
P13 CHANGE TEMP % 5 95 80<br />
9
HARD MAX<br />
P14 AIR TEMP °C -20 15 -15<br />
P15 Chill Time MINUTES 5 480 90<br />
P16 CHILL TEMP °C -15 15 3<br />
P17 HOLD TEMP °C -15 15 3<br />
SHOCK FREEZE<br />
P18 AIR TEMP °C -35 15 -30<br />
P19 CHILL TIME MINUTES 5 480 240<br />
P20 CHILL TEMP °C -35 15 -21<br />
P21 HOLD TEMP °C -35 15 -21<br />
PROFFESSIONAL 1<br />
P22 Air Temp. Std. °C -20 15 -15<br />
P23 Chill Time Std. Minutes P24 P25 90<br />
P24 Chill Time Minimum Minutes 5 <strong>60</strong> 5<br />
P25 Chill Time Maximum Minutes <strong>60</strong> 480 240<br />
P26 Chill Temp. Std. °C P27 P28 3<br />
P27 Chill Temp. Minimum °C -20 -5 -10<br />
P28 Chill Temp. Maximum °C -5 15 5<br />
P29 Hold Temp. Std. °C P30 P31 3<br />
P30 Hold Temp. Minimum °C -10 0 0<br />
P31 Hold Temp. Maximum °C 0 10 10<br />
P32 Change Time % 5 95 80<br />
P33 Change Temp. % 5 95 80<br />
PROFFESSIONAL 2<br />
P34 Air Temp. Std. °C -20 15 -15<br />
P35 Chill Time Std. Minutes P36 P37 90<br />
P36 Chill Time Minimum Minutes 5 <strong>60</strong> 5<br />
P37 Chill Time Maximum Minutes <strong>60</strong> 480 240<br />
P38 Chill Temp. Std °C P39 P40 3<br />
P39 Chill Temp. Minimum °C -20 -5 -10<br />
P40 Chill temp. Maximum °C -5 15 5<br />
P41 Hold Temp. Std. °C P42 P43 3<br />
P42 Hold Temp. Minimum °C -10 0 0<br />
P43 Hold Temp. Maximum °C 0 10 10<br />
P44 Change Time % 5 95 80<br />
P45 Change Temp. % 5 95 80<br />
PROFESSIONAL 3<br />
P46 Air Temp. Std. °C -20 15 -15<br />
P47 Chill Time Std. Minutes P48 P49 90<br />
P48 Chill Time Minimum Minutes 5 <strong>60</strong> 5<br />
P49 Chill Time Maximum Minutes <strong>60</strong> 480 240<br />
P50 Chill Temp. Std. °C P51 P52 3<br />
P51 Chill Temp. Minimum °C -20 -5 -10<br />
P52 Chill Temp. Maximum °C -5 15 5<br />
P53 Hold Temp. Std. °C P54 P55 3<br />
P54 Hold Temp. Minimum °C -10 0 0<br />
P55 Hold Temp. Maximum °C 0 10 10<br />
P56 Change Time % 5 95 80<br />
P57 Change Temp. % 5 95 80<br />
SYSTEM<br />
P58 UV Light Enable Minutes 0 120 0<br />
P59 HACCP Enable Function NO YES NO<br />
P<strong>60</strong> Shock Chill Temp. Function NO YES NO<br />
P61 Chill Hysteresis °K 2 20 4<br />
P62 Hold Hysteresis °K 2 20 4<br />
P63 APM Time Minutes 0 30 2<br />
P64 APM Differential °K 0 20 10<br />
P65 FAN 1 Hold Operation Function OFF/ CYCLE/ AUTO/ ON AUTO<br />
P66 FAN 2 Hold Operation Function OFF/ CYCLE/ AUTO/ ON AUTO<br />
P67 Capacity Enable Function OFF/ AUTO/ ON ON<br />
P68 Capacity Hysteresis °K 2 20 5<br />
P69 Defrost Type Function OFF/ ELE/ GAS OFF<br />
P70 Smart Defrost Inc Integer 0 240 30<br />
P71 Defrost End Time Minutes 1 <strong>60</strong> 20<br />
P72 Defrost End Temp. °C 0 50 20<br />
P73 Drain Time. Minutes 0 30 1<br />
P74 Fan Delay Temp. °C -15 15 5<br />
P75 Duty Cycle % 0 100 <strong>60</strong><br />
P76 Comp. Rest Time Minutes 0 30 3<br />
P77 HP Switch Function NO YES YES<br />
P78 Door Switch 2 Function NO YES NO<br />
P79 Door Switch 1 Function NO YES YES<br />
P80 Door Stop Minutes 0 30 1<br />
P81 Door Alarm Delay Minutes 0 30 5<br />
P82 High Alarm Temp. °K 0 50 10<br />
P83 High Alarm Delay Minutes 0 120 30<br />
P84 Alarm Time Minutes 0 120 1<br />
P85 Alarm Repeat Interval Minutes 0 480 0<br />
10
P86 Alarm Buzzer Function NO YES NO<br />
P87 Air Probe Offset °K -15 15 0<br />
P88 Coil Probe Offset °K -15 15 0<br />
P89 Food 1 Offset °K -15 15 0<br />
P90 Food 2 Enable Function NO YES NO<br />
P91 Food 2 Offset °K -15 15 0<br />
P92 Food 3 Enable Function NO YES NO<br />
P93 Food 3 Offset °K -15 15 0<br />
P94 Address Integer 1 255 255<br />
Parameter Definitions<br />
Pre-Chill<br />
P01 Pre-Chill Enable<br />
The air temperature, which the air probe must read before the condensing system is de-energised in the chill<br />
mode of the Pre-Chill Program.<br />
Range -15°C to 15°C.<br />
P02 Chill Time<br />
The period Pre-Chill is in the chill mode prior entering the Hold Mode.<br />
Range 5 minutes to <strong>60</strong> minutes.<br />
P03 Hold Temp<br />
The temperature, which the air probe must read before the condensing system is de-energised in the Hold mode<br />
of the Pre-Chill program.<br />
Range -15°C to 15°C.<br />
Soft-Chill<br />
P04 Air Temp<br />
The temperature, which the air probe must read before the condensing system is de-energised in the chill mode<br />
of the Soft-Chill Program.<br />
Range -10°C to 15°C.<br />
P05 Chill Time<br />
The period Soft Chill program is in chill mode prior to entering Hold mode in a time based chill cycle.<br />
Range 5 minutes to 480 minutes.<br />
P06 Chill Temp<br />
The temperature, which the Food Probe 1 must read before the condensing system is de-energised in the chill<br />
mode of the Soft Chill program prior to entering the Hold mode of a temperature based cycle.<br />
Range -5°C to 15°C.<br />
P07 Hold Temp<br />
The temperature, which the air probe must read before the condensing system is de-energised in the Hold mode<br />
of the Soft Chill program.<br />
Range -5°C to 15°C.<br />
Hard Chill<br />
P08 Air Temp<br />
The temperature, which the air probe must read before the condensing system is de-energised in the chill mode<br />
of the Hard Chill Program.<br />
Range -20°C to 15°C.<br />
P09 Chill Time<br />
The period Hard Chill program is in chill mode prior to entering Hold mode in a time based chill cycle.<br />
Range 5 minutes to 480 minutes.<br />
P10 Chill Temp<br />
The temperature, which the Food Probe 1 must read before the condensing system is de-energised in the chill<br />
mode of the Hard Chill program prior to entering the Hold mode of a temperature based cycle.<br />
Range -15°C to 15°C.<br />
P11 Hold Temp<br />
The temperature, which the air probe must read before the condensing system is de-energised in the Hold mode<br />
of the Hard Chill program.<br />
Range -15°C to 15°C.<br />
P12 Change Time<br />
The percentage period of a time based chill cycle, which is to have passed before automatically adjusting the air<br />
temperature set point to 1°C.The range is adjustable in 5% increments.<br />
Range 05% to 95%.<br />
11
P13 Change Temp<br />
The percentage of a temperature based chill cycle, which is passed before automatically adjusting the air<br />
temperature set point to 1°C.The range is adjustable in 5% increments.<br />
Range 5% to 95%.<br />
Hard Max<br />
P14 Air Temp<br />
The temperature, which the air probe must read before the condensing system is de-energised in the chill mode<br />
of the Hard Chill Max Program.<br />
Range -20°C to 15°C.<br />
P15 Chill Time<br />
The period Hard Chill Max program is in chill mode prior to entering Hold mode in a time based chill cycle.<br />
Range 5 minutes to 480 minutes.<br />
P16 Chill Temp<br />
The temperature, which the Food Probe 1 must read before the condensing system is de-energised in the chill<br />
mode of the Hard Chill Max program prior to entering the Hold mode of a temperature based cycle.<br />
Range -15°C to 15°C.<br />
P17 Hold Temp<br />
The temperature, which the air probe must read before the condensing system is de-energised in the Hold mode<br />
of the Hard Chill Max program.<br />
Range -15°C to 15°C.<br />
Shock Freeze<br />
P18 Air Temp<br />
The temperature, which the air probe must read before the condensing system is de-energised in the chill mode<br />
of the Shock Freeze Program.<br />
Range -35°C to 15°C.<br />
P19 Chill Time<br />
The period Shock Freeze program is in chill mode prior to entering Hold mode in a time based chill cycle.<br />
Range 5 minutes to 480 minutes.<br />
P20 Chill Temp<br />
The temperature, which the Food Probe 1 must read before the condensing system is de-energised in the chill<br />
mode of the Shock Freeze program prior to entering the Hold mode of a temperature based cycle.<br />
Range -15°C to 15°C.<br />
P21 Hold Temp<br />
The temperature, which the air probe must read before the condensing system is de-energised in the Hold mode<br />
of the Shock Freeze program.<br />
Range -35°C to 15°C.<br />
Professional 1<br />
P22 Air Temp Std<br />
The standard temperature, which the air probe must read before the condensing system is de-energised in the<br />
chill mode of the Professional 1 Program.<br />
Range -20°C to 15°C.<br />
P23 Chill Time Std<br />
The standard period Professional 1 program is in chill mode prior to entering Hold mode in a time based chill<br />
cycle.<br />
Range 5 minutes to 480 minutes.<br />
P24 Chill Time Minimum<br />
The minimum period Professional 1 program is in chill mode prior to entering Hold mode in a time based chill<br />
cycle that it can be adjusted to by the operator.<br />
Range 5 minute to <strong>60</strong> minutes.<br />
P25 Chill Time Maximum<br />
The maximum period Professional 1 program is in chill mode prior to entering Hold mode in a time based chill<br />
cycle that it can be adjusted to by the operator.<br />
Range <strong>60</strong> minute to 480 minutes.<br />
P26 Chill Temp Std<br />
The standard temperature, which the Food Probe 1 must read before the condensing system is de-energised in<br />
the chill mode of the Professional 1 program prior to entering the Hold mode of a temperature based cycle.<br />
Range -15°C to 15°C.<br />
12
P27 Chill Temp Minimum<br />
The minimum value that the temperature, which Food Probe 1 must read before the condensing system is deenergised<br />
in the chill mode of the Professional 1 program, prior to entering the Hold mode of a temperature based<br />
cycle, which it can be adjusted to by the operator.<br />
Range -20°C to -5°C.<br />
P28 Chill Temp Maximum<br />
The maximum value that the temperature, which Food Probe 1 must read before the condensing system is deenergised<br />
in the chill mode of the Professional 1 program, prior to entering the Hold mode of a temperature based<br />
cycle, which it can be adjusted to by the operator.<br />
Range -5°C to -15°C.<br />
P29 Hold Temp Std<br />
The standard temperature, which the air probe must read before the condensing system is de-energised in the<br />
Hold mode of the Professional 1 Program.<br />
Range -15°C to 15°C.<br />
P30 Hold Temp Minimum<br />
The minimum value that the Hold temperature set point can be adjusted to by the operator in the Professional 1<br />
program.<br />
Range -10°C to 0°C.<br />
P31 Hold Temp Maximum<br />
The maximum value that the Hold temperature set point can be adjusted to by the operator in the Professional 1<br />
program.<br />
Range 0°C to 10°C.<br />
P32 Change Time<br />
The percentage period of a time based chill cycle, which is to have passed before automatically adjusting the air<br />
temperature set point to 1°C.The range is adjustable in 5% increments.<br />
Range 05% to 95%.<br />
P33<br />
Change Temp<br />
The percentage of a temperature based chill cycle, which is passed before automatically adjusting the air<br />
temperature set point to 1°C.The range is adjustable in 5% increments.<br />
Range 5% to 95%.<br />
Professional<br />
2<br />
P34<br />
Air Temp Std<br />
The standard temperature, which the air probe must read before the condensing system is de-energised in the<br />
chill mode of the Professional 2 Program.<br />
Range -20°C to 15°C.<br />
P35 Chill Time Std<br />
The standard period Professional 2 program is in chill mode prior to entering Hold mode in a time based chill<br />
cycle.<br />
Range 5 minutes to 480 minutes.<br />
P36 Chill Time Minimum<br />
The minimum period Professional 2 program is in chill mode prior to entering Hold mode in a time based chill<br />
cycle that it can be adjusted to by the operator.<br />
Range 5 minute to <strong>60</strong> minutes.<br />
P37 Chill Time Maximum<br />
The maximum period Professional 2 program is in chill mode prior to entering Hold mode in a time based chill<br />
cycle that it can be adjusted to by the operator.<br />
Range <strong>60</strong> minute to 480 minutes.<br />
P38 Chill Temp Std<br />
The standard temperature, which the Food Probe 1 must read before the condensing system is de-energised in<br />
the chill mode of the Professional 2 program prior to entering the Hold mode of a temperature based cycle.<br />
Range -15°C to 15°C.<br />
P39 Chill Temp Minimum<br />
The minimum value that the temperature, which Food Probe 1 must read before the condensing system is deenergised<br />
in the chill mode of the Professional 2 program, prior to entering the Hold mode of a temperature based<br />
cycle, which it can be adjusted to by the operator.<br />
Range -20°C to -5°C.<br />
13
P40 Chill Temp Maximum<br />
The maximum value that the temperature, which Food Probe 1 must read before the condensing system is deenergised<br />
in the chill mode of the Professional 2 program, prior to entering the Hold mode of a temperature based<br />
cycle, which it can be adjusted to by the operator.<br />
Range -5°C to -15°C.<br />
P41 Hold Temp Std<br />
The standard temperature, which the air probe must read before the condensing system is de-energised in the<br />
Hold mode of the Professional 2 Program.<br />
Range -15°C to 15°C.<br />
P42 Hold Temp Minimum<br />
The minimum value that the Hold temperature set point can be adjusted to by the operator in the Professional 2<br />
program.<br />
Range -10°C to 0°C.<br />
P43 Hold Temp Maximum<br />
The maximum value that the Hold temperature set point can be adjusted to by the operator in the Professional 2<br />
program.<br />
Range 0°C to 10°C.<br />
P44 Change Time<br />
The percentage period of a time based chill cycle, which is to have passed before automatically adjusting the air<br />
temperature set point to 1°C.The range is adjustable in 5% increments.<br />
Range 05% to 95%.<br />
P45<br />
Change Temp<br />
The percentage of a temperature based chill cycle, which is passed before automatically adjusting the air<br />
temperature set point to 1°C.The range is adjustable in 5% increments.<br />
Range 5% to 95%.<br />
Professional<br />
3<br />
P46<br />
Air Temp Std<br />
The standard temperature, which the air probe must read before the condensing system is de-energised in the<br />
chill mode of the Professional 3 Program.<br />
Range -20°C to 15°C.<br />
P47 Chill Time Std<br />
The standard period Professional 3 program is in chill mode prior to entering Hold mode in a time based chill<br />
cycle.<br />
Range 5 minutes to 480 minutes.<br />
P48 Chill Time Minimum<br />
The minimum period Professional 3 program is in chill mode prior to entering Hold mode in a time based chill<br />
cycle that it can be adjusted to by the operator.<br />
Range 5 minute to <strong>60</strong> minutes.<br />
P49 Chill Time Maximum<br />
The maximum period Professional 3 program is in chill mode prior to entering Hold mode in a time based chill<br />
cycle that it can be adjusted to by the operator.<br />
Range <strong>60</strong> minute to 480 minutes.<br />
P50 Chill Temp Std<br />
The standard temperature, which the Food Probe 1 must read before the condensing system is de-energised in<br />
the chill mode of the Professional 3 program prior to entering the Hold mode of a temperature based cycle.<br />
Range -15°C to 15°C.<br />
P51 Chill Temp Minimum<br />
The minimum value that the temperature, which Food Probe 1 must read before the condensing system is deenergised<br />
in the chill mode of the Professional 3 program, prior to entering the Hold mode of a temperature based<br />
cycle, which it can be adjusted to by the operator.<br />
Range -20°C to -5°C.<br />
P52 Chill Temp Maximum<br />
The maximum value that the temperature, which Food Probe 1 must read before the condensing system is deenergised<br />
in the chill mode of the Professional 3 program, prior to entering the Hold mode of a temperature based<br />
cycle, which it can be adjusted to by the operator.<br />
Range -5°C to -15°C.<br />
14
P53 Hold Temp Std<br />
The standard temperature, which the air probe must read before the condensing system is de-energised in the<br />
Hold mode of the Professional 3 Program.<br />
Range -15°C to 15°C.<br />
P54 Hold Temp Minimum<br />
The minimum value that the Hold temperature set point can be adjusted to by the operator in the Professional 3<br />
program.<br />
Range -10°C to 0°C.<br />
P55 Hold Temp Maximum<br />
The maximum value that the Hold temperature set point can be adjusted to by the operator in the Professional 3<br />
program.<br />
Range 0°C to 10°C.<br />
P56 Change Time<br />
The percentage period of a time based chill cycle, which is to have passed before automatically adjusting the air<br />
temperature set point to 1°C.The range is adjustable in 5% increments.<br />
Range 05% to 95%.<br />
P57<br />
Change Temp<br />
The percentage of a temperature based chill cycle, which is passed before automatically adjusting the air<br />
temperature set point to 1°C.The range is adjustable in 5% increments.<br />
Range 5% to 95%.<br />
System<br />
P58 UV Light Enable<br />
Determines whether the user can select the UV sanitisation.<br />
Minutes 0 = disabled, 1 to 120 = enabled (set the time between 1 and 120 to determine the length of the<br />
program).<br />
P59 HACCP Enable<br />
Determines whether the logging system is available to the user.<br />
Function, YES = enabled. NO = disabled.<br />
P<strong>60</strong> Shock Freeze Temp<br />
Allows for the probe to be used in the Shock Freeze mode.<br />
Function, YES = enables. NO = disables.<br />
P61 Chill Hysteresis<br />
Allowable temperature increase from chill cycle air temperature Set Point before switching on the refrigeration<br />
system.<br />
Range 02°K to 20°K.<br />
P62 Hold Hysteresis<br />
Allowable temperature increase from hold cycle air temperature Set Point before switching on the refrigeration<br />
system.<br />
Range 02°K to 20°K.<br />
P63 APM Time<br />
Automatic Program Mode Time. The time period that must pass before the air temperature and Food Probe 1<br />
temperature are compared to determine whether the cycle is time or temperature based.<br />
00 = Instantaneous decision. 01 to 30 = the time selected determines the start time decision.<br />
P64 APM Differential<br />
Automatic Program Mode Differential. The difference in temperature between the air temperature and food probe<br />
1 temperature after APM time to determine whether the cycle is time or temperature based. If air probe<br />
temperature + the APM differential is greater than or equal to food temperature the chill cycle will be time based.<br />
If air probe temperature + APM differential is less than the food probe temperature the chill cycle will be<br />
temperature based.<br />
Range 0°K to 20°K.<br />
P65 FAN 1 Hold Operation<br />
Determines the evaporator fan relay energisation during ‘Hold’ mode.<br />
‘OFF’ = Evaporator fan 1 relay is not energised in ‘Hold’.<br />
‘CYCLE’ = Evaporator fan 1 relay cycles with condensing system relay in ‘Hold’.<br />
‘AUTO’ = Evaporator fan 1 relay cycles with condensing system and fan hysteresis in ‘Hold’.<br />
‘ON’ = Evaporator fan 1 relay is always energised in ‘Hold’.<br />
15
Note: The fan 1 hold operation does not effect routine defrost operation.<br />
P66 FAN 2 Hold Operation<br />
Determines the evaporator fan relay energisation during ‘Hold’ mode.<br />
‘OFF’ = Evaporator fan 2 relay is not energised in ‘Hold’.<br />
‘CYCLE’ = Evaporator fan 2 relay cycles with condensing system relay in ‘Hold’.<br />
‘AUTO’ = Evaporator fan 2 relay cycles with condensing system and fan hysteresis in ‘Hold’.<br />
‘ON’ = Evaporator fan 2 relay is always energised in ‘Hold’.<br />
Note: The fan 2 hold operation does not effect routine defrost operation.<br />
P67 Capacity Enable<br />
Determines if Capacity Control is enabled.<br />
‘OFF’ = Capacity is disabled.<br />
‘AUTO’ = Capacity is enabled in chill and hold modes in conjunction with Capacity Hysteresis.<br />
‘ON’ = Capacity is enabled (in hold mode only).<br />
P68 Capacity Hysteresis<br />
The differential value at which capacity control is de-energised.<br />
Capacity control is disabled during the chill hold cycle (Capacity Enable set to ‘Auto’) if the temperature =<br />
program air set point + chill hysteresis + capacity hysteresis (rising from chill set point). During hold (Capacity<br />
Enable set to ‘Auto’ or ‘On’) if the temperature = hold air set point + hold hysteresis + capacity hysteresis (rising<br />
from hold air set point).<br />
Range 2°C to 20°C.<br />
P69 Defrost Type<br />
Identifies the type of defrost cycle to be initiated either standard or manually.<br />
OFF = Off cycle defrost. ELE = Electric defrost. GAS = Hot gas defrost.<br />
P70 Smart Defrost Inc<br />
DO NOT ADJUST.<br />
P71 Defrost End Time<br />
The length of time that the Defrost period will last before reverting to the chill or hold cycle.<br />
Range 01minute to <strong>60</strong> minutes.<br />
P72 Defrost End Temp<br />
The coil temperature as detected by the evaporator probe at which the Defrost function will terminate before<br />
reverting back to chill or hold mode.<br />
Range 0°C to 10°C.<br />
P73 Drain Time<br />
The time period following the defrost routine (terminated by time or temperature) that is allowed for ‘melt water’ to<br />
drain from the evaporator coil prior to the condensing system restarting.<br />
00 = No drain down time. 01 to 30 = Drain down period in minutes.<br />
P74 Fan delay Temp<br />
The temperature the evaporator coil must reach following a defrost before the evaporator fan/s are allowed to restart.<br />
Range -15°C to 15°C.<br />
P75 Duty Cycle<br />
The percentage time that the condensing system will operate in order to maintain Hold temperature in the event<br />
of an air probe failure.<br />
Range 0% to 100%.<br />
P76 Comp. Rest Time<br />
The forced rest period before the condensing system can be energised from when it was de-energised.<br />
00 = Excludes compressor rest period. 01 to 30 = Compressor rest period in minutes.<br />
Note: This is not a compressor start delay.<br />
P77 HP Switch<br />
Terminates the condensing system in the event of a high pressure developing in the refrigeration system as a<br />
result of, to high food temperature, condenser fan failure, blocked condenser, air flow restriction etc.<br />
Automatically re – sets when the normal working pressure is achieved.<br />
YES = enabled. NO = disabled.<br />
P78 Door Switch 2<br />
Determines if a safety door switch is fitted. If enabled this will not allow any chill, defrost or UV Sanitisation<br />
programs to be run if the door is open.<br />
16
NO = No safety door switch fitted. YES = Safety door switch fitted.<br />
Note: Usually fitted to the evaporator fan door on Modular <strong>Blast</strong> <strong>Chiller</strong>s.<br />
P79 Door Switch 1<br />
Determines if a door switch is fitted or not, and consequently dictates Evaporator Fan operation, UV Sanitisation<br />
operation and door alarm activation’s. Also used to initiate the controller from the energy saving mode.<br />
NO = No door switch fitted. YES = Door switch fitted.<br />
P80 Door Stop<br />
The delay period between the door being opened and the condensing unit stopping (only active if the ‘Door<br />
Switch’ is set to ‘YES’).<br />
00 minutes = Condensing unit stops instantaneously. 01 to 30 minutes = Delay before unit stops.<br />
P81 Door Alarm Delay<br />
The delay following the ‘Door Stop’ period before the door open alarm sounds. Therefore if the ‘Door Stop’ is set<br />
for 1 minute, and the ‘Door Alarm’ is set to 5 minutes, the door alarm will sound 6 minutes after the door was<br />
opened. (Only active if ‘Door Switch’ = YES).<br />
00 minutes = //instantaneous door alarm. 01 to 30 minutes = Delay before alarm sounds.<br />
P82 High Alarm Temp<br />
The temperature at which the alarm will sound to warn that the measured air temperature value is too high. The<br />
alarm sounding is dependent upon the selected program and the stage of the cycle. I.e. during a chill cycle if the<br />
measured temperature is greater than or equal to program air set point temperature + chill hysteresis + high<br />
alarm temperature value (after the appropriate alarm delay period) the alarm will sound. Similarly if the measured<br />
hold temperature is greater than or equal to program hold set point + hold hysteresis + high alarm temperature<br />
value the alarm will sound.<br />
Range 1°C to 50°C.<br />
P83 High Alarm Delay<br />
The delay period between a temperature alarm condition occurring.<br />
00 minutes = Instantaneous audible alarm. 01 to 120 minutes = period of delay.<br />
P84 Alarm Time<br />
The length of time, which the alarm will sound for an end of program cycle alarm or any other alarm warning prior<br />
to automatically muting.<br />
00 minutes No alarm. 01 to 120 minutes = Alarm energised period.<br />
P85 Alarm Repeat Interval<br />
The length of time between an acknowledged alarm being automatically muted and the alarm sounder being reenergised.<br />
00 minutes = No alarm reminder. 01 to 480 minutes = Alarm reminder period.<br />
P86 Alarm Buzzer<br />
Enables or disables the board alarm buzzer.<br />
NO = Alarm disabled. YES = Alarm enabled.<br />
P87 Air Probe Offset<br />
Allows the value of the Air Probes to be offset allowing the product temperature to be accurately measured.<br />
Range -15°C to +15°C<br />
P88 Coil Probe Offset<br />
Allows the value of the Evaporator Coil Probe to be offset allowing the coil temperature to be accurately<br />
measured.<br />
Range -15°C to +15°C.<br />
P89 Food 1 Offset<br />
Allows the value of Food Probe 1 to be offset allowing for the product temperature to be accurately measured.<br />
Range -15°C to +15°C.<br />
P90 Food 2 Enable<br />
Determines whether a second Food Probe is fitted.<br />
NO = No second food probe fitted. YES = Second food probe fitted.<br />
P91 Food 2 Offset<br />
Allows the value of Food Probe 2 to be offset allowing for the product temperature to be accurately measured.<br />
Range -15°C to +15°C.<br />
P92 Food 3 Enable<br />
Determines whether a third Food Probe is fitted.<br />
17
NO = No third food probe fitted. YES = Third food probe fitted.<br />
P93 Food 3 Offset<br />
Allows the value of Food Probe 3 to be offset allowing for the product temperature to be accurately measured.<br />
Range -15°C to +15°C.<br />
P94 Address<br />
The controller peripheral number. This is only necessary when controller are linked via a network to a computer<br />
management and data recording system (such as with the Foster TAB or ARGO systems).<br />
Range 00 to 255.<br />
Alarm and Warnings<br />
In general if an alarm occurs the appropriate alarm symbol will be displayed and the alarm will sound to attract attention.<br />
The cabinet will attempt to continue running or to finish the cycle (if safe to do so).<br />
The distinction between an alarm and a warning is that a warning may be a non-critical occurrence such as door open or<br />
temporary power failure. An alarm would be for a system failure such as a probe fault or high-pressure fault, which would<br />
require positive intervention.<br />
High pressure developing in the refrigeration system as a result of, to high food temperature,<br />
condenser fan failure, blocked condenser, air flow restriction etc. Automatically re – sets<br />
when the normal working pressure is achieved.<br />
Air Probe Fault<br />
Evaporator Probe Fault<br />
Food Probe Fault. If more than 1 probe are enabled the probe fault would be displayed<br />
accordingly<br />
Door 2 open. Will not allow any chill, defrost or UV Sanitisation programs to be run if the door<br />
is open.<br />
Ribbon cable between the power switching PCB and the display disconnected.<br />
18
Foot Print Test operation<br />
The foot print test is a method of checking the operation of the process in a reduced time period<br />
The foot print test takes ten minutes.<br />
The first ten seconds are used for the display test, after that the relays are energised in a simple operating pattern to<br />
ensure each are energised. During the final ten seconds the alarm is sounded to indicate the end of the test.<br />
The graph below shows how the relays are energised relating to time.<br />
The air, coil and food temperature probes are disregarded (the only exception is an over temperature alarm).<br />
All relays commence Footprint test in the de-energised state.<br />
Operation Summary<br />
• Relay 1 is energised after 10 seconds from start of test for 470 seconds (de-energises 480 seconds from start).<br />
• Relay 2 is energised after <strong>60</strong> seconds from start of test for 30 seconds (de-energises 90 seconds from start).<br />
• Relay 2 is energised again after 120 seconds from start of test for 300 seconds (de-energises 420 seconds from start).<br />
• Relay 3 is energised after 90 seconds from start of test for 330 seconds (de-energises 420 seconds from start).<br />
• Relay 3 is energised after 540 seconds from start of test for 30 seconds (de-energises 570 seconds from start).<br />
• Relay 4 is energised after 450 seconds from start of test for 90 seconds (de-energises 540 seconds from start).<br />
• Relay 5 is energised after 590 seconds from start of test for 10 seconds (de-energises <strong>60</strong>0 seconds from start).<br />
• Relay 6 is energised after 3<strong>60</strong> seconds from start of test for 90 seconds (de-energises 450 seconds from start).<br />
• Relay 7 is energised after 570 seconds from start of test for 20 seconds (de-energises 590 seconds from start).<br />
All relays are de-energised on completion of the test.<br />
At any point during the test pressing and holding the dial for 2 seconds can stop it. The test will be terminated and the<br />
display will revert to the last run cycle. Upon normal completion of the test the display will revert to the last run cycle (not<br />
the service parameters).<br />
Probes<br />
Air and Evaporator Probes<br />
The air and evaporator probes are the same and are identified as T1 Air Probe and T2 Evaporator Probe. These are the<br />
thermistor type and are fully enclosed to make it completely waterproof and resilient to temperature variation within the<br />
limits of rapid cycling. The probe is capable of measuring temperature in excess of -30°C and 50°C with 1°K accuracy at<br />
1°C and no more than 2°K at the upper and lower temperature ranges.<br />
Food Probe<br />
The food probe is inserted directly into the product that is being chilled to measure the core temperature. The resistance<br />
values are the same as for the air and evaporator probes.<br />
Probe temperature resistance values<br />
°C K ohm °C K ohm °C K ohm °C K ohm °C K ohm<br />
-40 44.657 -5 7.198 30 1.651 65 0.497 100 0.189<br />
-35 33.505 0 5.716 35 1.371 70 0.426 105 0.166<br />
-30 25.388 5 4.571 40 1.143 75 0.367 110 0.142<br />
-25 19.402 10 3.682 45 0.958 80 0.318 115 0.125<br />
-20 14.961 15 2.987 50 0.807 85 0.276 120 0.111<br />
-15 11.644 20 2.437 55 0.683 90 0.24 125 0.099<br />
-10 8.133 25 2 <strong>60</strong> 0.582 95 0.21<br />
19
Technical Data<br />
<strong>RBC20</strong>-<strong>60</strong> <strong>RBC20</strong>-<strong>60</strong>R<br />
Nominal Chilling Capacity <strong>60</strong>Kg <strong>60</strong>Kg<br />
Duty @ -15°C 3800w 3800w<br />
Fans 3 3<br />
Evaporating Temperature -15°C -15°C<br />
HP Switch Setting<br />
Refrigerant Control TEV TEV<br />
Refrigerant R404a R404a<br />
Refrigerant Quantity<br />
System 1 1900grms<br />
System 2 1900grms<br />
Electrical Supply 400/3/50 – 16amp 230/1/50 13 amp (Fans & Defrost)<br />
Total Heat Rejection 1500w<br />
Important Note<br />
There are two refrigeration systems on this model<br />
Refrigerant used is R404A.<br />
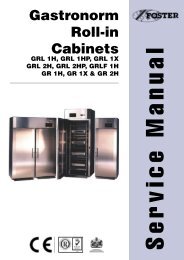
The <strong>RBC20</strong>-<strong>60</strong> has two separate refrigeration systems comprising, two condensing units, a twin circuit condenser (see<br />
below) and a twin circuit evaporator. (See page 21for assembly details and page 22 for schematic dual circuit refrigeration<br />
layout).<br />
The condenser fan on system 2 is controlled by the HP switch, which is set at 18 BAR with a 3 BAR diff.<br />
The <strong>RBC20</strong>-<strong>60</strong>R has the same refrigeration systems but the condensing units are remotely sited.<br />
System 2<br />
CONDENSING UNIT ASSEMBLY <strong>RBC20</strong>-<strong>60</strong><br />
The parameter ‘Capacity Enable’ is set to ‘AUTO’ to allow for both condensing units to be running at the start of the chill<br />
cycle therefore maximising the heat extraction from the product. On reaching ‘HOLD’ one of the condensing units will shut<br />
down. During the ‘HOLD’ mode one compressor will control the temperature throughout unless the temperature exceeds<br />
the capacity control limit.<br />
Refrigerant control is by expansion valve to control the correct amount of refrigerant required to meet the demand of the<br />
evaporator. (See page 21 for assembly detail).<br />
Expansion Valve Setting (Superheat)<br />
Adjust the superheat by turning the expansion valve setting spindle anti clockwise until back seated then turn the setting<br />
spindle clockwise THREE FULL TURNS IN.<br />
20<br />
HP Switch<br />
System 1
FAN PLATE<br />
SERVICE PLATE<br />
EVAPORATOR ASSEMBLY <strong>RBC20</strong>-<strong>60</strong><br />
21<br />
SYSTEM 1 & SYSTEM 2<br />
PHIALS MUST BE FITTED<br />
IN THE HORIZONTAL<br />
POSITION AND CORK<br />
TAPED
PHIAL<br />
EQUALISING LINE<br />
PHIAL<br />
EVAPORATOR – DUAL CIRCUIT<br />
EQUALISING LINE<br />
EXP. VALVE<br />
EXP. VALVE<br />
SIGHT<br />
GLASS<br />
SIGHT<br />
GLASS<br />
SOL.<br />
VALVE<br />
SOL.<br />
VALVE<br />
COMPRESSOR<br />
COMPRESSOR<br />
Schematic Dual Circuit Refrigeration Layout<br />
22<br />
DRIER<br />
DRIER<br />
LP SW.<br />
LP SW.<br />
STAT<br />
LIQUID RECEIVER<br />
LIQUID RECEIVER<br />
HP SW.<br />
HP SW.<br />
CONDENSER - DUAL CIRCUIT
COMPRESSOR WIRING <strong>RBC20</strong>-<strong>60</strong><br />
23
<strong>RBC20</strong>-<strong>60</strong> 1 of 2 Wiring Diagram<br />
24
<strong>RBC20</strong>-<strong>60</strong> 2 of 2 Wiring Diagram<br />
25
<strong>RBC20</strong>-<strong>60</strong>R 1 of 2 Wiring Diagram<br />
26
<strong>RBC20</strong>-<strong>60</strong>R 2 of 2 Wiring Diagram<br />
27
Foster European Operations<br />
France<br />
Foster<br />
Refrigerator France SA<br />
Tel:<br />
(33) 01 34 30 22 22 Fax: (33) 01 30 37 68 74 Email: info@fosterfrance.com<br />
Germany<br />
Foster<br />
Refrigerator Germany<br />
Tel:<br />
(0781) 96 93 00 Fax: (0781) 96 93 019 Email: info@fosterrefrigerator.de<br />
Foster<br />
Refrigerator<br />
Oldmedow<br />
Road, King’s Lynn,<br />
Norfolk<br />
Pe30 4JU<br />
England<br />
Tel:<br />
01553 691122<br />
Fax:<br />
01553 691447<br />
Website:<br />
www.fosterrifrigerator.co.uk<br />
Email: sales@foster-uk.com<br />
a Division of ITW (UK) Ltd.<br />
<strong>RBC20</strong>/SM/0107<br />
4