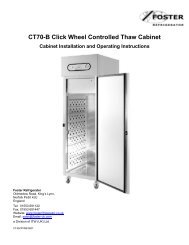
Gastronorm Roll-in Cabinets S.M.indd
Gastronorm Roll-in Cabinets S.M.indd
Gastronorm Roll-in Cabinets S.M.indd

Create successful ePaper yourself
Turn your PDF publications into a flip-book with our unique Google optimized e-Paper software.
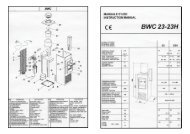
7.6.6 Heater assembly replacement<br />
Remove the <strong>in</strong>sulated metal cage cover<strong>in</strong>g the heater assembly. A “U” shaped cover at the fan end of the assembly and a<br />
clos<strong>in</strong>g plate at the opposite end, they are both screwed <strong>in</strong> position secur<strong>in</strong>g the assembly <strong>in</strong>to place. Remove the cage from<br />
the top tak<strong>in</strong>g care not to damage the <strong>in</strong>sulation. Disconnect the electrical cables. Release the four fix<strong>in</strong>g screws attach<strong>in</strong>g<br />
the heater assembly to the top of the cab<strong>in</strong>et and remove it. To refit a replacement reverse the procedure mak<strong>in</strong>g sure that<br />
all covers are refitted correctly ensur<strong>in</strong>g that the <strong>in</strong>sulation <strong>in</strong> the metal cage is not damaged when refitt<strong>in</strong>g.<br />
7.6.7 Heater duct safety thermostat replacement<br />
Access the electrical connections and remove the <strong>in</strong>sulated metal cage cover<strong>in</strong>g the heater assembly as described <strong>in</strong> 7.6.6.<br />
release the two screws above and below the temperature scale attach<strong>in</strong>g the thermostat to its bracket. The thermostat<br />
stat phial is located centrally beneath the heater assembly attached to a bracket. Remove the phial from its clip. To refit a<br />
replacement reverse the procedure mak<strong>in</strong>g sure that all covers are refitted correctly ensur<strong>in</strong>g that the <strong>in</strong>sulation <strong>in</strong> the metal<br />
cage is not damaged when refitt<strong>in</strong>g.<br />
7.6.8 Fan motor replacement<br />
Remove the <strong>in</strong>sulated metal cage cover<strong>in</strong>g the heater assembly as described <strong>in</strong> 7.6.6. Release the four fix<strong>in</strong>g screws<br />
attach<strong>in</strong>g the heater assembly to the top of the cab<strong>in</strong>et and remove it. Disconnect the fan wires. The fan motors is attached<br />
to the heater duct by four screws and nuts, remove the screws to separate the two parts. To refit a replacement reverse the<br />
procedure mak<strong>in</strong>g sure that all covers are refitted correctly ensur<strong>in</strong>g that the <strong>in</strong>sulation <strong>in</strong> the metal cage is not damaged<br />
when refitt<strong>in</strong>g.<br />
7.6.9 Heater replacement<br />
Remove the <strong>in</strong>sulated metal cage cover<strong>in</strong>g the heater assembly as described <strong>in</strong> 7.6.6. Release the four fix<strong>in</strong>g screws attach<strong>in</strong>g<br />
the heater assembly to the top of the cab<strong>in</strong>et and remove it. The heater duct is attached to the fan motor by four screws<br />
and nuts, remove the screws to separate the two parts. Unbolt the cables from the heater term<strong>in</strong>als. Release the two nuts<br />
secur<strong>in</strong>g the heater to the duct and extract it. To refit a replacement reverse the procedure mak<strong>in</strong>g sure that all covers are<br />
refitted correctly ensur<strong>in</strong>g that the <strong>in</strong>sulation <strong>in</strong> the metal cage is not damaged when refitt<strong>in</strong>g.<br />
28