Gastronorm Roll-in Cabinets S.M.indd
Gastronorm Roll-in Cabinets S.M.indd
Gastronorm Roll-in Cabinets S.M.indd

You also want an ePaper? Increase the reach of your titles
YUMPU automatically turns print PDFs into web optimized ePapers that Google loves.
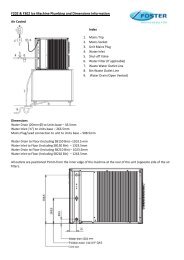
(see page 29 for general arrangement)<br />
GR 1X<br />
7.5 The MTR 122 controller is accessible from the front of the unit for all programm<strong>in</strong>g functions.<br />
IMPORTANT - all repairs must be carried out with the ma<strong>in</strong>s electrical supply disconnected and by a competent<br />
person.<br />
7.5.1 Access to electrical connections.<br />
To ga<strong>in</strong> access to the electrical connections remove the perforated panel at the top of the cab<strong>in</strong>et. This is achieved by<br />
remov<strong>in</strong>g the two screws secur<strong>in</strong>g the panel to the cab<strong>in</strong>et. Remove the rubber grommet from the panel and slide the ma<strong>in</strong>s<br />
cable through the slot allow<strong>in</strong>g the panel to be removed. For refitt<strong>in</strong>g reverse the procedure ensur<strong>in</strong>g the ma<strong>in</strong>s cable and<br />
grommet are fitted correctly. The electrical connections are located on the right-hand side viewed from the rear. Remove the<br />
four screws secur<strong>in</strong>g the lid to access the term<strong>in</strong>al block and overtemperature thermostat.<br />
7.5.2 Controller replacement<br />
Remove the unit cover and electrical box cover as described <strong>in</strong> 7.5.1. Disconnect the cables ensur<strong>in</strong>g that all cables are<br />
correctly identified for correct refitt<strong>in</strong>g. Release the two reta<strong>in</strong><strong>in</strong>g clips fitted to each side of the Controller and slide the<br />
part forward through the cutout <strong>in</strong> the unit cover. Remove it from the unit. Reverse the procedure to fit the new Controller.<br />
Programme the controller us<strong>in</strong>g the <strong>in</strong>formation given <strong>in</strong> the sett<strong>in</strong>g up <strong>in</strong>structions. (see section 4).<br />
7.5.3 Temperature probe replacement - see page 13 for detail<br />
Disconnect the probe from the controller. Unclip the probe wire from the top of the unit. Inside the unit at the top remove the<br />
fan hous<strong>in</strong>g by releas<strong>in</strong>g the three screws along the front edge. Release the airduct with a sharp forward motion releas<strong>in</strong>g<br />
the spr<strong>in</strong>g clips from their reta<strong>in</strong>ers and remove the duct. The sensor is fitted to the air deflector located between the fan and<br />
the heater. Remove it from its reta<strong>in</strong><strong>in</strong>g clip and withdraw it from the unit. Fit the replacement by revers<strong>in</strong>g the procedure<br />
ensur<strong>in</strong>g all covers are refitted correctly.<br />
7.5.4 Red overtemperature light illum<strong>in</strong>ated<br />
With the top perforated panel removed as described <strong>in</strong> 7.5.1 reset the thermostat by depress<strong>in</strong>g the green switch on the<br />
top right hand side above the temperature scale. If the unit starts immediately check if the fan is work<strong>in</strong>g, normally. If not<br />
disconnect the ma<strong>in</strong>s supply and check for free rotation of the fan motor and test the motor w<strong>in</strong>d<strong>in</strong>gs for open circuit condition.<br />
If satisfactory reconnect the electrical supply and check connections. If the fan is work<strong>in</strong>g check that the air ducts are not<br />
obstructed. If the overtemperature thermostat can not be reset it is possible it will need replac<strong>in</strong>g.<br />
7.5.5 Overtemperature thermostat replacement<br />
Remove the top perforated panel and cover as described <strong>in</strong> 7.5.1. Unscrew the two screws above and below the temperature<br />
scale attach<strong>in</strong>g the stat to its bracket. Unclip the thermostat capillary from the top of the unit. Inside the unit at the top remove<br />
the fan hous<strong>in</strong>g by releas<strong>in</strong>g the three screws along the front edge. Release the airduct with a sharp forward motion releas<strong>in</strong>g<br />
the spr<strong>in</strong>g clips from their reta<strong>in</strong>ers and remove the duct. The thermostat sensor is fitted to the air deflector plate located<br />
between the fan and the heater. Remove it from its reta<strong>in</strong><strong>in</strong>g clip and withdraw it from the unit. To fit a replacement reverse<br />
the procedure ensur<strong>in</strong>g that all covers are refitted correctly.<br />
7.5.6 Heater replacement<br />
Remove the rear airduct as described <strong>in</strong> 7.5.4. Remove the heater from its reta<strong>in</strong>ers. Fit the replacement heater to reta<strong>in</strong>er.<br />
If reconnection is be<strong>in</strong>g made close to the heater and not <strong>in</strong> the external term<strong>in</strong>al block ensure the correct connectors are<br />
used and that the jo<strong>in</strong>ts are sealed us<strong>in</strong>g a heat shr<strong>in</strong>k sleeve or an approved alternative.<br />
26