Gastronorm Supra Cabinet & Counter.indd
Gastronorm Supra Cabinet & Counter.indd
Gastronorm Supra Cabinet & Counter.indd

Create successful ePaper yourself
Turn your PDF publications into a flip-book with our unique Google optimized e-Paper software.
<strong>Gastronorm</strong><br />
<strong>Supra</strong> <strong>Cabinet</strong><br />
& <strong>Counter</strong><br />
By Appointment to<br />
Her Majesty Queen Elizabeth II<br />
Suppliers of Commercial Refrigeration<br />
Foster Refrigerator (UK) Ltd King’s Lynn S<br />
e r v i c e M a n u a l
<strong>Gastronorm</strong> <strong>Supra</strong> <strong>Cabinet</strong><br />
& <strong>Counter</strong><br />
CONTENTS<br />
1. Controller Operation For <strong>Cabinet</strong>s and <strong>Counter</strong>s From 1996 Onwards 3<br />
1.1 Introduction 3<br />
1.2 Symbols And Indicators 3<br />
Page<br />
1.3 Parameter Programming And Operating Instructions 3 - 4<br />
1.4 Entering Factory Set And Programming Mode 4 - 5<br />
1.5 Factory Set Parameters 6 - 7<br />
1.6 Error Annunciation 8<br />
1.7 Wiring Diagrams 9 - 11<br />
2. Controller Operation For <strong>Cabinet</strong>s From 1994 To 1996 12<br />
2.1 Service Data 12<br />
2.2 Introduction 12<br />
2.3 Displays 12 - 13<br />
2.4 Parameter Programming And Operating Instructions 13 - 14<br />
2.5 Entering Factory Set And Programming Mode 14 - 15<br />
2.6 Factory Set Parameters 16<br />
2.7 Wiring Diagrams 17 - 19<br />
2
1. GASTRONORM CABINETS AND COUNTERS<br />
FROM 1996 ONWARDS<br />
1.1 INTRODUCTION<br />
A microprocessor temperature controller which holds and displays a pre-set counter / cabinet air temperature.<br />
The controller performs many other functions which include automatic defrost initiation, alarm functions<br />
and calculation of stored product temperature.<br />
The display fascia panel and microprocessor control board form a single integral unit, from here on referred<br />
to as the controller.<br />
1.2 SYMBOLS AND INDICATORS<br />
1.2.1 The symbols on the fascia panel consist of a seven segment display together with the following indicators<br />
and symbols.<br />
1.2.2 Illuminated indicators — these appear adjacent to the three digit display.<br />
1.2.3 Condensing Unit - LED illuminated green when Condensing Unit output is high.<br />
1.2.4 Evaporator Fans - LED illuminated green when Evaporator Fan output is high.<br />
1.2.5 Condenser Clean - LED Illuminated green when Condenser Clean time (P2) has elapsed.<br />
1.2.6 Food temperature - LED illuminated amber when Calculated Stored Product Temperature is<br />
outside<br />
the pre-set High and Low Foot Temperature Alarm Settings (C2 and C3 respectively).<br />
1.2.7 Door Open - !<br />
LED illuminated red when the Door Alarm Delay (A1) has elapsed. Extinguished when<br />
all doors are re-closed.<br />
1.3 PARAMETER PROGRAMMING AND OPERATING INSTRUCTIONS<br />
1.3.1 The parameters which control the operation are divided into User Parameters (those to which the operator<br />
has access) and the Factory Set parameters (additional parameters not intended to be modified by the<br />
user).<br />
1.3.2 User Parameter Programming — Access to the user parameters can be made by a simple series of key<br />
operations.<br />
1.3.3 While the controller is switched in and operating normally, pressing the SET button will cause the controller<br />
to enter the programming mode, with the display showing SET. Further operation of the SET key causes<br />
the display to scroll through the User Parameters C1 to C4.<br />
While the SET key is depressed, the parameter number is displayed, releasing the SET key causes the<br />
value of the parameter to be displayed. A parameter value may be altered using the (increment) or<br />
(Decrement key). While the or key is depressed, the parameter number is displayed,<br />
releasing the key causes the new value of the parameter (incremented or decremented) to be displayed.<br />
3
1.3.4 To exit the User Parameter Programming Mode and return to normal operation of the Controller, the<br />
key must be pressed while holding down the SET key. While both buttons are depressed the display will<br />
show FIN and releasing the buttons will return the Controller to normal operation with the display showing<br />
internal air temperature. Note, while the Controller is in the programming mode, control of the cabinet/<br />
counter refrigeration components is still maintained.<br />
Note, while in the programming mode, if no button is depressed for two minutes, the Controller will revert<br />
to normal operation.<br />
1.3.5 Example:<br />
Press SET Display shows SET<br />
Press SET Display shows C1 (while SET button is depressed)<br />
Display shows value (when SET button is released)<br />
Press SET Display shows C2 (while SET button is depressed)<br />
Display shows value (when SET button is released)<br />
Pressing or buttons will cause the value of a parameter to incremement.<br />
Press Display shows C2 (while the button is depressed)<br />
Display shows new value (when the button is released)<br />
Press SET Display shows C3 (while the SET button is depressed)<br />
Display shows new value (when the SET button is released)<br />
Press SET Display shows C4 (while the SET button is depressed)<br />
Display shows ne value (when the SET button is released)<br />
Pressing the SET button after the last parameter will cause the display to return again to the first<br />
parameter.<br />
Press SET Display shows C1 (while SET button is depressed)<br />
Display shows value (when SET button is released)<br />
If desired, the controller can be caused to exit the programming mode having saved any new parameter<br />
values.<br />
Press SET Display shows FIN (while buttons are depressed)<br />
& together Display shown Air Temp (when buttons are released)<br />
1.4 ENTERING FACTORY SET AND PROGRAMMING MODE<br />
1.4.1 Display Factory Parameter<br />
Access to the Factory Parameter settings is made by first entering the User Programme C1 to C4. Holding<br />
down the SET key and pressing the key will cause the controller to display FIN. Releasing the<br />
key and depressing the ‘I/O’ (with the SET key still pressed) will cause the controller to display LLL.<br />
Pressing the SET key will scroll through to parameter L1.<br />
4
1.4.2 Display / Amend Parameters P1 - P6.<br />
Holding the SET key and pressing the key will cause the controller to display ‘OPS’.<br />
Pressing the SET key will scroll through parameters P1 to P6.<br />
Parameter values may be altered using or key.<br />
1.4.3 Display / Amend Parameters D1 - D8.<br />
Holding the SET key and pressing the key will cause the controller to display ‘df’.<br />
Pressing the SET key will scroll through parameters D1 to D8.<br />
Parameter values may be altered using or key.<br />
1.4.4 Display / Amend Parameters A1 - A6.<br />
Holding the SET key and pressing the key will cause the controller to display ‘AL’.<br />
Pressing the SET key will scroll through parameters A1 to A8.<br />
Parameter values may be altered using or key.<br />
1.4.5 Exit Factory Parameters.<br />
To exit Factory Parameter Programming and return to normal operation of the controller, the SET key must<br />
be held down and the key must be pressed.<br />
While both buttons are pressed, the display will show FIN and releasing the buttons will return the controller<br />
to normal operation.<br />
Note, while in the programming mode, if no button is pressed for a period of thirty seconds, the controller<br />
will revert to normal operation.<br />
1.4.6 Defrost.<br />
During the Defrost operation the display will show DEF. The evaporator indicator will be off. At the end<br />
of the defrost operation there will be a drain down period when neither the compressor or evaporator will<br />
run, therefore both indicator lights will be off. During this period DEF will be displayed.<br />
Upon completion of the drain down period, the Recovery operation is initiated with the display showing<br />
REC.<br />
The compressor will run and the green compressor on indicator will illuminate.<br />
On completion of the fan delay period (either by temperature or time) the evaporator fan will run with the<br />
green fan indicator LED illuminated.<br />
At the end of the Recovery time the display will revert back to displaying the internal cabinet<br />
temperature.<br />
To initiate a MANUAL DEFROST press and hold the defrost button, press the button, the display will<br />
show DEF, release both buttons.<br />
The defrost will be the same as an automatic defrost.<br />
5
1.5 FACTORY SET PARAMETERS<br />
SET No. CABINET MODELS COUNTER MODELS<br />
1 GS 501, 601, 1131, 1351, 2101 HT GSC ALL H<br />
GS 501, 601, 1131, 1351, 2101 HTR GSC ALL HR<br />
GS 501, 601, 1131 HU<br />
GS 501, 601, 1131 HUR<br />
GS ALL (High Temp Section) HLT<br />
2 GS 501, 601, 1131 WT<br />
GS 501, 601, 1131 WTR<br />
GS 501, 601, 1131 WU<br />
GS 501, 601, 1131 WUR<br />
3 GS 601, 1131 FT GSC ALL F<br />
6<br />
GSC ALL FR<br />
4 GS 501, 601, 1131, 1351 LT GSC ALL L<br />
5 GS 501, 601, 1131, 1351 MT GSC ALL M<br />
6 GS 501, 601, 1131, 1351 CT GSC ALL C<br />
7 GS 2101 MT GSC ALL MR<br />
GS 501, 601, 1131, 1351, 2101 MTR<br />
GS 501, 601, 1131 MU<br />
GS 501, 601, 1131 MUR<br />
8 GS 2101 CT GSC ALL CR<br />
GS 501, 601, 1131, 1351, 2101 CTR<br />
GS 501, 601, 1131 CU<br />
GS 501, 601, 1131 CUR<br />
9 GS 501, 601 LU GSC ALL LR<br />
GS ALL (Low Temp Section) HLT<br />
10 GS 501, 601, 1351 LTR<br />
GS ALL (Low Temp Section) LUR<br />
11 GS 2101 LT<br />
GS 2101 LTR<br />
GS 1131 LU
Parameter<br />
Parameter Set No. 1 2 3 4 5 6 7 8 9 10 11<br />
Temperature Set Point C1 1 10 -1 -21 -2 0 -2 0 -21 -21 -21 C1<br />
High Food Temp Alarm C2 8 19 5 -15 5 8 5 8 -15 -15 -15 C2<br />
Low Temp Food Alarm C3 0 4 -3 -25 -4 -1 -4 -1 -25 -25 -25 C3<br />
Condenser Clean Interval C4 0 0 0 0 0 0 0 0 0 0 0 C4<br />
Time Since Last Defrost L1 L1<br />
Temperature Differential P1 3 2 2 3 2 2 2 2 3 3 3 P1<br />
Time Between Condenser Clean P2 15 15 15 15 15 15 15 15 15 15 15 P2<br />
Maximum Set Point P3 5 17 2 -15 0 2 0 2 -15 -15 -15 P3<br />
Minimum Set Point P4 1 5 -2 -25 -3 -1 -3 -1 -25 -25 -25 P4<br />
Evap Fan Operating During Defrost P5 1 1 1 0 0 0 0 0 0 0 0 P5<br />
Air Temperature Offset P6 0 0 0 0 0 0 0 0 0 0 0 P6<br />
Number of Defrost Per Day D1 4 4 4 4 4 4 4 4 4 4 4 D1<br />
Termination Temperature D2 30 30 30 30 30 30 15 15 20 30 15 D2<br />
Termination Time D3 15 15 15 10 5 5 10 10 15 15 12 D3<br />
Defrost Type D4 0 0 0 1 1 1 0 0 0 0 0 D4<br />
Drain Down Time D5 1 0 1 1 1 1 1 1 1 1 1 D5<br />
Fan Delay Time D6 5 5 5 5 3 3 3 3 5 5 5 D6<br />
Fan Delay Temperature D7 -5 -5 -5 -5 -5 -5 -5 -5 -5 -5 -5 D7<br />
Recovery Time D8 5 5 5 8 5 5 5 5 5 5 5 D8<br />
Door Alarm Delay A1 5 5 5 5 5 5 5 5 5 5 5 A1<br />
Internal Audible Alarm Select A2 1 1 1 1 1 1 1 1 1 1 1 A2<br />
External Alarm Select A3 1 1 1 1 1 1 1 1 1 1 1 A3<br />
Probe Failure Response A4 0 0 0 0 0 0 0 0 1 1 1 A4<br />
Max. High Food Temp Alarm A5 10 20 8 -10 8 10 8 10 -10 -10 -10 A5<br />
Min. Low Food Temp Alarm A6 -5 2 -5 -30 -5 -2 -5 -2 -30 -30 -30 A6<br />
7
1.6 ERROR ANNUNCIATION<br />
1.6.1 Should a temperature probe failure occur the controller will indicate the fault by flashing on the fascia: PF1<br />
or PF2.<br />
PF1. When an air probe fault occurs the Condensing Unit Output may fall low depending on the status<br />
of the parameter Probe Failure Response (A4).<br />
PF2. If an evaporator probe failure occurs, the parameter defrost Termination Temperature (D2) is ignored<br />
and defrosts are caused to terminate only after the period Termination Time (D3) has elapsed.<br />
Please Note:<br />
As of November 1998 the RED defrost probe (PF2) has been removed and replaced with a 5.1kOhm<br />
Resistor.<br />
All new controllers come with the resistor fitted. Should you require resistors you can contact the Product<br />
Support at King’s Lynn and they will be issued free of charge.<br />
For <strong>Supra</strong> <strong>Cabinet</strong> and <strong>Counter</strong> products having hot gas defrost, no changes are required to the parameter<br />
settings.<br />
For <strong>Supra</strong> <strong>Cabinet</strong> and <strong>Counter</strong> electric defrost models, a heat limit Klixon should be fitted as an additional<br />
safety device. The type of Klixon to be fitted will depend on the particular model, for further information on<br />
type contact the Product Support Department on Telephone Number: 01553 691122.<br />
The effect of removing the probe will mean that the coil probe will always be shown as between -1°C or<br />
+1°C when pressing the button.<br />
1.5.2 Ferrite Ring Suppressor on the <strong>Supra</strong> Controller.<br />
As of October 1998 a ferrite core has been fitted to give immunity to the controller from mains borne electrical<br />
noise (“EFT” = Electrical Fast Transients). The ferrite operates by absorbing energy from the noise, thus<br />
reducing the amount of noise passed on to the controller.<br />
For further information contact the Product Support Department on Telephone Number: 01553 691122.<br />
1.5.3 Door Open Alarm<br />
When the door is open the evaporator fans are switched off. The green LED will flash. After a preprogrammed<br />
set point an audible alarm will be turned on and the red alarm LED will flash. This alarm will<br />
be cleared when the door is closed.<br />
If the door is left open for more than five minutes the compressor will also be turned off, i.e., nothing will<br />
be on except the lights.<br />
8
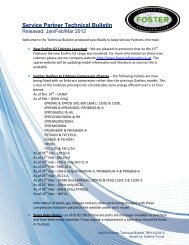
WIRING DIAGRAM<br />
9
WIRING DIAGRAM<br />
10
WIRING DIAGRAM<br />
11
2. CONTROLLER OPERATION FOR CABINETS<br />
FROM 1994 TO 1996<br />
2.1 SERVICE DATA<br />
One function of the controller is to provide certain data which may assist engineers in fault diagnosis.<br />
The function is ‘LLL’ in factory set parameters. Access into this function is described in the general operating<br />
instructions.<br />
Function<br />
L1 The data displayed shows the time in hours since the last defrost.<br />
This can be of help if a complaint of ‘icing’ up of the evaporator has been received as this allows the engineer<br />
to check that defrost occurs and whether under certain circumstances the defrost period is long enough.<br />
L2 In the event of high frequency door opening the value is displayed between 0 and 10.<br />
This value is a percentage of the door opening time.<br />
Display Door Operation<br />
00 Door closed for 100% of the time.<br />
1 Door has been open for 10% of the time.<br />
2 Door has been open for 20% of the time.<br />
3 Door has been open for 30% of the time.<br />
4 Door has been open for 40% of the time.<br />
5 Door has been open for 50% of the time.<br />
6 Door has been open for 60% of the time.<br />
7 Door has been open for 70% of the time.<br />
8 Door has been open for 80% of the time.<br />
9 Door has been open for 90% of the time.<br />
10 Door has been open for 100% of the time.<br />
This data can be useful if an engineer is called to investigate poor performance / high cabinet temperature<br />
as he can see from the factor displayed if heavy door usage could be the cause of the performance<br />
experienced.<br />
L3 The data displayed will be the door open factor (L2) at the time of the last overtemperature warning<br />
occurred.<br />
The values displayed will change automatically as the operation of the cabinet changes. It is not possible<br />
to change the values using the increment and decrement buttons.<br />
2.2 INTRODUCTION<br />
This is a multi-function microprocessor digital temperature controller which not only controls and displays<br />
the cabinet temperature but has other features and displays.<br />
2.3 DISPLAYS<br />
2.3.1 Compressor.<br />
The cycle of the compressor is indicated by means of a green LED adjacent to the symbol on the<br />
facia. When illuminated the compressor is running during the normal running operation or during defrost<br />
if the hot gas method is used.<br />
12
2.3.2 Evaporator Fan.<br />
The operation of the evaporator is indicated by means of a green LED adjacent to the symbol whilst<br />
it is illuminated.<br />
When the door is opened the green LED will ‘flash’. When closed it will revert back to a solid display.<br />
2.3.3 Condenser Clean.<br />
Adjacent to the condenser symbol is a green LED that illuminates if the compressor run time exceeds<br />
the value entered in the service programme (the value is based on hundreds of hours). If illuminated clean<br />
the condenser and re-set the compressor run hours in the customer programme C4.<br />
2.3.4 Food Temperature Value.<br />
The temperature of the ‘food’ within the cabinet is monitored via the microprocessor which ‘calculates’<br />
from the air sensing probe the stored food temperature. If this temperature is within the high/low food<br />
temperature conditions set within the factory service parameters, the green LED at the top left hand corner<br />
of the display window will be illuminated. If it is outside the high/low settings the red LED adjacent to the<br />
!<br />
symbol will be illuminated.<br />
It should be noted that as the monitoring system simulates actual food there will be a delay in reaching<br />
the ‘safe’ conditions after initial start up of the cabinet. This time could be up to 6-8 hours depending on<br />
storage temperature.<br />
2.4 PARAMETER PROGRAMMING AND OPERATING INSTRUCTIONS<br />
The controller is a multi-function microprocessor having five levels of control operation. The ‘end user’ has<br />
access only to one level limiting accidental changing of operation parameters.<br />
2.4.1 Switching On.<br />
With power connected to the cabinet the display on the controller fascia will be – – –<br />
Switch on by depressing the on/off button. The display will show actual internal temperature plus compressor<br />
and evaporator fan LED’s.<br />
2.4.2 User Operation.<br />
Cut out temperature.<br />
2.4.3 Press SET — display — SET<br />
2.4.4 Press SET again — display — C1<br />
Release — display — cut out temperature<br />
2.4.5 To adjust — press or buttons: during this process as the or buttons is pressed<br />
the parameter will be displayed and releasing it will show the value. As the button is continuously pressed<br />
the value will change. When the required value is set cease pressing the or buttons.<br />
2.4.6 To exit operation press SET — display C2.<br />
Hold SET press — display FIN.<br />
Release both buttons. The cabinet will operate to the new value.<br />
13
To change high/low alarm setting<br />
2.4.7 Press SET — display SET.<br />
Press SET — display C1.<br />
Release — display value of C1.<br />
2.4.8 Press SET — display C2 (high temp alarm).<br />
Release — display value of C2.<br />
To adjust press or as instruction 1.3.5 page 4.<br />
2.4.9 Press SET — display C3 (low temp alarm).<br />
Release — display value of C3.<br />
To adjust press or as instruction 1.3.5 page 4.<br />
2.4.10 Press SET — display C4 (condenser clean, hours reset).<br />
Release — display value — compressor run hours.<br />
To reset to zero as instruction 1.3.5 page 4.<br />
To exit programming and allow the cabinet to operate normally.<br />
2.4.11 Press SET — display C1.<br />
Hold SET and press button — display FIN<br />
Release both buttons for normal operation.<br />
NOTE: If no changes are made during a programming operation for 2 minutes, the controller will<br />
reset itself automatically for normal operation.<br />
2.5 ENTERING FACTORY SET AND PROGRAMMING MODE<br />
Press and hold SET — display SET.<br />
Press whilst still holding SET — display FIN.<br />
Release — display FIN.<br />
Press on/off I/O whilst still holding SET — display LLL.<br />
Release all buttons.<br />
To change parameter in information mode.<br />
2.5.1 Press SET — display L1.<br />
Release — display value.<br />
2.5.2 Press SET — display L2<br />
Release — display value.<br />
2.5.3 Press SET — display L3.<br />
Release — display value.<br />
To exit without entering any other value.<br />
2.5.4 Press SET — display L1.<br />
Press whilst still holding SET — display SET.<br />
Release whilst still holding SET — display FIN.<br />
Release both buttons.<br />
14
2.5.5 Display Factory Parameter.<br />
Access to the Factory Parameter settings is made by first entering the User Programme C1 to C4.<br />
Holding down the SET key and pressing the key will cause the controller to display FIN.<br />
Releasing the key and depressing the ‘I/O’ (with the SET key still pressed) will cause the controller<br />
to display LLL. Pressing the SET key will scroll through the parameters L1, L2 and L3.<br />
2.5.6 Display / Amend Parameters P1 - P7.<br />
Holding the SET key and pressing the key will cause the controller to display ‘OPS’.<br />
Pressing the SET key will scroll through the parameters P1 to P7.<br />
Parameter values may be altered using the or key.<br />
2.5.7 Display / Amend Parameters D1 - D7.<br />
Holding the SET key and pressing the key will cause the controller to display ‘df’.<br />
Pressing the SET key will scroll through the parameters D1 to D7.<br />
Parameter values may be altered using the or key.<br />
2.5.8 Display / Amend Parameters A1 - A6.<br />
Holding the SET key and pressing the key will cause the controller to display ‘AL’.<br />
Pressing the SET key will scroll through the parameters A1 to A6.<br />
Parameter values may be altered using the or key.<br />
2.5.9 Exit Factory Parameters.<br />
To exit Factory Parameter Programming and return to normal operation of the controller, the SET key must<br />
be held down and the must be pressed.<br />
While both buttons are pressed, the display will show FIN and releasing the buttons will return the controller<br />
to normal operation.<br />
Note, while in the programming mode, if no button is pressed for a period of thirty seconds, the controller<br />
will revert to normal operation.<br />
2.5.10 Defrost.<br />
During the Defrost operation the display will show DEF. The evaporator indicator will be off. At the end<br />
of the defrost operation there will be a drain down period when neither the compressor or evaporator will<br />
run, therefore both indicator lights will be off. During this period DEF will be displayed.<br />
Upon completion of the drain down period, the Recovery operation is initiated with the display showing<br />
REC.<br />
The compressor will run and the green compressor on indicator will illuminate.<br />
On completion of the fan delay period (either by temperature or time) the evaporator fan will run with the<br />
green fan indicator LED illuminated.<br />
At the end of the Recovery time the display will revert back to displaying the internal cabinet<br />
temperature.<br />
To initiate a MANUAL DEFROST press and hold the defrost button, press the button, the display will<br />
show DEF, release both buttons.<br />
The defrost will be the same as an automatic defrost.<br />
15
2.7 FACTORY SET PARAMETERS<br />
SET No. CABINET MODELS<br />
1 GS 501, 601, 1131, 1351, 2101 HT<br />
GS 501, 601, 1131, 1351, 2101 HTR<br />
GS 501, 601, 1131 HU<br />
GS 501, 601, 1131 HUR<br />
GS ALL (High Temp Section) HLT<br />
2 GS 501, 601, 1131 WT<br />
GS 501, 601, 1131 WTR<br />
GS 501, 601, 1131 WU<br />
GS 501, 601, 1131 WUR<br />
3 GS 601, 1131 FT<br />
4 GS 501, 601, 1131, 1351 LT<br />
5 GS 501, 601, 1131, 1351 MT<br />
6 GS 501, 601, 1131, 1351 CT<br />
Parameter<br />
16<br />
SET No. CABINET MODELS<br />
7 GS 2101 MT<br />
GS 501, 601, 1131, 1351, 2101 MTR<br />
GS 501, 601, 1131 MU<br />
GS 501, 601, 1131 MUR<br />
8 GS 2101 CT<br />
GS 501, 601, 1131, 1351, 2101 CTR<br />
GS 501, 601, 1131 CU<br />
GS 501, 601, 1131 CUR<br />
9 GS 501, 601 LU<br />
GS ALL (Low Temp Section) HLT<br />
10 GS 501, 601, 1351 LTR<br />
GS 1131 LUR<br />
11 GS 2101 LT<br />
GS 2101 LTR<br />
GS 1131 LU<br />
Parameter Set No. 1 2 3 4 5 6 7 8 9 10 11<br />
Temperature Set Point C1 2 10 -1 -21 -1 0 -2 0 -21 -21 -21 C1<br />
High Food Temp Alarm C2 8 15 5 -15 5 8 5 8 -15 -15 -15 C2<br />
Low Temp Food Alarm C3 0 4 -3 -25 -4 -1 -4 -1 -25 -25 -25 C3<br />
Condenser Clean Interval C4 0 0 0 0 0 0 0 0 0 0 0 C4<br />
Time Since Last Defrost L1 L1<br />
Door Open Factor L2 L2<br />
Door Open Factored At Last Alarm Cond. L3 L2<br />
Temperature Differential P1 3 2 2 3 2 2 2 2 3 3 3 P1<br />
Condenser Clean Interval P2 15 15 15 15 15 15 15 15 15 15 15 P2<br />
Compressor Rest Time P3 0 0 0 0 0 0 0 0 0 0 0 P3<br />
Food Probe Offset P4 0 0 0 0 0 0 0 0 0 0 0 P4<br />
Maximum Set Point P5 5 15 2 -15 0 2 0 2 -15 -15 -15 P5<br />
Minimum Set Point P6 1 5 -2 -25 -3 -1 -3 -1 -25 -25 -25 P6<br />
Fans On In Defrost P7 1 1 1 0 0 0 0 0 0 0 0 P7<br />
Defrost Type D1 0 0 0 1 1 1 0 0 0 0 0 D1<br />
Defrost Per Day D2 4 4 4 4 4 4 4 4 4 4 4 D2<br />
Termination Temperature D3 30 30 30 30 30 30 15 15 20 30 15 D3<br />
Termination Time D4 15 15 15 10 5 5 10 10 15 15 12 D4<br />
Drain Down Time D5 1 0 0 1 1 1 1 1 1 1 1 D5<br />
Fan Delay Time D6 5 5 5 5 3 3 3 3 5 5 5 D6<br />
Fan Delay Temperature D7 -5 -5 -5 -5 -5 -5 -5 -5 -5 -5 -5 D7<br />
Door Alarm Delay A1 5 5 5 5 5 5 5 5 5 5 5 A1<br />
Alarm Required A2 1 1 1 1 1 1 1 1 1 1 1 A2<br />
Probe Failure Response A3 1 1 1 0 1 1 1 1 0 0 0 A3<br />
Max High Alarm A4 10 20 8 -10 8 10 8 10 -10 -10 -10 A4<br />
Min Low Alarm A5 -5 2 -5 -30 -5 -2 -5 -2 -30 -30 -30 A5<br />
Recovery Time A6 5 5 5 8 5 5 5 5 5 5 5 A6
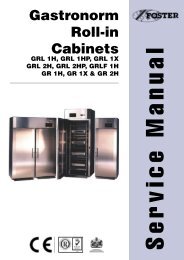
WIRING DIAGRAM<br />
17
WIRING DIAGRAM<br />
18
WIRING DIAGRAM<br />
19