SHILOH - Foremost
SHILOH - Foremost
SHILOH - Foremost

You also want an ePaper? Increase the reach of your titles
YUMPU automatically turns print PDFs into web optimized ePapers that Google loves.
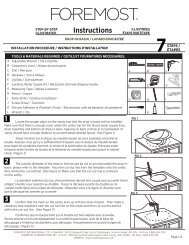
INSTRUCTIONS<br />
ILLUSTRÉES<br />
MIRROR / MIROIR / ESPEJO<br />
Model / Modèle / Modelo #: SHCOM1822<br />
<strong>SHILOH</strong><br />
ILLUSTRATED<br />
INSTRUCTIONS<br />
SHCOM1822<br />
INSTRUCCIONES<br />
ILUSTRADAS<br />
1/2
INSTRUCTIONS<br />
ILLUSTRÉES<br />
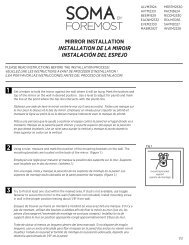
Wire<br />
Fil<br />
Alambre<br />
Back of the mirror<br />
Arrière du miroir<br />
Detrás del espejo<br />
© 2010 <strong>Foremost</strong> Groups, Inc. & <strong>Foremost</strong> International Ltd.<br />
906 Murray Road<br />
East Hanover, New Jersey<br />
07936<br />
<strong>SHILOH</strong><br />
ILLUSTRATED<br />
INSTRUCTIONS<br />
5970 Chedworth Way<br />
Mississauga, Ontario<br />
L5R 3V5<br />
www.SOMAbyFOREMOST.com<br />
Wall<br />
Mur<br />
Pared<br />
INSTRUCCIONES<br />
ILUSTRADAS<br />
2/2
VANITY TOP INSTALLATION<br />
INSTALLATION DE LA PLATE-FORME<br />
INSTALACIÓN DE LA PARTE SUPERIOR DEL TOCADOR<br />
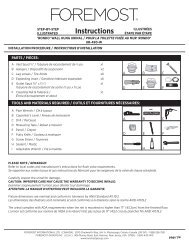
TOOLS AND MATERIALS REQUIRED:<br />
OUTILS ET FOURNITURES NÈCESSAIRES :<br />
HERRAMIENTAS Y MATERIALES REQUERIDOS: A B C<br />
D<br />
A Cloth / Chion / Paño<br />
B Carpenter’s Level / Niveau / Nivel de carpintero<br />
C Silicone Latex Caulk / Produit de calfeutrage silicone-latex / Masilla de látex de silicona<br />
D Wooden Shims (Wooden Strips) / Cales ou lattes de bois / Cuñas de madera<br />
1<br />
2<br />
3<br />
Make sure the top fits onto the vanity by doing a trial fit (Figure 1). The top should sit flush<br />
and level against the vanity. If the top rocks, then wooden shims will be needed to secure<br />
a firm fit.<br />
Assurez-vous que le dessus s'ajuste sur le meuble-lavabo en eectuant un essai d'ajustement<br />
(schéma 1). Le dessus devrait reposer exactement au niveau du meuble-lavabo. S'il bascule,<br />
on doit installer des cales en bois pour favoriser un ajustement ferme.<br />
Verifique que la parte superior se ajuste al tocador, haciendo una prueba inicial (figura 1).<br />
La parte superior debe quedar al ras y nivelada respecto al tocador. Si la parte superior se<br />
mueve, se debe colocar cuñas de madera para asegurar que esta quede firme.<br />
Install the faucet and the drain assembly (not provided) onto the top according to drain<br />
manufacturer’s instructions. Note: DO NOT OVERTIGHTEN<br />
Installez le robinet et l’assemblage du drain (non inclus), sur le dessus conformément aux<br />
directives du fabricant du drain. Remarque: NE PAS TROP SERRER<br />
Instale el grifo y la unidad de drenaje (que no se incluye) sobre la parte superior, según<br />
las instrucciones del fabricante de las piezas de drenaje. Nota: NO LOS APRIETE DEMASIADO<br />
Apply Silicone Latex Caulk onto the entire edge of the vanity (Figure 2). Set top in place.<br />
Appliquez de calfeutrage silicone-latex sur tout le pourtour du meuble-lavabo (schéma 2).<br />
Déposez le dessus.<br />
Aplique la masilla de látex de silicona por todo el borde del tocador (figura 2). Monte el<br />
tocador en su sitio<br />
Fig 1<br />
Fig 2<br />
13-0029-4W<br />
AVTAT2116<br />
F-3690-8W<br />
F-3919-W<br />
SHCOAT1617<br />
WW-1200<br />
WOODEN SHIMS<br />
1/2
4<br />
VANITY TOP INSTALLATION<br />
INSTALLATION DE LA PLATE-FORME<br />
INSTALACIÓN DE LA PARTE SUPERIOR DEL TOCADOR<br />
Trim wood shims if necessary. Wipe o any excess Silicone Latex Caulk with a damp cloth<br />
and allow to dry (Figure 3). Try not to move or slide the top in any way for at least 24 hours.<br />
Découpez les cales au besoin. Essuyez tout excédent de calfeutrage silicone-latex avec un<br />
ligne humide, et laissez sécher (schéma 3). Évitez de déplacer ou de glisser le dessus de<br />
quelque façon que ce soit pendant au moins 24 h.<br />
Si es necesario, recorte las cuñas de madera. Con un paño húmedo, quite el exceso de masilla<br />
de látex de silicona y deje que se seque (figura 3). Evite mover o deslizar la parte superior en<br />
forma alguna.<br />
© 2010 <strong>Foremost</strong> Groups, Inc. & <strong>Foremost</strong> International Ltd.<br />
906 Murray Road<br />
East Hanover, New Jersey<br />
07936<br />
5970 Chedworth Way<br />
Mississauga, Ontario<br />
L5R 3V5<br />
www.SOMAbyFOREMOST.com<br />
Fig 3<br />
2/2