Inquisitor ilthaman warlord ptar An Apocalypse ... - Games Workshop
Inquisitor ilthaman warlord ptar An Apocalypse ... - Games Workshop
Inquisitor ilthaman warlord ptar An Apocalypse ... - Games Workshop

Create successful ePaper yourself
Turn your PDF publications into a flip-book with our unique Google optimized e-Paper software.
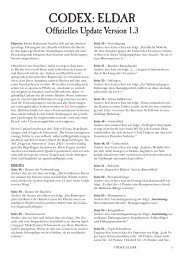
<strong>An</strong> <strong>Apocalypse</strong>/Cities of Death Campaign<br />
This campaign uses both the<br />
Cities of Death and<br />
<strong>Apocalypse</strong> expansions for<br />
Warhammer 40,000.<br />
<strong>An</strong> expansion gives you<br />
all the rules and information<br />
you need to play games in<br />
different and exciting new<br />
ways – like fighting in a dense<br />
urban environment or using<br />
truly massive armies.<br />
54 WHITE DWARF CITIES SHALL FALL<br />
Welcome to the second part of our Warhammer 40,000<br />
campaign! Will <strong>Inquisitor</strong> Ilthaman’s plan to defeat Warlord<br />
Ptar succeed, or will his gamble cost the Imperium another<br />
world to the forces of Chaos?<br />
Last month, in the first part of the Cities<br />
Shall Fall campaign, we presented the<br />
battle of the 13th Parallel, in which the<br />
hordes of Chaos surged into the city of<br />
Cor Hydrae.<br />
The Imperial force’s high commander,<br />
<strong>Inquisitor</strong> Ilthaman, planned to draw the<br />
forces of Chaos into the heart of the city,<br />
where his armies could grind them to dust<br />
amidst the dense terrain, before the<br />
<strong>Inquisitor</strong> himself would join the fray and<br />
take on Warlord Ptar in single combat. If<br />
Ilthaman could entrap the Chaos horde in<br />
his city, he could surround them, and<br />
destroy them utterly. Or so he planned…<br />
Ilthaman’s Gambit<br />
Even as the Shock Troopers of the Cadian<br />
74th A, B and E companies sold their lives<br />
dearly at the 13th Parallel, the remainder<br />
of the regiment redeployed further towards<br />
the centre of Cor Hydrae. The manoeuvre<br />
was a trying one, for an orderly retreat in<br />
the face of an enemy is amongst the<br />
hardest of military endeavours. But these<br />
men were Cadians, and death held no fear<br />
for them. With the sounds of the Chaos<br />
hordes giving chase behind them, the<br />
Cadians fell back to their prepared<br />
positions at Martyr’s Square.<br />
Having manned the defences prepared<br />
for them mere days before, the Cadians<br />
prepared to hold the square until ordered<br />
to fall back once more. Few men of the<br />
lead companies expected anything other<br />
than to stand and die, just as the other<br />
companies had at the 13th Parallel. They<br />
saw this action as a fitting repayment to<br />
those who had died that day.<br />
Watching tensely across the wide<br />
square for the first signs of Chaos forces,<br />
the Cadians were surprised to see a single<br />
Rhino crash through a ruined wall and<br />
head towards their lines. As the transport<br />
slewed to a halt in front of the Cadian<br />
positions, heavy shells began to fall,<br />
massive explosions wracking the square<br />
and scarring it with ragged craters. The<br />
Rhino’s ramp slammed down, and the<br />
Cadians were astonished to see a Space<br />
Marine Chaplain disembark. The Cadians<br />
gave voice to a mighty cheer as another<br />
figure emerged. It was their commanding<br />
officer, Colonel Kaze. He had somehow<br />
survived the action to draw the forces of<br />
Chaos across the 13th Parallel, and had led<br />
the lead elements of Ptar’s force directly<br />
into the killing ground of Martyr’s Square.<br />
Even as the Colonel was greeted by his<br />
jubilant men, battle was joined…<br />
<strong>Inquisitor</strong> <strong>ilthaman</strong><br />
The high commander of the Imperial<br />
forces on Malin’s Reach, <strong>Inquisitor</strong><br />
Ilthaman is a man noted for his<br />
ruthlessness, even amongst his peers in<br />
the Ordo Malleus. He has faced Warlord<br />
Ptar, the so-called “Execrator of Dolonis<br />
VII”, on several occasions, and the two<br />
harbour a grudge for one another that has<br />
yet to be settled. Ilthaman is prepared to<br />
go to any extreme to defeat his nemesis,<br />
even to sacrifice an entire world to<br />
<strong>warlord</strong> <strong>ptar</strong><br />
The Execrator of Dolonis VII has carved a<br />
bloody path across at least a dozen of the<br />
Imperium’s worlds, and has the blood of<br />
millions on his hands. Following the<br />
victory at Dolonis, Ptar’s horde grew still<br />
larger, and he dared to imagine himself<br />
worthy of the greatest of rewards a loyal<br />
servant of the Ruinous Powers might<br />
receive – apotheosis to Daemonhood. To<br />
that end, Ptar has sealed a terrible pact<br />
with his patron gods. He will offer up to<br />
entrap and destroy the Chaos <strong>warlord</strong>.<br />
Ilthaman intends to surround Ptar and his<br />
forces in the heart of Cor Hyrdae, and to<br />
face the <strong>warlord</strong> in single combat. Only<br />
then, having slain Ptar by his own hand,<br />
will Ilthaman’s mission be complete.<br />
Ilthaman will take to the field in<br />
Mission 3 – use an <strong>Inquisitor</strong> model from<br />
the Witch Hunters or Daemonhunters<br />
ranges, and follow the rules from the<br />
appropriate Codex.<br />
them the world of Malin’s Reach, and he,<br />
in return, shall become a Daemon Prince<br />
of Chaos!<br />
Warlord Ptar will take to the<br />
battlefield in Mission 2 – the Battle of<br />
Martyr’s Square, and Mission 3 – the<br />
Battle of the Pious Heart. If you wish to<br />
field him, then you could use the new<br />
plastic Chaos Lord in Terminator Armour<br />
model and the rules from Codex: Chaos<br />
Space Marines.<br />
www.games-workshop.com<br />
55
Brother Lysil of the Blood<br />
<strong>An</strong>gels Chapter gazed out<br />
across Martyr’s Square.<br />
He knew the enemy<br />
would soon come into sight.<br />
He could almost smell their<br />
evil upon the hot, corditelaced<br />
winds.<br />
“Sir?” Lysil turned to<br />
face the man who addressed<br />
him. It was a trooper of the<br />
Malin’s Reach Planetary<br />
Defence Force. “Speak,<br />
trooper,” Lyslil replied.<br />
“Sir. If we survive this,<br />
my lord, what will become<br />
of us?”<br />
Lysil considered the<br />
man’s question for a<br />
moment. Across the square<br />
rose the crump of explosions<br />
and the grinding sound of<br />
tracks crushing rubble.<br />
“What matter if we<br />
survive this?” the Blood<br />
<strong>An</strong>gel answered, hefting his<br />
bolter and checking the<br />
sights in readiness for the<br />
inevitable assault.<br />
“What matter?” the<br />
trooper replied, confusion<br />
writ large across his face.<br />
“Yes, trooper,” Lysil<br />
replied. “So long as we do<br />
our duty to Emperor and<br />
Primarch, our deaths shall be<br />
a glorious thing.”<br />
The trooper nodded, and<br />
lifted his own weapon to his<br />
shoulder. Space Marine and<br />
Defence Force trooper stood<br />
side by side as the forces of<br />
Chaos advanced into the<br />
open. As battle was joined,<br />
the bark of Lysil’s bolter<br />
and the sharp crack of the<br />
Imperial Guardman's lasgun<br />
merged into one.<br />
56 WHITE DWARF CITIES SHALL FALL<br />
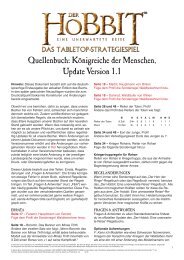
Artillery deployment<br />
ST JERRON’S HILL<br />
Scenario 2: The Battle of Martyr’s Square<br />
The Battle of Martyr’s Square was the<br />
second of <strong>Inquisitor</strong> Ilthaman’s bold actions<br />
to draw the forces of Warlord Ptar into the<br />
centre of Cor Hydrae. The Chaos forces<br />
were forced to cross the wide-open space<br />
of the square before getting to grips with<br />
their foes; the Cadians’ fire taking a<br />
fearsome toll upon them as they did so.<br />
The Shock Troopers knew that they had to<br />
hold the line and not give an inch, so that<br />
the enemy might be punished for every<br />
step of the Imperium’s city they gained.<br />
Despite their fate, the Cadians knew<br />
that they were fortunate indeed to have a<br />
detachment of Space Marines bolstering<br />
their lines. The example of these stoic<br />
defenders of Humanity was one the<br />
Cadians would emulate even as the enemy<br />
bore down upon them. Each man prayed<br />
not for survival, but that he might do his<br />
duty to the Emperor and take with him<br />
enough of his foe to save Cor Hydrae, and<br />
Malin’s Reach itself.<br />
Armies<br />
Defending the positions hastily erected<br />
across Martyr’s Square is a mixed force of<br />
Imperial Guard and Space Marines. The<br />
Imperial Guard army should amount to<br />
around 5000 points, and the Space<br />
Marines around 2000 points.<br />
In addition, the Cadians are now in<br />
range of their medium heavy artillery. This<br />
consists of up to 500 points of Imperial<br />
Chaos deployment zone<br />
Guard artillery pieces such as Basilisks, or<br />
any of the Forge World models capable of<br />
indirect fire.<br />
The Chaos army should be of an equal<br />
size (approximately 7500 points). In<br />
addition, the Chaos army has a further<br />
2000 points of units held in Strategic<br />
Reserve, dispatched by Warlord Ptar to<br />
replace the inevitable casualties his force<br />
will take crossing the open ground of<br />
Martyr’s Square in the very teeth of the<br />
Cadian gun positions.<br />
The Battlefield<br />
This battle is fought on two tables. One<br />
represents Martyr’s Square, while the other<br />
represents Saint Jerron’s Hill, on which the<br />
Cadians have emplaced their artillery in<br />
support of their units in the square.<br />
Martyr’s Square should be set up on a<br />
6' x 8' gaming area. The photo above<br />
provides an example of how to set up the<br />
battlefield, though you will need to adapt<br />
this according to your own terrain<br />
collection. Most importantly, the City Ruins<br />
are only placed around the table edges,<br />
leaving most of the table open.<br />
Saint Jerron’s Hill is located only a mile<br />
or so from Martyr’s Square, and the summit<br />
of the hill is represented by a 4' x 4' table,<br />
which you should set up near to your main<br />
table. This battlefield should use any urban<br />
terrain you have available, and may be set<br />
up by the Imperial side.<br />
MARTYR’S SQUARE<br />
Imperial deployment zone<br />
Time Limit<br />
Agree on a time limit appropriate to your<br />
group. You should be able to play this<br />
game over the course of a single day, but<br />
be prepared to run into the evening.<br />
Cityfighting Stratagems<br />
Imperium: Fortifications on the Martyr’s<br />
Square table, Obstacles on both tables.<br />
Chaos: Deep Strike on both tables.<br />
<strong>Apocalypse</strong> Strategic Assets<br />
Imperium: Minefields on the Martyr’s<br />
Square table, Disruptor Beacon on the<br />
Saint Jerron’s Hill table.<br />
Chaos: Strategic Redeployment and Blind<br />
Barrage on both tables.<br />
Deployment<br />
The Imperium must set up first, in the areas<br />
indicated above. They have 30 minutes in<br />
which to do so.<br />
The Imperium deploys its main force in<br />
its deployment zone in Martyr’s Square. No<br />
Imperial Guard indirect-firing artillery (such<br />
as Basilisks) may be set up in the square –<br />
these must be assigned to the Saint Jerron’s<br />
Hill table. The Imperial side may assign up<br />
to 1000 points of its army to defend the<br />
artillery at Saint Jerron’s Hill, and these are<br />
deployed along with the artillery there, in<br />
the area shown.<br />
The forces assigned to Saint Jerron’s<br />
Hill are also set up at this time, within the<br />
deployment time limit.<br />
OBJECTIVES<br />
The Chaos Space Marines also have 30<br />
minutes to set up. <strong>An</strong>y number of units<br />
may be held in Strategic Reserve, but only<br />
those able to Deep Strike may enter play<br />
on the Saint Jerron’s Hill table.<br />
Objectives<br />
Just as in the first battle, the objectives<br />
are all set up on one side of the table, as<br />
shown above. There are six in all, and<br />
they are captured in the manner<br />
described in the <strong>Apocalypse</strong><br />
expansion. Note that there are no<br />
objectives on the Saint Jerron’s Hill<br />
table – the motivation for fighting<br />
there is explained in the Special<br />
Rules below.<br />
Who Goes First?<br />
The Imperium has the first turn.<br />
Special Rules<br />
Fire Support: The artillery placed<br />
on Saint Jerron’s Hill may fire upon<br />
the Martyr’s Square table. If any<br />
Imperial Guard Command Squad<br />
containing a vox or master vox has<br />
line of sight to a target, then the<br />
scatter dice may be re-rolled.<br />
Victory or Defeat<br />
If the Imperium wins, every model in<br />
the army will be Stubborn in the next<br />
game. If Chaos wins, they gain the<br />
Ambush asset next game.<br />
No-man’s Land<br />
www.games-workshop.com<br />
57
“Colonel!” Kaze turned<br />
at the shout. “Duck!”<br />
He did so without<br />
thinking, trusting the<br />
instincts of the trooper<br />
who had called his name.<br />
As he slammed to the<br />
rubble-strewn ground, he<br />
felt something impossibly<br />
hot pass overhead, the hairs<br />
on the back of his neck<br />
beginning to melt in its<br />
backwash.<br />
Forcing himself to<br />
open his eyes, Kaze rolled<br />
back over. Whatever had<br />
passed overhead was gone,<br />
but it had left a boiling<br />
contrail through the air,<br />
leading all the way back to<br />
the centre of the<br />
Imperium’s lines.<br />
<strong>An</strong>d there, on the steps<br />
of the Chapel of the Pious<br />
Heart, Kaze saw Ilthaman<br />
locked in combat with a<br />
beast from a terrible<br />
nightmare. Rearing above<br />
the <strong>Inquisitor</strong> was a winged<br />
giant, its face leering and<br />
demonic, its claws were<br />
mighty blades from which<br />
roiling energies spat.<br />
Kaze could see that the<br />
<strong>Inquisitor</strong> had but minutes<br />
to live.<br />
“To me!” he bellowed<br />
above the roar of battle.<br />
“Cadians! To me!”<br />
In moments, a score of<br />
men surrounded him. He<br />
spared an instant to look<br />
each in the eye, before<br />
pointing towards the chapel<br />
and the titanic battle being<br />
played out on its steps.<br />
Twenty pairs of eyes<br />
followed his gesture.<br />
The colonel and his<br />
men stood, all<br />
understanding what must be<br />
done. Kaze knew that no<br />
hollow speech was required.<br />
These men would follow<br />
him into the very Eye of<br />
Terror, for they were<br />
Cadians, beyond reproach,<br />
loyal to the last, with fire<br />
in their hearts.<br />
“Charge!” bellowed<br />
Kaze. The colonel and his<br />
hastily formed detachment<br />
broke from cover, running<br />
– oblivious to the bolter<br />
and las-fire around them –<br />
towards the <strong>Inquisitor</strong> and<br />
the vile monstrosity. None<br />
made it to the chapel, but<br />
Kaze had never been more<br />
proud of his men.<br />
58 WHITE DWARF CITIES SHALL FALL<br />
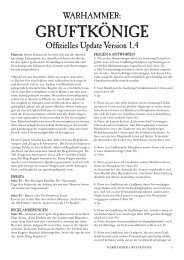
Scenario 3: The Battle of the Pious Heart<br />
Following the Battle of Martyr’s Square,<br />
Ilthaman’s forces were successful in<br />
drawing Ptar’s hordes into the centre of the<br />
city, at terrible cost to both sides. The<br />
<strong>Inquisitor</strong> Lord himself took to the<br />
battlefield, determined that he would face<br />
the vile Chaos <strong>warlord</strong> in combat, and<br />
defeat him once and for all.<br />
Every last warrior in the city gathered to<br />
do battle at the Chapel of the Pious Heart.<br />
Ilthaman deployed the bulk of his forces<br />
around the chapel, while keeping the<br />
remainder back to encircle his enemy’s<br />
army. Here, in the very centre of Cor<br />
Hydrae, the decades-old battle between<br />
the <strong>Inquisitor</strong> and his nemesis would be<br />
settled, one way or another.<br />
Armies<br />
Both armies are of the same size – use as<br />
many models as you can get your hands<br />
on! In addition, the Imperium has a single<br />
squad of Grey Knight Terminators, up to<br />
the points value of any such models you<br />
have available.<br />
OBJECTIVES<br />
The Battlefield<br />
You will need a 6' x 8' gaming area. The<br />
photo below provides an example of how<br />
to set it up, though you will need to adapt<br />
this according to your own terrain<br />
collection. If you have appropriate terrain<br />
to represent the Chapel of the Pious Heart<br />
(such as any Sanctum Imperialis or Chapel<br />
of Sanctuary pieces), these should be<br />
concentrated in the centre of the table. A<br />
suitable terrain piece, or some manner of<br />
counter, should be used to indicate the<br />
altar of the Chapel of the Pious Heart.<br />
Time Limit<br />
Agree on a time limit appropriate to your<br />
group. You should be able to play this<br />
game over the course of a single day, but<br />
be prepared to run into the evening.<br />
Cityfighting Strategems<br />
Imperium: Obstacles, Booby Traps, Sacred<br />
Ground (the Chapel).<br />
Chaos: Deep Strike, Infiltrate, Sewer Rats.<br />
Chaos deployment zone<br />
<strong>Apocalypse</strong> Strategic Assets<br />
Imperium: Flank March, Null Field<br />
Generator (the altar)<br />
Chaos: Supreme Headquarters, Vortex<br />
Grenade (Ptar).<br />
Deployment<br />
The Imperium must set up first, in the area<br />
indicated above. They have 30 minutes in<br />
which to do so.<br />
The Chaos Space Marines also have 30<br />
minutes to set up, in the areas indicated on<br />
the map.<br />
Objectives<br />
Ptar is attempting to seal his pact with the<br />
Ruinous Powers by enacting a ritual of<br />
desecration at the altar of the Pious Heart.<br />
To do so, he must move into base contact<br />
with the altar, and will then achieve<br />
apotheosis as described in the special<br />
rules, right. If Ptar has achieved apotheosis<br />
and is alive at the end of the game, Chaos<br />
wins the game, and the campaign. If Ptar<br />
has not achieved apotheosis or has been<br />
killed, then the Imperium wins the game.<br />
Who Goes First?<br />
Roll a D6 to determine which side gets the<br />
first turn – the winner decides.<br />
Imperial deployment zone<br />
Special Rules<br />
Apotheosis! If Ptar comes in base contact<br />
with the altar in the Chapel of the Pious<br />
Heart, then at the beginning of the<br />
following turn, the model is replaced by a<br />
Daemon Prince.<br />
Grey Knight Intervention: The Imperium’s<br />
Grey Knights are held in Strategic Reserve,<br />
and will deep strike onto the table at the<br />
beginning of the next Imperial turn after<br />
Ptar’s apotheosis is achieved. They will<br />
deep strike to any point within 12" of him,<br />
and will not scatter.<br />
The End?<br />
So, did Ptar succeed in his blasphemous<br />
ritual and become a Daemon Prince of<br />
Chaos? Or did <strong>Inquisitor</strong> Ilthaman<br />
finally kill his enemy, thus ending his<br />
lifetime’s obsession? Either way, we<br />
hope that you’ve enjoyed this simple<br />
campaign, and feel inspired to create<br />
one for yourself. The obvious place to<br />
start is to continue the story. If he<br />
survived, what foul deeds will the new<br />
Daemon Prince perform in his service of<br />
the Ruinous Powers? <strong>An</strong>d if Ilthaman<br />
survived, what terrible steps will the<br />
<strong>Inquisitor</strong> Lord be driven to in his quest<br />
to stymie Ptar’s ambition? Over to you!<br />
No-man’s Land<br />
www.games-workshop.com 59