Technical Analysis by MPFX - Forex Factory
Technical Analysis by MPFX - Forex Factory
Technical Analysis by MPFX - Forex Factory

You also want an ePaper? Increase the reach of your titles
YUMPU automatically turns print PDFs into web optimized ePapers that Google loves.
By <strong>MPFX</strong><br />
Our aim at S.T.I. is to make <strong>Technical</strong> <strong>Analysis</strong> as simple and uncomplicated as possible.<br />
We will try to explain the concepts of each indicator in Plain English and include examples where<br />
possible.<br />
No indicator is 100% accurate but <strong>by</strong> the use of several at the same time we may be able to<br />
eliminate many False signals.<br />
We will start with the basics and work our way up to the more complex indicators.<br />
1. <strong>by</strong> <strong>MPFX</strong><br />
The basis for drawing trend lines onto charts is probably one of the most basic to do and<br />
master, yet it is one of the more powerful and reliable indicators used to determine a change in<br />
trend.<br />
Trend lines can be applied to many different indicators but for the reference of this article we will<br />
use closing price data. This is the most common data used.<br />
We will discuss the other uses at a latter stage.<br />
Use the list below to navigate or simply scroll down.<br />
1. What are trend lines and how to draw them !<br />
2. Support lines.<br />
3. Resistance lines<br />
4. What to look for / Breakout's
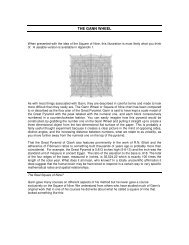
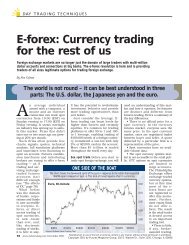
Trend lines<br />
When viewing most<br />
charts a pattern of<br />
the price formation<br />
is usually visible to<br />
the naked eye. This<br />
pattern is called a<br />
trend and these<br />
trends have three<br />
distinct patterns.<br />
UP TREND :<br />
Prices increasing<br />
DOWNTREND:<br />
Prices decreasing<br />
HOLDING OR<br />
FLAT LINE :<br />
Prices stagnant or<br />
small trading range.<br />
A trend line is<br />
basically a line<br />
drawn joining<br />
consecutive lows<br />
or highs in a trend<br />
pattern.<br />
Draw a line<br />
connecting the<br />
lowest points on a<br />
chart in an up<br />
trend.<br />
Draw a line<br />
connecting the<br />
highest points on a<br />
chart in a down<br />
trend.<br />
Draw BOTH highs<br />
and lows for a<br />
holding pattern<br />
Note Rising<br />
volumes on lead<br />
up to Breakout<br />
An Up trend with trend line drawn in<br />
A down trend with trend line drawn in<br />
Holding pattern with BOTH lines drawn in<br />
TOP
Support Line<br />
When we draw a line<br />
joining all the lows of a<br />
price pattern together<br />
the line is called a<br />
Support Line.<br />
These lines are a low<br />
point on the chart on<br />
which the price<br />
bounces<br />
off consistently when<br />
reached.<br />
Many traders elect to<br />
BUY when the price<br />
reaches this point.<br />
It is our belief that the<br />
market likes to test<br />
Support lines more<br />
than once and we look<br />
for BUY signals after a<br />
second or third<br />
testing of this line.<br />
If a support line is<br />
broken then the current<br />
trend is said to be<br />
broken or in a Down<br />
Trend and the market<br />
will look for a lower<br />
price to set up a new<br />
support level.<br />
TOP<br />
Support line<br />
You will hear comments about support levels consistently on the chat<br />
rooms and in editorials.<br />
These levels ARE very powerful and SHOULD be<br />
monitored diligently when reached.
Resistance<br />
lines<br />
When we draw a line<br />
joining all the tops of a<br />
price pattern together<br />
the line is called a<br />
Resistance Line.<br />
It is basically the exact<br />
opposite of the support,<br />
it is a series of highs on<br />
a chart where the<br />
market continually<br />
rejects the price thus<br />
not allowing it to go any<br />
higher.<br />
Many traders elect to<br />
SELL when the price<br />
reaches this point.<br />
It is our belief that the<br />
market likes to test<br />
Resistance lines<br />
more than once and<br />
we look for SELL<br />
signals after a second<br />
or third testing of this<br />
line.<br />
The same applies for<br />
resistance in that it is a<br />
powerful level and<br />
one SHOULD think<br />
seriously about taking<br />
profit at this level.<br />
Some traders like to<br />
sell small parcels to<br />
average out their price<br />
paid and leave the rest<br />
in hope of greater<br />
gains.<br />
Resistance line is drawn in RED.<br />
Support in Green<br />
TOP
What to look<br />
for! Breakouts<br />
We have now<br />
established what are<br />
trend lines and how to<br />
draw them. When one<br />
of theses lines is<br />
breached is called a<br />
Breakout.<br />
If a breakout occurs<br />
on a Resistance line<br />
many Trader's will<br />
class this as BUY<br />
signal and act<br />
accordingly.<br />
If a breakout occurs<br />
on a Support line<br />
many Traders will<br />
class it as a SELL<br />
signal an act<br />
accordingly.<br />
Please note how the<br />
OLD Support line<br />
NOW becomes the<br />
NEW Resistance line<br />
Resistance Broken
Note Rising<br />
Volumes on<br />
Breakout<br />
TOP<br />
Resistance Broken<br />
Resistance Broken<br />
Support Broken<br />
From time to time there will be FALSE signals given.<br />
This is why it is important to WAIT FOR CONFIRMATION of a trend reversal or breakout.<br />
It is at this point we need to add other indicators to help with our <strong>Analysis</strong>.
2. <strong>by</strong> <strong>MPFX</strong><br />
You should now have a basic understanding of Trend Lines and their workings from our first<br />
chapter. In this chapter we will discuss some of the patterns that form on the charts that help give<br />
a further indication of an impending Trend Reversal. Once again some of the patterns about to be<br />
discussed are very powerful and SHOULD be respected!<br />
Use the list below to navigate or simply scroll down.<br />
Head & Shoulder Patterns<br />
Inverse Head & Shoulder Pattern<br />
Double Tops<br />
Double Bottoms<br />
Rounded Top / Saucers<br />
Rounded Bottoms / Saucers and Cups<br />
Triangles<br />
Flags / Pennants / Wedges
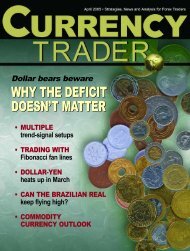
Head &<br />
Shoulder<br />
Pattern<br />
The Head &<br />
Shoulder Pattern<br />
has claim to<br />
being one of the<br />
most<br />
reliable of all<br />
chart patterns. It<br />
is usually formed<br />
at the end of an<br />
upward trend or<br />
market rally and<br />
acts as a SELL<br />
signal.<br />
There are four<br />
main<br />
components that<br />
make up a H&S<br />
pattern and they<br />
are :<br />
The Left<br />
Shoulder<br />
The Head<br />
The Right<br />
Shoulder<br />
The Neckline.<br />
The Left<br />
Shoulder - The<br />
market looks to<br />
test higher price<br />
levels. Increasing<br />
Volumes.<br />
Followed <strong>by</strong><br />
retracement to<br />
neckline.<br />
The Head -<br />
Market again<br />
looks to test<br />
higher ground<br />
and succeeds<br />
with setting<br />
a higher price<br />
that was set <strong>by</strong><br />
the Left<br />
Shoulder. Large<br />
Volumes<br />
Followed <strong>by</strong><br />
retracement to<br />
neckline.
The Right<br />
Shoulder - Once<br />
again the market<br />
looks to test<br />
higher<br />
ground but this<br />
time fails to<br />
achieve the high<br />
price set <strong>by</strong><br />
Head. Reducing<br />
Volumes. Again<br />
followed <strong>by</strong><br />
retracement to<br />
neckline only this<br />
time there is a<br />
good chance of<br />
the Neckline<br />
being<br />
violated and the<br />
market MAY look<br />
to test Lower<br />
ground.<br />
The Neckline -<br />
Is a line that is<br />
drawn<br />
connecting<br />
consecutive<br />
lows. It is a line<br />
where the price<br />
bounces off and<br />
refuses to go<br />
below. It is<br />
basically the<br />
same as a<br />
support line<br />
Most traders who<br />
are familiar with<br />
this pattern<br />
would try to<br />
liquidate at the<br />
top of the Head<br />
or as it started to<br />
retrace towards<br />
the Neckline.<br />
If you are still<br />
holding a stock<br />
during the Right<br />
Shoulder stage it<br />
may be your last<br />
chance to<br />
liquidate before<br />
the price tests<br />
lower ground.<br />
I advise that you<br />
look to liquidate<br />
at the top of the<br />
Right Shoulder.
Inverse<br />
Head &<br />
Shoulder<br />
Pattern<br />
This pattern is<br />
identical to the<br />
H&S discussed<br />
above except it<br />
occurs at<br />
the end of a<br />
downward trend or<br />
market sell off. It is<br />
made up of the<br />
same<br />
four components<br />
only this time they<br />
are acting in<br />
reverse and thus<br />
give a Buy signal.<br />
The Left Shoulder -<br />
The market looks<br />
to test lower price<br />
levels. Decreasing<br />
Volumes. Followed<br />
<strong>by</strong> test of Neckline.<br />
The Head - Market<br />
again looks to test<br />
lower ground and<br />
succeeds with<br />
setting a higher<br />
price that was set<br />
<strong>by</strong> the Left<br />
Shoulder. Steady<br />
to slightly<br />
increasing<br />
Volumes. Followed<br />
<strong>by</strong> test of Neckline.<br />
The Right<br />
Shoulder - Once<br />
again the market<br />
looks to test lower<br />
ground but this<br />
time fails to<br />
achieve the low<br />
price set <strong>by</strong><br />
Head. Increasing<br />
Volumes. Again<br />
followed <strong>by</strong> test of<br />
the neckline only<br />
this time there is a<br />
good chance of the<br />
Neckline being<br />
violated and<br />
the market MAY<br />
look to test Higher<br />
ground.<br />
Please note volumes rising.
The Neckline - Is a<br />
line that is drawn<br />
connecting<br />
consecutive Highs.<br />
It is a line where<br />
the price bounces<br />
off and refuses any<br />
Higher. It is<br />
basically the same<br />
as a Resistance<br />
Line<br />
Again most traders<br />
who are familiar<br />
with this pattern<br />
would try to Buy at<br />
the bottom of the<br />
head but it is a<br />
safer way to trade<br />
if you wait till<br />
confirmation that<br />
the Right Shoulder<br />
has formed and is<br />
looking to test the<br />
Neckline once<br />
again.<br />
Where you decide<br />
to take your<br />
position is a matter<br />
of personal<br />
preference and risk<br />
adversity.<br />
TOP
Double Tops<br />
This is another powerful pattern<br />
that MAY indicate that the market<br />
is looking to test Lower levels.<br />
It occurs at the end of a upward<br />
trend or market rally.<br />
Double tops basically tell us that<br />
the market has tested a price level<br />
on two occasions and on both<br />
times refused to go higher.<br />
They can also come in the form of<br />
triple and quadruple tops.<br />
Volumes on the second top should<br />
be lower than the first top.<br />
If you hold a stock that exhibits a<br />
double top be ready to liquidate as<br />
there is a good chance the market<br />
will go lower.<br />
TIP<br />
Bar and Candle Charts will give<br />
you a better example of double<br />
tops than line charts.<br />
Examples of Double and Triple Tops:
TOP
Double<br />
Bottoms<br />
Double bottoms are<br />
identical to double tops<br />
except they work in the<br />
opposite way and thus<br />
create a Buy signal.<br />
Double bottoms<br />
basically tell us that the<br />
market has tested a<br />
price level on two<br />
occasions and on both<br />
times refused to go<br />
Lower.<br />
They can also come in<br />
the form of triple and<br />
quadruple bottoms.<br />
Volumes on the second<br />
bottom should be<br />
Greater than the first<br />
bottom.<br />
Double bottoms can<br />
give an excellent Buy<br />
signal and most<br />
<strong>Technical</strong> Traders would<br />
act on such a sign.<br />
TOP<br />
Examples of Double Bottoms :<br />
Note Dramatic rise in volumes on second bottom
Rounded Top /<br />
Saucers<br />
The formation of a<br />
rounded top on a chart is<br />
a good indication that the<br />
market will look to test<br />
Lower ground soon and<br />
thus giving us a Sell<br />
signal.<br />
It can also be called a<br />
saucer or distribution<br />
curve and is seen at the<br />
end of an upward trend. It<br />
shows the market is<br />
running out of steam and<br />
cannot achieve new<br />
highs.<br />
Volumes will start to<br />
reduce as the price<br />
reaches it's peak and<br />
increase as the price<br />
starts to fall.<br />
Most experienced<br />
Traders would note this<br />
and exit their position.<br />
TOP<br />
Some example of Rounded Tops:
Rounded<br />
Bottoms<br />
This formation has the<br />
same characteristics as<br />
a rounded top only this<br />
time it works in the<br />
opposite way and<br />
creates a BUY signal.<br />
Rounded bottoms are<br />
sometimes called<br />
Saucers or the<br />
Accumulation Period.<br />
All of these patterns<br />
indicate that the<br />
downward trend is<br />
running out of<br />
steam and the market<br />
is looking to test higher<br />
ground once again.<br />
Most experienced<br />
traders would be<br />
looking to position<br />
themselves in this<br />
accumulation period, it<br />
is called the<br />
accumulation stage as<br />
that is exactly what is<br />
happening, traders are<br />
accumulating shares.<br />
A further extension of<br />
the rounded bottom is a<br />
formation called a Cup.<br />
It is basically a<br />
completed rounded<br />
bottom with a smaller<br />
rounded bottom<br />
formed on the right<br />
hand side thus giving<br />
the appearance of a<br />
handle for the cup.<br />
Volume should be on<br />
the increase as the<br />
bottom starts to climb<br />
upward.<br />
There should be even<br />
larger volumes again<br />
during the Handle<br />
stage.<br />
Below are examples of rounded bottoms and cups:
The Handle is maybe<br />
our last chance to take<br />
a position before the<br />
market tests higher<br />
ground.<br />
TOP
Triangles<br />
Triangles and wedges<br />
are probably the most<br />
frequently occurring<br />
pattern to form on<br />
the charts and can give<br />
a possible early<br />
indication of a trend<br />
reversal.<br />
As they occur so<br />
frequently they are not<br />
as reliable as some<br />
patterns previously<br />
discussed but are still a<br />
very useful indicator for<br />
the <strong>Technical</strong> Trader.<br />
Drawing Triangles onto<br />
charts is basically just<br />
drawing BOTH support<br />
and resistance lines at<br />
the same time.<br />
They can be found<br />
nearly anywhere on a<br />
chart. Sometimes an<br />
entire up trend or<br />
downtrend may be<br />
made up of lots of little<br />
triangles.<br />
The two main types of<br />
triangles that can be<br />
found are:<br />
Symmetrical<br />
Triangles and Right<br />
Angled Triangles:<br />
Symmetrical<br />
Triangles - These<br />
occur when the price is<br />
locked into a reducing<br />
trading range. Both<br />
support and resistance<br />
lines meet in a point.<br />
The lines are said to be<br />
in Convergence.<br />
Volumes slowly reduce<br />
as the price nears the<br />
point of the triangle and<br />
then on breakout surge<br />
considerably.<br />
Below are examples of triangles :
As Traders we are<br />
looking for this<br />
breakout and would<br />
either buy or<br />
sell according to the<br />
direction of the<br />
breakout.<br />
Please remember that<br />
false are common with<br />
this type of pattern.<br />
Right Angled Triangles<br />
- Are similar to<br />
symmetrical triangle<br />
but instead one of the<br />
lines drawn will either<br />
have a flat top or flat<br />
bottom and is drawn<br />
near perfectly<br />
horizontal.<br />
These triangles are<br />
probably more accurate<br />
than all others and may<br />
also indicate which<br />
way the price could<br />
break.<br />
Again extreme caution<br />
is needed when using<br />
triangles as they DO<br />
generate false signals.
Flags<br />
Pennants<br />
Wedges<br />
Flags, pennants and<br />
wedges occur on both<br />
up and down trends<br />
and indicate the<br />
market is reassessing<br />
the share price or<br />
more simply taking a<br />
breather.<br />
They are more often<br />
than not formed at the<br />
halfway stage of a<br />
trend.<br />
They are drawn onto<br />
charts <strong>by</strong> drawing both<br />
support and<br />
resistance lines<br />
simultaneously.<br />
Once drawn they<br />
should take on the<br />
appearance as their<br />
names imply. I.e. A<br />
Flag looks like a Flag<br />
A basic rule to follow<br />
is ' If a Flag, Pennant<br />
or Wedge forms in<br />
an up or down trend,<br />
the trend USUALLY<br />
continues on the<br />
same path'. I.e.<br />
An up trend<br />
continues Up<br />
.<br />
Below are some examples :
If holding a stock and<br />
one of these patterns<br />
forms on the chart it is<br />
a signal for caution<br />
and a breach of either<br />
the support or<br />
resistance should<br />
be acted upon
As you can see<br />
Wedges and<br />
Pennants are very<br />
similar in appearance<br />
but in essence as<br />
Traders we are only<br />
interested in which<br />
way they will break as<br />
opposed to what to<br />
call them.<br />
FOOTNOTE:<br />
Be Warned.. ALL of the above mentioned in this chapter<br />
CAN and WILL give False buy and sell signals.<br />
It is at the Traders discretion whether to act on any of these signals.<br />
It is my recommendation that diligent monitoring should be applied if you<br />
are holding a stock that exhibits ANY of these patterns mentioned.<br />
TOP
BY <strong>MPFX</strong><br />
When looking at a chart we have the option to view the price formations in four main styles, these are: Line, Bar,<br />
Candle and Point and Figure. All of these have their strengths and weaknesses and which style you choose will<br />
be a matter of personal preference.<br />
I personally elect to use three of the four types with point and figure the one I never use. This works for me but<br />
there are many <strong>Technical</strong> Traders out there who trade with great success using only P&F so as already stated<br />
this really is a personal choice that you will have to make.<br />
The line chart<br />
is the one most<br />
of us would<br />
have seen<br />
many times<br />
before and is<br />
usually plotted<br />
using closing<br />
price data.<br />
This chart is<br />
good for<br />
visualizing the<br />
overall trend of<br />
a stock and on<br />
some charting<br />
programs it will<br />
allow you to<br />
see more data<br />
over a longer<br />
time span.<br />
It's use is<br />
limited as it is<br />
basically what I<br />
call a one<br />
dimensional<br />
chart as it uses<br />
only one form<br />
of data.<br />
Good for<br />
glancing, but<br />
not for<br />
analyzing.<br />
TOP
Bar charts are probably the<br />
most widely used <strong>by</strong> traders<br />
and not only give us the<br />
closing price but also the<br />
high, low and opening<br />
prices.<br />
As traders we need to know<br />
as much as possible about a<br />
stock and its movements<br />
and these bars are the<br />
perfect tool for the job.<br />
With a single glance at one<br />
of these bars we can get a<br />
feel for how investors traded<br />
this stock for the day and<br />
their general sentiment<br />
towards it.
Small bars ( or bodies as<br />
they are <strong>Technical</strong>ly called )<br />
are a sign the market maybe<br />
consolidating its position or<br />
thinking about its nest move.<br />
Long bodies could indicate<br />
the market is again on the<br />
move and looking to test<br />
new levels.
Some charting packages will<br />
only show the close on the<br />
bar, many traders elect to<br />
use this style with great<br />
success. Some say the<br />
opening price does not give<br />
a true indication of market<br />
sentiment and choose to<br />
ignore it.<br />
There is a marked difference<br />
when drawing trend lines on<br />
a line chart compared to a<br />
bar chart. With a bar chart<br />
you get the entire trading<br />
range and a trend line can<br />
be drawn using these<br />
ranges as opposed to only<br />
using closing price data on a<br />
line chart. To make this<br />
more clear please refer to<br />
diagrams opposite.<br />
These two charts are<br />
identical except one is a line<br />
chart and one is a bar. The<br />
trend lines drawn in are the<br />
same for both charts based<br />
on the bar chart only.
In the circled areas you can<br />
see the clear difference<br />
between the two.<br />
With a bar chart we are<br />
drawing trend line based on<br />
trading ranges rather than<br />
end of day closing prices.<br />
By doing this we are<br />
allowing ourselves a better<br />
chance of gaining a lower<br />
entry price and a higher exit<br />
level. We also increase the<br />
range in which the stock<br />
may trade thus allowing<br />
greater profit margins.<br />
TOP
Candle stick<br />
charting was<br />
developed <strong>by</strong> the<br />
Japanese several<br />
centuries ago<br />
and has<br />
undergone a<br />
resurgence in<br />
popularity in<br />
recent times. This<br />
form of chart is <strong>by</strong><br />
far my personal<br />
favorite and I<br />
usually use it<br />
exclusively.<br />
Although more<br />
complex to<br />
understand, once<br />
mastered, candle<br />
charts can give<br />
you the best<br />
overall view of<br />
market sentiment.<br />
In this section I<br />
will give you a<br />
brief summary of<br />
candles but the<br />
purchase of a<br />
book dedicated to<br />
candle charting<br />
should be a must<br />
for anyone<br />
serious about<br />
developing their<br />
charting skills.<br />
Candles are<br />
similar to bar<br />
charts in that they<br />
show all four data<br />
components (<br />
open , close, high<br />
and low ) but that<br />
is where the<br />
similarities end.<br />
Candle charts<br />
use rectangular<br />
boxes that join<br />
the open and<br />
closing prices<br />
together, and use<br />
vertical thinner<br />
lines to define the<br />
trading range.<br />
The boxes are<br />
called the ' Real<br />
Body ' and the<br />
thin trading range<br />
line are called the<br />
' wicks or shadow
If the closing<br />
price is higher<br />
than the opening<br />
price the body will<br />
be white, if the<br />
closing price is<br />
lower than the<br />
opening price the<br />
body will be<br />
black.<br />
Opposite is a<br />
basic list of<br />
common candle<br />
stick formations.<br />
A = Open/close<br />
the same. large<br />
trading range.<br />
B = Open/close<br />
the same. small<br />
trading range.<br />
C = Open/close<br />
the same. no<br />
trading range<br />
D = Open close<br />
the same. Market<br />
tested higher<br />
levels but failed<br />
to close any<br />
higher than open.<br />
E = Open close<br />
the same. Market<br />
tested lower<br />
levels but failed<br />
to close lower<br />
than open.<br />
F = Doji with<br />
market testing<br />
higher levels but<br />
refusing to close<br />
above open. Also<br />
known as a '<br />
Hammer ". The<br />
appearance of a<br />
hammer at the<br />
top of a trend<br />
could suggest<br />
lower prices may<br />
follow. Bearish<br />
sign.<br />
The correct term for a line that represents a price that opened and closed at identical<br />
levels is ' Doji '
G = Doji with<br />
market testing<br />
lower levels but<br />
refusing to close<br />
below open. Also<br />
known as<br />
Hammer. The<br />
appearance of a<br />
hammer at the<br />
bottom of a trend<br />
could suggest<br />
higher prices may<br />
follow. Bullish<br />
sign.<br />
H = Hammer with<br />
close higher than<br />
open. Bullish at<br />
bottom<br />
I = Hammer with<br />
close lower than<br />
open. Bullish at<br />
bottom.<br />
J = Hammer with<br />
close higher than<br />
open. Bearish at<br />
top.<br />
K = Hammer with<br />
close lower than<br />
open. Bearish at<br />
top.<br />
Please note that<br />
Hammers are<br />
also referred to<br />
as ' umbrella<br />
lines ".<br />
L & M = Both of<br />
these are known<br />
as spinning tops.<br />
They represent<br />
small trading<br />
ranges and are<br />
important in some<br />
candle chart<br />
patterns. Again<br />
where they occur<br />
is of the up most<br />
importance.
Opposite are 3<br />
examples of<br />
Hammers. The<br />
bottom two are<br />
bullish while the<br />
top one is<br />
Bearish.<br />
The appearance<br />
of Dark clouds is<br />
not a good sign.<br />
It is formed with a<br />
white real body<br />
followed <strong>by</strong> a<br />
Larger black real<br />
body that closed<br />
lower than the<br />
previous days<br />
close.<br />
As mentioned at<br />
the start of this<br />
chapter Candle<br />
stick charting is<br />
so involved that<br />
the purchase of a<br />
book solely<br />
dedicated to this<br />
subject should be<br />
must for any<br />
serious trader.<br />
I have only<br />
scratched the<br />
surface of this<br />
invaluable<br />
method of<br />
charting in this<br />
chapter.
Moving Averages<br />
have been<br />
around for many<br />
centuries and<br />
helps the trader<br />
to try and<br />
eliminate some of<br />
the volatility that<br />
is associated with<br />
stock prices.<br />
There are three<br />
main types of<br />
moving<br />
averages:<br />
Simple,<br />
Exponential and<br />
Weighted.<br />
I personally use<br />
only Simple M/As<br />
for my trading.<br />
This suits my<br />
trading style and<br />
all examples<br />
shown here are<br />
based on this.<br />
I suggest that you<br />
experiment with<br />
all 3 on the same<br />
stock to see how<br />
all three behave<br />
just that little bit<br />
differently.<br />
Moving averages<br />
are basically the<br />
share price<br />
smoothed out<br />
over a set time<br />
frame. They are<br />
calculated <strong>by</strong><br />
adding all the<br />
closing prices<br />
together for a set<br />
number of days<br />
and then dividing<br />
this total <strong>by</strong> that<br />
set number of<br />
days. So for a 20<br />
day m/a we use<br />
the last 20 days<br />
of data. As new<br />
data becomes<br />
available the<br />
earliest entry is<br />
replaced with the<br />
latest entry thus<br />
keeping our 20<br />
day total intact.<br />
By <strong>MPFX</strong><br />
The four charts below are all of the same stock with only the time frames changed on<br />
the m/a.<br />
The longer the time frame the less false signals.
As most charting<br />
packages<br />
automatically<br />
construct all three<br />
types of moving<br />
averages I<br />
believe that time<br />
is better spent<br />
here explaining<br />
how to trade<br />
using them as<br />
opposed to their<br />
how they are<br />
mathematical<br />
made up.<br />
The first and<br />
most basic<br />
method for the<br />
use of m/a's is to<br />
wait till the price<br />
of the stock<br />
crosses over the<br />
m/a.<br />
This works as<br />
both a buy and<br />
sell signal and is<br />
one of the most<br />
widely used<br />
methods.<br />
The key to this<br />
method is the<br />
time frame. The<br />
basic rule is the<br />
longer the time<br />
frame the less<br />
false signals.<br />
This is fine but<br />
with this you also<br />
get the longer the<br />
time frame the<br />
later the buy or<br />
sell signal.<br />
Day traders and<br />
short term<br />
speculative<br />
traders may elect<br />
for shorter time<br />
spans than a long<br />
term, more<br />
cautious trader.<br />
Ranges from 9<br />
days to 24<br />
months can be<br />
used. The most<br />
common used <strong>by</strong><br />
traders would be<br />
9, 20, 25, 30, 50,<br />
75, and 100<br />
days.
I advise that you<br />
run tests on a<br />
stock you are<br />
familiar with,<br />
changing the m/a<br />
time frame to see<br />
the differences in<br />
entry and exit<br />
levels.<br />
As we have<br />
already<br />
discussed trend<br />
lines we can now<br />
apply them<br />
together with a<br />
m/a on the same<br />
chart.<br />
We now how<br />
have two<br />
indicators giving<br />
us signals.<br />
Sell Signal = 50<br />
m/a crossed to<br />
the downside and<br />
support line has<br />
been broken.<br />
Buy Signal = 50<br />
m/a crossed to<br />
upside and<br />
resistance line<br />
has been broken.<br />
Interesting to<br />
note that the<br />
50ma gave a sell<br />
signal before the<br />
support was<br />
broken but gave<br />
a buy signal after<br />
the resistance<br />
was broken.<br />
Above and below are the same stock with only five days added to both m/a's in the<br />
one below. It is interesting to note that such a small change can effect the timing of<br />
the signals.
The second<br />
method for the<br />
use of m/a's is to<br />
apply Multiple<br />
Moving<br />
Averages.<br />
This is the<br />
preferred method<br />
<strong>by</strong> many traders<br />
and the method I<br />
personally elect<br />
to use.<br />
It involves the<br />
use two or more<br />
moving averages<br />
at the same time<br />
which are set at<br />
different times<br />
spans.<br />
When the moving<br />
averages cross<br />
each other, either<br />
a buy or sell<br />
signal is<br />
generated.<br />
When the faster<br />
moving average (<br />
25ma ) crosses<br />
above a slower<br />
moving average (<br />
50ma ) it is<br />
classed as a Buy<br />
signal.<br />
When the faster<br />
moving average<br />
crosses below<br />
the slower<br />
moving average it<br />
is classed as a<br />
Sell signal.<br />
Once again the<br />
time frames used<br />
have a great<br />
impact on where<br />
the signals are<br />
generated on the<br />
charts.<br />
Below are all the same stock with a moving average added each time. It is of PBL<br />
daily.
I advise running<br />
numerous tests<br />
adjusting the time<br />
frames on both<br />
m/a's. Make sure<br />
you use the same<br />
stock for the<br />
tests. This<br />
method is <strong>by</strong> far<br />
the best way to<br />
truly understand<br />
moving averages<br />
and will allow you<br />
develop your own<br />
set of trading<br />
criteria.<br />
Some traders like<br />
to use up to 6<br />
moving averages<br />
at a time<br />
believing that<br />
when all the<br />
averages<br />
converge to the<br />
same spot on the<br />
chart a change of<br />
trend is very<br />
near.<br />
As you can see<br />
from charts<br />
opposite, <strong>by</strong> the<br />
time we use four<br />
m/a's the chart<br />
begins to look<br />
very busy. This<br />
method definitely<br />
its merits as the<br />
lines converging<br />
is sometimes the<br />
first indictor to get<br />
the attention of<br />
the <strong>Technical</strong><br />
Trader and is a<br />
sign that this<br />
stock should be<br />
placed in the '<br />
watch closely<br />
basket '.
In summary I<br />
would like to<br />
advise that the<br />
best way to gain<br />
a real<br />
understanding of<br />
moving averages<br />
is to run tests.<br />
Please keep in<br />
mind that once<br />
you have tested<br />
the ma's on the<br />
one stock and<br />
you are<br />
comfortable with<br />
the settings you<br />
have chosen, try<br />
testing those<br />
settings on at<br />
least 50 others<br />
stocks to see if<br />
they still show the<br />
same results.<br />
The more time<br />
spent testing, the<br />
more comfortable<br />
you will be when<br />
making your<br />
trading decisions.<br />
In closing I have<br />
included a chart<br />
opposite with the<br />
settings I use<br />
when trading. It is<br />
of PBL and is a<br />
current chart. I<br />
have included all<br />
signals that are<br />
relevant that<br />
have been<br />
discussed so far.<br />
PLEASE do not<br />
just copy my<br />
settings and take<br />
them as gospel.<br />
This works for me<br />
and may not be<br />
suitable for you,<br />
PLUS it will not<br />
aid in your own<br />
development as a<br />
trader, please<br />
take the time to<br />
run the tests, you<br />
will be more than<br />
rewarded in the<br />
end.
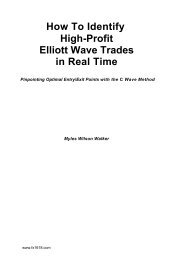
MACD<br />
MACD indicators are yet a<br />
further extension of the<br />
moving average theory.<br />
They are part of the<br />
Momentum indicator<br />
family.<br />
MACD simply stands for<br />
Moving Average<br />
Convergence Divergence.<br />
The most common form<br />
used <strong>by</strong> traders is the<br />
MACD Histogram. It is<br />
constructed <strong>by</strong> measuring<br />
the convergence and the<br />
divergence of two moving<br />
averages.<br />
The most widely used time<br />
frame is a 12,26,9 macd.<br />
The 12 and 26 ma's are<br />
divided and plotted as the<br />
Red line, the 9 ma is<br />
plotted as the blue line.<br />
A horizontal line is drawn<br />
and is used as the point<br />
when these two moving<br />
averages are at the exact<br />
same level. ( The 12,26<br />
macd crosses the 9 ma)<br />
This is called the<br />
Equilibrium Line .<br />
A dotted line is usually<br />
added which represents<br />
the zero line.<br />
Bars are used as a visual<br />
aid in determining the<br />
position of the faster<br />
moving average in<br />
relevance to the slower<br />
moving average.<br />
Bars pointing above the<br />
Equilibrium Line indicate<br />
that the Macd average is<br />
above the 9 day moving<br />
average.<br />
Bars pointing below the<br />
Equilibrium Line indicate<br />
that the Macd average is<br />
below the 9 day moving<br />
average.<br />
<strong>by</strong> <strong>MPFX</strong>
There are 3 mains ways<br />
to trade when using<br />
Macd's.<br />
The first is use the<br />
crossing of the m/a's as<br />
a signal.<br />
A buy signal is given<br />
when the bars first point<br />
above the equilibrium<br />
line.<br />
A sell signal is given<br />
when the bars first point<br />
down below the<br />
equilibrium line.<br />
The chart opposite shows<br />
two buy and two sell<br />
signals. It is interesting to<br />
note where the signals<br />
given correspond to the<br />
price action on the main<br />
chart. The first two signals<br />
are pretty much spot on,<br />
but after the second sell<br />
signal was given, the price<br />
moved higher before<br />
moving down again. On<br />
the second buy signal the<br />
price drifted lower before<br />
moving up again. The<br />
second sell signal was too<br />
low and the second buy<br />
signal was too high. This<br />
is important because<br />
traders who set tight stop<br />
losses on their trades run<br />
the risk of getting out of<br />
their trade only to watch<br />
the stock rebound.<br />
This is why it is so<br />
important not to rely on<br />
only one technical<br />
indicator, it is the<br />
culmination of many<br />
indicators that are<br />
positive or negative at<br />
the same time.
On this next chart we have<br />
five signals being<br />
generated <strong>by</strong> the Macd.<br />
The Red circle indicates 4<br />
sell signals occurring<br />
within 2 weeks of each<br />
other. This is a what I<br />
mean <strong>by</strong> more than one<br />
indicator turning negative<br />
at same time, it does not<br />
have to happen on the<br />
same day.<br />
The Pink circle indicates<br />
that although the price did<br />
drop on both sell signals,<br />
the support line remained<br />
intact. The price only<br />
crossed the 20ma on the<br />
first sell signal but<br />
remained above on the<br />
second.<br />
The 20 ma remained<br />
above the 50ma on both<br />
sell signals.
The second method<br />
used with Macd's is the<br />
Convergence /<br />
Divergence method.<br />
Convergence means two<br />
separate objects heading<br />
towards the same meeting<br />
point.<br />
Divergence means two<br />
separate objects moving<br />
away from a meeting<br />
point.<br />
For the use in trading we<br />
are interested in the<br />
convergence or<br />
divergence of the price<br />
chart and the indicator that<br />
we have selected, in this<br />
case Macd.<br />
What we are looking for is<br />
lower lows on the price<br />
chart and higher lows on<br />
the Macd. This creates a<br />
buy signal or at least<br />
should alert the trader to a<br />
possible trend reversal.<br />
Using this method is a<br />
good visual aid for seeing<br />
that a trend is slowly<br />
running out of steam.<br />
Nearly all momentum<br />
indicators exhibit these<br />
converge / diverge<br />
properties. Most technical<br />
traders use what is called<br />
a lead indicator. This is the<br />
indicator that is the first to<br />
show signs of an<br />
impending trend change.<br />
Momentum indicators are<br />
usually high on this list.
The same applies when<br />
we are searching for sell<br />
signals. Instead of the<br />
lines converging, this time<br />
we are looking for<br />
divergence of the price<br />
and the Macd.<br />
We are looking for the<br />
price to be making higher<br />
highs but the Macd to be<br />
setting lower highs.<br />
We are looking for the<br />
price to be making higher<br />
highs but the Macd to be<br />
setting lower highs.<br />
Again these signals are<br />
only part of the equation<br />
when look to buy and sell.<br />
If a trader only looks to<br />
use one indicator he will<br />
get caught out more times<br />
than not, but on the other<br />
hand, I believe the use of<br />
too many indicators is just<br />
as a fatal mistake as using<br />
only one. It is a fine<br />
balance of the indicators<br />
that you feel most<br />
comfortable with.<br />
The third method used<br />
is to use the macd line<br />
crossing the zero line as<br />
a buy signal and the<br />
macd line making a clear<br />
break of the histogram<br />
bars as a sell signal.<br />
This method creates the<br />
least amount of buy and<br />
sell signals but also the<br />
least amount of false<br />
signals.<br />
This method is also the<br />
slowest to generate a<br />
signal and is good for the<br />
longer term trend<br />
changes.<br />
Of course it still generates<br />
false signals like ALL<br />
indicators so advice<br />
mentioned already above<br />
about multiply signals<br />
should be heeded.
Time Fames.<br />
Choosing which time<br />
frames to use varies<br />
greatly and<br />
experimentation is <strong>by</strong> far<br />
the best way to educate<br />
yourself. Again use the<br />
same stock and adjust the<br />
settings of the macd to<br />
see the difference in<br />
where buy and sell signals<br />
are being generated.<br />
Some standard time<br />
frames are :<br />
12, 26, 9<br />
8, 17, 9<br />
12 ,25, 9<br />
Please take the time<br />
to do your OWN<br />
experimentation.<br />
As you can see above a faster Macd gives an earlier buy signal but<br />
many more false signals.
STOCHASTIC<br />
Stochastic<br />
indicators are<br />
part of the<br />
momentum<br />
indicator family<br />
and are extremely<br />
useful for<br />
determining<br />
whether a stock<br />
has moved into an<br />
overbought or<br />
oversold area.<br />
There are usually<br />
2 lines plotted on<br />
the standard<br />
stochastic, these<br />
are the %K and<br />
the %D lines.<br />
%K is a moving<br />
average of a<br />
stocks past<br />
trading range<br />
relative to its<br />
current price.<br />
%D is a moving<br />
average of the<br />
%K line.<br />
These lines are<br />
plotted on a chart<br />
with a range of 0 -<br />
100.<br />
As most charting<br />
packages do all<br />
these calculations<br />
for us I believe<br />
that time is better<br />
spent learning to<br />
read them as<br />
opposed to their<br />
mathematical<br />
make up.<br />
<strong>by</strong> <strong>MPFX</strong>
Once again there<br />
a several ways to<br />
trade using the<br />
stochastic<br />
indicator.<br />
The first is <strong>by</strong> the<br />
use of bands at<br />
the 20 and 80<br />
mark.<br />
A stock is<br />
considered<br />
overbought ( Sell<br />
Signal ) when the<br />
stochastic is at or<br />
above the 80<br />
level.<br />
A stock is<br />
considered<br />
oversold ( Buy<br />
Signal ) when the<br />
stochastic is at or<br />
below the 20<br />
level.<br />
Of course this<br />
does not mean<br />
sell when it hits<br />
80 and buy when<br />
it reaches 20, as<br />
false signals are<br />
common place as<br />
the chart opposite<br />
illustrates.<br />
It does however<br />
indicate that the<br />
trend, in either<br />
direction, is<br />
running out of<br />
steam.<br />
This is a current chart of BDL
The second<br />
method is to buy<br />
and sell at the<br />
crossing of the<br />
%K and %D<br />
lines. This is the<br />
same method<br />
applied to 2<br />
multiple m/a's on<br />
a price chart.<br />
Once again there<br />
are many false<br />
signals given<br />
using this method.<br />
On the chart<br />
opposite you can<br />
see 5 signals<br />
being given. Only<br />
2 of these are<br />
valid and would<br />
have resulted in<br />
profit or saved<br />
losses.<br />
The third method<br />
that can be used is<br />
<strong>by</strong> the addition of<br />
trend lines to the<br />
stochastic chart in<br />
the exact same<br />
manner as you<br />
would on a price<br />
chart.<br />
As the chart<br />
opposite<br />
illustrates the<br />
down trend ( Blue<br />
Line ) has clearly<br />
been broken <strong>by</strong><br />
both lines.<br />
This works for<br />
both up trends<br />
and down trends.<br />
What levels to set
your stochastic at<br />
will have to be a<br />
personal<br />
preference to suit<br />
the type of trader<br />
you are.<br />
The default on<br />
most charting<br />
programs is set to<br />
20 & 9. Once<br />
again I strongly<br />
recommend<br />
experimenting<br />
with the levels to<br />
find a<br />
combination<br />
which best suits<br />
your trading style.<br />
On the chart<br />
opposite I have<br />
included<br />
examples of three<br />
different settings.<br />
You can clearly<br />
see that the<br />
slower stochastic,<br />
the less false<br />
signals.<br />
My personal<br />
preference for<br />
stochastic on a<br />
daily chart are 17<br />
and 9.<br />
If using intra-day<br />
charts these<br />
numbers could<br />
possibly go as<br />
low as 5 and 3.<br />
Please take the<br />
time to<br />
experiment.
SUMMARY<br />
After much back<br />
testing I have<br />
found that the<br />
best way to use<br />
stochastic<br />
indicators is to<br />
combine the<br />
entire above<br />
mentioned rules.<br />
On the chart<br />
opposite you can<br />
see these<br />
confirmations<br />
occurring.<br />
The top sell signal<br />
shows 2 out of<br />
our 3 rules<br />
confirmed, while<br />
the bottom buy<br />
signals shows all<br />
3.
Once again it is<br />
time to put all that<br />
has been<br />
mentioned so far<br />
onto the one<br />
chart.<br />
The chart<br />
opposite shows a<br />
combined total of<br />
10 positive<br />
signals from 4<br />
different<br />
indicators.<br />
Throughout this<br />
editorial I have<br />
stressed the point<br />
that T/A is a<br />
combination of<br />
many signals<br />
given at the one<br />
time and this is an<br />
excellent example<br />
of this.<br />
The chart<br />
opposite is of<br />
BDL dated 30-10-<br />
2001.