Troubleshooting Guide - For professionals - Cochlear Americas
Troubleshooting Guide - For professionals - Cochlear Americas
Troubleshooting Guide - For professionals - Cochlear Americas

You also want an ePaper? Increase the reach of your titles
YUMPU automatically turns print PDFs into web optimized ePapers that Google loves.
<strong>Troubleshooting</strong><br />
<strong>Guide</strong><br />
Your introduction to cochlear implants<br />
Freedom BTE<br />
SPrint <br />
Sound Processor<br />
Freedom <br />
Bodyworn<br />
ESPrit 3G<br />
Sound Processor
<strong>Troubleshooting</strong> <strong>Guide</strong><br />
Contents<br />
3<br />
5<br />
11<br />
17<br />
25<br />
Introduction<br />
SPrint<br />
ESPrit 3G<br />
Freedom BTE,<br />
Mini BTE and Babyworn<br />
Freedom Bodyworn<br />
Introduction<br />
This troubleshooting kit was developed by <strong>Cochlear</strong> <strong>Americas</strong> specifically for<br />
individuals who work with children with cochlear implants in school settings.<br />
It is intended to help identify and remedy simple problems with a child’s sound<br />
processor and minimize the amount of time that a child is without auditory<br />
stimulation. It is important that this kit only be used for a child implanted with<br />
a Nucleus ® cochlear implant system.<br />
We currently support six speech processors in the Nucleus family. They include:<br />
Nucleus cochlear implant Compatible sound processor<br />
Nucleus ® 22 ESPrit 3G for Nucleus 22 ear-level<br />
Nucleus ® Freedom BTE<br />
Nucleus ® Freedom Bodyworn<br />
Nucleus ® Freedom Babyworn<br />
Nucleus ® 24 SPrint Bodyworn<br />
ESPrit 3G ear-level<br />
Nucleus ® Freedom BTE<br />
Nucleus ® Freedom Bodyworn<br />
Nucleus ® Freedom Babyworn<br />
Nucleus ® Freedom Nucleus ® Freedom BTE<br />
Nucleus ® Freedom Bodyworn<br />
Nucleus ® Freedom Babyworn<br />
Each processor requires somewhat different troubleshooting procedures. Hence<br />
the contents of this manual are separated according to the various models of<br />
sound processors.<br />
It is recommended that at least one person at the child’s school become<br />
familiar with this kit and, most importantly, understand how to use it relative to<br />
the applicable sound processor.<br />
<strong>For</strong> information on working with a child with a Nucleus cochlear implant,<br />
please refer to the booklet, “A Teacher’s <strong>Guide</strong> to the Nucleus ® <strong>Cochlear</strong><br />
Implant System”. To order your free copy, please contact<br />
<strong>Cochlear</strong> <strong>Americas</strong> 800 523 5798.<br />
3
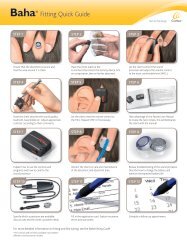
SPrint Sound Processor<br />
The SPrint sound processor is compatible with the Nucleus ® 24 cochlear implant.<br />
The pieces pictured here are important parts comprising the external components<br />
of the SPrint sound processor.<br />
Headset cable<br />
cover<br />
Headset cable<br />
cover release<br />
latch<br />
Battery cover<br />
release latch<br />
Battery<br />
cover<br />
Up button<br />
Down button<br />
Program<br />
button<br />
Earhook<br />
External input<br />
socket<br />
Indicator<br />
light<br />
Transmitting<br />
cable<br />
* Note: There is also a single AA battery case available.<br />
Microphone<br />
Options button<br />
Select button<br />
Autosensitivity/ADRO button<br />
On/off button<br />
Transmitting<br />
coil<br />
Processing unit<br />
LCD panel<br />
Battery case<br />
release latch<br />
(not shown)<br />
2 AAA<br />
Battery case *<br />
5
<strong>Troubleshooting</strong> <strong>Guide</strong><br />
SPrint Sound Processor<br />
<strong>Troubleshooting</strong> Kit Contents<br />
• 2 AA batteries<br />
• 4” HS8 transmitting cable – beige<br />
• 24” HS8 headset cable – beige<br />
• Earhook, large<br />
• Signal check<br />
• 31” lapel microphone & clip for the SPrint<br />
• Monitor earphones for the SPrint<br />
Before doing step-by-step troubleshooting, conduct a maintenance<br />
check of the equipment by visually inspecting it.<br />
Maintenance Check<br />
Confirm:<br />
• The headset and transmitting cable are properly connected.<br />
• The cables are not broken or cracked.<br />
• The correct transmitting coil is in place on the student’s<br />
head (should see an “S” or “L” embossed on the coil).<br />
6<br />
Also check the following:<br />
• Confirm that the SPrint is ‘ON’.<br />
• Check that the segment meter on the LCD panel<br />
responds within the normal range when speaking<br />
into the microphone (with sensitivity set on at least 10).<br />
• Confirm that the child is using the recommended<br />
program setting(s).<br />
• Check that the red indicator light at the top of<br />
the sound processor is responding to sound input.<br />
Program<br />
Microphone sensitivity<br />
Indicator External light input<br />
socket<br />
➤<br />
➤➤<br />
Segment meter<br />
If the child reports no sound from the processor and the above inspection<br />
is good, take the following steps:<br />
<strong>Troubleshooting</strong> Steps<br />
STEP 1: Check/change the batteries<br />
• Look at the LCD panel on the SPrint. The low<br />
battery symbol will appear if the batteries are<br />
inserted wrong or if the batteries need replacing.<br />
— Confirm the batteries are inserted correctly<br />
into the battery pack.<br />
— Replace both batteries using the alkaline<br />
disposable AA batteries in the kit.<br />
STEP 2: Check if the sound processor is transmitting<br />
sound to the cochlear implant<br />
• Turn on the sound processor and set at the<br />
child’s “normal” settings.<br />
• Place the transmitting coil over<br />
the back of the SPrint.<br />
• Look at the LCD display on the<br />
front. If the sound processor is<br />
transmitting a signal, the LCD<br />
displays the radio frequency<br />
(RF) test coil symbol.<br />
• If no RF transmission, check the<br />
transmitting coil [See STEP 3].<br />
Alternatively, use the signal check to check the transmitting coil.<br />
• Turn on the sound processor and<br />
set at the child’s “normal” settings.<br />
• Place the signal check over the<br />
transmitting coil, if the signal<br />
check lights up the coil is<br />
functioning. If it does not,<br />
replace the transmitting coil,<br />
transmitting cable or headset.<br />
Signal check<br />
➤<br />
Low battery symbol<br />
Battery cover<br />
release latch<br />
Transmitting coil<br />
Back of SPrint<br />
speech processor<br />
7
8<br />
STEP 3: Check the headset components (cables, microphone)<br />
Cables:<br />
• Check that the cable connections are plugged in correctly.<br />
• Hold the microphone case with one hand and<br />
put your thumbnail in the slot on the microphone<br />
cover. Remove the microphone cover by pulling<br />
it away from the microphone case.<br />
• Plug the orange connector on the headset<br />
cable (A) into the orange socket at the bottom<br />
Slot<br />
of the microphone case.<br />
• Plug the transmitting cable (B) into the socket<br />
at the top of the microphone case.<br />
• Place the coil in your hand.<br />
• Turn on the SPrint and set microphone<br />
sensitivity to 10.<br />
• Speak into the microphone and check if the<br />
segment meter responds to speech.<br />
A<br />
• If no response, change each cable sequentially using<br />
the cables from the kit.<br />
— Check the segment meter after<br />
each cable change to determine whether<br />
it responds to speech.<br />
• If the segment meter still does not respond,<br />
go to the next step to check the<br />
ear-level microphone.<br />
➤<br />
Microphone sensitivity<br />
➤➤<br />
Segment meter<br />
B<br />
A<br />
Microphone:<br />
To ensure the ear-level microphone is working, use the lapel microphone<br />
from the kit.<br />
• Turn off the sound processor and remove<br />
from the child’s head.<br />
• Insert the lapel microphone connector into<br />
the top of the SPrint processor.<br />
• Place the transmitting coil on the child’s head<br />
or in your hand, turn on the sound processor<br />
and set at the child’s “normal” settings.<br />
• Speak into the microphone and check if the<br />
segment meter responds to speech.<br />
• If the segment meter responds, the<br />
ear-level microphone is faulty and<br />
the lapel microphone can be used<br />
as a substitute until the child’s<br />
headset microphone can be replaced.<br />
• Inform the parent that a replacement<br />
microphone is required.<br />
Monitor<br />
earphone<br />
➤<br />
External input<br />
socket<br />
Note: If the child needs to use the lapel microphone, clip the lapel microphone onto<br />
the child’s clothing where it is least likely to be jostled, obstructed or contacted<br />
(clothes, food or fingers brushing over the microphone will generate sounds).<br />
If you have reached the end of these instructions, and have not been able to<br />
address or identify the issue, please contact:<br />
• The child’s family (spare processor)<br />
• The child’s implant center (loaner processor)<br />
• <strong>Cochlear</strong>, ask to speak with customer service or the audiologist on call<br />
(for additional troubleshooting/instructions) 800 523 5798<br />
STEP 4: Identify help messages on LCD<br />
• Read manual<br />
• Service required<br />
• Current speech processor is faulty +<br />
• Low battery<br />
Accessory<br />
9
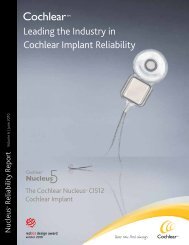
ESPrit 3G Sound Processor<br />
The ESPrit 3G sound processor is compatible with both Nucleus ® 24 cochlear<br />
implants and Nucleus ® 22 cochlear implants. The only difference between the<br />
two sound processors is the transmitting coil/cable. These differences are<br />
outlined below.<br />
The pieces pictured here are important parts comprising the external<br />
components of the ESPrit 3G sound processor.<br />
Transmitting<br />
coil<br />
Transmitting<br />
cable<br />
Top controls<br />
Microphone ports<br />
Earhook<br />
Battery cover<br />
Mode controls<br />
11
<strong>Troubleshooting</strong> <strong>Guide</strong><br />
ESPrit 3G Sound Processor<br />
<strong>Troubleshooting</strong> Kit Contents<br />
• 675 PowerOne HP zinc air batteries, 6 pack<br />
• Signal check<br />
• Accessories adapter for the ESPrit 3G<br />
• 59” lapel microphone & clip ESPrit 3G<br />
• Monitor earphones for the ESPrit 3G<br />
• Soft earhook cover<br />
• Earmold compatible earhook<br />
Before troubleshooting step by step, conduct a maintenance check<br />
of the equipment.<br />
Maintenance Check<br />
Confirm:<br />
• Transmitting cable is properly connected.<br />
• Cable is not broken or cracked.<br />
• Transmitting coil is on the child’s head and is correct N24<br />
(yellow connector), N22 (green connector).<br />
12<br />
Also do the following:<br />
• Confirm that the ESPrit 3G is ‘ON’.<br />
— If no sound, switch the ESPrit 3G ‘Off’ for about<br />
3 seconds, and then ‘On’.<br />
• Confirm that the student is using the recommended mode setting.<br />
• Confirm that the child is using the recommended program setting.<br />
• Confirm that the rotary wheel is set at the recommended setting.<br />
Volume<br />
or Volume sensitivity or<br />
(rotary sensitivity wheel)<br />
control<br />
Top controls<br />
Program<br />
Program selection selection /on/<br />
off control<br />
control<br />
'T' for telecoil<br />
'W' for Whisper Setting<br />
'M' for microphone<br />
Mode setting switch<br />
Socket for attaching<br />
the accessories<br />
adaptor<br />
If the child reports no sound from the processor and the above inspection is<br />
good, take the following steps:<br />
<strong>Troubleshooting</strong> Steps<br />
STEP 1: Check/change the batteries<br />
• Switch the ESPrit 3G off and<br />
open the battery cover.<br />
• Check that the batteries<br />
are inserted correctly with<br />
the positive (flat) side up.<br />
• Replace all batteries using<br />
the 675 PowerOne HP<br />
zinc air batteries in the kit.<br />
Gently push battery out<br />
from the back<br />
Tip battery out<br />
Grip each side<br />
Grip each side<br />
and squeeze lightly<br />
Slide<br />
downwards<br />
Cover slides<br />
down and off<br />
STEP 2: Check whether the transmitting<br />
coil/cable is sending a signal across the skin<br />
• Check that the transmitting cable<br />
connection is plugged in correctly.<br />
— Cable/coil N24 = yellow, N22 = green<br />
• Use the signal check from the<br />
troubleshooting kit.<br />
Signal check<br />
• Turn ‘ON’ the sound processor and set<br />
at the student’s normal settings.<br />
• Hold the transmitting coil in one hand or place it on the child’s head.<br />
• Hold the signal check over the transmitting coil.<br />
Red light should illuminate.<br />
• If it doesn’t light up, there is no coil transmission.<br />
• Replace the transmitting coil.<br />
• Place the coil on the child’s head or in your hand and turn<br />
the sound processor ‘ON’.<br />
• Try again using the signal check.<br />
• If still no coil transmission, check the processor<br />
microphone [See Step 3].<br />
13
14<br />
STEP 3: Check the processor microphone<br />
Microphone:<br />
To check the sound quality of the microphone:<br />
• Use the monitor earphones.<br />
• Turn the ESPrit 3G off and remove from the child’s head.<br />
• Attach the monitor earphones.<br />
• Place the listening earphones into your ears and turn<br />
on the sound processor.<br />
• With your mouth 8 inches from the microphone, speak into the<br />
microphone listening for distortions.<br />
— If no sound, check other programs to ensure<br />
the monitor earphone is activated.<br />
• The sound you hear is the sound received by the microphone<br />
before it is processed by the sound processor.<br />
• Be sure you’re not close to sources of electromagnetic interference<br />
(i.e., radio and TV transmission towers, security systems, computers).<br />
Plug for your ESPrit 3G<br />
Socket for your<br />
monitoring earphones<br />
Socket for your accessories or<br />
wired assistive listening devices<br />
Socket for attaching the<br />
Accessories Adaptor<br />
To check if the microphone is working:<br />
• Use the lapel microphone and accessories adapter from<br />
the troubleshooting kit.<br />
• Turn off the ESPrit 3G and remove from the child’s head.<br />
• Remove accessories adapter socket cover (if inserted).<br />
• Attach the accessories adapter firmly into the base of the ESPrit 3G<br />
until it snaps into place.<br />
• Push the lapel microphone connector into the accessories adapter.<br />
• Place the transmitting coil on the child’s head.<br />
• Turn on the sound processor and set at the child’s “normal” settings.<br />
• Speak into the microphone.<br />
• If the child can hear, the ESPrit 3G microphone is faulty and the lapel<br />
microphone can be used as a substitute until the child’s headset<br />
microphone can be replaced.<br />
If the child’s ESPrit 3G microphone appears to be producing poor sound quality,<br />
a lapel microphone can be used until the child’s headset microphone can be<br />
replaced. Inform the parent that a replacement microphone is required.<br />
If you have reached the end of these instructions, and have not been able to address<br />
or identify the issue, please contact:<br />
• The child’s family (spare processor)<br />
• The child’s implant center (loaner processor)<br />
• <strong>Cochlear</strong>, ask to speak with customer service or the audiologist on<br />
call (for additional troubleshooting/instructions) 800 523 5798<br />
15
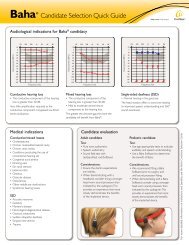
Freedom BTE, Mini BTE<br />
and Babyworn BTE<br />
Sound Processors<br />
The Freedom BTE, Mini BTE and Babyworn sound processors are compatible<br />
with Nucleus ® Freedom, Nucleus ® 22 and Nucleus ® 24 cochlear implants.<br />
Each of the pieces pictured here is an important part comprising the external<br />
components of the Freedom BTE sound processor.<br />
Display<br />
and control<br />
buttons<br />
Coil<br />
Processing unit<br />
Accessories<br />
connection<br />
Magnet<br />
Indicator light<br />
Earhook<br />
BTE Controller with<br />
three zinc air batteries or<br />
rechargeable battery<br />
17
18<br />
Each of the pieces pictured here is an important part comprising the external<br />
components of the Mini BTE sound processor.<br />
Each of the pieces pictured here is an important part comprising the external<br />
components of the Babyworn BTE sound processor.<br />
Case<br />
Processing unit<br />
Select<br />
Display<br />
Increase/Decrease<br />
BTE Controller*<br />
(3ZA)<br />
Controller panel<br />
Shoe/Cable<br />
Processing Unit<br />
Accessory<br />
Connection<br />
Clip Retention Option<br />
*Not compatible with Mini controller or MicroLink Freedom <br />
Mini BTE<br />
Battery holder<br />
<strong>Troubleshooting</strong> <strong>Guide</strong><br />
Freedom BTE, Mini BTE<br />
and Babyworn BTE<br />
Sound Processor<br />
<strong>Troubleshooting</strong> Kit Contents<br />
• 675 PowerOne HP, zinc air batteries, 6 pack<br />
• Freedom coil (8cm)<br />
• Freedom magnet - #2 beige<br />
• Freedom lapel microphone<br />
• Freedom monitor earphones<br />
• Freedom earhook set (small and large)<br />
• Freedom microphone protector<br />
• Freedom battery holder<br />
Before troubleshooting step-by-step, conduct<br />
a maintenance check of the equipment.<br />
Maintenance Check<br />
Confirm:<br />
• Transmitting cable is properly connected.<br />
• Cable is not broken or cracked.<br />
• Transmitting coil is on the child’s head.<br />
Display<br />
Decrease<br />
button<br />
Sample setting shown here:<br />
Cover for<br />
accessories<br />
connection<br />
Select<br />
button<br />
on/off<br />
Increase<br />
button<br />
Also do the following:<br />
• Confirm that the Freedom BTE is ‘ON’.<br />
• If no sound, turn the Freedom BTE ‘Off’ for about 3 sec. and then ‘On’.<br />
• Confirm that the child is using the recommended program setting.<br />
• Identify whether help messages are displayed on the LCD.<br />
Program 3 in use<br />
Microphone only<br />
Program 2 in use<br />
Telecoil only<br />
19
20<br />
Help message H1 = battery flat<br />
• Change the batteries (ensure that<br />
all of the batteries are changed).<br />
• Ensure that all of the batteries<br />
are inserted correctly –<br />
flat/positive side on the bottom.<br />
Grip<br />
• Insert a new battery holder<br />
containing new batteries or<br />
insert a fully charged<br />
rechargeable battery.<br />
Battery holder<br />
Help message H2 = battery low<br />
• Replace all of the batteries or the rechargeable battery.<br />
Help message H3 = coil error<br />
• Check that the coil is fully inserted in the socket.<br />
• Check that the coil is correctly located over<br />
the Implant.<br />
• Check for cable damage.<br />
• Change coil by placing your fingernails<br />
underneath the coil plug where it meets<br />
the sound processor body, then pulling<br />
straight out. Ensure you are using the<br />
correct coil for the child’s implant type:<br />
green plug for Nucleus 22, black plug<br />
for Nucleus 24 or Freedom.<br />
Pull out<br />
Magnet<br />
Help message H4 = sound/stimulation error<br />
• Turn processor ‘OFF’ then ‘ON’.<br />
• Check sensitivity is above ‘0’. Typical use setting is 12, but check with<br />
child's audiologist.<br />
• After removing the coil, check/change microphone protector cover.<br />
• Check/change coil.<br />
• Try using the lapel microphone. To use: turn off processor, lift rubber<br />
cover on bottom of processor, insert lapel microphone and turn<br />
processor back on.<br />
• Change the processing unit (use backup processing unit).<br />
• Contact the child’s cochlear implant clinician.<br />
Help message H5 = MAP corrupt<br />
• Try alternate program.<br />
• Contact the child’s cochlear implant clinician.<br />
Help message H6 = Implant ID error, or bilateral interference.<br />
• Check that the processor is on the correct ear.<br />
• Remove any other sound processors from the area (the radio frequency<br />
signal from the transmitting coil may be interfering), or turn them off.<br />
• If you are sure the processors are on the correct ears and you still see<br />
H6 on one or both screens as you look while both are on the<br />
child’s head, contact his or her cochlear implant clinician.<br />
Presented Complaints:<br />
No sound/intermittent sound (help messages H1, H2, H3, H4)<br />
• Change the batteries (ensure that all of the batteries are changed).<br />
• Check using the lapel microphone.<br />
• Check that the coil is fully inserted in the processing unit socket<br />
(and correctly located over the implant).<br />
• Change the coil.<br />
• Change the controller (ensure new batteries are fitted).<br />
• Change the processing unit (use back-up processing unit or contact<br />
the child’s cochlear implant clinician).<br />
Sound unclear/muffled<br />
• Check the LCD for help message (H4 = see steps 2 – 5,<br />
H5 = contact your clinician).<br />
• Check using the lapel microphone. Determine whether<br />
the sound improves. If so, replace microphone cover.<br />
• If the sound does not improve with new mic cover, use lapel micro<br />
phone clipped to child's shirt until processor is repaired or replaced.<br />
• Replace the processing unit (use back-up processing unit or contact the<br />
child’s cochlear implant clinician).<br />
LCD blank (but sound OK)<br />
• Change the controller (return the suspected faulty controller).<br />
• Stop the power to the processing unit and then restart it.<br />
Sounds uncomfortably loud<br />
• Contact the child’s cochlear implant audiologist.<br />
• Check settings as prescribed by audiologist.<br />
21
22<br />
Indicator light<br />
When the indicator light is turned on *, it:<br />
• Flickers when incoming sounds are being received.<br />
• Shows a slow flash rate as a low battery warning.<br />
• Shows a fast flash rate for all other warnings e.g. the coil is off its<br />
position over the implant, or there is a sound error (help message H4).<br />
• To stop the alarm, push any button.<br />
* Note that the programming audiologist may activate the indicator light for<br />
one or all of the above alerts (incoming sound and/or help messages).<br />
Microphone and accessories<br />
Monitor earphones can be used by a hearing person to listen to the sound<br />
signal from either of the following:<br />
• Microphone<br />
• Built-in telecoil<br />
• Microphone and built-in telecoil, together<br />
• Accessory<br />
• Accessory and microphone together<br />
• Monitor earphones and lapel mic can not be used with Mini BTE<br />
• <strong>For</strong> Babyworn BTE, ensure monitor earphones are plugged into<br />
Babyworn cable shoe accessory connection (see image page 18)<br />
Note that EA does not remain on screen. It appears when pressing the<br />
increase/decrease buttons together to activate an accessory, but then<br />
screen reverts to main display (P 1, 2, 3, or 4).<br />
To use the lapel microphone:<br />
• Turn off sound processor.<br />
• Use your fingernail to lift the socket cover.<br />
• Insert the lapel mic plug.<br />
• Turn on the sound processor.<br />
• The lapel microphone will automatically<br />
be activated.<br />
• To stop using the lapel<br />
microphone, unplug it.<br />
To use the monitor earphones:<br />
• Ensure the sound processor is on.<br />
• Plug the monitor earphones into the base of the BTE controller.<br />
— Caution: Do not use force.<br />
• Monitor earphones will turn off after 90 seconds.<br />
• Push both the ‘Increase’ and ‘Decrease’ buttons at the same time for a<br />
few seconds to activate.<br />
• Should you wish to test an accessory, plug it in to the monitor<br />
earphone connector.<br />
• Listen to sounds.<br />
• While listening, press any button<br />
on the BTE controller, for more<br />
than one second, to re-activate<br />
the earphones, or if they turn off,<br />
press increase/decrease again.<br />
• Should you wish to test an accessory,<br />
plug it in to the monitor earphone connector.<br />
• Listen to sounds.<br />
Monitor earphones only indicate that sound can be heard. They do not<br />
indicate the quality of sound as heard by the sound processor user.<br />
Electromagnetic interference<br />
Move away from any electronic device that may be causing interference, e.g.<br />
buzzing sounds or distorted speech.<br />
Most electronic devices produce electromagnetic fields. Headset cables, like<br />
antennae, pick them up. Common sources of interference include:<br />
• Radio and TV transmission towers<br />
• Mobile phone towers<br />
• Shopping center and airport security systems<br />
• Some digital mobile phones<br />
• Battery chargers<br />
The electronic interference (EMI) will be no louder than the programmed<br />
levels and will neither hurt nor damage the processor. If buzzing is still heard,<br />
or distorted speech, turn off the speech processor, take off the coil and<br />
consult the implant clinician.<br />
23
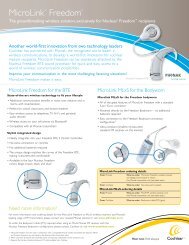
Freedom Bodyworn<br />
Sound Processoressor<br />
The Freedom Bodyworn sound processor is compatible with Nucleus ® Freedom<br />
cochlear implants.<br />
Each of the pieces pictured here is an important part comprising the external<br />
components of the Freedom Bodyworn sound processor.<br />
Bodyworn Controller<br />
with two AAA batteries<br />
Coil<br />
Processing<br />
unit<br />
Magnet Indicator<br />
light<br />
Accessories<br />
connection<br />
Earhook<br />
Bodyworn Controller<br />
Shoe and Cable<br />
Control<br />
buttons<br />
On/Off//Select<br />
Buzzer<br />
ports<br />
Display<br />
25
<strong>Troubleshooting</strong> <strong>Guide</strong><br />
Freedom Bodyworn<br />
Sound Processor<br />
<strong>Troubleshooting</strong> Kit Contents<br />
• Disposable AAA batteries (2)<br />
• Freedom coil (8cm)<br />
• Freedom magnet – #2 beige<br />
• Freedom lapel microphone<br />
• Freedom monitor earphones<br />
• Freedom Bodyworn shoe and cable<br />
• Freedom earhook set (small and large)<br />
• Freedom microphone protector<br />
Before troubleshooting step-by-step, conduct a maintenance check<br />
of the equipment.<br />
Maintenance Check<br />
Confirm:<br />
• Transmitting cable is properly connected.<br />
• Cable is not broken or cracked.<br />
• Transmitting coil is on the child’s head.<br />
<strong>Troubleshooting</strong>:<br />
Also do the following:<br />
• Confirm that the Freedom<br />
Bodyworn is ‘ON’.<br />
• If no sound, turn the Freedom<br />
Bodyworn ‘Off’ for about<br />
3 seconds, and then ‘On’.<br />
• Confirm that the child is using<br />
the recommended program setting.<br />
• Identify any help messages<br />
on the LCD.<br />
26<br />
Sample Settings<br />
Select on/off<br />
Button<br />
Increase Button<br />
Decrease Button<br />
Help message H1 = battery flat<br />
• Change the batteries (ensure that both of the batteries are changed).<br />
• Ensure that both of the batteries are inserted correctly (make sure the<br />
“+” and “-” symbols on the batteries match the “+” and “-” symbols on<br />
the compartment.<br />
Help message H2 = battery low<br />
• Replace/recharge both of the batteries.<br />
Battery full Battery low Battery flat<br />
Help message H3 = coil error<br />
• Check that the coil is fully inserted in the socket.<br />
• Check that the coil is correctly located over the implant.<br />
• Check for cable damage.<br />
• Change coil by placing your fingernails underneath the coil plug where<br />
it meets the sound processor body, then pulling straight out.<br />
Ensure you are using the correct coil for the child’s implant type: green<br />
plug for Nucleus 22, black plug for Nucleus 24 or Freedom.<br />
27
28<br />
Help message H4 = sound/stimulation error<br />
• Turn processor ‘OFF’ then ‘ON’.<br />
• Check sensitivity is above ‘0’.<br />
• After removing the coil, check/change microphone protector cover.<br />
• Check/change coil.<br />
• Try using the lapel microphone. To use: turn off processor, lift rubber<br />
cover on the "shoe" portion of the cable, insert lapel microphone and<br />
turn processor back on.<br />
• Change the processing unit (use backup processing unit).<br />
• Contact the child’s cochlear implant clinician.<br />
Help message H5 = MAP corrupt<br />
• Try another program location.<br />
• Use back-up processing unit.<br />
• Contact the child’s cochlear implant clinician.<br />
Help message H6 = Implant ID error<br />
(incorrect implant detected by your processor)<br />
• Check that the processor is on the correct ear.<br />
• Remove any other sound processors from the area (the radio frequency<br />
signal from the transmitting coil may be interfering), or turn them off.<br />
• If you are sure the processors are on the correct ears and you still see<br />
H6 on one or both screens as you look while both are on the<br />
child’s head, contact his or her cochlear implant clinician.<br />
Presented Complaints:<br />
No sound/intermittent sound (help messages H1, H2, H3, H4, H6)<br />
• Ensure processor is on the correct implant.<br />
• Check that the batteries are correctly inserted.<br />
• Turn the sound processor off and then on.<br />
• Change the batteries (ensure that all of the batteries are changed).<br />
• Check using the lapel microphone.<br />
• Check that the coil is fully inserted in the processing unit socket<br />
(and correctly located above the Implant).<br />
• Change the coil.<br />
• Change the bodyworn controller (can also try the BTE controller).<br />
• Change the processing unit (use back-up processing unit or contact the<br />
child’s cochlear implant clinician).<br />
Sound unclear/muffled<br />
• Check the LCD for help message (H4 = see steps 2 – 5,<br />
H5 = contact your clinician).<br />
• Check using the lapel microphone. Determine whether<br />
the sound improves.<br />
• Disconnect the lapel microphone and replace the microphone cover.<br />
Determine whether the sound improves.<br />
• Replace the processing unit (use back-up processing unit or contact the<br />
child’s cochlear implant clinician).<br />
LCD blank (but sound OK)<br />
• Change the bodyworn controller (return the suspected faulty controller).<br />
Sounds uncomfortably loud<br />
• Check settings as prescribed by audiologist.<br />
• Contact the child’s cochlear implant audiologist.<br />
Indicator light<br />
When the indicator light is turned on, it:<br />
• Flickers when incoming sounds are being received.<br />
• Shows a slow flash rate as a low battery warning.<br />
• Shows a fast flash rate for all other warnings e.g. the coil<br />
is off its position over the implant, or there is a sound error<br />
(help message H4).<br />
• To stop the alarm, push any button.<br />
29
30<br />
Public alarm<br />
When the public alarm is turned on, it:<br />
• Provides an audible beep for button presses or for help messages.<br />
Lapel microphone and accessories<br />
Monitor earphones can be used by a hearing<br />
person to listen to the sound signal from either<br />
of the following:<br />
• Microphone<br />
• Built-in telecoil<br />
• Microphone and built-in telecoil, together<br />
• Accessory<br />
• Accessory and microphone together<br />
To use the lapel microphone:<br />
• Use your fingernail to lift the<br />
socket cover.<br />
• Turn off sound processor.<br />
• Use your fingernail to lift the socket cover.<br />
• Insert the lapel mic plug.<br />
• Turn on the sound processor.<br />
• The lapel microphone will automatically<br />
be activated.<br />
• To stop using the lapel microphone,<br />
unplug it.<br />
An ‘X’ on the<br />
Bodyworn controller<br />
display shows the<br />
accessory has been<br />
activated.<br />
To use the monitor earphones:<br />
• Ensure the sound processor is on.<br />
• Plug the monitor earphones into the Bodyworn<br />
controller shoe accessory connection.<br />
— Caution: Do not use force.<br />
• Press any button on the Bodyworn controller, for more than<br />
one second, to activate the earphones.<br />
• Should you wish to test an accessory, plug it in to the monitor<br />
earphone connector.<br />
• Listen to sounds.<br />
Monitor earphones only indicate that sound can be heard. They do not<br />
indicate the quality of sound as heard by the speech processor user.<br />
Electromagnetic Interference<br />
Move away from any electronic device that may be causing interference, e.g.<br />
buzzing sounds or distorted speech.<br />
Most electronic devices produce electromagnetic fields. Headset cables, like<br />
antennae, pick them up. Common sources of interference include:<br />
• Radio and TV transmission towers<br />
• Mobile phone towers<br />
• Shopping center and airport security systems<br />
• Some digital mobile phones<br />
• Battery chargers<br />
The electronic interference (EMI) will be no louder than the programmed<br />
levels and will neither hurt nor damage the processor. If buzzing is still heard,<br />
or distorted speech, turn off the speech processor, take off the coil and<br />
consult the implant clinician.<br />
31
<strong>Cochlear</strong> <strong>Americas</strong><br />
13059 East Peakview Avenue<br />
Centennial, CO 80111<br />
USA<br />
Tel: 1 303 790 9010<br />
Fax: 1 303 792 9025<br />
Toll Free: 1 800 523 5798<br />
www.cochlear.com<br />
We believe.<br />
At <strong>Cochlear</strong>, we believe in the joy of sound. We believe<br />
that our purpose is to bring the sounds of life to the ears of<br />
those who cannot hear by providing the tools and confidence<br />
they need to explore the world around them. Our passionate<br />
dedication to providing the best hearing performance and most<br />
reliable technology has enabled our implant systems to deliver<br />
the miracle of sound to over 140,000 individuals around the<br />
world. And we promise to continue this tradition, giving you<br />
the best possible sound. <strong>For</strong> life.<br />
Nucleus is a registered trademark of <strong>Cochlear</strong> Limited. Freedom is a trademark<br />
of <strong>Cochlear</strong> Limited, registered in the U.S. and other countries. <strong>Cochlear</strong> and the<br />
elliptical logo are trademarks of <strong>Cochlear</strong> Limited.<br />
FUN599 ISS3 JAN09