INQUIRY SCIENCE LESSON PLAN Grade Level ... - Franklin College
INQUIRY SCIENCE LESSON PLAN Grade Level ... - Franklin College
INQUIRY SCIENCE LESSON PLAN Grade Level ... - Franklin College
You also want an ePaper? Increase the reach of your titles
YUMPU automatically turns print PDFs into web optimized ePapers that Google loves.
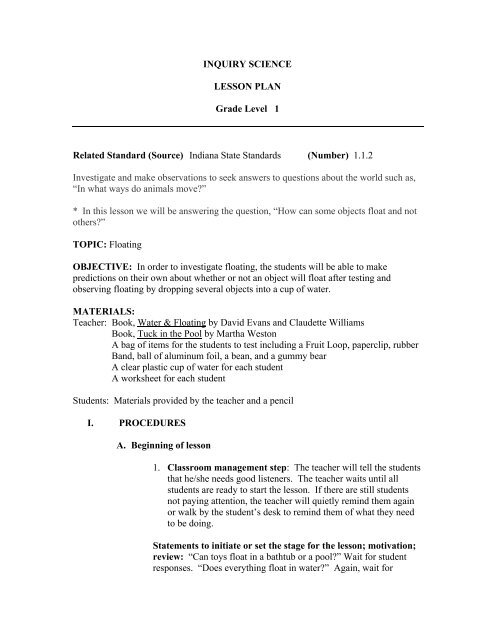
<strong>INQUIRY</strong> <strong>SCIENCE</strong><br />
<strong>LESSON</strong> <strong>PLAN</strong><br />
<strong>Grade</strong> <strong>Level</strong> 1<br />
Related Standard (Source) Indiana State Standards (Number) 1.1.2<br />
Investigate and make observations to seek answers to questions about the world such as,<br />
“In what ways do animals move?”<br />
* In this lesson we will be answering the question, “How can some objects float and not<br />
others?”<br />
TOPIC: Floating<br />
OBJECTIVE: In order to investigate floating, the students will be able to make<br />
predictions on their own about whether or not an object will float after testing and<br />
observing floating by dropping several objects into a cup of water.<br />
MATERIALS:<br />
Teacher: Book, Water & Floating by David Evans and Claudette Williams<br />
Book, Tuck in the Pool by Martha Weston<br />
A bag of items for the students to test including a Fruit Loop, paperclip, rubber<br />
Band, ball of aluminum foil, a bean, and a gummy bear<br />
A clear plastic cup of water for each student<br />
A worksheet for each student<br />
Students: Materials provided by the teacher and a pencil<br />
I. PROCEDURES<br />
A. Beginning of lesson<br />
1. Classroom management step: The teacher will tell the students<br />
that he/she needs good listeners. The teacher waits until all<br />
students are ready to start the lesson. If there are still students<br />
not paying attention, the teacher will quietly remind them again<br />
or walk by the student’s desk to remind them of what they need<br />
to be doing.<br />
Statements to initiate or set the stage for the lesson; motivation;<br />
review: “Can toys float in a bathtub or a pool?” Wait for student<br />
responses. “Does everything float in water?” Again, wait for
esponses. “No, some objects float in water and some do not. Today<br />
you are going to get a chance to make predictions about whether or<br />
not objects will float and then test them out.”<br />
B. Instruction Steps<br />
1. Begin by having a cup of water on the front table. Have a marble<br />
and ask if anyone can predict whether or not the object will float.<br />
Call on several students.<br />
2. Put the object into the water so the students can see that it does<br />
not float.<br />
3. Give a simple explanation of floating from the book, Water &<br />
Floating, saying that, “Liquids exert an upward force on an<br />
object. This force prevents an object from sinking unless that<br />
object can exert a greater force downward.”<br />
4. Tell the students that they will be receiving several objects to use<br />
to see if they will float.<br />
5. Teacher will give directions as, “You will all be receiving a cup<br />
of water. Please be careful not to spill your water so you can use<br />
it for your experiments. After you have your water, you will<br />
receive your bag of items. Once you have your objects, take<br />
them back to your desk and test them to see if they float. Some<br />
of the objects are food and some are not. Please do not eat the<br />
food because besides being dirty, you will need to use them in<br />
your experiments. You will have a worksheet (hold up the<br />
worksheet). On the worksheet you will need to write your name<br />
at the top and by the name of the object you are using put a check<br />
on the line that says, “float” if you think it will float, or put a<br />
check on the line that says, “not float” if you do not think it will<br />
float.” After you have made your prediction, put the object into<br />
the water to see if it floats. Once you have tested the object,<br />
write yes on the line if it floated, or no on the line if it did not<br />
float.”<br />
* The objects already written out on the paper will assist<br />
students in remembering to try all objects.<br />
6. Ask students if there are any questions.
* Ask an average student to repeat the directions in order to<br />
check for understanding and allow the lower students to hear the<br />
directions again.<br />
7. Tell students to get out their pencils and pass out the cups of<br />
water while having a student helper pass out the worksheets and<br />
bags of objects.<br />
8. Tell students to get started testing their objects and to get as<br />
many done as they can in about five minutes.<br />
* Do not give a set amount of objects so that it does not stress<br />
out the slower students and it will allow students to work at their<br />
own pace. Allow more time if needed for the slower students.<br />
9. Constantly walk around the room making sure the students are<br />
making predictions as well as testing their objects correctly.<br />
* Ask the higher level students questions about why they think<br />
some of the objects floated and some did not.<br />
10. Once the class is finished, call on several students to tell what<br />
objects floated and what objects did not float.<br />
* Since these questions have an obvious answer, call on lower<br />
level students to allow them to participate in the discussion.<br />
11. Ask students if their predictions were right or wrong and lead a<br />
discussion according to student responses about why they<br />
predicted what they did. Mention that predictions do not always<br />
have to be correct and that is why experiments are made.<br />
12. Call on several students to discuss why they thought some of the<br />
objects floated and some did not.<br />
C. Closure Statement<br />
“Now that we have discussed floating and tested some objects, think about<br />
things you know float such as a rubber duck. Why does the duck float?”<br />
II. ASSESSMENT<br />
Assessment will be based on the worksheet that the students’ used to predict<br />
floating. All students’ work will be assessed and will receive a sticker if all<br />
objects were predicted. If a student did not test or predict one of the objects,
the teacher will simply circle it and remind the student to complete the entire<br />
worksheet. A participation grade will be given.<br />
III. EXTENSION AND REMEDIATION<br />
Extension: For the entire class: Read the book, Tuck in the Pool and discuss<br />
why the pigs were able to float in the pool with the kick boards, but not able to<br />
without them.<br />
For an individual student: Teacher will let he/she or a small group look<br />
through the book, Water & Floating to see more floating experiments that<br />
could be done or the student will write about why he/she thinks objects float<br />
before the class discussion.<br />
Remediation: For the entire class: Have the students look up other trade<br />
books on floating or look up information about floating on websites.<br />
For an individual student: Use the book, Water & Floating and explain oneon-one<br />
using that resource about floating.<br />
IV. HOMEWORK<br />
The students will need to find an object from their home, write down the name<br />
of it, test it to see if it floats, and write the result. These will be shared the<br />
next day in class.


