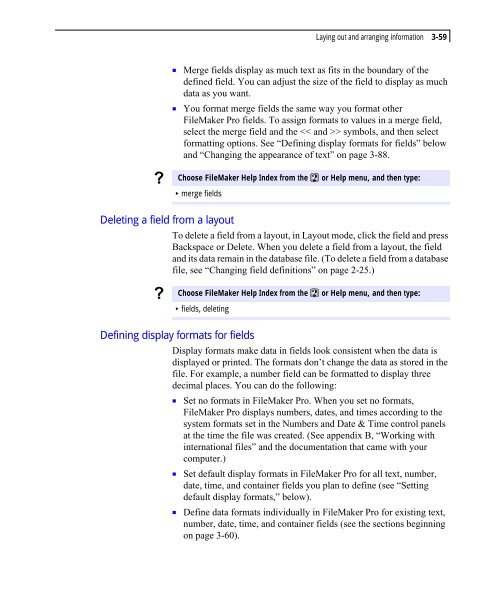
- Page 1 and 2:
FOR MAC OS ©1990, 1992, 1995, 1997
- Page 3 and 4:
IV FileMaker Pro User’s Guide Def
- Page 5 and 6:
VI FileMaker Pro User’s Guide Cop
- Page 7 and 8:
VIII FileMaker Pro User’s Guide U
- Page 9 and 10:
X FileMaker Pro User’s Guide Web
- Page 11 and 12:
XIV FileMaker Pro User’s Guide Us
- Page 13 and 14:
XVI FileMaker Pro User’s Guide Us
- Page 15 and 16:
XVIII FileMaker Pro User’s Guide
- Page 17 and 18:
Chapter 1: FileMaker Pro basics Und
- Page 19 and 20:
Records in a Clients file ? What’
- Page 21 and 22:
Records One record contains all the
- Page 23 and 24:
Working with modes FileMaker Pro ba
- Page 25 and 26:
Managing files Creating and opening
- Page 27 and 28:
Closing files ? ? Saving a copy of
- Page 29 and 30:
Leaving FileMaker Pro ? Checking yo
- Page 31 and 32:
? 4. When all questionable words ar
- Page 33 and 34:
? To select, ignore, or create a sp
- Page 35 and 36:
? FileMaker Pro basics 1-19 3. When
- Page 37 and 38:
2-2 FileMaker Pro User’s Guide Fo
- Page 39 and 40:
2-4 FileMaker Pro User’s Guide Fi
- Page 41 and 42:
2-6 FileMaker Pro User’s Guide ?
- Page 43 and 44:
2-8 FileMaker Pro User’s Guide Se
- Page 45 and 46:
2-10 FileMaker Pro User’s Guide C
- Page 47 and 48:
2-12 FileMaker Pro User’s Guide I
- Page 49 and 50:
2-14 FileMaker Pro User’s Guide U
- Page 51 and 52:
2-16 FileMaker Pro User’s Guide F
- Page 53 and 54:
2-18 FileMaker Pro User’s Guide ?
- Page 55 and 56:
2-20 FileMaker Pro User’s Guide S
- Page 57 and 58:
2-22 FileMaker Pro User’s Guide S
- Page 59 and 60:
2-24 FileMaker Pro User’s Guide 5
- Page 61 and 62:
2-26 FileMaker Pro User’s Guide ?
- Page 63 and 64:
3-2 FileMaker Pro User’s Guide Da
- Page 65 and 66:
3-4 FileMaker Pro User’s Guide La
- Page 67 and 68:
3-6 FileMaker Pro User’s Guide To
- Page 69 and 70: 3-8 FileMaker Pro User’s Guide St
- Page 71 and 72: 3-10 FileMaker Pro User’s Guide A
- Page 73 and 74: 3-12 FileMaker Pro User’s Guide T
- Page 75 and 76: 3-14 FileMaker Pro User’s Guide S
- Page 77 and 78: 3-16 FileMaker Pro User’s Guide ?
- Page 79 and 80: 3-18 FileMaker Pro User’s Guide U
- Page 81 and 82: 3-20 FileMaker Pro User’s Guide A
- Page 83 and 84: 3-22 FileMaker Pro User’s Guide K
- Page 85 and 86: 3-24 FileMaker Pro User’s Guide W
- Page 87 and 88: 3-26 FileMaker Pro User’s Guide T
- Page 89 and 90: 3-28 FileMaker Pro User’s Guide L
- Page 91 and 92: 3-30 FileMaker Pro User’s Guide P
- Page 93 and 94: 3-32 FileMaker Pro User’s Guide ?
- Page 95 and 96: 3-34 FileMaker Pro User’s Guide T
- Page 97 and 98: 3-36 FileMaker Pro User’s Guide R
- Page 99 and 100: 3-38 FileMaker Pro User’s Guide W
- Page 101 and 102: 3-40 FileMaker Pro User’s Guide G
- Page 103 and 104: 3-42 FileMaker Pro User’s Guide C
- Page 105 and 106: 3-44 FileMaker Pro User’s Guide A
- Page 107 and 108: 3-46 FileMaker Pro User’s Guide S
- Page 109 and 110: 3-48 FileMaker Pro User’s Guide A
- Page 111 and 112: 3-50 FileMaker Pro User’s Guide ?
- Page 113 and 114: 3-52 FileMaker Pro User’s Guide ?
- Page 115 and 116: 3-54 FileMaker Pro User’s Guide ?
- Page 117 and 118: 3-56 FileMaker Pro User’s Guide A
- Page 119: 3-58 FileMaker Pro User’s Guide A
- Page 123 and 124: 3-62 FileMaker Pro User’s Guide C
- Page 125 and 126: 3-64 FileMaker Pro User’s Guide ?
- Page 127 and 128: 3-66 FileMaker Pro User’s Guide C
- Page 129 and 130: 3-68 FileMaker Pro User’s Guide D
- Page 131 and 132: 3-70 FileMaker Pro User’s Guide 2
- Page 133 and 134: 3-72 FileMaker Pro User’s Guide ?
- Page 135 and 136: 3-74 FileMaker Pro User’s Guide O
- Page 137 and 138: 3-76 FileMaker Pro User’s Guide N
- Page 139 and 140: 3-78 FileMaker Pro User’s Guide 1
- Page 141 and 142: 3-80 FileMaker Pro User’s Guide T
- Page 143 and 144: 3-82 FileMaker Pro User’s Guide S
- Page 145 and 146: 3-84 FileMaker Pro User’s Guide ?
- Page 147 and 148: 3-86 FileMaker Pro User’s Guide C
- Page 149 and 150: 3-88 FileMaker Pro User’s Guide C
- Page 151 and 152: 3-90 FileMaker Pro User’s Guide C
- Page 153 and 154: 4-2 FileMaker Pro User’s Guide La
- Page 155 and 156: 4-4 FileMaker Pro User’s Guide ?
- Page 157 and 158: 4-6 FileMaker Pro User’s Guide Wo
- Page 159 and 160: 4-8 FileMaker Pro User’s Guide ?
- Page 161 and 162: 4-10 FileMaker Pro User’s Guide T
- Page 163 and 164: 4-12 FileMaker Pro User’s Guide ?
- Page 165 and 166: 4-14 FileMaker Pro User’s Guide ?
- Page 167 and 168: 4-16 FileMaker Pro User’s Guide ?
- Page 169 and 170: 4-18 FileMaker Pro User’s Guide M
- Page 171 and 172:
4-20 FileMaker Pro User’s Guide Y
- Page 173 and 174:
4-22 FileMaker Pro User’s Guide ?
- Page 175 and 176:
4-24 FileMaker Pro User’s Guide ?
- Page 177 and 178:
4-26 FileMaker Pro User’s Guide ?
- Page 179 and 180:
4-28 FileMaker Pro User’s Guide T
- Page 181 and 182:
4-30 FileMaker Pro User’s Guide S
- Page 183 and 184:
4-32 FileMaker Pro User’s Guide ?
- Page 185 and 186:
Chapter 5: Using ScriptMaker and bu
- Page 187 and 188:
? Using ScriptMaker and buttons 5-3
- Page 189 and 190:
Control steps ? Use this step To Pe
- Page 191 and 192:
Editing steps Fields steps ? ? Use
- Page 193 and 194:
Windows steps Files steps ? ? Use t
- Page 195 and 196:
Miscellaneous steps Planning script
- Page 197 and 198:
Scripts with checkmarks appear in t
- Page 199 and 200:
? 7. Click Done. Storing settings f
- Page 201 and 202:
? Using ScriptMaker and buttons 5-1
- Page 203 and 204:
Performing, resuming, or stopping s
- Page 205 and 206:
Defining buttons Button tool Using
- Page 207 and 208:
Copying, changing, or deleting butt
- Page 209 and 210:
? Using ScriptMaker and buttons 5-2
- Page 211 and 212:
? Using ScriptMaker and buttons 5-2
- Page 213 and 214:
? Examples of ScriptMaker scripts ?
- Page 215 and 216:
Finding data Using ScriptMaker and
- Page 217 and 218:
Using ScriptMaker and buttons 5-33
- Page 219 and 220:
Example step 4: Store settings Stor
- Page 221 and 222:
Using ScriptMaker and buttons 5-37
- Page 223 and 224:
Chapter 6: Previewing and printing
- Page 225 and 226:
Layout showing margins Layout not s
- Page 227 and 228:
? Previewing and printing informati
- Page 229 and 230:
? Previewing and printing informati
- Page 231 and 232:
Previewing and printing information
- Page 233 and 234:
Printing layouts with subsummaries
- Page 235 and 236:
Choose the data to print Previewing
- Page 237 and 238:
Chapter 7: Networking and access pr
- Page 239 and 240:
Opening files as the host To host a
- Page 241 and 242:
? Networking and access privileges
- Page 243 and 244:
? Networking and access privileges
- Page 245 and 246:
? Protecting your files Networking
- Page 247 and 248:
? Human Resources can’t see this
- Page 249 and 250:
Blank password Passwords defined in
- Page 251 and 252:
Deleting or changing passwords ? To
- Page 253 and 254:
Groups defined in the file Type a n
- Page 255 and 256:
Deleting or changing groups ? Netwo
- Page 257 and 258:
8-2 FileMaker Pro User’s Guide ?
- Page 259 and 260:
8-4 FileMaker Pro User’s Guide ?
- Page 261 and 262:
8-6 FileMaker Pro User’s Guide Im
- Page 263 and 264:
8-8 FileMaker Pro User’s Guide ?
- Page 265 and 266:
8-10 FileMaker Pro User’s Guide T
- Page 267 and 268:
8-12 FileMaker Pro User’s Guide E
- Page 269 and 270:
8-14 FileMaker Pro User’s Guide E
- Page 271 and 272:
9-2 FileMaker Pro User’s Guide Se
- Page 273 and 274:
9-4 FileMaker Pro User’s Guide Se
- Page 275 and 276:
9-6 FileMaker Pro User’s Guide Th
- Page 277 and 278:
9-8 FileMaker Pro User’s Guide Ch
- Page 279 and 280:
Chapter 10: Using data from related
- Page 281 and 282:
Understanding lookups This term Mea
- Page 283 and 284:
Lookup destination field for first
- Page 285 and 286:
. Related fields in a portal Relate
- Page 287 and 288:
Understanding relationships Match f
- Page 289 and 290:
Defining lookups between files Usin
- Page 291 and 292:
Defining a relationship for a looku
- Page 293 and 294:
Planning a relational database Usin
- Page 295 and 296:
Using data from related files 10-17
- Page 297 and 298:
? Client file Route file Trip file
- Page 299 and 300:
Related fields in Layout mode Relat
- Page 301 and 302:
? 6. Select options for the relatio
- Page 303 and 304:
4. Select options for the portal, a
- Page 305 and 306:
? 3. Double-click the name of a rel
- Page 307 and 308:
Choosing a different relationship f
- Page 309 and 310:
? Define a calculation formula in t
- Page 311 and 312:
Match field Related records from th
- Page 313 and 314:
? Employee ID Name Item ID Item Com
- Page 315 and 316:
Example step 1: Plan the system Usi
- Page 317 and 318:
One record per order Agents type th
- Page 319 and 320:
2. Define these fields in the Produ
- Page 321 and 322:
Using data from related files 10-43
- Page 323 and 324:
11-2 FileMaker Pro User’s Guide A
- Page 325 and 326:
11-4 FileMaker Pro User’s Guide 4
- Page 327 and 328:
11-6 FileMaker Pro User’s Guide I
- Page 329 and 330:
11-8 FileMaker Pro User’s Guide S
- Page 331 and 332:
11-10 FileMaker Pro User’s Guide
- Page 333 and 334:
11-12 FileMaker Pro User’s Guide
- Page 335 and 336:
11-14 FileMaker Pro User’s Guide
- Page 337 and 338:
11-16 FileMaker Pro User’s Guide
- Page 339 and 340:
11-18 FileMaker Pro User’s Guide
- Page 341 and 342:
11-20 FileMaker Pro User’s Guide
- Page 343 and 344:
11-22 FileMaker Pro User’s Guide
- Page 345 and 346:
11-24 FileMaker Pro User’s Guide
- Page 347 and 348:
11-26 FileMaker Pro User’s Guide
- Page 349 and 350:
11-28 FileMaker Pro User’s Guide
- Page 351 and 352:
? Recovering damaged files A-2 Keep
- Page 353 and 354:
B-2 FileMaker Pro User’s Guide Us
- Page 355 and 356:
Appendix C: Summary of functions Un
- Page 357 and 358:
Text functions ? Summary of functio
- Page 359 and 360:
Date functions ? Syntax Definition
- Page 361 and 362:
Syntax Definition Max (field) Max (
- Page 363 and 364:
Example 1 Single input parameter Ex
- Page 365 and 366:
? Summary of functions C-11 This co
- Page 367 and 368:
Financial functions ? Trigonometric
- Page 369 and 370:
SYNTAX: Summary of functions C-15 T
- Page 371 and 372:
Syntax Definition Summary of functi
- Page 373 and 374:
Syntax Definition RelationInfo (dat
- Page 375 and 376:
Index Symbols ! 4-20 - 2-3 - 2-17 "
- Page 377 and 378:
fields between fields 4-12, 8-4 bet
- Page 379 and 380:
Fields See also Calculation fields;
- Page 381 and 382:
Grouping objects 3-47 Groups access
- Page 383 and 384:
Master file described 10-2 planning
- Page 385 and 386:
Predefined layouts described 3-5 su
- Page 387 and 388:
S Sample data in fields 3-57 Saving
- Page 389 and 390:
Syntax formulas 2-14 related field


