
Create successful ePaper yourself
Turn your PDF publications into a flip-book with our unique Google optimized e-Paper software.
<strong>Broaching</strong> Principles<br />
<strong>Broaching</strong> is a machining process that pushes or pulls a cutting tool (called a broach)<br />
over or through the surface being machined. Its high-production, metal-removal process<br />
is sometimes required to make one-of-a-kind parts. The concept of broaching as a<br />
legitimate machining process can be traced back to the early 1850s. Early broaching<br />
applications were cutting keyways in pulleys and gears. After World War 1, broaching<br />
contributed to the rifling of gun barrels. Advances in broaching machines and form<br />
grinding during the 1920s and 30s enabled tolerances to be tightened and broaching costs<br />
to become competitive with other machining processes. Today, almost every conceivable<br />
type of form and material can be broached. It represents a machining operation that,<br />
while known for many years, is still in its infancy. New uses for broaching are being<br />
devised every day.<br />
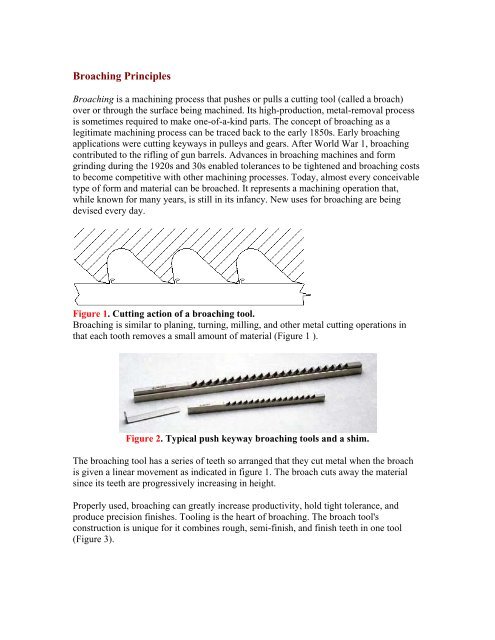
Figure 1. Cutting action of a broaching tool.<br />
<strong>Broaching</strong> is similar to planing, turning, milling, and other metal cutting operations in<br />
that each tooth removes a small amount of material (Figure 1 ).<br />
Figure 2. Typical push keyway broaching tools and a shim.<br />
The broaching tool has a series of teeth so arranged that they cut metal when the broach<br />
is given a linear movement as indicated in figure 1. The broach cuts away the material<br />
since its teeth are progressively increasing in height.<br />
Properly used, broaching can greatly increase productivity, hold tight tolerance, and<br />
produce precision finishes. Tooling is the heart of broaching. The broach tool's<br />
construction is unique for it combines rough, semi-finish, and finish teeth in one tool<br />
(Figure 3).
Figure 3. Parts of a broaching tool.<br />
There are two types of broaching procedures: internal broaching and external broaching.<br />
For exterior broaching, the broach tool may be pulled or pushed across a workpiece<br />
surface, or the surface may move across the tool. Internal broaching requires a starting<br />
hole or opening in the workpiece so the tool can be inserted. The tool, or workpiece, is<br />
then pushed or pulled to force the tool through the starter hole.<br />
Almost any irregular cross-section can be broached as long as all surfaces of the section<br />
remain parallel to the direction of broach travel (Figure 4). Helical cuts can also be<br />
produced by twisting the broach tool as it passes the workpiece surface.<br />
Figure 4. Different types of broaches.<br />
Hints for successfully broaching a keyway<br />
Set-up<br />
Maintain a rigid set-up at all times. The workpiece must be solidly fixed or nested
perfectly square with the baseplate and ram face. Check to make sure that all square and<br />
parallel surfaces on the face of the ram and the baseplate remain true.<br />
Alignment<br />
Proper alignment of the broach, workpiece, and ram is the most important factor in all<br />
broaching operations. Misalignment can cause drifting, deflection, and even breakage.<br />
Alignment Tips--If a keyway broach drifts and cuts a taper, try the following:<br />
1. Reverse workpiece or turn broach so teeth face toward the back of the press.<br />
2. Let the bushing protrude above the workpiece to give more support to the back of the<br />
broach thereby helping to keep it aligned. If a collared bushing is used, place it upside<br />
down under the workpiece.<br />
3. Make sure the broach is centered under the ram at the beginning of the cut. If the<br />
broach moves out of alignment after starting to cut, back off the pressure on the ram and<br />
align the broach itself. Repeat during successive cuts to ensure perfectly straight cuts.
<strong>Broaching</strong> Procedures<br />
<strong>Broaching</strong> with Keyway Sets or Individual Keyway Broaches<br />
Bushings are required. Shims are required with all but the smallest broaches, and are<br />
provided with each individual keyway broach and broach set for cutting to standard<br />
depth.<br />
1. Select the right bushing for the bore (sizes are plainly marked)<br />
and insert in the bore of work.<br />
2. Insert broach (which is also plainly marked for size) for the desired width of keyway<br />
into the bushing slot and check alignment.<br />
3. Place this assembly in the press.<br />
4. Lubricate.<br />
5. Push Broach through.<br />
6. Clean broach.<br />
7. Insert shims as required to obtain exact keyway depth.<br />
<strong>Broaching</strong> with One-Pass Keyway Broaches<br />
No shims are necessary. "C" style bushings are required.
1. Insert bushing in part.<br />
2. Insert broach and check alignment.<br />
3. Lubricate.<br />
4. Push broach through.<br />
5. Clean broach.<br />
<strong>Broaching</strong> with Production Keyway Broaches<br />
No shims or bushings required.<br />
1. Insert broach pilot into bore of part.<br />
2. Lubricate.<br />
3. Push broach through.<br />
4. Clean broach.<br />
<strong>Broaching</strong> with Internal Hole Broaches<br />
Round, Square, Hexagon, and Special Shapes. No shims or bushings required.<br />
1. Insert broach and check alignment. (The use of a ram adapter is advised with all<br />
round, oval, D-hole broaches, and for square and hexagon broaches 1/4" and smaller).<br />
2. Lubricate.<br />
3. Push broach through.<br />
4. Clean broach.<br />
5. Ram Speed: Always use proper ram speed to prevent chatter marks and edge wear.<br />
(See Metals Handbook--Vol. 3 "Machining".)
6. Pilot Holes: Properly drilled pilot holes are essential for a true and clean cut.<br />
Never use a dull or poorly sharpened drill to make pilot holes.<br />
Ram Adapters<br />
Ram adapters, or rear guides, provide support and guidance for the broach at the shank<br />
end,<br />
minimizing the possibility of deflection or breakage. Ram adapters are recommended for<br />
all<br />
standard round, oval, D-hole broaches, square and hexagon broaches 1/4" and smaller,<br />
and in<br />
certain other situations where an extraordinarily high degree of accuracy is required.<br />
If a ram adapter is used as a rear guide for the broach, the hole in the ram adapter must be<br />
in alignment with the pilot hole in the workpiece. Whenever ram adapters are used they<br />
must<br />
provide a tight, true fit to both the press ram and the broach shank.<br />
Ram Adapter to guide broach shank: When using special broaches, all D, Double-D,<br />
and most rectangular broaches have a tendency to deflect. To prevent this, the simple<br />
ram adapter, which can be fitted to either an arbor or hydraulic press, will guide the<br />
broach throughout the cut.