fiberon installation guide - Fiberon Europe
fiberon installation guide - Fiberon Europe
fiberon installation guide - Fiberon Europe

Create successful ePaper yourself
Turn your PDF publications into a flip-book with our unique Google optimized e-Paper software.
Prior to <strong>installation</strong><br />
<strong>fiberon</strong>® decking <strong>installation</strong><br />
READ CAREFULLY THIS INSTALLATION SHEET BEFORE STARTING YOUR DECKING PROJECT<br />
Failure to follow these instructions will void the warranty<br />
1. All <strong>fiberon</strong>® decking boards can only be used for outdoorwalking<br />
decking application.<br />
2. Prior to <strong>installation</strong>, boards should be stored and covered from<br />
light and water. Use a waterproof opaque cover to better<br />
protect the boards.<br />
3. When carrying <strong>fiberon</strong>® boards, carry on edge to have a better<br />
weight balance and store on a flat surface.<br />
4. <strong>fiberon</strong>® boards are specifically made for DECKING projects<br />
and are not intended for structural applications.<br />
5. There is +3cm tolerance on the board’s length. Therefore, most<br />
of <strong>fiberon</strong>® boards should be cut at the end to match with the<br />
joist spacing and to have a better finishing.<br />
6. For all materials, standard woodworking tools can be used. We<br />
advise the use of tungsten carbide saw blades.<br />
7. Wasted materials can be rejected with normal construction<br />
debris.<br />
8. Consult local building codes prior to <strong>installation</strong>.<br />
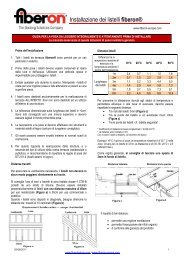
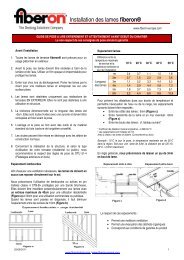
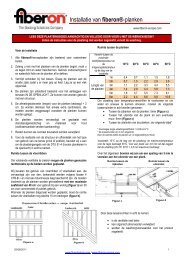
Joists spacing<br />
To have a better ventilation, boards should not be laid directly<br />
on the ground.<br />
We recommend the use of Tanalith treated pine joists class 4 CTB-<br />
B+ or tropical hardwood joists. Joists should be protected with a<br />
cover tape.<br />
When installing deck boards perpendicular to the joists in<br />
residential applications, spacing is 40cm on center (Figure a).<br />
For commercial applications, spacing should be no more than<br />
30cm on center. When the decking is to be laid diagonally, reduce<br />
the on-center joist spacing by 10cm (Figure b).<br />
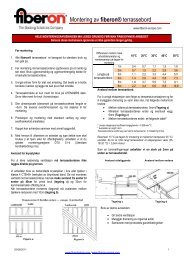
Boards spacing<br />
Updated on 24/08/2011 www.fiberdecking.com I www.<strong>fiberon</strong>-europe.com<br />
All composite materials undergo some degree of linear expansion<br />
due to temperature’s differences. To compensate the contraction<br />
and expansion effects, following boards’ spacings should be<br />
respected:<br />
Side to side spacing : 5mm (Figure c)<br />
Between the board side and any permanent structure<br />
such as a wall or a post : 6mm (Figure c)<br />
End to end spacing : see table below*<br />
Difference between the<br />
highest temperature and<br />
the day <strong>installation</strong><br />
temperature*<br />
Length of<br />
the board<br />
6m 2,2 4,4 6,6 8,8 10,9<br />
* Coefficient of thermal expansion per linear meter = 0,036mm/°C<br />
* Spacing is given in mm<br />
Due to the heat, wood-plastic composite will expand (not like natural wood)<br />
Example: 15°C during <strong>installation</strong>, maximal temperature around the project<br />
is 35°C. For a 3.6m board, expansion would be (35-15= 20°C = 2,5 mm<br />
maximum)<br />
In general, and in case of any doubt, we recommend leaving a<br />
3mm gap end-to-end.<br />
Respecting these spacing requirements will:<br />
10°C 20°C 30°C 40°C 50°C<br />
1m 0,4 0,7 1,1 1,5 1,8<br />
2m 0,7 1,5 2,2 2,9 3,6<br />
3m 1,1 2,2 3,3 4,4 5,5<br />
4m 1,4 2,9 4,4 5,8 7,3<br />
5m 1,8 3,7 5,5 7,3 9,1<br />
Side to side spacing<br />
Figure c<br />
www.<strong>fiberon</strong>-europe.com<br />
Allows good ventilation<br />
Helps to remove organic debris<br />
Corresponds to <strong>fiberon</strong>® warranty terms<br />
End to end spacing<br />
Figure d<br />
1
Installing on concrete ground<br />
Attention : do not use wood plastic composite joists !<br />
Joists should have a minimum of 28mm thickness to allow a better<br />
ventilation.<br />
The minimum height H (between the ground level, and the top level<br />
of the deck) should be more than 6cm.<br />
Joists should be fixed to the ground with nylon anchors screws.<br />
Screws dimensions can vary depending on the joist thickness. In<br />
general, the screw length should be 2.5 times the joist thickness.<br />
Nylon anchors screws spacing should be 80cm maximum.<br />
Plastic pads should be put under the joists and spaced each 40cm.<br />
This will allow water circulation and insure good ventilation under<br />
the joists.<br />
We recommend the use of Bitudeck® cover tape on the joists. It<br />
reduces walking sound effect and protects the joists from water<br />
(rain).<br />
Unobstructed air flow is required below deck. Promote proper<br />
drainage and ventilation. Insufficient ventilation will void the<br />
warranty.<br />
Updated on 24/08/2011 www.fiberdecking.com I www.<strong>fiberon</strong>-europe.com<br />
Installing on wooden joists + pedestals<br />
In case your deck will lay over a non-conrete ground (gravels,<br />
sand...), we recommend the use of adjusted pedestals.<br />
Pedestals should be uniformly positioned under the joists. Spacing<br />
will vary depending on the joist thickness.<br />
For residential use, spacing should be as follow:<br />
Joists of 30 – 40 mm thickness = 1 pedestal every 40cm<br />
Joists of 40 – 50 mm thickness = 1 pedestal every 50cm<br />
Joists of 50 – 60 mm thickness = 1 pedestal every 60cm<br />
Joists of 60 – 70 mm thickness = 1 pedestal every 75cm<br />
Joists of 70 – 80 mm thickness = 1 pedestal every 90cm<br />
If the ground is not flat, we recommend making a weak mortar to<br />
have a stable structure. Before installing the pedestals, spread a<br />
weed control film of 100gr/m² minimum, to prevent growing<br />
weeds.<br />
Use long screws to fix the joists on the pedestals.<br />
If joists are more than 3m length, we recommend fixing wooden<br />
spacers in between to avoid twisting. Therefore, joists are perfectly<br />
parallel to each others.<br />
2
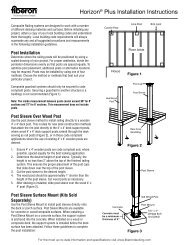
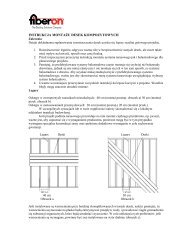
<strong>Fiberon</strong>® boards <strong>installation</strong> with COBRA® hidden fasteners<br />
Easy and quick to install, COBRA® fastener is a hidden deck<br />
fastener designed specifically for <strong>fiberon</strong>® decking boards.<br />
COBRA® fasteners allow an exceptional hold-down power thanks<br />
to the claws located on the tabs. The result is a stable and smooth<br />
deck surface.<br />
1. Position the first deck board and leave a 6mm gap from any<br />
permanent structure.<br />
2. Pre-drill the first deck board with a 3mm drill. Use Cobra®<br />
composite decking screws along the outside edge. The screw<br />
placement should be at 25mm from the edge of the board. Do<br />
not over-tighten the screws.<br />
3. Insert COBRA® fasteners into the groove channel of the 1 st<br />
board at every support joist (Figure 1).<br />
4. Position the 2 nd board against the fasteners. Slightly lift the<br />
outer edge of the 2 nd board to ease the assembly (Figure 1<br />
bis). COBRA® fasteners allow a 5-6mm board spacing.<br />
5. Once 1 st and 2 nd boards are positioned, tighten the COBRA®<br />
screws down. A special bit is provided. Do not over tighten the<br />
screws (Figure 2). Use a plastic hammer to tighten the 2 nd<br />
board to the 1 st one (Figure 3). Repeat the same steps for next<br />
boards.<br />
6. Adjust the last board width with a circular saw, and fix it with<br />
Cobra® composite decking screws along the outside edge<br />
7. To obtain a fascia, you can cut a board in the length direction<br />
and place it alongside your deck.<br />
Figure 1<br />
Figure 2<br />
Figure 3<br />
(Figure 1 bis)<br />
Figure 1 bis<br />
Updated on 24/08/2011 www.fiberdecking.com I www.<strong>fiberon</strong>-europe.com<br />
TIGHTENING TORQUE: You should carefully tighten the hidden<br />
fastener screw down. High tightening torque may break the screw<br />
head.<br />
FOR TROPICAL HARDWOOD JOISTS : You should absolutely<br />
pre-drill before fixing the hidden fastener screw into the joist. For<br />
treated pine joists, you can screw directly (without pre-drilling).<br />
Defected / damaged boards replacement<br />
COBRA® hidden fasteners could fix two boards end-to-end.<br />
This allows an easy board replacement<br />
without altering the rest of the deck.<br />
<strong>fiberon</strong>® boards are 100% reversible. Both<br />
top and bottom faces are similar. It is possible<br />
to turn over the board and use the nondamaged<br />
face.<br />
1. Unscrew COBRA® fasteners that hold the board to be<br />
turned over / replaced (including fasteners that holds<br />
boards A and B) and slide them inside the groove channel<br />
of boards A and B (Figure 1’)<br />
2. Position the clean face (or new board) and slide the<br />
COBRA® fasteners back in the groove channel of the<br />
replaced board (using a screw driver) (Figure 2’). Tighten<br />
the screws down (a special bit is provided)<br />
A<br />
Figure 1’<br />
Figure 2’<br />
A special bit is provided to allow<br />
fastening COBRA® screws between<br />
the boards<br />
3<br />
B
<strong>fiberon</strong>® boards <strong>installation</strong> with COBRA® composite screws<br />
We strongly recommend the use of COBRA® composite screws.<br />
They have a special coating against corrosion, and are engineered<br />
specifically to match with all kind of composite decking. Galvanized<br />
screws are prohibited.<br />
Pre-drill all screws holes at 25mm from board ends with a 3mm<br />
countersink drill bit. Even though it is not necessary, pre-drilling is<br />
recommended to have better looking finished projects.<br />
Drive fastener perpendicular to deck surface (not at an angle) until<br />
top of screw head flush with deck surface (Figure e).<br />
When screwing, some mushrooming (residues) may appear<br />
around the screw head. For a clean finishing, we recommend the<br />
use of COBRA® composite screws. This will reduce the<br />
mushrooming effect. Different colors are available to match with<br />
most popular WPC decking colors. (Figure f)<br />
Each board requires 2 screws at each end, but only 1 screw per<br />
joist (Figure g). Designed for the professional deck builder, this<br />
<strong>installation</strong> efficiency results in a 40% reduction in screws and a<br />
30% reduction in labor.<br />
Wood grain patterns<br />
graining on <strong>fiberon</strong>® Professional is directional. Different looks<br />
can be achieved by laying the decking in the same or alternating<br />
directions (Figure h).<br />
Same direction<br />
Figure e<br />
Figure f<br />
Figure g<br />
Figure h<br />
Alternating directions<br />
Updated on 24/08/2011 www.fiberdecking.com I www.<strong>fiberon</strong>-europe.com<br />
The graining pattern repeats approximately every 90cm along the<br />
board length. To ensure you orient the boards to achieve the<br />
desired effect, a directional arrow is inked on the side of each<br />
board showing the direction of the graining.<br />
During the planning phase of any deck project, choose the desired<br />
effect to have a homogenous look and be sure that boards are<br />
correctly oriented.<br />
Fascia / trims / deck finishing<br />
Equalize edge decking boards with a circular saw, and fasten a<br />
fascia board with COBRA® composite screws every 40cm (on<br />
each joist end). Do not forget to leave a 3mm gap between end-toend<br />
fascia, to allow natural thermal expansion (Figure i).<br />
Important notes<br />
Figure i<br />
<strong>fiberon</strong>® boards cannot be glued.<br />
Do not fix parts such as posts, pools covers.. directly on<br />
deck boards.<br />
Leave a gap for thermal expansion around parts inserted<br />
in the deck board such as posts, lights etc.<br />
For swimming pool shed, shed post cannot sit on non<br />
structural boards. Shed wheels should be on rails to not<br />
damage deck boards<br />
For swimming pools, we do not recommend the use of<br />
<strong>fiberon</strong>® boards as trims directly in contact with water.<br />
Better use a stone trim.<br />
Color can differ slightly from one lot to another, due to a<br />
different wood sawdust supplies. Colors are not<br />
contractual.<br />
4