CHAPITRE1 (TRAINING THEORY)b - Fedec
CHAPITRE1 (TRAINING THEORY)b - Fedec
CHAPITRE1 (TRAINING THEORY)b - Fedec

You also want an ePaper? Increase the reach of your titles
YUMPU automatically turns print PDFs into web optimized ePapers that Google loves.
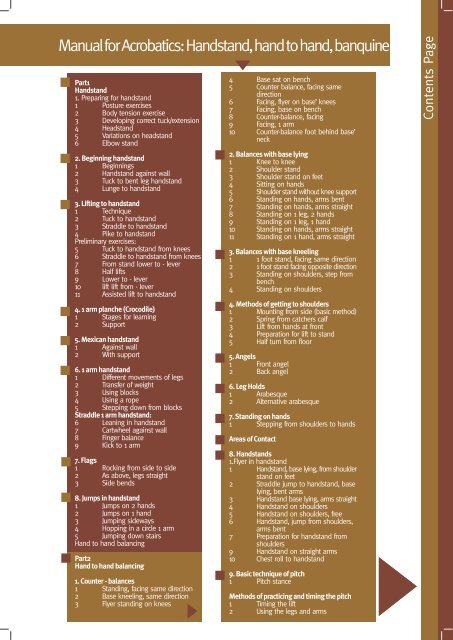
Manual for Acrobatics: Handstand, hand to hand, banquine<br />
Part1<br />
Handstand<br />
1. Preparing for handstand<br />
1 Posture exercises<br />
2 Body tension exercise<br />
3 Developing correct tuck/extension<br />
4 Headstand<br />
5 Variations on headstand<br />
6 Elbow stand<br />
2. Beginning handstand<br />
1 Beginnings<br />
2 Handstand against wall<br />
3 Tuck to bent leg handstand<br />
4 Lunge to handstand<br />
3. Lifting to handstand<br />
1 Technique<br />
2 Tuck to handstand<br />
3 Straddle to handstand<br />
4 Pike to handstand<br />
Preliminary exercises:<br />
5 Tuck to handstand from knees<br />
6 Straddle to handstand from knees<br />
7 From stand lower to - lever<br />
8 Half lifts<br />
9 Lower to - lever<br />
10 lift lift from - lever<br />
11 Assisted lift to handstand<br />
4. 1 arm planche (Crocodile)<br />
1 Stages for learning<br />
2 Support<br />
5. Mexican handstand<br />
1 Against wall<br />
2 With support<br />
6. 1 arm handstand<br />
1 Different movements of legs<br />
2 Transfer of weight<br />
3 Using blocks<br />
4 Using a rope<br />
5 Stepping down from blocks<br />
Straddle 1 arm handstand:<br />
6 Leaning in handstand<br />
7 Cartwheel against wall<br />
8 Finger balance<br />
9 Kick to 1 arm<br />
7. Flags<br />
1 Rocking from side to side<br />
2 As above, legs straight<br />
3 Side bends<br />
8. Jumps in handstand<br />
1 Jumps on 2 hands<br />
2 Jumps on 1 hand<br />
3 Jumping sideways<br />
4 Hopping in a circle 1 arm<br />
5 Jumping down stairs<br />
Hand to hand balancing<br />
Part2<br />
Hand to hand balancing<br />
1. Counter - balances<br />
1 Standing, facing same direction<br />
2 Base kneeling, same direction<br />
3 Flyer standing on knees<br />
4 Base sat on bench<br />
5 Counter balance, facing same<br />
direction<br />
6 Facing, flyer on base’ knees<br />
7 Facing, base on bench<br />
8 Counter-balance, facing<br />
9 Facing, 1 arm<br />
10 Counter-balance foot behind base’<br />
neck<br />
2. Balances with base lying<br />
1 Knee to knee<br />
2 Shoulder stand<br />
3 Shoulder stand on feet<br />
4 Sitting on hands<br />
5 Shoulder stand without knee support<br />
6 Standing on hands, arms bent<br />
7 Standing on hands, arms straight<br />
8 Standing on 1 leg, 2 hands<br />
9 Standing on 1 leg, 1 hand<br />
10 Standing on hands, arms straight<br />
11 Standing on 1 hand, arms straight<br />
3. Balances with base kneeling<br />
1 1 foot stand, facing same direction<br />
2 1 foot stand facing opposite direction<br />
3 Standing on shoulders, step from<br />
bench<br />
4 Standing on shoulders<br />
4. Methods of getting to shoulders<br />
1 Mounting from side (basic method)<br />
2 Spring from catchers calf<br />
3 Lift from hands at front<br />
4 Preparation for lift to stand<br />
5 Half turn from floor<br />
5. Angels<br />
1 Front angel<br />
2 Back angel<br />
6. Leg Holds<br />
1 Arabesque<br />
2 Alternative arabesque<br />
7. Standing on hands<br />
1 Stepping from shoulders to hands<br />
Areas of Contact<br />
8. Handstands<br />
1.Flyer in handstand<br />
1 Handstand, base lying, from shoulder<br />
stand on feet<br />
2 Straddle jump to handstand, base<br />
lying, bent arms<br />
3 Handstand base lying, arms straight<br />
4 Handstand on shoulders<br />
5 Handstand on shoulders, free<br />
6 Handstand, jump from shoulders,<br />
arms bent<br />
7 Preparation for handstand from<br />
shoulders<br />
9 Handstand on straight arms<br />
10 Chest roll to handstand<br />
9. Basic technique of pitch<br />
1 Pitch stance<br />
Methods of practicing and timing the pitch<br />
1 Timing the lift<br />
2 Using the legs and arms<br />
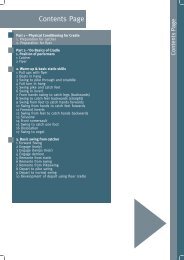
Contents Page
Contents Page<br />
3 Tempo jump for direction and timing<br />
10. Mounting to stand on hands<br />
1 Pitch to stand on hands, facing<br />
2 Pitch half turn to stand<br />
3<br />
11. Mounting to handstand<br />
1 Forwards mount to handstand<br />
2 Forward mount from calf<br />
3 Tuck through to handstand<br />
4 Preparation for tuck through<br />
5 Same with pike<br />
6 Cannonball<br />
12. Movements for the base<br />
1 Roulade<br />
2 From lie, to sit, to stand and back<br />
3 Turns and rolls<br />
13. Beginning one arm handstand<br />
1 1 arm handstand preparation<br />
2 Development<br />
3 1 arm handstand, base standing<br />
14. Flighted movements<br />
1 Half back somersault to stand on shoulders<br />
2 Cascade<br />
3 Courbette<br />
4 Front somersault dismount<br />
5 Back somersault shoulders to shoulders<br />
6 Back somersault, hands to hands<br />
Part3<br />
Banquine<br />
1. Safety<br />
1 Catchers safety<br />
2 Flyers safety<br />
3 Group safety<br />
2. Catchers stance and grip<br />
1 Stance<br />
2 Grip<br />
3. Getting the flyer onto the platform<br />
1 Jumping on<br />
2 Stepping on<br />
4. Timing exercises for pitching<br />
1 Exercise 1<br />
2 Exercise 2<br />
3 Exercise 3<br />
4 Exercise 4<br />
5 Exercise 5<br />
5. Balancing drills<br />
6.Trampoline exercises<br />
7. Basic platform pitches<br />
1 Pitch to stand on floor<br />
2 Pitch to sit in cradle<br />
3 Somersault dismount from cradle<br />
4 Somersault to sit in cradle<br />
5 Somersault to return to platform<br />
6 Cascade<br />
7 Courbette<br />
8. Pitching from ‘stage’<br />
1 Getting into position and practising the<br />
tempo<br />
2 Pitch to stand<br />
3 Somersault to stand<br />
4 Pitch somersault to stand on platform<br />
Manual for Acrobatics,<br />
Handstand, hand to hand, banquine<br />
fdfsdfsdfsdfsdfsdfsdfsdfsdfsdfsdfsd<strong>TRAINING</strong>
Part1/ Handstand<br />
1/ PREPARING FOR HANDSTAND (BASIC SKILLS)<br />
Posture training<br />
- Lie flat on back with lower back and<br />
backs of hands pressed to floor.<br />
- Repeat lifting legs from the floor<br />
maintaining back flat to the floor.<br />
Body tension exercise<br />
Lifting arms above the head<br />
maintaining the correct position of the<br />
lower back and pelvis.<br />
- (Can be done against the wall to<br />
begin).<br />
Lying face down lifting the arms off<br />
the floor (extension through the<br />
shoulders and not the lower back).<br />
Body tension exercise:<br />
- Maintain straight position of body<br />
- Keep shoulders extended<br />
- Push against the wall<br />
- Progress by moving the feet further<br />
away from the wall.<br />
Developing the correct tuck-extension<br />
technique<br />
- Lie on the back, lift the feet and<br />
bring the knees up to the chest<br />
keeping back flat on the floor. The<br />
lower leg must be kept parallel to<br />
the floor.<br />
1<br />
6<br />
Manual for Acrobatics: Handstand, hand to hand, banquine
6<br />
Manual for Acrobatics: Handstand, hand to hand, banquine<br />
Headstand:<br />
- Begin with tuck progressing to<br />
straight body. The headstand allows<br />
the student to concentrate on the<br />
correct position of the back and pelvis<br />
without having to worry about the<br />
balance.<br />
- The head and hands should form an<br />
equilateral triangle.<br />
- The legs should extend with the lower<br />
leg perpendicular to the floor, as when<br />
extending on the back.<br />
Variations on headstand<br />
Pike to headstand<br />
Pike down from headstand<br />
- Head stand – arms wide<br />
- Straight arms<br />
- Balance on back of hands<br />
Headstand wide arms<br />
- Balance on back of hands<br />
2<br />
Part1/ Handstand
Part1/ Handstand<br />
Elbow stand<br />
There are three advantages to this skill<br />
1. It allows a transition from balancing<br />
on three points to balancing on two<br />
2. You can work on the position of the<br />
body without putting pressure on the<br />
wrists<br />
It can also be used for preparation for<br />
contortion balances.<br />
2/ BEGINNING HANDSTAND<br />
1. Front support position, walk the<br />
hands in towards the box until the<br />
back and arms are vertical and in line.<br />
Lift each leg to correct handstand<br />
position and then both legs with<br />
support.<br />
2. Handstand facing the wall<br />
Start in high front support, walk the<br />
hands back to the wall<br />
Forehead and toes should be touching<br />
the wall<br />
3. From squat, tuck to bent leg handstand<br />
I. The back position should be as per<br />
earlier headstand without an arch.<br />
II. Use the legs as much as possible to<br />
avoid fatigue during the session.<br />
III. The hands are placed so that the<br />
index fingers are parallel, with the<br />
fingers slightly bent, to allow the weight<br />
to be spread across the wole hand.<br />
The shoulders must be positioned<br />
directly over the centre of the hands.<br />
Lunge to handstand<br />
There are two different approaches to this skill:<br />
1. Short step (Only relevant for hand balancing)<br />
2. Long step (Relevant to dynamic skills as well)<br />
The short step technique allows the student to put the shoulders in the correct position<br />
as soon as the hands have been placed on the floor.<br />
3<br />
6<br />
Manual for Acrobatics: Handstand, hand to hand, banquine
6<br />
Manual for Acrobatics: Handstand, hand to hand, banquine<br />
4<br />
Part1/ Handstand<br />
The long step is a more advanced technique as the body is swung into position. It<br />
ensures the shoulders are extended. It can also lead on to dynamic tumbling moves<br />
such as handspring.<br />
3/ LIFTING TO HANDSTAND<br />
Technique<br />
Whatever the shape the performer intends to lift handstand there are certain techniques<br />
that must be used. It is essential to keep the body and limbs in as close a proximity<br />
to the line of balance as possible. Consequently, the shoulders are brought over the<br />
hands and the hips lifted to a position as straight as possible in a vertical line from<br />
the centre of the hands. When straddling, the legs should be split as wide as possible<br />
so that they don’t move too far out of this line. Consequently, the flexibility of the hips<br />
is of great importance.<br />
Beginning to lift to handstand<br />
Before using strength to lift to handstand, the student should train the correct technique<br />
and positions of the body by performing the same moves with the legs assisting to<br />
“jump” to handstand. This can be performed three ways:<br />
1.Tuck to handstand<br />
2.Straddle to handstand<br />
3.Pike to handstand
Part1/ Handstand<br />
Preliminary exercises to Train Lifting to Handstand<br />
Tuck to handstand from knees<br />
Straddle to handstand from knees<br />
From straddle stand, lower to - lever<br />
between boxes<br />
Straddle fold on hands, against wall<br />
- The shoulders should be fully<br />
extended<br />
- The feet are held away from the wall<br />
Half lift<br />
(i) From front support<br />
(ii) From straddle<br />
- The feet are drawn towards the<br />
hands<br />
- The body is folded as tightly as<br />
possible<br />
- Slow return to 1 st position<br />
5<br />
6<br />
Manual for Acrobatics: Handstand, hand to hand, banquine
6<br />
Manual for Acrobatics: Handstand, hand to hand, banquine<br />
Lower to - lever on sticks or boxes<br />
- The descent should be slow and<br />
controlled<br />
Half lift from - lever<br />
- The skill is complete when the<br />
feet are above hand level<br />
- As above the body should be as<br />
tightly folded as possible<br />
Assisted lift to handstand<br />
- This can be done with the supporter<br />
sitting on a chair<br />
- Care should be taken to make sure<br />
the technique is correct<br />
4/ ONE ARM PLANCHE (CROCODILE)<br />
Stages for learning<br />
Get into crocodile position but leave<br />
the toes on the floor<br />
- This allows the student to focus on<br />
the requirements and position of the<br />
upper body<br />
6<br />
Part1/ Handstand
Part1/ Handstand<br />
2. Crocodile with both hands on floor<br />
- This time the feet are lifted to feel the<br />
correct position of the lower body<br />
3. Full crocodile position<br />
- The teacher can support across the<br />
waist and under the leg<br />
- Alternatively the student can be<br />
balanced by holding one hand as<br />
shown<br />
Teaching Points<br />
i. Push down on the supporting hand to lift the shoulder<br />
ii. Contract the muscles of the lower back and buttocks on the opposite side to<br />
ensure horizontal balance.<br />
iii. Practice on a box top and place the hands forwards as for handstand, rotating<br />
the body 90° into the planche<br />
5/ MEXICAN HANDSTAND<br />
The Mexican handstand can be developed in two ways:<br />
- Use the wall and increase the range<br />
of movement slowly<br />
- Use the toes to balance<br />
- The most important part of the move<br />
is the return to normal handstand<br />
- The teacher stands behind the student<br />
and assists them towards to the correct<br />
shape.<br />
- The student should press the<br />
shoulders back as the feet move<br />
further forwards<br />
7<br />
6<br />
Manual for Acrobatics: Handstand, hand to hand, banquine
6<br />
Manual for Acrobatics: Handstand, hand to hand, banquine<br />
6/ ONE ARM HANDSTAND<br />
First exercises<br />
- Practice different movements of the<br />
legs while in handstand<br />
- Also perform handstand twisting the<br />
hips to improve proprioception<br />
- Partial transfer of weight can be<br />
practised in front support<br />
- The shoulder must not be lifted or<br />
leaned too far to either side<br />
- The blocks are removed merely by<br />
flicking the fingers<br />
Practise weight transfer by placing three<br />
blocks under 1 hand<br />
Training without a teacher<br />
All of the training exercises above can<br />
be performed without a teacher by<br />
using a rope. This is preferable to using<br />
the wall, as the wall will stop you if you<br />
overbalance and allow bad body<br />
positions – the rope will not.<br />
The performer will also know if the<br />
body is twisted because only one leg<br />
will touch the rope.<br />
Training with Blocks<br />
Stepping down from blocks<br />
- Perform handstand on blocks and then<br />
push blocks away 1 by 1<br />
- The blocks are cleared by transferring<br />
the weight from side to side<br />
- The student should end up in<br />
handstand on the floor<br />
8<br />
Part1/ Handstand
Part1/ Handstand<br />
Teaching Points:<br />
I. Ensure student does not over extend through the shoulders, only the elbow should<br />
move while the shoulders stay fixed.<br />
II. Make the movements slow and controlled.<br />
- When using the wall for a learning<br />
progression, place the blocks 5cm<br />
away from the wall. This is the<br />
optimal distance to achieve the<br />
correct shape<br />
To find the position for the one arm handstand:<br />
- Tuck to Handstand<br />
- Open legs slightly<br />
- Shoulders should be extended into correct position<br />
- Begin to transfer weight from one side to the other<br />
- Avoid movement of the shoulders<br />
- When the legs are together, the head moves away from the shoulder to achieve<br />
the correct position for balance<br />
- During the beginning stages, the instructor should touch his hand on the student’s<br />
leg when explaining positional changes to help improve the student’s awareness<br />
of their body position<br />
(The arm should be moved slowly to avoid a transfer of angular momentum)<br />
Learning straddle one arm handstand<br />
Practise straddle handstand leaning<br />
each way<br />
Cartwheel against the wall<br />
- Pass through 1 arm handstand on<br />
the way up and again on the way<br />
down on the other side<br />
9<br />
6<br />
Manual for Acrobatics: Handstand, hand to hand, banquine
6<br />
Manual for Acrobatics: Handstand, hand to hand, banquine<br />
Finger balance<br />
- Tilt the hips sideways in handstand<br />
and extend through the shoulder<br />
- Release hand, use fingers for balance<br />
- Return to handstand<br />
- Repeat opposite side<br />
More advanced exercises and related movements<br />
Kick to 1 arm handstand<br />
10<br />
Part1/ Handstand<br />
Teaching Points:<br />
I. Start at a diagonal<br />
II. Position feet at a distance where the shoulder is over the hand to begin<br />
III. The free arm should be positioned diagonally with the shoulder close to the ear<br />
IV. This is easier than 1 arm handstand as it is only a transition<br />
V. Increase time in 1 arm handstand by transferring weight to 2 nd arm later and later<br />
VI. Descend the same way<br />
7/FLAGS<br />
Rocking from side to side<br />
- The aim is to get the foot to the floor<br />
- Start with the leading leg bent to<br />
make it easier<br />
- The more flexible the student the less<br />
strength is required<br />
Repeat above, lowering leg in straight<br />
position<br />
Advanced exercise for flags<br />
- Against the wall, bend sideways as<br />
far as possible each way<br />
- Flexibility is essential for this exercise
Part1/ Handstand<br />
8/ JUMPS IN HANDSTAND<br />
Jumps on two hands<br />
Teaching points:<br />
I. The jump is made by the depression and elevation of the shoulders at the same<br />
time as the extension of the legs.<br />
II. The student should begin by going slightly off balance and jumping backwards<br />
Jumps on one hand<br />
Teaching Points:<br />
I. Begin by sliding rather than jumping<br />
II. There is a natural tendency to turn this should be fought, try to make a zigzag<br />
before advancing into a straight line<br />
III. For turning begin with small angle turns in a large circle eventually progressing<br />
to turning on the spot<br />
IV. Turn in the direction of the back and not the stomach<br />
Jump from 1 hand to the other<br />
Jumping sideways in handstand<br />
Hopping in a circle on one arm<br />
11<br />
6<br />
Manual for Acrobatics: Handstand, hand to hand, banquine
6<br />
Manual for Acrobatics: Handstand, hand to hand, banquine<br />
Handstand, jumping down steps<br />
12<br />
Part1/ Handstand
Part2/ Hand to Hand Balancing<br />
INTRODUCTION:<br />
Acro-balance skills work much better if each partner has already had a basic grounding<br />
in individual acrobatic skills. They should understand the basic principles of<br />
acrobatics/gymnastics e.g. body tension and extension, poise, body control, good body<br />
shape and good posture.<br />
Important considerations:<br />
- In weight bearing skills it is usually advisable for the base to be heavier and stronger<br />
than the top. This is not essential but the closer the pair are in weight and stature then<br />
the more limited the skills and the higher the potential for injury.<br />
- It is essential for the pair to have good communication and build a physical ‘rapport’<br />
- It is essential that performers only progress in line with their physical capabilities,<br />
progressing too quickly, especially if the physical preparation has not been done can<br />
result in injury and lack of achievement.<br />
Simple pair balances<br />
1/ Counter-balances<br />
The following series shows the various steps to forward and backward counter balances.<br />
These can be completed or missed out if the students don’t need them.<br />
Counter-balance facing same<br />
direction, both standing<br />
- First concept of counter-balance<br />
- Partners must get used to<br />
countering each others weight<br />
Counter-balance base kneeling<br />
- Gives the feeling of standing<br />
on the thighs as the height is<br />
similar<br />
Counter balance top on knees<br />
- 1 st stage to getting the flyers<br />
weight onto the base<br />
- Be careful of the bases knees<br />
13<br />
6<br />
Manual for Acrobatics: Handstand, hand to hand, banquine
6<br />
Manual for Acrobatics: Handstand, hand to hand, banquine<br />
Counter-balance, base sat on<br />
bench<br />
- The weight can gradually be<br />
taken off the bench as c<br />
onfidence grows<br />
- Allows a stable base for the<br />
flyer to step onto<br />
Free counter-balance<br />
- The base holds the flyer at the<br />
hips and lifts<br />
- The flyer places her hands on<br />
the bases wrists and presses<br />
- The flyer should be placed onto<br />
the legs with control<br />
- Flyer must maintain body<br />
tension<br />
Counter-balance facing, base<br />
kneeling<br />
As per above with flyer facing<br />
forwards<br />
Base on bench<br />
Complete counter balance,<br />
backwards<br />
- This can be done by stepping<br />
as shown or by jumping as above<br />
with flyer facing forwards<br />
- Once the flyers feet are stable<br />
then both partners lean back<br />
Part2/ Hand to Hand Balancing<br />
14
Part2/ Hand to Hand Balancing<br />
Backward counter balance one<br />
arm<br />
- Begin with the arms crossed<br />
- Both partners use the same<br />
hand to hold<br />
- As the flyer steps on the base<br />
bends the knees<br />
Counter balance with foot behind<br />
catchers neck<br />
- Start from normal face to face<br />
counter and flyer places 1 foot<br />
behind catchers neck<br />
- The corresponding hand can<br />
be left in contact until the<br />
balance is stable<br />
- Flyer must keep the hooked<br />
foot strongly flexed<br />
2/ Balances with base lying<br />
Knee to knee<br />
- Flyer starts with feet either<br />
side of catchers head and with<br />
catchers hands on flyers ankles<br />
- Flyer leans forward to take<br />
weight on catchers knees and<br />
base lifts flyers legs<br />
Shoulder stand<br />
- From stand, flyer places hands<br />
on catchers knees leans<br />
forwards and catcher takes<br />
flyers shoulders as flyer lifts to<br />
shoulders stand<br />
Shoulder stand on feet<br />
- Base begins with legs bent<br />
and straightens when in<br />
balance<br />
- Both partners must press<br />
hard on the hands until the<br />
balance is achieved<br />
15<br />
6<br />
Manual for Acrobatics: Handstand, hand to hand, banquine
6<br />
Manual for Acrobatics: Handstand, hand to hand, banquine<br />
Sitting on hands<br />
- Begin with flyer standing<br />
straddling the base waist<br />
- Flyer leans back and base<br />
takes the weight<br />
- Flyer must maintain tension<br />
Shoulder stand without knee<br />
support<br />
- This can either be done from<br />
candlestick or as shown<br />
- The base helps the flyer to<br />
balance with the feet until stable<br />
- The flyer grips in front of<br />
the forearms of the base<br />
Standing on hands, arms bent<br />
- The flyer uses the base’ feet to<br />
balance until stable<br />
- The base’ forearms must be<br />
vertical<br />
- The base grips the arches of<br />
the flyers feet<br />
- Some like to place 2 fingers<br />
at the back of the heel<br />
Standing on hands, arms straight (1)<br />
- From bent arms, base pushes<br />
arms straight<br />
- Flyer needs to lean back<br />
slightly to stay on balance<br />
Standing on hands, arms straight (2)<br />
- Starting with the flyer standing<br />
on the base hands on the floor,<br />
arms bent<br />
- The flyer makes a small jump<br />
and the base lifts her to straight<br />
arms<br />
Part2/ Hand to Hand Balancing<br />
16
Part2/ Hand to Hand Balancing<br />
Standing on 1 leg, both hands<br />
supporting<br />
- Transfer from 2 feet<br />
- The base supports the leg with<br />
the 2 nd hand on the flyers ankle<br />
Standing on 1 leg, 1 hand<br />
- A development from the above<br />
- Requires strong support from<br />
the base and good body tension<br />
from the flyer<br />
Standing on hands arms straight<br />
- This can be achieved by<br />
straightening from bent arms or<br />
jumping from the floor as shown<br />
- The above is more difficult but<br />
requires less effort from the base<br />
Standing on 1 hand arms straight<br />
- Transfer from 2 feet<br />
- The flyer leans across until the<br />
weight is on the correct foot<br />
- Base takes foot in both hands<br />
then releases when stable<br />
3/ Balances with base kneeling<br />
1 foot stand facing same direction<br />
- Flyer steps into this from the<br />
side<br />
- Balance is maintained using<br />
the arms<br />
17 1<br />
6<br />
Manual for Acrobatics: Handstand, hand to hand, banquine
6<br />
Manual for Acrobatics: Handstand, hand to hand, banquine<br />
1 foot stand facing opposite<br />
direction<br />
- Balance maintained using the<br />
hands<br />
- Flyer steps on from the front<br />
Standing on shoulders<br />
(step from bench)<br />
Preparation for 2 high<br />
If the base has trouble with the<br />
knees then he can kneel up<br />
rather than sitting on the heels<br />
Standing on shoulders<br />
- A stage further to 2 high<br />
4/ Methods of getting to shoulders<br />
Part2/ Hand to Hand Balancing<br />
These are four basic methods of getting onto the catchers shoulders without flight.<br />
Basic method, mounting from side<br />
- Base remains upright in plie<br />
- Flyer must get her weight over<br />
the base as soon as possible<br />
- Base helps the flyer by<br />
pressing hard through the arms<br />
- Once the flyer is stable the base<br />
straightens his legs and brings<br />
them together.<br />
Mounting, foot on catchers calf<br />
from behind<br />
- As the flyer pushes from the<br />
back foot the base straightens<br />
his back leg to help propel the<br />
flyer onto the shoulders<br />
- Flyer must try to get the weight<br />
over the base as soon as possible<br />
18
Part2/ Hand to Hand Balancing<br />
Lift from hands at front<br />
- Base must squat as low as<br />
possible to ensure a strong lift<br />
from the legs<br />
- The flyer remains straight until<br />
the base is standing arms<br />
straight, then lifts the hips to<br />
stand<br />
- The flyer helps by jumping<br />
Preparation for lift to stand from<br />
front<br />
Lift to sit on hands<br />
Half turn from floor<br />
- The flyer must jump and put<br />
her weight onto the base’ hands<br />
as soon as possible<br />
- Base squats in order to allow<br />
the flyer to get above him and to<br />
use the legs to push<br />
5/ Angels<br />
Front angel<br />
- The catcher places hands on<br />
the flyers hips (best balance<br />
position is found through<br />
experimenting)<br />
- As the flyer jumps, hold the<br />
catchers wrists for more support,<br />
the catcher lifts the flyer into<br />
support<br />
Back angel<br />
- Once again the catcher must<br />
find the best position of the<br />
hands for balance<br />
- While the pair are trying to find<br />
this position there should always<br />
be a spotter standing behind<br />
- The flyer jumps as the catcher<br />
lifts<br />
19<br />
6<br />
Manual for Acrobatics: Handstand, hand to hand, banquine
6<br />
Manual for Acrobatics: Handstand, hand to hand, banquine<br />
6/ Leg Holds<br />
Arabesque<br />
- Normal ‘stage’ pitching position<br />
- The flyer starts with her hands<br />
on the base’ shoulders<br />
- Once the weight is over the<br />
base, he then transfers the other<br />
hand to the flyers thigh<br />
- The flyer then releases and lifts<br />
the chest<br />
Alternative arabesque<br />
7/ Standing on hands:<br />
Stepping from shoulders to hands<br />
- The base extends the arm to<br />
receive the flyers foot<br />
- The flyer transfers the weight<br />
to this foot and then pushes<br />
with the other foot<br />
- The base receives the other<br />
foot with the arms still<br />
extended, then settles to the<br />
shoulders<br />
Part2/ Hand to Hand Balancing<br />
At this point we need to look a little closer at the points of contact between catcher<br />
and flyer. The following chapter was written as an article for the British Gymnastics<br />
technical newsletter, Gymcraft. The author was Fabrice Berthet from the Ecole Nationale<br />
des Arts du Cirque in Chatellerault.<br />
20
Part2/ Training Hand for to handstand Hand Balancing<br />
AREAS OF CONTACT<br />
By Fabrice Berthet, drawings by Isabelle Ponsot<br />
This article is about the nature and quality of the main areas of contact between the<br />
Base and the Flier. During early training it is extremely important to work on both static<br />
and dynamic techniques to perfect these contacts.<br />
- Obtain the greatest area of pressure<br />
- Give a stable platform to the flier<br />
- Control and anticipate a lack of balance<br />
- Understand how to transfer force in an efficient manner<br />
- Adapt and personalize the areas of contact to suit both parties<br />
Hand to Hand Contact<br />
The main point of pressure is on the central part of the palm (fig 1). This point is at<br />
the top end of a straight line passing through the wrist, elbow and shoulder. The fingers<br />
are spread around the hands allowing a stable hold and it minimises the imbalance<br />
by way of controlled pressure.<br />
The thumb, the little finger and the third finger squeeze the palms together one<br />
against the other. (This will get rid of any empty spaces between the hands.)<br />
The first and second finger control front and back movement by way of pressure<br />
on the base of the forearms.<br />
fig1<br />
The flexion of the wrists is between 45° and 60°(fig 2 & 3). This positioning favours<br />
the alignment of the elbows and shoulders of the Base and the Flier.<br />
The contraction of the fingers should not in any way modify the angle of the wrists.<br />
Fig 2 Fig 3<br />
21<br />
6<br />
Manual for Acrobatics: Handstand, Training hand to hand, for handstand banquine
6<br />
Manual for Acrobatics: Handstand, hand to hand, banquine<br />
Consequences<br />
- For the Flier, handstand training is practiced on sloped sticks in order to make it as real<br />
as possible.<br />
- When the angle of the wrists is moved, there is a loss of alignment and therefore a loss<br />
of stability in the contact. When the angle approaches 90° (fig 4), or at the other end of<br />
the scale towards 0º (fig 5), the position of the body of the Base and/or the Flier, may<br />
change as a result. (example closing the shoulder angle, will cause a pronounced hollowing<br />
of the body, and a forwards movement of the Flier’s shoulders) and therefore, creating a<br />
lack of efficiency to the balance. We often notice this type of error when the Base is<br />
pressing from bent arms to straight arms (example fig 4 to fig 5, the Base lifts by pushing<br />
with the wrists, there is a change of angle).<br />
fig 4 fig 5<br />
The position of the hand is the natural extension of the forearm (fig 6). Holding this<br />
position avoids sideways movement of the point of contact (fig 7 & 8).<br />
fig 6 fig 7 fig 8<br />
Part2/ Hand to Hand Balancing<br />
Consequences fig 7 (most frequent)<br />
- For the Base: an inwards tilt of the hands causes a slight flexion of the arms and a slight<br />
backward movement of the shoulders, therefore there is a hollowing of the back and a<br />
rotation of the contact.<br />
- For the Flier: an inwards tilt of the hands causes a forwards rotation of the shoulders.<br />
22
Part2/ Training Hand for to handstand Hand Balancing<br />
Consequences fig 8<br />
- An outward tilt of the Base’s hands causes a slight flexion of the Flier’s arms.<br />
Hand to hand contact during a lift in a static routine or a throw in a tempo routine.<br />
The positioning of the Base’s arms is very important in order to give the Flier the best form<br />
of support. We often find two different positions (fig 9 & 10)<br />
fig 9 Fig 1<br />
Consequences<br />
- fig 9, keeping the elbows horizontal, in a slightly open position allows the hand to hand<br />
contact to be maintained straight above the Base’s chest. During the throw, all the forces<br />
exerted pass through the same vertical axis making this action highly efficient.<br />
- fig 10, the lower position of the elbows causes an outwards rotation of the Base’s wrists<br />
and a consequent hollowing of the back. During the lift or the throw, the Base’s back is<br />
hollow, which causes a break in alignment of arms/chest at the end of the technique. This<br />
transfer of force results in a lack of stability for the Flier.<br />
Contact hand to foot<br />
The mechanical principles and all the positions shown earlier regarding hand to hand contact<br />
are the same for hand to foot.<br />
The main point of support is on the central part of the palm (Base) and the foot (Flier).<br />
The angle of the Base’s wrist is identical. The Flier’s foot is slightly extended to get alignment<br />
between his knee and the Base’s elbow (fig 11).<br />
23<br />
6<br />
Manual for Acrobatics: Handstand, hand Training to hand, for handstand banquine
6<br />
Manual for Acrobatics: Handstand, hand to hand, banquine<br />
Fig 11<br />
Consequences<br />
- The Flier must get used to a standing position with the heels raised (example: standing<br />
on sloping sticks while keeping the body weight above the central part of the foot without<br />
leaning forward).<br />
- If the angle of the hands approaches 90º, the Flier’s weight is over his heels, his chest<br />
will lean forward, thus breaking the body alignment. If the angle approaches 0º, the Flier<br />
loses his forward support, bends his knees and falls forward.<br />
The fingers are spread around the foot allowing stability, maintaining contact by squeezing.<br />
The Flier’s toes are pressed against the wrist of the Base (fig 12).<br />
Fig 12<br />
Part2/ Hand to Hand Balancing<br />
- The thumb, the first, third and fourth fingers grip the foot against the palm.<br />
- The second finger is placed in the centre of the heel. This allows the heel to be held whilst<br />
giving a large area of support for the foot<br />
24
Part2/ Training Hand for to handstand Hand Balancing<br />
As for hand to hand contact, it is important to avoid sideways movement of the hands<br />
(Base) and the feet (Flier). Sideways movement often causes the Flier to lose balance.<br />
Hand to foot contact in throws (Tempo)<br />
Usually we find two types of contact during throws:<br />
1.The hand supports the back of the foot. The fingers are directed outwards, only<br />
the thumb is placed inwards. The ball of the foot rests on the Base’s shoulder (fig 13).<br />
fig 13<br />
2. The hand supports the whole foot. The fingers are spread in 3 directions (the thumb<br />
inwards, the first and second finger on the front part of the foot, the third and fourth finger<br />
outwards). The front of the foot rests on the first finger, the second finger, and the Base’s<br />
shoulder. (fig 14).<br />
fig 14<br />
25<br />
6<br />
Manual for Acrobatics: Handstand, hand Training to hand, for handstand banquine
6<br />
Manual for Acrobatics: Handstand, hand to hand, banquine<br />
Consequences<br />
In these 2 cases, the direction of the hands has a direct effect on the position of the elbows.<br />
fig 13, the elbows move towards each other and go lower than horizontal. During the Base’s<br />
lift, this movement is accentuated and the Flier is in support on his heels.<br />
fig 14, the elbows are slightly open and stay horizontal. During the Base’s lift, the position<br />
is kept and thus the Flier gets the maximum support.<br />
Consequences at the end of the throw.<br />
If the start position is fig 13, the end of the throw looks like fig 15.<br />
fig 15<br />
The Flier is supporting on his heels and cannot push with the front of his foot. The Flier’s<br />
alignment is broken (example: hips forward and hollow back).<br />
If the starting position looks like fig 14, the end of the throw is similar to fig 16.<br />
Fig 16<br />
Part2/ Hand to Hand Balancing<br />
26
Part2/ Training Hand for to handstand Hand Balancing<br />
The Flier can push right through the extension of the toes; therefore he ca control his body<br />
position and his flight.<br />
Some specific exercises.<br />
For the Flier:<br />
Balance on sloping sticks, alternately clenching and relaxing<br />
the fingers<br />
Standing (on 1 or 2 feet) on a wobble board (board for ankle rehabilitation)<br />
For the Base: With elastic strands curl the wrist.<br />
For both:<br />
With soft balls (juggling balls) or with specific climbing equipment, practice clenching and<br />
relaxing fingers without moving the wrist.<br />
These exercises improve the strength of the wrists, fingers and ankles. It is important to<br />
differentiate between the separate actions of the wrist and fingers during certain exercises.<br />
The most important thing is the harmony between the Base and the Flier during these skills.<br />
In conclusion<br />
The technique of these contacts has a direct effect on mastering skills. Evidently, the higher<br />
the level of performance the more important is the quality of these contacts.<br />
This article concentrates mainly on preparing pairs or beginner groups. It is extremely<br />
important during this period to concentrate on the strength of the contact.<br />
More advanced acrobats can afford to relax their grip, thanks to the perfection of their<br />
alignment, and the knowledge they have of working together.<br />
The quality of these contacts is obtained by the simultaneous action of the partners. The<br />
movements of one have consequences for the placement of the other. The Base and the<br />
Flier need to feel a strong bond in the grip of their hands and feet in order to progress<br />
and modify their position. Further more, there is an increase in confidence between the<br />
two.<br />
It is therefore necessary for the coaches and acrobats to spend a lot of time in understanding<br />
these contacts. Their improvement is based upon an exchange of sensations and analysis<br />
of the effects of each others movements. Beyond these purely technical criteria, the experience<br />
of the partners brings a familiarity of grip, therefore improving the unity of the group.<br />
The principal contacts are not the only considerations during early training. Other aspects<br />
are to be taken into account to guarantee a strong support:-<br />
Technical precision<br />
- Muscular strength (above all the Base)<br />
- Visual cues<br />
- Isolation of different parts of the body<br />
- Inner feeling<br />
Of course, other techniques of contact exist, which can be developed in further articles<br />
(example: hand to head contact, the grip called “banquine” for women’s group and men’s<br />
group etc).<br />
27<br />
6<br />
Manual for Acrobatics: Handstand, hand Training to hand, for handstand banquine
6<br />
Manual for Acrobatics: Handstand, hand to hand, banquine<br />
8/ Handstands<br />
Handstands Base Lying, Bent Arms(Stage 1)<br />
- This is a useful preparation for<br />
handstand<br />
- From the shoulderstand on feet<br />
the base bends his legs and<br />
starts to tip the weight back on<br />
to his hands<br />
- The base can help to maintain<br />
the balance with the feet.<br />
Straddle Jump to Handstand (Stage2)<br />
- This can be done either<br />
straddled as shown, tucked or<br />
piked.<br />
- It is essential that the flyer is<br />
used to performing this skill on<br />
blocks and sticks before<br />
attempting this<br />
- Base begins with bent arms<br />
and then straightens as the flyers<br />
centre of mass comes over the<br />
hands<br />
Handstand on shoulders<br />
- This is a simpler form of<br />
handstand starting from a pitch<br />
from’stage’<br />
- As the flyers centre of mass<br />
moves over the base’ shoulders<br />
the hands are taken to the flyers<br />
upper arms to add stability<br />
Handstand on shoulders (free)<br />
- A more advanced form of the<br />
above without the support from<br />
the base’ hands<br />
- The balance should first be<br />
gained with the base holding<br />
the arms, and then released<br />
when stable<br />
Part2/ Hand to Hand Balancing<br />
28
Part2/ Training Hand for to handstand Hand Balancing<br />
Handstand, jump from Shoulders,<br />
arms bent<br />
- The stability of the base is most<br />
important<br />
- The timing of the flyers jump<br />
and the base’ push is critical<br />
- The base arms are extended to<br />
begin and then settle once<br />
balance is achieved<br />
Preparation for handstand<br />
from Shoulders<br />
- half lift<br />
Handstand on straight arms<br />
- This is a more advanced form<br />
of the bent arms handstand and<br />
should not be attempted until the<br />
former is consolidated and stable<br />
- There should be a straight line<br />
from the base’ feet to the flyers<br />
feet<br />
Chest roll to handstand<br />
- This is a nice way of getting to<br />
handstand but it is not easy to<br />
stop the momentum of the roll<br />
29<br />
6<br />
Manual for Acrobatics: Handstand, hand Training to hand, for handstand banquine
6<br />
Manual for Acrobatics: Handstand, hand to hand, banquine<br />
Part2/ Hand to Hand Balancing<br />
Before attempting handstand on the base the flyer should be highly competent in handstand.<br />
One exercise for helping balance is shown below.<br />
Basic pitching techniques<br />
9/ Basic technique of pitch:<br />
Pitch stance<br />
The position of the base when pitching is personal and each individual must find a technique<br />
and stance that is comfortable and effective. Most pitchers like to keep their legs together<br />
or fairly close. This allows them to support the hands with the thighs. The only drawback<br />
of this method is that the back has to be bent forwards placing pressure on the spine and<br />
the extent of the knee bend is restricted by the flexion of the ankles. It is also possible to<br />
stand in a classical plie position with the feet wide and turned out. This allows the back<br />
to remain straight and is more stable in the bent leg position. However it does lot allow<br />
the support of the thighs on the hands and there is a danger of the flyer slipping through.<br />
Pitch stance with legs together Plie style pitch stance<br />
30
Part2/ Training Hand for to handstand Hand Balancing<br />
The hands can also be placed together in different ways, however, the most popular fashion<br />
is to place the back of one hand into the palm of the other and lock the thumbs together.<br />
Methods of practicing and timing the pitch<br />
Timing the lift<br />
- The flyer should straighten the<br />
body and allow the pitcher to lift<br />
upwards<br />
Using the legs and the arms<br />
- Here the base straightens the<br />
legs and lifts the arms<br />
- The flyer must stand up straight<br />
keeping the weight over the hands<br />
of the base<br />
Tempo jump for direction and timing<br />
- This a direct progression from<br />
above<br />
- The pitch is taken a bit further<br />
until the flyer leaves the hands<br />
- The jump should be straight<br />
upwards<br />
- The base should catch the flyer<br />
at the hips on landing<br />
10/ Mounting to stand on hands:<br />
Pitch to stand on hands facing base<br />
- This is also a direct progression<br />
from above<br />
- The top hand of the base and the<br />
pitching foot of the flyer should<br />
correspond so that the foot doesn’t<br />
actually have to leave the hand<br />
- Notice how the base is standing<br />
up until the moment the flyer is put<br />
into stand, when he squats<br />
31<br />
6<br />
Manual for Acrobatics: Handstand, hand Training to hand, for handstand banquine
6<br />
Manual for Acrobatics: Handstand, hand to hand, banquine<br />
Pitch half turn to stand<br />
- As above the hand and foot<br />
must correspond<br />
- The flyers weight must be above<br />
the base’ hands during the turn<br />
11/ Mounting to handstand<br />
Forwards mount to handstand<br />
(straddled)<br />
- Start by lifting the flyer to<br />
support above the head<br />
- Then use half lift as from<br />
shoulders above<br />
- Flyer must raise hips sharply<br />
from the floor<br />
Forwards mount to handstand<br />
(straight)<br />
- Base can help the flyer by<br />
pushing on the hips from<br />
position 3<br />
- Requires strength and good<br />
body tension from flyer<br />
Forward mount from behind base<br />
- Base must get the hands in<br />
position for support as soon as<br />
possible<br />
- Flyer must get the shoulders<br />
and hips over the point of<br />
support as soon as possible<br />
Preparation for tuck through to<br />
handstand<br />
Part2/ Hand to Hand Balancing<br />
32
Part2/ Training Hand for to handstand Hand Balancing<br />
Same action with pike<br />
Tuck through to handstand<br />
- The pair must be comfortable<br />
with lifting to support on the<br />
hands<br />
- Flyer must fold very tight to<br />
avoid kicking the base<br />
- As the flyer squats through the<br />
base straightens the arms then<br />
settles<br />
Swing through legs and tuck to<br />
handstand<br />
(cannonball) (Part 1)<br />
- This is an advanced move and<br />
should not be attempted without<br />
the correct background and the<br />
presence of an experienced<br />
teacher<br />
Cannonball (Part 2)<br />
12/ Movements for the base<br />
Roulade (1 st half)<br />
- Turning right, the left leg is<br />
crossed over the right and the left<br />
arms remains extended as the<br />
right one bends<br />
- The right elbow then forms a<br />
support<br />
- The left elbow is supported on<br />
the base’ side<br />
33<br />
6<br />
Manual for Acrobatics: Handstand, hand Training to hand, for handstand banquine
6<br />
Manual for Acrobatics: Handstand, hand to hand, banquine<br />
Roulade (2 nd half)<br />
- The right leg is bent out to the<br />
side to form a support for the turn<br />
- The right arm is extended and<br />
then placed on the right hip<br />
- As the turn continues, the left<br />
elbow forms a support and the<br />
right arm continues to extend,<br />
followed by the left as the move<br />
is completed<br />
Moving from lying to sitting to stand and back:<br />
13/ Beginning one arm handstand<br />
Part2/ Hand to Hand Balancing<br />
It is an obvious pre-requisite that the flyer must be capable of holding 1 arm handstand<br />
on blocks and sticks with no problem. The base must also be strong enough to be able<br />
to hold the flyer on one hand.<br />
1 arm handstand preparation<br />
- The flyer’s weight is transferred<br />
to one arm<br />
- The flyer bends the other arm as<br />
the base straightens his<br />
- Weight is gradually taken from<br />
the non-supporting hand<br />
- Both sides are trained<br />
34
Part2/ Training Hand for to handstand Hand Balancing<br />
Development from above<br />
- The arm action for the flyer is<br />
exactly the same as above when<br />
the catcher is lying.<br />
14/ Flighted movements<br />
All of these movements are advanced and should not be attempted unless the pair are<br />
very strong in their basic skills and balances. Begin using a lunge system for support.<br />
When ready this can be taken off and the teacher can hand spot the skill.<br />
35<br />
6<br />
Manual for Acrobatics: Handstand, hand Training to hand, for handstand banquine
6<br />
Manual for Acrobatics: Handstand, hand to hand, banquine<br />
Half back somersault to stand<br />
on shoulders<br />
Pitch from stand on shoulders<br />
to handstand (Cascade)<br />
Pitch from handstand back to<br />
stand (Courbette)<br />
Front somersault dismount<br />
Back somersault, shoulders<br />
to shoulders<br />
Back somersault hands to hands<br />
Part2/ Hand to Hand Balancing<br />
36
BANQUINE<br />
Part3/ Banquine<br />
The basis of Banquine or platform pitching is a group of minimum three people, with two<br />
or more bases or catchers and a flyer. The catchers form a platform with their arms and<br />
hands which the flyer uses as a take-off position for various somersaults and other tricks.<br />
Most Banquine groups also include some balancing and at an advanced level somersaults<br />
are performed from two high balances on the platform. Much of the material performed<br />
in circus is also shown in the sport of Acrobatic Gymnastics.<br />
1/ Safety:<br />
Obviously the flyer is presented with the most danger during the performance of this<br />
discipline and so his or her safety must be of paramount importance to the catchers.<br />
However, there are also inherent dangers for the catchers if the preparation is not correct.<br />
Catchers safety implications:<br />
1. Correct posture is necessary to avoid potential back injuries. It is also important<br />
to avoid painful clashes of head that the body is kept upright especially during<br />
catches. Some pairs offset their feet to avoid clashes.<br />
2. Correct pitching technique is also very important, the strongest muscles should be<br />
used and good timing is essential.<br />
3. Progressive and correct physical conditioning should play a large part in the training<br />
of the catchers. Insufficient strength will lead to injury on the part of the catcher<br />
and potential dangers for the whole group.<br />
4. It is the catchers role to ensure the safety of the flyer. They must be aware of that<br />
at all times.<br />
Flyers Safety Implications:<br />
1. The flyer should not try to balance themselves but should allow the catchers to do<br />
it.<br />
2. He or she should have excellent acrobatic experience and aerial awareness.<br />
3. The flyer should be aware of the catchers at all times and have respect for them.<br />
4. All skills should be developed and perfected in rebound situation such as a trampoline<br />
before transferring them to the pitching platform.<br />
Group Safety Implications:<br />
1. All new skills should be developed gradually and through repeatable stages.<br />
2. Communication between the members of the group is essential.<br />
3. The group should have set signals for timing etc.<br />
4. Basic exercises should be practised every day for warm-up to develop timing and<br />
coordination of the separate members of the group<br />
5. Whenever necessary safety devices such as lunges, spotters and safety mats must<br />
be used.<br />
37<br />
6<br />
Manual for Acrobatics: Handstand, hand to hand, banquine
6<br />
Manual for Acrobatics: Handstand, hand to hand, banquine<br />
2/ Catchers stance and grip.<br />
Stance<br />
When platform pitching, the catchers should stand with their feet forming the four corners<br />
of a square. Feet should be slightly wider than shoulder width although this can be<br />
altered when one catcher is significantly taller than the other. In this case the taller one<br />
will have his legs wider to ensure a flat platform. They should also be turned out slightly,<br />
so that when the knees are bent they move outwards and not toward each other. (See<br />
fig 1) It is possible to have the feet offset to avoid clashing heads and knees. The upper<br />
body must remain upright throughout the pitching and catching process.<br />
Fig 1 - Platform pitching stance<br />
Grip<br />
Each catcher holds his or her own wrist and the wrists of the partner forming a square<br />
‘platform’ for the flyer to stand on. The conventional grip is with the thumbs around the<br />
wrist (on the bottom), but it is also possible to hold with the thumbs on top. This can<br />
be more comfortable for catching and throwing because as the arms are lifted above the<br />
head the thumb is pushed downwards. However, the thumbs round grip is generally<br />
thought to be stronger. An alternative possibility is to have the thumb on your own wrist<br />
on top and that on the partner’s wrist at the bottom. The catchers should form a platform<br />
just big enough for the flyers feet, if the wrists are held too high up this creates a bigger<br />
platform but also leaves a hole in the middle.<br />
Fig 2 - Platform grip – showing thumbs around technique<br />
38<br />
Part3/ Banquine
Part3/ Banquine<br />
3/ Getting the flyer onto the platform:<br />
This can be achieved in a number of ways:<br />
The most efficient and popular way is for the catchers to plie to make the platform lower,<br />
the catcher places his or her hands on the shoulders of the catchers and jumps onto the<br />
platform. It is also possible to put the hands on the catcher’s heads. Much depends upon<br />
the relative sizes of the group. The flyer jumps into squat on the platform and as the<br />
catchers straighten their legs the flyer straightens as well to stand.<br />
Fig 3 – Flyer mounting<br />
The flyer should have body tension but should not be stiff. Good posture is essential,<br />
the back should not be hollow and the legs should be straight but not stiff.<br />
Mounting the platform by stepping on, the flyer can either use the catchers heads or their<br />
shoulders for support<br />
4/ Timing exercises for pitching:<br />
There are a number of timing drills and exercises. These should be practised constantly<br />
even when the group are quite experienced. They serve as a good warm-up and will<br />
guarantee the efficiency of the group.<br />
Exercise 1:<br />
During this drill the flyer remains still and the catchers bend and straighten their legs.<br />
The catchers arms stay in the original platform position and do not lift the flyer.<br />
Exercise 2:<br />
The flyer bends and straightens whilst the catchers remain still<br />
Exercise 3:<br />
The catchers bend into plie and the flyer bends as well, pushing back into platform<br />
position<br />
39<br />
6<br />
Manual for Acrobatics: Handstand, hand to hand, banquine
6<br />
Manual for Acrobatics: Handstand, hand to hand, banquine<br />
Exercise 4:<br />
The catchers bend the legs and straighten pushing the flyer upwards and then back into<br />
platform position with the legs bent<br />
Exercise 5:<br />
This involves a tempo action with the catchers bending the legs in preparation for the pitch<br />
and then returning to platform position immediately followed by another pitch to high arms<br />
which is held. So the catchers hold the flyer at arms length. This can then be repeated<br />
again.<br />
5/ Balancing drills:<br />
Part3/ Banquine<br />
1. With the flyer standing on the platform the catchers must put him or her off balance<br />
and then move to regain balance.<br />
2. As a preliminary balancing drill for the flyer the catchers hold a weight lifting bar<br />
between them and the flyer stands on this. The catchers must keep the balance.<br />
40
Progress to holding the bar on the shoulders.<br />
6/ Trampoline Exercises<br />
Any potential flyer for a Banquine group if they don’t have a solid background in trampoline<br />
then they should spend a lot of time practising on it. Not only is it a great way to improve<br />
your aerial awareness, which is of great importance to the flyer but it can also help<br />
develop the correct posture, timing and technique for take-offs and landing. Following<br />
is a series of exercises on the trampoline devised by Jack Kelly, a UK National coach for<br />
trampolining. The exercises will help any flyer to understand the technique of takeoff ,<br />
training the correct posture at the same time.<br />
Exercise 1 (Fig 2)<br />
In order to develop an appreciation of arm efficiency ask the gymnast to try jumping with<br />
their arms held tightly by the sides of their body. As the Joni Mitchell song says "You<br />
don't know what you got till it's gone!" This is an excellent exercise for teaching an<br />
appreciation of correct posture, balance and optimum tension throughout the take off<br />
and landing phases as well as focusing attention on thevalue of the arms currently out<br />
of use. No reactive arm movement is allowed and the performer should be stopped as<br />
soon as any arm movement is detected. The exercise exposes any small loss of balance<br />
due to postural inaccuracy which will cause the gymnast's arms to break away. Aim for<br />
three sets of ten bounces and a percentage score can be given for accuracy with the<br />
results recorded in order to map progress and provide motivation.<br />
Initiate bed<br />
depression by leg<br />
drive<br />
Whilst keeping<br />
upright posture.<br />
Arms tight to sides.<br />
Exercise 2 (Fig 3)<br />
Part3/ Banquine<br />
As bed recoils,<br />
maintain posture<br />
And arm position.<br />
fig 2<br />
To test the effectiveness of a straight arm swing, stand upright on the trampoline with<br />
the knees locked so that no leg push is possible. Start rotating the arms in small but<br />
vigorous backward circles. You will find that a correspondingly small but distinct reaction<br />
occurs in the bed causing the body to rise and fall. As this reaction continues, gradually<br />
increase the size of the arm circling, making sure that the rhythm is sympathetic to the<br />
bed's reaction time. The principle is similar to gradually building up height on a child's<br />
swing. It is essential that the knees are locked so that no assistance is given by the leg<br />
action. Ideally the feet will be kept flat with no toe pointing so that the only height gained<br />
comes from the rhythmic work of the arms. The coach needs to check that the performer<br />
maintains a "long" arm throughout and should be alert for an elbow bend developing<br />
at the bottom of the bounce. As the well timed rhythmic arm circling continues to grow<br />
41<br />
Maintain tight form<br />
position<br />
throughout flight.<br />
Do not Permit<br />
reactive arm<br />
movement.<br />
6<br />
Manual for Acrobatics: Handstand, hand to hand, banquine
6<br />
Manual for Acrobatics: Handstand, hand to hand, banquine<br />
larger, the height above the bed will increase until the arms are reaching directly above<br />
the head. Aim for ten jumps after the full arm swing has been attained. Stop the gymnast<br />
of any leg action is detected and coaches will find that this is best monitored with<br />
gymnasts wearing shorts or a leotard. Once again the ten bounce format permits the<br />
allocation of a percentage score for monitoring purposes.<br />
Keep the knees<br />
locked and start<br />
From a still bed<br />
with small<br />
Vigorous backward<br />
arm circles.<br />
7/ Exercise 3<br />
Begin as in exercise 2 with the knees locked and using only the arms to gain height,<br />
gradually introduce a push with the legs until full jumping height is attained then continue<br />
for another ten jumps. Stop the gymnast if the arm action ceases to be long and rhythmical.<br />
Again the ten bounce format is for monitoring and specificity. Although I have stressed<br />
the "circular" action of the arms, this is an over simplification because as the arms<br />
gradually reach higher, the limb track becomes more elliptical. Indeed it is highly undesirable<br />
to maintain a circular path as this will cause the arms to start their downward journey<br />
too far behind the line of the body causing the legs to swing back in flight creating an<br />
arch in the back often followed by a reactive piking prior to landing with risk of instability<br />
once contact has been regained. (Fig 4)<br />
Fig 4<br />
Keeping knees<br />
locked and feet<br />
flat, gradually<br />
increase height<br />
and vigour of the<br />
arm swing In time<br />
with bed reaction.<br />
fig 3<br />
42<br />
Part3/ Banquine<br />
Full arm swing<br />
achieved with<br />
knees locked and<br />
feet flat.
Equally unacceptable is the stopping of the arms at the top of the jump followed by a<br />
reactive forward motion causing a dishing during the descent phase (Fig 5)<br />
Fig 5<br />
Part3/ Banquine<br />
The arms should therefore return from the highest point only slightly behind the line of<br />
the body to maintain the integrity of the long arm swing concept but without creating<br />
either of the unwanted reactions described (Fig 6).<br />
Fig 6<br />
In my next article I will look more closely at the work of the arms during somersault take<br />
offs and landings with a particular focus on the contentious matter of "arm setting".<br />
Basic Platform Pitches<br />
Pitch to stand on floor<br />
This should be practiced first with the flyer jumping from a box or similar platform, so<br />
that the catchers can master the correct catch technique.<br />
Preliminary exercise for perfecting the catch technique on the arms of the flyer. This allows<br />
the performer to control her jump and remain balanced for the catchers to practice.<br />
43<br />
6<br />
Manual for Acrobatics: Handstand, hand to hand, banquine
6<br />
Manual for Acrobatics: Handstand, hand to hand, banquine<br />
In the picture sequence above the group use a tempo preparation before bending for<br />
the pitch. Notice that:<br />
1. The upper bodies of both catchers remain straight and upright throughout the<br />
pitch and the catch<br />
2. Both catchers are prepared to receive the flyer right from the moment she takes<br />
off, with the arms above the head.<br />
3. The catchers take the flyer at the wrist and the upper arm to ensure stability on<br />
landing.<br />
Pitch to sit in cradle<br />
In this skill, the flyer is caught by the catchers with one hand under the upper leg or<br />
knee and the other at the waist or just below. In this example the catchers are bending<br />
the knees far more than the trio in the earlier examples. This is probably because of the<br />
difference in size and weight of the flyer and the need to put more energy into the pitch.<br />
Somersault dismount from platform<br />
44<br />
Part3/ Banquine
Part3/ Banquine<br />
Somersault to sit in cradle<br />
Somersault to return to platform<br />
Cascade and Courbette:<br />
Cascade<br />
Cascade entails jumping from stand into handstand. Obviously, the flyer must be strong<br />
in handstand<br />
45<br />
6<br />
Manual for Acrobatics: Handstand, hand to hand, banquine
6<br />
Manual for Acrobatics: Handstand, hand to hand, banquine<br />
Courbette<br />
Courbette involves the opposite of the Cascade and the flyer is pitched from handstand<br />
to stand<br />
8/ Pitching from “stage”<br />
This form of pitching involves the catchers standing side by side. The flyer puts one foot<br />
into each of the cupped hands of the catchers, with the hands either on the catcher’s<br />
heads or the shoulders. As with the pitches from platform the tempo and timing of the<br />
pitch needs to be practised and perfected before progressing to more difficult skills. The<br />
technique for pitching from this position has already been discussed in the acrobalance<br />
section, but the type of skills performed from this pitch are different to those of acrobalance<br />
and therefore a number of different hand positions are open to the pitchers. During the<br />
practical sessions at the FEDEC module in Turin we experimented with a different hand<br />
position with some success. Imagine how each catcher gets their hands into the position<br />
to make a platform, by holding their own wrist. This in itself can make a good position<br />
for pitching from stage, as the hands can be lifted right above the head without splitting.<br />
It also provides a good base for the flyer’s foot.<br />
Getting into the position and practising the tempo:<br />
46<br />
Part3/ Banquine
As is clear from the pictures the flyer is helped into position by the catchers with the catcher<br />
on the right lifting the leg as the foot is in the left catchers hands and guiding it into the<br />
cupped hands. The catchers straighten as if to throw and the flyer uses the support of their<br />
heads for balance, making sure that the weight stays over the catchers.<br />
Pitch to stand:<br />
Part3/ Banquine<br />
The same tempo action as above is followed by the flyer releasing the heads of the catchers<br />
standing up and being pitched in a straight jump directly upwards. The landing is caught<br />
by the catchers in exactly the same way as from the platform.<br />
Somersault to stand<br />
47<br />
6<br />
Manual for Acrobatics: Handstand, hand to hand, banquine
6<br />
Manual for Acrobatics: Handstand, hand to hand, banquine<br />
Pitch somersault to stand on platform<br />
48<br />
Part3/ Banquine<br />
This involves pitching the performer from ‘stage’, the catchers must then turn and make a<br />
platform ready to receive the flyer. It is important for the flyer to jump directly upwards<br />
and not lean back.