Create successful ePaper yourself
Turn your PDF publications into a flip-book with our unique Google optimized e-Paper software.
www.QuiltingTreasures.com<br />
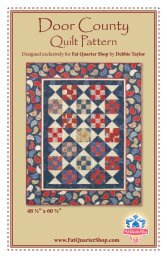
<strong>Creepers</strong> <strong>Peepers</strong><br />
Finished Size: 61 ” x 61 ”<br />
22104 G 22107 E 22108 G<br />
(inc binding)<br />
22102 JE<br />
21111 J 22108 O<br />
22105 E<br />
(inc backing)<br />
© Janet Wecker Frisch<br />
FABIRC<br />
REQUIREMENTS<br />
Design Yards<br />
22104 G<br />
(5 motifs)<br />
⅔ or<br />
1 repeat<br />
22107 E ½<br />
22108 G<br />
(inc binding)<br />
⅔<br />
22102 JE 2<br />
21111 J ⅞<br />
22108 O ½<br />
22105 E<br />
(backing)<br />
4
<strong>Creepers</strong> <strong>Peepers</strong><br />
Finished quilt size: 61 ” x 61 ”<br />
Finished block size: 11 ¼” x 11 ¼”<br />
Number of blocks: 4 pieced blocks and<br />
5 panel blocks<br />
Skill level: Intermediate<br />
Cutting Directions: WOF = Width of Fabric<br />
22104-G Large Blocks<br />
• Cut (5) 11 ¾” squares from the Large Blocks<br />
panel, centering motifs in the squares.<br />
22102-JE Character Stripe<br />
• Cut (4) identical 65” stripe motifs along the length<br />
of the stripe for wide borders. Four of the stripe<br />
motifs appear across the width of the fabric.<br />
• Cut these motifs apart through the center of the<br />
orange area separating the motifs. The cut strips<br />
should be approximately 10¾” wide to finish at<br />
approximately 10 ¼”.<br />
22107-E Cream Music Score<br />
• Cut (1) 4 ⅝” x WOF strip. Cut the strip into (8) 4<br />
⅝” squares for pieced blocks.<br />
• Cut (1) 4 ¼” x WOF strip. Cut the strip into (4) 4<br />
¼” squares for pieced blocks.<br />
• Cut (2) 1 ¾” x WOF strips for side units in the<br />
pieced blocks.<br />
22108-G Green Blender<br />
• Cut (1) 1 ½” x WOF strip. Cut the strip into<br />
(16) 1 ½” squares for sashing.<br />
• Cut (7) 2 ½” x WOF strips for binding.<br />
22108-O Orange Blender<br />
• Cut (1) 11 ¾” x WOF strip. Cut the strip into<br />
(24) 1 ½” x 11 ¾” strips for sashing.<br />
21111-J Black Spider Webs<br />
• Cut (1) 4 ⅝” x WOF strip. Cut the strip into<br />
(8) 4 ⅝” squares for pieced blocks.<br />
• Cut (4) 1 ¾” x WOF strip for side units in the<br />
pieced blocks.<br />
•Cut (7) 2” x WOF strips for outer border.<br />
22105-E Owl Toss<br />
• Cut (2) 70” strips along the length of fabric.<br />
www.QuiltingTreasures.com<br />
<strong>Creepers</strong> <strong>Peepers</strong><br />
A Blocks:<br />
1. Sew a 1 ¾”-wide cream music score strip<br />
between (2) 1 ¾”-wide black spider webs strips to<br />
make a black/cream/black strip set. Press seams<br />
toward the black strips. Repeat to make a second<br />
strip set. Crosscut the strip sets into<br />
(16) 4 ¼” side units. Diagram 1.<br />
2. Mark a diagonal line from corner to corner on the<br />
wrong side of each 4 ⅝” cream music score square.<br />
Place a marked square right sides together with a<br />
4 ⅝” black spider webs square and stitch ¼” on<br />
each side of the marked line. Cut apart on the<br />
marked line, open the stitched units and press with<br />
seams toward the black triangles to complete 2<br />
corner units. Repeat to make a total of 16 corner<br />
units. Diagram 2.<br />
3. To complete 1 A block, sew a side unit to<br />
opposite sides of a 4 ¼” cream music score square<br />
to make the center row. Press seams toward the<br />
cream square. Diagram 3.
4. Sew a corner unit to opposite sides of a side unit<br />
to complete the top row. Repeat to make the bottom<br />
row. Press seams toward the corner units.<br />
Diagram 4.<br />
5. Sew the center row between the top and bottom<br />
rows to complete the block. Press seams toward the<br />
center row. Diagram 5.<br />
6. Repeat steps 3–5 to complete a total of<br />
4 A blocks.<br />
Quilt Assembly:<br />
1. Referring to the quilt diagram or photo, join 1<br />
A block, (2) 11 ¾” Large Block squares and (4) 1<br />
½” x 11 ¾” orange blender strips to make the top<br />
row, starting and ending with an orange strip. Press<br />
seams toward the orange strips. Repeat to make a<br />
second block row.<br />
2. Join 2 A blocks with (1) 11 ¾” Large Block<br />
square and (4) 1 ½” x 11 ¾” orange blender strips to<br />
make the center block row, starting and ending with<br />
an orange strip. Press seams toward the<br />
<strong>Creepers</strong> <strong>Peepers</strong><br />
orange strips.<br />
3. Join (3) 1 ½” x 11 ¾” orange blender strips with<br />
(4) 1 ½” green blender squares to make a sashing<br />
row. Press seams toward the orange strips. Repeat<br />
to make a total of 4 sashing rows.<br />
4. Join the block rows and the sashing rows,<br />
beginning and ending with a sashing row, to<br />
complete the quilt center. Press seams toward the<br />
sashing rows.<br />
5. Join the 2” x 42” strips black spider webs on the<br />
short ends to make 1 long strip. Press seams to<br />
1 side. Cut the strip into (4) 65” strips.<br />
6. Sew a black strip to the cream stripe edge of<br />
each 11”- wide Character Stripe strip to make wide<br />
border strips. Press seams toward the black strips.<br />
7. Center and sew a wide border strip to each side<br />
of the quilt center, starting and stopping stitching<br />
¼” from corners of the quilt top. Miter corner seams<br />
and trim excess to ¼”. Press seams in the mitered<br />
seam open and the long seams toward the border<br />
strips.<br />
8. Remove the selvage edges from the backing<br />
pieces. Join the pieces on the long edges with a ½”<br />
seam allowance. Press seam open. Trim the side<br />
edges to make a 70” x 70” backing piece.<br />
9. Layer, quilt and bind, using your favorite method<br />
and the green blender binding strips, to complete<br />
the quilt.<br />
While all possible care has been taken to ensure the accuracy of<br />
this pattern, we are not responsible for printing errors or the way in<br />
which individual work varies.<br />
www.QuiltingTreasures.com Not for Resale/Winter 2012