Tuner Style (Item no.: 25168) - Carrera
Tuner Style (Item no.: 25168) - Carrera
Tuner Style (Item no.: 25168) - Carrera

You also want an ePaper? Increase the reach of your titles
YUMPU automatically turns print PDFs into web optimized ePapers that Google loves.
<strong>25168</strong> TUNER STylE<br />
Montage- und Betriebsanleitung<br />
Assembly and operating instructions<br />
Instructions de montage et d’utilisation<br />
Instrucciones de uso y montaje<br />
Instruções de montagem e modo de utilização<br />
Istruzioni per il montaggio e l’uso<br />
Montage- en gebruiksaanwijzing<br />
Monterings- och bruksanvisning<br />
Asennus- ja käyttöohjeet<br />
Montajse- og bruksanvisning<br />
Ősszeszerelési és használati útmutató<br />
Instrukcja obsługi i montażu<br />
Návod na montáž a pre prevádzkuo<br />
Návod na montáž a pro provoz<br />
Ръководство за монтаж и експлоатация<br />
Mоνтάζ και Оδηγία χρήσης<br />
Instrucţiuni de montaj şi de utilizare<br />
Monterings- og driftsvejledning<br />
安装和使用说明<br />
取扱説明書取扱説明書の内容は予<br />
조립과 작동 방법<br />
Montaj ve işletme kılavuzu<br />
Инструкция по монтажу и эксплуатации
2<br />
E<br />
Verpackungsinhalt · Contents of package · Contenu du carton · Contenido de la caja · Conteúdo<br />
da embalagem · Contenuto della confezione · Verpakkingsinhoud · Innehållet i förpackningen<br />
Pakkauksen sisältö · Innholdet i pakningen · A csomag tartalma · Zawartość opakowania<br />
Obsah balenia · Obsah balení · Съдържание на опаковката · Περιεχόμενα συσκευασίας<br />
Conţinutul ambalajului · Emballageindhold · 包装内容 · 梱包内容 · 포장내용물<br />
· Ambalaj içeriği · Содержимое картона<br />
<strong>25168</strong> TUNER STylE<br />
B<br />
B<br />
B<br />
B<br />
A A A<br />
G<br />
F<br />
A<br />
1x 1x<br />
7x 8x<br />
A B<br />
F<br />
A<br />
G<br />
F F<br />
C<br />
A<br />
B B<br />
Opel Trademarks licensed to<br />
Stadlbauer Spiel- und Freizeitartikel GmbH.<br />
Ford Oval and nameplates are registered<br />
trademarks owned and licensed by Ford Motor<br />
Company. Manufactured by Stadlbauer Spiel-<br />
und Freizeitartikel GmbH. www.ford.com<br />
A<br />
B<br />
B<br />
1x 60°/44 cm/17.32 inch<br />
C<br />
1x 180°/126 cm/49.61 inch<br />
D<br />
1x 240°/168 cm/66.14 inch<br />
E<br />
Ausbauvorschläge · Proposals for extension · Suggestions d‘extension · Propuestas de ampliación<br />
Propostas de expansão · Proposte di ampliamento · Uitbreidingsvoorstellen · Monteringsförslag<br />
Rakennelmaehdotuksia · Strekningsforslag · Kiépítési javaslatok · Propozycje rozbudowy<br />
Návrhy výstavby · Návrhy výstavby · Предложения за демонтаж · Προτάσεις επέκτασης<br />
Propuneri de asamblare · Udvidelsesforslag · 多项扩充建议 · 拡張提案 · 기타 조립 예<br />
· Genişletme önerileri · Предложения по расширению<br />
<strong>25168</strong> + 26953<br />
D<br />
2x<br />
G<br />
4x<br />
2x<br />
40x<br />
28x<br />
<strong>25168</strong> + 26953 + 20509<br />
1x<br />
2x<br />
3x<br />
2x<br />
F<br />
4x
6<br />
Welcome<br />
Welcome to the Team <strong>Carrera</strong>!<br />
These operating instructions contain important information regarding<br />
the assembly and operation of your Evolution racetrack. Please<br />
read them carefully and keep them in a safe place afterwards.<br />
If you have any queries, please do <strong>no</strong>t hasitate to contact our distributor<br />
or visit our websites:<br />
www.carrera-toys.com · www.carreraclub.com<br />
Please check the contents for completeness and possible transport<br />
damage. The packaging contains important information and should<br />
also be retained.<br />
We hope you will derive a lot of pleasure from your new <strong>Carrera</strong><br />
Evolution track.<br />
Safety instructions<br />
• WARNING! Not for children under 36 months. Danger of suffocation<br />
due to small parts which can be swallowed by children.<br />
Attention: Functional clamping danger.<br />
• WARNING!<br />
This toy contains magnets or magnetic components. Magnets sticking<br />
together or becoming attached to a metallic object inside the human<br />
body can cause serious or fatal injury. Seek immediate medical<br />
help if magnets are swallowed or inhaled.<br />
• The transformer is <strong>no</strong>t a toy! Do <strong>no</strong>t short-circuit the transformer’s<br />
connections! Note to parents: Regularly inspect the transformer for<br />
damage to the cable, plug or housing! Only operate the toy with recommended<br />
transformers! The transformer may <strong>no</strong> longer be used<br />
if it is damaged! Only operate the racetrack with a transformer! If<br />
play is interrupted for longer periods, it is recommended to separate<br />
the transformer from the power supply. Do <strong>no</strong>t open transformer or<br />
speed controller housings!<br />
Important <strong>no</strong>te to parents:<br />
Transformers and power supply units are <strong>no</strong>t suitable to be used as<br />
toys. The use of such products needs to be constantly supervised<br />
by the parents.<br />
• Regularly check the track and cars for damage to cables, plugs<br />
and housings! Replace defective parts.<br />
• The car racetrack is <strong>no</strong>t suitable for outdoor operation or operation<br />
in wet locations! Keep away from liquids.<br />
• Do <strong>no</strong>t place any metal parts onto the track to avoid short-circuits.<br />
Do <strong>no</strong>t place the track in the immediate vicinity of delicate objects,<br />
as these could be damaged by cars hurled from the track.<br />
• Pull the plug before cleaning the racetrack! Only use a damp cloth<br />
for cleaning, <strong>no</strong> solvents or chemicals. When it is <strong>no</strong>t in use, store<br />
the track in a dry and dust-protected location, preferably in the original<br />
cardboard box.<br />
• Do <strong>no</strong>t operate race track at face- or eye-level – risk of injury due<br />
to cars being catapulted off the track.<br />
Note:<br />
The vehicle may only be operated again in a completely assembled<br />
condition. Assembly may only be carried out by an adult.<br />
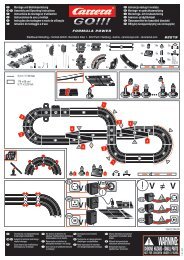
Contents of package<br />
1 Opel GT Steinmetz <strong>Tuner</strong> 1<br />
1 Ford Capri RS „<strong>Tuner</strong> 3“<br />
7 Standard straights<br />
1 Connecting section<br />
8 Curves 1/60°<br />
2 Mech. speed controllers<br />
1 Transformer<br />
Guardrails<br />
Replacement contacts<br />
Accessories<br />
Instructions<br />
Dimensions when assembled: 217 x 139 cm / 7.12 x 4.56 ft.<br />
Track length: 5,3 m / 17.39 ft.<br />
Assembly instructions<br />
1 4<br />
2 3<br />
1 + 2 + 3 Before assembling please insert the connecting clips<br />
in the track as shown in figure 1 . Stick tracks together on a flat<br />
base. Move the connecting clips according to figure 2 in direction<br />
of the arrow until they audibly snap in. The connecting clip may also<br />
be inserted later. The connecting clips can be removed into both<br />
directions by simply pressing down the clamped <strong>no</strong>se (see fig. 3 ).<br />
4 Fastening: To fasten the track sections on a board, it is necessary<br />
to use the track section fasteners (<strong>Item</strong> <strong>no</strong>. 85209, <strong>no</strong>t contained<br />
in the package).<br />
Note:<br />
Carpeting is <strong>no</strong>t a suitable foundation on which to build the track because<br />
of static charging, formation of fluff and ready inflammability.<br />
Guard Rails and Supports<br />
1 2<br />
3 4<br />
1 Guard rails: Guard rail mounts are fitted by tilting them upwards<br />
onto the verge of the track.<br />
2 + 3 Supporting raised sections: The shank of the ball pivot is<br />
to be inserted into the square slots provided on the underside of the<br />
track. The supports can be made higher by using the extensions.<br />
The pedestal of the supports can be screwed to a base if required<br />
(screws <strong>no</strong>t included).<br />
4 Supporting steep curves:<br />
Slanting supports of the right height are provided to support steep<br />
curves. Fix the <strong>no</strong>nadjustable supports at the beginning and end of<br />
the curves. Insert the heads of the supports in the round slots of the<br />
underside of the track.<br />
1<br />
2<br />
Electrical connection<br />
The connecting rail is the straight track with sockets for the transformer<br />
and hand-held control unit.<br />
1 The transformer’s plugs are plugged into the central socket.<br />
2 The hand-held control unit’s plugs are plugged into the external<br />
sockets.<br />
Care should be taken that the + and – symbols on the plugs agree<br />
with those on the connecting rail.<br />
Advice: The toy must <strong>no</strong>t be connected to extraneous electrical<br />
equipment, plugs, cables or other objects: short-circuits and power<br />
surges can thus be avoided. The <strong>Carrera</strong> Evolution racing track only<br />
functions faultlessly with the original <strong>Carrera</strong> Evolution transformer.<br />
4<br />
11<br />
1<br />
8<br />
10<br />
Car components<br />
9<br />
1 Body, spoiler<br />
2 Engine<br />
3 LED cover<br />
4 Tyres<br />
5 Rear axle<br />
6 Chassis<br />
7 Guide keel<br />
8 Double sliding contact<br />
9 Front axle<br />
10 Car board with reversing switch<br />
11 Front light board<br />
12 Rear light board<br />
7<br />
Vehicle construction depends on the model.<br />
3<br />
4<br />
The designation of the individual parts may <strong>no</strong>t be used as<br />
order numbers.<br />
6<br />
4<br />
2<br />
5<br />
12<br />
4
Preparation of start<br />
1 2<br />
3<br />
This <strong>Carrera</strong> Evolution vehicle ideally matches the <strong>Carrera</strong> track<br />
system scale 1:24.<br />
1 Make sure that the car’s guide keel is located inside the track<br />
slot and that the double sliding contact is in contact with the current<br />
carrying track. Place the cars onto the connecting track.<br />
2 + 3 Optimally setting up the grinders:<br />
To ensure proper and continuous driving, slightly fan out the ends<br />
of the contact brushes 2 and bend them towards the track as per<br />
fig. 3 . Only the end of the contact brush should have contact to the<br />
track and may be cut off slightly in case of wear. Dust and abrasion<br />
should be removed from track material and sliding contacts from<br />
time to time.<br />
During operation small car parts as spoilers or mirrors may get off or<br />
brake due to being original detailed parts of the car model. To avoid<br />
this it is possible to remove them before operation.<br />
Change of running direction<br />
This is necessary and/or possible in case the running direction shall<br />
be changed. Therefore the reversing switch at the car’s bottom side<br />
has to be positioned accordingly.<br />
1<br />
2<br />
Maintenance and care<br />
To ensure a proper operation of the motor-racing circuit, all racetrack<br />
components should be regularly cleaned. Pull the plug prior to<br />
cleaning.<br />
1 Racetrack: Keep the track surface and track slots clean with a<br />
dry cloth. Do <strong>no</strong>t use any solvents or chemicals for cleaning. When<br />
it is <strong>no</strong>t in use, store the racetrack in a clean and dust-protected<br />
location, preferably in the original cardboard box.<br />
2 Car check: Clean axle and wheel bearings, pinion gears, gearwheels<br />
and bearings and lubricate using a resin- and acid-free<br />
grease. You can use a toothpick or similar as aid. Regularly check<br />
the condition of sliding contacts and tyres.<br />
Replacement of double sliding<br />
contact and guide keel<br />
1<br />
2 a 2 b<br />
Advice:<br />
• It is recommended to always take out and change only one<br />
grinder.<br />
• Never pull the vehicle backwards, because the grinders could be<br />
damaged otherwise.<br />
1 Please carefully pull out the guide keel according to fig. 1 .<br />
2 When changing the double contact brushes please take<br />
care that in stage one the upper contact brush 2 a is only<br />
pulled out partly and that in stage two the double contact brush can<br />
be pulled out completely with the contact brush 2 b . For inserting<br />
please proceed the same way.<br />
1<br />
Changing the rear axle<br />
2 3<br />
Take off the vehicle´s upper part from the chassis as per fig. 1 .<br />
Remove the axles from the bearings positions with pressure ( 2 ).<br />
Insert new axle. Pay attention to the correct position of the axle<br />
bearings ( 3 ).<br />
Troubleshooting<br />
Driving tips<br />
Troubleshooting:<br />
In case of any malfunctions, please check the following:<br />
• Has the connection to the power supply been established<br />
correctly?<br />
• Have transformer and speed controllers been connected<br />
correctly?<br />
• Are the track connections faultless?<br />
• Are the racetrack and track slots clean and free of any foreign<br />
objects?<br />
• Are the sliding contacts in order and do they make contact with<br />
the track slot?<br />
Driving technique:<br />
• You can drive fast along the straight track but you should brake<br />
before the curve and then accelerate again when coming out of the<br />
curve.<br />
• Do <strong>no</strong>t fasten or block the vehicles when the motor is running:<br />
overheating or damage to the motor could result otherwise.<br />
Note: When using track systems which are <strong>no</strong>t manufactured by<br />
<strong>Carrera</strong> the existing guide keel has to be replaced by the special<br />
guide keel (#85309). While using the <strong>Carrera</strong> crossing (#20587) or<br />
high banked curve 1/30° (#20574) slight driving <strong>no</strong>ise might occur<br />
which is due to the full-scale genuineness and does <strong>no</strong>t affect flawless<br />
operation.<br />
All <strong>Carrera</strong> spare parts are available in the webshop:<br />
www.carrera-toys.com<br />
Delivery exclusively to Germany, Austria, Netherlands, Belgium and<br />
Luxembourg.<br />
Technical specifications<br />
Output voltage: Toy transformer<br />
14,8 V 2 x 14,8 VA<br />
Electricity modes<br />
1.) Operating mode = cars are operated via speed controllers<br />
2.) Idle mode / Stand-by mode = speed controllers are <strong>no</strong>t activated,<br />
<strong>no</strong> game<br />
CURRENT CONSUMPTION < 1 watt / 1w<br />
3.) Off-state = power supply unit disconnected from mains supply<br />
This device is marked by “selective sort throught” symbol related to<br />
sort through domestic, electric and electronic, waste.<br />
This means the product must be treated by a specialized “sorting/<br />
collecting” system in accordance with European directive 2002/96/<br />
CE, to reduce the impact upon environment.<br />
For more precise information, please contact your local administration.<br />
Electronical product which are <strong>no</strong>t going through special collecting,<br />
are potentially dangerous for environment and human health,<br />
because of dangerous substance.<br />
Output voltage: Toy transformer<br />
14,8 V 2 x 14,8 VA<br />
Electricity modes<br />
1.) Operating mode = cars are operated via speed controllers<br />
2.) Idle mode / Stand-by mode = speed controllers are <strong>no</strong>t activated,<br />
<strong>no</strong> game CURRENT CONSUMPTION < 1 watt / 1w<br />
3.) Off-state = power supply unit disconnected from mains supply<br />
7