Bluetooth-/USB-Interface VW / Audi 7 607 545 550 - Blaupunkt
Bluetooth-/USB-Interface VW / Audi 7 607 545 550 - Blaupunkt
Bluetooth-/USB-Interface VW / Audi 7 607 545 550 - Blaupunkt

You also want an ePaper? Increase the reach of your titles
YUMPU automatically turns print PDFs into web optimized ePapers that Google loves.
Zubehör / Accessories<br />
<strong>Bluetooth</strong>-/<strong>USB</strong>-<strong>Interface</strong> <strong>VW</strong> / <strong>Audi</strong> 7 <strong>607</strong> <strong>545</strong> <strong>550</strong><br />
mit / with PTT<br />
mit / with OLED-Display (optional) 7 <strong>607</strong> 548 500<br />
PTT<br />
optional<br />
www.blaupunkt.com
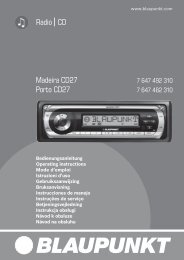
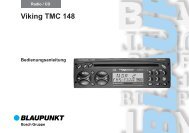
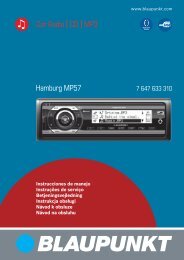
Connection / Anschluss<br />
Fakra<br />
Fakra<br />
Phone Mute<br />
2<br />
10<br />
GROUND<br />
Pin9<br />
(Fakra)<br />
Pin 2<br />
(ISO)<br />
AK 7 <strong>607</strong> 001 539<br />
Microphone<br />
Radio Mute<br />
Pin9<br />
(Fakra)<br />
BLAUPUNKT<br />
<strong>Bluetooth</strong><br />
PTT (Push to talk) - key<br />
GROUND<br />
AK 7 <strong>607</strong> 001 543<br />
Phone Mute<br />
<strong>USB</strong> socket<br />
(Memory stick not included)<br />
OLED<br />
(not included)<br />
oder/or
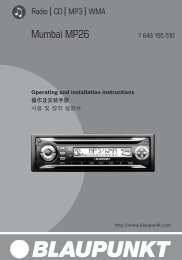
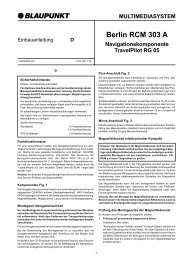
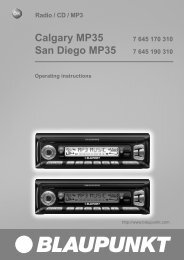
Connection / Anschluss<br />
ISO<br />
GROUND<br />
ISO <strong>Audi</strong><br />
D<br />
GROUND<br />
10<br />
10<br />
3 7<br />
1<br />
5<br />
6 8<br />
2<br />
C3<br />
A<br />
Pin 9<br />
Pin 2<br />
(ISO)<br />
Pin 9<br />
7 <strong>607</strong> 001 540<br />
PTT (Push to talk) - key<br />
Microphone<br />
<strong>Bluetooth</strong><br />
<strong>Bluetooth</strong><br />
BLAUPUNKT<br />
Microphone<br />
BLAUPUNKT<br />
oder/or<br />
<strong>USB</strong> socket (Memory stick not included)<br />
PTT (Push to talk) - key<br />
OLED<br />
(not included)<br />
OLED<br />
(not included)<br />
oder/or<br />
<strong>USB</strong> socket (Memory stick not included)<br />
3
Technical Data / Technische Daten<br />
<strong>Bluetooth</strong> 1.2 (compatible with 1.x)<br />
Supported <strong>Bluetooth</strong> profi les<br />
Unterstützte <strong>Bluetooth</strong>-Profi le<br />
HFP, SPP, GAP, SDAP. AADP (A2DP), AVRCP<br />
Certifi cations<br />
Standards<br />
e1, CE, FCC, <strong>Bluetooth</strong><br />
<strong>USB</strong> Version 2.0 (full speed), (compatible with 1.x)<br />
Mass Storage Device Class<br />
MP3-<strong>USB</strong>-Bitrate max. 320 kb/s, max. 48 kHz sample rate<br />
MP3 Meta Data ID3 v1, v2 (ISO8859-1 and ASCII), max.32char Title,<br />
Album, Artist<br />
Playlist M3U format supported, Latin-1 char set,<br />
see e.g. http://en.wikipedia.org/wiki/M3U<br />
Data Structure max. 64000 fi les and directories, up to 16 directory levels<br />
Temperature range<br />
Temperaturbereich<br />
- 40° C ... 85° C<br />
<strong>USB</strong> voltage / current strength<br />
<strong>USB</strong>-Spannung / -Stromstärke<br />
5V / 0,5 A (1,0 A short term / kurzzeitig)<br />
Power Supply<br />
Spannungsversorgung<br />
+12 ... 28 V<br />
Dimensions (inch)<br />
1.1 x 3.2 x 4.8 (without cables)<br />
Abmessungen (mm)<br />
28 x 81 x 121 (ohne Kabel)<br />
Weight<br />
Gewicht<br />
300 g<br />
For / Für <strong>VW</strong>, <strong>Audi</strong>, Seat, Skoda, Ford Radios see / siehe www.blaupunkt.com<br />
<strong>Bluetooth</strong> <strong>USB</strong> <strong>Interface</strong> <strong>VW</strong> Compatibility list of OEM devices<br />
<strong>Bluetooth</strong>-<strong>USB</strong>-<strong>Interface</strong>-<strong>VW</strong> Kompatibilitätsliste Erstausrüstergeräte<br />
4
Connection ............................................................... 2<br />
Technical Data ........................................................... 4<br />
Safety notes ............................................................ 25<br />
Declaration of conformity ........................................ 25<br />
Switch-on ................................................................ 25<br />
Switch-off ............................................................... 25<br />
Displays and controls ............................................... 26<br />
Registering (pairing) your cell phone<br />
with the interface .................................................... 26<br />
Connecting two BT devices with<br />
the interface at the same time .................................. 27<br />
Overview of functions .............................................. 28<br />
Telephone: incoming call .......................................... 30<br />
Telephone: outgoing call .......................................... 30<br />
<strong>Audi</strong>o streaming via BT ............................................ 30<br />
MP3 playback via <strong>USB</strong> .............................................. 31<br />
Browsing (OLED) ..................................................... 31<br />
Folder management /<br />
Structure on <strong>USB</strong> removable data carrier ................... 32<br />
Settings menu (OLED only) ....................................... 33<br />
Settings .................................................................. 34<br />
Software update ...................................................... 39<br />
Reading out technical data ....................................... 39<br />
Changing the confi guration (PTT) ............................. 40<br />
FCC-Statements ...................................................... 42<br />
24
ENGLISH<br />
We provide a manufacturer's warranty for<br />
our products purchased within the European<br />
Union. You can view the warranty terms at<br />
www.blaupunkt.de or request them directly<br />
from:<br />
<strong>Blaupunkt</strong> GmbH<br />
Hotline<br />
Robert Bosch Str. 200<br />
D-31139 Hildesheim<br />
Safety notes<br />
Before drilling holes for mounting, ensure that<br />
no routed cables or vehicle components are<br />
damaged!<br />
Do not install the <strong>USB</strong> socket, microphone and PTT<br />
button in the deployment area of the airbag, and<br />
ensure that the tray is safe and solid so that passengers<br />
in the vehicle are not at risk during emergency<br />
braking. Use cable glands for holes with sharp<br />
edges.<br />
The negative terminal on the battery<br />
must be disconnected while<br />
the device is being installed and<br />
connected.<br />
Observe the safety notes from the vehicle manufacturer<br />
(airbag, alarm systems, on-board computers,<br />
immobilisers).<br />
Recycling and disposal<br />
Please use the return and collection systems available<br />
to dispose of the product.<br />
Declaration of conformity<br />
The <strong>Blaupunkt</strong> GmbH declares that the <strong>Bluetooth</strong>/<br />
<strong>USB</strong> <strong>Interface</strong> device complies with the basic requirements<br />
and the other relevant regulations of<br />
the directive 1999/5/EG.<br />
Dear customer,<br />
the fi rmware "SW8C01<strong>VW</strong>" for the <strong>Bluetooth</strong> <strong>USB</strong><br />
interface (BT-<strong>USB</strong> interface, 7<strong>607</strong> <strong>545</strong> 500 001)<br />
is now available and provides several new functions<br />
that we would like to explain below.<br />
A signifi cant innovation since SW8625<strong>VW</strong><br />
is the support for the OLED display<br />
(7 <strong>607</strong> 548 500 001).<br />
Caution:<br />
Before startup of the OLED display, it is necessary<br />
to update the fi rmware of your BT-<strong>USB</strong><br />
interface (see the section Software update).<br />
The following instructions assume that the<br />
fi rmware of your BT-<strong>USB</strong> interface has already<br />
been updated, and the language was set to English<br />
(see the section Settings menu).<br />
This fi rmware can also be used with your PTT like<br />
the previous versions. The OLED-specifi c control<br />
and display options listed below are not available<br />
in this case.<br />
Switch-on<br />
The OLED display switches on automatically as<br />
soon as you switch on your radio or radio navigation<br />
device (RNS).<br />
Switch-off<br />
The OLED display switches off automatically as<br />
soon as you switch off your radio or radio navigation<br />
device (RNS).<br />
You can also switch off the display manually; to<br />
do so, press and hold the red phone button for<br />
longer than 5 seconds. The buttons remain illuminated<br />
to improve navigation at night.<br />
In the "Display -> Standby" Settings menu, you<br />
can preselect a time after which the display automatically<br />
switches off with switched-on radio,<br />
e.g. to reduce a possible distraction of the driver.<br />
25
In the "Display -> Switch-on" menu item, you select<br />
how the display will be switched on again.<br />
If a call should be received after manual or automatic<br />
switch-off, the display switches on automatically<br />
again (provided that the radio is still<br />
switched on).<br />
Displays and controls<br />
The OLED display shows different information depending<br />
on the current status of your BT-<strong>USB</strong> interface.<br />
Which control options are available via<br />
the green (left) and red right) phone button as<br />
well as the central rotary pushbutton is listed in<br />
the following sections.<br />
Pressing the red and green phone button at the<br />
same time calls up the Settings menu. Here you<br />
can adjust many properties to your personal preferences,<br />
such as the language (English, French,<br />
German) or ID3 tags from MP3 fi les to be displayed.<br />
After initial switch-on<br />
After switch-on, the OLED display greets you with<br />
a <strong>Blaupunkt</strong> lettering which gives way for a smaller<br />
lettering after a few seconds.<br />
Registering (pairing) your cell phone<br />
with the interface<br />
Use your cell phone to search for <strong>Bluetooth</strong> devices<br />
(see the instructions of the cell phone -><br />
Pairing). The telephone fi nds "<strong>Blaupunkt</strong> IF" and<br />
asks for a PIN. Enter PIN 1234 on your cell phone.<br />
An existing BT handsfree connection is shown on<br />
your OLED display by a non-fl ashing BT symbol in<br />
the top left corner.<br />
If you telephone does not request a PIN, please<br />
check by means of the compatibility list for cell<br />
phones (www.blaupunkt.com) whether a different<br />
confi guration should be set for operation with<br />
your type of telephone.<br />
26<br />
You can couple up to 5 cell phones with the interface.<br />
If additional phones are coupled, the data of<br />
the phone coupled fi rst are deleted from the list.<br />
The automatic reconnect for handsfree registering<br />
is started by the interface under the following<br />
conditions:<br />
1. After switch-on of the interface, every one<br />
of the last up to 5 pairings is checked for<br />
up to 15 seconds whether a pairing can<br />
be re-established. During this time, the BT<br />
symbol fl ashes. With active pairing, the BT<br />
symbol is displayed constantly. If no pairing<br />
is accomplished, the BT symbol goes out.<br />
As long as the BT symbol fl ashes, acoustic<br />
interference's are possible in an existing<br />
audio stream connection, since all BT radio<br />
channels (including those in which an audio<br />
stream already exists) are checked for the<br />
pairing.<br />
2. An automatic pairing attempt (fl ashing BT<br />
symbol) starts if an existing pairing is dissolved<br />
with switching off BT in the cell phone<br />
or removing it from the BT radio range.<br />
3.<br />
Press on the green phone button (as long as<br />
no telephone is registered).ntaste (solange<br />
kein Telefon gekoppelt ist).<br />
Note:<br />
To initiate a pairing, it is NO LONGER required to<br />
hold the PTT button pressed for 5 seconds. The<br />
interface is always visible in the BT radio range<br />
and ready for pairing.<br />
Without any preparation at the interface of your<br />
BT device, start the function "Find other BT devices"<br />
(may be called differently, see the instructions<br />
of your BT device) and select your<br />
"<strong>Blaupunkt</strong> interface"
Connecting two BT devices with the<br />
interface at the same time<br />
The use of the services "Hands-Free Calling" and<br />
"<strong>Audi</strong>o Streaming" can now (new) be performed<br />
by different BT devices that are connected with<br />
the interface at the same time.<br />
For example: cell phone for hands-free calling and<br />
Music Player with <strong>Bluetooth</strong> transmitter (BT-TX)<br />
for audio streaming.<br />
Until now, it has only been possible to perform<br />
both functions with the same BT device. The following<br />
illustrations (overview of functions) display<br />
the existing and the newly made possible<br />
connections:<br />
Each of the offered services "Hands-Free Calling"<br />
(BT profi le HFP) and "<strong>Audi</strong>o Streaming" (BT profi<br />
le A2DP and AVRCP) can only be used by no<br />
more than one BT device at the same time.<br />
Notes:<br />
A simultaneous hands-free connection with two<br />
cell phones is NOT possible. Only after disconnecting<br />
a hands-free connection is it possible to<br />
activate the second one.<br />
For audio streaming connections, there is no list<br />
of the devices used last.<br />
A <strong>Bluetooth</strong> <strong>Audi</strong>o streaming transmitter (BT-TX)<br />
connects itself only if the connection is actually<br />
requested.<br />
An interface that is switched on is always ready<br />
for pairing with a BT-TX.<br />
The pairing of a BT streaming device is NOT saved<br />
in the interface, some streaming devices may request<br />
the PIN after every restart.<br />
27
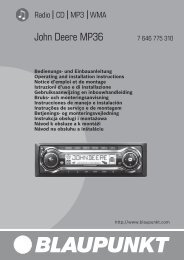
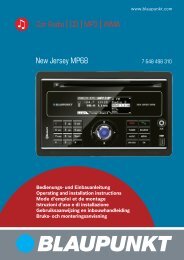
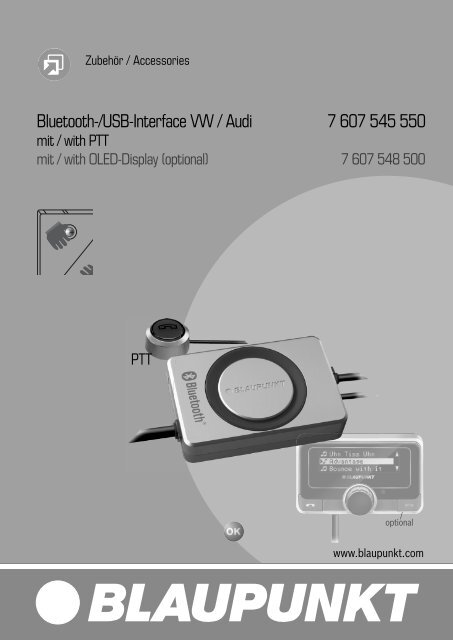
Overview of functions<br />
28<br />
Mode Previously possible Possible with SW8205 or higher<br />
1 Hands-free calling with cell phone Hands-free calling with cell phone<br />
BLAUPUNKT<br />
2 Hands-free calling and audio<br />
streaming with cell phone<br />
3 <strong>Audi</strong>o streaming with BT<br />
transmitter (BT-TX)<br />
BT-Freisprechen BT-Freisprechen<br />
BLAUPUNKT<br />
BT-<strong>Audi</strong>o-Streaming<br />
BT-Freisprechen<br />
BLAUPUNKT<br />
Hands-free calling and audio streaming<br />
with cell phone<br />
<strong>Audi</strong>o streaming with BT transmitter (BT-TX)<br />
4 Function not available! Hands-free calling with cell phone and audio<br />
streaming (connected at the same time) with<br />
BT transmitter (BT-TX)<br />
BLAUPUNKT<br />
BLAUPUNKT<br />
BT-<strong>Audi</strong>o-Streaming<br />
BT-Freisprechen<br />
BLAUPUNKT<br />
BT-<strong>Audi</strong>o-Streaming BT-<strong>Audi</strong>o-Streaming<br />
BT-Freisprechen<br />
BLAUPUNKT<br />
BT-<strong>Audi</strong>o-Streaming
Overview of functions<br />
Mode Previously possible Technically not possible<br />
Not<br />
possible<br />
Not<br />
possible<br />
Hands-free calling with 2 cell phones<br />
Function not available!<br />
<strong>Audi</strong>o streaming with 2 BT<br />
transmitters (BT-TX)<br />
Function not available!<br />
Hands-free calling with 2 cell phones<br />
Function not available!<br />
BT-Freisprechen<br />
BLAUPUNKT<br />
BT-Freisprechen<br />
<strong>Audi</strong>o streaming with 2 BT<br />
transmitters (BT-TX)<br />
Function not available!<br />
BT-<strong>Audi</strong>o-Streaming<br />
BLAUPUNKT<br />
BT-<strong>Audi</strong>o-Streaming<br />
29
Telephone: incoming call<br />
An incoming call is shown on the OLED display by<br />
a vibrating telephone, the note "Call" and (if transmitted)<br />
name or phone number of the call as well<br />
as a fl ashing rotary button.<br />
You can reject the call by pressing the red telephone<br />
button or pressing the PTT button for a<br />
longer time.<br />
You can answer the call by pressing the green<br />
telephone button, the rotary button or briefl y<br />
pressing the PTT button.<br />
"Call Active" indicates that the phone connection<br />
(GSM) is active. At the same time, the car sound<br />
system is muted (Tel. Mute) and the voice of the<br />
caller is played via the car loudspeakers.<br />
You can end the call by pressing the red telephone<br />
button or the rotary button or pressing<br />
the PTT button.<br />
Telephone: outgoing call<br />
To make a phone call, press the green telephone<br />
button or the PTT button.<br />
The voice recognition of the cell phone is activated<br />
(if available and activated).<br />
The OLED display shows "Phone Book". Push the<br />
rotary button to confi rm your selection and select<br />
the fi rst letter of the desired contact by turning<br />
the button clockwise or counterclockwise.<br />
Pressing the rotary button again displays a 3-line<br />
segment from the list of all contacts whose name<br />
starts with this letter. "No Phone Book" indicates<br />
that no phone book could be loaded by your cell<br />
phone. "Loading Phone Book" indicates that the<br />
download by the cell phone has not been completed<br />
yet; please repeat your attempt at a later time.<br />
Select the desired contact from the phone list by<br />
turning the rotary button clockwise or counterclockwise.<br />
In addition to the contact name, the<br />
phone number is also displayed now. You start the<br />
dialing process with the green telephone button.<br />
30<br />
The OLED display shows a phone icon and the text<br />
"Dialing …" with the selected phone number. You<br />
can cancel by pressing the red phone button.<br />
As soon as the contact you are calling has answered<br />
the call, the OLED display shows "Call<br />
Active" again. You can end the call by pressing the<br />
red phone button.<br />
If you turn the button during the "Phone book" display,<br />
"Dial Number" appears as an alternate input<br />
option, which you can select by pressing the rotary<br />
button.<br />
From the displayed list, select the fi rst digit of the<br />
desired phone number and copy it to the 2nd line<br />
containing your selected number by pressing the<br />
button. If you inadvertently selected a wrong digit,<br />
you can delete it by briefl y pressing once on the<br />
red phone button. If you want to completely cancel<br />
the number entry, hold the red button pressed<br />
for at least 2 seconds, and you are returned to<br />
"Dial Number".<br />
After completely entering the number, start dialing<br />
by pressing the green phone button.<br />
You can cancel or end by pressing the red phone<br />
button<br />
<strong>Audi</strong>o streaming via BT<br />
Activate the audio streaming on your cell phone<br />
or BT streaming transmitter. Use PIN 1234. If the<br />
PIN of your BT streaming transmitter is permanently<br />
set to "0000", you can also adjust the interface<br />
to this PIN, see the Settings menu.<br />
During the audio streaming, the OLED display<br />
shows "STREAM".<br />
For some BT streaming transmitters with remote<br />
control option (BT AVRCP, <strong>Audi</strong>o Video Remote<br />
Control Profi le), it is possible to jump to the previous/next<br />
track by turning the rotary button to<br />
the left or right or pressing the left/right radio<br />
button.
MP3 playback via <strong>USB</strong><br />
You can connect a <strong>USB</strong> removable media drive<br />
with MP3 fi les to the interface to play the MP3<br />
fi les via the car sound system. The car sound system<br />
must be switched on. During a hands-free<br />
telephone call and with active audio streaming,<br />
the <strong>USB</strong> playback is interrupted.<br />
By turning the button left or pressing the radio<br />
button 3 sec.) or to the<br />
previous track.<br />
By turning the button right or pressing the radio<br />
button >, you jump to the next track.<br />
Forward and reverse can be done as before with<br />
a long press on the Right or Left button of your<br />
radio.<br />
Mix, Repeat and Scan settings should also be<br />
performed on your radio.<br />
During the MP3 playback, the OLED display<br />
shows additional information from the MP3<br />
fi les ("ID3 tags"). In the Settings menu, you can<br />
select different views and confi gurations for<br />
this purpose. If ID3 tags to be displayed should<br />
not be fi lled out in MP3 fi les (e.g. no track), the<br />
note "No Track" is displayed.<br />
Browsing (OLED)<br />
During the MP3 playback from the <strong>USB</strong> medium,<br />
press the rotary button to reach the Browsing<br />
mode. It allows you a convenient navigation<br />
through the directories of your music collection<br />
on the <strong>USB</strong> medium. While selecting a new<br />
song, the currently played song continues being<br />
played. Only after confi rmation does the new<br />
song begin to be played.<br />
"Please wait" indicates that new list entries are<br />
being searched.<br />
The displayed 3-line list contains all the subdirectories,<br />
playlists and MP3 fi les in the currently<br />
used directory of your <strong>USB</strong> memory.<br />
The currently played MP3 fi le is preselected and<br />
identifi ed with "->".<br />
You scroll through the list entries by turning the rotary<br />
button left or right.<br />
A list entry is a subdirectory or a playlist:<br />
•<br />
Pressing on the rotary button opens the subdirectory<br />
or the playlist.<br />
The display corresponds to the aforementioned<br />
one.<br />
List entry is MP3 fi le:<br />
Pressing on the rotary button end the current<br />
playback and starts the playback of the selected<br />
fi le. The display corresponds to the aforementioned<br />
one.<br />
Pressing on the red phone button calls up the<br />
higher-level directory.<br />
With the up/down radio buttons, you reach the<br />
next/previous directory or playlist according to<br />
the memory order on the <strong>USB</strong> memory device.<br />
Note:<br />
The browsing mode is exited automatically 30 seconds<br />
after the last button or rotary button activation<br />
or manually with a long press on the red<br />
phone button.<br />
Tip: (OLED or PTT)<br />
The convenient navigation through your <strong>USB</strong> fi le<br />
structure allows you to clearly organise your music<br />
data and quickly access the data.<br />
However, a large number of directories, particularly<br />
on large <strong>USB</strong> hard disks, slow down access<br />
to your music data. As an alternative, try to organise<br />
your music collection via playlists (M3U playlists,<br />
for format see http://de.wikipedia.org/wiki/<br />
M3U).<br />
31
Folder management / Structure on<br />
<strong>USB</strong> removable data carrier<br />
Default Mode<br />
Default Mode (see Settings menu) is factory set<br />
with the following properties:<br />
• Direct selection of up to 6 directories with CD<br />
selection buttons on the radio<br />
• Playback of up to 99 tracks from each of these<br />
directories<br />
• Use of playlists (with OLED display only)<br />
Please prepare your <strong>USB</strong> memory as follows for<br />
this purpose:<br />
Create a folder called <strong>Blaupunkt</strong>.<br />
Create 6 subfolders in this folder called<br />
"CD01" to "CD06".<br />
In every subfolder ("CD0x"), you can manage<br />
up to 99 tracks / pieces of music. The<br />
operation corresponds to the <strong>VW</strong> / <strong>Audi</strong> CD<br />
changer.<br />
It is also possible to manage more than 99<br />
music files, but then the display of the track<br />
number can no longer be uniquely associated<br />
with the music file.<br />
Let's assume that the <strong>USB</strong> drive is U:<br />
• U:\<strong>Blaupunkt</strong>\<br />
Playlists (can only be used with OLED<br />
display!)<br />
• U:\<strong>Blaupunkt</strong>\CD01<br />
containing up to 99 MP3 files<br />
• U:\<strong>Blaupunkt</strong>\CD02<br />
containing up to 99 MP3 files<br />
• U:\<strong>Blaupunkt</strong>\CD03<br />
containing up to 99 MP3 files<br />
• U:\<strong>Blaupunkt</strong>\CD04<br />
containing up to 99 MP3 files<br />
32<br />
• U:\<strong>Blaupunkt</strong>\CD05<br />
containing up to 99 MP3 files<br />
• U:\<strong>Blaupunkt</strong>\CD06<br />
containing up to 99 MP3 files<br />
Extended Mode<br />
If you connected an OLED display (7<strong>607</strong> 548<br />
500) to your interface, you can alternately activate<br />
the Extended Mode with the following properties<br />
via the Settings menu:<br />
• Use of any directory structure on up to 16 directory<br />
levels<br />
• No limitation for the <strong>Blaupunkt</strong> directory and<br />
the names CD01 … CD06<br />
• More than 99 tracks possible in every directory<br />
• Playlists possible in all directories<br />
Operation and display on your radio are then limited<br />
to<br />
• No direct selection of directories<br />
• Track display of 01 to 99<br />
•<br />
No direct assignment of displayed track<br />
number to music fi le<br />
The Settings menu can be used again to activate<br />
the Default Mode, if needed.<br />
Notes:<br />
After changing between Default and Extended<br />
Mode, you should turn your car sound system off<br />
and on again, so that all the changes also take effect<br />
in your radio.<br />
In radios with integrated CD changer, the CD<br />
count for the interface begins after the maximal<br />
internal CD number.<br />
Example:<br />
Internal changer for 6 CDs (CD01 ... CD06)<br />
BT-<strong>USB</strong> interface with 6 directories<br />
<strong>Blaupunkt</strong> \ CD01 ... CD06 will be shown as<br />
CD 07 ... CD12.
Settings menu (OLED only)<br />
To call up the Settings menu, press the green or<br />
red phone button at the same time. The OLED<br />
display shows "Settings <strong>Bluetooth</strong>". Music playback<br />
and data transfer to the radio are interrupted<br />
to prevent interferences that could occur by saving<br />
the settings data.<br />
The individual menu items can be reached by turning<br />
the rotary button left or right.<br />
Briefl y pressing on the rotary button opens the selected<br />
menu. Additional settings can be made by<br />
turning and pressing on the rotary button. OK on<br />
the display confi rms your selection, and the successful<br />
storing of your defi ned values.<br />
Briefl y pressing on the red phone button calls up<br />
the previous/higher-level menu item.<br />
Notes:<br />
• To avoid possible setting confl icts, you should<br />
delete or rename the confi g.txt fi le from your<br />
<strong>Blaupunkt</strong> directory when using an OLED display.<br />
• The following overview shows which settings<br />
you can perform in your interface. The basic<br />
factory settings are marked in grey<br />
Which settings are active?<br />
In the Settings menu under Settings -> Info -><br />
BT-<strong>USB</strong>-IF -> Confi g, the OLED display indicates<br />
which confi guration settings are currently active.<br />
The active settings appear inversely in the individual<br />
setting menus.<br />
This information can also be found in the id.txt<br />
fi le, see the section Instructions for reading out<br />
technical data.<br />
Operation with PTT<br />
Adjust the desired confi guration by loading a confi<br />
g.txt fi le. See the section Instructions for confi guration<br />
changes.<br />
The following table shows the displayed<br />
confi gurations in square brackets […].<br />
33
Settings<br />
[Confi g dispay]<br />
<strong>Bluetooth</strong><br />
34<br />
Function<br />
Settings of various <strong>Bluetooth</strong> functions<br />
Delete pairing<br />
Deleting the pairings between interface and <strong>Bluetooth</strong> devices<br />
Device Name All pairings saved in the interface are deleted.<br />
Start pairing<br />
PIN<br />
On Opens the time window in which interface and<br />
<strong>Bluetooth</strong> devices can be paired.<br />
1234 Standard setting "1234"<br />
0000 For streaming devices with fi xed setting of the PIN to "0000"<br />
Comp. mode<br />
<strong>Bluetooth</strong> compatibility mode<br />
Off Basic setting for all <strong>Bluetooth</strong> cell phones that<br />
do not have the following specifi c feature.<br />
On<br />
[BT_COMP_MODE]<br />
Phone book<br />
All<br />
[CFG_PB_ALL]<br />
SIM<br />
[CFG_PB_SIM]<br />
internal<br />
[CGF_PB_INT]<br />
No download<br />
[CFG_PB_NONE]<br />
BT On / Off<br />
[BT_ON_OFF]<br />
HFP On / Off<br />
[BT_HFP_ON_OFF]<br />
A2DP On / Off<br />
[BT_A2DP_ON_OFF]<br />
This setting should be activated if your cell phone does<br />
not request the PIN for the "<strong>Blaupunkt</strong> IF" after the pairing<br />
during the <strong>Bluetooth</strong> connection attempt. For example,<br />
this applies to Nokia 6210, Motorola V300<br />
Which phone book should be loaded from the cell phone?<br />
All available phone books (SIM card, inside cell phone)<br />
are loaded into the interface (max. total entries: 200)<br />
Only the phone book of the SIM card is being loaded<br />
(max. total entries: 200)<br />
Only the internal phone book of the cell phone is being loaded<br />
(max. total entries: 200)<br />
No phone book is being loaded into the interface.<br />
Turns the <strong>Bluetooth</strong> function of the interfaces on or off.<br />
Turns the <strong>Bluetooth</strong> hands-free function on (BT On/Off must be<br />
On!) or off.<br />
Turns the <strong>Bluetooth</strong> streaming receiver in the interface on<br />
(BT On/Off must be On!) or off.
Settings<br />
[Confi g dispay]<br />
Display<br />
Brightness<br />
Standby<br />
Switch-on<br />
Function<br />
Settings of various display functions<br />
Brightness setting<br />
Auto (Sensor) The brightness of the display adjusts automatically<br />
to the ambient light conditions.<br />
Fix 20% … Fix 100% The brightness value is permanently set to xx%<br />
(xx = 20 | 40 | 60 | 80 | 100)<br />
Activation of the Standby mode<br />
Off The display always remains active and is not switched off<br />
10 sec. … 120 sec. After xx seconds, the display switches to Standby mode (xx<br />
= 10 | 20 | … | 110 | 120), display dark, button illumination<br />
switched on, switches on again with a phone call or the event<br />
selected in "Switch-on"<br />
Press button +<br />
display update<br />
Criteria for switching on the display again from Standby mode<br />
Display switches on after pressing the button or changing the<br />
display content, e.g. playback of next track<br />
Press button Display switches on after pressing the button<br />
or turning the rotary button<br />
Scroll mode<br />
Browsing<br />
Display of texts that are longer than one line<br />
Continuous Text is being fed through continuously<br />
Once Text is fed through once, then the fi rst part<br />
of the text is permanently displayed<br />
Off First part of text is permanently displayed<br />
Standard or extended browsing options<br />
Standard Access to <strong>Blaupunkt</strong> directories only \ CD01 ... CD06.<br />
Extended Access to any directories (only possible with OLED display!).<br />
35
36<br />
Settings<br />
[Confi g dispay]<br />
Function<br />
ID3 Confi g Display of data from MP3 fi les (ID3 tags)<br />
Display Selection of display form<br />
1 line The data selected in "Info 1" are displayed on one line<br />
(display height)..<br />
2 lines The data selected in "Info 1" / "Info 2" are displayed on<br />
the top and bottom line (half display height each).<br />
Info 1 Selection of data displayed on line 1<br />
Track track data from ID3 tags<br />
Album Album data from ID3 tags<br />
Artist Artist data from ID3 tags<br />
File name File name<br />
Directory or playlist name Name of current directory or current playlist<br />
Info 2<br />
Track<br />
Album<br />
Artist<br />
File name<br />
Directory or playlist name<br />
Track data from ID3 tags<br />
Album data from ID3 tags<br />
Artist data from ID3 tags<br />
File name<br />
Name of current directory or current playlist
Settings Function<br />
Info Display of technical data<br />
BT <strong>USB</strong> IF<br />
<strong>Bluetooth</strong> <strong>USB</strong> interface<br />
7 <strong>607</strong> <strong>545</strong> <strong>550</strong> 001<br />
BT-ID: <br />
HW ver: 1<br />
SW ver: 8C01<strong>VW</strong><br />
P.Date 7113 P.Code: CN<br />
Confi g:<br />
[CDC_...] | [CFG_PB_...] | …<br />
The displayed technical data of the <strong>Bluetooth</strong> <strong>USB</strong><br />
interface correspond to the data listed in "id.txt"<br />
Product name of the interface<br />
<strong>Blaupunkt</strong> product no<br />
<strong>Bluetooth</strong> address (serial number of the interface)<br />
Hardware version, here "1"<br />
Software version, here "8C01<strong>VW</strong>"<br />
Production date and code (coded)<br />
Confi gurations defi ned in the interface<br />
Details see below<br />
Display module technical data of the OLED display module<br />
<strong>Blaupunkt</strong> display<br />
7 <strong>607</strong> 548 500 001<br />
SW ver: 02.05<br />
HW ver: 0E.00<br />
Product name of OLED display<br />
<strong>Blaupunkt</strong> product number<br />
Software version, here "02.05<br />
Hardware version, here "0E.00"<br />
37
38<br />
Settings<br />
[Confi g dispay]<br />
Radio Confi g.<br />
Function<br />
Setting of the interface to the radio, no change for the OLED display<br />
use.<br />
Please delete existing confi g.txt fi les from the <strong>Blaupunkt</strong> directory of<br />
your <strong>USB</strong> stick or <strong>USB</strong> hard disk stick or <strong>USB</strong> hard disk.<br />
Standard For all compatible <strong>VW</strong> radios, except for the following model.<br />
<strong>VW</strong> Gamma<br />
[RADIO_TYP_GAMMA]<br />
Startup Basic settings<br />
Activate this setting if you are operating the interface with a <strong>VW</strong><br />
Gamma radio.<br />
Mic. Test This allows you to check the installation of your interface.<br />
On Switches the hands-free microphone to the loudspeaker<br />
Mic. Test (fl ashes) Microphone test is active. End with red phone button.<br />
Mic. amplifi cation<br />
Adjusting the microphone volume. The effect of this setting is reduced<br />
by the automatic echo compensation during hand-free calling<br />
Standard value Factory settingg<br />
Mic. 2 … 14 Softer (2) or louder (14) than standard value<br />
Factory setting Resetting of all settings to factory setting<br />
Sure ? Confi rmation dialogue<br />
Yes = press the rotary button<br />
No = cancel = red phone button<br />
Language Selection of the language for the operating menu<br />
English<br />
German<br />
French
Software update<br />
You can update the software of the interface yourself<br />
to render the interface compatible with newer<br />
cell phones.<br />
Note:<br />
When you update the software, it is possible that<br />
these operating instructions are no longer up-todate.<br />
Please download a current version of the instructions<br />
from www.blaupunkt.de.<br />
The following are required to update the software:<br />
• <strong>USB</strong> data carrier (e.g. <strong>USB</strong> stick) with FAT16<br />
or FAT32 formatting and at least 4 MB free<br />
memory capacity<br />
• Computer with Internet access<br />
• ZIP software<br />
Updating<br />
On the <strong>USB</strong> device, create the "<strong>Blaupunkt</strong>"<br />
directory at the top level. Example: "W:\<br />
<strong>Blaupunkt</strong>"<br />
Load the software of the <strong>Bluetooth</strong>/<strong>USB</strong> interface<br />
from www.blaupunkt.de and store it in a<br />
directory of your computer.<br />
Unzip the ZIP fi le and copy the unzipped fi les<br />
to the <strong>Blaupunkt</strong> directory on the <strong>USB</strong> device.<br />
Deactivate the <strong>USB</strong> device at the computer.<br />
Connect the <strong>USB</strong> device with the <strong>USB</strong> cable<br />
of the interface.<br />
Turn on the car sound system.<br />
Press and hold the PTT button or the green<br />
phone button while switching the car sound<br />
system off and on again.<br />
Release the PTT button or the green phone<br />
button.<br />
The loading process starts.<br />
Select CD Changer (CDC) at the car sound<br />
system as the audio source.<br />
The display shows the progress of the load process.<br />
At the same time, the title numbers "1"<br />
through "5" are shown in ascending order and the<br />
current time for every title number. After the load<br />
process has completed, the display shows the<br />
track number "99" and the time "59:59".<br />
Notes:<br />
• If the progress indicator stops before the end<br />
of the loading process, disconnect the <strong>USB</strong><br />
data carrier and reconnect it to the <strong>USB</strong> cable<br />
of the interface. If this is not successful,<br />
repeat the update process.<br />
• If the time "00:00" is displayed at the end of<br />
the loading process, an error occurred. In this<br />
case, repeat the update process.<br />
Switch the car sound system off and on<br />
again.<br />
The new software is now activated.<br />
Reading out technical data<br />
During the update, two fi les with information<br />
about the interface and the update process are<br />
created in the "<strong>Blaupunkt</strong>" directory of the <strong>USB</strong><br />
data carrier. Both fi les can be opened and read on<br />
a computer using a plain text editor:<br />
• The "id.txt" fi le contains information about<br />
the status of the interface, e.g. the current<br />
hardware and software version as well as the<br />
<strong>Bluetooth</strong> ID of the interface.<br />
•<br />
The "setup.log" fi le contains information<br />
about the process of the update, e.g. the<br />
message about a successful installation or<br />
any errors that occurred.<br />
39
40<br />
id.txt: Display of technical data<br />
<strong>Bluetooth</strong> <strong>USB</strong> <strong>Interface</strong><br />
7 <strong>607</strong> <strong>545</strong> <strong>550</strong> 001<br />
BT-ID: <br />
HW ver: 1<br />
SW ver: 8C01<strong>VW</strong><br />
P.Date 7113 P.Code: CN<br />
Confi g:[CDC_..] [CFG_PB_..] |<br />
Changing the confi guration (PTT)<br />
This requires:<br />
• PC with Internet connection<br />
• Removable <strong>USB</strong> device with at least 4 MB<br />
memory (FAT16 or FAT32 formatting)<br />
• ZIP software to unzip the confi guration fi les<br />
Loading a confi guration fi le<br />
The <strong>Bluetooth</strong> <strong>USB</strong> interface comes ex factory<br />
with a standard confi guration that offers reliable<br />
operation in combination with as many radio models<br />
and <strong>Bluetooth</strong> devices as possible.<br />
You can match various settings from the above tables<br />
to your personal preferences or technical requirements<br />
by loading a confi guration fi le.<br />
The following confi guration is available:<br />
Confi g_<strong>VW</strong>_universal.txt<br />
In the download archive you will fi nd the<br />
fi le "confi g_<strong>VW</strong>_universal.txt". This fi le includes<br />
all possible confi guration settings. You<br />
can select your favorite confi guration by activating<br />
(remove # in the fi rst column) or deactivating<br />
(add # in the fi rst column) the desired<br />
parameters.<br />
For this, proceed as follows:<br />
<br />
Create a new "<strong>Blaupunkt</strong>" directory on the<br />
<strong>USB</strong> removable media drive.<br />
Product name of the interface<br />
<strong>Blaupunkt</strong> product no<br />
<strong>Bluetooth</strong> address (serial number of the interface)<br />
Hardware version, here "1"<br />
Software version, here "8C01<strong>VW</strong>"<br />
Production date and code (coded)<br />
Confi gurations defi ned in the interface<br />
<br />
<br />
<br />
<br />
<br />
<br />
<br />
Copy the fi le "confi g_universal.txt" from<br />
the unpacked download archive into the<br />
<strong>Blaupunkt</strong> directory of your <strong>USB</strong> data medium.<br />
Rename the fi le in "confi g.txt".<br />
Open the "confi g.txt" fi le with a text editor,<br />
e.g. Windows Notepad.<br />
(De) activate the desired parameters.<br />
Remove/add # in the fi rst column, see notes<br />
in the fi le.<br />
Store the fi le and close the editor.<br />
Deactivate the <strong>USB</strong> data medium on your PC.<br />
Carry out the operating steps on "Changing<br />
the confi guration of your interface" described<br />
in the following.<br />
Changing the confi guration<br />
in your vehicle:<br />
Connect the <strong>USB</strong> device with the <strong>USB</strong> cable<br />
of the interface.<br />
Turn on your car sound system.<br />
After a few seconds (max. one minute), the<br />
interface recognises the fi le, analyses it and<br />
stores the modifi ed confi guration in the interface.<br />
Switch the car sound system off and on<br />
again.<br />
The new confi guration is now activated.
If you have any questions, please take a look at<br />
the FAQ (Frequently Asked Questions) under<br />
http://blaupunkt.com/de/infoservices_3.asp<br />
or contact the <strong>Blaupunkt</strong> Hotline<br />
+49 (180) 5000 225 (0.14 EUR/min from the<br />
German PSTN; for cell phone rates, please contact<br />
your provider)<br />
Additional notes about the <strong>USB</strong> interface<br />
are located at:<br />
www.blaupunkt.de<br />
Subject to change!<br />
41
FCC-Statements<br />
All following FCC statements are valid for the<br />
Industry Canada Standard (IC) as well.<br />
1. General<br />
Interference Warning: (according to FCC part<br />
15.19)<br />
This device complies with Part 15 of the FCC<br />
Rules. Operation is subject to the following two<br />
conditions:<br />
(1) this device may not cause harmful interference,<br />
and<br />
(2) this device must accept any interference received,<br />
including interference that may cause<br />
undesired operation<br />
Caution: (pertaining to FCC part 15.21)<br />
Modifi cations not expressly approved by this<br />
company could void the user’s authority to operate<br />
the equipment<br />
2. Specifi c Part 15.105<br />
Information to the user:<br />
2.1 For Class A digital device<br />
(A digital device that is marketed for use in a commercial,<br />
industrial or business environment, exclusive<br />
of a device which is marketed for use by<br />
the general public or is intended to be used in the<br />
home.)<br />
Note: This equipment has been tested and found<br />
to comply with the limits for a Class A digital device,<br />
pursuant to part 15 of the FCC Rules. These<br />
limits are designed to provide reasonable protection<br />
against harmful interference when the equipment<br />
is operated in a commercial environment.<br />
This equipment generates, uses, and can radiate<br />
radio frequency energy and, if not installed and<br />
used in accordance with the instruction manual,<br />
may cause harmful interference to radio communications.<br />
Operation of this equipment in a resi-<br />
42<br />
dential area is likely to cause harmful interference<br />
in which case the user will be required to correct<br />
the interference at his own expense.<br />
RF Radiation Exposure<br />
This equipment complies with FCC RF radiation<br />
exposure limits set forth for an uncontrolled environment.<br />
This equipment should be installed and<br />
operated with a minimum distance of 20 centimeters<br />
between the radiator and your body.<br />
This transmitter must not be co-located or operating<br />
in conjunction with any other antenna or<br />
transmitter.
Service numbers, Service-Nummern<br />
Country: Phone: Fax:<br />
Germany (D) 0180-5000225 05121-49 4002<br />
Austria (A) 01-610 39 0 01-610 393 91<br />
Denmark (DK) 44 898 360 44-898 644<br />
Finland (FIN) 09-435 991 09-435 99236<br />
Great Britain (GB) 01-89583 8880 01-89583 8394<br />
Greece (GR) 210 94 27 337 210 94 12 711<br />
Ireland (IRL) 01-46 66 700 01-46 66 706<br />
Italy (I) 02-369 62331 02-369 6464<br />
Luxembourg (L) 40 4078 40 2085<br />
Norway (N) +47 64 87 89 60 +47 64 87 89 02<br />
Portugal (P) 2185 00144 2185 00165<br />
Spain (E) 902 52 77 70 91 410 4078<br />
Sweden (S) 08-750 18 50 08-750 18 10<br />
Switzerland (CH) 01-8471644 01-8471650<br />
Czech Rep. (CZ) 02-6130 0446 02-6130 0514<br />
Hungary (H) 76 889 704 _<br />
Poland (PL) 0800-118922 022-8771260<br />
Turkey (TR) 0212-335 07 23 0212-3460040<br />
USA<br />
Brasil<br />
(USA) 800-950-2528 708-6817188<br />
(Mercosur)<br />
Malaysia<br />
(BR) 0800 7045446 +55-19 3745 2773<br />
(Asia Pacifi c) (MAL) +604-6382 474 +604-6413 640<br />
01.09<br />
<strong>Blaupunkt</strong> GmbH<br />
Robert-Bosch-Str. 200<br />
D-31139 Hildesheim<br />
CM-BP/PRM-AC - 8 622 406 381