PG-C45X - diagramas.diagram...
PG-C45X - diagramas.diagram... PG-C45X - diagramas.diagram...
PG-C45X 3. Removal of the PWBs 3-1. Remove the lock screw from the lamp socket angle. Detach the lamp socket angle. 3-2. Lift the ballast unit. Disconnect the connector and detach the ballast unit. 3-3. Remove the lock screw from the PWB unit cover and detach the cover. 3-4. Remove the three lock screws from the PWB assembly, disconnect the connector and detach the PWB assembly. 3-5. Remove the two lock screws from the cooling fan, disconnect the connector and detach the cooling fan. 3-6. Remove the lock screw from the grounding terminal, disconnect the connector and detach the AC inlet PWB. 4. Removal of the optical mechanism, fan PWB, power PWB and R/C receiver PWB 4-1. Remove the eight lock screws from the optical mechanism, and take out the optical mechanism. 4-2. Remove the lock screw from the cooling fan, and detach the cooling fan and fan PWB. 4-3. Remove the four lock screws from the power PWB, and detach the power PWB. 4-4. Take out the R/C receiver PWB. Ballast Unit Cooling Fan 3-2 3-1 3-5 3-4 Power PWB 3-4 3-3 PWB Ass'y 14 3-6 AC Inlet PWB PWB Ass'y cover 4-3 R/C Receiver PWB 4-1 4-1 4-2 Cooling Fan 4-1 Fan PWB
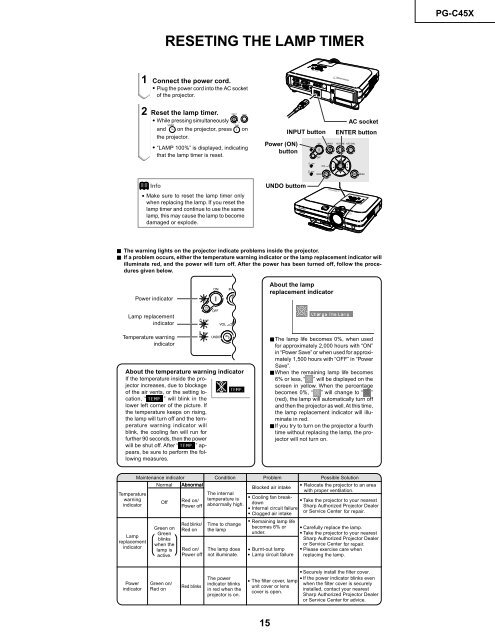
1 2 Connect the power cord. • Plug the power cord into the AC socket of the projector. Reset the lamp timer. • While pressing simultaneously , and on the projector, press • ON on the projector. “LAMP 100%” is displayed, indicating that the lamp timer is reset. Info • Make sure to reset the lamp timer only when replacing the lamp. If you reset the lamp timer and continue to use the same lamp, this may cause the lamp to become damaged or explode. Power indicator Lamp replacement indicator Temperature warning indicator About the temperature warning indicator If the temperature inside the projector increases, due to blockage of the air vents, or the setting location, “ ” will blink in the lower left corner of the picture. If the temperature keeps on rising, the lamp will turn off and the temperature warning indicator will blink, the cooling fan will run for further 90 seconds, then the power will be shut off. After “ ” appears, be sure to perform the following measures. 15 Power (ON) button AC socket INPUT button ENTER button UNDO buttom Ë The warning lights on the projector indicate problems inside the projector. Ë If a problem occurs, either the temperature warning indicator or the lamp replacement indicator will illuminate red, and the power will turn off. After the power has been turned off, follow the procedures given below. ËThe lamp life becomes 0%, when used for approximately 2,000 hours with “ON” in “Power Save” or when used for approximately 1,500 hours with “OFF” in “Power Save”. ËWhen the remaining lamp life becomes 6% or less, “ ” will be displayed on the screen in yellow. When the percentage becomes 0%, “ ” will change to “ ” (red), the lamp will automatically turn off and then the projector as well. At this time, the lamp replacement indicator will illuminate in red. ËIf you try to turn on the projector a fourth time without replacing the lamp, the projector will not turn on. Maintenance indicator Condition Problem Possible Solution Temperature warning indicator Normal Off Abnormal Red on/ Power off The internal temperature is abnormally high. • Blocked air intake Relocate the projector to an area with proper ventilation. • Cooling fan break- • down Take the projector to your nearest • Internal circuit failure Sharp Authorized Projector Dealer • Clogged air intake or Service Center for repair. Lamp replacement indicator Green on Green blinks when the lamp is active. Red blinks/ Red on Red on/ Power off Time to change the lamp The lamp does not illuminate. • Remaining lamp life becomes 6% or under. • Burnt-out lamp • Lamp circuit failure • Carefully replace the lamp. • Take the projector to your nearest Sharp Authorized Projector Dealer or Service Center for repair. • Please exercise care when replacing the lamp. Power indicator Green on/ Red on RESETING THE LAMP TIMER Red blinks The power indicator blinks in red when the projector is on. About the lamp replacement indicator • Securely install the filter cover. • If the power indicator blinks even • The filter cover, lamp when the filter cover is securely unit cover or lens installed, contact your nearest cover is open. Sharp Authorized Projector Dealer or Service Center for advice. PG-C45X
- Page 1 and 2: MODEL MODELL PG-C45X In the interes
- Page 3 and 4: IMPORTANT SERVICE SAFETY NOTES (for
- Page 5 and 6: 12345678901234567890123456789012123
- Page 7 and 8: Precautions for using lead-free sol
- Page 9 and 10: Projector (Rear View) USB Port AUDI
- Page 11 and 12: Connection Pin Assignments INPUT 1/
- Page 13: REMOVING OF MAJOR PARTS 13 PG-C45X
- Page 17 and 18: 17 PG-C45X Adjusting the mirrors Th
- Page 19 and 20: How to Release the System Lock 19 P
- Page 21 and 22: No. Adjustment Items Adjustment Con
- Page 23 and 24: No. Adjustment Items Adjustment Con
- Page 25 and 26: How to Adjust the PC I/F unit 25 PG
- Page 27 and 28: Group Sub Group Subject Process Mod
- Page 29 and 30: Lamp fails to light-up Turn on the
- Page 31 and 32: No audio output Is the audio signal
- Page 33 and 34: Checking the S-video system Is the
- Page 35 and 36: Checking the RGB Sync. Are the sync
- Page 37 and 38: 37 PG-C45X TROUBLE SHOOTING TABLE f
- Page 39 and 40: 39 PG-C45X TROUBLE SHOOTING TABLE f
- Page 41 and 42: 41 PG-C45X TROUBLE SHOOTING TABLE f
- Page 43 and 44: 4 43 PG-C45X TROUBLE SHOOTING TABLE
- Page 45 and 46: 5 45 PG-C45X TROUBLE SHOOTING TABLE
- Page 47 and 48: 47 PG-C45X TROUBLE SHOOTING TABLE f
- Page 49 and 50: HINWEIS FÜR DAS WARTUNGSPERSONAL 1
- Page 51 and 52: Bedienungsanleitung Projektor (Vord
- Page 53 and 54: Fernbedienung (Vordersicht) KEYSTON
- Page 55 and 56: Abmessungen Einheiten: Zoll (mm) 8
- Page 57 and 58: 57 PG-C45X 3. Entfernen der Leiterp
- Page 59 and 60: KURZBESCHREIBUNG DER OPTIK-EINHEIT
- Page 61 and 62: Ersetzen der Prismen-Einheit 1. Die
- Page 63 and 64: ELEKTRISCHE EINSTELLUNG Nr. Einstel
1<br />
2<br />
Connect the power cord.<br />
• Plug the power cord into the AC socket<br />
of the projector.<br />
Reset the lamp timer.<br />
• While pressing simultaneously ,<br />
and on the projector, press<br />
•<br />
ON<br />
on<br />
the projector.<br />
“LAMP 100%” is displayed, indicating<br />
that the lamp timer is reset.<br />
Info<br />
• Make sure to reset the lamp timer only<br />
when replacing the lamp. If you reset the<br />
lamp timer and continue to use the same<br />
lamp, this may cause the lamp to become<br />
damaged or explode.<br />
Power indicator<br />
Lamp replacement<br />
indicator<br />
Temperature warning<br />
indicator<br />
About the temperature warning indicator<br />
If the temperature inside the projector<br />
increases, due to blockage<br />
of the air vents, or the setting location,<br />
“ ” will blink in the<br />
lower left corner of the picture. If<br />
the temperature keeps on rising,<br />
the lamp will turn off and the temperature<br />
warning indicator will<br />
blink, the cooling fan will run for<br />
further 90 seconds, then the power<br />
will be shut off. After “ ” appears,<br />
be sure to perform the following<br />
measures.<br />
15<br />
Power (ON)<br />
button<br />
AC socket<br />
INPUT button ENTER button<br />
UNDO buttom<br />
Ë The warning lights on the projector indicate problems inside the projector.<br />
Ë If a problem occurs, either the temperature warning indicator or the lamp replacement indicator will<br />
illuminate red, and the power will turn off. After the power has been turned off, follow the procedures<br />
given below.<br />
ËThe<br />
lamp life becomes 0%, when used<br />
for approximately 2,000 hours with “ON”<br />
in “Power Save” or when used for approximately<br />
1,500 hours with “OFF” in “Power<br />
Save”.<br />
ËWhen<br />
the remaining lamp life becomes<br />
6% or less, “ ” will be displayed on the<br />
screen in yellow. When the percentage<br />
becomes 0%, “ ” will change to “ ”<br />
(red), the lamp will automatically turn off<br />
and then the projector as well. At this time,<br />
the lamp replacement indicator will illuminate<br />
in red.<br />
ËIf<br />
you try to turn on the projector a fourth<br />
time without replacing the lamp, the projector<br />
will not turn on.<br />
Maintenance indicator Condition Problem Possible Solution<br />
Temperature<br />
warning<br />
indicator<br />
Normal<br />
Off<br />
Abnormal<br />
Red on/<br />
Power off<br />
The internal<br />
temperature is<br />
abnormally high.<br />
•<br />
Blocked air intake<br />
Relocate the projector to an area<br />
with proper ventilation.<br />
• Cooling fan break-<br />
•<br />
down<br />
Take the projector to your nearest<br />
• Internal circuit failure<br />
Sharp Authorized Projector Dealer<br />
• Clogged air intake<br />
or Service Center for repair.<br />
Lamp<br />
replacement<br />
indicator<br />
Green on<br />
Green<br />
blinks<br />
when the<br />
lamp is<br />
active.<br />
Red blinks/<br />
Red on<br />
Red on/<br />
Power off<br />
Time to change<br />
the lamp<br />
The lamp does<br />
not illuminate.<br />
• Remaining lamp life<br />
becomes 6% or<br />
under.<br />
• Burnt-out lamp<br />
• Lamp circuit failure<br />
• Carefully replace the lamp.<br />
• Take the projector to your nearest<br />
Sharp Authorized Projector Dealer<br />
or Service Center for repair.<br />
• Please exercise care when<br />
replacing the lamp.<br />
Power<br />
indicator<br />
Green on/<br />
Red on<br />
RESETING THE LAMP TIMER<br />
Red blinks<br />
The power<br />
indicator blinks<br />
in red when the<br />
projector is on.<br />
About the lamp<br />
replacement indicator<br />
• Securely install the filter cover.<br />
• If the power indicator blinks even<br />
• The filter cover, lamp<br />
when the filter cover is securely<br />
unit cover or lens<br />
installed, contact your nearest<br />
cover is open.<br />
Sharp Authorized Projector Dealer<br />
or Service Center for advice.<br />
<strong>PG</strong>-<strong>C45X</strong>


