Robinair 34700-2K 134a Recovery Unit - NY Tech Supply
Robinair 34700-2K 134a Recovery Unit - NY Tech Supply
Robinair 34700-2K 134a Recovery Unit - NY Tech Supply

You also want an ePaper? Increase the reach of your titles
YUMPU automatically turns print PDFs into web optimized ePapers that Google loves.
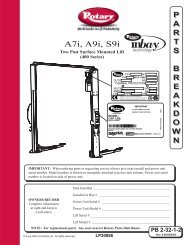
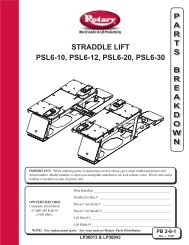
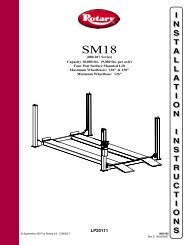
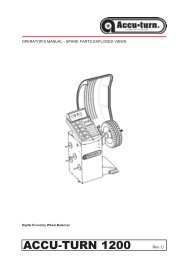
Setup Instructions<br />
NOTE: The vacuum pump is shipped without oil in the reservoir. Before starting<br />
the pump, oil must be added to the pump, or damage to the pump may occur.<br />
6<br />
5. Press the START key to begin the oil fill process.<br />
6. Attach the flexible tube and cap to the oil bottle, and pour eight ounces of<br />
vacuum pump oil into the fill port.<br />
7. Press the START key. While the vacuum pump is running, slowly add oil<br />
until the level rises to the center of the reservoir's sight glass.<br />
8. Press the STOP key, and replace the black plastic plug on the fill port.<br />
9. Connect the service hoses, open both panel valves, and press START.<br />
10. Connect the fill hose to a full source tank.<br />
11. Open the tank valve. Invert the tank and install it on the back of the unit,<br />
making sure to secure the tank strap.<br />
NOTE: If using a refillable tank, install the tank upside down, and connect the fill<br />
hose to the vapor valve.<br />
12. Press START, and the unit will automatically run a<br />
five-minute vacuum to clear all internal air.<br />
13. After the vacuum is complete, press START to begin<br />
filling the internal storage vessel.<br />
14. The unit stops when a sufficient amount of refrigerant<br />
has been transferred to the internal tank, or when the<br />
source tank is empty. Press the STOP key to pause the<br />
process. Press STOP again to exit, or START to<br />
resume. This process takes 15-20 minutes.<br />
NOTE: Add at least 8 lb. (3.6 kg) of refrigerant before<br />
stopping the process to ensure enough refrigerant is available<br />
for charging.<br />
15. When the fill process is complete, you may press STOP<br />
to exit.<br />
16. The unit is now ready to operate.<br />
NOTE: There is no need to calibrate the scale, because it is<br />
calibrated at the factory.<br />
OUNCES<br />
12<br />
4<br />
3<br />
2<br />
1<br />
MLS<br />
340<br />
320<br />
11<br />
300<br />
10<br />
280<br />
9<br />
260<br />
8<br />
240<br />
220<br />
7<br />
200<br />
6<br />
180<br />
160<br />
5<br />
140<br />
120<br />
100<br />
80<br />
60<br />
40<br />
20<br />
FLOW<br />
RECOVER VACUUM<br />
VAC-CHARGE CHARGE<br />
START<br />
STOP<br />
LOW HIGH<br />
CLOSED<br />
CLOSED<br />
1 2 3<br />
RECOVER<br />
VACUUM<br />
RECOVER<br />
VACUUM<br />
OIL INJECT<br />
CHARGE<br />
4 5 6<br />
MENU<br />
F1<br />
7 8 9<br />
CLEAR<br />
ENTER 0<br />
IMPORTANT!<br />
For maximum<br />
performance,<br />
change the<br />
vacuum pump<br />
oil frequently.<br />
IMPORTANT!<br />
The pump must<br />
be running<br />
when adding<br />
oil.<br />
CLOSE<br />
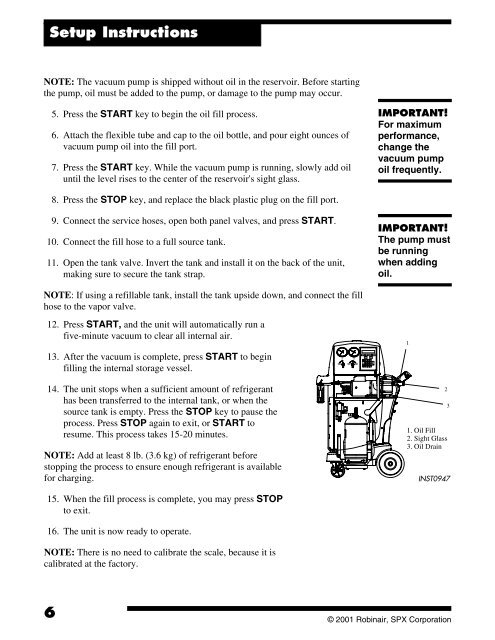
INST0947<br />
© 2001 <strong>Robinair</strong>, SPX Corporation<br />
1<br />
2<br />
3<br />
1. Oil Fill<br />
2. Sight Glass<br />
3. Oil Drain