

Focus On Lighting Photos Focus on the Fundamentals.pdf

Create successful ePaper yourself
Turn your PDF publications into a flip-book with our unique Google optimized e-Paper software.
<str<strong>on</strong>g>Focus</str<strong>on</strong>g> <str<strong>on</strong>g>On</str<strong>on</strong>g><br />
<str<strong>on</strong>g>Lighting</str<strong>on</strong>g> <str<strong>on</strong>g>Photos</str<strong>on</strong>g>
The <str<strong>on</strong>g>Focus</str<strong>on</strong>g> <str<strong>on</strong>g>On</str<strong>on</strong>g> Series<br />
Photography is all about <strong>the</strong> end result—your photo. The <str<strong>on</strong>g>Focus</str<strong>on</strong>g> <str<strong>on</strong>g>On</str<strong>on</strong>g> series offers books<br />
with essential informati<strong>on</strong> so you can get <strong>the</strong> best photos without spending thousands<br />
of hours learning techniques or software skills. Each book focuses <strong>on</strong> a specific area<br />
of knowledge within photography, cutting through <strong>the</strong> often c<strong>on</strong>fusing waffle of<br />
photographic jarg<strong>on</strong> to focus solely <strong>on</strong> showing you what you need to do to capture<br />
beautiful and dynamic shots every time you pick up your camera.<br />
Titles in <strong>the</strong> <str<strong>on</strong>g>Focus</str<strong>on</strong>g> <str<strong>on</strong>g>On</str<strong>on</strong>g> series:
<str<strong>on</strong>g>Focus</str<strong>on</strong>g> <str<strong>on</strong>g>On</str<strong>on</strong>g><br />
<str<strong>on</strong>g>Lighting</str<strong>on</strong>g> <str<strong>on</strong>g>Photos</str<strong>on</strong>g><br />
Fil Hunter and Robin Reid<br />
AMSTERDAM • BOSTON • HEIDELBERG • LONDON • NEW YORK • OXFORD • PARIS<br />
SAN DIEGO • SAN FRANCISCO • SINGAPORE • SYDNEY • TOKYO<br />
Focal Press is an imprint of Elsevier
Focal Press is an imprint of Elsevier<br />
225 Wyman Street, Waltham, MA 02451, USA<br />
The Boulevard, Langford Lane, Kidlingt<strong>on</strong>, Oxford, OX5 1GB, UK<br />
© 2011 Elsevier, Inc. All rights reserved.<br />
No part of this publicati<strong>on</strong> may be reproduced or transmitted in any form or by any means, electr<strong>on</strong>ic or mechanical, including<br />
photocopying, recording, or any informati<strong>on</strong> storage and retrieval system, without permissi<strong>on</strong> in writing from <strong>the</strong> publisher. Details <strong>on</strong><br />
how to seek permissi<strong>on</strong>, fur<strong>the</strong>r informati<strong>on</strong> about <strong>the</strong> Publisher’s permissi<strong>on</strong>s policies and our arrangements with organizati<strong>on</strong>s such<br />
as <strong>the</strong> Copyright Clearance Center and <strong>the</strong> Copyright Licensing Agency, can be found at our website: www.elsevier.com/permissi<strong>on</strong>s.<br />
This book and <strong>the</strong> individual c<strong>on</strong>tributi<strong>on</strong>s c<strong>on</strong>tained in it are protected under copyright by <strong>the</strong><br />
Publisher (o<strong>the</strong>r than as may be noted herein).<br />
Notices<br />
Knowledge and best practice in this field are c<strong>on</strong>stantly changing. As new research and experience broaden our understanding,<br />
changes in research methods, professi<strong>on</strong>al practices, or medical treatment may become necessary.<br />
Practiti<strong>on</strong>ers and researchers must always rely <strong>on</strong> <strong>the</strong>ir own experience and knowledge in evaluating and using any informati<strong>on</strong>,<br />
methods, compounds, or experiments described herein. In using such informati<strong>on</strong> or methods <strong>the</strong>y should be mindful of <strong>the</strong>ir own<br />
safety and <strong>the</strong> safety of o<strong>the</strong>rs, including parties for whom <strong>the</strong>y have a professi<strong>on</strong>al resp<strong>on</strong>sibility.<br />
To <strong>the</strong> fullest extent of <strong>the</strong> law, nei<strong>the</strong>r <strong>the</strong> Publisher nor <strong>the</strong> authors, c<strong>on</strong>tributors, or editors, assume any liability for any injury and/or<br />
damage to pers<strong>on</strong>s or property as a matter of products liability, negligence or o<strong>the</strong>rwise, or from any use or operati<strong>on</strong> of any methods,<br />
products, instructi<strong>on</strong>s, or ideas c<strong>on</strong>tained in <strong>the</strong> material herein.<br />
Library of C<strong>on</strong>gress Cataloging-in-Publicati<strong>on</strong> Data<br />
Hunter, Fil.<br />
<str<strong>on</strong>g>Focus</str<strong>on</strong>g> <strong>on</strong> lighting photos : focus <strong>on</strong> <strong>the</strong> fundamentals / Fil Hunter, Robin Reid.<br />
p. cm.<br />
ISBN 978-0-240-81711-8 (pbk.)<br />
1. Photography—<str<strong>on</strong>g>Lighting</str<strong>on</strong>g>. I. Reid, Robin, 1949– II. Title.<br />
TR590.H839 2011<br />
778.7’2—dc22<br />
2011009663<br />
British Library Cataloguing-in-Publicati<strong>on</strong> Data<br />
A catalogue record for this book is available from <strong>the</strong> British Library.<br />
ISBN: 978-0-240-81711-8<br />
For informati<strong>on</strong> <strong>on</strong> all Focal Press publicati<strong>on</strong>s<br />
visit our website at www.elsevierdirect.com<br />
Printed in China<br />
11 12 13 14 15 5 4 3 2 1<br />
Typeset by: diacriTech, Chennai, India
Dedicati<strong>on</strong><br />
To Polly Frye, who tirelessly organized and educated generati<strong>on</strong>s of<br />
photographers who wanted to learn.<br />
And, to Polly Frye, who said to Fil and Robin 30 years ago, “I think you two<br />
need to get to know each o<strong>the</strong>r better.” We took her advice.<br />
Thank you, Polly.<br />
v
C<strong>on</strong>tents<br />
v Dedicati<strong>on</strong><br />
ix Acknowledgments<br />
xiii Introducti<strong>on</strong>: <str<strong>on</strong>g>Lighting</str<strong>on</strong>g>? Why<br />
Bo<strong>the</strong>r?<br />
3 Chapter 1: There’s More Than<br />
<str<strong>on</strong>g>On</str<strong>on</strong>g>e Way to Get Things D<strong>on</strong>e<br />
5 Built-in flash<br />
7 Modifier 1: A mirror<br />
9 Modifier 2: A big white reflector<br />
11 O<strong>the</strong>r modifiers: Fill light,<br />
hair light<br />
13 Same principle: We can c<strong>on</strong>trol<br />
<strong>the</strong> size of <strong>the</strong> light in many ways<br />
16 Adding ano<strong>the</strong>r light<br />
23 Chapter 2: Tools: Now We<br />
Have Light, but How Do We<br />
Get It under C<strong>on</strong>trol?<br />
25 Off-camera flash<br />
27 How to trigger flash<br />
32 The size of <strong>the</strong> light<br />
35 But what if we d<strong>on</strong>’t have a wall<br />
or a ceiling to use for bounce?<br />
59 Now, get to work!<br />
61 Chapter 3: The Color of Light<br />
73 Using gels for dramatic color<br />
79 Chapter 4: Light and Shadow<br />
83 Texture<br />
86 Why does <strong>the</strong> same light look so<br />
different <strong>on</strong> ano<strong>the</strong>r subject?<br />
91 Chapter 5: Sunlight<br />
92 Found light<br />
97 Amending or mixing light<br />
103 Distance and haze<br />
104 Architecture<br />
107 Chapter 6: So, Where Do We<br />
Put This Light for Portraits?<br />
109 Split lighting<br />
111 Short lighting<br />
112 Broad lighting<br />
113 Hair light<br />
115 Background light<br />
116 Rim lighting/kicker<br />
118 Butterfly/Beauty lighting<br />
120 Low key versus high key lighting
C<strong>on</strong>tents<br />
127 The wrinkle<br />
128 Eyeglasses and lighting: Can<br />
<strong>the</strong>y get al<strong>on</strong>g?<br />
131 Groups<br />
135 Pets<br />
141 Chapter 7: So, Where Do We<br />
Put This Light for Metal?<br />
144 Flat metal<br />
147 Round metal<br />
151 Chapter 8: So, Where Do We<br />
Put This Light for Glass?<br />
152 Dark-field lighting<br />
154 Bright-field lighting<br />
157 A glass half full<br />
158 Glass and paper<br />
160 Bottles and more<br />
165 Chapter 9: Moti<strong>on</strong><br />
165 A bit of moti<strong>on</strong><br />
167 Lots of moti<strong>on</strong><br />
171 Freezing moti<strong>on</strong><br />
175 Chapter 10: The Future Is<br />
Now?<br />
175 New light sources<br />
176 Postproducti<strong>on</strong><br />
177 High dynamic range imaging<br />
183 C<strong>on</strong>clusi<strong>on</strong><br />
184 Glossary<br />
196 Index
Our thanks tO <strong>the</strong> c<strong>on</strong>tributors<br />
who generously made images<br />
available for us to use in this<br />
book. As you’ll see, some are<br />
professi<strong>on</strong>als, but o<strong>the</strong>rs are<br />
novices or hobbyists. It doesn’t<br />
really matter which is which.<br />
Both of <strong>the</strong> authors, Robin and<br />
Fil, made some fairly decent<br />
images as amateurs and <strong>the</strong>n<br />
went <strong>on</strong> to make a (hopefully<br />
very) few terrible <strong>on</strong>es as professi<strong>on</strong>als.<br />
We are all still learning.<br />
We must help each o<strong>the</strong>r.<br />
Thanks, too, to Wein and<br />
PocketWizard, for allowing <strong>the</strong><br />
use of images of <strong>the</strong>ir products,<br />
and to our various models:<br />
Mandeep, Karina, Joshua, Nancy,<br />
Maggie, San, Cathie, Maggie,<br />
Wendell, Stephanie, Katie,<br />
Joanne, Jan, Jas<strong>on</strong>, and Robert.<br />
A bit about our photographic<br />
c<strong>on</strong>tributors:<br />
Chris Brearley: I have no<br />
biography. I’m just a QA test<br />
engineer who enjoys taking<br />
photos. Although I tend to prefer<br />
staying in <strong>the</strong> studio, I’m trying<br />
to get out more and see what is<br />
around me. Page 166, fireworks.<br />
Alesa Dam: Born in 1971,<br />
Belgium, I have been intrigued by<br />
photography since my childhood.<br />
As a child I owned a Kodak<br />
Disc film camera. My fa<strong>the</strong>r was<br />
interested in photography himself<br />
and had some books about <strong>the</strong><br />
subject <strong>on</strong> <strong>the</strong> bookshelf. Love,<br />
study, and my first job got in<br />
<strong>the</strong> way of this hobby in my late<br />
teens and twenties. I regained<br />
interest in photography when<br />
we switched from disposable<br />
film cameras to our first, and<br />
<strong>on</strong>ly, digital point-and-shoot<br />
back in 2001. My first DSLR,<br />
bought sec<strong>on</strong>dhand in 2009,<br />
opened up a new world full of<br />
creativity. Being more involved in<br />
photography for <strong>on</strong>ly 2 years, I’m<br />
not really clear yet what directi<strong>on</strong><br />
it’s taking me, but it seems my<br />
preferred subjects include l<strong>on</strong>gexposure<br />
night photography,<br />
abstracts, and studio portraiture.<br />
Page 174, LEDs.<br />
Joel DeYoung: Based in<br />
Holland, Michigan, I began my<br />
Acknowledgments<br />
photographic journey in 2006<br />
and found that <strong>the</strong> challenges<br />
of photography fit well with my<br />
inquisitive pers<strong>on</strong>ality, my love of<br />
nature, and my need for artistic<br />
expressi<strong>on</strong>. Through photography,<br />
I have been able to experience<br />
and explore <strong>the</strong> world in new<br />
and w<strong>on</strong>derful ways, finding and<br />
photographing details in nature<br />
that most people overlook. From<br />
<strong>the</strong> grand landscape to <strong>the</strong> tiniest<br />
insect, I have found that <strong>the</strong> world<br />
is full of beauty when you take<br />
<strong>the</strong> time to notice. C<strong>on</strong>tact me at<br />
joel@joeldeyoungphotography<br />
.com. Page 96, boy’s head shot.<br />
John Hartman: John Hartman<br />
is a professi<strong>on</strong>al photographer<br />
who has d<strong>on</strong>e fine art and<br />
commercial work for more<br />
than 25 years. He works from<br />
a studio in Alexandria, Virginia,<br />
and produces assignment and<br />
stock imagery that is published<br />
in magazines every m<strong>on</strong>th. John<br />
is <strong>the</strong> s<strong>on</strong> of Henry Hartman, a<br />
nati<strong>on</strong>ally known illustrator and<br />
fine artist. His l<strong>on</strong>g-standing<br />
interest in nautical subjects has<br />
led to collaborati<strong>on</strong>s with various<br />
Acknowledgments ix
oating publicati<strong>on</strong>s including<br />
Chesapeake Bay magazine,<br />
where he has been a part of <strong>the</strong><br />
creative team for 13 years. John’s<br />
approach to photography is <strong>on</strong>e<br />
of discovery, and he describes<br />
his pers<strong>on</strong>al creative process as<br />
“visual explorati<strong>on</strong>.” <str<strong>on</strong>g>On</str<strong>on</strong>g> land<br />
he sees himself as a “street<br />
photographer” at heart. Through<br />
a busy shooting schedule, he<br />
produces an average of 30,000<br />
images annually. His prints<br />
have received “Best of Show”<br />
recogniti<strong>on</strong> in juried gallery<br />
competiti<strong>on</strong>s, and his magazine<br />
work has w<strong>on</strong> several publishing<br />
awards. Eastman Kodak has used<br />
his imagery in its advertising. John<br />
has taught photography at <strong>the</strong><br />
Art League School in Alexandria,<br />
Virginia, for 10 years, and he<br />
served 6 years <strong>on</strong> <strong>the</strong> Art League’s<br />
board of directors. He is a<br />
member of <strong>the</strong> American Society<br />
of Media Photographers (ASMP),<br />
Nik<strong>on</strong> Professi<strong>on</strong>al Service (NPS),<br />
<strong>the</strong> Stock Artists Alliance (SAA),<br />
and <strong>the</strong> Society for Photographic<br />
Educati<strong>on</strong> (SPE). In additi<strong>on</strong>, John<br />
offers fine art prints including<br />
abstracts, water- and sea-related<br />
subjects, and musicians in c<strong>on</strong>cert.<br />
Visit both of his sites to see more<br />
at www.johnhartman.com and<br />
www.hartmanfinearts.com.<br />
Page 92, boat.<br />
x<br />
<str<strong>on</strong>g>Focus</str<strong>on</strong>g> <str<strong>on</strong>g>On</str<strong>on</strong>g> <str<strong>on</strong>g>Lighting</str<strong>on</strong>g> <str<strong>on</strong>g>Photos</str<strong>on</strong>g><br />
Erik Heitfield: Erik Heitfield is<br />
an amateur photographer living in<br />
Washingt<strong>on</strong>, D.C. He has enjoyed<br />
photography all his life, but he<br />
<strong>on</strong>ly recently began experimenting<br />
with <strong>the</strong> use of off-camera flash<br />
and do-it-yourself light modifiers.<br />
He credits his knowledge of<br />
photographic lighting to <strong>the</strong> book<br />
Light—Science & Magic, to David<br />
Hobby’s strobist.com blog, and<br />
to his many friends <strong>on</strong> Flickr. You<br />
can view Erik’s o<strong>the</strong>r work <strong>on</strong><br />
Flickr.com under <strong>the</strong> screen name<br />
“EriksWeeklyPhoto.” Page 13, girl<br />
with hat; page 14, DIY softbox.<br />
Paul Hodgs<strong>on</strong>: I run a successful<br />
wedding and portrait business<br />
in <strong>the</strong> UK al<strong>on</strong>g with my wife,<br />
Nikki Hodgs<strong>on</strong>. While located<br />
in <strong>the</strong> north of <strong>the</strong> UK, it’s not<br />
uncomm<strong>on</strong> for us to travel outside<br />
of <strong>the</strong> UK for commissi<strong>on</strong>s. In my<br />
spare time I still take photographs<br />
and have an equal interest in<br />
capture and postproducti<strong>on</strong>.<br />
PP doesn’t mean oodles of pixel<br />
destructi<strong>on</strong>, just sharpening in all<br />
<strong>the</strong> right places and correcting any<br />
exposure errors. Surely not! We<br />
can be found at www.bof.uk.com,<br />
which stands for Box of Frogs.<br />
Page 67, both church images.<br />
David House Sr.: David<br />
House Sr. is a photographer in<br />
Lapeer, Michigan. His web page,<br />
www.LapeerPhotography.com,<br />
includes a representati<strong>on</strong> of<br />
his work. His primary focus is<br />
commercial photography and<br />
portraiture. His 25-year journey<br />
into photography has been<br />
largely self-taught, as he knew no<br />
<strong>on</strong>e with any knowledge about<br />
photography in <strong>the</strong> beginning.<br />
So he read books and magazines,<br />
asked a lot of questi<strong>on</strong>s,<br />
experimented, and tried new<br />
things. His nature photography<br />
is <strong>the</strong> opportunity to get back to<br />
what was his first photographic<br />
love, nature and landscapes.<br />
Because he is comfortable<br />
with lighting and flash in <strong>the</strong><br />
studio and <strong>on</strong> locati<strong>on</strong>, he<br />
often uses similar, yet modified,<br />
techniques in <strong>the</strong> field. Page 102,<br />
mushrooms and outdoor setup.<br />
Fil Hunter: Professi<strong>on</strong>al<br />
photographer from <strong>the</strong> age<br />
of 17. While achieving a double<br />
major in psychology and<br />
religi<strong>on</strong>, served as principal<br />
photographer experimenting with<br />
<strong>the</strong> predistorti<strong>on</strong> of images so that<br />
<strong>the</strong>y would appear undistorted <strong>on</strong><br />
a planetarium dome. Lead author<br />
of Light—Science & Magic, <strong>the</strong><br />
first book to establish universal<br />
principles of lighting.<br />
David Kittos: I’m a UK-based,<br />
amateur photographer currently
living in Surrey. My first<br />
photography experience was a<br />
ra<strong>the</strong>r unsuccessful attempt at<br />
underwater photography during<br />
a scuba diving holiday in <strong>the</strong><br />
Red Sea in 2005. Just like a<br />
bad workman who blames his<br />
tools, I still blame <strong>the</strong> camera<br />
I used at <strong>the</strong> time for my lack<br />
of success! It was a cheap and<br />
nasty $10 box that I bought in a<br />
local scuba shop. At some point<br />
I upgraded to a real camera, this<br />
time an Olympus SP350 with an<br />
underwater housing and a very<br />
expensive underwater flashgun.<br />
Things moved quickly from<br />
<strong>the</strong>re. Photography proved way<br />
too much fun to do <strong>on</strong>ly during<br />
my diving holidays, so I bought<br />
an Olympus DSLR, a copy of<br />
Light—Science & Magic, and<br />
2 years later I’m still learning<br />
new stuff and have built up a<br />
diverse portfolio. My interests<br />
include glassware photography,<br />
off-camera flash (speed lights<br />
and studio work), high-speed<br />
photography, and working with<br />
alternative models. I’m also<br />
an occasi<strong>on</strong>al c<strong>on</strong>tributor to<br />
photography magazines, and<br />
my work (pictures and articles)<br />
has been published in various<br />
UK and web publicati<strong>on</strong>s such<br />
as Underwater Photography web<br />
magazine (uwpmag.com), DSLR<br />
User, What Digital Camera (Flash<br />
Supplement), and Olympus User.<br />
Page 87, night lights; page 90,<br />
dusty road; pages 164, 171,<br />
strawberry; page 173, set-up;<br />
page 182, babo<strong>on</strong>.<br />
Ant<strong>on</strong> Lenke: Ant<strong>on</strong> Lenke<br />
remains enigmatic. Some say<br />
he has shot Czech supermodels<br />
while hanging out of an airplane.<br />
O<strong>the</strong>rs claim he can build a<br />
camera with a shoebox, a dart,<br />
and <strong>the</strong> chain from a 1957 Harley<br />
Davids<strong>on</strong>. The superhuman stories<br />
c<strong>on</strong>tinue to grow, but <strong>the</strong> proof<br />
is in <strong>the</strong> portfolio. For more, visit<br />
Ant<strong>on</strong>lenke.com or c<strong>on</strong>tact him<br />
at ant<strong>on</strong>lenke@gmail.com. No<br />
capes. Page 50, grid background.<br />
Ryan McGehee: When I was 18<br />
I graduated from <strong>the</strong> New York<br />
Institute of Photography (having<br />
enrolled when I was 16). This<br />
helped start me <strong>on</strong> my journey of<br />
photography. Now, many years<br />
later, my passi<strong>on</strong> for this art has<br />
c<strong>on</strong>tinued to increase. I enjoy<br />
capturing <strong>the</strong> beautiful moments<br />
in this world. Photography allows<br />
me to create works that I can<br />
share with o<strong>the</strong>rs, that which I see<br />
and feel. It may be an entire valley<br />
below me or <strong>the</strong> way <strong>the</strong> shadows<br />
fall <strong>on</strong> <strong>the</strong> snow. It may be <strong>the</strong> way<br />
<strong>the</strong> light ripples across <strong>the</strong> water<br />
or <strong>the</strong> perfecti<strong>on</strong> of a little detail.<br />
Whatever it is, it is that which I<br />
c<strong>on</strong>nect to, that I become a part<br />
of. This I try to capture <strong>the</strong> essence<br />
of, that feeling, that moment.<br />
Knowing that I will always be<br />
a student in this amazing craft,<br />
I c<strong>on</strong>tinually try to learn how to<br />
capture and present this beautiful<br />
world at its best. I want to be<br />
able to c<strong>on</strong>nect <strong>the</strong> viewers of my<br />
work with <strong>the</strong> beauty, uniqueness,<br />
and poetry of this world through<br />
my eyes, my photography.<br />
They tell me a pers<strong>on</strong> can get<br />
a lot by asking, so if you’re<br />
looking for a photographer,<br />
I would love to have <strong>the</strong><br />
opportunity to bring my visi<strong>on</strong><br />
to your commercial or editorial<br />
project. C<strong>on</strong>tact me at ryan@<br />
fleetingmomentsphoto.com or visit<br />
www.fleetingmomentsphoto.com.<br />
Page 63, mountain lake; page 65,<br />
girl at dock; page 66, water<br />
ripples; page 99, man with hat.<br />
Jeremy Millar: Jeremy Millar is<br />
a Sydney-based photographer.<br />
Working with portable lighting,<br />
Jeremy likes to experiment with<br />
simple lighting setups for portraits<br />
and dance photography. You<br />
can see more of his work at<br />
www.ensofoto.com. Page 101,<br />
ballerina; page 166, male dancer.<br />
Acknowledgments xi
Robin Reid: Trained as a<br />
classical pianist, loves Motown<br />
and <strong>the</strong> Rolling St<strong>on</strong>es anyway.<br />
Degree in internati<strong>on</strong>al politics,<br />
danced professi<strong>on</strong>ally for<br />
15 years. Still works as a portrait<br />
and commercial photographer<br />
and graphic designer, with a<br />
particular penchant for book<br />
design. Teaches regularly for <strong>the</strong><br />
Alexandria Art League.<br />
Rishi Saikia: Rishi is an up and<br />
coming photographer from India,<br />
specializing in portraiture. He has<br />
a distinctive minimalist style of<br />
lighting that helps preserve, and<br />
at times create, a signature mood<br />
in his images. Rishi embarked <strong>on</strong><br />
his photographic journey about<br />
7 years back when he happened<br />
to come across Fil Hunter and Paul<br />
Fuqua’s amazing book Light—<br />
Science & Magic: An Introducti<strong>on</strong><br />
to Photographic <str<strong>on</strong>g>Lighting</str<strong>on</strong>g>. He is<br />
self-taught but c<strong>on</strong>siders <strong>the</strong> <strong>on</strong>line<br />
photographic community at Flickr<br />
as a major source of learning and<br />
inspirati<strong>on</strong>. Rishi’s latest images<br />
can be found <strong>on</strong> his Flickr stream<br />
(Rishi S). He also maintains a<br />
blog (www.roll<strong>on</strong>.in) where he<br />
documents his photographic<br />
journey, detailing every photo<br />
shoot—<strong>the</strong> entire process of<br />
c<strong>on</strong>ceptualizing, executing, and<br />
postprocessing his images. He<br />
xii<br />
<str<strong>on</strong>g>Focus</str<strong>on</strong>g> <str<strong>on</strong>g>On</str<strong>on</strong>g> <str<strong>on</strong>g>Lighting</str<strong>on</strong>g> <str<strong>on</strong>g>Photos</str<strong>on</strong>g><br />
accepts requests for photo shoots<br />
via his Flickr mail. Page 74,<br />
smoker; page 116, woman.<br />
Adam Sewell: I am 37 years<br />
old and have lived in and around<br />
South East England all my life.<br />
I first started photography to<br />
document <strong>the</strong> growth of my<br />
family, preferring <strong>the</strong> power of <strong>the</strong><br />
still image as a medium; it is an<br />
<strong>on</strong>going and w<strong>on</strong>derful project. I<br />
also venture into still life as a way<br />
of exploring shape and form and<br />
have taken <strong>on</strong> some commercial<br />
work, although my family project<br />
remains my passi<strong>on</strong>. C<strong>on</strong>tact me<br />
at asimaging@btinternet.com.<br />
Page 64, mountain snow;<br />
page 105, clock tower.<br />
Ivan Sorens<strong>on</strong>: Ivan Sorensen<br />
is from Hamilt<strong>on</strong>, <str<strong>on</strong>g>On</str<strong>on</strong>g>tario,<br />
Canada, and has been involved<br />
in photography since <strong>the</strong> mid-<br />
1970s, shooting weddings and<br />
developing and printing from a<br />
home darkroom. Although he<br />
has not been a full-time hobby<br />
photographer for many years<br />
because of <strong>the</strong> vagaries of career<br />
and family, he has returned to<br />
<strong>the</strong> world of digital imaging,<br />
specializing in fine art landscape<br />
prints and <strong>the</strong> odd portrait thrown<br />
in for balance. Ivan’s work has<br />
been included in several galleries,<br />
such as <strong>the</strong> summer issue of<br />
PhotoNews magazine, several<br />
commercial websites, and this<br />
fine instructi<strong>on</strong>al book by Fil<br />
Hunter and Robin Reid. C<strong>on</strong>tact<br />
him at ivan.sorensen@hotmail<br />
.com or visit www.flickr.com/<br />
photos/pics_by_ivan. Page 60,<br />
morning lake; page 3, grapes.<br />
T<strong>on</strong>y Traub: I am totally selftaught<br />
and have been shooting<br />
since I was a teenager. I started<br />
with a Minolta xg1, I believe, and<br />
have used various film cameras<br />
over time. My favorite types of<br />
photos back <strong>the</strong>n were mostly<br />
about my camping trips with<br />
friends and <strong>the</strong> scenery around our<br />
different campsites. I got into digital<br />
about 3 to 4 years back. My first<br />
digital camera was a Nik<strong>on</strong> d50,<br />
which I still own. I now use a<br />
Nik<strong>on</strong> d300, which is an excellent<br />
body. I still use my d50 though and<br />
think it’s also an excellent camera<br />
as well. I also have a Nik<strong>on</strong> n80<br />
for when I like to play with film.<br />
I hope to get into medium format<br />
photography some day and start<br />
to learn landscape photography.<br />
As of now, I mostly shoot still life/<br />
tabletop photography because<br />
I like <strong>the</strong> total c<strong>on</strong>trol you have<br />
over lighting and setup. Page 75,<br />
whisks.<br />
All unattributed images and<br />
diagrams are by Robin and Fil.
Modern digital cameras can do<br />
everything for us, right? They<br />
focus accurately. They get a<br />
good exposure almost every<br />
time. We’ve got <strong>the</strong> sun, and<br />
our built-in flash, and maybe an<br />
additi<strong>on</strong>al more powerful flash,<br />
as well as all <strong>the</strong>ir manuals, so<br />
why do we need to learn about<br />
light?<br />
If we need more light, we can<br />
just use that built-in or popup<br />
camera flash, what we’ll refer<br />
to as built-in flash, and we get<br />
Introducti<strong>on</strong>: <str<strong>on</strong>g>Lighting</str<strong>on</strong>g>? Why Bo<strong>the</strong>r?<br />
as much light as most people<br />
need. Still not enough light?<br />
D<strong>on</strong>’t have a built-in flash? Just<br />
put <strong>on</strong>e of those smart dedicated<br />
flashes <strong>on</strong> <strong>the</strong> hot shoe, <strong>the</strong> <strong>on</strong>es<br />
that intelligently measure <strong>the</strong>ir<br />
own reflected light and know<br />
when <strong>the</strong> light is enough and turn<br />
<strong>the</strong>mselves off. We can even set<br />
<strong>the</strong>m to communicate with <strong>the</strong><br />
camera so that <strong>the</strong> camera sees<br />
both <strong>the</strong> flash and <strong>the</strong> ambient<br />
light and adjusts intelligently<br />
between <strong>the</strong> two.<br />
Any terms you do not<br />
understand here? Check<br />
in <strong>the</strong> glossary at <strong>the</strong><br />
end of this book. In<br />
fact, if c<strong>on</strong>trolling light<br />
is new to you, you may<br />
want to at least<br />
skim <strong>the</strong> glossary<br />
right now.<br />
It’s easy <strong>the</strong>se days. The smart<br />
camera and <strong>the</strong> smart flash do<br />
<strong>the</strong> hard thinking for us; all we<br />
need to do is to c<strong>on</strong>centrate <strong>on</strong><br />
our art.<br />
But you’re not buying any of<br />
this misinformati<strong>on</strong> are you?<br />
Or at least not all of it. That’s<br />
why you bought (or borrowed<br />
or stole) this book in <strong>the</strong> first<br />
place. There has to be more,<br />
but what is it? More equipment?<br />
Sometimes, but not usually.<br />
Better pictures mostly require<br />
simply understanding how to use<br />
whatever light we have.<br />
There is more. It’s not difficult<br />
to learn, and you have <strong>the</strong><br />
guidebook in your hands right<br />
now. The key is learning how<br />
light works and how to get it<br />
where you want it and with<br />
<strong>the</strong> quality of light you need,<br />
and that means turning off all<br />
smart settings for now. If you<br />
There IS more!<br />
Introducti<strong>on</strong>: <str<strong>on</strong>g>Lighting</str<strong>on</strong>g>? Why Bo<strong>the</strong>r? xiii
learn to work with simple, dumb<br />
lighting—where you do <strong>the</strong><br />
thinking—you’ll get great images<br />
with simple equipment. If you’ve<br />
got <strong>on</strong>e of those dedicated<br />
flashes already and learn to<br />
work with it in manual mode first,<br />
you’ll actually make better use<br />
of its sophisticated capabilities<br />
afterward. For our purposes<br />
here, we want <strong>the</strong> camera and<br />
any flash we have to be set to<br />
manual, so we’re making all <strong>the</strong><br />
decisi<strong>on</strong>s.<br />
Sometimes we find <strong>the</strong> light;<br />
everything is perfect—shoot<br />
now, d<strong>on</strong>’t wait! But to do that,<br />
we have to learn to see that <strong>the</strong><br />
light is perfect. We also need to<br />
see when <strong>the</strong> light is wr<strong>on</strong>g and<br />
decide what to do about that<br />
“wr<strong>on</strong>g” light. Often we can fix<br />
problems; sometimes we d<strong>on</strong>’t<br />
bo<strong>the</strong>r. If it’s our best friend’s<br />
wedding, we hope that milest<strong>on</strong>e<br />
is not ever going to happen<br />
again and we take <strong>the</strong> picture<br />
anyway. We d<strong>on</strong>’t get ano<strong>the</strong>r<br />
chance <strong>on</strong> that <strong>on</strong>e.<br />
There will be o<strong>the</strong>r times when<br />
<strong>the</strong> light is bad, but we can at<br />
least help it very quickly: pop<br />
up that built-in flash (or turn <strong>on</strong><br />
<strong>the</strong> flash we’ve already attached<br />
to <strong>the</strong> camera, just in case we<br />
needed it) to fill shadows if a<br />
xiv<br />
<str<strong>on</strong>g>Focus</str<strong>on</strong>g> <str<strong>on</strong>g>On</str<strong>on</strong>g> <str<strong>on</strong>g>Lighting</str<strong>on</strong>g> <str<strong>on</strong>g>Photos</str<strong>on</strong>g><br />
face is sunlit entirely from <strong>the</strong><br />
back. Sometimes this will make<br />
quite a beautiful picture, but<br />
often not so beautiful. There’s no<br />
magic in when it happens right<br />
and when it happens wr<strong>on</strong>g,<br />
though (unless it’s <strong>the</strong> magic of<br />
our own brains). The difference<br />
between <strong>the</strong> good and <strong>the</strong> bad<br />
depends <strong>on</strong> whe<strong>the</strong>r we learn to<br />
see <strong>the</strong> difference and whe<strong>the</strong>r<br />
we have time to fix <strong>the</strong> problems.<br />
Balancing <strong>the</strong> relative brightness<br />
of <strong>the</strong> flash and <strong>the</strong> ambient<br />
light makes a huge difference,<br />
and doing that requires time for<br />
us to think. Timing and learning<br />
relate, though. If we learn better,<br />
we can work faster. That gives us<br />
more time.<br />
Finally, <strong>the</strong>re will be many, many<br />
times when putting <strong>the</strong> flash <strong>on</strong><br />
<strong>the</strong> camera is <strong>the</strong> worst thing to<br />
do. Still, what if <strong>the</strong> <strong>on</strong>ly flash<br />
we have is <strong>the</strong> <strong>on</strong>e built into<br />
<strong>the</strong> camera? We certainly can’t<br />
disassemble our cameras to<br />
put <strong>the</strong> flash somewhere else.<br />
That’s a job for engineers, most<br />
(not all) of whom have put so<br />
much effort into learning <strong>the</strong>ir<br />
craft that <strong>the</strong>y haven’t had time<br />
to learn photography as art. At<br />
<strong>the</strong> same time, we need to learn<br />
some engineering to be good<br />
photographers.<br />
Learn engineering! Horrors!<br />
No, not horrors at all, for two<br />
reas<strong>on</strong>s. First, <strong>the</strong> engineering we<br />
need is mostly stuff we already<br />
learned when we started to<br />
use our eyes as babies, but it’s<br />
sitting in <strong>the</strong> unc<strong>on</strong>scious back<br />
of our brains. There’s nothing<br />
new to learn; we simply need<br />
to move what we already know<br />
from <strong>the</strong> back to <strong>the</strong> intelligent<br />
fr<strong>on</strong>t of our brains to become<br />
aware of what we already know.<br />
The sec<strong>on</strong>d good news is that<br />
<strong>the</strong> engineering can be cheap.<br />
All of us want an amount of<br />
photographic equipment with a<br />
value approximately equal to our<br />
nati<strong>on</strong>al debt (in whatever nati<strong>on</strong><br />
we live). At <strong>the</strong> same time, we<br />
can often do as much with pieces<br />
of cardboard and aluminum foil.<br />
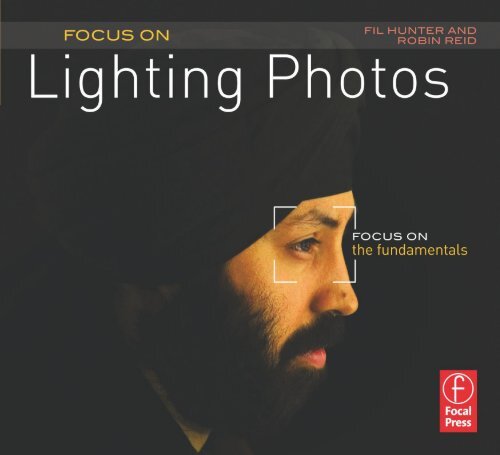
In our cover photograph, <strong>the</strong><br />
important light source was <strong>the</strong><br />
built-in flash. It was <strong>the</strong> <strong>on</strong>ly flash<br />
used. Most people’s reacti<strong>on</strong><br />
when <strong>the</strong>y learn this is to say,<br />
“No way!” This little flash is not<br />
known for creating such beautiful<br />
light. Its light always comes<br />
from <strong>the</strong> fr<strong>on</strong>t of <strong>the</strong> camera,<br />
which doesn’t seem to be what is<br />
happening in this portrait. If you<br />
have a white wall (or white paper<br />
taped to a colored wall), some<br />
cardboard, and silver foil, you
can do this picture, too. We’ll talk<br />
you through it in Chapter 1.<br />
Our goal here is to give you<br />
enough knowledge of lighting—<br />
whatever <strong>the</strong> source—that you<br />
can take great photos without a<br />
t<strong>on</strong> of gear or expensive strobes.<br />
We also want you to understand<br />
<strong>the</strong> lighting before you make<br />
any more significant equipment<br />
investment. If you decide you<br />
must have <strong>on</strong>e more light, not<br />
attached to <strong>the</strong> camera, get <strong>the</strong><br />
least intelligent, least expensive<br />
you can find. It will always be<br />
useful in <strong>the</strong> future when you<br />
need <strong>on</strong>e more light in a complex<br />
arrangement.<br />
Later, if you need a more<br />
expensive flash, or a whole studio<br />
filled with strobes, you will know<br />
better what works, spend your<br />
m<strong>on</strong>ey more wisely, and get a lot<br />
more from your investment.<br />
In <strong>the</strong> meantime, learn about<br />
light. Join a camera club, where<br />
<strong>the</strong>re is enthusiasm plus a<br />
great willingness to exchange<br />
informati<strong>on</strong>. Share what<br />
equipment is available. If each<br />
of you can afford to buy <strong>on</strong>ly<br />
<strong>on</strong>e cheap light, toge<strong>the</strong>r you<br />
can outclass many professi<strong>on</strong>al<br />
studios. We’ll also show you how<br />
to make all sorts of tools, which<br />
photographers need <strong>on</strong> occasi<strong>on</strong>.<br />
The camera and <strong>the</strong> little builtin<br />
flash or an off-camera flash<br />
often are not enough. Sometimes<br />
we need to make a little light<br />
bigger. Sometimes we need to<br />
restrict <strong>the</strong> spread of a light.<br />
There are tools to do this. Most<br />
can be homemade. Experiment.<br />
Make a homemade softbox,<br />
snoot, grid, and gobo. There<br />
are samples of all in <strong>the</strong> book,<br />
as well as excellent photos using<br />
<strong>the</strong>m. Tape a white sheet to a<br />
colored wall before investing in<br />
seamless paper. Learn what you<br />
like to work with—what helps<br />
you get <strong>the</strong> photos you want.<br />
If you find yourself wearing out<br />
your homemade versi<strong>on</strong>s, <strong>the</strong>n<br />
it’s time to upgrade. But while<br />
you’re learning, save your m<strong>on</strong>ey.<br />
Professi<strong>on</strong>al equipment is great—<br />
it’s made to hold up for a career.<br />
But it tends to be expensive. Resist<br />
<strong>the</strong> urge to run out and buy stuff.<br />
Ra<strong>the</strong>r like exercise equipment,<br />
for all too many photographers<br />
(professi<strong>on</strong>al and amateur),<br />
<strong>the</strong>se tools just ga<strong>the</strong>r dust all too<br />
often. Until you’re ready for <strong>the</strong><br />
investment, make your own tools<br />
or rent <strong>the</strong>m or borrow <strong>the</strong>m. In<br />
<strong>the</strong> l<strong>on</strong>g run, you’ll end up with<br />
equipment you actually use and<br />
not waste m<strong>on</strong>ey and stuff your<br />
basement with cool gear you<br />
d<strong>on</strong>’t use.<br />
Photography has always been<br />
exciting. Today, we d<strong>on</strong>’t have to<br />
wait for <strong>the</strong> film to be processed<br />
to know if we got <strong>the</strong> shot. With<br />
digital, we know immediately.<br />
It’s an ever-changing field.<br />
New technology. New software.<br />
Boy, it’s fun. However, with<br />
more knowledge and a few<br />
tools, you’re more likely to get<br />
<strong>the</strong> image you want and get<br />
it faster.<br />
Introducti<strong>on</strong>: <str<strong>on</strong>g>Lighting</str<strong>on</strong>g>? Why Bo<strong>the</strong>r? xv
Chapter 1: There’s More Than <str<strong>on</strong>g>On</str<strong>on</strong>g>e<br />
Way to Get Things D<strong>on</strong>e<br />
We’ll start With profile lighting. It’s fairly<br />
easy. This is not lighting we’ll often use,<br />
because it works <strong>on</strong>ly with <strong>on</strong>e head<br />
positi<strong>on</strong>. Okay, two positi<strong>on</strong>s: cameraleft<br />
and camera-right, essentially <strong>the</strong><br />
same thing d<strong>on</strong>e from each directi<strong>on</strong>.<br />
Still, <strong>the</strong> subject doesn’t have to “pose”<br />
for <strong>the</strong> picture. Well, <strong>the</strong> pers<strong>on</strong> does<br />
pose, but because <strong>the</strong> subject doesn’t<br />
have to face <strong>the</strong> camera, he or she<br />
doesn’t have to interact with <strong>the</strong> camera.<br />
The subject need not be friendly,<br />
dignified, warm, assertive; any emoti<strong>on</strong><br />
or no emoti<strong>on</strong> will work. This gives us<br />
two advantages.<br />
First, we d<strong>on</strong>’t need a professi<strong>on</strong>al<br />
model, performer, or actor. Nor do we<br />
need to try to turn a “real pers<strong>on</strong>” into a<br />
professi<strong>on</strong>al subject. This makes things<br />
easy for <strong>the</strong> subject. “Just sit <strong>the</strong>re, and<br />
I’ll do <strong>the</strong> rest.”<br />
Sec<strong>on</strong>d, because we d<strong>on</strong>’t have to<br />
direct <strong>the</strong> subject very much, we can<br />
c<strong>on</strong>centrate just <strong>on</strong> <strong>the</strong> lighting. Later,<br />
when we’re sure we know <strong>the</strong> lighting so<br />
well that we d<strong>on</strong>’t have to think about it<br />
much, we can <strong>the</strong>n c<strong>on</strong>centrate instead<br />
<strong>on</strong> directing <strong>the</strong> subject to look as good<br />
as possible.<br />
Because we d<strong>on</strong>’t have to worry much<br />
about posing and emoti<strong>on</strong>, we’ll<br />
c<strong>on</strong>centrate mostly <strong>on</strong> <strong>the</strong> simple<br />
mechanics of how <strong>the</strong> light behaves.<br />
This light will behave in exactly <strong>the</strong> same<br />
ways with o<strong>the</strong>r poses, but let’s learn<br />
about that behavior with an easy pose.<br />
There’s More Than <str<strong>on</strong>g>On</str<strong>on</strong>g>e Way to Get Things D<strong>on</strong>e<br />
3
4<br />
<str<strong>on</strong>g>Focus</str<strong>on</strong>g> <str<strong>on</strong>g>On</str<strong>on</strong>g> <str<strong>on</strong>g>Lighting</str<strong>on</strong>g> <str<strong>on</strong>g>Photos</str<strong>on</strong>g><br />
What’s this “camera-right”<br />
business?<br />
It’s a term invented in<br />
<strong>the</strong>ater and dance at least<br />
500 years ago. “Stage right”<br />
means <strong>the</strong> right side of <strong>the</strong><br />
stage as <strong>the</strong> audience sees<br />
it, <strong>the</strong> opposite of what <strong>the</strong><br />
performer sees. This makes<br />
sense in photography because,<br />
despite <strong>the</strong> ego of<br />
<strong>the</strong> photographer, <strong>the</strong><br />
camera is <strong>the</strong> audience,<br />
not <strong>the</strong> performer.
Built-in flash<br />
Shot with built-in<br />
flash.<br />
Built-in flash.<br />
There’s More Than <str<strong>on</strong>g>On</str<strong>on</strong>g>e Way to Get Things D<strong>on</strong>e<br />
5
We made <strong>the</strong> portrait <strong>on</strong> page 5<br />
with <strong>the</strong> camera’s built-in flash.<br />
It’s an okay picture: <strong>the</strong> compositi<strong>on</strong><br />
is acceptable, <strong>the</strong> posing<br />
is good, and <strong>the</strong> exposure is<br />
perfect. Still, it’s not a picture<br />
this man is eager to hang <strong>on</strong> <strong>the</strong><br />
wall. We must improve it, and<br />
we can.<br />
6<br />
<str<strong>on</strong>g>Focus</str<strong>on</strong>g> <str<strong>on</strong>g>On</str<strong>on</strong>g> <str<strong>on</strong>g>Lighting</str<strong>on</strong>g> <str<strong>on</strong>g>Photos</str<strong>on</strong>g><br />
Booooring!<br />
The cover shot was d<strong>on</strong>e with <strong>the</strong><br />
same <strong>on</strong>-camera flash and no<br />
additi<strong>on</strong>al lights. The difference is<br />
in <strong>the</strong> use of light modifiers. The<br />
box describes <strong>the</strong> modifiers we<br />
used for this picture.<br />
Light modifiers<br />
Whe<strong>the</strong>r we use <strong>the</strong> simple<br />
light built into <strong>the</strong> camera,<br />
studio strobes costing several<br />
thousands of dollars each,<br />
or (most likely) something in<br />
between <strong>the</strong>se extremes, we<br />
often find that our lights will<br />
not do what we want without<br />
modifiers. There are dozens of<br />
light modifiers. We’ll buy some<br />
and make more, but <strong>the</strong>re are<br />
four general types we need to<br />
know about. For now, we’ll talk<br />
about <strong>the</strong> <strong>on</strong>es that make this<br />
picture work, but you’ll find a<br />
more complete catalog of light<br />
modifiers in Chapter 2.
Modifier 1: A mirror<br />
Having <strong>the</strong> flash built into<br />
<strong>the</strong> camera certainly doesn’t<br />
mean we have to keep it <strong>the</strong>re.<br />
Even if <strong>the</strong> flash is built into<br />
<strong>the</strong> camera, we can move its<br />
effective locati<strong>on</strong>, and we can<br />
do that ourselves without a team<br />
of electr<strong>on</strong>ic and mechanical<br />
engineers. Here’s how.<br />
We need a mirror to move <strong>the</strong><br />
light to where we want it to be.<br />
We angle a mirror in fr<strong>on</strong>t of <strong>the</strong><br />
camera flash so <strong>the</strong> light bounces<br />
from this mirror to where we<br />
point it. This allows us to put <strong>the</strong><br />
light almost anywhere we want<br />
it. (In fact, we could put <strong>the</strong> light<br />
absolutely anywhere we want it,<br />
but that would require a series<br />
of mirrors, light bouncing from<br />
<strong>on</strong>e to ano<strong>the</strong>r. After reflecting<br />
from all of those mirrors, <strong>the</strong><br />
light would be about as bright<br />
as a candle in a coal mine! We<br />
wouldn’t try that.)<br />
What sort of mirror do we use?<br />
Anything we have handy, but<br />
here’s a good way to make<br />
a simple, lightweight, safe,<br />
unbreakable <strong>on</strong>e. First, get a<br />
sheet of silver Mylar film. (Mylar<br />
is a DuP<strong>on</strong>t brand name and <strong>the</strong><br />
product may be available under<br />
Silver reflector<br />
different names where you live.)<br />
Compared to o<strong>the</strong>r photographic<br />
equipment, it’s cheaper than dirt;<br />
buy a little more than you need.<br />
You’ll use it again.<br />
Now glue some of <strong>the</strong> Mylar to<br />
a thin, stiff board and cut it to<br />
approximately <strong>the</strong> area <strong>the</strong> flash<br />
will illuminate. At such a close<br />
distance, this will certainly be less<br />
than 3 by 5 inches and may be<br />
much smaller than that.<br />
Positi<strong>on</strong> <strong>the</strong> reflector in fr<strong>on</strong>t<br />
of your flash. How do you<br />
hold it <strong>the</strong>re? You can hold it<br />
in your hand or clamp it to a<br />
Silver reflector<br />
White reflector Black background<br />
light stand. Or you can attach<br />
it directly to your camera with<br />
a glob of what we call “blue<br />
glue,” which w<strong>on</strong>’t damage<br />
your camera. (Blue glue,<br />
originally designed to seal<br />
refrigerator gaskets, has been<br />
since marketed under many<br />
brand names as a way for<br />
parents to temporarily put<br />
up <strong>the</strong>ir children’s art without<br />
damaging <strong>the</strong> wall.) “Blue glue”<br />
is photographer slang for a<br />
product available under several<br />
brand names in many hardware<br />
and crafts-supply stores; your<br />
store clerk may have never<br />
There’s More Than <str<strong>on</strong>g>On</str<strong>on</strong>g>e Way to Get Things D<strong>on</strong>e<br />
7
heard <strong>the</strong> term, so you may<br />
have to describe it or show <strong>the</strong><br />
picture in this book to find it.<br />
So now we’ve redirected our flash<br />
off into space. Our subject now<br />
gets no light at all. How do we<br />
get that light back?<br />
8<br />
<str<strong>on</strong>g>Focus</str<strong>on</strong>g> <str<strong>on</strong>g>On</str<strong>on</strong>g> <str<strong>on</strong>g>Lighting</str<strong>on</strong>g> <str<strong>on</strong>g>Photos</str<strong>on</strong>g><br />
Blue Glue
Modifier 2: A big white<br />
reflector<br />
In portraiture, <strong>the</strong>re is almost<br />
always a main or key light (same<br />
thing, different words). So far, we<br />
d<strong>on</strong>’t have <strong>on</strong>e. Now it’s time to<br />
establish <strong>on</strong>e. (When more than<br />
<strong>on</strong>e light is used, <strong>the</strong> <strong>on</strong>e <strong>the</strong><br />
camera sees as brightest is <strong>the</strong><br />
main light.)<br />
In this case, our main light will be<br />
a big white board. That big white<br />
reflecting board could be <strong>the</strong> wall<br />
of your apartment. You may have<br />
that readily available, but you<br />
can’t take it with you wherever<br />
you go. Ano<strong>the</strong>r alternative is <strong>the</strong><br />
biggest piece of foam board you<br />
can carry. (This is often called<br />
Fome-Cor, <strong>the</strong> original manufacturer’s<br />
name; <strong>the</strong> specific brand<br />
does not matter.)<br />
What’s <strong>the</strong> biggest we can carry?<br />
Of course, that depends <strong>on</strong> our<br />
vehicle, but whatever that limitati<strong>on</strong><br />
is, we can carry a sheet<br />
double that size. Score <strong>the</strong> board<br />
with a razor blade, and <strong>the</strong>n fold<br />
it in half. (Note that <strong>the</strong> scored<br />
board will last l<strong>on</strong>ger if we cover<br />
<strong>the</strong> o<strong>the</strong>r side with Mylar to<br />
make <strong>on</strong>e side silver. We w<strong>on</strong>’t<br />
use <strong>the</strong> silver side yet, but it will<br />
certainly be useful in <strong>the</strong> future.)<br />
Usually not<br />
Usually so<br />
There’s More Than <str<strong>on</strong>g>On</str<strong>on</strong>g>e Way to Get Things D<strong>on</strong>e<br />
9
10<br />
Most modern flashes are shaped<br />
like boxes. In a diagram, it can be<br />
difficult to see how <strong>the</strong> reflecti<strong>on</strong><br />
happens. Still, internally, <strong>the</strong>ir<br />
reflectors very closely resemble <strong>the</strong><br />
old-time parabolic reflector.<br />
So if <strong>the</strong> shape of <strong>the</strong><br />
flash in <strong>the</strong> diagram doesn’t<br />
look like yours, d<strong>on</strong>’t<br />
worry; <strong>the</strong> same thing is<br />
happening.<br />
What is ISO?<br />
The Internati<strong>on</strong>al Standards<br />
Associati<strong>on</strong> agrees <strong>on</strong> ways of<br />
measuring all sorts of things,<br />
including photographic exposure.<br />
The higher <strong>the</strong> ISO to which we<br />
set <strong>the</strong> camera (or of <strong>the</strong><br />
film we buy) <strong>the</strong> less light<br />
required. Still, lower ISO<br />
gives us higher quality.<br />
<str<strong>on</strong>g>Focus</str<strong>on</strong>g> <str<strong>on</strong>g>On</str<strong>on</strong>g> <str<strong>on</strong>g>Lighting</str<strong>on</strong>g> <str<strong>on</strong>g>Photos</str<strong>on</strong>g><br />
Why use a white reflector? Why<br />
not ano<strong>the</strong>r silver <strong>on</strong>e, like <strong>the</strong><br />
<strong>on</strong>e we are using for <strong>the</strong> flash?<br />
Silver would be brighter, and<br />
we could use a lower ISO or a<br />
smaller aperture.<br />
All true, but a silver reflector will<br />
reflect <strong>the</strong> light like a mirror.<br />
It will look similar to whatever<br />
<strong>the</strong> original light source is. That<br />
means that a big silver reflector<br />
behaves exactly like a small <strong>on</strong>e,<br />
and we d<strong>on</strong>’t want that. We want<br />
a fairly large light source because<br />
it is softer. We’ll talk more about<br />
what that means in <strong>the</strong> next<br />
chapter, but for now all we need<br />
to know is that softer light is<br />
generally better for portraiture<br />
and that <strong>the</strong> bigger <strong>the</strong> light is,<br />
<strong>the</strong> softer it is.
O<strong>the</strong>r modifiers: Fill<br />
light, hair light<br />
Now we may be d<strong>on</strong>e with<br />
<strong>the</strong> picture. We’ve proven our<br />
points about <strong>the</strong> importance of<br />
<strong>the</strong> placement of <strong>the</strong> light and<br />
<strong>the</strong> size of <strong>the</strong> light. Still, if we<br />
want to do more, we can. When<br />
working with <strong>on</strong>ly <strong>the</strong> <strong>on</strong>e tiny<br />
little light built into <strong>the</strong> camera,<br />
additi<strong>on</strong>al enhancements make<br />
little difference, but working with<br />
a more powerful external light<br />
can make <strong>the</strong>se enhancements<br />
important. Depending <strong>on</strong> <strong>the</strong><br />
specific picture and <strong>on</strong> pers<strong>on</strong>al<br />
taste, <strong>the</strong>se may be things you<br />
will always do or things you will<br />
never do. Ei<strong>the</strong>r way, you should<br />
always c<strong>on</strong>sider <strong>the</strong>m.<br />
Silver reflector<br />
Hair light may sound like a silly<br />
term for a portrait of a Sikh who<br />
always covers his hair in public,<br />
but that’s what photographers<br />
usually call it. We almost never<br />
use it for bald people, but we<br />
frequently use it for every<strong>on</strong>e<br />
else. A kicker is almost <strong>the</strong> same<br />
thing, except it’s moved a little to<br />
<strong>the</strong> side usually to light a tiny bit<br />
of <strong>the</strong> face.<br />
We did use a hair light for this<br />
picture to try to get a little light<br />
<strong>on</strong>to <strong>the</strong> back of <strong>the</strong> black turban<br />
to separate it from <strong>the</strong> black<br />
background. However, we didn’t<br />
use an additi<strong>on</strong>al flash. We used<br />
ano<strong>the</strong>r silver reflector.<br />
Our hair light accomplished very<br />
little in this case, but we think it’s<br />
Silver reflector<br />
White reflector Black background<br />
an important “little.” We think <strong>the</strong><br />
definiti<strong>on</strong> of <strong>the</strong> back of <strong>the</strong> head<br />
matters a lot, but that’s a judgment<br />
call. You may decide that<br />
having <strong>the</strong> back of <strong>the</strong> head disappear<br />
into darkness is just fine.<br />
We didn’t think that would be just<br />
fine, because we were determined<br />
to do complete portrait lighting<br />
with <strong>on</strong>ly <strong>on</strong>e little light built into<br />
a cheap camera. With big bl<strong>on</strong>d<br />
hair or with a sec<strong>on</strong>d light, <strong>the</strong><br />
hair light can be w<strong>on</strong>derful.<br />
So here we are with a <strong>on</strong>-camera<br />
flash used as an off-camera main<br />
Fill light brightens <strong>the</strong><br />
shadows. We liked <strong>the</strong> shadow<br />
in this picture and left it as<br />
it was. Still, a different head<br />
positi<strong>on</strong> could have made a<br />
big difference in <strong>the</strong> lighting.<br />
As l<strong>on</strong>g as <strong>the</strong> man is facing<br />
<strong>the</strong> light, no fill is necessary.<br />
Had he faced <strong>the</strong> camera,<br />
though, too much of his face<br />
might have been in shadow.<br />
In that case, we would have<br />
moved <strong>the</strong> main light (<strong>the</strong><br />
big white card) closer to <strong>the</strong><br />
camera to light more from<br />
<strong>the</strong> fr<strong>on</strong>t. We also might have<br />
added a sec<strong>on</strong>d white card as<br />
a fill. We’ll talk more about fill<br />
in <strong>the</strong> next photo. For this <strong>on</strong>e,<br />
we’re happy with <strong>the</strong> shadows.<br />
There’s More Than <str<strong>on</strong>g>On</str<strong>on</strong>g>e Way to Get Things D<strong>on</strong>e<br />
11
light, a hair light, and a hint that<br />
we’re going to add a fill light in<br />
<strong>the</strong> next chapter. Is this truly a<br />
<strong>on</strong>e-light portrait? Yes. And no.<br />
All of this light comes from <strong>the</strong><br />
tiny cheap flash built into <strong>the</strong><br />
camera. That sort of makes it a<br />
<strong>on</strong>e-light picture. The rest comes<br />
from inexpensive reflectors we put<br />
in place because we knew what<br />
to put where, and that sort of<br />
makes it a multiple-light portrait.<br />
The fact is that almost no pictures<br />
are truly lit by a single light.<br />
Even architecture and landscape<br />
photography, where even <strong>the</strong><br />
biggest, most powerful flashes<br />
are useless—is usually made up<br />
12<br />
D<strong>on</strong>’t have Mylar or foam<br />
board? Tape silver foil to a bit<br />
of cardboard for a mirror. Use<br />
a white wall or tape a white<br />
sheet (or shower curtain) to<br />
a colored wall instead of foam<br />
board. Pretty much all<br />
of us have at least<br />
<strong>on</strong>e <strong>the</strong>se at home<br />
already.<br />
<str<strong>on</strong>g>Focus</str<strong>on</strong>g> <str<strong>on</strong>g>On</str<strong>on</strong>g> <str<strong>on</strong>g>Lighting</str<strong>on</strong>g> <str<strong>on</strong>g>Photos</str<strong>on</strong>g><br />
of multiple-light pictures. The<br />
main light is <strong>the</strong> sun; <strong>the</strong> fill light<br />
is <strong>the</strong> open sky.<br />
So we need to learn <strong>on</strong>ly three<br />
things: where to put <strong>the</strong> light,<br />
what size should it be, and how<br />
to make a fill.<br />
Where to put <strong>the</strong> sun is easy. We<br />
simply need to choose <strong>the</strong> right<br />
time of day when <strong>the</strong> sun comes<br />
from whatever directi<strong>on</strong> we want.<br />
(Those living in <strong>the</strong> 48 c<strong>on</strong>tiguous<br />
U.S. states or Hawaii have an<br />
easier job of this than do those<br />
who live in Alaska, where sunrise<br />
and sunset may happen<br />
very early or inc<strong>on</strong>veniently<br />
late. Photographers in nor<strong>the</strong>rn<br />
Greenland may have to wait<br />
m<strong>on</strong>ths for <strong>the</strong> light to be right!)<br />
C<strong>on</strong>trolling <strong>the</strong> size of <strong>the</strong> sun,<br />
however, requires luck. <str<strong>on</strong>g>On</str<strong>on</strong>g> a<br />
cloudless day, <strong>the</strong> sun is a small,<br />
hard light. <str<strong>on</strong>g>On</str<strong>on</strong>g> a very cloudy day,<br />
<strong>the</strong> sun is a huge soft source.<br />
Usually, we want something<br />
between those extremes: just a<br />
little cloud cover, right between us<br />
and <strong>the</strong> sun to soften <strong>the</strong> light a<br />
bit, and <strong>the</strong> rest of <strong>the</strong> sky mostly<br />
clear blue, maybe with a cloud<br />
here or <strong>the</strong>re just for decorati<strong>on</strong>.<br />
We can’t c<strong>on</strong>trol this, and we<br />
need to see it quickly and shoot<br />
quickly when it happens. Clouds<br />
move, and <strong>the</strong> best light may be<br />
<strong>the</strong>re for <strong>on</strong>ly a few sec<strong>on</strong>ds.<br />
This means that <strong>the</strong> easiest way<br />
to learn lighting is in <strong>the</strong> studio.<br />
It doesn’t matter if your “studio”<br />
happens to be your living room,<br />
your garage, or a temporarily<br />
vacant office in <strong>the</strong> building<br />
where you work. The whole<br />
advantage is to have your space<br />
where you can make mistakes,<br />
and <strong>the</strong>n go back to identical<br />
c<strong>on</strong>diti<strong>on</strong>s, make a few adjustments,<br />
and get <strong>the</strong> picture right.<br />
We learn about lighting lot faster<br />
if all <strong>the</strong> mistakes and successes<br />
are our mistakes and successes<br />
instead of <strong>the</strong> random acts of<br />
wea<strong>the</strong>r.
Same principle: We can<br />
c<strong>on</strong>trol <strong>the</strong> size of <strong>the</strong><br />
light in many ways<br />
This photo of a little girl is also a<br />
<strong>on</strong>e-flash setup. In this case, <strong>the</strong><br />
photographer used an off-camera<br />
flash. The flash was set off by a<br />
wireless flash trigger. The photographer<br />
made his own softbox using<br />
cardboard box with tracing paper<br />
taped over an 8-by-10-inch square<br />
hole cut in a cardboard box. A<br />
sec<strong>on</strong>d hole was cut into <strong>the</strong> back<br />
side, just big enough to put <strong>the</strong><br />
flash in. To make <strong>the</strong> catchlights<br />
in <strong>the</strong> eyes look like <strong>the</strong>y came<br />
from a four-pane window, he put<br />
two strips of black tape across <strong>the</strong><br />
tracing paper in a cross pattern.<br />
In this case, a white foam board<br />
reflector was positi<strong>on</strong>ed at camera<br />
left to bounce a bit of light back<br />
into <strong>the</strong> shadows. The decisi<strong>on</strong> of<br />
when to add fill is an individual<br />
<strong>on</strong>e—<strong>the</strong>re is no <strong>on</strong>e right answer.<br />
So look at your camera’s image<br />
display and make decisi<strong>on</strong>s as you<br />
shoot. No reflector was used as a<br />
hair light because <strong>the</strong> light-colored<br />
hat retained enough detail. The<br />
softbox was about a foot away<br />
from <strong>the</strong> subject.<br />
Haven’t got a softbox and<br />
d<strong>on</strong>’t feel like making <strong>on</strong>e? We<br />
can get <strong>the</strong> same effect using<br />
actual window light. The <strong>on</strong>ly<br />
problem with a real window is<br />
that we d<strong>on</strong>’t have immediate<br />
c<strong>on</strong>trol over <strong>the</strong> light coming in.<br />
Unclouded sun makes a hard<br />
light, whereas both clouded sun<br />
and open sky make soft lights.<br />
The best time for <strong>the</strong> light may be<br />
<strong>the</strong> worst time for our schedule of<br />
o<strong>the</strong>r things we have to do.<br />
There’s More Than <str<strong>on</strong>g>On</str<strong>on</strong>g>e Way to Get Things D<strong>on</strong>e<br />
13
Homemade softbox.<br />
Haven’t got white foam board?<br />
Tape white copy paper to some<br />
cardboard! Use a white wall! D<strong>on</strong>’t<br />
have a wireless flash trigger? Use<br />
a small plain piece of cardboard<br />
in fr<strong>on</strong>t of <strong>the</strong> built-in flash, angled<br />
so that n<strong>on</strong>e of its light strikes<br />
<strong>the</strong> subject but <strong>the</strong> off-camera<br />
flash is triggered by <strong>the</strong> built-in<br />
flash (which has a slave and will<br />
trigger when it sees ano<strong>the</strong>r flash<br />
go off). Although all <strong>the</strong> tools we<br />
are menti<strong>on</strong>ing are great to have<br />
(and at some point you’ll get at<br />
14<br />
<str<strong>on</strong>g>Focus</str<strong>on</strong>g> <str<strong>on</strong>g>On</str<strong>on</strong>g> <str<strong>on</strong>g>Lighting</str<strong>on</strong>g> <str<strong>on</strong>g>Photos</str<strong>on</strong>g><br />
least some), quite often <strong>the</strong>re are<br />
workarounds that you already<br />
have in your possessi<strong>on</strong>.<br />
The photographer also did<br />
some postproducti<strong>on</strong> work in<br />
<strong>the</strong> previous picture of <strong>the</strong> girl<br />
with <strong>the</strong> teddy bear to add a<br />
bit of sepia t<strong>on</strong>e and create a<br />
vignette. The color judgments<br />
are pers<strong>on</strong>al, but many portrait<br />
photographers vignette images<br />
regularly. This means darkening<br />
<strong>the</strong> edges of a portrait that<br />
is mostly dark or lightening<br />
<strong>the</strong> edges when <strong>the</strong> image is<br />
mostly light. It helps direct <strong>the</strong><br />
eye to <strong>the</strong> subject and makes<br />
<strong>the</strong> edge of <strong>the</strong> image sort of<br />
fade away instead of just cutting<br />
off. The edge darkening<br />
may be obvious, or it may be<br />
so subtle no <strong>on</strong>e notices. (Ansel<br />
Adams believed that practically<br />
all pictures needed a very slight<br />
“burn” <strong>on</strong> <strong>the</strong> edges to center<br />
<strong>the</strong> eye <strong>on</strong> <strong>the</strong> principal subject.)
how many pictures shouLd i shoot?<br />
Good questi<strong>on</strong>, but not quite <strong>the</strong> right questi<strong>on</strong>. The better questi<strong>on</strong><br />
is how many pictures should you submit? The answer depends <strong>on</strong> for<br />
whom you are working.<br />
We are no l<strong>on</strong>ger limited by <strong>the</strong> cost of film and processing (especially<br />
because hardly any<strong>on</strong>e shoots expensive 8-by-10-inch film anymore).<br />
Buying extra gigabytes of flash RAM is getting cheaper daily. We shoot<br />
as many pictures as we think we need, and <strong>the</strong>n we submit as few as<br />
possible. (Keep in mind, too, that downloading and editing takes time.<br />
So although we d<strong>on</strong>’t have <strong>the</strong> cost of film and processing, our time<br />
counts, too.)<br />
C<strong>on</strong>sider <strong>the</strong>se examples. Portrait photographers shoot as many<br />
pictures as <strong>the</strong> patience of <strong>the</strong> subject allows, and <strong>the</strong>n <strong>the</strong>y submit<br />
<strong>on</strong>ly <strong>the</strong> best for customer c<strong>on</strong>siderati<strong>on</strong>. Notice that showing more<br />
pictures does not always increase sales. Instead, <strong>on</strong>ly show pictures<br />
with different moods and expressi<strong>on</strong>. If <strong>the</strong>y are all good, people are<br />
more likely to buy <strong>on</strong>e of each.<br />
Journalistic photographers shoot as many frames as time allows, and<br />
<strong>the</strong>n <strong>the</strong>y submit most of <strong>the</strong> pictures to <strong>the</strong> picture editor. We d<strong>on</strong>’t<br />
know <strong>the</strong> final text yet and never know when our worst submissi<strong>on</strong> may<br />
turn out to fit <strong>the</strong> text best vertically or horiz<strong>on</strong>tally. Mediocre pictures<br />
sometimes win Pulitzer prizes if <strong>the</strong>y appear in <strong>the</strong> right article.<br />
Commercial photographers shoot an assignment until <strong>the</strong>y get <strong>on</strong>e<br />
good picture. If <strong>the</strong>y shoot more, <strong>the</strong> client just may pick <strong>the</strong> bad <strong>on</strong>e.<br />
D<strong>on</strong>’t give <strong>the</strong> client that chance.<br />
Developing photographers d<strong>on</strong>’t yet know what <strong>the</strong>y do well and<br />
should shoot everything <strong>the</strong>y can. Submit your best to as many forums<br />
as possible: your school, local camera clubs, websites, neighborhood<br />
art shows. Spread yourself around as much as possible; your local<br />
school or camera club guru may be great, but not <strong>the</strong> guru for you. If<br />
you haven’t yet found your directi<strong>on</strong>, your main job is to keep looking<br />
for it. Your own guru may be right down <strong>the</strong> hall in your school or may<br />
be running a website 8,000 miles away. Good luck!<br />
In any shoot,<br />
try to save a<br />
few shots for<br />
experimentati<strong>on</strong>.<br />
Push yourself.<br />
It will keep<br />
you fresh,<br />
and often you<br />
will surprise<br />
yourself!<br />
There’s More Than <str<strong>on</strong>g>On</str<strong>on</strong>g>e Way to Get Things D<strong>on</strong>e<br />
15
Adding ano<strong>the</strong>r light<br />
In <strong>the</strong> photo at right, we’re sort<br />
of doing <strong>the</strong> same thing we did<br />
in <strong>the</strong> photo at <strong>the</strong> beginning<br />
of this chapter <strong>on</strong> page 2, but<br />
<strong>the</strong>re are some big differences.<br />
Mainly, we have a sec<strong>on</strong>d light,<br />
and we’re assuming that it will be<br />
a brighter light than <strong>the</strong> <strong>on</strong>e built<br />
into <strong>the</strong> camera. What should<br />
that light be? Whatever you want,<br />
whatever you have. Light is light,<br />
and we think <strong>the</strong> simpler, <strong>the</strong><br />
better for learners. If you have<br />
an intelligent flash, good! It will<br />
pay you back in <strong>the</strong> l<strong>on</strong>g run.<br />
But both your intelligent flash<br />
and your intelligent camera have<br />
already learned all <strong>the</strong>y will ever<br />
know. Eventually, learn to use<br />
<strong>the</strong>ir particular features, but for<br />
now, try not to depend <strong>on</strong> <strong>the</strong>ir<br />
intelligence.<br />
You have a better computer right<br />
inside your head. It’s been built<br />
<strong>on</strong> thousands of years of research<br />
and development. Learn to use<br />
it. Fur<strong>the</strong>rmore, if we are just<br />
beginning to learn lighting, we<br />
will actually find a simple light<br />
much easier to learn to use than<br />
a complex <strong>on</strong>e. We have enough<br />
to deal with to just learn how <strong>the</strong><br />
light behaves. Learning <strong>the</strong> various<br />
program modes of <strong>the</strong> most<br />
sophisticated flash is a whole book<br />
16<br />
<str<strong>on</strong>g>Focus</str<strong>on</strong>g> <str<strong>on</strong>g>On</str<strong>on</strong>g> <str<strong>on</strong>g>Lighting</str<strong>on</strong>g> <str<strong>on</strong>g>Photos</str<strong>on</strong>g><br />
unto itself, and each model of<br />
flash requires still ano<strong>the</strong>r book.<br />
“Sufficient unto each day <strong>the</strong> evils<br />
<strong>the</strong>reof.” We’re here to learn<br />
lighting, not equipment operati<strong>on</strong>.<br />
Those are two different<br />
issues. Even if we have fully mastered<br />
a particular sophisticated<br />
flash, <strong>on</strong>e of <strong>the</strong> fist steps in<br />
learning lighting is to simplify <strong>the</strong><br />
situati<strong>on</strong> so that we can tell <strong>the</strong><br />
difference between what we are<br />
thinking and what <strong>the</strong> cameraflash<br />
system is thinking.<br />
The most important c<strong>on</strong>cept here<br />
is to think about <strong>the</strong> lighting.<br />
If you want to learn, turn off<br />
every automatic feature you<br />
can, both <strong>on</strong> your flash and <strong>on</strong><br />
your camera. (The <strong>on</strong>ly frequent<br />
excepti<strong>on</strong> is autofocus. When <strong>the</strong><br />
camera is thinking properly, it<br />
can focus even a poor lens better<br />
than we can focus with those two<br />
even poorer lenses we have built<br />
into our heads.)<br />
With <strong>the</strong> most sophisticated<br />
camera-flash combinati<strong>on</strong>s, a<br />
m<strong>on</strong>key can shoot 800 pictures<br />
and get at least <strong>on</strong>e good <strong>on</strong>e.<br />
Turning off <strong>the</strong> automati<strong>on</strong>, we<br />
can shoot five or six pictures and<br />
get at least <strong>on</strong>e good <strong>on</strong>e. D<strong>on</strong>’t<br />
be a m<strong>on</strong>key.
Later, turn <strong>on</strong> all <strong>the</strong> automati<strong>on</strong><br />
you please. It’s good stuff<br />
for efficient working, even if it’s<br />
not good for efficient learning.<br />
Some of <strong>the</strong> best photographers<br />
in <strong>the</strong> world use <strong>the</strong> most highly<br />
automated systems, but most first<br />
learned with dumb equipment.<br />
But enough philosophy already.<br />
In <strong>the</strong> Sikh’s picture, we needed<br />
to put <strong>the</strong> white reflector in a<br />
specific spot to get <strong>the</strong> result we<br />
wanted. After all, if we put it in<br />
<strong>the</strong> wr<strong>on</strong>g spot, it wouldn’t have<br />
reflected <strong>the</strong> light from <strong>the</strong> builtin<br />
flash in <strong>the</strong> camera. By getting<br />
<strong>the</strong> main light off <strong>the</strong> camera, we<br />
can put it absolutely anywhere we<br />
want. In <strong>the</strong> photo <strong>on</strong> page 16,<br />
our main light is at camera right,<br />
and that’s a big advantage.<br />
What do we need to use as <strong>the</strong><br />
main light? We certainly get <strong>the</strong><br />
biggest bang for <strong>the</strong> buck if we<br />
use <strong>the</strong> sun. It’s free, it’s powerful,<br />
and it’s available for at<br />
least a few hours a day almost<br />
anywhere in <strong>the</strong> world. We even<br />
have a certain amount of c<strong>on</strong>trol<br />
over it. Want it to come from a<br />
different directi<strong>on</strong>? Choose<br />
a different time of day or use<br />
a silver reflector to change its<br />
directi<strong>on</strong>. Want it to be softer?<br />
Choose a day with some cloud<br />
cover. Photographers like all of<br />
<strong>the</strong>se advantages, and that’s why<br />
many pictures use sunlight as <strong>the</strong><br />
main light.<br />
Still, we d<strong>on</strong>’t have good c<strong>on</strong>trol<br />
over <strong>the</strong> sun. What if we need to<br />
shoot exactly now and <strong>the</strong> sun is<br />
not in <strong>the</strong> right place? What if we<br />
want a softer light, but <strong>the</strong>re is no<br />
cloud cover? What if we live in<br />
a climate where <strong>the</strong>re is almost<br />
never any cloud cover?<br />
<str<strong>on</strong>g>On</str<strong>on</strong>g>e way or ano<strong>the</strong>r, experienced<br />
photographers often overcome<br />
<strong>the</strong>se problems, but if we’re<br />
not already experienced, <strong>the</strong>se<br />
difficulties will hinder our learning.<br />
It will take us a lot l<strong>on</strong>ger<br />
to become <strong>the</strong> experienced<br />
photographers who can deal with<br />
<strong>the</strong> problems. In fact, <strong>the</strong> complicati<strong>on</strong>s<br />
may prevent us from ever<br />
gaining that experience at all.<br />
So that’s <strong>the</strong> problem. What’s<br />
<strong>the</strong> soluti<strong>on</strong>? Life is short, and<br />
we want to learn as quickly as<br />
possible. After buying whatever<br />
camera we can afford, with<br />
whatever lens we can afford, <strong>the</strong><br />
next step is buying whatever flash<br />
we can afford.<br />
Which flash do we want? This is<br />
<strong>the</strong> hardest decisi<strong>on</strong> we have to<br />
make! In <strong>the</strong> l<strong>on</strong>g run, buying a<br />
dedicated flash built to work with<br />
our camera is probably <strong>the</strong> best<br />
decisi<strong>on</strong>. But right now, while we<br />
are still learning, that could be<br />
<strong>the</strong> worst decisi<strong>on</strong>. Why? First<br />
of all, it’s likely to be an expensive<br />
decisi<strong>on</strong>. When we buy <strong>the</strong><br />
dedicated flash, we’re paying for<br />
<strong>the</strong> work of a lot of very smart<br />
engineers who made that flash<br />
to work with our camera. That’s<br />
okay; <strong>the</strong>y earned it. But those<br />
same shamefully prideful engineers<br />
sometimes build equipment<br />
that makes it impossible to operate<br />
in a fully manual mode, and<br />
we want full c<strong>on</strong>trol!<br />
So look carefully at <strong>the</strong> opti<strong>on</strong>s<br />
available for <strong>the</strong> camera’s<br />
dedicated flash. If it, al<strong>on</strong>g with<br />
“Whatever we can afford.” Having<br />
<strong>the</strong> right equipment matters more<br />
than having <strong>the</strong> best equipment.<br />
There’s More Than <str<strong>on</strong>g>On</str<strong>on</strong>g>e Way to Get Things D<strong>on</strong>e<br />
17
<strong>the</strong> camera, offers fully manual<br />
c<strong>on</strong>trol, we want it, and we’ll<br />
be wise to spend <strong>the</strong> extra cash<br />
for <strong>the</strong> little brain in <strong>the</strong> flash.<br />
We’d like to use those automatic<br />
opti<strong>on</strong>s later. But if we can’t<br />
totally c<strong>on</strong>trol <strong>the</strong> flash with our<br />
own hands and brains, we d<strong>on</strong>’t<br />
want it right now. Instead, we’ll<br />
buy a dumb flash, probably with<br />
a lot more power for a lot less<br />
m<strong>on</strong>ey. Maybe later we’ll buy<br />
<strong>the</strong> intelligent flash and save<br />
ourselves some work, or maybe<br />
we’ll stay with <strong>the</strong> dumb flash but<br />
buy more of <strong>the</strong>m. Ei<strong>the</strong>r way, it<br />
needs to be our decisi<strong>on</strong> and not<br />
<strong>the</strong> decisi<strong>on</strong> of engineers.<br />
Right now, we’ll use a small light.<br />
We could skip <strong>the</strong> expense and<br />
do <strong>the</strong> same thing with <strong>the</strong> sun,<br />
but for now we want to talk about<br />
your light source. First, we’ll<br />
assume you’ve bought a small<br />
light to increase c<strong>on</strong>trol. If you<br />
haven’t d<strong>on</strong>e that, you can still<br />
use <strong>the</strong> sun.<br />
Let’s look at <strong>the</strong> photo <strong>on</strong> page 16<br />
again. We already know it’s a<br />
good photo. How did we get<br />
<strong>the</strong>re?<br />
The photo at right is essentially<br />
<strong>the</strong> same photo, but it sure<br />
doesn’t look <strong>the</strong> same. Why not?<br />
Well, for a start, we’ve taken <strong>on</strong>e<br />
18<br />
<str<strong>on</strong>g>Focus</str<strong>on</strong>g> <str<strong>on</strong>g>On</str<strong>on</strong>g> <str<strong>on</strong>g>Lighting</str<strong>on</strong>g> <str<strong>on</strong>g>Photos</str<strong>on</strong>g><br />
of <strong>the</strong> most beautiful women<br />
we’ve ever seen and turned her<br />
into a hag. Pretty women have<br />
smooth skin, but look at <strong>the</strong> skin<br />
texture in this picture. It’s rough<br />
and wrinkled, even though she’s<br />
very young. That’s not her fault;<br />
it’s ours. What did we do wr<strong>on</strong>g?<br />
The whole problem is <strong>the</strong> size of<br />
our light. Small lights make hard<br />
shadows; big lights make soft<br />
shadows. It’s as simple as that.<br />
Nei<strong>the</strong>r is inherently better than<br />
<strong>the</strong> o<strong>the</strong>r, but we have to think<br />
about which we want and make<br />
that decisi<strong>on</strong> again for each<br />
picture. If we’ve bought a small<br />
Old women and<br />
old men are<br />
beautiful, too!<br />
We’ll get to<br />
that so<strong>on</strong>.<br />
flash, we already have a small<br />
light. So getting <strong>the</strong> hard shadow<br />
is easy. Now we have to turn that<br />
small light into a big <strong>on</strong>e. <str<strong>on</strong>g>On</str<strong>on</strong>g>ce<br />
we learn how to obtain both, we
can also get anything in between:<br />
a medium-size light of whatever<br />
size we want.<br />
To get from <strong>the</strong> harsh, unflattering<br />
image <strong>on</strong> page 18 to <strong>the</strong><br />
improved light in <strong>the</strong> photo <strong>on</strong><br />
page 16, we put a large sheet of<br />
translucent white diffusi<strong>on</strong> material<br />
between our subject and <strong>the</strong><br />
flash. Voilà! What is diffusi<strong>on</strong><br />
material? Many things: cloudy<br />
sky, thin white paper or plastic,<br />
foggy or smoky air. All of <strong>the</strong>se<br />
can turn a small light into a bigger<br />
<strong>on</strong>e. The distance between<br />
<strong>the</strong> light source and <strong>the</strong> diffusi<strong>on</strong><br />
also affects <strong>the</strong> effective size of <strong>the</strong><br />
light: <strong>the</strong> far<strong>the</strong>r away, <strong>the</strong> bigger<br />
<strong>the</strong> light. Notice that this is exactly<br />
<strong>the</strong> opposite of <strong>the</strong> effect of<br />
moving an undiffused light far<strong>the</strong>r<br />
away! Moving an undiffused light<br />
far<strong>the</strong>r away makes it a smaller<br />
light: think of <strong>the</strong> unclouded sun,<br />
93 milli<strong>on</strong> miles away. Moving<br />
a small light far enough away<br />
to fully light a large diffusi<strong>on</strong><br />
material evenly makes it softer.<br />
Try putting your small flash directly<br />
against a white shower curtain.<br />
(We’ll talk about white shower<br />
curtains a few times, because<br />
it’s <strong>the</strong> largest piece of diffusi<strong>on</strong><br />
material many people have where<br />
<strong>the</strong>y live.) Take a picture of almost<br />
anything, move <strong>the</strong> light as far<br />
Translucent? Transparent?<br />
What’s <strong>the</strong> difference? Both<br />
words describe material that<br />
lets light through, and many<br />
people use <strong>the</strong>m interchangeably.<br />
They mean different things,<br />
though, and photographers<br />
talking to each o<strong>the</strong>r have to get<br />
<strong>the</strong> terms right.<br />
from <strong>the</strong> curtain as possible, and<br />
<strong>the</strong>n shoot ano<strong>the</strong>r picture of <strong>the</strong><br />
same subject without moving <strong>the</strong><br />
camera. (You may or may not<br />
need to adjust exposure.) If you<br />
d<strong>on</strong>’t already understand <strong>the</strong><br />
Transparency allows an image to<br />
pass through. Our neighbor’s<br />
cat looks like a cat through<br />
a clear glass window. But if<br />
<strong>the</strong> same window fogs or ices<br />
because of wea<strong>the</strong>r,<br />
we still see light<br />
coming through but no<br />
identifiable cat. That’s<br />
translucency.<br />
difference <strong>the</strong> effective size of <strong>the</strong><br />
light makes, you will see it here<br />
and never forget.<br />
A large light is <strong>the</strong> kindest light<br />
for faces. We also added some<br />
There’s More Than <str<strong>on</strong>g>On</str<strong>on</strong>g>e Way to Get Things D<strong>on</strong>e<br />
19
neutral density filter in fr<strong>on</strong>t of<br />
<strong>the</strong> built-in flash because its<br />
lowest power setting was too<br />
much. By diffusing our lights (thus<br />
enlarging <strong>the</strong>m), we still got an<br />
image with <strong>the</strong> drama provided<br />
by shadows, but we’ve eliminated<br />
<strong>the</strong> ugliness of harsh lighting (<strong>the</strong><br />
bane of small lights).<br />
All that said, we may not always<br />
want <strong>the</strong> kindest light. If we shoot<br />
for a newspaper, <strong>the</strong> paper may<br />
20<br />
<str<strong>on</strong>g>Focus</str<strong>on</strong>g> <str<strong>on</strong>g>On</str<strong>on</strong>g> <str<strong>on</strong>g>Lighting</str<strong>on</strong>g> <str<strong>on</strong>g>Photos</str<strong>on</strong>g><br />
not always want <strong>the</strong> kindest light<br />
if <strong>the</strong> subject is an oppressive<br />
dictator or a vicious criminal. Even<br />
good-hearted people may not<br />
want <strong>the</strong> most flattering portrait<br />
if <strong>the</strong>y happen to be avant-garde<br />
artists or suffering saints.<br />
Diffusi<strong>on</strong> and neutral density<br />
material comes in a variety of<br />
densities. We d<strong>on</strong>’t need <strong>the</strong>m all.<br />
Get a lighter and medium density<br />
of each to start. We can always<br />
stack <strong>the</strong>m toge<strong>the</strong>r in layers if<br />
we need ei<strong>the</strong>r more diffusi<strong>on</strong> or<br />
more dimming of <strong>the</strong> built-in flash.<br />
So we’ve got <strong>on</strong>e basic profile<br />
d<strong>on</strong>e three different ways. If<br />
we find ourselves with great<br />
window light, use it. If not, with<br />
<strong>the</strong>se simple tools, we’ve still got<br />
opti<strong>on</strong>s.<br />
Now let’s look at <strong>the</strong> simple tools<br />
that make this possible.
This page intenti<strong>on</strong>ally left blank
Chapter 2: Tools: Now We Have Light,<br />
but How Do We Get It Under C<strong>on</strong>trol?<br />
a gOOd <str<strong>on</strong>g>On</str<strong>on</strong>g>line photographic store<br />
will have several thousand tools, and<br />
<strong>the</strong>se sources aren’t <strong>the</strong> <strong>on</strong>ly choice.<br />
Theatrical supply stores have even more.<br />
Still, we’ve already proved that we can<br />
make a good portrait with <strong>on</strong>ly <strong>on</strong>e<br />
tiny light and some homemade tools.<br />
Never<strong>the</strong>less, we need to at least put<br />
forth a list of equipment and tools that<br />
each photographer should be aware<br />
of. As your experience grows, you can<br />
pick and choose from <strong>the</strong>se additi<strong>on</strong>al<br />
items. We’re not suggesting that you<br />
run out and buy everything described<br />
in this book. In fact, we recommend<br />
you stay minimalist at this point. If you<br />
find yourself thinking you’ve got to have<br />
something that you can’t make yourself,<br />
try renting or borrowing it first. All too<br />
many photographers have bought<br />
something blindly, <strong>on</strong>ly to have it ga<strong>the</strong>r<br />
dust. Experiment with homemade or<br />
borrowed tools first.<br />
Know that <strong>the</strong>se tools are available.<br />
Over <strong>the</strong> l<strong>on</strong>g term, having a selecti<strong>on</strong><br />
will enable you to work more efficiently<br />
and easily. (And <strong>the</strong> faster we work, <strong>the</strong><br />
more we can charge!) Throughout we’ll<br />
menti<strong>on</strong> opti<strong>on</strong>s for making many of<br />
<strong>the</strong>se tools yourself for pennies (such<br />
as <strong>the</strong> softbox and mirror described in<br />
Chapter 1).<br />
Tools: Now We Have Light, but How Do We Get It under C<strong>on</strong>trol?<br />
23
24<br />
<str<strong>on</strong>g>Focus</str<strong>on</strong>g> <str<strong>on</strong>g>On</str<strong>on</strong>g> <str<strong>on</strong>g>Lighting</str<strong>on</strong>g> <str<strong>on</strong>g>Photos</str<strong>on</strong>g><br />
D<strong>on</strong>’t be<br />
intimidated by<br />
<strong>the</strong> list. Learn<br />
what’s available,<br />
and <strong>the</strong>n pick<br />
and choose.<br />
There are various ways<br />
to get things d<strong>on</strong>e in<br />
photography. The tools<br />
here give us opti<strong>on</strong>s.<br />
Start simply and when<br />
possible with homemade<br />
versi<strong>on</strong>s. <str<strong>on</strong>g>On</str<strong>on</strong>g>ly upgrade to<br />
manufactured versi<strong>on</strong>s when<br />
you find yourself<br />
having to remake an<br />
item often because<br />
you use it so much.
Off-camera flash<br />
We’ve proved that we can make<br />
a good portrait with <strong>on</strong>ly <strong>on</strong>e<br />
tiny light <strong>on</strong> <strong>the</strong> camera. If that’s<br />
all we have, keep that light and<br />
keep working. Still, working with<br />
so little is difficult, and we’d like<br />
to have at least <strong>on</strong>e more light.<br />
The easiest way to get ano<strong>the</strong>r<br />
light is to use <strong>the</strong> sun. Let that<br />
be your main light and use your<br />
<strong>on</strong>-camera flash as fill. For us,<br />
though, that’s not <strong>the</strong> easiest<br />
way to teach lighting. The sun<br />
is too difficult to c<strong>on</strong>trol. It may<br />
be extremely “hard” for <strong>on</strong>e<br />
reader, but with enough cloud<br />
cover, it may be extremely “soft”<br />
for ano<strong>the</strong>r reader in a different<br />
place in <strong>the</strong> world <strong>on</strong> <strong>the</strong> same<br />
day. We can depend <strong>on</strong> <strong>the</strong> sun<br />
for energy for a bazilli<strong>on</strong> years<br />
to come, but we can’t depend <strong>on</strong><br />
it for photographic lighting from<br />
<strong>on</strong>e minute to <strong>the</strong> next. With so<br />
many random things happening<br />
with sunlight, a novice photographer<br />
has no idea what lighting<br />
changes he or she has made<br />
versus what changes <strong>the</strong> wea<strong>the</strong>r<br />
has made. Ignorance is guaranteed;<br />
both of your co-authors,<br />
Fil and Robin, have been <strong>the</strong>re,<br />
d<strong>on</strong>e that.<br />
So we want you to get <strong>on</strong>e more<br />
light bey<strong>on</strong>d what your camera<br />
offers. What sort of light? Almost<br />
anything, as l<strong>on</strong>g as it’s your light<br />
and you can c<strong>on</strong>trol it with your<br />
own hands, eyes, and brain. A<br />
60-watt desk lamp will be fine for<br />
many subjects. An “intelligent”<br />
flash is better, but a “dumb” flash<br />
is perfectly adequate.<br />
M<strong>on</strong>ey always matters, no matter<br />
what we can afford. A photographer<br />
who can <strong>on</strong>ly buy a $50<br />
flash inevitably wants a $100<br />
flash. Ano<strong>the</strong>r who can afford<br />
$20,000 worth of studio strobes<br />
always wants to have $40,000<br />
worth of lights. We all do what<br />
we can with whatever we have.<br />
Think seriously about whe<strong>the</strong>r<br />
you want an intelligent or a<br />
dumb flash. You’ll base that decisi<strong>on</strong><br />
mostly <strong>on</strong> what you want<br />
to photograph. If you’re <strong>on</strong>e<br />
of <strong>the</strong> paparazzi and need to<br />
shoot quickly before <strong>the</strong> celebrity<br />
disappears into a building where<br />
you’re not allowed, you definitely<br />
want <strong>the</strong> intelligent flash. You<br />
d<strong>on</strong>’t have time to think about<br />
flash power settings unless you<br />
are very experienced. The flash,<br />
al<strong>on</strong>g with your intelligent camera,<br />
will sometimes get <strong>the</strong> exposure<br />
wr<strong>on</strong>g. But if you spend even<br />
an extra two sec<strong>on</strong>ds figuring<br />
out <strong>the</strong> right exposure with fully<br />
manual equipment, it may be too<br />
late to get any picture at all.<br />
If you like still life, though, a bowl<br />
of fruit or a glass of wine will<br />
sit for a pretty l<strong>on</strong>g time without<br />
changing appearance. (Some of<br />
Edward West<strong>on</strong>’s pepper photographs,<br />
without flash, required<br />
up to 12 hours of exposure time.)<br />
People who want to do this sort of<br />
thing can buy a dumb flash with<br />
way more power for a lot lower<br />
price.<br />
If you are a novice photographer,<br />
you may not yet know what you<br />
most want to do. In that case,<br />
buy <strong>the</strong> least expensive intelligent<br />
flash you can. Experiment. Save<br />
your major investment for later.<br />
Whatever light we use, it’s important<br />
that we be able to fully c<strong>on</strong>trol<br />
<strong>the</strong> camera and <strong>the</strong> light <strong>on</strong><br />
<strong>the</strong> camera. All cameras can be<br />
set to a “Manual” (read “dumb”)<br />
mode, and that’s good. However,<br />
many of <strong>the</strong>m will still revert to<br />
some sort of automatic (read<br />
“really stupid”) mode when we<br />
use <strong>the</strong> popup flash al<strong>on</strong>g with a<br />
sec<strong>on</strong>d external flash. That takes<br />
c<strong>on</strong>trol out of our hands, and we<br />
d<strong>on</strong>’t want that.<br />
Tools: Now We Have Light, but How Do We Get It under C<strong>on</strong>trol?<br />
25
We all want <strong>the</strong> most intelligent<br />
camera and flash combinati<strong>on</strong><br />
we can get but that can be set to<br />
fully manual operati<strong>on</strong> when we<br />
need it.<br />
Although <strong>the</strong>re is plenty we can<br />
do with just <strong>the</strong> sun and <strong>the</strong> builtin<br />
flash, <strong>the</strong> benefit of an offcamera<br />
flash is its mobility. We<br />
can place it anywhere we want.<br />
In some cases, we will just put<br />
this additi<strong>on</strong>al flash right <strong>on</strong> <strong>the</strong><br />
camera’s hot shoe. It’s pretty<br />
much where <strong>the</strong> built-in flash is,<br />
26<br />
<str<strong>on</strong>g>Focus</str<strong>on</strong>g> <str<strong>on</strong>g>On</str<strong>on</strong>g> <str<strong>on</strong>g>Lighting</str<strong>on</strong>g> <str<strong>on</strong>g>Photos</str<strong>on</strong>g><br />
but it has more power and it’s a<br />
bit bigger than <strong>the</strong> built-in flash.<br />
This can be a good thing to do,<br />
in specific situati<strong>on</strong>s:<br />
1. We are shooting a quickmoving<br />
event—news,<br />
weddings, locker-room sports<br />
celebrati<strong>on</strong>s—where <strong>the</strong>re is<br />
simply no time to put <strong>the</strong> light<br />
someplace else.<br />
2. We are using “beauty lighting”<br />
for as little shadow as possible.<br />
(But in this case we would<br />
still like to use a bigger light.)<br />
Off-camera flash<br />
<strong>on</strong> a light stand.<br />
You d<strong>on</strong>’t need<br />
<strong>the</strong> newest flash<br />
<strong>on</strong> <strong>the</strong> market.<br />
C<strong>on</strong>sider buying<br />
used equipment<br />
to start.<br />
3. We are shooting small-scale<br />
scientific and medical photography.<br />
(But <strong>the</strong>n we often<br />
want <strong>the</strong> light to be a ring light<br />
around <strong>the</strong> lens instead of a<br />
light <strong>on</strong> top of <strong>the</strong> camera.)<br />
4. The light <strong>on</strong> <strong>the</strong> camera is a<br />
fill light to illuminate shadows<br />
cast by <strong>the</strong> main light. How do<br />
we combine <strong>the</strong>se two?<br />
For people learning lighting,<br />
number 4 is <strong>the</strong> important <strong>on</strong>e to<br />
most of us. We d<strong>on</strong>’t always need<br />
a fill light. This book’s cover<br />
was d<strong>on</strong>e without <strong>on</strong>e. Still, in<br />
most cases most photographers<br />
will want <strong>on</strong>e. Fortunately, <strong>the</strong><br />
fill light is usually <strong>the</strong>re already:<br />
<strong>the</strong> flash built into our camera.<br />
Al<strong>on</strong>g with that, we almost<br />
always have a sec<strong>on</strong>d light. It<br />
may be free sunlight provided by<br />
nature, it may be a studio strobe<br />
worth more than <strong>the</strong> mortgage<br />
<strong>on</strong> our house, or, most likely, it<br />
may be something in between.<br />
It makes good sense to put that<br />
light to work doing something<br />
bey<strong>on</strong>d what our built-in flash<br />
can do with ease.
How to trigger flash<br />
If <strong>the</strong> flash is not mounted <strong>on</strong> <strong>the</strong><br />
camera, we need a way to trigger<br />
it remotely. O<strong>the</strong>r than <strong>the</strong> hit-ormiss<br />
method of having an assistant<br />
fire <strong>the</strong> flash as we shoot,<br />
<strong>the</strong>re are several good ways to<br />
do this. The best way depends <strong>on</strong><br />
what we are shooting and where<br />
and, always, budget. Ideally,<br />
balancing real need and real<br />
m<strong>on</strong>ey, we each decide what’s<br />
best for us.<br />
Synch cord<br />
This is certainly <strong>the</strong> least expensive<br />
and often <strong>the</strong> most reliable<br />
tool for <strong>the</strong> job. In most cases,<br />
<strong>the</strong>re’s an electrical c<strong>on</strong>nector<br />
<strong>on</strong> <strong>the</strong> camera and ano<strong>the</strong>r <strong>on</strong>e<br />
<strong>on</strong> <strong>the</strong> flash intended for this use.<br />
Exactly how those c<strong>on</strong>nectors are<br />
shaped varies, though, and we<br />
have to get <strong>the</strong> right cord to mate<br />
with <strong>the</strong> camera and <strong>the</strong> flash at<br />
each end.<br />
L<strong>on</strong>g synch cords may be expensive.<br />
If we want <strong>the</strong> flash to be a<br />
greater distance from <strong>the</strong> camera,<br />
<strong>on</strong>e of <strong>the</strong> more “expensive”<br />
synch methods may actually<br />
cost less than <strong>the</strong> “cheap” synch<br />
cord. Still, we d<strong>on</strong>’t always<br />
need a synch cord to cover <strong>the</strong><br />
whole distance. We can use a<br />
short synch cord where <strong>on</strong>e end<br />
matches <strong>the</strong> camera and <strong>the</strong><br />
o<strong>the</strong>r fits an ordinary household<br />
extensi<strong>on</strong> cord. At <strong>the</strong> o<strong>the</strong>r<br />
end, we have ano<strong>the</strong>r synch<br />
cord that mates <strong>the</strong> household<br />
cord to <strong>the</strong> flash. This gives us<br />
l<strong>on</strong>ger-distance triggering for<br />
fairly low cost. Until very recent<br />
times, almost all photographers<br />
used synch cords at least much<br />
of <strong>the</strong> time. They have two big<br />
disadvantages, though:<br />
Disadvantage 1. We can<br />
safely use a synch cord to<br />
trigger <strong>on</strong>ly <strong>on</strong>e remote flash.<br />
Mechanical cameras had<br />
very lightweight electrical<br />
switches, able to survive <strong>on</strong>ly<br />
very low electrical current, for<br />
Tools: Now We Have Light, but How Do We Get It under C<strong>on</strong>trol? 27
28<br />
<strong>the</strong> sake of rapid, accurate<br />
movement; today’s cameras<br />
follow similar standards.<br />
Plugging toge<strong>the</strong>r a makeshift<br />
arrangement of cables<br />
to trigger multiple flash units<br />
can burn <strong>the</strong> electrical circuits<br />
in <strong>the</strong> best-built camera! If we<br />
want more than <strong>on</strong>e remote<br />
flash, we have to trigger <strong>the</strong>m<br />
without wires.<br />
Disadvantage 2. A simple<br />
synch cord <strong>on</strong>ly triggers<br />
<strong>the</strong> flash. There can be no<br />
intelligent communicati<strong>on</strong><br />
An inexpensive trigger.<br />
<str<strong>on</strong>g>Focus</str<strong>on</strong>g> <str<strong>on</strong>g>On</str<strong>on</strong>g> <str<strong>on</strong>g>Lighting</str<strong>on</strong>g> <str<strong>on</strong>g>Photos</str<strong>on</strong>g><br />
between <strong>the</strong> smart flash and<br />
<strong>the</strong> smart camera. That’s fine<br />
for now, because we want<br />
you to do as much of <strong>the</strong><br />
thinking as possible. Later,<br />
though, you will probably want<br />
to make use of some or all of<br />
your equipment’s intelligence,<br />
and synch cords that can transmit<br />
<strong>the</strong> extra data tend to be<br />
short and expensive. Because<br />
<strong>the</strong> whole point of using <strong>the</strong><br />
synch cord is to save m<strong>on</strong>ey,<br />
we may undo its sole advantage<br />
this way.<br />
Light-sensitive trigger<br />
We plug <strong>on</strong>e of <strong>the</strong>se into <strong>the</strong><br />
remote flash. It sees <strong>the</strong> light<br />
from an <strong>on</strong>-camera flash and<br />
nearly instantly triggers <strong>the</strong><br />
flash it’s plugged into. Some<br />
of <strong>the</strong>se actually cost less than<br />
many synch cords, and we can<br />
plug <strong>the</strong>m into literally any<br />
number of flashes without any<br />
risk of damaging our camera<br />
electr<strong>on</strong>ics. Many studio strobes<br />
have <strong>the</strong>se already built in, and<br />
we have nothing extra to buy.<br />
This trigger can be<br />
plugged in two ways,<br />
possibly reversing its<br />
positive and negative<br />
electrical terminals.<br />
We tested it at a<br />
distance where it<br />
would barely work at<br />
all. Then we painted a<br />
red dot <strong>on</strong> <strong>the</strong> trigger<br />
and <strong>the</strong> flash to mark<br />
<strong>the</strong> positi<strong>on</strong><br />
where it works<br />
best.
Sounds like a good soluti<strong>on</strong>,<br />
and it can be! Still, we need<br />
to know about disadvantages,<br />
here, too.<br />
Disadvantage 1. Lack of<br />
sensitivity. This may not be<br />
a disadvantage at all if we<br />
work indoors at fairly small<br />
distances. However, if we<br />
photograph a large group<br />
A more sensitive (and more costly)<br />
trigger.<br />
in bright sunlight, <strong>the</strong> trigger<br />
may not see <strong>the</strong> camera flash<br />
and may do nothing. We<br />
can easily solve this problem<br />
by buying more sensitive<br />
triggers, but <strong>the</strong> increased<br />
cost may undo any ec<strong>on</strong>omic<br />
advantage over o<strong>the</strong>r triggers.<br />
A good compromise, used in<br />
<strong>the</strong> past by both Robin and Fil,<br />
This trigger<br />
will work at a<br />
greater distance,<br />
even in bright<br />
sunlight.<br />
Tools: Now We Have Light, but How Do We Get It under C<strong>on</strong>trol? 29
30<br />
can be to buy <strong>on</strong>e expensive<br />
trigger for <strong>the</strong> most distant<br />
light and a handful of cheap<br />
triggers for <strong>the</strong> lights closer to<br />
<strong>the</strong> camera.<br />
Disadvantage 2. These<br />
resp<strong>on</strong>d to any flash <strong>the</strong>y<br />
see. Any o<strong>the</strong>r photographer<br />
present may trigger<br />
our flash. Our flash may be<br />
in <strong>the</strong> middle of a recycle<br />
exactly when we need it most.<br />
Most photographers tend<br />
to cooperate in this situati<strong>on</strong><br />
and time <strong>the</strong>ir shooting<br />
to give <strong>the</strong> o<strong>the</strong>r guy a<br />
<str<strong>on</strong>g>Focus</str<strong>on</strong>g> <str<strong>on</strong>g>On</str<strong>on</strong>g> <str<strong>on</strong>g>Lighting</str<strong>on</strong>g> <str<strong>on</strong>g>Photos</str<strong>on</strong>g><br />
chance at <strong>the</strong> shot, but this<br />
compromise is not ideal for<br />
any<strong>on</strong>e and can result in<br />
complete disaster for every<strong>on</strong>e<br />
when competitors refuse to<br />
cooperate.<br />
Infrared trigger<br />
Technically, we could simply<br />
c<strong>on</strong>sider <strong>the</strong>se to be a special<br />
type of light-sensitive trigger,<br />
as infrared is simply ano<strong>the</strong>r<br />
frequency of light that happens<br />
to be invisible to humans. The<br />
similarity ends <strong>the</strong>re, though:<br />
most infrared triggers are highly<br />
intelligent. They allow both <strong>the</strong><br />
camera and <strong>the</strong> flash to measure<br />
<strong>the</strong> scene, think about what each<br />
sees from its viewpoint, and<br />
agree with each o<strong>the</strong>r about what<br />
<strong>the</strong> camera is going to do and<br />
what <strong>the</strong> light is going to do.<br />
These are expensive, but some<br />
of <strong>the</strong> cost is reduced by not<br />
having to buy a separate device.<br />
The system may be ideal for (1)<br />
absolute novice photographers<br />
who want as much automati<strong>on</strong><br />
as possible so <strong>the</strong>y d<strong>on</strong>’t<br />
have to spend a lot of study<br />
time and (2) highly experienced<br />
photographers who want <strong>the</strong><br />
system to take over a lot of <strong>the</strong><br />
The infrared trigger<br />
<strong>on</strong> this flash<br />
not <strong>on</strong>ly triggers<br />
<strong>the</strong> flash, but it<br />
can communicate<br />
intelligently<br />
with <strong>the</strong> camera<br />
for remote<br />
power<br />
adjustment.
outine thinking, but know when<br />
to override <strong>the</strong> automati<strong>on</strong> to<br />
get a better picture. The fact that<br />
you are taking <strong>the</strong> time to read<br />
this book probably means that<br />
you fit nei<strong>the</strong>r of <strong>the</strong>se categories.<br />
Disadvantage 1. These triggers<br />
tend to be brand specific. If we<br />
want <strong>on</strong>e maker’s camera and<br />
ano<strong>the</strong>r maker’s flash, <strong>the</strong>y<br />
may speak different languages.<br />
The extra cost is wasted.<br />
Disadvantage 2. These often<br />
provide <strong>on</strong>ly short-range<br />
communicati<strong>on</strong>. Sometimes <strong>the</strong><br />
best of <strong>the</strong> dumb visible light<br />
triggers will work over greater<br />
range.<br />
Radio trigger<br />
These triggers require a transmitter<br />
<strong>on</strong> <strong>the</strong> camera and ano<strong>the</strong>r<br />
<strong>on</strong> <strong>the</strong> light. They allow remote<br />
c<strong>on</strong>trol of a specific brand<br />
of flash by ano<strong>the</strong>r maker’s<br />
camera. Some models of this<br />
equipment also allow remote<br />
c<strong>on</strong>trol not <strong>on</strong>ly of lights but<br />
also of a sec<strong>on</strong>d camera!<br />
Depending <strong>on</strong> <strong>the</strong> brand, <strong>the</strong>y<br />
often allow remote c<strong>on</strong>trol over<br />
much greater distance than o<strong>the</strong>r<br />
synch systems.<br />
Disadvantage. Cost.<br />
When <strong>on</strong>e of <strong>the</strong>se triggers is<br />
attached to <strong>the</strong> camera and<br />
ano<strong>the</strong>r to <strong>the</strong> flash, you will<br />
gain maximum c<strong>on</strong>trol. They work<br />
<strong>on</strong> different frequencies, and we<br />
can select <strong>the</strong> frequency we want<br />
<strong>the</strong> device to use, so different<br />
photographers’ lights d<strong>on</strong>’t trigger<br />
<strong>on</strong>e ano<strong>the</strong>r. Do some research,<br />
though, and find a<br />
frequency that fewer<br />
photographers are<br />
using.<br />
Tools: Now We Have Light, but How Do We Get It under C<strong>on</strong>trol? 31
The size of <strong>the</strong> light<br />
The size of <strong>the</strong> light may be <strong>the</strong><br />
most important decisi<strong>on</strong> we make.<br />
More often than not, we’ll want a<br />
large <strong>on</strong>e. The easiest way to get<br />
a bigger light is simply to buy a<br />
bigger light. We could close our<br />
case right <strong>the</strong>re, except this is not<br />
practical for most people. Beginning<br />
photographers d<strong>on</strong>’t want to<br />
pay <strong>the</strong> cost. Experienced photographers<br />
generally want <strong>the</strong> flexibility<br />
of taking <strong>the</strong> light to ano<strong>the</strong>r<br />
locati<strong>on</strong> with as few assistants as<br />
possible. So we usually want to<br />
make a small light behave as if<br />
it were a bigger <strong>on</strong>e. There are<br />
several basic ways to do this, and<br />
we’ll want to use <strong>the</strong>m all.<br />
Bounce is our principal tool.<br />
Instead of aiming <strong>the</strong> light<br />
directly at our subject, we aim it<br />
at a bigger white surface and let<br />
that surface be our main light.<br />
What might that surface be?<br />
Anything big and (usually) white.<br />
If we have a white wall or ceiling<br />
handy, we’re in fat city. Little<br />
work, good lighting.<br />
We can bounce <strong>the</strong> light from<br />
anything handy. What’s handy?<br />
The following two situati<strong>on</strong>s are<br />
most comm<strong>on</strong>:<br />
32<br />
Wall bounce. If we are using<br />
<strong>on</strong>ly <strong>the</strong> light built into <strong>the</strong><br />
<str<strong>on</strong>g>Focus</str<strong>on</strong>g> <str<strong>on</strong>g>On</str<strong>on</strong>g> <str<strong>on</strong>g>Lighting</str<strong>on</strong>g> <str<strong>on</strong>g>Photos</str<strong>on</strong>g><br />
This light is bounced<br />
from <strong>the</strong> white ceiling.<br />
We could just as<br />
easily bounce it from a<br />
white wall or a white<br />
bed sheet taped<br />
to <strong>the</strong> wall.
camera, we can use a silver<br />
reflector to direct it to a nearby<br />
wall. Better lights, attached<br />
to <strong>the</strong> camera, often allow<br />
swiveling to point <strong>the</strong>m in<br />
ano<strong>the</strong>r directi<strong>on</strong>. Still, we can’t<br />
use just any wall that happens<br />
to be handy; <strong>the</strong> wall needs<br />
to be close to white. What is<br />
“close to white”? That depends<br />
<strong>on</strong> how good your camera is<br />
at automatic color adjustment<br />
or <strong>on</strong> how carefully you adjust<br />
<strong>the</strong> color balance. Automatic<br />
color balance is amazingly<br />
good right now and is likely to<br />
be even better in <strong>the</strong> cameras<br />
available by <strong>the</strong> time you read<br />
this book. Manual balance can<br />
compensate for a very wide<br />
range of degrees Kelvin.<br />
This <strong>on</strong>ly works, however, if<br />
<strong>the</strong> wall is “nearly white.” It<br />
also <strong>on</strong>ly works with a single<br />
light. If we use a sec<strong>on</strong>d light<br />
bouncing from a beige wall,<br />
plus <strong>the</strong> camera’s built-in light<br />
for fill, <strong>the</strong>re’s no way to adjust<br />
for both colors at <strong>on</strong>ce.<br />
The same is true if <strong>the</strong> sun is<br />
our main light. Our <strong>on</strong>-camera<br />
flash approximates <strong>the</strong> same<br />
color as midday sunlight, but<br />
if we shoot near dawn, at<br />
dusk, or <strong>on</strong> a cloudy day, <strong>the</strong><br />
colors of <strong>the</strong> two lights can be<br />
dramatically different. We’ll<br />
talk more about this later.<br />
Ceiling bounce. Most ceilings<br />
are white. Bouncing a flash off<br />
<strong>the</strong> ceiling generally gives us<br />
pretty accurate color. Still, if <strong>the</strong><br />
“Racco<strong>on</strong> eyes”—most<br />
people d<strong>on</strong>’t find this<br />
flattering.<br />
ceiling bounce is our <strong>on</strong>ly light,<br />
we may get very dark shadows<br />
under <strong>the</strong> eyes, especially if we<br />
are very close to <strong>the</strong> subject.<br />
(American photographers often<br />
call this “racco<strong>on</strong> eyes.”)<br />
Tools: Now We Have Light, but How Do We Get It under C<strong>on</strong>trol? 33
We need to know about this<br />
defect to keep it from happening.<br />
The good news is that it<br />
is easy to deal with. The flash<br />
we bounce off <strong>the</strong> ceiling is<br />
almost always an external light.<br />
We still have that built-in flash<br />
<strong>on</strong> our camera to illuminate<br />
those shadows, or we can use<br />
a fill card. The next picture is<br />
<strong>the</strong> more likely event: a ceiling<br />
34<br />
<str<strong>on</strong>g>Focus</str<strong>on</strong>g> <str<strong>on</strong>g>On</str<strong>on</strong>g> <str<strong>on</strong>g>Lighting</str<strong>on</strong>g> <str<strong>on</strong>g>Photos</str<strong>on</strong>g><br />
bounce external light plus, in this<br />
case, a white fill card.<br />
This is not exciting lighting. It<br />
w<strong>on</strong>’t win us any awards unless<br />
<strong>the</strong> subject is an interesting<br />
pers<strong>on</strong> and <strong>the</strong> background is<br />
enticing. Still, it’s a good, basic<br />
arrangement that allows a novice<br />
photographer to get a competent<br />
picture. It’s also a quick<br />
lighting style that plenty of highly<br />
Wall Bounce<br />
experienced photographers use<br />
to meet a deadline.<br />
In fact, wall and ceiling bounce<br />
works so well that some photographers<br />
can stop reading this<br />
chapter right now. Skip <strong>on</strong> to <strong>the</strong><br />
next chapter. You may already<br />
know all you need here. Most<br />
photographers who buy books,<br />
though, want to do more. So<br />
keep reading.
But what if we d<strong>on</strong>’t<br />
have a wall or a ceiling<br />
to use for bounce?<br />
Maybe we’re outdoors and <strong>the</strong>re<br />
is no wall or ceiling. Maybe we’re<br />
photographing <strong>the</strong> designer of a<br />
newly successful microprocessor<br />
in <strong>the</strong> newly built manufacturing<br />
facility where <strong>the</strong> ceiling is 14 feet<br />
high (and maybe painted black)<br />
and <strong>the</strong> nearest wall is 30 feet<br />
away. D<strong>on</strong>’t discount this possibility,<br />
even if you are <strong>the</strong> mailroom<br />
clerk. If you are a good amateur<br />
photographer, your employer<br />
may say, “Why bring in a $2,000<br />
professi<strong>on</strong>al when we have Sally<br />
right here?”<br />
This happens. In those cases we<br />
have to bring our own bounce<br />
reflector. There are many ways<br />
to do this, but <strong>the</strong> three comm<strong>on</strong><br />
<strong>on</strong>es are a big bounce card, an<br />
umbrella, and a collapsible ring<br />
reflector. By far, most photographers<br />
choose <strong>the</strong> umbrella. Still,<br />
we’ll talk about <strong>the</strong> bounce card<br />
first, partly because it resembles<br />
<strong>the</strong> walls and ceilings we’ve<br />
already discussed, but mostly<br />
because it is <strong>the</strong> cheapest.<br />
The big bounce card<br />
We want <strong>the</strong> biggest card we can<br />
carry. What “biggest” means to<br />
you will depend <strong>on</strong> whe<strong>the</strong>r you<br />
drive a truck, ride <strong>the</strong> subway,<br />
or do something in between.<br />
We’ll talk about a 4-by-8-foot<br />
card. Scale it up if you can carry<br />
it; scale it down to whatever<br />
size you can accommodate.<br />
Also c<strong>on</strong>sider what you want to<br />
photograph.<br />
For <strong>the</strong> first material, overwhelmingly,<br />
we recommend Fome-Cor.<br />
That’s <strong>the</strong> original name, but<br />
o<strong>the</strong>r manufacturers sell it under<br />
different names. Generically,<br />
it’s foam board: plastic foam<br />
sandwiched between two sheets<br />
of paper. Most makers sell two<br />
different degrees of hardness.<br />
The harder versi<strong>on</strong> is better for<br />
purposes like building tradeshow<br />
signage, but <strong>the</strong> less<br />
expensive softer versi<strong>on</strong> is good<br />
enough for a photographic<br />
reflector.<br />
For <strong>the</strong> sec<strong>on</strong>d material,<br />
we recommend silver Mylar<br />
(a DuP<strong>on</strong>t name). Cover <strong>on</strong>e<br />
side of <strong>the</strong> foam core board<br />
with this mirror plastic. We<br />
can buy it in two versi<strong>on</strong>s: with<br />
and without an adhesive back.<br />
The adhesive back versi<strong>on</strong><br />
costs more, but <strong>the</strong> ease of<br />
applicati<strong>on</strong> is well worth <strong>the</strong><br />
price. Whatever versi<strong>on</strong> you<br />
find, practice attaching a small<br />
piece smoothly to a board<br />
before you assemble <strong>the</strong><br />
big <strong>on</strong>e.<br />
Tools: Now We Have Light, but How Do We Get It under C<strong>on</strong>trol? 35
36<br />
<str<strong>on</strong>g>Focus</str<strong>on</strong>g> <str<strong>on</strong>g>On</str<strong>on</strong>g> <str<strong>on</strong>g>Lighting</str<strong>on</strong>g> <str<strong>on</strong>g>Photos</str<strong>on</strong>g><br />
We can lean foam<br />
board against<br />
something (a chair,<br />
a wall, a ladder, a<br />
book) and clamp it<br />
to an angle ir<strong>on</strong> or<br />
light stand in order<br />
to place it where we<br />
want it. By scoring<br />
it, it folds for easier<br />
transport. With Mylar<br />
<strong>on</strong> <strong>on</strong>e side, we get<br />
two reflectors in <strong>on</strong>e.<br />
Of all <strong>the</strong> tools,<br />
this is <strong>on</strong>e of<br />
<strong>the</strong> cheapest and<br />
it’s incredibly<br />
useful.
Having <strong>the</strong> foam board white <strong>on</strong><br />
<strong>on</strong>e side and silver <strong>on</strong> <strong>the</strong> o<strong>the</strong>r<br />
allows us to switch it back and<br />
forth. Sometimes we want <strong>the</strong><br />
silver side, sometimes <strong>the</strong> white<br />
side. As we menti<strong>on</strong>ed earlier,<br />
that’s not <strong>the</strong> <strong>on</strong>ly advantage of<br />
<strong>the</strong> Mylar, though. The Mylar is<br />
extremely tough stuff. Score <strong>the</strong><br />
board with a razor blade or a<br />
sharp knife <strong>on</strong> <strong>the</strong> white side.<br />
Make <strong>the</strong> score exactly in <strong>the</strong><br />
center and use a metal straightedge<br />
to guide <strong>the</strong> cut. Then bend<br />
<strong>the</strong> board in half.<br />
Now we can store <strong>the</strong> reflector<br />
in half <strong>the</strong> space and carry<br />
it in a vehicle half as big. The<br />
silver Mylar that holds <strong>the</strong> board<br />
toge<strong>the</strong>r will bend and unbend<br />
essentially forever. We suspect<br />
that archeologists unearthing our<br />
civilizati<strong>on</strong> centuries from now<br />
will find photographers’ bounce<br />
cards, dirty but intact.<br />
The umbrella<br />
The big bounce card, al<strong>on</strong>g with<br />
a few smaller <strong>on</strong>es, is <strong>the</strong> most<br />
useful and cheapest reflector a<br />
photographer can have, but it<br />
certainly is not always <strong>the</strong> most<br />
practical to store or to carry.<br />
If we can spend a little more<br />
m<strong>on</strong>ey, we certainly also want an<br />
umbrella.<br />
We d<strong>on</strong>’t think any<strong>on</strong>e knows<br />
which photographer first thought<br />
of this idea. Almost certainly<br />
he used an ordinary white<br />
umbrella designed to keep rain<br />
off peoples’ heads, plus some<br />
sort of jerry-rigged arrangement<br />
of clamps and tape to hold <strong>the</strong><br />
umbrella, <strong>the</strong> light, and a light<br />
stand toge<strong>the</strong>r. Today we have<br />
several umbrella designs made<br />
specifically for photography.<br />
A well-equipped professi<strong>on</strong>al<br />
photographer will have at least<br />
<strong>on</strong>e of each design, possibly in<br />
several sizes. A serious amateur<br />
Tools: Now We Have Light, but How Do We Get It under C<strong>on</strong>trol? 37
needs to c<strong>on</strong>sider buying <strong>on</strong>e<br />
of whatever design seems most<br />
often useful.<br />
A white umbrella is <strong>the</strong> least<br />
expensive and also most versatile<br />
versi<strong>on</strong>, because we can use it<br />
two ways. We can use it as ei<strong>the</strong>r<br />
a reflector or a diffuser. We’ll talk<br />
about diffusi<strong>on</strong> later, so for now<br />
we’ll look at <strong>the</strong> umbrella simply<br />
as a reflector.<br />
As a reflector, <strong>the</strong> umbrella<br />
behaves exactly like our big<br />
38<br />
<str<strong>on</strong>g>Focus</str<strong>on</strong>g> <str<strong>on</strong>g>On</str<strong>on</strong>g> <str<strong>on</strong>g>Lighting</str<strong>on</strong>g> <str<strong>on</strong>g>Photos</str<strong>on</strong>g><br />
bounce card, but with <strong>on</strong>e<br />
important excepti<strong>on</strong>. If we are<br />
shooting a portrait, <strong>the</strong> reflecti<strong>on</strong><br />
from human skin will be<br />
identical whe<strong>the</strong>r we use a<br />
bounce card or an umbrella.<br />
However, if we photograph a<br />
mirror-like subject—glass or<br />
bright metal—<strong>the</strong> shape of<br />
<strong>the</strong> light will be apparent in<br />
<strong>the</strong> reflecti<strong>on</strong>. In those cases<br />
an umbrella-shaped reflecti<strong>on</strong><br />
can be quite ugly and we d<strong>on</strong>’t<br />
want it. (We do get <strong>the</strong> same<br />
ugly reflecti<strong>on</strong> in a portrait: <strong>the</strong><br />
highlight in <strong>the</strong> eyes. But those<br />
reflecti<strong>on</strong>s are so small that<br />
usually no <strong>on</strong>e notices.)<br />
A silver umbrella reflects more<br />
light than a white <strong>on</strong>e. It also<br />
provides less diffusi<strong>on</strong>, so we<br />
may need to buy a bigger <strong>on</strong>e to<br />
get <strong>the</strong> same effect. (Remember,<br />
<strong>the</strong> bigger <strong>the</strong> light, <strong>the</strong> softer<br />
<strong>the</strong> shadow.) Still, buying a bigger<br />
umbrella is less expensive than<br />
buying a brighter light.
A black-backed umbrella is<br />
sometimes useful when we<br />
work in tight spaces. These<br />
umbrellas may be white or silver<br />
<strong>on</strong> <strong>the</strong> inside, but <strong>the</strong> outside<br />
is covered by a sec<strong>on</strong>d layer of<br />
black cloth. This keeps light from<br />
going through <strong>the</strong> umbrella and<br />
reflecting from walls and o<strong>the</strong>r<br />
surfaces. The black cloth is easily<br />
removable if we want those<br />
additi<strong>on</strong>al reflecti<strong>on</strong>s. This is<br />
<strong>the</strong> best umbrella to have, but<br />
it is also <strong>the</strong> most expensive.<br />
Few amateurs will find it worth<br />
<strong>the</strong> cost. Still, it’s good to know<br />
about, because we can improvise<br />
<strong>the</strong> same effect with a piece of<br />
black cloth paper clipped to <strong>the</strong><br />
back of our white umbrella.<br />
The circular reflector<br />
The circular reflector has a piece<br />
of silvered cloth stretched over a<br />
plastic frame. The plastic frame<br />
can be twisted into a figure-8<br />
and <strong>the</strong>n folded to half its<br />
original diameter. This reflector<br />
also comes with a carrying case.<br />
So what’s its advantage over<br />
<strong>the</strong> silver foam-core reflector we<br />
already know how to make and<br />
much less expensively?<br />
The advantage is more stability<br />
in wind. Cloth allows some air<br />
to blow through it: paper and<br />
plastic blow over to <strong>the</strong> ground<br />
more easily.<br />
Folded circular reflector.<br />
Tools: Now We Have Light, but How Do We Get It under C<strong>on</strong>trol? 39
Softbox<br />
Softboxes are boxes with diffusi<strong>on</strong><br />
material in fr<strong>on</strong>t and attach<br />
to a light source. Sometimes<br />
<strong>the</strong>re is additi<strong>on</strong>al diffusi<strong>on</strong><br />
material (baffle) inside. They<br />
create beautiful soft light. They<br />
come in a wide range of sizes.<br />
Most professi<strong>on</strong>al softboxes disassemble<br />
for easy transport from<br />
locati<strong>on</strong> to locati<strong>on</strong>. Their costs<br />
vary by manufacturer and size,<br />
but we saw in Chapter 1 that we<br />
can make <strong>on</strong>e ourselves out of a<br />
cardboard box, cutting holes for<br />
<strong>the</strong> flash to fit in and a hole <strong>on</strong><br />
<strong>the</strong> fr<strong>on</strong>t to which we can tape<br />
tracing paper.<br />
There are also a variety of small<br />
diffusers that attach with Velcro<br />
to a flash; <strong>the</strong>se act like softboxes<br />
but are very portable.<br />
Regardless of which type you<br />
use, <strong>the</strong> larger <strong>the</strong> diffuser, <strong>the</strong><br />
larger <strong>the</strong> light.<br />
40<br />
<str<strong>on</strong>g>Focus</str<strong>on</strong>g> <str<strong>on</strong>g>On</str<strong>on</strong>g> <str<strong>on</strong>g>Lighting</str<strong>on</strong>g> <str<strong>on</strong>g>Photos</str<strong>on</strong>g><br />
Medium manufactured softbox.
Small manufactured softbox. A small diffuser <strong>on</strong> a<br />
flash that bounces light.<br />
Tools: Now We Have Light, but How Do We Get It under C<strong>on</strong>trol? 41
Diffusi<strong>on</strong><br />
The o<strong>the</strong>r way to make a light<br />
bigger is to use diffusi<strong>on</strong>. This<br />
means putting <strong>the</strong> light through<br />
a big piece of translucent material.<br />
How big? Well, pretty small<br />
if we’re photographing a flower<br />
or insect specimen. But makers<br />
of major moti<strong>on</strong> pictures with big<br />
budgets sometimes hang huge<br />
diffusi<strong>on</strong> material from <strong>the</strong> top of<br />
<strong>on</strong>e building to ano<strong>the</strong>r, diffusing<br />
<strong>the</strong> light over a whole block, to<br />
get <strong>the</strong> picture. We’ll assume that<br />
you cannot spend thousands of<br />
dollars to make a photograph.<br />
42<br />
<str<strong>on</strong>g>Focus</str<strong>on</strong>g> <str<strong>on</strong>g>On</str<strong>on</strong>g> <str<strong>on</strong>g>Lighting</str<strong>on</strong>g> <str<strong>on</strong>g>Photos</str<strong>on</strong>g><br />
So what do we use for diffusi<strong>on</strong><br />
material? A white shower curtain<br />
bought at a discount store<br />
works just fine. We can cut it into<br />
smaller pieces, and we can buy<br />
ano<strong>the</strong>r <strong>on</strong>e whenever we need<br />
it. But what do we do if we need<br />
it <strong>on</strong> a day when <strong>the</strong> discount<br />
store is <strong>on</strong>ly selling flowerpatterned<br />
shower curtains?<br />
A better soluti<strong>on</strong> is diffusi<strong>on</strong><br />
material made specifically for<br />
photography. They’re called<br />
gels, because <strong>the</strong>y used to be<br />
made of gelatin, and <strong>the</strong>y are<br />
available in a very wide range<br />
of transparent colors in additi<strong>on</strong><br />
to <strong>the</strong> white diffusi<strong>on</strong> material.<br />
It’s best if you can buy this item<br />
from a brick-and-mortar store,<br />
because with <strong>the</strong> wide variety of<br />
densities available, you’ll want to<br />
look at <strong>the</strong>m before you buy. You<br />
may also be able to get a sample<br />
booklet of any manufacturer’s<br />
complete selecti<strong>on</strong> of filters, but<br />
retailers are generally willing to<br />
give <strong>the</strong>m <strong>on</strong>ly to <strong>the</strong>ir bigger<br />
and more regular customers. Try<br />
asking for a gel sample pack at<br />
<strong>the</strong> same time you are buying a<br />
particularly expensive item.<br />
Roscoe sample pack<br />
opened to diffusi<strong>on</strong><br />
material.
Many photographers use <strong>the</strong>se<br />
“samples” as working filters <strong>on</strong><br />
small lights, never buying <strong>the</strong><br />
larger gels at all! Roscoe has<br />
wised up to <strong>the</strong> fact that <strong>the</strong>y<br />
were giving away free usable<br />
merchandise and started selling<br />
<strong>the</strong> Strobist sample pack.<br />
It <strong>on</strong>ly c<strong>on</strong>tains a few colors,<br />
including translucent white, but it<br />
includes <strong>the</strong> colors most photographers<br />
are likely to use. Is this<br />
an improvement, to be able to<br />
buy something we used to get for<br />
free? Absolutely! Now every<strong>on</strong>e,<br />
not just <strong>the</strong> big spenders, can<br />
have a sample pack for a very<br />
affordable price. By <strong>the</strong> time you<br />
read this, we hope o<strong>the</strong>r makers<br />
beside Roscoe see <strong>the</strong> wisdom of<br />
selling <strong>the</strong>ir gels this way.<br />
Unlike standard sample packs,<br />
<strong>the</strong> Strobist pack (and presumably<br />
some future n<strong>on</strong>-Roscoe<br />
products) also includes multiple<br />
copies of each of <strong>the</strong> colors<br />
photographers are most likely to<br />
use, so that we can put <strong>the</strong> same<br />
gel <strong>on</strong> multiple flashes or replace<br />
a dirty <strong>on</strong>e <strong>on</strong> a single flash. The<br />
<strong>on</strong>ly trouble is that <strong>the</strong>se fit <strong>on</strong>ly<br />
small flashes; still, <strong>the</strong>y allow us<br />
to see how each gel works and<br />
we can always buy bigger sheets<br />
and often big rolls of <strong>the</strong> single<br />
colors we find most useful.<br />
Roscolux colored gels.<br />
Handy for changing or<br />
intensifying <strong>the</strong> color<br />
of backgrounds or<br />
subjects in a photo.<br />
Tools: Now We Have Light, but How Do We Get It under C<strong>on</strong>trol? 43
For this book, <strong>the</strong> translucent<br />
white filter is <strong>the</strong> <strong>on</strong>e we’ll probably<br />
discuss <strong>the</strong> most, but having<br />
some neutral density filters <strong>on</strong><br />
hand is also a good idea. They<br />
come in a variety of densities.<br />
They are useful when <strong>on</strong>e of your<br />
lights is too str<strong>on</strong>g and you ei<strong>the</strong>r<br />
can’t or d<strong>on</strong>’t want to move it far<strong>the</strong>r<br />
away. The joy of <strong>the</strong>se filters<br />
is that <strong>the</strong>ir impact <strong>on</strong> <strong>the</strong> color is<br />
minimal. For many of <strong>the</strong> images<br />
in this book, <strong>the</strong> popup flash was<br />
too str<strong>on</strong>g, so we put a neutral<br />
density filter in fr<strong>on</strong>t of it. If we’ve<br />
<strong>on</strong>ly got <strong>the</strong> weakest density of<br />
this filter, we can always fold it<br />
up as many times as our piece<br />
will allow and still cover <strong>the</strong> flash,<br />
until we get <strong>the</strong> amount of light<br />
we want.<br />
So now we have some sort of<br />
diffusi<strong>on</strong> material. How do we<br />
put it in fr<strong>on</strong>t of <strong>the</strong> light? Obviously<br />
we can just tape it to <strong>the</strong><br />
light, but that’s often not good<br />
enough: we still have just a small<br />
flash and <strong>the</strong> whole point is to<br />
get a bigger light. We need to<br />
get <strong>the</strong> diffusi<strong>on</strong> a significant<br />
distance out in fr<strong>on</strong>t of <strong>the</strong> flash<br />
so that <strong>the</strong> bigger diffusi<strong>on</strong> material<br />
becomes <strong>the</strong> effective light<br />
source.<br />
If we have a big enough piece<br />
of diffusi<strong>on</strong> material, we can<br />
44<br />
<str<strong>on</strong>g>Focus</str<strong>on</strong>g> <str<strong>on</strong>g>On</str<strong>on</strong>g> <str<strong>on</strong>g>Lighting</str<strong>on</strong>g> <str<strong>on</strong>g>Photos</str<strong>on</strong>g><br />
Become a stroBist<br />
Speaking of Strobist, that’s<br />
David Hobby’s brand name<br />
for his philosophy of lighting,<br />
and any<strong>on</strong>e reading this<br />
book should look up Strobist<br />
<strong>on</strong>line. Using a combinati<strong>on</strong><br />
of a free website, pers<strong>on</strong>al<br />
seminars for a fee, and a video<br />
series for people who cannot<br />
attend <strong>the</strong> seminars, David<br />
may be <strong>the</strong> most influential<br />
lighting teacher in <strong>the</strong> world.<br />
Some people learn better<br />
from books, some <strong>on</strong>line, and<br />
some in classrooms, but most<br />
people learn better with all of<br />
<strong>the</strong>se. David has promised not<br />
to write a book, so he doesn’t<br />
compete with us, and we are<br />
happy to recommend him!<br />
tape it to a doorway and put <strong>the</strong><br />
light outside <strong>the</strong> room. We can<br />
also tape it to a window and let<br />
<strong>the</strong> sun be our main light. Both<br />
of <strong>the</strong>se are good ideas, and if<br />
you are a hobbyist, you should<br />
certainly try <strong>the</strong>m; <strong>the</strong>y may be all<br />
you ever need.<br />
So how do we hold <strong>the</strong> diffusi<strong>on</strong><br />
material a few inches or a few<br />
feet away from <strong>the</strong> light? That<br />
depends <strong>on</strong> whe<strong>the</strong>r we have<br />
more friends or more m<strong>on</strong>ey. We<br />
can simply ask a friend to hold<br />
<strong>the</strong>re’s tape and <strong>the</strong>n <strong>the</strong>re’s<br />
gaffer tape<br />
Duct tape, available from<br />
hardware stores, is str<strong>on</strong>g and<br />
will hold a diffuser in place for<br />
years. However, we want to<br />
take that diffuser down after<br />
a shoot, and duct tape often<br />
damages <strong>the</strong> surface. Masking<br />
tape, with a weaker hold, is<br />
much less likely to damage.<br />
Gaffer tape offers good hold<br />
with much less possibility of<br />
damage and is available from<br />
good photographic suppliers.<br />
Gaffer tapes differ. If you<br />
d<strong>on</strong>’t like <strong>the</strong> first <strong>on</strong>e you buy,<br />
try ano<strong>the</strong>r brand. We have<br />
attached things to historically<br />
important walls while curators<br />
gasped in horror and <strong>the</strong>n<br />
removed <strong>the</strong> tape without<br />
damage.<br />
Gaffer tape is more expensive<br />
than o<strong>the</strong>r tapes, so keep duct<br />
tape and masking tape in your<br />
kit, and use those when it’s<br />
safe to do so.<br />
<strong>the</strong> diffusi<strong>on</strong> material a distance<br />
from <strong>the</strong> light, or we can buy<br />
o<strong>the</strong>r equipment to hold <strong>the</strong> diffuser.<br />
(All too often, people with<br />
more m<strong>on</strong>ey also have more<br />
friends, but that’s a social issue<br />
we’ll avoid in a technical book!)
D<strong>on</strong>’t overlook <strong>the</strong> possibility of<br />
human hands holding <strong>the</strong> diffuser,<br />
especially if you’ve joined a<br />
local camera club where members<br />
are eager to help each o<strong>the</strong>r<br />
to make good pictures. Still we’ll<br />
assume <strong>the</strong> worst-case (or sometimes<br />
<strong>the</strong> best-case) scenario<br />
in which you ei<strong>the</strong>r d<strong>on</strong>’t have<br />
friends to help or you’re a professi<strong>on</strong>al<br />
photographer who needs<br />
to pay assistants. In those two<br />
cases, buying or making some<br />
more equipment makes sense.<br />
The extra equipment is also more<br />
reliable: it stays where we want it;<br />
humans move around.<br />
Framed diffusers<br />
Sometimes we find ourselves<br />
using <strong>the</strong> same size and shape<br />
diffusi<strong>on</strong> over and over again. In<br />
this case, it might make sense to<br />
already have a framed diffuser<br />
of <strong>the</strong> size and shape we want.<br />
We can buy <strong>the</strong>se, but <strong>the</strong>y<br />
require almost no skill to make,<br />
and doing it ourselves makes<br />
good sense. Screwing toge<strong>the</strong>r a<br />
few pieces of wood and taping<br />
<strong>on</strong> a piece of diffusi<strong>on</strong> material<br />
is something almost any<strong>on</strong>e<br />
can do.<br />
A diffuser scatters so much light<br />
in so many different directi<strong>on</strong>s<br />
that we almost always also want a<br />
Tools: Now We Have Light, but How Do We Get It under C<strong>on</strong>trol? 45
gobo to block some of that light.<br />
(A gobo isn’t a diffuser, so we<br />
w<strong>on</strong>’t talk about it much here, but<br />
we’ll say more later.) If we work<br />
mostly in our own space and<br />
usually d<strong>on</strong>’t have to worry about<br />
transporting bulky things, it makes<br />
sense to permanently attach a<br />
black card to <strong>the</strong> framed diffuser<br />
with inexpensive hinges. That’s<br />
what we’ve d<strong>on</strong>e in <strong>the</strong> diagram<br />
at right. <str<strong>on</strong>g>On</str<strong>on</strong>g> a tabletop, <strong>the</strong> gobo<br />
also serves as <strong>the</strong> support for <strong>the</strong><br />
diffusi<strong>on</strong>. Without a table, <strong>the</strong><br />
whole assembly can be clamped<br />
to a light stand. Inexpensive light<br />
stands work fine: if <strong>the</strong> thing falls<br />
over, we’re not damaging an<br />
expensive light. Cheap hardware<br />
store spring clamps also work; we<br />
d<strong>on</strong>’t need photographic specialty<br />
clamps.<br />
Things get a lot more difficult<br />
when we leave <strong>the</strong> studio, though.<br />
Just <strong>on</strong>e of <strong>the</strong>se framed diffusers<br />
can be pretty bulky to carry. <str<strong>on</strong>g>On</str<strong>on</strong>g><br />
locati<strong>on</strong> we’d usually ra<strong>the</strong>r have<br />
a collapsible umbrella. Umbrellas<br />
d<strong>on</strong>’t work well, though, if <strong>the</strong><br />
subject is highly reflective—metal,<br />
glass, glossy plastic. The shape<br />
of <strong>the</strong> umbrella reflecti<strong>on</strong> in <strong>the</strong><br />
subject is so pr<strong>on</strong>ounced that it<br />
distracts from <strong>the</strong> subject itself. In<br />
those cases, we need to make <strong>the</strong><br />
46<br />
<str<strong>on</strong>g>Focus</str<strong>on</strong>g> <str<strong>on</strong>g>On</str<strong>on</strong>g> <str<strong>on</strong>g>Lighting</str<strong>on</strong>g> <str<strong>on</strong>g>Photos</str<strong>on</strong>g><br />
diffusi<strong>on</strong> panel after we get to <strong>the</strong><br />
locati<strong>on</strong>. <str<strong>on</strong>g>On</str<strong>on</strong>g>e good way to do this<br />
is with inexpensive plastic plumbing<br />
pipe. We cut it in advance to<br />
<strong>the</strong> lengths we think we need and<br />
put it toge<strong>the</strong>r <strong>on</strong> <strong>the</strong> scene with<br />
plastic elbows made of <strong>the</strong> same<br />
material. Plumbers have to glue<br />
those joints toge<strong>the</strong>r for a watertight<br />
seal, but we d<strong>on</strong>’t have to<br />
worry about that. The frame will<br />
hold toge<strong>the</strong>r just fine with no<br />
adhesive and come apart easily<br />
when we are ready to leave. We<br />
Umbrella shaft<br />
carry our diffusi<strong>on</strong> material in a<br />
roll and tape it to <strong>the</strong> frame.<br />
The umbrella<br />
But wait! We’ve already talked<br />
about this, haven’t we? Yes, but<br />
not enough. The umbrella can<br />
ei<strong>the</strong>r be a reflector or a diffuser.<br />
So far, we’ve <strong>on</strong>ly used it as a<br />
reflector. Now we’ll use it as a<br />
diffuser. If you like this technique,<br />
<strong>the</strong> good news is that <strong>on</strong>ly <strong>the</strong><br />
cheapest plain white umbrellas<br />
work well this way.<br />
Thin white umbrella<br />
Limit of camera view
Why would we want to do this,<br />
when <strong>the</strong> umbrella works so<br />
well as a reflector instead of<br />
a diffuser? The reas<strong>on</strong> is that<br />
<strong>the</strong> closer <strong>the</strong> light is to <strong>the</strong><br />
subject, <strong>the</strong> bigger it effectively<br />
becomes. We can’t move <strong>the</strong><br />
reflective umbrella as close to<br />
<strong>the</strong> subject, because <strong>the</strong> camera<br />
begins to see <strong>the</strong> shaft of <strong>the</strong><br />
umbrella. If we move it even<br />
closer, <strong>the</strong> camera can see <strong>the</strong><br />
flash itself. And after all this,<br />
our primary light source—which<br />
is <strong>the</strong> umbrella, not <strong>the</strong> flash—<br />
may still not be close enough<br />
to our subject. Remember that<br />
<strong>the</strong> closer <strong>the</strong> light is to <strong>the</strong><br />
subject, <strong>the</strong> bigger it effectively<br />
becomes. We can use <strong>the</strong> diffusi<strong>on</strong><br />
umbrella much closer to<br />
our subject. We can use smaller<br />
equipment, carry it more easily,<br />
and spend less m<strong>on</strong>ey more<br />
effectively if we use <strong>the</strong> shootthrough<br />
technique.<br />
The bad news is that if <strong>the</strong> lighting<br />
assembly is in a small space,<br />
<strong>the</strong> shoot-through technique is<br />
going to cause a lot of additi<strong>on</strong>al<br />
reflecti<strong>on</strong> from nearby walls. If we<br />
d<strong>on</strong>’t want this additi<strong>on</strong>al reflecti<strong>on</strong>,<br />
we have to drape <strong>the</strong> entire<br />
backside of <strong>the</strong> lighting assembly<br />
with something black to avoid <strong>the</strong><br />
additi<strong>on</strong>al reflecti<strong>on</strong>. The better<br />
news is that most of <strong>the</strong> time we<br />
will be happy to have this additi<strong>on</strong>al<br />
fill, accept <strong>the</strong> picture as<br />
is, and shoot it with no fur<strong>the</strong>r<br />
modificati<strong>on</strong>.<br />
Light blockers<br />
Almost everything we’ve talked<br />
about so far tends to spread<br />
<strong>the</strong> light around. That’s not<br />
always good; some things and<br />
some areas need to be kept<br />
dark. The most practical way to<br />
do this is with black paper and<br />
cardboard.<br />
Adjustable flash coverage<br />
Many of us already have a flash<br />
that adjusts to <strong>the</strong> angle <strong>the</strong> lens<br />
sees. If we have full manual<br />
Large lights are not<br />
always <strong>the</strong> best lights!<br />
Still, if we have <strong>on</strong>ly<br />
a small light but learn<br />
how to turn it<br />
into a big <strong>on</strong>e,<br />
<strong>the</strong>n we can do<br />
anything!<br />
c<strong>on</strong>trol, we may be able to set <strong>the</strong><br />
flash for a l<strong>on</strong>g lens (narrow angle<br />
of coverage) and <strong>the</strong>n actually use<br />
a much shorter lens. This gives <strong>the</strong><br />
flash a slight spotlight effect.<br />
The gobo<br />
The gobo is a black card that<br />
goes between <strong>the</strong> light and anything<br />
else we d<strong>on</strong>’t want to light.<br />
We can use gobos with any level<br />
of sophisticati<strong>on</strong> we want. L<strong>on</strong>e<br />
photographers often handhold a<br />
gobo in fr<strong>on</strong>t of <strong>the</strong>ir light as far<br />
as <strong>the</strong>ir arms can reach. Hollywood<br />
directors of lighting (DLs or<br />
LDs), with bigger budgets, attach<br />
<strong>the</strong> gobo to a separate stand (and<br />
use a half-dozen names for different<br />
sizes and shapes of gobos).<br />
Tools: Now We Have Light, but How Do We Get It under C<strong>on</strong>trol? 47
48<br />
<str<strong>on</strong>g>Focus</str<strong>on</strong>g> <str<strong>on</strong>g>On</str<strong>on</strong>g> <str<strong>on</strong>g>Lighting</str<strong>on</strong>g> <str<strong>on</strong>g>Photos</str<strong>on</strong>g><br />
Black card gobo.<br />
D<strong>on</strong>’t think of a gobo<br />
as just blocking <strong>the</strong><br />
light from <strong>the</strong> subject.<br />
A simple black card can<br />
also be used as a gobo<br />
to keep unwanted light<br />
from hitting our lens.<br />
Because we can precisely<br />
positi<strong>on</strong> <strong>the</strong> gobo,<br />
it’s much more<br />
effective than a<br />
fixed lens hood!
More sophisticated gobos with<br />
holes can create moody lighting.<br />
With a little patience and a<br />
sharp knife, you can make your<br />
own. Gobos with holes are called<br />
cookies (short for cucoloris, with<br />
several spelling variati<strong>on</strong>s). The<br />
photo below shows a homemade<br />
gobo, which makes <strong>the</strong> light from<br />
<strong>the</strong> flash appear to be sunlight<br />
streaming through window blinds.<br />
The photo <strong>on</strong> <strong>the</strong> next page<br />
at left is a commercially made<br />
wooden gobo to simulate, say,<br />
light passing through tree leaves.<br />
Certainly it’s sturdier than <strong>the</strong><br />
cardboard versi<strong>on</strong>, but you can<br />
make something similar yourself<br />
and spend your extra m<strong>on</strong>ey <strong>on</strong><br />
o<strong>the</strong>r photographic equipment.<br />
The photo at right <strong>on</strong> page 50<br />
shows a slatted homemade cardboard<br />
gobo in use. Depending <strong>on</strong><br />
<strong>the</strong> angle and <strong>the</strong> intensity of <strong>the</strong><br />
light passing through <strong>the</strong> gobo, it<br />
can look like light coming through<br />
a window with blinds or can simply<br />
create an interesting pattern<br />
<strong>on</strong> a background. In this case, <strong>the</strong><br />
gobo was clamped in place <strong>on</strong> a<br />
stand. The studio was darkened<br />
because <strong>the</strong> background was lit<br />
with a c<strong>on</strong>tinuous tungsten light<br />
source. This light isn’t very bright,<br />
so a l<strong>on</strong>g exposure was needed.<br />
(How l<strong>on</strong>g an exposure? This <strong>on</strong>e<br />
was 2 sec<strong>on</strong>ds. But <strong>the</strong> determinati<strong>on</strong><br />
comes from how str<strong>on</strong>g <strong>the</strong><br />
c<strong>on</strong>tinuous light source is and how<br />
bright we want <strong>the</strong> background<br />
to be.) A flash was positi<strong>on</strong>ed<br />
slightly off-axis camera right in a<br />
medium-sized softbox. The flash<br />
was used to light <strong>the</strong> man. Even<br />
though this was a l<strong>on</strong>g exposure,<br />
<strong>the</strong> man is sharp because he was<br />
lit <strong>on</strong>ly by <strong>the</strong> flash.<br />
Homemade cardboard<br />
cookie. This would<br />
create <strong>the</strong> effect of<br />
light coming through<br />
window blinds.<br />
Tools: Now We Have Light, but How Do We Get It under C<strong>on</strong>trol? 49
A commercially produced wooden<br />
cookie. We can easily make this<br />
with cardboard as well.<br />
50<br />
<str<strong>on</strong>g>Focus</str<strong>on</strong>g> <str<strong>on</strong>g>On</str<strong>on</strong>g> <str<strong>on</strong>g>Lighting</str<strong>on</strong>g> <str<strong>on</strong>g>Photos</str<strong>on</strong>g>
Barn doors<br />
A barn door is a special type of<br />
gobo that attaches directly to<br />
<strong>the</strong> light; we need no additi<strong>on</strong>al<br />
stands or hands to support <strong>the</strong>se<br />
devices. Barn doors swing open<br />
and closed to c<strong>on</strong>trol <strong>the</strong> spread<br />
of <strong>the</strong> beam. This sounds like a<br />
good idea until we realize that<br />
<strong>the</strong>re’s no way to move a barn<br />
door closer or far<strong>the</strong>r from <strong>the</strong><br />
light, and that’s a big loss of c<strong>on</strong>trol.<br />
Sometimes, though, we d<strong>on</strong>’t<br />
need precise c<strong>on</strong>trol. Then we<br />
prefer <strong>the</strong> barn door because<br />
it is <strong>the</strong> simplest and least<br />
cumbersome way to block light.<br />
We can make a barn door simply<br />
by taping a black card to <strong>the</strong><br />
flash and bending it as much<br />
as we need to restrict <strong>the</strong> beam.<br />
If we find ourselves using barn<br />
doors frequently, <strong>the</strong>n we buy a<br />
commercially manufactured barn<br />
door that has better durability<br />
and precisi<strong>on</strong>. Usually, <strong>on</strong>e barn<br />
door is enough, but for uses such<br />
as background lights, we may put<br />
<strong>the</strong>m <strong>on</strong> all four sides of <strong>the</strong> flash.<br />
Snoots and grids<br />
Snoots and grids go over lights<br />
with <strong>the</strong> purpose of restricting<br />
<strong>the</strong> light’s spread. Using <strong>the</strong>se<br />
can be a huge step for a novice<br />
In this case, we just have <strong>on</strong>e door, but<br />
<strong>the</strong>re are times when we will have four.<br />
who wants more dramatic lighting.<br />
As with <strong>the</strong> barn door, we<br />
can make snoots and grids for<br />
pennies. <str<strong>on</strong>g>On</str<strong>on</strong>g>ly if you find yourself<br />
using <strong>the</strong>m over and over might<br />
you c<strong>on</strong>sider buying <strong>on</strong>e. (Also,<br />
know that we must have a<br />
commercially manufactured metal<br />
grid and probably an auxiliary fan<br />
for studio strobes to avoid overheating.)<br />
The photo <strong>on</strong> <strong>the</strong> following<br />
page shows <strong>the</strong> basic supplies<br />
we used, which not every<strong>on</strong>e<br />
will have <strong>on</strong> hand: cardboard,<br />
straws, and tape. We’ll also need<br />
scissors, a ruler, and pretty much<br />
Tools: Now We Have Light, but How Do We Get It under C<strong>on</strong>trol? 51
any glue—all of which we already<br />
have. We can measure each side<br />
of <strong>the</strong> flash or we can wrap a<br />
piece of paper around <strong>the</strong> flash,<br />
pressing so that we can see where<br />
<strong>the</strong> edges are.<br />
Making a grid<br />
Cut a piece of cardboard to<br />
go around your flash, adding<br />
about 3 ⁄8 inch to create a flap,<br />
which you’ll eventually use to<br />
seal <strong>the</strong> ends toge<strong>the</strong>r. It should<br />
be about 31 ⁄4 inches deep,<br />
enough to hold a handful of<br />
short soda straws plus an empty<br />
secti<strong>on</strong> to slip over <strong>the</strong> flash.<br />
Score <strong>the</strong> cardboard lightly to<br />
help it bend around a rectangular<br />
flash. Cut <strong>the</strong> straws into<br />
1 3 ⁄2- to ⁄4-inch lengths. This<br />
doesn’t mean <strong>the</strong> straws should<br />
be different lengths—<strong>the</strong>y should<br />
all be <strong>the</strong> same—but you may<br />
decide to make a deeper or<br />
shallower grid later for a wider<br />
or narrower spot effect. Bend<br />
<strong>the</strong> scored cardboard so that <strong>the</strong><br />
widest part is <strong>on</strong> <strong>the</strong> table and<br />
you’ve got <strong>the</strong> ends sticking up. If<br />
you put a book <strong>on</strong> ei<strong>the</strong>r side, it<br />
will free your hands and keep <strong>the</strong><br />
sides vertical. Then start gluing<br />
<strong>the</strong> straws to that widest porti<strong>on</strong><br />
of <strong>the</strong> cardboard. You want <strong>the</strong><br />
straws to line up at <strong>the</strong> outer Supplies for a homemade grid.<br />
52<br />
<str<strong>on</strong>g>Focus</str<strong>on</strong>g> <str<strong>on</strong>g>On</str<strong>on</strong>g> <str<strong>on</strong>g>Lighting</str<strong>on</strong>g> <str<strong>on</strong>g>Photos</str<strong>on</strong>g><br />
edge of <strong>the</strong> cardboard. Keep<br />
going until <strong>the</strong> space is filled and<br />
you can <strong>the</strong>n fold <strong>the</strong> top down<br />
and seal <strong>the</strong> box by gluing <strong>the</strong><br />
flap and wrapping it over. Then<br />
spray everything, inside and out,<br />
with flat black paint. For added<br />
sturdiness, wrap <strong>the</strong> sides of<br />
<strong>the</strong> grid with black gaffer tape.<br />
It should fit snugly enough as is,<br />
but if you like, you could make<br />
<strong>the</strong> box a little deeper and affix<br />
Velcro so it can attach to your<br />
flash (especially if you already<br />
have Velcro <strong>on</strong> <strong>the</strong> flash to hold<br />
barn doors).<br />
The grid seems to focus <strong>the</strong> light,<br />
but it really doesn’t. It simply<br />
blocks light going in directi<strong>on</strong>s<br />
we d<strong>on</strong>’t want. Depending <strong>on</strong> <strong>the</strong><br />
area we want to light, we may<br />
have to buy a more powerful<br />
flash to compensate.
Homemade grid.<br />
Homemade grid <strong>on</strong> a flash.<br />
Tools: Now We Have Light, but How Do We Get It under C<strong>on</strong>trol? 53
54<br />
We can use <strong>the</strong> grid<br />
for many purposes,<br />
but <strong>on</strong>e comm<strong>on</strong><br />
use is to light <strong>the</strong><br />
background. Without<br />
a background light, <strong>the</strong><br />
dark hat in this<br />
picture begins to<br />
disappear.<br />
<str<strong>on</strong>g>Focus</str<strong>on</strong>g> <str<strong>on</strong>g>On</str<strong>on</strong>g> <str<strong>on</strong>g>Lighting</str<strong>on</strong>g> <str<strong>on</strong>g>Photos</str<strong>on</strong>g>
If <strong>the</strong> main light is a<br />
sunlit window, we could<br />
use our <strong>on</strong>e o<strong>the</strong>r light<br />
as a background light.<br />
But in this case, <strong>the</strong><br />
picture is too uniformly<br />
bright. The eye no<br />
l<strong>on</strong>ger goes directly<br />
to <strong>the</strong> subject.<br />
(<str<strong>on</strong>g>Lighting</str<strong>on</strong>g> is also<br />
compositi<strong>on</strong>!)<br />
Image made with a<br />
flash, but no grid.<br />
Depending <strong>on</strong> <strong>the</strong> setting<br />
of <strong>the</strong> flash, we can<br />
brighten <strong>the</strong> background<br />
substantially, but it’s a<br />
flat background.<br />
Tools: Now We Have Light, but How Do We Get It under C<strong>on</strong>trol? 55
56<br />
A grid solves <strong>the</strong><br />
problem: We have<br />
enough background<br />
light to separate <strong>the</strong><br />
subject from <strong>the</strong><br />
background, but<br />
<strong>the</strong> background still<br />
has enough dark area<br />
to keep our<br />
attenti<strong>on</strong> <strong>on</strong> <strong>the</strong><br />
subject.<br />
Image made with a<br />
background flash with a<br />
grid. By adding <strong>the</strong> grid,<br />
we get a background<br />
with a brighter spot,<br />
which <strong>the</strong>n falls off at<br />
<strong>the</strong> edges.<br />
<str<strong>on</strong>g>Focus</str<strong>on</strong>g> <str<strong>on</strong>g>On</str<strong>on</strong>g> <str<strong>on</strong>g>Lighting</str<strong>on</strong>g> <str<strong>on</strong>g>Photos</str<strong>on</strong>g>
Making a snoot<br />
A snoot does exactly <strong>the</strong> same<br />
job as a grid. It’s much less effective<br />
than a grid, but we can make<br />
<strong>on</strong>e in a few sec<strong>on</strong>ds with black<br />
paper and tape. (We should try to<br />
Learn what’s<br />
available. Try a<br />
homemade versi<strong>on</strong><br />
first. Use it a<br />
lot? Then c<strong>on</strong>sider<br />
professi<strong>on</strong>al<br />
versi<strong>on</strong>s.<br />
D<strong>on</strong>’t shoot<br />
madly. Study<br />
your images<br />
while shooting.<br />
Ask, “What<br />
would make this<br />
better?”<br />
always have black paper handy.<br />
It is so often useful for needs<br />
we might not have anticipated.)<br />
Basically it is a small opening<br />
through which light will pass,<br />
<strong>the</strong>reby restricting <strong>the</strong> spread of<br />
light. In Chapter 3, we have an<br />
image made using a homemade<br />
snoot c<strong>on</strong>structed from a cereal<br />
box. Isn’t creativity great?<br />
People see beautiful<br />
photos and w<strong>on</strong>der why<br />
<strong>the</strong>y can’t get <strong>the</strong> same<br />
result with <strong>the</strong>ir own<br />
camera. Often it’s not<br />
<strong>the</strong> camera’s fault. It’s<br />
because we need a tool or<br />
two to amend <strong>the</strong> light.<br />
We each need to find those<br />
that work best for<br />
us. We d<strong>on</strong>’t need<br />
everything!<br />
Tools: Now We Have Light, but How Do We Get It under C<strong>on</strong>trol? 57
Lens filters<br />
Most lens filters change <strong>the</strong> color<br />
of <strong>the</strong> scene, many of <strong>the</strong>m dramatically<br />
so. In a black-and-white<br />
picture, a yellow, orange, or red<br />
filter could dramatically darken a<br />
too-bright sky; a green <strong>on</strong>e could<br />
greatly increase detail in leaves.<br />
Today <strong>the</strong>se “str<strong>on</strong>g” filters have<br />
little use. We usually shoot color,<br />
and if we do want black-andwhite,<br />
we can usually get <strong>the</strong><br />
effect of colored filters by discarding<br />
some or all of any two of<br />
our red, green, or blue channels<br />
with photographic software after<br />
<strong>the</strong> picture has been shot.<br />
Still, <strong>the</strong>re are two lens filters we<br />
all need to c<strong>on</strong>sider:<br />
Polarizing filter. Putting this<br />
as simply as possible, light<br />
vibrates in two directi<strong>on</strong>s—up<br />
and down and side to side.<br />
Depending <strong>on</strong> <strong>the</strong> angle of<br />
<strong>the</strong> light, <strong>on</strong>e of those vibrati<strong>on</strong>s<br />
may c<strong>on</strong>vey all of <strong>the</strong><br />
color while <strong>the</strong> o<strong>the</strong>r c<strong>on</strong>veys<br />
nothing but glare (or, in Light—<br />
Science & Magic,“polarized<br />
direct reflecti<strong>on</strong>”). Do we want<br />
better color or more glare?<br />
The answer first seems to be<br />
color, but glare can be good,<br />
too. Think of seeing <strong>the</strong> ripples<br />
in <strong>the</strong> water (glare) or <strong>the</strong> fish<br />
58<br />
<str<strong>on</strong>g>Focus</str<strong>on</strong>g> <str<strong>on</strong>g>On</str<strong>on</strong>g> <str<strong>on</strong>g>Lighting</str<strong>on</strong>g> <str<strong>on</strong>g>Photos</str<strong>on</strong>g><br />
beneath <strong>the</strong> surface (no surface<br />
glare interference). Ei<strong>the</strong>r can<br />
make a good picture. Depending<br />
<strong>on</strong> its rotati<strong>on</strong>, a polarizing<br />
filter can block ei<strong>the</strong>r of <strong>the</strong>se<br />
reflecti<strong>on</strong>s. Do we want <strong>the</strong> fish<br />
or <strong>the</strong> water? We d<strong>on</strong>’t know<br />
which you want, but we’d like<br />
for you to have <strong>the</strong> choice.<br />
UV or haze filter. Ultraviolet<br />
is a color human eyes cannot<br />
see or can barely see. Our<br />
cameras see it though, and as<br />
it reflects from air molecules<br />
and dust over a great distance,<br />
it dulls <strong>the</strong> visible color and<br />
can turn our colorful autumnleaved<br />
mountain into a dingy<br />
beige photograph. This filter<br />
blocks UV to increase color<br />
saturati<strong>on</strong>. Whe<strong>the</strong>r we like<br />
this is ano<strong>the</strong>r judgment call;<br />
if we have enough foreground<br />
color, <strong>the</strong> haze may emphasize<br />
<strong>the</strong> distance and size of <strong>the</strong><br />
mountain in a way that we like.<br />
There is ano<strong>the</strong>r advantage,<br />
even if we are not interested<br />
in landscapes: a UV filter at<br />
close distances has essentially<br />
no effect <strong>on</strong> <strong>the</strong> color, but this<br />
relatively cheap piece of glass<br />
can protect an expensive lens<br />
from damage.<br />
Filter size. If we have more<br />
than <strong>on</strong>e lens or expect to buy<br />
Focal Press has<br />
o<strong>the</strong>r books<br />
that discuss<br />
how to adjust<br />
channels in more<br />
detail.<br />
more, we’d like to have <strong>on</strong>e<br />
filter to fit our largest lens and<br />
<strong>the</strong>n buy step-down rings to<br />
make <strong>the</strong> same filter fit <strong>the</strong><br />
o<strong>the</strong>r lenses. This is usually <strong>the</strong><br />
most ec<strong>on</strong>omical tactic, but<br />
still, it’s not always affordable.<br />
Fil’s largest lens polarizing<br />
filter cost more than many very<br />
good cameras do. It paid back<br />
handsomely however, because<br />
of <strong>the</strong> type of work he was<br />
doing at <strong>the</strong> time. Judge your<br />
own situati<strong>on</strong> carefully. The<br />
“best” is not always <strong>the</strong> best<br />
for you.
Support: Stands, clamps,<br />
friends, and family<br />
Somehow we have to hold all of<br />
this stuff toge<strong>the</strong>r, and <strong>the</strong> ways<br />
to do that could make a whole<br />
book. Many of those ways can<br />
be pretty expensive, and if you<br />
are just beginning to learn this<br />
business you would much ra<strong>the</strong>r<br />
invest in lights, cameras, and<br />
lenses. Here are a few hints to<br />
make things easier:<br />
Buy <strong>on</strong>e good stand. We can<br />
get by with a lot of cheap<br />
equipment, but if our most<br />
expensive light blows over in<br />
<strong>the</strong> wind and hits a c<strong>on</strong>crete<br />
sidewalk, that stand was not<br />
a bargain. We can support<br />
reflectors and gobos any way<br />
we please, but we want to<br />
protect our electr<strong>on</strong>ic equipment<br />
as well as possible.<br />
Improvise. Photographers<br />
who d<strong>on</strong>’t travel much have<br />
made a very heavy, but very<br />
reliable light stand by sticking<br />
a wooden pole into a bucket<br />
of wet c<strong>on</strong>crete and letting<br />
it harden. A few ropes and<br />
pulleys attached to <strong>the</strong> ceiling<br />
can support a big softbox as<br />
well as a ceiling track system<br />
costing thousands of dollars,<br />
although it will be slower to<br />
use. Buy <strong>the</strong> track system when<br />
you have enough photographic<br />
income to justify it.<br />
Take a tour of your hardware<br />
store. There are a lot of expensive<br />
photographic clamps<br />
that do <strong>the</strong>ir job <strong>on</strong>ly slightly<br />
better than inexpensive spring<br />
clamps, C-clamps, and bar<br />
clamps. If you still need to buy<br />
an expensive photographic<br />
clamp to hold a boom, that<br />
doesn’t necessarily mean you<br />
also have to buy an expensive<br />
photographic boom: sometimes<br />
a simple wooden dowel<br />
will work just as well. <str<strong>on</strong>g>On</str<strong>on</strong>g> some<br />
surfaces, duct tape works better<br />
than gaffer tape.<br />
Gain weight. Less expensive<br />
stands become much more reliable<br />
if we attach extra weight<br />
to <strong>the</strong>ir base. There are clamp<strong>on</strong><br />
photographic weights to do<br />
just this, but tying <strong>on</strong> plastic<br />
bottles of water, bags of sand,<br />
or cinder blocks can also work.<br />
Just beware of <strong>the</strong> water bottle<br />
if you need to plug anything<br />
into an electrical outlet.<br />
Get help. If your next-door<br />
neighbor can hold a light or a<br />
reflector for you, he may not<br />
reliably positi<strong>on</strong> it exactly as<br />
you want it, but at least he’s<br />
not likely to drop it. Better<br />
still, join a local camera club.<br />
People with at least minimal<br />
photographic experience can<br />
take turns helping <strong>on</strong>e ano<strong>the</strong>r<br />
more effectively than <strong>the</strong><br />
completely untrained.<br />
Now, get to work!<br />
A basic understanding of our<br />
tools is essential. This includes<br />
tools we d<strong>on</strong>’t have and d<strong>on</strong>’t<br />
intend to buy right away, but<br />
we do need to know when it<br />
becomes important to have <strong>the</strong>m.<br />
Still, <strong>the</strong> tools <strong>the</strong>mselves do us<br />
no good until we learn to use<br />
<strong>the</strong>m. That’s what <strong>the</strong> rest of this<br />
book is about.<br />
Tools: Now We Have Light, but How Do We Get It under C<strong>on</strong>trol? 59
in Our daily lives, we go through various<br />
types of light, probably without thinking<br />
about it. We wake up in <strong>the</strong> morning<br />
and turn <strong>on</strong> a lamp; go to our office,<br />
which is probably lit with fluorescent<br />
tubes; walk outside into <strong>the</strong> daylight for<br />
lunch; and <strong>the</strong>n go back home at dusk.<br />
All of <strong>the</strong>se envir<strong>on</strong>ments ba<strong>the</strong> us in<br />
different colors of light, but we generally<br />
d<strong>on</strong>’t register <strong>the</strong> color shifts because<br />
our brains adapt so well. Walk from a<br />
sunlit bedroom into <strong>the</strong> closet where<br />
you’ve got <strong>the</strong> overhead light <strong>on</strong>. It’s<br />
probably dimmer than <strong>the</strong> bright bedroom<br />
and <strong>the</strong> color you see is actually a<br />
different color, but our brains and eyes<br />
quickly compensate, and <strong>the</strong> stuff in <strong>the</strong><br />
closet appears to be <strong>the</strong> right color and<br />
<strong>the</strong> room doesn’t seem so dark. Our<br />
white shirt pretty much always looks<br />
white to us, wherever we are. In reality,<br />
it is a different white depending <strong>on</strong> <strong>the</strong><br />
light source in which we find ourselves.<br />
To get this lake image, <strong>the</strong> photographer<br />
had to wake up really early, had to be<br />
Chapter 3: The Color of Light<br />
ready before <strong>the</strong> sun actually started<br />
to rise, and was prepared to work<br />
quickly because light at this time of<br />
day will rapidly change. We can see<br />
just a hint of pink in <strong>the</strong> sky. As <strong>the</strong> sun<br />
rises, <strong>the</strong> pink will spread and become<br />
warmer.<br />
The color temperature of a light source<br />
determines what color <strong>the</strong> light is.<br />
We use <strong>the</strong> Kelvin temperature scale<br />
as a rating, so, for example, daylight<br />
(midday, when <strong>the</strong> sky is clear and<br />
cloudless) is generally between 5000°<br />
and 5500°K; whereas tungsten is<br />
generally 3200°K. Happily, we d<strong>on</strong>’t<br />
need to know a lot about <strong>the</strong> exact<br />
numbers for <strong>the</strong> most part. We just have<br />
to be aware of what our light source is<br />
and set <strong>the</strong> camera appropriately or use<br />
some color-correcting filters or gels. If<br />
absolute accuracy is needed, <strong>the</strong>re are<br />
color meters to help us out, but most<br />
photographers can get by without <strong>on</strong>e<br />
just fine.<br />
The Color of Light<br />
61
62<br />
what are “degrees KeLvin”?<br />
Kelvin is a temperature scale,<br />
like Fahrenheit, Centigrade, or<br />
Celsius, but Kelvin also measures<br />
color. If we heat anything<br />
enough, it will glow. The more<br />
we heat it, <strong>the</strong> bluer its color.<br />
Of course, if we heat anything<br />
too much, it’s likely to burn.<br />
So we heat things in a vacuum.<br />
Without air, <strong>the</strong> thing we heat<br />
can’t burn. That’s why our old<br />
tungsten lightbulbs are made<br />
with as little air inside as possible.<br />
That allows us to heat <strong>the</strong><br />
tungsten up to about 2800°K<br />
without immediate burnout.<br />
The Kelvin scale is counterintuitive<br />
to most people. The colors<br />
that artists call “cool”—blues<br />
and greens—have a higher<br />
(hotter) Kelvin temperature,<br />
whereas <strong>the</strong> colors we call<br />
“warm”—red, yellow, orange—<br />
have a lower (cooler) Kelvin<br />
temperature.<br />
For a simple explanati<strong>on</strong>,<br />
ignore fluorescent lights. They<br />
are also measured in degrees<br />
Kelvin, but <strong>the</strong>re is more going<br />
<strong>on</strong> <strong>the</strong>re than Dr. Kelvin’s old<br />
heat principle.<br />
<str<strong>on</strong>g>Focus</str<strong>on</strong>g> <str<strong>on</strong>g>On</str<strong>on</strong>g> <str<strong>on</strong>g>Lighting</str<strong>on</strong>g> <str<strong>on</strong>g>Photos</str<strong>on</strong>g><br />
It’s always<br />
better to<br />
make color<br />
adjustments<br />
in <strong>the</strong> camera<br />
ra<strong>the</strong>r than later<br />
with software!<br />
Pretty much every digital camera<br />
today comes with settings<br />
for Sunny, Shade, Incandescent<br />
(Tungsten) modes, and some<br />
even accommodate various<br />
fluorescent light sources. (These<br />
terms may vary from brand to<br />
brand.) They also usually have<br />
an Auto Balance (Auto White<br />
Balance) setting where <strong>the</strong><br />
camera automatically takes <strong>the</strong><br />
amount of light and its color<br />
informati<strong>on</strong> and provides a<br />
natural white balance (not always<br />
reliably). Many cameras also<br />
allow us to create Custom White<br />
Balance (handy if we are using<br />
old softboxes or diffusi<strong>on</strong> materials<br />
that have yellowed with age).<br />
Some cameras will also allow<br />
us to actually enter <strong>the</strong> Kelvin<br />
number we want.<br />
When we want <strong>the</strong> image to be<br />
as close to <strong>the</strong> way we perceive<br />
<strong>the</strong> scene, we’ll want to be sure<br />
to set <strong>the</strong> camera to match our<br />
light source. If we d<strong>on</strong>’t, we’ll<br />
get a photo that doesn’t look like<br />
what we anticipate. We can mix<br />
and match if we want to have fun<br />
or create a mood, but if we’re<br />
looking for “reality,” <strong>the</strong>n we<br />
have to learn to recognize our<br />
light sources.<br />
We generally c<strong>on</strong>sider midday<br />
light <strong>on</strong> a clear day to be<br />
“normal” lighting. Most flashes<br />
are set to approximate this color<br />
of light. However, daylight actually<br />
changes based <strong>on</strong> <strong>the</strong> time of day,<br />
whe<strong>the</strong>r <strong>the</strong> subject is in shade<br />
and whe<strong>the</strong>r <strong>the</strong>re is cloud cover.<br />
It can be very blue, red, or orange.<br />
So now we know sunlight<br />
changes color during <strong>the</strong> day.<br />
When <strong>the</strong> sun strikes <strong>the</strong> subject<br />
directly, we see warmer light.<br />
When <strong>the</strong> day is bright but <strong>the</strong><br />
sun doesn’t strike directly, <strong>the</strong><br />
color is cooler. Why? Think of<br />
a white building in an open
The colors of sunrise and sunset can<br />
provide spectacular images. Just be<br />
prepared to work quickly because <strong>the</strong> light<br />
w<strong>on</strong>’t stay <strong>the</strong> same very l<strong>on</strong>g.<br />
Early afterno<strong>on</strong> light.<br />
The sun is nearly<br />
directly overhead,<br />
hence <strong>the</strong> short<br />
shadows. This is <strong>the</strong><br />
type of light we mean<br />
when we talk about<br />
daylight. A polarizer<br />
was used to make <strong>the</strong><br />
sky bluer, which we’ll<br />
explain at <strong>the</strong> end<br />
of <strong>the</strong> chapter.<br />
The Color of Light<br />
63
64<br />
<str<strong>on</strong>g>Focus</str<strong>on</strong>g> <str<strong>on</strong>g>On</str<strong>on</strong>g> <str<strong>on</strong>g>Lighting</str<strong>on</strong>g> <str<strong>on</strong>g>Photos</str<strong>on</strong>g><br />
Early morning. This image, shot at<br />
around 7 a.m., was obviously taken<br />
in a different place from <strong>the</strong> <strong>on</strong>e<br />
<strong>on</strong> <strong>the</strong> preceding page, but that’s okay.<br />
The sun works <strong>the</strong> same everywhere.<br />
The warm t<strong>on</strong>es are caused by<br />
refracti<strong>on</strong> (bending) of <strong>the</strong> light<br />
entering <strong>the</strong> air at a shallow angle.<br />
(<str<strong>on</strong>g>On</str<strong>on</strong>g> a much smaller scale, we see <strong>the</strong><br />
same effect from a diam<strong>on</strong>d, a crystal<br />
chandelier, or a glass optical prism.)<br />
The color of sunlight<br />
varies from day to day<br />
depending <strong>on</strong> cloud cover<br />
and <strong>the</strong> numbers and types<br />
of dust particles in <strong>the</strong><br />
air. Air polluti<strong>on</strong> also<br />
affects <strong>the</strong> color of <strong>the</strong><br />
light. If we want <strong>the</strong> truly<br />
brilliant colors,<br />
we’ll have better<br />
luck in areas with<br />
less polluted air.
Early evening. The sun is lower in <strong>the</strong> sky and <strong>the</strong> colors are<br />
warm. The soft lighting comes from <strong>the</strong> diffusi<strong>on</strong> <strong>the</strong> clouds<br />
cause. The light reflected off <strong>the</strong> water also helped fill <strong>the</strong><br />
shadows <strong>on</strong> <strong>the</strong> model’s face. No fill flash was needed.<br />
The Color of Light<br />
65
Sunset. There’s no sky here, but we know it is a brilliant<br />
orange because it is reflected in <strong>the</strong> water. The photographer<br />
noticed fish surfacing and waited to get a shot with <strong>the</strong><br />
resultant ripples. A ripple in <strong>the</strong> right place adds a point of<br />
focus. The shape, material, and texture of <strong>the</strong> subject can have<br />
as much effect <strong>on</strong> <strong>the</strong> lighting as <strong>the</strong> light itself.<br />
66<br />
<str<strong>on</strong>g>Focus</str<strong>on</strong>g> <str<strong>on</strong>g>On</str<strong>on</strong>g> <str<strong>on</strong>g>Lighting</str<strong>on</strong>g> <str<strong>on</strong>g>Photos</str<strong>on</strong>g>
space. The sunlit side will be both<br />
brighter and warmer (yellower)<br />
than <strong>the</strong> opposite side. Light<br />
still falls <strong>on</strong> <strong>the</strong> o<strong>the</strong>r side of <strong>the</strong><br />
This church is mostly lit<br />
with tungsten bulbs. With<br />
<strong>the</strong> camera set to tungsten,<br />
it is compensating for <strong>the</strong><br />
yellow light, giving us a<br />
neutral-t<strong>on</strong>ed photo.<br />
house, but it is light reflected from<br />
<strong>the</strong> open blue sky and <strong>the</strong> white<br />
wall <strong>on</strong> that side of <strong>the</strong> building<br />
will be dimmer and bluer. The<br />
open shade beneath a large tree<br />
will likely be greenish, instead of<br />
bluish, because <strong>the</strong> light is filtered<br />
through <strong>the</strong> green leaves.<br />
This same photo with <strong>the</strong> camera<br />
set to daylight white balance. The<br />
camera thinks that <strong>the</strong> light in<br />
<strong>the</strong> photo is daylight, but it is<br />
actually tungsten. The image is<br />
<strong>the</strong>refore golden. Which is right?<br />
That’s your call.<br />
The Color of Light<br />
67
O<strong>the</strong>r light sources are available<br />
to us besides <strong>the</strong> sun. What are<br />
<strong>the</strong>y and what color is <strong>the</strong>ir light?<br />
Tungsten lights produce yellow/<br />
orange light. These can be<br />
tungsten house lamps or quartzhalogen<br />
lights. (Quartz-halogen<br />
refers to <strong>the</strong> type of glass and<br />
<strong>the</strong> gas inside; <strong>the</strong> filament is still<br />
68<br />
<str<strong>on</strong>g>Focus</str<strong>on</strong>g> <str<strong>on</strong>g>On</str<strong>on</strong>g> <str<strong>on</strong>g>Lighting</str<strong>on</strong>g> <str<strong>on</strong>g>Photos</str<strong>on</strong>g><br />
tungsten.) Candles sort of fit into<br />
this category, but <strong>the</strong>ir light is redder.<br />
If we leave our camera set<br />
to daylight but our light source is<br />
actually yellow, we get a yellow/<br />
orange image. If we want colors<br />
as we see <strong>the</strong>m (that is, neutralcolored<br />
with our brain adjusting<br />
for <strong>the</strong> yellow), <strong>the</strong>n we set <strong>the</strong><br />
camera to tungsten; <strong>the</strong> camera<br />
will compensate for <strong>the</strong> yellow<br />
and we will get a neutral image<br />
with no yellow cast. (Under U.S.<br />
law, classic, energy-inefficient<br />
tungsten lights will become illegal<br />
to sell in 2014, but we predict<br />
<strong>the</strong>y will be replaced by o<strong>the</strong>r<br />
lights of <strong>the</strong> same color.)<br />
The <strong>on</strong>ly light source here is<br />
a household lamp with a big<br />
white shade. The teleph<strong>on</strong>e<br />
is just below it. With <strong>the</strong><br />
camera set to tungsten, we<br />
get a pretty neutral image.<br />
The <strong>on</strong>ly change we made<br />
here was to set <strong>the</strong> camera<br />
to its daylight setting. The<br />
image is very warm. Both<br />
approaches can lead to good<br />
pictures. We just have to<br />
decide what we want.
What happens when we go in <strong>the</strong><br />
opposite directi<strong>on</strong>, use daylight,<br />
but set <strong>the</strong> camera to tungsten?<br />
We get blue pictures. In <strong>the</strong> photo<br />
<strong>on</strong> <strong>the</strong> left <strong>on</strong> page 70, we set <strong>the</strong><br />
camera to daylight and we get a<br />
In <strong>the</strong> warm photos <strong>on</strong> pages<br />
67 and 68, both cameras were<br />
set to daylight balance. Why<br />
is <strong>on</strong>e warmer than <strong>the</strong> o<strong>the</strong>r?<br />
Household bulbs warm with<br />
age. As a result, <strong>the</strong> lighting<br />
is sometimes pretty, but it’s<br />
seldom accurate. Photographers<br />
who need accurate tungsten<br />
(lower-budget video) always use<br />
<strong>the</strong> pricier quartzhalogen<br />
versi<strong>on</strong> with<br />
nearly c<strong>on</strong>stant color<br />
throughout <strong>the</strong> life<br />
of <strong>the</strong> lamp.<br />
realistic image of <strong>the</strong> black-andwhite<br />
painted wooden cat. But it’s<br />
a crazy cat. To emphasize that,<br />
we set <strong>the</strong> camera to its tungsten<br />
setting. The camera is expecting<br />
yellow light. It plans to neutralize<br />
that yellow into gray. However,<br />
our light isn’t yellow, so <strong>the</strong> camera<br />
“corrects” <strong>the</strong> image to blue.<br />
Generally this is not what we<br />
want, but it’s still worth playing<br />
with occasi<strong>on</strong>ally.<br />
The Color of Light<br />
69
We have choices, too, when<br />
it comes to cloudy or overcast<br />
lighting. The images of <strong>the</strong> chess<br />
pieces were taken <strong>on</strong> a drab gray<br />
day. The chess board photo at left<br />
<strong>on</strong> page 71 was taken with <strong>the</strong><br />
camera <strong>on</strong> <strong>the</strong> daylight setting.<br />
Because <strong>the</strong> light <strong>on</strong> this particular<br />
afterno<strong>on</strong> was bluer than<br />
70<br />
<str<strong>on</strong>g>Focus</str<strong>on</strong>g> <str<strong>on</strong>g>On</str<strong>on</strong>g> <str<strong>on</strong>g>Lighting</str<strong>on</strong>g> <str<strong>on</strong>g>Photos</str<strong>on</strong>g><br />
<strong>the</strong> midday sun, we get a bluish<br />
image. If you want it warmer, try<br />
changing to Auto White Balance or<br />
Shade. All cameras in <strong>the</strong> Shade<br />
mode will warm <strong>the</strong> image made<br />
in open shade or overcast settings,<br />
some more than o<strong>the</strong>rs and<br />
sometimes more than we’d like.<br />
This is a case where you need to<br />
experiment with your camera and<br />
see which setting you prefer. For<br />
<strong>the</strong> photo <strong>on</strong> <strong>the</strong> right (page 71),<br />
we set our camera to Shade and it<br />
warmed <strong>the</strong> image nicely. Is ei<strong>the</strong>r<br />
<strong>on</strong>e <strong>the</strong> right <strong>on</strong>e? No. It’s <strong>the</strong><br />
photographer’s artistic decisi<strong>on</strong>.<br />
The <strong>on</strong>ly time more people will<br />
almost always prefer <strong>the</strong> Shade
setting in this open shade lighting<br />
is when <strong>the</strong>re are people in<br />
<strong>the</strong> photograph. Few people want<br />
<strong>the</strong>ir skin to be blue or green. (For<br />
practical purposes, we’ll ignore<br />
<strong>the</strong> 50 BC British warriors, who<br />
painted <strong>the</strong>mselves blue.)<br />
Fluorescent lights come in four<br />
color spectra: daylight, warm<br />
white, cool white, and forgetabout-<strong>the</strong>-color-just-make-light,<br />
but most of us can’t tell which just<br />
by looking. However, if we do a<br />
test shot with no flash, we can<br />
figure it out. Depending <strong>on</strong> <strong>the</strong><br />
type of fluorescent tube, we’re<br />
most likely to get an image with<br />
green light, although sometimes<br />
it will be magenta.<br />
A few fluorescent lights have<br />
very accurate color: those used<br />
The Color of Light<br />
71
in photographic light tables<br />
and viewing booths, plus a few<br />
workbenches used for assembling<br />
small parts. There are also<br />
photographic softboxes with<br />
fluorescent tubes approximating<br />
daylight color. All of <strong>the</strong>se are too<br />
expensive for most general room<br />
illuminati<strong>on</strong>, however.<br />
To make matters worse, many<br />
building maintenance people<br />
d<strong>on</strong>’t care what color fluorescent<br />
<strong>the</strong>y use. Many work areas have<br />
a mix of tubes that add toge<strong>the</strong>r<br />
to c<strong>on</strong>form to no standard color.<br />
Although few photographers like<br />
fluorescent lighting, we are still<br />
forced to deal with <strong>the</strong>m. These<br />
72 <str<strong>on</strong>g>Focus</str<strong>on</strong>g> <str<strong>on</strong>g>On</str<strong>on</strong>g> <str<strong>on</strong>g>Lighting</str<strong>on</strong>g> <str<strong>on</strong>g>Photos</str<strong>on</strong>g><br />
lights are generally used as<br />
ceiling lighting for large spaces.<br />
Even though we can correct<br />
for <strong>the</strong> green or magenta hues (if<br />
<strong>the</strong> lights are all <strong>the</strong> same color),<br />
<strong>the</strong> people may still look awful<br />
because most light is coming<br />
from directly above and we get<br />
horrible shadows (remember <strong>the</strong><br />
racco<strong>on</strong> eyes). The <strong>on</strong>ly way to<br />
fix this is first to set our camera<br />
to <strong>the</strong> correct fluorescent white<br />
balance and <strong>the</strong>n use a flash (in<br />
camera or off camera) to fill in<br />
those ugly shadows with a gel<br />
<strong>on</strong> <strong>the</strong> flash to make it match<br />
<strong>the</strong> color setting in <strong>the</strong> camera.<br />
Which gel we use will depend <strong>on</strong><br />
<strong>the</strong> type of fluorescent lighting<br />
we’re in. If we shoot with <strong>the</strong><br />
camera <strong>on</strong> <strong>the</strong> correct fluorescent<br />
setting but d<strong>on</strong>’t gel <strong>the</strong> flash,<br />
<strong>the</strong> flash will make every<strong>on</strong>e look<br />
fairly orange. If we leave <strong>the</strong><br />
camera <strong>on</strong> daylight and gel <strong>the</strong><br />
flash, <strong>the</strong> color of <strong>the</strong> fluorescents<br />
will be evident in <strong>the</strong> shot. So if<br />
you are going to be shooting a<br />
lot in this type of light, carry a<br />
couple of gels specifically for <strong>the</strong><br />
green and magenta fluorescent<br />
light types. They weigh almost<br />
nothing and <strong>the</strong>y just need to be<br />
big enough to cover your flash<br />
head. (The Strobist gel collecti<strong>on</strong><br />
includes a couple of gels of each<br />
color we are most likely to need,<br />
including fluorescent correcti<strong>on</strong>.)
Using gels for dramatic<br />
color<br />
In <strong>the</strong> previous chapter, we menti<strong>on</strong>ed<br />
colored gels <strong>on</strong>ly briefly,<br />
as we w<strong>on</strong>’t use <strong>the</strong>m often in<br />
this book. However, for <strong>the</strong> photo<br />
below we wanted to warm our<br />
daylight-balanced light. We could<br />
have set <strong>the</strong> camera to its Shade<br />
setting to warm <strong>the</strong> photo, but<br />
that limits our c<strong>on</strong>trol. We preferred<br />
to use a full CTO warming<br />
filter instead. CTO comes in a<br />
variety of strengths, so we could<br />
pick <strong>the</strong> <strong>on</strong>e we wanted.<br />
cto<br />
CTO means “c<strong>on</strong>vert to orange.” A full CTO c<strong>on</strong>verts <strong>the</strong> color of<br />
daylight to <strong>the</strong> color of tungsten light—good to have <strong>on</strong> our flash if we<br />
are using a mix of our daylight-colored flash with old-time tungsten<br />
bulbs and we want <strong>the</strong> color of <strong>the</strong> lights to match. If we d<strong>on</strong>’t want <strong>the</strong><br />
colors to quite match, we can get half, quarter, and eighth CTOs to put<br />
<strong>on</strong> our flash.<br />
These <strong>the</strong>atrical gels have nei<strong>the</strong>r <strong>the</strong> color precisi<strong>on</strong> nor <strong>the</strong> optical<br />
quality of filters intended for use <strong>on</strong> lenses. This reduces cost. If we like<br />
existing tungsten light in a room, we may be able to tape a huge CTO<br />
sheet outside <strong>the</strong> window, making <strong>the</strong> outdoor sunlight approximate<br />
<strong>the</strong> color of <strong>the</strong> indoor light.<br />
The Color of Light<br />
73
74<br />
Yes, of course<br />
<strong>the</strong>re are also gels<br />
to c<strong>on</strong>vert tungsten<br />
to daylight: CTB<br />
(c<strong>on</strong>vert to blue).<br />
We tend to use<br />
<strong>the</strong>m less, though.<br />
Gels dim <strong>the</strong> light,<br />
especially if <strong>the</strong>y<br />
are blue gels. If<br />
we have a few dim<br />
tungsten lights<br />
competing with <strong>the</strong><br />
sun, we’d usually<br />
prefer to dim <strong>the</strong><br />
sun with<br />
orange, ra<strong>the</strong>r<br />
than <strong>the</strong> o<strong>the</strong>r<br />
way around.<br />
<str<strong>on</strong>g>Focus</str<strong>on</strong>g> <str<strong>on</strong>g>On</str<strong>on</strong>g> <str<strong>on</strong>g>Lighting</str<strong>on</strong>g> <str<strong>on</strong>g>Photos</str<strong>on</strong>g><br />
A CTO gel was used here with<br />
a homemade snoot made from<br />
a cereal box. This allowed <strong>the</strong><br />
photographer to c<strong>on</strong>trol <strong>the</strong> area<br />
of illuminati<strong>on</strong> so that <strong>the</strong>re is<br />
just enough light <strong>on</strong> <strong>the</strong> face and<br />
a little spillover <strong>on</strong>to <strong>the</strong> hands.<br />
The CTO, with <strong>the</strong> camera set<br />
to daylight balance, replicates <strong>the</strong><br />
illuminati<strong>on</strong> from <strong>the</strong> cigarette<br />
lighter but allows a much faster<br />
shutter speed or a much smaller<br />
aperture than <strong>the</strong> lighter al<strong>on</strong>e.
The photo above was d<strong>on</strong>e by<br />
placing whisks <strong>on</strong> a horiz<strong>on</strong>tal<br />
piece of black acrylic plastic with<br />
a vertical sheet of white foam<br />
board a couple of feet directly<br />
behind <strong>the</strong> setup. A flash was<br />
positi<strong>on</strong>ed <strong>on</strong> each side just outside<br />
<strong>the</strong> frame and aimed toward<br />
<strong>the</strong> foam board. The left flash<br />
was gelled red and angled about<br />
45 degrees to <strong>the</strong> left. The right<br />
flash was gelled blue and angled<br />
to <strong>the</strong> right.<br />
In <strong>the</strong> mountain lake photo <strong>on</strong><br />
page 63 (a midday color of light<br />
image), a screw-<strong>on</strong> lens polar-<br />
izer was used to blue up <strong>the</strong> sky.<br />
(Please d<strong>on</strong>’t tell o<strong>the</strong>r photographers<br />
about how you “blew<br />
up <strong>the</strong> sky” while you’re going<br />
through airport security. Similarly,<br />
<strong>on</strong>e of your co-authors, Robin,<br />
absolutely must not tell guards<br />
she’s come to “shoot” several<br />
federal court judges!) The photographer<br />
rotated <strong>the</strong> polarizing<br />
filter to reduce atmospheric glare<br />
and increase <strong>the</strong> saturati<strong>on</strong> in <strong>the</strong><br />
sky color.<br />
Still, even with <strong>the</strong> polarizing<br />
filter, sometimes <strong>the</strong> sky is too<br />
bright. In <strong>the</strong> snow photo <strong>on</strong><br />
page 64, a gradient neutral<br />
density filter was used to gently<br />
darken <strong>the</strong> sky without affecting<br />
<strong>the</strong> foreground.<br />
A gradient neutral density filter<br />
does exactly what <strong>the</strong> name<br />
implies: it darkens part of <strong>the</strong><br />
image while exposing <strong>the</strong> rest<br />
of <strong>the</strong> image through clear<br />
high-quality optical glass. Bright<br />
areas get reduced exposure,<br />
whereas dark areas get increased<br />
exposure. Good idea? Absolutely,<br />
if <strong>the</strong> transiti<strong>on</strong> of <strong>the</strong> gradient<br />
happens to fit <strong>the</strong> scene. Getting<br />
<strong>the</strong> picture right in <strong>the</strong> camera<br />
The Color of Light<br />
75
almost always surpasses <strong>the</strong><br />
quality of fixing it later.<br />
But what if <strong>the</strong> neutral gradient<br />
doesn’t transiti<strong>on</strong> exactly where<br />
we want it? What if we want <strong>the</strong><br />
darkness to go a little far<strong>the</strong>r<br />
or a little less into <strong>the</strong> scene?<br />
Suppose we have to point <strong>the</strong><br />
camera higher or lower to get<br />
that transiti<strong>on</strong> where we want it?<br />
Suppose we want a more abrupt<br />
or more gradual transiti<strong>on</strong> than<br />
<strong>the</strong> filter offers? The result can<br />
still be pretty good, but seldom<br />
76<br />
<str<strong>on</strong>g>Focus</str<strong>on</strong>g> <str<strong>on</strong>g>On</str<strong>on</strong>g> <str<strong>on</strong>g>Lighting</str<strong>on</strong>g> <str<strong>on</strong>g>Photos</str<strong>on</strong>g><br />
as good as what we might do<br />
with a c<strong>on</strong>trolled alpha channel<br />
in image editing software, where<br />
we can put <strong>the</strong> transiti<strong>on</strong> exactly<br />
where we want it and make that<br />
transiti<strong>on</strong> as gradual or as abrupt<br />
as we want.<br />
But that’s a topic for ano<strong>the</strong>r<br />
book. In a basic lighting book,<br />
we will not overburden you with<br />
technical detail. Still, we absolutely<br />
must point you in <strong>the</strong> directi<strong>on</strong><br />
you need to be facing when<br />
you are ready to go <strong>the</strong>re.<br />
D<strong>on</strong>’t buy every<br />
filter/gel. Just<br />
know <strong>the</strong>y’re<br />
available. Buy as<br />
needed.<br />
The color of light can be gratifying<br />
to play with and offers a fun<br />
way to start thinking about light.<br />
Still, often we can ignore it and<br />
take whatever color we get. As<br />
l<strong>on</strong>g as <strong>the</strong> daylight, <strong>the</strong> flash, or<br />
<strong>the</strong> tungsten is reas<strong>on</strong>ably close<br />
to “normal,” we may not even<br />
notice <strong>the</strong> color.<br />
What we must always c<strong>on</strong>sider,<br />
though, is highlight and shadow.<br />
Let’s explore that subject next.
This page intenti<strong>on</strong>ally left blank
thrOughOut this bOOk, we are going to<br />
work exclusively with <strong>the</strong> sun, <strong>the</strong> builtin<br />
flash, and <strong>the</strong> off-camera flash—<br />
all small lights. The sun, small? Yes.<br />
Although <strong>the</strong> sun is physically huge, it’s<br />
also very far away, and thus it becomes<br />
a small light source.<br />
Photographers call a shadow hard or<br />
soft, depending <strong>on</strong> how sharp its edge is.<br />
Nobody fails to notice <strong>the</strong> shadow in <strong>the</strong><br />
photo to <strong>the</strong> left. Its edge is so sharply<br />
defined that it becomes an essential part<br />
of <strong>the</strong> picture. This is not simply a picture<br />
of a gourd: it is a picture of a gourd<br />
and its shadow. This hard shadow is an<br />
essential part of <strong>the</strong> compositi<strong>on</strong>.<br />
Does <strong>the</strong> hard shadow make a better<br />
picture or a worse <strong>on</strong>e? You decide.<br />
Whatever you decide, you may make<br />
<strong>the</strong> opposite decisi<strong>on</strong> for a different<br />
Chapter 4: Light and Shadow<br />
Hard-edged shadows from a small light<br />
source with little shadow detail.<br />
subject. You may even make <strong>the</strong><br />
opposite decisi<strong>on</strong> for <strong>the</strong> same subject<br />
when you look at it tomorrow! The most<br />
important thing is to make that decisi<strong>on</strong>.<br />
Good pictures d<strong>on</strong>’t just happen by<br />
magic. (Well, sometimes <strong>the</strong>y do, but<br />
that “magic” usually comes from a<br />
photographer’s well-thought decisi<strong>on</strong>,<br />
not luck.) So how do we make that<br />
decisi<strong>on</strong>? That’s art, and we’ll leave that<br />
to you. What we will do here is to talk<br />
about how to turn that decisi<strong>on</strong> into a<br />
photograph.<br />
In this photo, we used a small offcamera<br />
flash behind and slightly to<br />
<strong>the</strong> right. We could have d<strong>on</strong>e exactly<br />
<strong>the</strong> same picture with sunlight, waiting<br />
for <strong>the</strong> right day and hour, if we were<br />
hobbyists instead of professi<strong>on</strong>al<br />
photographers with a c<strong>on</strong>tract deadline.<br />
Light and Shadow<br />
79
Small lights make hard shadows.<br />
Fur<strong>the</strong>rmore, distant lights<br />
(unclouded sun) always behave<br />
as small lights, regardless of <strong>the</strong>ir<br />
physical size.<br />
Because we are using <strong>the</strong><br />
small light al<strong>on</strong>e, we get <strong>the</strong><br />
expected hard-edged shadows.<br />
Sometimes, that’s exactly what<br />
80<br />
<str<strong>on</strong>g>Focus</str<strong>on</strong>g> <str<strong>on</strong>g>On</str<strong>on</strong>g> <str<strong>on</strong>g>Lighting</str<strong>on</strong>g> <str<strong>on</strong>g>Photos</str<strong>on</strong>g><br />
It’s also important to<br />
notice that <strong>the</strong> hardness of<br />
a shadow has nothing to do<br />
with how dark <strong>the</strong> shadow<br />
is. <str<strong>on</strong>g>On</str<strong>on</strong>g>ly <strong>the</strong> sharpness of<br />
its edge matters. If we<br />
popped up an <strong>on</strong>-camera<br />
flash for fill, <strong>the</strong> shadow<br />
could be much<br />
lighter. Still, <strong>the</strong><br />
sharp edge makes it<br />
hard.<br />
we want, but certainly not always.<br />
Hard shadows are so noticeable<br />
that <strong>the</strong>y become part of <strong>the</strong><br />
picture subject; <strong>the</strong>n <strong>the</strong>y can<br />
compete with what we want our<br />
main subject to be.<br />
Hard shadows can emphasize<br />
texture. That can be good if we<br />
want to show <strong>the</strong> worn engraved<br />
text carved into an ancient<br />
Egyptian st<strong>on</strong>e; it’s bad, though,<br />
if we photograph our middleaged<br />
aunt who wants people to<br />
see her still youthfully smooth<br />
skin. We have to learn to make<br />
hard shadows, soft shadows, and<br />
anything in between to make <strong>the</strong><br />
light suit <strong>the</strong> subject.
Soft-edged shadows<br />
from large light<br />
source with good<br />
shadow detail.<br />
Want hard-edged shadows?<br />
Work without diffusi<strong>on</strong> or<br />
move <strong>the</strong> flash far<strong>the</strong>r away<br />
(making it a smaller light<br />
source). Shoot <strong>on</strong> a cloudless<br />
day at high no<strong>on</strong>. Want softedged<br />
shadows? Do <strong>the</strong><br />
reverse. Shadows give shape<br />
to our subjects. We<br />
almost always want<br />
some shadow. How<br />
much? You decide.<br />
Light and Shadow<br />
81
Compare <strong>the</strong> gourd <strong>on</strong> page 81<br />
with <strong>the</strong> <strong>on</strong>e at <strong>the</strong> beginning<br />
of this chapter. The <strong>on</strong>ly change<br />
here is we’ve hung a large sheet<br />
of diffusi<strong>on</strong> material between <strong>the</strong><br />
flash and <strong>the</strong> subject. Because<br />
<strong>the</strong> diffusi<strong>on</strong> material makes a<br />
bigger light, we get a soft-edged<br />
shadow. Within reas<strong>on</strong>able limits,<br />
<strong>the</strong> far<strong>the</strong>r away <strong>the</strong> flash is from<br />
<strong>the</strong> diffusi<strong>on</strong> material, <strong>the</strong> larger<br />
<strong>the</strong> light becomes, because it<br />
begins to light <strong>the</strong> whole sheet<br />
and, in effect, becomes a bigger<br />
light. We d<strong>on</strong>’t absolutely have<br />
to have a big sheet of diffusi<strong>on</strong><br />
material here. O<strong>the</strong>r methods<br />
from Chapter 2 work just fine.<br />
Still, it’s pretty difficult to put a<br />
big umbrella behind <strong>the</strong> sun.<br />
Also, <strong>the</strong> closer <strong>the</strong> diffusi<strong>on</strong><br />
material is to <strong>the</strong> subject, <strong>the</strong> larger<br />
<strong>the</strong> light becomes. Remember<br />
that we said <strong>the</strong> huge sun<br />
becomes a small light because<br />
of its distance? We can apply<br />
<strong>the</strong> same principle in reverse:<br />
<strong>the</strong> closer we move <strong>the</strong> diffusi<strong>on</strong><br />
material to our subject, <strong>the</strong> softer<br />
<strong>the</strong> light becomes.<br />
82<br />
<str<strong>on</strong>g>Focus</str<strong>on</strong>g> <str<strong>on</strong>g>On</str<strong>on</strong>g> <str<strong>on</strong>g>Lighting</str<strong>on</strong>g> <str<strong>on</strong>g>Photos</str<strong>on</strong>g><br />
So when we want soft-edged<br />
shadows, we need a big light.<br />
Many flash units come with<br />
diffusers that snap <strong>on</strong>to <strong>the</strong> fr<strong>on</strong>t<br />
of <strong>the</strong> flash; if we d<strong>on</strong>’t get <strong>on</strong>e<br />
with <strong>the</strong> flash, we can usually buy<br />
<strong>on</strong>e to fit whatever flash we have.<br />
These are simply translucent<br />
plastic. They look professi<strong>on</strong>al,<br />
but if professi<strong>on</strong>al appearance<br />
doesn’t matter, we can just as<br />
well cut a piece of a translucent<br />
carryout c<strong>on</strong>tainer to fit <strong>the</strong> flash<br />
and tape it <strong>on</strong>. (Or just tape <strong>the</strong><br />
whole thing over <strong>the</strong> flash, which<br />
will make it a little bit bigger.)<br />
The effect is <strong>the</strong> same. These<br />
indeed are helpful and certainly<br />
mobile, but <strong>the</strong>y’re still pretty<br />
small. The whole point of diffusi<strong>on</strong><br />
is to get a bigger light. To<br />
get a significantly bigger light,<br />
we have to use some of <strong>the</strong> tools<br />
in Chapter 2: diffusi<strong>on</strong> material<br />
(including both softboxes and<br />
shoot-through umbrellas) and<br />
bounce (including walls, ceilings,<br />
white cards, and, <strong>on</strong>ce again,<br />
umbrellas). For now, we’ll use diffusi<strong>on</strong><br />
sheets. This is <strong>the</strong> bulkiest<br />
and clumsiest way to do <strong>the</strong> job,<br />
but it is often <strong>the</strong> best in terms<br />
of both c<strong>on</strong>trolling <strong>the</strong> light and<br />
learning <strong>the</strong> light. It’s also <strong>the</strong><br />
cheapest.<br />
Photographers have to use <strong>the</strong><br />
play of light and shadow to<br />
create depth. It is how <strong>the</strong> viewer<br />
gets a sense of scale, shape,<br />
and texture. The keys to excellent<br />
photography are good<br />
compositi<strong>on</strong>, correct exposure,<br />
and good light. There are plenty<br />
of o<strong>the</strong>r books to give us tips<br />
<strong>on</strong> <strong>the</strong> first two. We’re here to<br />
discuss light—its qualities, how<br />
it works, and how to amend it<br />
if what we’ve got isn’t what we<br />
want or need. We want to be<br />
able to c<strong>on</strong>trol <strong>the</strong> light. The<br />
artistic decisi<strong>on</strong>s should be ours.<br />
If we want hard- or soft-edged<br />
shadows, that’s our call. But we<br />
want to know how to get whatever<br />
we want.<br />
Let’s look at some specific<br />
examples.
Texture<br />
Subjects d<strong>on</strong>’t just cast shadows<br />
<strong>on</strong> backgrounds. There are also<br />
shadows within <strong>the</strong> subject itself<br />
that reveal shape and texture.<br />
Putting <strong>the</strong> right light in <strong>the</strong> right<br />
place makes this happen. The<br />
“right place” for that light is almost<br />
never <strong>on</strong> top of <strong>the</strong> camera.<br />
This photo to <strong>the</strong> right shows <strong>the</strong><br />
problem. The light <strong>on</strong> <strong>the</strong> camera<br />
certainly casts shadow, but<br />
<strong>the</strong> shadow is mostly under <strong>the</strong><br />
subject. The camera cannot see<br />
much of <strong>the</strong> shadow, so <strong>the</strong>re is<br />
not much texture.<br />
Understanding this problem<br />
makes <strong>the</strong> soluti<strong>on</strong> easy: get <strong>the</strong><br />
light off <strong>the</strong> camera. Sunlight<br />
works well if <strong>the</strong> sun happens<br />
to be where we want it when we<br />
want it. Household lamps also<br />
can work. Unlike <strong>the</strong> sun, we<br />
can move <strong>the</strong>m to wherever we<br />
want. Household lights would<br />
work just fine with this piece of<br />
Belgian lace. Still, if <strong>the</strong> subject<br />
were moving—think of swarming<br />
ants or pouring flour— household<br />
lights might not be bright enough<br />
to stop <strong>the</strong> moti<strong>on</strong>. Ideally, we<br />
would like to do this with a<br />
flash that is not attached to <strong>the</strong><br />
camera, because that’s <strong>the</strong> most<br />
c<strong>on</strong>trollable soluti<strong>on</strong>. We can<br />
put <strong>the</strong> light exactly where we<br />
want it, and it’s bright enough<br />
and fast enough to handle most<br />
movement.<br />
The photo <strong>on</strong> <strong>the</strong> following page<br />
was made with a small flash at<br />
a low angle to <strong>the</strong> side of <strong>the</strong><br />
same lace. The improvement is<br />
dramatic.<br />
If we simply tell you to move your<br />
light to <strong>the</strong> side we’re still not<br />
telling you enough.<br />
The light needs to be small. Small<br />
lights make hard shadows, and<br />
that emphasizes texture. This<br />
<strong>on</strong>e is easy. It simply saves us <strong>the</strong><br />
extra step of putting up diffusi<strong>on</strong><br />
material or getting out an<br />
umbrella.<br />
The light needs to be much<br />
far<strong>the</strong>r from <strong>the</strong> subject. At first,<br />
this is a little less obvious, but it’s<br />
still easy to explain. As we move<br />
<strong>the</strong> light to <strong>the</strong> side, <strong>the</strong> part of<br />
<strong>the</strong> subject closer to <strong>the</strong> light<br />
will be much brighter than <strong>the</strong><br />
more distant part of <strong>the</strong> subject.<br />
If <strong>the</strong> light is too close, it will be<br />
impossible to get good exposure<br />
through <strong>the</strong> whole picture.<br />
Light and Shadow<br />
83
We could solve <strong>the</strong> exposure<br />
problem by simply putting<br />
ano<strong>the</strong>r light <strong>on</strong> <strong>the</strong> opposite<br />
side, and for some subjects, such<br />
as reproducti<strong>on</strong>s of paintings,<br />
that’s a good idea. But we want<br />
to emphasize texture here, and<br />
using ano<strong>the</strong>r light <strong>on</strong> <strong>the</strong> opposite<br />
side simply fills in <strong>the</strong> shadow<br />
we most need to do that.<br />
By moving <strong>the</strong> light as far from<br />
<strong>the</strong> subject as possible, we get<br />
more even illuminati<strong>on</strong> of <strong>the</strong> flat<br />
surface. Think about that for a<br />
half-minute. If <strong>the</strong> subject is two<br />
84<br />
<str<strong>on</strong>g>Focus</str<strong>on</strong>g> <str<strong>on</strong>g>On</str<strong>on</strong>g> <str<strong>on</strong>g>Lighting</str<strong>on</strong>g> <str<strong>on</strong>g>Photos</str<strong>on</strong>g><br />
feet wide and we put our flash<br />
<strong>on</strong>e foot to <strong>the</strong> right, <strong>the</strong> near<br />
edge of <strong>the</strong> subject gets pretty<br />
bright. A good exposure for <strong>the</strong><br />
near edge means huge underexposure<br />
for <strong>the</strong> far edge. Now,<br />
think ano<strong>the</strong>r half-minute about<br />
what happens when we move <strong>the</strong><br />
light, say, 12 feet away. The near<br />
edge of <strong>the</strong> surface gets pretty<br />
close to <strong>the</strong> same exposure as <strong>the</strong><br />
far edge. In fact, <strong>the</strong> whole thing<br />
is lit evenly enough that we probably<br />
need no subsequent digital<br />
manipulati<strong>on</strong> to get it right.<br />
Moving <strong>the</strong> light<br />
far<strong>the</strong>r away<br />
also makes<br />
it a smaller<br />
light! This, too,<br />
emphasizes<br />
texture.<br />
So far, so good. We have a good<br />
picture of <strong>the</strong> lace. But we’re not<br />
out of trouble yet. Let’s try <strong>the</strong><br />
same technique with a different<br />
subject.<br />
The next picture is a blackcovered<br />
book with an embossed<br />
title. Like <strong>the</strong> lace, <strong>the</strong>re’s no<br />
difference in color between <strong>the</strong><br />
book title and <strong>the</strong> surface it’s<br />
<strong>on</strong>. So we have to use texture to<br />
make <strong>the</strong> title visible. Sounds like<br />
we could use <strong>the</strong> same approach<br />
we used for <strong>the</strong> lace, right? Let’s<br />
try that.
direct vs. diffuse refLecti<strong>on</strong><br />
Diffuse reflecti<strong>on</strong> happens at any angle. Direct reflecti<strong>on</strong> is mirror-like. It<br />
happens at <strong>on</strong>ly <strong>on</strong>e angle. Black subjects by definiti<strong>on</strong> emit little diffuse<br />
reflecti<strong>on</strong>. So, if we want to emphasize <strong>the</strong>ir detail, we have to look to<br />
direct reflecti<strong>on</strong>.<br />
Grump! This is a<br />
terrible picture. But<br />
we’ve used exactly<br />
<strong>the</strong> same technique<br />
that worked so well<br />
with <strong>the</strong> lace. Why<br />
isn’t it working<br />
now?<br />
Light and Shadow<br />
85
Why does <strong>the</strong> same<br />
light look so different <strong>on</strong><br />
ano<strong>the</strong>r subject?<br />
Same light. Similar texture. <str<strong>on</strong>g>On</str<strong>on</strong>g>e<br />
picture is good, <strong>the</strong> o<strong>the</strong>r bad.<br />
Why?<br />
So far, we’ve been looking at<br />
diffuse reflecti<strong>on</strong>. Where <strong>the</strong> light<br />
comes from obviously makes a big<br />
difference in where <strong>the</strong> shadows<br />
fall, but <strong>the</strong> subject is about <strong>the</strong><br />
same brightness, regardless of <strong>the</strong><br />
directi<strong>on</strong> of <strong>the</strong> light. With simple<br />
diffuse reflecti<strong>on</strong>, white things are<br />
always white and black things are<br />
always black. Plain and simple.<br />
But that beautiful new black car<br />
our neighbor just bought is not<br />
black. It seems to gleam brighter<br />
in <strong>the</strong> sunlight than our own<br />
white car! How can this happen?<br />
Not all reflecti<strong>on</strong> is diffuse. Some<br />
of it is direct, and a whole different<br />
set of rules apply here.<br />
Diffuse reflecti<strong>on</strong> can come from<br />
a light at any angle. Direct reflecti<strong>on</strong><br />
comes from <strong>on</strong>ly <strong>on</strong>e angle,<br />
and if we are not at <strong>the</strong> angle to<br />
see it, it is invisible.<br />
Right now, pick up a white thing<br />
in <strong>the</strong> room where you are<br />
(maybe this page in this book,<br />
if you are reading it <strong>on</strong> paper).<br />
Turn it and look at it at different<br />
86<br />
<str<strong>on</strong>g>Focus</str<strong>on</strong>g> <str<strong>on</strong>g>On</str<strong>on</strong>g> <str<strong>on</strong>g>Lighting</str<strong>on</strong>g> <str<strong>on</strong>g>Photos</str<strong>on</strong>g><br />
angles. It stays white, no matter<br />
what angle. If <strong>the</strong> angle doesn’t<br />
affect brightness, we’re looking<br />
at diffuse reflecti<strong>on</strong>.<br />
Next, pick up a black thing<br />
(maybe your teleph<strong>on</strong>e). Look<br />
at it while you turn it to different<br />
angles. Whatever light you have<br />
in your room, <strong>the</strong> highlights will<br />
move as you turn this thing. We<br />
are looking at direct reflecti<strong>on</strong><br />
here. Our teleph<strong>on</strong>e changes<br />
brightness as we turn it.<br />
So we have two types of<br />
reflecti<strong>on</strong>s, and <strong>the</strong>y work in<br />
totally different ways. With black<br />
subjects, learn to capitalize <strong>on</strong><br />
direct reflecti<strong>on</strong>, not diffuse.
noise<br />
Noise is <strong>the</strong> worst problem any digital photographer has to deal with,<br />
so let’s get to it right now, early in <strong>the</strong> book. Noise is a result of how<br />
our cameras handle <strong>the</strong> light. It is exaggerated whenever our camera<br />
needs to amplify low light levels to get an adequate exposure. But what<br />
is noise?<br />
Noise is any random electr<strong>on</strong>ic impulse that has nothing to do with <strong>the</strong><br />
picture. It can come from cosmic rays, a passing car or motorcycle, or<br />
<strong>the</strong> camera itself. Wherever it comes from, it degrades our pictures,<br />
and we want to get rid of it. It is especially noticeable in areas of<br />
smooth or solid color.<br />
More megapixels. The least<br />
expensive digital cameras<br />
already resolve everything<br />
<strong>the</strong> lens can see. Why would<br />
any<strong>on</strong>e ever pay <strong>the</strong> price for<br />
a camera that produces more<br />
pixels than <strong>the</strong> lens can resolve<br />
or <strong>the</strong> eye can ever see? But<br />
that’s just <strong>the</strong> whole point of<br />
<strong>the</strong> argument: get <strong>the</strong> pixels<br />
small enough and <strong>the</strong> eye can’t<br />
see <strong>the</strong> noise. The bad part is<br />
that this soluti<strong>on</strong> leads to hugely<br />
increased file sizes, slower<br />
computer processing, and a<br />
waste of all of our resources.<br />
Nighttime photo in mixed light.<br />
Camera was set to Auto White<br />
Balance. Because of <strong>the</strong> high<br />
ISO, <strong>the</strong>re was a lot of noise.<br />
In this case, Lightroom was used<br />
to reduce <strong>the</strong> noise. So how do<br />
we reduce noise? Three ways,<br />
and you’re not going to like any<br />
of <strong>the</strong>m: buy a more expensive<br />
camera, increase exposure, or get<br />
software like Adobe’s Lightroom.<br />
Let’s talk about <strong>the</strong>m.<br />
Light and Shadow<br />
87
We had to shoot <strong>the</strong> cover<br />
shot of <strong>the</strong> Sikh twice.<br />
We started out with a<br />
cheaper camera. This secti<strong>on</strong><br />
shows that <strong>the</strong> noise was<br />
unacceptable.<br />
88<br />
Increase exposure. This<br />
totally eliminates <strong>the</strong> noise<br />
problem, and it works with<br />
a cheap camera. Increasing<br />
exposure brings <strong>the</strong> whole<br />
picture up to <strong>the</strong> level of an<br />
orchestra playing a great<br />
symph<strong>on</strong>y at its loudest<br />
moment. No <strong>on</strong>e notices a<br />
cough in <strong>the</strong> audience at<br />
<str<strong>on</strong>g>Focus</str<strong>on</strong>g> <str<strong>on</strong>g>On</str<strong>on</strong>g> <str<strong>on</strong>g>Lighting</str<strong>on</strong>g> <str<strong>on</strong>g>Photos</str<strong>on</strong>g><br />
that point. The problem with<br />
increased exposure is that it<br />
destroys highlight detail. Light<br />
grays all become white. Different<br />
light colors all become<br />
<strong>the</strong> same color. Still, <strong>on</strong>e of<br />
<strong>the</strong> main reas<strong>on</strong>s we learn<br />
lighting is to keep <strong>the</strong> highlights<br />
and shadows within a<br />
small enough dynamic range<br />
This is a similar porti<strong>on</strong> of<br />
<strong>the</strong> headshot, but this <strong>on</strong>e<br />
was d<strong>on</strong>e with a camera that<br />
has more megapixels. No<br />
noise problem!<br />
that we keep detail in both <strong>the</strong><br />
highlights and <strong>the</strong> shadows.<br />
Software. There are various<br />
software packages that come<br />
with noise reducti<strong>on</strong>/correcti<strong>on</strong><br />
capability. Their success<br />
varies—both because of <strong>the</strong>ir<br />
capabilities and because of <strong>the</strong><br />
amount of noise in <strong>the</strong> image.
This page intenti<strong>on</strong>ally left blank
sunlight is great, and not just because<br />
it is free. It can be our main light, a fill<br />
light, or a hair light. Depending <strong>on</strong> <strong>the</strong><br />
time of day and <strong>the</strong> wea<strong>the</strong>r, it can be<br />
a big or small light source. Sometimes<br />
it’s perfect without our use of flash at<br />
Chapter 5: Sunlight<br />
all. The most serious downside is that<br />
<strong>the</strong> wea<strong>the</strong>r is unpredictable. The o<strong>the</strong>r<br />
disadvantage is that we can’t move <strong>the</strong><br />
sun to whatever spot we want: <strong>the</strong> sun<br />
dictates <strong>the</strong> schedule.<br />
We can always know in<br />
advance, anywhere in <strong>the</strong><br />
world, where <strong>the</strong> sun will<br />
be in <strong>the</strong> sky at any time<br />
of day. The U.S. Naval<br />
Observatory provides that<br />
informati<strong>on</strong> for free <strong>on</strong> its<br />
website. Because <strong>the</strong> site is<br />
in c<strong>on</strong>tinuous development,<br />
we can’t give a specific<br />
web address, but seek and<br />
you will find. For<br />
cloud cover, though,<br />
we have to guess<br />
from local wea<strong>the</strong>r<br />
forecasts.<br />
Sunlight<br />
91
Found light<br />
Sometimes we simply get lucky<br />
and find ourselves with something<br />
great to photograph when<br />
<strong>the</strong> light is perfect as is. These<br />
times are gifts. (And “perfect”<br />
doesn’t always mean sunny with<br />
a bit of cloud cover!)<br />
92<br />
<str<strong>on</strong>g>Focus</str<strong>on</strong>g> <str<strong>on</strong>g>On</str<strong>on</strong>g> <str<strong>on</strong>g>Lighting</str<strong>on</strong>g> <str<strong>on</strong>g>Photos</str<strong>on</strong>g><br />
The image below is an example<br />
of not being put off by “bad”<br />
wea<strong>the</strong>r. The distance from <strong>the</strong><br />
camera to <strong>the</strong> ship meant that<br />
even <strong>the</strong> best flash in <strong>the</strong> world<br />
wouldn’t have <strong>the</strong> power to light<br />
<strong>the</strong> ship. In this case, more light<br />
would have ruined <strong>the</strong> image.<br />
Here it was a matter of staying<br />
open to possibilities, sitting and<br />
waiting, and getting <strong>the</strong> exposure<br />
right.<br />
The courtyard photo <strong>on</strong> <strong>the</strong> next<br />
page also uses existing light, but<br />
what a different quality of light it<br />
is! And that’s not just because it<br />
wasn’t foggy. The image almost
looks like a painting. We were<br />
too far away and <strong>the</strong> subject area<br />
was too big for most photographers<br />
to have any realistic chance<br />
of amending <strong>the</strong> light. (Yes, <strong>the</strong>re<br />
are photographers who have<br />
enough equipment to handle a<br />
scene of this size, but not many.)<br />
It was taken shortly after no<strong>on</strong>, so<br />
you’d expect hard shadows. But<br />
Dappled light filtering<br />
through <strong>the</strong> grapes. Nothing<br />
more needed than to get<br />
<strong>the</strong> exposure right and, of<br />
course, to learn to stop,<br />
look around, and see <strong>the</strong><br />
possibilities.<br />
Sunlight 93
ecause <strong>the</strong> light was bounced<br />
off <strong>the</strong> lighter colored walls,<br />
everything was gently lit.<br />
So no <strong>on</strong>e kind of light makes<br />
for <strong>the</strong> perfect photo—gray<br />
days, no<strong>on</strong>time, a mix can all<br />
work. Sometimes <strong>the</strong> light can<br />
be right but <strong>the</strong> subject is just in<br />
<strong>the</strong> wr<strong>on</strong>g place. The butterfly in<br />
<strong>the</strong> photo <strong>on</strong> <strong>the</strong> left <strong>on</strong> page 95<br />
landed <strong>on</strong> <strong>the</strong> pavement at our<br />
feet. Although <strong>the</strong> light is just fine<br />
for <strong>the</strong> butterfly itself, <strong>the</strong> no<strong>on</strong><br />
sun casts a l<strong>on</strong>g shadow. The<br />
shadow is hard, for two reas<strong>on</strong>s:<br />
<strong>on</strong>e, unclouded sunlight is always<br />
hard, and, two, <strong>the</strong> butterfly is so<br />
close to <strong>the</strong> “background” (<strong>the</strong><br />
pavement). Regardless of <strong>the</strong><br />
size of <strong>the</strong> light, a background<br />
shadow is harder if <strong>the</strong> subject is<br />
closer to <strong>the</strong> background.<br />
Butterflies d<strong>on</strong>’t stay put very<br />
l<strong>on</strong>g—certainly not l<strong>on</strong>g enough<br />
for us to put a reflector in place<br />
(which would probably scare it<br />
away anyway). So we waited for<br />
it to move to a bunch of flowers<br />
and hoped it would alight <strong>on</strong> a<br />
tallish flower. Okay, <strong>the</strong> same<br />
butterfly didn’t cooperate. But a<br />
different <strong>on</strong>e did. In <strong>the</strong> sec<strong>on</strong>d<br />
butterfly image <strong>on</strong> <strong>the</strong> next page<br />
<strong>the</strong> height of <strong>the</strong> flower meant<br />
that <strong>the</strong> shadow wasn’t cast <strong>on</strong><br />
anything close by; <strong>the</strong>refore, we<br />
94<br />
<str<strong>on</strong>g>Focus</str<strong>on</strong>g> <str<strong>on</strong>g>On</str<strong>on</strong>g> <str<strong>on</strong>g>Lighting</str<strong>on</strong>g> <str<strong>on</strong>g>Photos</str<strong>on</strong>g><br />
get good detail in <strong>the</strong> butterfly<br />
but without <strong>the</strong> distracti<strong>on</strong> of <strong>the</strong><br />
shadow. If we had really needed<br />
<strong>the</strong> same butterfly, we would<br />
have had to stick around l<strong>on</strong>ger.<br />
Patience, if we can afford <strong>the</strong><br />
time, is always helpful. Ansel<br />
Adams went back to some of <strong>the</strong><br />
same sites for years before he<br />
got some of his classic images.<br />
Open shade can also work well,<br />
although we need to be aware<br />
of <strong>the</strong> color of <strong>the</strong> light. In <strong>the</strong><br />
shade of a building, <strong>the</strong> color<br />
will be affected by <strong>the</strong> wall’s<br />
color. Under a tree, <strong>the</strong> light will<br />
likely be green. In <strong>the</strong> photo <strong>on</strong><br />
page 96, <strong>the</strong> boy was playing in<br />
<strong>the</strong> open shade of a large tree.<br />
Since <strong>the</strong> photographer chose to<br />
If we need to photograph a<br />
cold-blooded animal and we<br />
can catch <strong>on</strong>e, just a few<br />
minutes in <strong>the</strong> refrigerator<br />
will slow it down. Then we<br />
can put it where we want<br />
and it will sit l<strong>on</strong>g enough<br />
for our picture. This<br />
should <strong>on</strong>ly be d<strong>on</strong>e (very<br />
carefully!) with reptiles or<br />
amphibians that we know can<br />
survive cold wea<strong>the</strong>r well.<br />
Cruel? Probably no<br />
more than sending<br />
our children to<br />
walk to school <strong>on</strong> a<br />
winter day.
c<strong>on</strong>vert <strong>the</strong> image to black and<br />
white, <strong>the</strong> green light no l<strong>on</strong>ger<br />
mattered. However, had he not<br />
d<strong>on</strong>e that, he probably would<br />
have had to ei<strong>the</strong>r put his camera<br />
in Shade mode or do some color<br />
correcti<strong>on</strong> in postproducti<strong>on</strong>.<br />
<str<strong>on</strong>g>Lighting</str<strong>on</strong>g> children doesn’t differ<br />
from lighting adults. They present<br />
a different challenge in terms<br />
of language skills, hyperactivity,<br />
shyness, or crankiness (probably<br />
because <strong>the</strong> sitting was scheduled<br />
at nap time). <str<strong>on</strong>g>On</str<strong>on</strong>g>e of <strong>the</strong> hardest<br />
issues to face is <strong>the</strong> cheesy, fake<br />
smile all kids seem to develop at<br />
some point. You can deal with<br />
this challenge by developing your<br />
people skills, but <strong>the</strong> soluti<strong>on</strong> has<br />
nothing to do with changing your<br />
lighting approach to <strong>the</strong>se small<br />
subjects.<br />
Sunlight 95
The image above was taken in open<br />
shade under a tree. Opening up to a<br />
large aperture allowed <strong>the</strong> background<br />
to go out of focus and draws us to<br />
<strong>the</strong> subject’s face. Always look for<br />
a variety of expressi<strong>on</strong>s. We have no<br />
smile, but we do have a compelling<br />
portrait.<br />
96<br />
<str<strong>on</strong>g>Focus</str<strong>on</strong>g> <str<strong>on</strong>g>On</str<strong>on</strong>g> <str<strong>on</strong>g>Lighting</str<strong>on</strong>g> <str<strong>on</strong>g>Photos</str<strong>on</strong>g><br />
why does aperture matter?<br />
Aperture refers to <strong>the</strong> lens<br />
opening. A wide-open lens<br />
(say f/2) lets in a lot of light.<br />
However, <strong>the</strong>re is a trade-off.<br />
With <strong>the</strong> lens wide open, we<br />
get shallow depth of field,<br />
<strong>the</strong> area of acceptable sharpness.<br />
If we want everything to<br />
be sharp, we have to go to a<br />
smaller f-stop (say f/32). This<br />
means increasing <strong>the</strong> power <strong>on</strong><br />
our light sources, if possible, or<br />
changing to a higher ISO.
Amending or mixing<br />
light<br />
So what do we do if <strong>the</strong> light isn’t<br />
just <strong>the</strong> way we want it? In <strong>the</strong><br />
photo of <strong>the</strong> boy <strong>on</strong> <strong>the</strong> previous<br />
page, no help was needed to get<br />
a nice shot, even though it was a<br />
shaded area. But how can we fix<br />
<strong>the</strong> lighting when we are outside<br />
and <strong>the</strong> light isn’t what we want?<br />
In <strong>the</strong> upper photo here <strong>the</strong><br />
flower was in <strong>the</strong> shade. We<br />
sense <strong>the</strong> delicacy of <strong>the</strong> flower,<br />
but it’s all ra<strong>the</strong>r drab. We tried<br />
<strong>the</strong> in-camera flash (bottom<br />
photo), but because <strong>the</strong> light<br />
came from directly in fr<strong>on</strong>t of <strong>the</strong><br />
flower (and <strong>the</strong>refore fills those<br />
informative shadows), we lose <strong>the</strong><br />
texture of <strong>the</strong> petals. In <strong>the</strong> subsequent<br />
photo <strong>on</strong> <strong>the</strong> next page,<br />
we held a reflector angled so it<br />
reflected back <strong>the</strong> sunlight <strong>on</strong>to<br />
<strong>the</strong> flower. (Now we ei<strong>the</strong>r need<br />
a friend to hold <strong>the</strong> reflector or,<br />
if we’re by ourselves, we need to<br />
mount <strong>the</strong> camera <strong>on</strong> a tripod.)<br />
We retain <strong>the</strong> delicacy but add a<br />
little brightness to <strong>the</strong> flower.<br />
We can apply this same technique<br />
when shooting photographs of<br />
people in open shade. We could<br />
certainly use a reflector (bigger<br />
than <strong>the</strong> <strong>on</strong>e we would use for<br />
shooting a small flower), use <strong>the</strong><br />
Sunlight 97
uilt-in flash for fill (maybe with<br />
some neutral density material),<br />
or just switch to <strong>the</strong> Shade mode.<br />
With a little experimentati<strong>on</strong>,<br />
all photographers will find what<br />
works best for <strong>the</strong>m.<br />
Sometimes <strong>the</strong> light is almost<br />
just right, but we need a little kiss<br />
of additi<strong>on</strong>al light. The photo <strong>on</strong><br />
page 99 is actually a self-portrait<br />
of <strong>the</strong> photographer facing away<br />
from <strong>the</strong> camera. The sky was<br />
a bit gray, so <strong>the</strong> photographer<br />
added a screw-<strong>on</strong> polarizer,<br />
which held <strong>on</strong>to <strong>the</strong> cloud detail.<br />
The exposure was set so that <strong>the</strong><br />
sky and clouds looked right. The<br />
photographer could have stopped<br />
<strong>the</strong>re, but <strong>the</strong> lower body was<br />
blending into <strong>the</strong> background<br />
shadows. Adding <strong>on</strong>e flash was<br />
<strong>the</strong> way to provide some definiti<strong>on</strong>.<br />
The light <strong>on</strong> <strong>the</strong> lower left<br />
arm in this photograph did not<br />
98<br />
Try different<br />
camera angles<br />
and heights. The<br />
first placement<br />
may not be <strong>the</strong><br />
right <strong>on</strong>e.<br />
<str<strong>on</strong>g>Focus</str<strong>on</strong>g> <str<strong>on</strong>g>On</str<strong>on</strong>g> <str<strong>on</strong>g>Lighting</str<strong>on</strong>g> <str<strong>on</strong>g>Photos</str<strong>on</strong>g><br />
come from <strong>the</strong> sun but ra<strong>the</strong>r from<br />
a flash <strong>on</strong> a low light stand and<br />
angled so it mimicked <strong>the</strong> sun’s<br />
lighting—just enough to provide<br />
separati<strong>on</strong> from <strong>the</strong> background.<br />
To get <strong>the</strong> focus for <strong>the</strong> photo,<br />
<strong>the</strong> photographer put <strong>the</strong> tripod<br />
where he eventually planned<br />
to stand. He noted where <strong>the</strong><br />
tripod was so he could eventually<br />
stand in that spot. He <strong>the</strong>n<br />
stood back and framed <strong>the</strong> photo<br />
in <strong>the</strong> camera. He focused <strong>on</strong><br />
<strong>the</strong> tripod. He <strong>the</strong>n brought <strong>the</strong><br />
tripod back to where <strong>the</strong> camera<br />
was, put <strong>the</strong> camera <strong>on</strong> <strong>the</strong><br />
tripod, and reframed <strong>the</strong> shot.<br />
He placed <strong>the</strong> off-camera flash<br />
where he thought it should go.<br />
He used <strong>the</strong> camera’s self-timer<br />
to take <strong>the</strong> picture and had a<br />
wireless radio c<strong>on</strong>trol attached<br />
to <strong>the</strong> camera to fire <strong>the</strong> flash.<br />
Wireless radio c<strong>on</strong>trols are neat<br />
gizmos that allow us to trigger<br />
a flash without <strong>the</strong> flash being<br />
c<strong>on</strong>nected to <strong>the</strong> camera. They’re<br />
nice because no cables are<br />
needed. If <strong>the</strong>y’re good, <strong>the</strong>y<br />
also d<strong>on</strong>’t need a line of sight to<br />
<strong>the</strong> flash and <strong>the</strong> sunlight w<strong>on</strong>’t<br />
c<strong>on</strong>fuse <strong>the</strong>m. (Think about your<br />
home radio. It gets its signal right<br />
through <strong>the</strong> walls that light can’t
penetrate.) But what if we d<strong>on</strong>’t<br />
have a wireless radio c<strong>on</strong>trol to<br />
fire <strong>the</strong> flash? After all, <strong>the</strong>se can<br />
be pretty expensive. We could use<br />
a synch cord attached to both<br />
<strong>the</strong> flash and <strong>the</strong> camera. D<strong>on</strong>’t<br />
have a synch cord? Go back and<br />
use that little mirror to direct <strong>the</strong><br />
built-in flash to <strong>the</strong> off-camera<br />
flash like we did at <strong>the</strong> beginning<br />
of <strong>the</strong> book.<br />
If we wanted more c<strong>on</strong>trol over<br />
when <strong>the</strong> picture would be taken,<br />
we could have used a l<strong>on</strong>g cable<br />
release instead of <strong>the</strong> self-timer. In<br />
this case, because getting <strong>the</strong> right<br />
expressi<strong>on</strong> or movement wasn’t<br />
critical, <strong>the</strong> self-timer was just fine.<br />
So now, we can both take <strong>the</strong><br />
photograph and watch <strong>the</strong><br />
sunset—all at <strong>the</strong> same time.<br />
Taken at a different time of<br />
day, <strong>the</strong> sun would act more<br />
like a hair light. In this photo, a<br />
silhouette is all that is needed.<br />
No fill flash is necessary. More<br />
frequently, we do want some<br />
more informati<strong>on</strong>. Using <strong>the</strong><br />
same approach but earlier in<br />
<strong>the</strong> day, we’d be inclined to use<br />
this backlighting more as a hair<br />
light. With <strong>the</strong> subjects facing<br />
<strong>the</strong> camera, we’re more likely<br />
to want to get some additi<strong>on</strong>al<br />
light into <strong>the</strong> faces so we can<br />
actually see who <strong>the</strong>y are.<br />
Using <strong>the</strong> in-camera flash as a<br />
fill light outside may be <strong>the</strong> most<br />
important value of this little light.<br />
It works very well. However, with<br />
Use a lens<br />
hood, especially<br />
when outdoors.<br />
It helps to<br />
avoid flare.<br />
Sunlight 99
a little more work, we can make<br />
<strong>the</strong> image more interesting.<br />
Again, by using a light directly<br />
in fr<strong>on</strong>t of <strong>the</strong> subject, we get flat<br />
lighting. Works fine in a pinch,<br />
but for a more refined image,<br />
we’d prefer to add an off-camera<br />
flash and possibly a reflector.<br />
In <strong>the</strong> top photo, we have an<br />
example of <strong>the</strong> sun creating<br />
backlighting. It just doesn’t<br />
happen to be outdoors. The<br />
light came from two windows,<br />
both behind and to <strong>the</strong> left of<br />
<strong>the</strong> cat. These windows were <strong>on</strong><br />
two sides of <strong>the</strong> corner of <strong>the</strong><br />
room. With <strong>the</strong> help of <strong>the</strong> white<br />
bedspread we got some fill light<br />
going <strong>on</strong>, but <strong>the</strong> face was still a<br />
little darker than we’d like. This<br />
particular cat wasn’t crazy about<br />
<strong>the</strong> flash, so for <strong>the</strong> bottom<br />
photo we opted for a simple<br />
white fill card merely leaned<br />
against <strong>the</strong> dresser. Note <strong>the</strong><br />
increased light in <strong>the</strong> face and<br />
<strong>the</strong> additi<strong>on</strong>al brightness in <strong>the</strong><br />
eyes. The cat was not stressed<br />
and we were happy.<br />
The photo <strong>on</strong> <strong>the</strong> following<br />
page is an example of shooting<br />
a beautiful subject in a beautiful<br />
place. The <strong>on</strong>ly problem was<br />
that <strong>the</strong> light actually was bit flat.<br />
So how might <strong>on</strong>e remedy this<br />
problem?<br />
100<br />
<str<strong>on</strong>g>Focus</str<strong>on</strong>g> <str<strong>on</strong>g>On</str<strong>on</strong>g> <str<strong>on</strong>g>Lighting</str<strong>on</strong>g> <str<strong>on</strong>g>Photos</str<strong>on</strong>g>
The sky was gray. In this case, <strong>the</strong><br />
photographer put a polarizer <strong>on</strong><br />
his camera to bring out what blue<br />
<strong>the</strong>re was in <strong>the</strong> sky. (Note that<br />
polarizers may not work <strong>on</strong> gray<br />
days—try it and see what happens.)<br />
As might be expected <strong>on</strong> a<br />
gray day, <strong>the</strong> light wasn’t directi<strong>on</strong>al.<br />
To add <strong>the</strong> feeling of more<br />
sunlight, <strong>the</strong> photographer put<br />
an off-camera flash in a softbox<br />
at camera left and positi<strong>on</strong>ed it<br />
fairly high, angled downward. A<br />
full CTO gel was placed over <strong>the</strong><br />
flash to warm <strong>the</strong> light so it would<br />
look like warm afterno<strong>on</strong> sunlight.<br />
The sand acted as a reflector to fill<br />
<strong>the</strong> shadows that occurred and no<br />
additi<strong>on</strong>al lighting was needed.<br />
For those who are particularly<br />
interested in close-up photography<br />
of flowers, here’s an approach<br />
that works well. We’ll need a lens<br />
that can handle close-up focusing,<br />
or we can add extensi<strong>on</strong> rings<br />
(assuming <strong>the</strong> camera accepts<br />
different lenses). It means carrying<br />
a bit of lightweight equipment,<br />
but with it you can create beautiful<br />
soft light. To handle harsh midday<br />
sun or deep shadows in a forested<br />
area, this photographer uses a<br />
combinati<strong>on</strong> of diffusi<strong>on</strong> and flash.<br />
He bends a 6-foot round diffuser<br />
into a “U” shape to form a little<br />
tent (held in place usually with stick<br />
placed into <strong>the</strong> ground at an angle<br />
to hold <strong>the</strong> diffuser in place—no<br />
holes in <strong>the</strong> diffuser, please!).<br />
Sometimes this is <strong>the</strong> <strong>on</strong>ly adjustment<br />
you’ll need. In <strong>the</strong> photo<br />
of <strong>the</strong> mushrooms <strong>on</strong> <strong>the</strong> next<br />
page, however, <strong>the</strong> photographer<br />
needed an accent light. He used<br />
an off-camera flash as seen in <strong>the</strong><br />
bottom photo, which shows <strong>the</strong><br />
setup. An alternate approach is to<br />
lean <strong>the</strong> diffuser against a tree and<br />
put <strong>the</strong> flash behind it, in effect<br />
creating a softbox.<br />
Sunlight 101
102<br />
<str<strong>on</strong>g>Focus</str<strong>on</strong>g> <str<strong>on</strong>g>On</str<strong>on</strong>g> <str<strong>on</strong>g>Lighting</str<strong>on</strong>g> <str<strong>on</strong>g>Photos</str<strong>on</strong>g><br />
Mushrooms<br />
growing <strong>on</strong> <strong>the</strong><br />
side of a log in<br />
dense forest with<br />
little light. Using<br />
a diffuser with a<br />
flash gave <strong>the</strong> added<br />
light needed to make<br />
<strong>the</strong> color of <strong>the</strong>se<br />
unusual little<br />
mushrooms pop.<br />
Setup for outdoor<br />
photography<br />
using flash and a<br />
diffuser.
Distance and haze<br />
Haze happens for two principal<br />
reas<strong>on</strong>s: dirty air and ultraviolet<br />
light. Whatever <strong>the</strong> cause, we<br />
see more of it in distant subjects<br />
simply because <strong>the</strong>re is more air<br />
between us and <strong>the</strong> subject.<br />
Haze degrades <strong>the</strong> image, but<br />
that’s not always a bad thing.<br />
Look back at <strong>the</strong> first picture in this<br />
chapter. The haze both enhances<br />
<strong>the</strong> feeling of distance and emphasizes<br />
<strong>the</strong> foreground subject.<br />
Still, if <strong>the</strong> background were our<br />
primary subject, we probably<br />
wouldn’t be too happy with <strong>the</strong><br />
photo. In that case, ei<strong>the</strong>r or both<br />
of two remedies might work:<br />
Use a UV filter. If ultraviolet is <strong>the</strong><br />
cause of <strong>the</strong> haze, a UV filter can<br />
make a big improvement.<br />
Shoot early in <strong>the</strong> day. In many<br />
locati<strong>on</strong>s, <strong>the</strong>re is less smoke and<br />
dust in <strong>the</strong> air earlier in <strong>the</strong> day<br />
before vehicles get <strong>on</strong> <strong>the</strong> road.<br />
In o<strong>the</strong>r locati<strong>on</strong>s, morning dew<br />
dampens <strong>the</strong> dust and keeps<br />
much of it out of <strong>the</strong> air.<br />
Sunlight 103
Architecture<br />
Usually we want <strong>the</strong> sun coming<br />
from <strong>the</strong> fr<strong>on</strong>t of <strong>the</strong> building<br />
and low enough in <strong>the</strong> sky to<br />
put light into overhangs. This<br />
means almost never shooting<br />
at no<strong>on</strong> when <strong>the</strong> sun is directly<br />
overhead. We’d prefer to shoot<br />
104<br />
<str<strong>on</strong>g>Focus</str<strong>on</strong>g> <str<strong>on</strong>g>On</str<strong>on</strong>g> <str<strong>on</strong>g>Lighting</str<strong>on</strong>g> <str<strong>on</strong>g>Photos</str<strong>on</strong>g><br />
in <strong>the</strong> morning when <strong>the</strong> air is<br />
likely to be cleaner, but we have<br />
to shoot later in <strong>the</strong> afterno<strong>on</strong>,<br />
depending <strong>on</strong> where <strong>the</strong> building<br />
faces.<br />
The “fr<strong>on</strong>t” of <strong>the</strong> building is<br />
sometimes a judgment call.<br />
What seems to be at least three<br />
buildings here is to some extent<br />
a single building with much more<br />
than a century of expansi<strong>on</strong>;<br />
what appears to be <strong>the</strong> fr<strong>on</strong>t<br />
entrance is actually a rarely used<br />
doorway. Still, it looks like a fr<strong>on</strong>t<br />
entrance, so we used it as such<br />
when we picked <strong>the</strong> time for <strong>the</strong><br />
right sun and camera positi<strong>on</strong>.
The photo above was taken in<br />
early evening and c<strong>on</strong>verted to<br />
black and white. This photographer<br />
used a 30-sec<strong>on</strong>d exposure<br />
to allow for some movement<br />
in <strong>the</strong> clouds. The star effect<br />
is a natural result of <strong>the</strong> light<br />
reflecting from <strong>the</strong> lens aperture<br />
blades. We d<strong>on</strong>’t have a lot of<br />
c<strong>on</strong>trol over when this happens<br />
or whe<strong>the</strong>r it’s a “good” or “bad”<br />
effect. Still, if we decide it’s bad,<br />
we can usually remedy it.<br />
When <strong>the</strong> effect is bad, it usually<br />
appears as flare coming from<br />
a too-bright light just outside of<br />
<strong>the</strong> camera view. We can block<br />
that with a black card (gobo) or<br />
even with a hand or hat. When<br />
we want <strong>the</strong> effect, but d<strong>on</strong>’t see<br />
it, we can add a cross-screen or<br />
star filter to <strong>the</strong> lens. Or if we do<br />
not want a very sharp picture,<br />
sometimes a piece of metal (not<br />
plastic) window screen over <strong>the</strong><br />
lens can get <strong>the</strong> same star effect,<br />
plus a bit of diffusi<strong>on</strong>.<br />
But enough of this outdoor<br />
photography! As we write it’s<br />
starting to get cold outside, so<br />
let’s move <strong>on</strong> to something we<br />
can more often do indoors:<br />
portraiture.<br />
Sunlight 105
Chapter 6: So, Where Do We Put This<br />
Light for Portraits?<br />
<strong>the</strong>re are a lot of things happening in this<br />
picture of Civil War reenactors, but n<strong>on</strong>e<br />
of those things is very difficult or complicated.<br />
Two lights and a couple of gels.<br />
We’ll start, however, by talking about a<br />
few of <strong>the</strong> simplest parts, and <strong>the</strong>n we’ll<br />
go <strong>on</strong> from <strong>the</strong>re.<br />
Learning to c<strong>on</strong>trol <strong>the</strong> light is what<br />
this book is all about, and that c<strong>on</strong>trol<br />
works with glass, metal, flowers,<br />
mountains, oceans, d<strong>on</strong>keys, and most<br />
o<strong>the</strong>r things. Still, we’ll stick with <strong>the</strong><br />
studio portrait for now. That’s because<br />
most of us can find a subject willing<br />
to cooperate. (The sunlight over <strong>the</strong><br />
mountain may not cooperate and your<br />
pet d<strong>on</strong>key certainly will not.) Also, <strong>the</strong><br />
portrait is a fairly simple subject that<br />
we can deal with in a fairly small space<br />
with our own light.<br />
We’re going to assume you have <strong>on</strong>e<br />
big light, maybe a window, maybe an<br />
external flash, plus a fill light: <strong>the</strong> little<br />
light built into your camera. We’ll also<br />
hope you sometimes have a third light.<br />
The third light doesn’t need to be an<br />
expensive electr<strong>on</strong>ic device: a large<br />
silver or white reflector indoors, <strong>the</strong> sun<br />
coming from just <strong>the</strong> right directi<strong>on</strong> to<br />
do something good al<strong>on</strong>g with your<br />
external flash.<br />
Portraiture, while challenging, can<br />
be w<strong>on</strong>derfully rewarding. There are<br />
various lighting styles to choose from.<br />
We need to learn <strong>the</strong>m all, but not<br />
all at <strong>on</strong>ce. Learn <strong>on</strong>e, master it, and<br />
move <strong>on</strong> to <strong>the</strong> next. The style we use<br />
depends <strong>on</strong> whom we are shooting<br />
for: ourselves, an art director, or <strong>the</strong><br />
subject? The approach that is right for<br />
<strong>on</strong>e may not be right for ano<strong>the</strong>r. Art<br />
directors may want <strong>the</strong> subject to look<br />
angry, silly, or meaner than all get-out.<br />
People looking for a portrait to give to<br />
<strong>the</strong>ir mo<strong>the</strong>r usually want to look pretty<br />
or handsome and sweet. A professi<strong>on</strong>al<br />
athlete may want to look as tough and<br />
nasty as possible.<br />
So, Where Do We Put This Light for Portraits?<br />
107
Regardless of which lighting style<br />
we are working with, we’ll generally<br />
need to adapt our setup a bit<br />
for each subject, based <strong>on</strong> b<strong>on</strong>e<br />
structure and skin t<strong>on</strong>e.<br />
108<br />
<str<strong>on</strong>g>Focus</str<strong>on</strong>g> <str<strong>on</strong>g>On</str<strong>on</strong>g> <str<strong>on</strong>g>Lighting</str<strong>on</strong>g> <str<strong>on</strong>g>Photos</str<strong>on</strong>g><br />
We can light a portrait any way<br />
we want. Still, <strong>the</strong>re are a few<br />
classic styles to start with, such<br />
as split, Rembrandt, butterfly,<br />
beauty, and rim/kicker. All are<br />
Use a tripod. We can<br />
make quick small<br />
adjustments to lighting<br />
or pose and not take<br />
time to reframe when<br />
we get back to<br />
<strong>the</strong> camera.<br />
good, and it’s a matter of taste<br />
as to which we use and when, as<br />
well as what <strong>the</strong> end purpose of<br />
<strong>the</strong> portrait is.
Split lighting<br />
Split or hatchet lighting involves<br />
lighting from <strong>the</strong> side of <strong>the</strong><br />
subject <strong>on</strong>ly. In <strong>the</strong> photo below,<br />
we did <strong>the</strong> same lighting setup<br />
as we did for <strong>the</strong> Sikh in profile<br />
in Chapter 1, using just our little<br />
silver reflector to bounce <strong>the</strong> light<br />
from our in-camera flash to our<br />
large white board. The difference<br />
here is that <strong>the</strong> subject is facing<br />
<strong>the</strong> camera directly. We wanted<br />
as little light to hit <strong>the</strong> shadow<br />
side as possible. If we are shooting<br />
in a really large room or<br />
a room with black walls, it will<br />
be easier to keep <strong>the</strong> shadow<br />
side dark. In this case, we hung<br />
black velvet very close to <strong>the</strong><br />
subject <strong>on</strong> <strong>the</strong> opposite side of<br />
<strong>the</strong> board to limit <strong>the</strong> light being<br />
bounced back from elsewhere<br />
in <strong>the</strong> room. If shooting in a<br />
smaller room with light walls,<br />
we’ll get automatic fill from those<br />
walls and we might have to do<br />
So, Where Do We Put This Light for Portraits? 109
postproducti<strong>on</strong> work to deepen<br />
<strong>the</strong> shadow side. This type of<br />
light brings out <strong>the</strong> texture of <strong>the</strong><br />
sculpture, which is fine for <strong>the</strong><br />
sculpture. It will do this for skin<br />
as well, and this should be taken<br />
110<br />
<str<strong>on</strong>g>Focus</str<strong>on</strong>g> <str<strong>on</strong>g>On</str<strong>on</strong>g> <str<strong>on</strong>g>Lighting</str<strong>on</strong>g> <str<strong>on</strong>g>Photos</str<strong>on</strong>g><br />
into account when using this<br />
lighting style.<br />
In this head shot, we placed <strong>the</strong><br />
off-camera flash into a softbox<br />
so we could get a rectangular<br />
catchlight in <strong>the</strong> eye (so it looks<br />
like window light) and placed it a<br />
tiny bit in fr<strong>on</strong>t of <strong>the</strong> subject so<br />
we got just a bit of light <strong>on</strong>to <strong>the</strong><br />
shadow side of <strong>the</strong> face and can<br />
see a bit of <strong>the</strong> sec<strong>on</strong>d eye.<br />
grayscaLe (BLacK-and-white)<br />
images<br />
There is no need to light<br />
differently for images intended<br />
to be grayscale (black and<br />
white) or color. We do need to<br />
be c<strong>on</strong>cerned that in grayscale<br />
some grays may blend toge<strong>the</strong>r.<br />
Photographers <strong>on</strong>ce fixed this<br />
problem with colored filters to<br />
turn different colors into different<br />
grays. Usually <strong>the</strong>re is no<br />
need for that any more: shoot<br />
RGB color. If we want <strong>the</strong> effect<br />
of a red or green filter, we just<br />
delete <strong>the</strong> o<strong>the</strong>r color channels.<br />
Same effect.
Short lighting<br />
Short lighting is where <strong>the</strong><br />
shadow side of <strong>the</strong> face is closest<br />
to <strong>the</strong> camera. The play of light<br />
and shadow brings out <strong>the</strong> shape<br />
of a face. Many photographers<br />
refer to this as Rembrandt lighting,<br />
but in reality Rembrandt<br />
lighting is a specific form of short<br />
lighting defined by <strong>the</strong> placement<br />
of <strong>the</strong> shadow so that <strong>the</strong>re is a<br />
triangle of light <strong>on</strong> <strong>the</strong> shadowed<br />
cheek. It is named after <strong>the</strong> master<br />
painter who used this style of<br />
lighting frequently in his works.<br />
In <strong>the</strong> photo below, we used<br />
our off-camera flash as our<br />
main light. It was placed to <strong>the</strong><br />
camera’s right side and slightly<br />
in fr<strong>on</strong>t of our subject with a<br />
large sheet of diffusi<strong>on</strong> material<br />
hung from a seamless stand. We<br />
used <strong>the</strong> in-camera flash as our<br />
fill light. In this case, we folded<br />
up our sheet of neutral density<br />
material several times because<br />
we wanted just a little bit of fill<br />
light. If we wanted less c<strong>on</strong>trast<br />
between <strong>the</strong> two lights, we could<br />
have just used less of our neutral<br />
density material. There isn’t a<br />
right or wr<strong>on</strong>g here, just a matter<br />
of taste. Always experiment—<br />
different faces handle <strong>the</strong> same<br />
lighting setup differently. What we<br />
like for <strong>on</strong>e, we may not like for<br />
ano<strong>the</strong>r.<br />
So, Where Do We Put This Light for Portraits? 111
Broad lighting<br />
Broad lighting is pretty much <strong>the</strong><br />
opposite of short lighting. It is<br />
when <strong>the</strong> light side of <strong>the</strong> face is<br />
closest to <strong>the</strong> camera. This tends<br />
to leave <strong>the</strong> face fairly flat with<br />
little b<strong>on</strong>e definiti<strong>on</strong>. It is good<br />
for thin, angular faces. Generally<br />
it is avoided for round faces,<br />
as it makes <strong>the</strong> face look even<br />
broader. However, this approach<br />
is worth knowing and practicing<br />
because <strong>the</strong>re are always<br />
112<br />
<str<strong>on</strong>g>Focus</str<strong>on</strong>g> <str<strong>on</strong>g>On</str<strong>on</strong>g> <str<strong>on</strong>g>Lighting</str<strong>on</strong>g> <str<strong>on</strong>g>Photos</str<strong>on</strong>g><br />
going to be times when we ei<strong>the</strong>r<br />
just need a different look or a<br />
face isn’t working well with short<br />
lighting.<br />
Sometimes <strong>the</strong>se names can<br />
be c<strong>on</strong>fusing, but it helps to<br />
think that broad lighting uses a<br />
“broad” swath of light to cross<br />
<strong>the</strong> face. Short lighting, <strong>on</strong><br />
<strong>the</strong> o<strong>the</strong>r hand, makes use of<br />
shadow and has just a little or<br />
“short” amount of light hitting<br />
<strong>the</strong> face.<br />
In <strong>the</strong> photo below, our main<br />
light, <strong>the</strong> off-camera flash, was<br />
placed <strong>on</strong> <strong>the</strong> opposite side,<br />
while <strong>the</strong> sitter is still in <strong>the</strong> same<br />
basic pose. As a result, <strong>the</strong> part<br />
of <strong>the</strong> face closest to <strong>the</strong> camera<br />
is now <strong>the</strong> more brightly lit. Our<br />
sitter has great cheekb<strong>on</strong>es, and<br />
we still get a hint of <strong>the</strong>m even<br />
with this lighting, but <strong>the</strong> face<br />
appears broader with this type of<br />
lighting.
Hair light<br />
In <strong>the</strong> photo below, a hair light<br />
is used to bring out <strong>the</strong> texture<br />
and sheen of <strong>the</strong> sitter’s hair and<br />
to separate <strong>the</strong> subject from <strong>the</strong><br />
background. Our subject has<br />
dark hair and we’ve got black<br />
velvet for a background. In all of<br />
<strong>the</strong> preceding images, some part<br />
of <strong>the</strong> hair blends into <strong>the</strong> background.<br />
Had she been bl<strong>on</strong>d,<br />
this wouldn’t have happened.<br />
Regardless of hair color, a hair<br />
light is a nice additi<strong>on</strong>.<br />
For <strong>the</strong> photo <strong>on</strong> <strong>the</strong> following<br />
page, we used <strong>the</strong> same lighting<br />
setup as we had for <strong>the</strong> Rembrandt<br />
lighting technique. We<br />
used less neutral density material<br />
<strong>on</strong> <strong>the</strong> in-camera flash, so we<br />
had gentler lighting. We used an<br />
additi<strong>on</strong>al off-camera flash for<br />
<strong>the</strong> hair light. Even if we d<strong>on</strong>’t<br />
have two off-camera flashes, this<br />
photo could be d<strong>on</strong>e if we used<br />
<strong>the</strong> sun coming through a large<br />
window as our main light. If <strong>the</strong><br />
sunlight is particularly bright,<br />
we’d like to use a sheer curtain to<br />
soften <strong>the</strong> light. If we d<strong>on</strong>’t have<br />
<strong>the</strong> big window, <strong>the</strong>n it’s time to<br />
borrow a flash from a friend!<br />
In our photo here, we used this<br />
flash with a silver umbrella, but<br />
you could also opt for a snoot<br />
or a grid. Most photographers<br />
So, Where Do We Put This Light for Portraits? 113
like to place it so that it lights <strong>the</strong><br />
shadow side of <strong>the</strong> hair (<strong>on</strong> <strong>the</strong><br />
side opposite where <strong>the</strong> main<br />
light is placed). The hair light in<br />
this case is placed behind and<br />
to <strong>the</strong> sitter’s right (camera left)<br />
high enough and at an angle to<br />
broadly light <strong>the</strong> hair.<br />
114<br />
<str<strong>on</strong>g>Focus</str<strong>on</strong>g> <str<strong>on</strong>g>On</str<strong>on</strong>g> <str<strong>on</strong>g>Lighting</str<strong>on</strong>g> <str<strong>on</strong>g>Photos</str<strong>on</strong>g><br />
Between <strong>the</strong> added fill light<br />
and <strong>the</strong> hair light, we now<br />
retain more detail in <strong>the</strong> hair,<br />
and where <strong>the</strong> hair light falls,<br />
we get a nice sheen to <strong>the</strong><br />
hair. It also adds depth to<br />
<strong>the</strong> image.<br />
D<strong>on</strong>’t<br />
automatically<br />
print <strong>the</strong><br />
full image as<br />
shot. Cropping<br />
can often<br />
streng<strong>the</strong>n an<br />
image.<br />
A boom light stand<br />
makes it easier to place<br />
<strong>the</strong> hair light, but it<br />
is not essential. D<strong>on</strong>’t<br />
use a hair light with a<br />
white background. The<br />
shiny hair disappears<br />
into <strong>the</strong> background.<br />
And d<strong>on</strong>’t use a<br />
hair light <strong>on</strong> bald<br />
subjects.
Background light<br />
Different backgrounds have an<br />
impact <strong>on</strong> <strong>the</strong> final style of <strong>the</strong><br />
portrait. While most photographers<br />
stock various shades of<br />
seamless paper, <strong>the</strong>y may <strong>on</strong>ly<br />
have <strong>on</strong>e or two painted canvas<br />
backgrounds as <strong>the</strong>y are c<strong>on</strong>siderably<br />
more expensive. Regardless<br />
of <strong>the</strong> background, by using<br />
a backlight, we can effectively<br />
c<strong>on</strong>trol how dark or light a<br />
background is.<br />
Up to this point, we’ve used<br />
ei<strong>the</strong>r black seamless or black<br />
velvet. For <strong>the</strong> photo to <strong>the</strong> left,<br />
we changed to a painted canvas<br />
background. A great many<br />
styles are available, or you can<br />
paint your own. This <strong>on</strong>e had<br />
fairly dark t<strong>on</strong>es. We wanted<br />
a more midt<strong>on</strong>e background.<br />
There are two ways to brighten a<br />
background. The first is to move<br />
<strong>the</strong> background closer to <strong>the</strong><br />
subject. Immediately, <strong>the</strong> lights<br />
we are using for <strong>the</strong> subject will<br />
also brighten <strong>the</strong> background<br />
because it is closer. If subject<br />
and background are too close,<br />
we can get shadows <strong>on</strong> <strong>the</strong><br />
background cast by <strong>the</strong> sitter.<br />
Although this can work <strong>on</strong> occasi<strong>on</strong>,<br />
we generally d<strong>on</strong>’t want this<br />
effect. We can sometimes eliminate<br />
<strong>the</strong>se distracting shadows<br />
by raising our main light so that<br />
<strong>the</strong> shadows will be cast at an<br />
angle where <strong>the</strong>y hopefully will<br />
fall behind <strong>the</strong> sitter unseen by<br />
<strong>the</strong> camera.<br />
An easier way is to use a background<br />
light. Place a flash <strong>on</strong><br />
a short light stand (or <strong>on</strong> some<br />
boxes) behind <strong>the</strong> sitter and point<br />
it at <strong>the</strong> background. Use a silver<br />
reflector and barn doors for more<br />
c<strong>on</strong>trol. The reflector will make<br />
our little light bigger, and <strong>the</strong><br />
barn doors will restrict <strong>the</strong> light<br />
so it falls off at <strong>the</strong> edges of our<br />
image. If we place <strong>the</strong>m correctly,<br />
we will see <strong>the</strong> background<br />
lighter behind <strong>the</strong> sitter and <strong>the</strong>n<br />
darker at <strong>the</strong> edges.<br />
In <strong>the</strong> image <strong>on</strong> <strong>the</strong> previous<br />
page, we’ve got four lights at<br />
work: main (key), fill, hair, and<br />
background (with four barn doors<br />
to restrict <strong>the</strong> spread of <strong>the</strong> light).<br />
This technique is doable with<br />
three lights and <strong>the</strong> sun, but it is<br />
still more than <strong>the</strong> simple lighting<br />
(two lights) we are mostly c<strong>on</strong>cerned<br />
with in this book. Something<br />
for future c<strong>on</strong>siderati<strong>on</strong>.<br />
feminine versus mascuLine<br />
In <strong>the</strong> photos <strong>on</strong> pages 111,<br />
112, and 113, our model is<br />
in <strong>the</strong> male pose. The body<br />
is turned toward <strong>the</strong> main<br />
light. The head is turned back<br />
to <strong>the</strong> camera and is in line<br />
with <strong>the</strong> spine. In <strong>the</strong> photo<br />
<strong>on</strong> page 114, our model is in<br />
<strong>the</strong> female pose. The body is<br />
turned away from <strong>the</strong> main<br />
light. The head is turned back<br />
toward <strong>the</strong> main light and<br />
tilted a little bit, creating sort<br />
of an S-shape. Women can<br />
do both male and female<br />
poses. Men should stick with<br />
<strong>the</strong> male pose. Men tend to<br />
look somewhat silly when<br />
<strong>the</strong>ir heads are tilted as in <strong>the</strong><br />
female pose.<br />
So, Where Do We Put This Light for Portraits? 115
Rim lighting/kicker<br />
Rim lighting is used to separate<br />
<strong>the</strong> subject from <strong>the</strong> background.<br />
Unlike a back (or background)<br />
light, where <strong>the</strong> light is pointed at<br />
<strong>the</strong> background, in rim lighting<br />
<strong>the</strong> light is pointed at <strong>the</strong> subject.<br />
It is placed so just a bit of light<br />
outlines <strong>the</strong> subject.<br />
The portrait below uses two<br />
off-camera flashes. The<br />
first was placed in a softbox<br />
at camera left and about<br />
45 degrees above <strong>the</strong> subject.<br />
Because of its placement to<br />
<strong>the</strong> side of <strong>the</strong> subject, we get<br />
116<br />
<str<strong>on</strong>g>Focus</str<strong>on</strong>g> <str<strong>on</strong>g>On</str<strong>on</strong>g> <str<strong>on</strong>g>Lighting</str<strong>on</strong>g> <str<strong>on</strong>g>Photos</str<strong>on</strong>g><br />
split lighting as we described<br />
earlier, but because <strong>the</strong> light<br />
was bigger and <strong>the</strong>re were light<br />
walls, <strong>the</strong> c<strong>on</strong>trast is less than as<br />
shown earlier. The sec<strong>on</strong>d flash<br />
was placed slightly behind <strong>the</strong><br />
sitter and acts as a rim light; it<br />
provides <strong>the</strong> separati<strong>on</strong> needed<br />
for <strong>the</strong> shoulder and hair from<br />
<strong>the</strong> background.<br />
Kicker lighting is what we used<br />
in <strong>the</strong> photo at <strong>the</strong> beginning of<br />
<strong>the</strong> chapter with <strong>the</strong> Civil War<br />
reenactors. Basically, a kicker is<br />
a light that comes from <strong>the</strong> side,<br />
often to give a bit of extra brightness<br />
or definiti<strong>on</strong>. This example<br />
presents a str<strong>on</strong>ger versi<strong>on</strong> of<br />
kicker lighting than is comm<strong>on</strong>ly<br />
used. We wanted a sense of<br />
light coming from a b<strong>on</strong>fire and<br />
thus used a large softbox to <strong>the</strong><br />
camera-left side of our subjects<br />
(<strong>the</strong>ir right) with a full CTO gel in<br />
fr<strong>on</strong>t of it. We had a sec<strong>on</strong>d light<br />
in a small softbox just to <strong>the</strong> right<br />
of <strong>the</strong> camera with a dark blue<br />
gel over it, quite high up and<br />
angled a bit downward toward<br />
<strong>the</strong> subjects. The photo <strong>on</strong> <strong>the</strong><br />
next page shows <strong>the</strong> image as<br />
shot. We had planned to use our<br />
smoke machine for this image,<br />
but it unexpectedly would not<br />
work. Without time to have it<br />
repaired, we let our models go<br />
home after getting <strong>the</strong> basic shot;<br />
<strong>the</strong>n we photographed cigarette<br />
smoke separately and put it into<br />
<strong>the</strong> image with postproducti<strong>on</strong><br />
work in <str<strong>on</strong>g>Photos</str<strong>on</strong>g>hop. This situati<strong>on</strong><br />
offers a good less<strong>on</strong>—<strong>on</strong>e<br />
way or <strong>the</strong> o<strong>the</strong>r, <strong>the</strong> photographer<br />
has to get <strong>the</strong> job d<strong>on</strong>e!<br />
Two lights, two gels, and a little<br />
software magic was all that we<br />
needed. Although we used two<br />
off-camera flashes in softboxes,<br />
it could have been d<strong>on</strong>e with a<br />
single off-camera flash with diffusi<strong>on</strong><br />
material and a CTO gel at<br />
<strong>the</strong> side and <strong>the</strong>n blue gel over<br />
<strong>the</strong> built-in flash. The blue light<br />
would not be positi<strong>on</strong>ed as high
as we liked, but <strong>the</strong> setup would<br />
have worked.<br />
Postproducti<strong>on</strong> work is an integral<br />
part of a photographer’s work<br />
<strong>the</strong>se days. Compare <strong>the</strong> photo<br />
below with <strong>the</strong> image at <strong>the</strong><br />
beginning of this chapter, which<br />
combines three photographs<br />
of smoke, adds some selective<br />
softening, and incorporates a<br />
small amount of vignetting. The<br />
additi<strong>on</strong>al work in postproducti<strong>on</strong><br />
makes a world of difference. In<br />
Chapter 10, we’ll discuss postproducti<strong>on</strong><br />
more.<br />
So, Where Do We Put This Light for Portraits? 117
Butterfly/Beauty lighting<br />
Butterfly lighting is where <strong>the</strong>re is<br />
<strong>on</strong>e light placed directly in fr<strong>on</strong>t<br />
of and a bit above <strong>the</strong> subject<br />
at an angle to create a shadow<br />
under <strong>the</strong> nose that is shaped<br />
like a butterfly. Depending <strong>on</strong> <strong>the</strong><br />
facial structure, we often want<br />
a bit of fill, which could be <strong>the</strong><br />
built-in flash, but a bit of foam<br />
board offers more choices as to<br />
what gets filled. In <strong>the</strong> photo at<br />
right, we used a flash with an<br />
umbrella as <strong>the</strong> sole light source.<br />
(We added <strong>the</strong> dark vignette in<br />
postproducti<strong>on</strong>.)<br />
Beauty lighting uses a larger light<br />
and a reflector or sec<strong>on</strong>d light is<br />
placed below. The goal in beauty<br />
lighting is to make most of <strong>the</strong><br />
shadows disappear.<br />
Beauty lighting is frequently used<br />
in, guess what, ads showing<br />
flawless skin for beauty products.<br />
The light is such that shadows are<br />
pretty much filled with light, leaving<br />
almost no wrinkles! <str<strong>on</strong>g>On</str<strong>on</strong>g> <strong>the</strong><br />
following page, for <strong>the</strong> image <strong>on</strong><br />
<strong>the</strong> right, we used an off-camera<br />
flash in a softbox placed above <strong>the</strong><br />
camera facing <strong>the</strong> sitter. A silver<br />
118<br />
<str<strong>on</strong>g>Focus</str<strong>on</strong>g> <str<strong>on</strong>g>On</str<strong>on</strong>g> <str<strong>on</strong>g>Lighting</str<strong>on</strong>g> <str<strong>on</strong>g>Photos</str<strong>on</strong>g><br />
reflector was placed just out of <strong>the</strong><br />
camera’s view, angled to reflect<br />
<strong>the</strong> flash above. We could have<br />
used a sec<strong>on</strong>d flash below, but for<br />
most of this book, we’re assuming<br />
you d<strong>on</strong>’t have two off-camera<br />
flashes. If we had used a sec<strong>on</strong>d<br />
flash, we would have used it with<br />
ei<strong>the</strong>r a softbox or an umbrella.<br />
You can see <strong>the</strong> difference <strong>the</strong> fill<br />
card makes by comparing it with<br />
<strong>the</strong> image <strong>on</strong> <strong>the</strong> left.
Without fill card With fill card<br />
So, Where Do We Put This Light for Portraits? 119
Low key versus high key<br />
lighting<br />
Both low key and high key lighting<br />
create lovely portraits. <str<strong>on</strong>g>On</str<strong>on</strong>g>e<br />
isn’t better than <strong>the</strong> o<strong>the</strong>r. Low<br />
key lighting tends to have a<br />
classy feel to it; high key lighting<br />
tends to be more c<strong>on</strong>temporary.<br />
The trick with ei<strong>the</strong>r is to shoot a<br />
portrait so that <strong>the</strong> face is <strong>the</strong> part<br />
<strong>the</strong> viewer looks at first. How do<br />
we achieve this? When <strong>the</strong> clothing<br />
and <strong>the</strong> background are similar,<br />
<strong>the</strong> face becomes <strong>the</strong> different<br />
part and <strong>the</strong>refore <strong>the</strong> viewer’s<br />
eye will go to <strong>the</strong> face, which is<br />
exactly what we want in a portrait.<br />
The background and <strong>the</strong> clothing<br />
d<strong>on</strong>’t have to match exactly, but<br />
<strong>the</strong>y should be approximately <strong>the</strong><br />
same brightness.<br />
If <strong>the</strong> subject is wearing dark<br />
clothing (preferably a solid color),<br />
<strong>the</strong>n opt for a dark background<br />
and low key lighting. The background<br />
can be a solid color<br />
(seamless paper), a painted<br />
canvas background (with a bit of<br />
light <strong>on</strong> it), or even a white wall<br />
120<br />
<str<strong>on</strong>g>Focus</str<strong>on</strong>g> <str<strong>on</strong>g>On</str<strong>on</strong>g> <str<strong>on</strong>g>Lighting</str<strong>on</strong>g> <str<strong>on</strong>g>Photos</str<strong>on</strong>g><br />
(assuming it is a very l<strong>on</strong>g way<br />
away from <strong>the</strong> subject, so that<br />
it receives little if any light and<br />
<strong>the</strong>refore will photograph dark<br />
gray or black). Low key portraits<br />
also tend to have less or even no<br />
fill light to take advantage of <strong>the</strong><br />
play of light and shadow.<br />
If <strong>the</strong> subject is wearing white or<br />
pastel-colored clothing (again<br />
preferably a solid color), <strong>the</strong>n<br />
opt for a white background<br />
and high key lighting. This can<br />
be white seamless or a white<br />
wall, or even black seamless<br />
with lots of light <strong>on</strong> it. High key<br />
portraits tend to use flatter lighting<br />
than low key portraits have,<br />
and <strong>the</strong>refore <strong>the</strong>y have less<br />
shadowing.<br />
The use of similar density clothing<br />
and background and <strong>the</strong><br />
amount of shadowing determine<br />
whe<strong>the</strong>r a photograph is deemed<br />
to be low or high key. These are<br />
not hard-and-fast rules but ra<strong>the</strong>r<br />
guidelines. It’s certainly possible to<br />
get lovely portraits and not follow<br />
<strong>the</strong>se suggesti<strong>on</strong>s, but <strong>the</strong>se guidelines<br />
are a good place to start.<br />
vary <strong>the</strong> camera and Lights<br />
Be sure to try different camera<br />
heights for portraiture. The<br />
same pose from a slightly<br />
higher or lower camera angle<br />
can have a dramatically different<br />
effect. Of course, as<br />
you raise or lower <strong>the</strong> camera,<br />
you may have to do <strong>the</strong> same<br />
with <strong>the</strong> face’s angle. Watch<br />
what happens to <strong>the</strong> shadows.<br />
You may also have to raise or<br />
lower your main light! Sometimes<br />
out of <strong>on</strong>e pose we can<br />
get multiple images that feel<br />
completely different.<br />
Stripes and<br />
patterns<br />
distract from<br />
<strong>the</strong> subject’s<br />
face. Have <strong>the</strong><br />
sitter wear<br />
solid colors!
Low key portraits can be quite<br />
dramatic. To a large extent, it<br />
depends <strong>on</strong> how much fill we<br />
use. Shadows define <strong>the</strong> face<br />
shape. In <strong>the</strong> photo above,<br />
we have an absolutely lovely<br />
older woman, again using <strong>the</strong><br />
off-camera flash behind some<br />
diffusi<strong>on</strong> material as our main<br />
light with our in-camera flash<br />
as fill with folded neutral density<br />
material, because we wanted very<br />
little fill at all. There is no white<br />
board or reflector. Although this<br />
style does accentuate wrinkles,<br />
sometimes <strong>the</strong>y are part of <strong>the</strong><br />
subject’s charm. How much you<br />
accentuate <strong>the</strong>m is determined by<br />
placement of <strong>the</strong> main light and<br />
how much fill you use. Because<br />
<strong>the</strong> clothing and background are<br />
dark, <strong>the</strong> viewer’s eye is drawn to<br />
<strong>the</strong> light area, namely, <strong>the</strong> face.<br />
By using very little fill light, we<br />
created a compelling portrait of<br />
some<strong>on</strong>e who has lived a rich life.<br />
Adding more fill light would have<br />
filled in those shadows that in this<br />
case we wanted to keep.<br />
Generally we want to place<br />
<strong>the</strong> main light so it skims across<br />
<strong>the</strong> face and ends at <strong>the</strong> near<br />
cheekb<strong>on</strong>e. The placement will<br />
vary from pers<strong>on</strong> to pers<strong>on</strong> based<br />
<strong>on</strong> <strong>the</strong> subject’s b<strong>on</strong>e structure.<br />
We also want it at a height so we<br />
get a good catchlight in <strong>the</strong> eyes.<br />
If <strong>the</strong> light is too high and <strong>the</strong>re<br />
is no catchlight, <strong>the</strong> pers<strong>on</strong> tends<br />
to look lifeless—not generally a<br />
goal in portraiture.<br />
Many photographers shy away from low key portraits<br />
of older subjects fearing that <strong>the</strong> subject w<strong>on</strong>’t like<br />
seeing <strong>the</strong> wrinkles. D<strong>on</strong>’t be afraid of this technique.<br />
You can create w<strong>on</strong>derful, charming images this way.<br />
So, Where Do We Put This Light for Portraits? 121
We blocked <strong>the</strong><br />
popup flash so<br />
n<strong>on</strong>e of its light<br />
strikes <strong>the</strong> subject.<br />
It was used solely<br />
to trigger <strong>the</strong> offcamera<br />
flash. We<br />
started with <strong>the</strong><br />
off-camera flash<br />
placed close to <strong>the</strong><br />
diffusi<strong>on</strong> material<br />
and almost directly<br />
to <strong>the</strong> side of<br />
<strong>the</strong> sitter. It’s<br />
essentially split<br />
lighting. Our eyes<br />
bounce back and<br />
forth between <strong>the</strong><br />
light and dark areas.<br />
The wrinkles are<br />
pr<strong>on</strong>ounced.<br />
122<br />
<str<strong>on</strong>g>Focus</str<strong>on</strong>g> <str<strong>on</strong>g>On</str<strong>on</strong>g> <str<strong>on</strong>g>Lighting</str<strong>on</strong>g> <str<strong>on</strong>g>Photos</str<strong>on</strong>g><br />
High key portraits tend to use<br />
more even lighting than low key.<br />
The effect is meant to be light<br />
and airy. They use a white or<br />
light-colored background (often<br />
seamless paper or muslin or a<br />
white wall or sheet). The sitter<br />
wears white or pastel-colored<br />
clothing. Again, this will draw <strong>the</strong><br />
viewer to <strong>the</strong> different part of <strong>the</strong><br />
image, namely, <strong>the</strong> face.<br />
In <strong>the</strong> following three photos, we<br />
show how to transiti<strong>on</strong> from hard<br />
lighting to <strong>the</strong> softer lighting we<br />
want for high key images.
We put <strong>the</strong> offcamera<br />
flash far<strong>the</strong>r<br />
away from <strong>the</strong> diffusi<strong>on</strong><br />
material and<br />
moved it so that it<br />
was at more of a<br />
45-degree angle from<br />
<strong>the</strong> sitter. This<br />
allowed <strong>the</strong> light to<br />
wrap around more<br />
of <strong>the</strong> face. We<br />
also used <strong>the</strong> built-<br />
in flash with some<br />
neutral density<br />
material in fr<strong>on</strong>t of<br />
it. The wrinkles<br />
immediately are less<br />
pr<strong>on</strong>ounced, we get<br />
better detail <strong>on</strong> <strong>the</strong><br />
shadow side of <strong>the</strong><br />
face, and we get a<br />
catchlight in both<br />
eyes instead of<br />
just <strong>on</strong>e.<br />
So, Where Do We Put This Light for Portraits? 123
124<br />
<str<strong>on</strong>g>Focus</str<strong>on</strong>g> <str<strong>on</strong>g>On</str<strong>on</strong>g> <str<strong>on</strong>g>Lighting</str<strong>on</strong>g> <str<strong>on</strong>g>Photos</str<strong>on</strong>g><br />
Here we simply<br />
took away <strong>the</strong><br />
neutral density<br />
material in fr<strong>on</strong>t of<br />
<strong>the</strong> popup, thus<br />
brightening <strong>the</strong> fill<br />
light.<br />
Clothing with<br />
l<strong>on</strong>g sleeves also<br />
helps direct <strong>the</strong><br />
eye to <strong>the</strong> face.
For high key images, we almost<br />
always use a background light in<br />
order to keep that background<br />
truly white. Without <strong>the</strong> background<br />
light, we would have<br />
to keep <strong>the</strong> background really<br />
close to <strong>the</strong> subject in order<br />
to keep <strong>the</strong> background truly<br />
white, but this increases <strong>the</strong><br />
likelihood of shadows falling <strong>on</strong><br />
<strong>the</strong> background. By raising our<br />
lights, we can often make <strong>the</strong><br />
shadow disappear behind <strong>the</strong><br />
subject, but this entails having all<br />
of our lights be off <strong>the</strong> camera.<br />
Because in this series of photos<br />
we are working with <strong>the</strong> built-in<br />
flash, which cannot be repositi<strong>on</strong>ed,<br />
we ei<strong>the</strong>r have to use a<br />
background light or settle for a<br />
gray background.<br />
When shooting images that<br />
encompass more than just head<br />
and shoulders, we will often<br />
need more than <strong>on</strong>e background<br />
light if we want more of <strong>the</strong><br />
background to stay evenly lit.<br />
Frequently, we can’t put a light<br />
directly behind <strong>the</strong> subject, but<br />
we would ra<strong>the</strong>r positi<strong>on</strong> <strong>on</strong>e<br />
or two lights <strong>on</strong> each side of<br />
<strong>the</strong> background and meter <strong>the</strong><br />
lights so we get even illuminati<strong>on</strong><br />
across <strong>the</strong> background. A<br />
general rule of thumb is to have<br />
<strong>on</strong>e to <strong>on</strong>e-and-a-half stops<br />
more light <strong>on</strong> <strong>the</strong> background<br />
than <strong>on</strong> <strong>the</strong> subject. Depending<br />
<strong>on</strong> <strong>the</strong> placement of <strong>the</strong>se<br />
lights, sometimes we will need<br />
to use gobos or barn doors to<br />
prevent <strong>the</strong> illuminati<strong>on</strong> from<br />
<strong>the</strong>se background lights from<br />
also lighting our subject, which<br />
we d<strong>on</strong>’t want.<br />
<str<strong>on</strong>g>Lighting</str<strong>on</strong>g> opti<strong>on</strong>s<br />
for kids and<br />
adults are <strong>the</strong><br />
same. How we<br />
entice expressi<strong>on</strong><br />
will differ.<br />
In <strong>the</strong> photo below, we indeed<br />
used four lights <strong>on</strong> <strong>the</strong> background<br />
(two <strong>on</strong> each side, <strong>on</strong>e<br />
fairly low and <strong>on</strong>e higher up).<br />
Because <strong>the</strong> boy is small, we<br />
were photographing him playing.<br />
He was running around<br />
and jumping, so we needed a<br />
broad expanse of evenly lit white<br />
background. We also shot from<br />
somewhat far<strong>the</strong>r back than normal<br />
to allow us to capture him<br />
wherever he was without taking<br />
<strong>the</strong> time to move <strong>the</strong> camera. In<br />
this particular image, <strong>the</strong> parent<br />
wanted us to crop in tight. However,<br />
<strong>the</strong> image works better with<br />
<strong>the</strong> additi<strong>on</strong>al room around him.<br />
We sense <strong>the</strong> space into which<br />
he is about to launch himself<br />
and we remember that he’s just a<br />
little kid.<br />
So, Where Do We Put This Light for Portraits? 125
126<br />
Light meters<br />
Do we need light meters?<br />
When set in Auto mode,<br />
today’s cameras do a great<br />
job of figuring out exposure.<br />
However, as we start to use<br />
multiple-flash techniques, a<br />
meter is really helpful. As in<br />
<strong>the</strong> portraits with <strong>the</strong> white<br />
background, we could just<br />
point <strong>the</strong> flash at <strong>the</strong> background<br />
and <strong>the</strong>n do a bunch<br />
of test shots until <strong>the</strong> lighting<br />
ratio is what we want. It is better,<br />
however, to use a meter to<br />
determine how much light is<br />
falling <strong>on</strong> <strong>the</strong> subject and <strong>the</strong>n<br />
how much is <strong>on</strong> <strong>the</strong> background.<br />
This method is much<br />
more efficient.<br />
<str<strong>on</strong>g>Focus</str<strong>on</strong>g> <str<strong>on</strong>g>On</str<strong>on</strong>g> <str<strong>on</strong>g>Lighting</str<strong>on</strong>g> <str<strong>on</strong>g>Photos</str<strong>on</strong>g><br />
With high key, watch out for flare, which<br />
is where <strong>the</strong> edges of <strong>the</strong> subject start<br />
to soften. This comes from <strong>the</strong> subject<br />
being too close to <strong>the</strong> background, <strong>the</strong><br />
light <strong>on</strong> <strong>the</strong> background being too intense,<br />
or <strong>the</strong> background light spilling <strong>on</strong>to <strong>the</strong><br />
subject. If <strong>the</strong> latter is <strong>the</strong> cause, gobos<br />
can help.<br />
No matter which style you go for, vary <strong>the</strong><br />
c<strong>on</strong>trast between your lights. No two faces<br />
react <strong>the</strong> same way. Customize for each.
The wrinkle<br />
Some people are proud of <strong>the</strong>ir<br />
time-earned wrinkles; o<strong>the</strong>rs<br />
aren’t. With both high and low<br />
key, <strong>the</strong> placement of <strong>the</strong> main<br />
light and <strong>the</strong> power of <strong>the</strong> fill light<br />
in relati<strong>on</strong> to <strong>the</strong> main will affect<br />
how <strong>the</strong> skin texture appears. The<br />
more even <strong>the</strong> two lights are, <strong>the</strong><br />
more <strong>the</strong> shadows of <strong>the</strong> wrinkles<br />
are filled in and thus appear flatter<br />
and less noticeable.<br />
Sometimes we want more dramatic<br />
lighting, but we still want to<br />
minimize <strong>the</strong> wrinkles. Soft focus<br />
filters are an opti<strong>on</strong>. There are<br />
various commercially made filters<br />
to choose from. Some will screw<br />
directly <strong>on</strong>to <strong>the</strong> lens, o<strong>the</strong>rs slip<br />
into a lens hood. Some diffuse<br />
so slightly that it is nearly impossible<br />
to tell that any softening has<br />
occurred. Some are so str<strong>on</strong>g<br />
that it almost looks like <strong>the</strong> photo<br />
is out of focus. If we are <strong>on</strong> a<br />
budget, we can make our own.<br />
A bit of clear plastic that you can<br />
hold directly in fr<strong>on</strong>t of <strong>the</strong> lens<br />
can work. Experiment with different<br />
types of plastic. Some will<br />
soften more than o<strong>the</strong>rs. Just be<br />
aware that <strong>the</strong>y diffuse <strong>the</strong> entire<br />
image.<br />
These soft focus filters work by<br />
diffusing or scattering str<strong>on</strong>g<br />
light, causing <strong>the</strong> edges to<br />
become soft. In o<strong>the</strong>r words,<br />
<strong>the</strong>se filters affect how your<br />
lighting is recorded. The effect of<br />
your lighting is changed as it is<br />
recorded by <strong>the</strong> camera. It is a<br />
matter of taste as to how much<br />
diffusi<strong>on</strong> is used. These filters can<br />
create w<strong>on</strong>derful moody images.<br />
For many photographers in this<br />
digital age, however, <strong>the</strong> fact that<br />
<strong>the</strong>y diffuse <strong>the</strong> entire image is a<br />
drawback.<br />
In <strong>the</strong> old days of film, portrait<br />
photographers would often use a<br />
tiny, tiny brush and photographic<br />
dyes to delicately outline <strong>the</strong><br />
eyeball and draw over <strong>the</strong><br />
eyelashes to sharpen up <strong>the</strong>se<br />
porti<strong>on</strong>s of <strong>the</strong> image. If <strong>the</strong> eyes<br />
appear sharp, <strong>the</strong> viewer sees <strong>the</strong><br />
photo as sharp, even if everything<br />
else is a bit soft. Today, with<br />
<strong>the</strong> focus <strong>on</strong> digital prints, we can<br />
still sharpen images by using leftover<br />
ink in our inkjet cartridges<br />
instead of photographic dyes. In<br />
truth, however, most of us today<br />
opt for using <str<strong>on</strong>g>Photos</str<strong>on</strong>g>hop’s c<strong>on</strong>siderable<br />
capabilities to selectively<br />
sharpen and blur. This gives us<br />
<strong>the</strong> best of both worlds.<br />
However, keep in mind that <strong>the</strong><br />
sitter may be taken aback when<br />
looking at really sharp images.<br />
The photographer choosing not<br />
to use a soft focus filter <strong>on</strong> older<br />
subjects will need good communicati<strong>on</strong><br />
skills when using<br />
this approach and should have<br />
samples showing before and<br />
after retouching before presenting<br />
unretouched images to <strong>the</strong><br />
subject.<br />
So, Where Do We Put This Light for Portraits? 127
Eyeglasses and lighting:<br />
Can <strong>the</strong>y get al<strong>on</strong>g?<br />
Eyeglasses have l<strong>on</strong>g been a<br />
bane to photographers. The sun<br />
or our flash gets reflected in <strong>the</strong>m<br />
and we lose important facial<br />
detail. We can’t always get rid<br />
of <strong>the</strong> entire reflecti<strong>on</strong>, but it is<br />
worth at least trying to minimize<br />
it. Regardless of whe<strong>the</strong>r <strong>the</strong> light<br />
128<br />
<str<strong>on</strong>g>Focus</str<strong>on</strong>g> <str<strong>on</strong>g>On</str<strong>on</strong>g> <str<strong>on</strong>g>Lighting</str<strong>on</strong>g> <str<strong>on</strong>g>Photos</str<strong>on</strong>g><br />
source is <strong>the</strong> sun or flash, <strong>the</strong><br />
same tips will help.<br />
The most obvious and easiest soluti<strong>on</strong><br />
to eyeglass glare is to have <strong>the</strong><br />
sitter remove <strong>the</strong> glasses (but you<br />
might have to retouch <strong>the</strong> marks<br />
from <strong>the</strong> nose pads). <str<strong>on</strong>g>On</str<strong>on</strong>g>ce in a<br />
while you get lucky and a sitter<br />
will have borrowed frames without<br />
lenses from an optometrist. Ei<strong>the</strong>r<br />
soluti<strong>on</strong> is great but not something<br />
Tip: If your subjects remove<br />
<strong>the</strong>ir glasses, speak a little louder.<br />
This doesn’t mean scream at your<br />
subject! However, people “hear”<br />
better when <strong>the</strong>y can see properly.<br />
Some of our hearing (even for<br />
those with normal hearing)<br />
is actually enhanced by some<br />
unc<strong>on</strong>scious lip-reading.<br />
you can count <strong>on</strong>. So we’ll assume<br />
people are going to keep <strong>the</strong>ir<br />
glasses <strong>on</strong>.<br />
More and more people have<br />
antiglare coating <strong>on</strong> <strong>the</strong>ir glasses<br />
<strong>the</strong>se days. Regular glasses will<br />
give us white reflecti<strong>on</strong>s. Those<br />
with <strong>the</strong> antiglare coating will<br />
give us pink or green. Ei<strong>the</strong>r way,<br />
we’d like to keep <strong>the</strong> reflecti<strong>on</strong>s<br />
to a minimum.
Antiglare-coated lenses are also subject to deteriorati<strong>on</strong> over time,<br />
which leaves <strong>the</strong> lenses spotty looking. Unfortunately, <strong>the</strong>re isn’t<br />
anything you can do. The spotting will show in <strong>the</strong> photo. No<br />
amount of cleaning will correct this problem.<br />
So, Where Do We Put This Light for Portraits? 129
In <strong>the</strong> photo <strong>on</strong> page 128, we’ve<br />
got <strong>the</strong> classic case of glare <strong>on</strong><br />
<strong>the</strong> glasses. In <strong>the</strong> photo <strong>on</strong><br />
page 129, <strong>the</strong>re is n<strong>on</strong>e. All we<br />
did was have <strong>the</strong> sitter lower her<br />
chin. This works in a great many<br />
cases. Watch out for double chins<br />
forming, though. If <strong>the</strong>y do, try<br />
having <strong>the</strong> sitter lean a little forward<br />
a little, or ask <strong>the</strong> subject to<br />
stretch his or her chin out a little<br />
bit. Often this gets rid of <strong>the</strong> double<br />
chin or at least minimizes it.<br />
If <strong>the</strong>se correcti<strong>on</strong>s d<strong>on</strong>’t work, try<br />
tipping <strong>the</strong> glasses a tiny bit so <strong>the</strong>y<br />
sit a little higher behind <strong>the</strong> ear.<br />
You can <strong>on</strong>ly tip a little bit or your<br />
130<br />
<str<strong>on</strong>g>Focus</str<strong>on</strong>g> <str<strong>on</strong>g>On</str<strong>on</strong>g> <str<strong>on</strong>g>Lighting</str<strong>on</strong>g> <str<strong>on</strong>g>Photos</str<strong>on</strong>g><br />
subject will look like a dork. Be<br />
aware that some glasses tip better<br />
than o<strong>the</strong>rs. Metal frames seem to<br />
grip better. Plastic frames tend to<br />
just slide back down. The tilt must<br />
be very slight—just enough to help<br />
with <strong>the</strong> glare; not so much that it<br />
is evident to <strong>the</strong> viewer.<br />
Ano<strong>the</strong>r opti<strong>on</strong> is to raise <strong>the</strong><br />
lights. This soluti<strong>on</strong> is generally<br />
quite successful. However, be<br />
careful not to raise <strong>the</strong> lights so<br />
much that ugly shadows start<br />
showing up under <strong>the</strong> subject’s<br />
chin. Occasi<strong>on</strong>ally a compromise<br />
is in order and a small amount<br />
of reflecti<strong>on</strong> will remain in an<br />
upper corner of <strong>the</strong> glasses.<br />
Most professi<strong>on</strong>al photographers<br />
will retouch this reflecti<strong>on</strong> out of<br />
<strong>the</strong> images that are ordered. By<br />
keeping any glare as small as<br />
possible, <strong>the</strong> retouching will be<br />
easier and faster.<br />
A last opti<strong>on</strong> is that you can<br />
also c<strong>on</strong>sider posing your subject<br />
with broad lighting. Because<br />
<strong>the</strong> body is facing away from<br />
<strong>the</strong> main light, <strong>the</strong> glasses w<strong>on</strong>’t<br />
present a problem. However,<br />
this lighting is ra<strong>the</strong>r flat <strong>on</strong> <strong>the</strong><br />
face and not always <strong>the</strong> most<br />
flattering.<br />
Transiti<strong>on</strong> lenses present an added difficulty. These lenses<br />
darken when exposed to bright light and turn into sunglasses.<br />
Unfortunately, <strong>the</strong> <strong>on</strong>ly answer is to pause <strong>the</strong> sitting periodically<br />
and have <strong>the</strong> sitter put <strong>the</strong> glasses in a pocket or purse or o<strong>the</strong>r<br />
dark place and wait for <strong>the</strong> discolorati<strong>on</strong> to go away.
Groups<br />
For a couple or a small family,<br />
we can still use lighting ra<strong>the</strong>r<br />
like we’ve d<strong>on</strong>e earlier in low key<br />
portraits. However, as <strong>the</strong> group<br />
gets larger, we’ll need to amend<br />
<strong>the</strong> lighting. If we d<strong>on</strong>’t, we’ll<br />
get an image where some of <strong>the</strong><br />
people are well lit and <strong>the</strong> o<strong>the</strong>rs<br />
are in deep shadow.<br />
In <strong>the</strong> photo <strong>on</strong> page 132, <strong>the</strong><br />
lighting is too c<strong>on</strong>trasty. With<br />
just <strong>on</strong>e light in a large umbrella<br />
(could be a window), we lose<br />
detail in <strong>the</strong> girl <strong>on</strong> <strong>the</strong> right and<br />
we’ve got intrusive shadows,<br />
particularly <strong>the</strong> shadow cast by<br />
<strong>the</strong> fa<strong>the</strong>r <strong>on</strong>to <strong>the</strong> daughter <strong>on</strong><br />
<strong>the</strong> left.<br />
In <strong>the</strong> subsequent photo <strong>on</strong> page<br />
133, we moved our light so that<br />
it was placed almost in fr<strong>on</strong>t of<br />
<strong>the</strong> group, just barely to <strong>the</strong> right<br />
of <strong>the</strong> camera. Because we were<br />
shooting in a large studio, we<br />
also placed a large piece of foam<br />
board at <strong>the</strong> left of <strong>the</strong> group.<br />
Had we been using window light,<br />
we would have had to change<br />
where <strong>the</strong> people were placed to<br />
The larger <strong>the</strong><br />
group, <strong>the</strong> more<br />
even <strong>the</strong> lighting<br />
needs to be.<br />
get <strong>the</strong> same effect. If we were<br />
shooting in a smaller room with<br />
white walls, <strong>the</strong> foam board<br />
would likely not be needed.<br />
In postproducti<strong>on</strong>, we also<br />
vignetted around <strong>the</strong> outer edges,<br />
so <strong>the</strong> focus is directed to <strong>the</strong><br />
faces and <strong>the</strong> bodies aren’t<br />
abruptly cut off.<br />
By aligning <strong>the</strong> people roughly in<br />
a line, very little depth of field is<br />
needed to keep every<strong>on</strong>e in focus,<br />
and <strong>the</strong>refore we d<strong>on</strong>’t need multiple<br />
lights or t<strong>on</strong>s of power.<br />
So, Where Do We Put This Light for Portraits? 131
132<br />
<str<strong>on</strong>g>Focus</str<strong>on</strong>g> <str<strong>on</strong>g>On</str<strong>on</strong>g> <str<strong>on</strong>g>Lighting</str<strong>on</strong>g> <str<strong>on</strong>g>Photos</str<strong>on</strong>g>
By posing <strong>the</strong> people so <strong>the</strong>y are facing slightly<br />
into <strong>the</strong> center, we can pose <strong>the</strong>m closer toge<strong>the</strong>r,<br />
<strong>the</strong>reby being able to use a smaller background. It<br />
also tends to have a slimming effect.<br />
So, Where Do We Put This Light for Portraits? 133
When photographing large<br />
groups, where some people are<br />
<strong>on</strong> <strong>the</strong> ground, some seated, and<br />
perhaps several rows of people<br />
standing (<strong>on</strong> risers or stairs), we’d<br />
prefer to shoot from a higher<br />
viewpoint. By placing <strong>the</strong> camera<br />
at <strong>the</strong> same angle as <strong>the</strong> rows of<br />
heads create (by looking at <strong>the</strong><br />
group from <strong>the</strong> side), it means<br />
134<br />
<str<strong>on</strong>g>Focus</str<strong>on</strong>g> <str<strong>on</strong>g>On</str<strong>on</strong>g> <str<strong>on</strong>g>Lighting</str<strong>on</strong>g> <str<strong>on</strong>g>Photos</str<strong>on</strong>g><br />
that we can use a fairly small<br />
f-stop (and need less lighting<br />
power) and yet all <strong>the</strong> faces will<br />
be in focus. This approach has<br />
<strong>the</strong> added benefit that all <strong>the</strong><br />
heads will be <strong>the</strong> same size. If<br />
<strong>the</strong> camera is simply pointed<br />
at a large group from standing<br />
level, <strong>the</strong> faces in <strong>the</strong> fr<strong>on</strong>t will<br />
be larger than those in <strong>the</strong> back.<br />
Hey, this makes sense because by<br />
shooting straight <strong>on</strong>, <strong>the</strong> people<br />
at <strong>the</strong> back are indeed far<strong>the</strong>r<br />
away and <strong>the</strong>refore smaller. So<br />
if you know ahead of time that<br />
you’ll be shooting a large group,<br />
be prepared to bring a ladder! If<br />
it’s a surprise to you, <strong>the</strong>n at least<br />
try to stand <strong>on</strong> a chair or find<br />
high ground.
Pets<br />
Pet portraiture can be challenging.<br />
While dogs may understand<br />
commands like “Sit!” or “Down!”<br />
<strong>the</strong>y d<strong>on</strong>’t understand, “Could<br />
you tilt your head a little to <strong>the</strong><br />
left?” (And, in truth, even welltrained<br />
dogs tend to forget <strong>the</strong>ir<br />
commands when <strong>the</strong> flash goes<br />
off.) However, most dogs still look<br />
cute even when <strong>the</strong>y aren’t sure of<br />
<strong>the</strong>ir surroundings, and most tend<br />
to get used to <strong>the</strong> flash eventually.<br />
Cats are generally tougher.<br />
Champi<strong>on</strong>ship cats that are used<br />
to handling and <strong>the</strong> hustle and<br />
bustle of shows will sit regally<br />
and patiently for <strong>the</strong>ir portrait<br />
sitting. All <strong>the</strong> rest tend to try to<br />
back into a corner or make a<br />
beeline for <strong>the</strong> most inaccessible<br />
part of <strong>the</strong> studio. They look<br />
unhappy. Photographing <strong>the</strong>m<br />
in <strong>the</strong>ir home or natural envir<strong>on</strong>ment<br />
is generally easier than in<br />
a studio.<br />
Although you can light animals<br />
just like people, it is better if you<br />
can angle a light to bring out <strong>the</strong><br />
texture of <strong>the</strong>ir fur or skin (think<br />
lizard or snake).<br />
As with any portrait, a head shot<br />
is easier than a whole-body shot.<br />
Because pers<strong>on</strong>ality comes from<br />
<strong>the</strong> face—whe<strong>the</strong>r human or<br />
animal, it’s a good place to start.<br />
Like with people, if <strong>the</strong> animal<br />
is mostly dark, use a darker<br />
background; if it’s mostly light,<br />
go with a lighter background. So<br />
many pet owners with a black<br />
dog come in wanting a white<br />
background thinking it’s <strong>the</strong> <strong>on</strong>ly<br />
Give <strong>the</strong> pet<br />
time to get to<br />
know you and to<br />
recognize that<br />
you’re not <strong>the</strong> vet.<br />
So, Where Do We Put This Light for Portraits? 135
way <strong>the</strong>y can get an image of <strong>the</strong><br />
dark fur. The reverse is <strong>the</strong> better<br />
way to go. If <strong>the</strong> pet is multicolored,<br />
<strong>the</strong>n we might opt for a<br />
medium background or pick a<br />
background color that is similar<br />
in density (darkness, not necessarily<br />
color) to <strong>the</strong> most dominant<br />
color of <strong>the</strong> pet.<br />
136<br />
<str<strong>on</strong>g>Focus</str<strong>on</strong>g> <str<strong>on</strong>g>On</str<strong>on</strong>g> <str<strong>on</strong>g>Lighting</str<strong>on</strong>g> <str<strong>on</strong>g>Photos</str<strong>on</strong>g><br />
The photo <strong>on</strong> <strong>the</strong> previous page<br />
is a classic “head-and-shoulders”<br />
portrait that just happens to be of<br />
a dog. We used a main light in<br />
a softbox, a fill light (in-camera<br />
flash), and a third flash placed to<br />
<strong>the</strong> dog’s left side (camera right).<br />
It’s this side lighting that brings<br />
out <strong>the</strong> texture in <strong>the</strong> dog’s fur.<br />
In this case, we used black seamless<br />
paper as a background.<br />
Some dogs find <strong>the</strong> surface slippery,<br />
in which case you could use<br />
black cloth. With seamless, you<br />
can just brush off any shed fur or<br />
cut off <strong>the</strong> used seamless. With<br />
material, it is obviously more<br />
work to get rid of any shed fur.
So opt for seamless, if you can.<br />
Of course, if you are just aiming<br />
to do a head-and-shoulders shot,<br />
you d<strong>on</strong>’t need to extend <strong>the</strong><br />
background under <strong>the</strong> animal<br />
and <strong>the</strong> slickness of <strong>the</strong> seamless<br />
w<strong>on</strong>’t be a c<strong>on</strong>cern.<br />
The photo with <strong>the</strong> white background<br />
<strong>on</strong> page 136 is a simple<br />
pet profile. As with <strong>the</strong> earlier pet<br />
portrait, we used a main light,<br />
<strong>the</strong> popup, and <strong>the</strong> accent light.<br />
We also had a flash <strong>on</strong> <strong>the</strong> white<br />
background. If you d<strong>on</strong>’t have<br />
<strong>the</strong> extra light, <strong>the</strong> background<br />
simply w<strong>on</strong>’t be as bright, but<br />
that would be okay.<br />
Having <strong>the</strong> pet owner in <strong>the</strong> room<br />
with you is generally very helpful.<br />
First of all, it tends to calm <strong>the</strong><br />
animal. The owner can help<br />
place <strong>the</strong> pet where you want it<br />
and to keep <strong>the</strong> pet <strong>the</strong>re. In this<br />
particular case, <strong>the</strong> owner was<br />
standing in fr<strong>on</strong>t of <strong>the</strong> dog and<br />
getting ready to give <strong>the</strong> dog a<br />
treat. The dog naturally looked up,<br />
and <strong>the</strong> photo was captured with<br />
<strong>the</strong> eyes engaged and <strong>the</strong> tilt of<br />
<strong>the</strong> head that gives <strong>the</strong> image life.<br />
It’s a good idea to crop more<br />
loosely in <strong>the</strong> camera when<br />
shooting animals. Even <strong>the</strong><br />
So, Where Do We Put This Light for Portraits? 137
est-behaved pets rarely sit as<br />
still as people do. This way, if <strong>the</strong><br />
pet moves, which is likely, <strong>the</strong><br />
pet’s tail or ear w<strong>on</strong>’t be out of<br />
<strong>the</strong> frame. Plan <strong>on</strong> cropping <strong>the</strong><br />
photograph in postproducti<strong>on</strong>, if<br />
warranted.<br />
In <strong>the</strong> image <strong>on</strong> page 137, we<br />
have a photo of <strong>the</strong> dog’s entire<br />
body. We wanted to capture <strong>the</strong><br />
liveliness of <strong>the</strong> puppy. We left<br />
138<br />
<str<strong>on</strong>g>Focus</str<strong>on</strong>g> <str<strong>on</strong>g>On</str<strong>on</strong>g> <str<strong>on</strong>g>Lighting</str<strong>on</strong>g> <str<strong>on</strong>g>Photos</str<strong>on</strong>g><br />
a lot of room in <strong>the</strong> frame. We<br />
knew this dog wasn’t going to sit<br />
still. We had <strong>the</strong> owner rub <strong>the</strong><br />
puppy’s belly and <strong>the</strong>n pull <strong>the</strong><br />
hand away. We had no way of<br />
knowing exactly how <strong>the</strong> puppy<br />
would move. The lighting had to<br />
cover enough space to allow for<br />
this movement and still keep <strong>the</strong><br />
dog well lit, wherever he went.<br />
We also had to have enough<br />
light to get enough depth of field<br />
to keep <strong>the</strong> body in focus and<br />
still shoot at a short exposure in<br />
order to freeze <strong>the</strong> moti<strong>on</strong>.<br />
<str<strong>on</strong>g>On</str<strong>on</strong>g>ce <strong>the</strong> favorite photo was<br />
selected, we cropped <strong>the</strong> image<br />
and <strong>the</strong>n did some postproducti<strong>on</strong><br />
work in <str<strong>on</strong>g>Photos</str<strong>on</strong>g>hop to burn<br />
(darken) <strong>the</strong> edges to focus<br />
<strong>the</strong> attenti<strong>on</strong> <strong>on</strong> <strong>the</strong> dog. Viewers<br />
of this photo often think <strong>the</strong>
overhead lighting was d<strong>on</strong>e<br />
with a snoot, but it wasn’t. The<br />
flash was combined with a silver<br />
umbrella. As you can see in <strong>the</strong><br />
photo <strong>on</strong> <strong>the</strong> facing page, which<br />
is <strong>the</strong> image as shot, without <strong>the</strong><br />
edge burning, <strong>the</strong> light was not<br />
nearly so c<strong>on</strong>centrated.<br />
Ah, cats. Delightful little buggers.<br />
Handsome, sleek, mysterious, but<br />
not known for <strong>the</strong>ir cooperati<strong>on</strong>.<br />
Working in a studio, you want to<br />
try to c<strong>on</strong>fine <strong>the</strong> space available<br />
to <strong>the</strong>m. As we indicated earlier,<br />
<strong>the</strong>y are much easier to photograph<br />
in <strong>the</strong>ir own envir<strong>on</strong>ment.<br />
Ei<strong>the</strong>r way, <strong>the</strong> lighting approach<br />
is <strong>the</strong> same, except that if you<br />
are in <strong>the</strong> home, you can make<br />
use of existing light (assuming<br />
your studio doesn’t have a lot of<br />
natural light streaming in). If you<br />
missed it, return to Chapter 5<br />
for an example of using just<br />
daylight and a fill card to photograph<br />
a cat.<br />
If you’re asked to<br />
photograph a snake, ask<br />
<strong>the</strong> owner not to feed it<br />
just before <strong>the</strong> sitting. It<br />
will just sleep. Tame goats<br />
are hard to find. Ferrets<br />
are great fun, but, boy, are<br />
<strong>the</strong>y fast. So are mice.<br />
You’ll need a lot of<br />
patience with <strong>the</strong>se<br />
guys.<br />
So, Where Do We Put This Light for Portraits? 139
140<br />
<str<strong>on</strong>g>Focus</str<strong>on</strong>g> <str<strong>on</strong>g>On</str<strong>on</strong>g> <str<strong>on</strong>g>Lighting</str<strong>on</strong>g> <str<strong>on</strong>g>Photos</str<strong>on</strong>g>
Chapter 7: So, Where Do We Put<br />
This Light for Metal?<br />
Oh, nO! Metal! It’s really hard to shoot,<br />
right? It’s reflective. It shines. It gets ugly<br />
highlights. The surprising news is that it<br />
can be easy to shoot, and we d<strong>on</strong>’t need<br />
elaborate equipment to get <strong>the</strong> photos<br />
right.<br />
It’s important to understand that<br />
almost anything reflects light in two<br />
dramatically different ways, and a<br />
good photographer must understand<br />
both of <strong>the</strong>m.<br />
Diffuse reflecti<strong>on</strong> means light coming<br />
from <strong>on</strong>e directi<strong>on</strong> reflects equally in<br />
all directi<strong>on</strong>s. Nothing produces perfect<br />
diffuse reflecti<strong>on</strong>, but ordinary n<strong>on</strong>glossy<br />
white paper comes pretty close. Take<br />
a piece of paper right now and turn<br />
it in different directi<strong>on</strong>s. Under many<br />
lighting c<strong>on</strong>diti<strong>on</strong>s you will see that <strong>the</strong><br />
brightness of <strong>the</strong> paper changes very<br />
little as you change <strong>the</strong> angle.<br />
Bright metal produces almost nothing<br />
but direct reflecti<strong>on</strong>. Direct reflecti<strong>on</strong><br />
happens in <strong>on</strong>ly <strong>on</strong>e directi<strong>on</strong>, and that<br />
directi<strong>on</strong> is <strong>the</strong> opposite of <strong>the</strong> angle at<br />
which <strong>the</strong> light strikes it. Now pick up a<br />
piece of flat, bright, unpainted metal.<br />
(You may have to go to <strong>the</strong> kitchen<br />
and find a metal spatula or tear off a<br />
piece of aluminum foil.) Turn that metal<br />
just as you did <strong>the</strong> paper. Depending<br />
<strong>on</strong> <strong>the</strong> room lighting, you may see <strong>the</strong><br />
metal turn from completely bright to<br />
completely black with a slight turn in<br />
angle. Even if <strong>the</strong> lighting in your kitchen<br />
does not produce <strong>the</strong> dramatic effect we<br />
describe here, you will certainly see a<br />
substantial difference.<br />
So, Where Do We Put This Light for Metal?<br />
141
Direct reflecti<strong>on</strong> means that <strong>the</strong><br />
light reflects from <strong>the</strong> surface<br />
at exactly <strong>the</strong> same angle, but<br />
in <strong>the</strong> opposite directi<strong>on</strong> from<br />
wherever <strong>the</strong> light comes. That<br />
means that we can <strong>on</strong>ly see <strong>the</strong><br />
light from <strong>on</strong>e directi<strong>on</strong>; we have<br />
to look at <strong>the</strong> subject from exactly<br />
<strong>the</strong> proper angle. If we d<strong>on</strong>’t<br />
want to move <strong>the</strong> camera to that<br />
angle, <strong>the</strong>n we have to move <strong>the</strong><br />
light to make that angle. If <strong>the</strong><br />
angles d<strong>on</strong>’t line up, we can light<br />
<strong>the</strong> metal with 40,000 gazilli<strong>on</strong><br />
watt-sec<strong>on</strong>ds (or joules, for most<br />
of you n<strong>on</strong>-Americans), and<br />
<strong>the</strong> metal will still be absolutely<br />
black.<br />
In fact, without capitalizing <strong>on</strong> <strong>the</strong><br />
proper angles, that metal will stay<br />
black until we give it enough light<br />
to heat it until it glows <strong>on</strong> its own.<br />
That w<strong>on</strong>’t happen though; we’ll<br />
be running to call <strong>the</strong> firefighters<br />
l<strong>on</strong>g before that.<br />
So we put <strong>the</strong> light in <strong>the</strong> right<br />
place so that it reflects brightly<br />
from <strong>the</strong> metal to <strong>the</strong> camera,<br />
and God says, “Let <strong>the</strong>re be<br />
light,” and certainly, <strong>the</strong>re is light.<br />
Fur<strong>the</strong>rmore, <strong>the</strong> light may be<br />
surprisingly bright, even with a<br />
very tiny, very low-power flash.<br />
D<strong>on</strong>e deal? No, not yet. So far<br />
we’ve <strong>on</strong>ly lit <strong>the</strong> metal from <strong>on</strong>e<br />
142<br />
<str<strong>on</strong>g>Focus</str<strong>on</strong>g> <str<strong>on</strong>g>On</str<strong>on</strong>g> <str<strong>on</strong>g>Lighting</str<strong>on</strong>g> <str<strong>on</strong>g>Photos</str<strong>on</strong>g><br />
angle. That’s fine if <strong>the</strong> metal<br />
is microscopically small, but<br />
most metal is bigger than that.<br />
It doesn’t just reflect light from<br />
<strong>on</strong>e angle but from a family of<br />
angles. Each point <strong>on</strong> <strong>the</strong> metal<br />
needs to be lit from a different<br />
place if we want <strong>the</strong> metal to be<br />
uniformly bright all over. Usually<br />
we d<strong>on</strong>’t want <strong>the</strong> metal to be<br />
uniformly bright; instead we want<br />
some dark areas to define <strong>the</strong><br />
We do wish some<strong>on</strong>e would<br />
come up with a shorter, more<br />
elegant term for “family of<br />
angles.” Still, no <strong>on</strong>e has since<br />
<strong>on</strong>e of your co-authors, Fil,<br />
invented <strong>the</strong> term a few decades<br />
ago. It’s now used in physics,<br />
astr<strong>on</strong>omy, and even chemistry.<br />
Come <strong>on</strong>, people, think up<br />
a simpler word! Any<br />
language will do, but we<br />
hope it transliterates<br />
reas<strong>on</strong>ably into English.<br />
shape. Still, we want our bright<br />
area to be pretty big.<br />
Polished metal produces mostly<br />
unpolarized direct reflecti<strong>on</strong>. You<br />
can quickly see where <strong>the</strong> problems<br />
are. The real decisi<strong>on</strong> is to<br />
determine how bright you want<br />
<strong>the</strong> metal to be. For <strong>the</strong> most<br />
part, you will want it to be bright<br />
with some texture, but that is an<br />
individual decisi<strong>on</strong>.
The first step is to figure out<br />
where <strong>the</strong> family of angles is.<br />
Because direct reflecti<strong>on</strong> <strong>on</strong>ly<br />
occurs within a small family of<br />
angles, <strong>the</strong> choice of where to put<br />
<strong>the</strong> light is limited. This actually<br />
makes it easier for <strong>the</strong> photographer<br />
to get it right quickly. The<br />
placement of <strong>the</strong> light and <strong>the</strong><br />
camera in relati<strong>on</strong> to <strong>the</strong> metal is<br />
automatically limited. If you want<br />
a specific camera viewpoint, <strong>the</strong>n<br />
as you’ll see, <strong>the</strong> light placement<br />
is fairly predetermined.<br />
Start by placing your diffusi<strong>on</strong><br />
material behind <strong>the</strong> subject. Point<br />
a simple test light (it could be a<br />
flashlight) at <strong>the</strong> metal from <strong>the</strong><br />
camera positi<strong>on</strong>. You’d like <strong>the</strong><br />
light source to be narrow enough<br />
to illuminate <strong>the</strong> metal and not<br />
<strong>the</strong> surrounding elements. Point<br />
it to <strong>the</strong> porti<strong>on</strong> of <strong>the</strong> metal that<br />
you want to light and note where<br />
<strong>the</strong> light is bounced back to your<br />
diffusi<strong>on</strong> material. If your light<br />
source is small, you may need to<br />
point to <strong>the</strong> top part first; note<br />
where it reflects back <strong>on</strong>to <strong>the</strong><br />
diffusi<strong>on</strong> material. Then move<br />
to <strong>the</strong> bottom and do <strong>the</strong> same.<br />
Assuming you want bright metal,<br />
your main light will have to be<br />
placed so it completely fills this<br />
family of angles. If it doesn’t, you<br />
will ei<strong>the</strong>r get dark or uneven<br />
lighting. If you are aiming for<br />
dark metal, your light has to be<br />
placed outside of <strong>the</strong> family of<br />
angles. Simple as that.<br />
D<strong>on</strong>’t fear metal!<br />
It’s actually pretty<br />
straightforward.<br />
So, Where Do We Put This Light for Metal? 143
Flat metal<br />
The image below was lit with <strong>the</strong><br />
off-camera flash behind <strong>the</strong> saw<br />
without diffusi<strong>on</strong>. The in-camera<br />
flash was used as fill. The handle<br />
is okay, but <strong>the</strong> blade is very<br />
dark. The shadows are big<br />
and sharply defined. Not very<br />
good, is it?<br />
In <strong>the</strong> image at top left <strong>on</strong> <strong>the</strong><br />
facing page, we put a white<br />
reflector to <strong>the</strong> left of <strong>the</strong> saw,<br />
which brightens both <strong>the</strong> blade<br />
and <strong>the</strong> shadows, but <strong>the</strong> blade<br />
still isn’t <strong>the</strong> shiny metal we<br />
expect.<br />
144<br />
<str<strong>on</strong>g>Focus</str<strong>on</strong>g> <str<strong>on</strong>g>On</str<strong>on</strong>g> <str<strong>on</strong>g>Lighting</str<strong>on</strong>g> <str<strong>on</strong>g>Photos</str<strong>on</strong>g><br />
In <strong>the</strong> photo top right (page 145),<br />
we added a framed diffuser<br />
between <strong>the</strong> saw and <strong>the</strong> offcamera<br />
(main light) flash. It was<br />
almost vertical but angled slightly<br />
toward <strong>the</strong> saw. The metal is<br />
starting to get brighter. Progress!<br />
Although <strong>the</strong>re are times when we<br />
want <strong>the</strong> light to fall off, this isn’t<br />
<strong>on</strong>e of <strong>the</strong>m. We need to make<br />
our main light source bigger if we<br />
want <strong>the</strong> metal to be c<strong>on</strong>sistently<br />
bright. We’ve already been using<br />
diffusi<strong>on</strong> material, so what’s<br />
wr<strong>on</strong>g? We need to angle <strong>the</strong><br />
diffusi<strong>on</strong> sheet <strong>on</strong> a steeper angle<br />
so that <strong>the</strong> top of <strong>the</strong> framed<br />
diffuser is just barely outside <strong>the</strong><br />
camera’s view. By doing so, we<br />
are now lighting all <strong>the</strong> metal’s<br />
family of angles so <strong>the</strong> blade<br />
will now be bright. There was no<br />
change in <strong>the</strong> light’s positi<strong>on</strong> in<br />
this case. The image bottom left<br />
(page 145) shows <strong>the</strong> result of<br />
this steeper angle.<br />
The blade now is bright (but not<br />
white) and still has detail. We<br />
could stop here. However, in <strong>the</strong><br />
photo bottom right (page 145),
So, Where Do We Put This Light for Metal? 145
we went ahead and put back <strong>the</strong><br />
reflectors we used earlier. This<br />
softens <strong>the</strong> shadows even more<br />
and we get more detail <strong>the</strong>re as<br />
well. The shadows are also less<br />
distracting.<br />
Now compare <strong>the</strong> photo at<br />
<strong>the</strong> bottom right <strong>on</strong> page 145<br />
with <strong>the</strong> image at <strong>the</strong> beginning<br />
of <strong>the</strong> chapter. They are<br />
almost identical. However, we<br />
146<br />
<str<strong>on</strong>g>Focus</str<strong>on</strong>g> <str<strong>on</strong>g>On</str<strong>on</strong>g> <str<strong>on</strong>g>Lighting</str<strong>on</strong>g> <str<strong>on</strong>g>Photos</str<strong>on</strong>g><br />
opted to put a gobo between<br />
<strong>the</strong> diffusi<strong>on</strong> material and <strong>the</strong><br />
saw. In this case, <strong>the</strong> gobo was<br />
black mat board cut as wide as<br />
what was seen in <strong>the</strong> camera<br />
and <strong>on</strong>ly a couple of inches high.<br />
It blocks hardly any light at all,<br />
but by using it we got a bit more<br />
definiti<strong>on</strong> of <strong>the</strong> shape of <strong>the</strong><br />
handle at its upper edge. It’s a<br />
small point.<br />
Use a l<strong>on</strong>g lens<br />
when possible.<br />
You’ll have more<br />
flexibility in light<br />
placement.<br />
Moving your light closer makes it a bigger light<br />
source. It makes <strong>the</strong> background brighter, but<br />
it w<strong>on</strong>’t affect <strong>the</strong> brightness of <strong>the</strong> metal.<br />
In reverse, move <strong>the</strong> light far<strong>the</strong>r away, and <strong>the</strong><br />
background will get darker with no change in <strong>the</strong><br />
brightness of <strong>the</strong> metal. Neat, huh?
Round metal<br />
Just as with flat metal, we are<br />
going to need a large light<br />
source to handle round metal.<br />
Because it is round, <strong>the</strong> angles<br />
of reflecti<strong>on</strong> are increased. So<br />
We started with an offcamera<br />
flash with no<br />
diffusi<strong>on</strong> at camera right<br />
(main light) and deflected <strong>the</strong><br />
in-camera flash so n<strong>on</strong>e of<br />
its light struck <strong>the</strong> subject<br />
but merely triggered <strong>the</strong> offcamera<br />
flash. Result? Ugly<br />
shadows and metal.<br />
our placement of light needs<br />
to change. We’ll start with little<br />
lights and <strong>the</strong>n turn <strong>the</strong>m into<br />
larger lights, step by step. The<br />
difference in <strong>the</strong> light quality<br />
really shows up with a shiny,<br />
brushed-metal peppermill. It’s<br />
not a new <strong>on</strong>e, as you’ll see in<br />
<strong>the</strong> early shots. Although it’s<br />
clean, it’s clearly used. By <strong>the</strong><br />
time we get to using big lights,<br />
those flaws are g<strong>on</strong>e!<br />
We removed <strong>the</strong> board blocking<br />
<strong>the</strong> in-camera flash and allowed<br />
it to be a fill light. No neutral<br />
density material was used in<br />
fr<strong>on</strong>t of <strong>the</strong> fill light. The<br />
shadows improve, but <strong>the</strong><br />
metal is worse. We’ve now got<br />
a truly ugly highlight in <strong>the</strong><br />
middle of <strong>the</strong> peppermill.<br />
So, Where Do We Put This Light for Metal? 147
148<br />
<str<strong>on</strong>g>Focus</str<strong>on</strong>g> <str<strong>on</strong>g>On</str<strong>on</strong>g> <str<strong>on</strong>g>Lighting</str<strong>on</strong>g> <str<strong>on</strong>g>Photos</str<strong>on</strong>g><br />
Two changes here. We added a white<br />
reflector at camera left and put<br />
some neutral density material in fr<strong>on</strong>t<br />
of <strong>the</strong> fill light. The peppermill is<br />
now shiny metal <strong>on</strong> <strong>on</strong>e side and <strong>the</strong><br />
ugly highlight in <strong>the</strong> middle is also<br />
improved.<br />
We added diffusi<strong>on</strong> material in fr<strong>on</strong>t<br />
of <strong>the</strong> off-camera flash. This simple<br />
act gets us a large light source. The<br />
highlights <strong>on</strong> <strong>the</strong> vegetables are softer<br />
and more pleasing. The peppermill<br />
now has a fully rounded shape and<br />
brightness <strong>on</strong> both sides. Note, too,<br />
<strong>the</strong> change in <strong>the</strong> shadows, especially<br />
<strong>on</strong> <strong>the</strong> flowerpot.
a Last touch<br />
We could have stopped at<br />
<strong>the</strong> previous image, but by<br />
attaching a small piece of white<br />
board to a dowel (clamped to<br />
a light stand) and angling it to<br />
reflect in <strong>the</strong> top of <strong>the</strong> peppermill,<br />
we are able to brighten<br />
<strong>the</strong> top of <strong>the</strong> peppermill and<br />
give it more definiti<strong>on</strong> as well.<br />
When using a reflector, get in <strong>the</strong> habit of<br />
clamping it to an angle ir<strong>on</strong> or light stand when<br />
possible. If you d<strong>on</strong>’t, <strong>the</strong> reflector can fall<br />
over and move items that have been carefully<br />
placed or, worse, damage items.<br />
So, Where Do We Put This Light for Metal? 149
glass is generally c<strong>on</strong>sidered hard to<br />
shoot. How do you capture an image of<br />
something that is transparent?<br />
In truth, glass is more challenging than<br />
metal. Light travels through <strong>the</strong> glass<br />
and isn’t reflected back to <strong>the</strong> viewer<br />
(camera). At <strong>the</strong> same time, it will have<br />
unwanted reflecti<strong>on</strong>s of its surroundings.<br />
Like metal, most of <strong>the</strong> reflecti<strong>on</strong>s are<br />
indeed direct reflecti<strong>on</strong>s. However,<br />
with glass <strong>the</strong> reflecti<strong>on</strong>s can also be<br />
polarized. The photographer needs to<br />
pay attenti<strong>on</strong> to <strong>the</strong> edges, which will<br />
Chapter 8: So, Where Do We<br />
Put This Light for Glass?<br />
With practice, you can enjoy<br />
photographing glass!<br />
give <strong>the</strong> glass form. The rest is not of<br />
much c<strong>on</strong>cern.<br />
When <strong>the</strong> light strikes a visible edge<br />
of glass, it is not reflected back to <strong>the</strong><br />
viewer (camera). Hence, it disappears.<br />
We need large reflecti<strong>on</strong>s, distinct<br />
enough that <strong>the</strong> viewer can discern<br />
<strong>the</strong> shape of <strong>the</strong> glass clearly. For this<br />
to occur, we need <strong>the</strong> reflecti<strong>on</strong>s to be<br />
different from <strong>the</strong> background. The<br />
choices are dark-field or bright-field<br />
lighting.<br />
So, Where Do We Put This Light for Glass?<br />
151
Dark-field lighting<br />
Dark-field lighting is where<br />
<strong>the</strong>re is a dark background and<br />
<strong>the</strong>refore glass needs bright lines<br />
to outline <strong>the</strong> shape of <strong>the</strong> glass<br />
with no o<strong>the</strong>r distracting light at<br />
any o<strong>the</strong>r point. These bright outlines<br />
tell us where <strong>the</strong> glass starts<br />
and stops.<br />
The good news is you d<strong>on</strong>’t need<br />
a lot of lights, nor even big <strong>on</strong>es,<br />
to make good photographs of<br />
glass. Well, actually you do need<br />
at least <strong>on</strong>e large light, but by now<br />
152<br />
<str<strong>on</strong>g>Focus</str<strong>on</strong>g> <str<strong>on</strong>g>On</str<strong>on</strong>g> <str<strong>on</strong>g>Lighting</str<strong>on</strong>g> <str<strong>on</strong>g>Photos</str<strong>on</strong>g><br />
you know you can create a big<br />
light out of your off-camera flash!<br />
Place your main light (your offcamera<br />
flash) behind and above<br />
<strong>the</strong> glass. You can ei<strong>the</strong>r aim <strong>the</strong><br />
off-camera flash at a white wall<br />
behind <strong>the</strong> glass or point <strong>the</strong> light<br />
toward <strong>the</strong> glass but with a diffusi<strong>on</strong><br />
sheet between <strong>the</strong> flash and<br />
<strong>the</strong> glass. Ei<strong>the</strong>r way, you now<br />
have a large light source, critical<br />
to doing this type of photograph.<br />
Next place a dark card (gobo)<br />
between <strong>the</strong> main light and <strong>the</strong><br />
glass. This card needs to be<br />
smaller than <strong>the</strong> light source. If<br />
you are shooting at <strong>the</strong> white wall,<br />
you can clamp <strong>the</strong> card behind<br />
<strong>the</strong> light to a light stand. If you<br />
are shooting through diffusi<strong>on</strong>,<br />
you can attach <strong>the</strong> board to <strong>the</strong><br />
diffusi<strong>on</strong> material directly, or again<br />
clamp it to a light stand. (If you<br />
d<strong>on</strong>’t have an extra light stand, you<br />
could hang <strong>the</strong> card from above<br />
with string.) The exact size of <strong>the</strong><br />
black background isn’t critical. It<br />
simply has to be small enough that<br />
sufficient light gets around it.<br />
Glass <strong>on</strong> black Plexiglas with black<br />
seamless behind <strong>the</strong> glass. This<br />
image was lit by using undiffused<br />
off-camera flash (camera right) and<br />
undiffused in-camera flash as fill.<br />
Not very good, is it?
Positi<strong>on</strong> <strong>the</strong> camera so <strong>the</strong><br />
viewfinder is exactly filled by <strong>the</strong><br />
background. This is important. If<br />
<strong>the</strong> background extends bey<strong>on</strong>d<br />
what <strong>the</strong> camera is seeing, it will<br />
block <strong>the</strong> very light that will give<br />
definiti<strong>on</strong> to <strong>the</strong> edges of <strong>the</strong><br />
glass.<br />
At this point you can move <strong>the</strong><br />
glass to <strong>the</strong> point you prefer. You’ll<br />
get sharper edges as you move<br />
<strong>the</strong> glass closer to <strong>the</strong> camera.<br />
In <strong>the</strong> image below, <strong>the</strong> glass now<br />
has simple, elegant definiti<strong>on</strong>.<br />
We got rid of<br />
<strong>the</strong> shadow by<br />
replacing <strong>the</strong> black<br />
seamless with<br />
black velvet. (You<br />
could also just<br />
move <strong>the</strong> seamless<br />
far<strong>the</strong>r back, if<br />
you have <strong>the</strong> room.)<br />
Unfortunately, all<br />
<strong>the</strong> o<strong>the</strong>r problems<br />
remain.<br />
Clean glass meticulously.<br />
Any smudges, fingerprints,<br />
or watermarks will show<br />
up and have to be retouched<br />
afterward! So to avoid<br />
retouching, clean,<br />
clean, clean.<br />
So, Where Do We Put This Light for Glass? 153
Bright-field lighting<br />
Bright-field lighting is, as you<br />
would expect, where you have a<br />
bright background and <strong>the</strong> glass<br />
<strong>the</strong>refore needs dark outlines to<br />
provide shape to <strong>the</strong> glass.<br />
Set up a light-colored background.<br />
This could be diffusi<strong>on</strong><br />
material, light seamless, a<br />
shower curtain, tracing paper,<br />
cloth, or a white card or wall).<br />
Place a light so that it lights<br />
<strong>the</strong> background evenly. If you<br />
are using translucent material,<br />
you will place <strong>the</strong> light behind<br />
<strong>the</strong> background and point it<br />
154<br />
<str<strong>on</strong>g>Focus</str<strong>on</strong>g> <str<strong>on</strong>g>On</str<strong>on</strong>g> <str<strong>on</strong>g>Lighting</str<strong>on</strong>g> <str<strong>on</strong>g>Photos</str<strong>on</strong>g><br />
toward <strong>the</strong> glass. If you are<br />
using opaque material, you will<br />
point <strong>the</strong> light at <strong>the</strong> background<br />
and let <strong>the</strong> light bounce back to<br />
<strong>the</strong> glass. If you use this latter<br />
approach, you need to be careful<br />
where you put <strong>the</strong> light so that it<br />
does not reflect in <strong>the</strong> glass!<br />
Set up <strong>the</strong> camera so that <strong>the</strong><br />
viewfinder is exactly filled by <strong>the</strong><br />
background. If <strong>the</strong> lit background<br />
is too big, you can make it right<br />
by adding black cards to each<br />
side so you get <strong>the</strong> viewfinder<br />
filled correctly—no more, no less.<br />
If you are using a white card, as<br />
opposed to a large white wall,<br />
and <strong>the</strong> field is too big, you could<br />
use a smaller card.<br />
You can now move <strong>the</strong> glass forward<br />
and back until it is <strong>the</strong> size<br />
you want. As you bring <strong>the</strong> glass<br />
closer, <strong>the</strong> edges will be more<br />
defined because less light will be<br />
reflected <strong>on</strong> it.<br />
So how do we fix <strong>the</strong> truly ugly<br />
image below? We need to both<br />
brighten <strong>the</strong> glass and get dark<br />
outlines. Because we used white<br />
diffusi<strong>on</strong> material as a background,<br />
attach black cards<br />
directly to <strong>the</strong> material. (If <strong>the</strong><br />
background were a white wall,<br />
Glass is placed <strong>on</strong> white Plexiglas,<br />
but you could use any light-colored<br />
background. Behind <strong>the</strong> glass is<br />
white diffusi<strong>on</strong> material, but it<br />
could just as well be a white<br />
wall. Photographed with just <strong>the</strong><br />
in-camera flash (with no neutral<br />
density material), we get a glass with<br />
no definiti<strong>on</strong> and we’ve got <strong>on</strong>e really<br />
ugly shadow.
we could have hung <strong>the</strong>m with<br />
string or attached <strong>the</strong>m to light<br />
stands.) The placement of <strong>the</strong>se<br />
black cards is important.<br />
Because we have diffusi<strong>on</strong><br />
material behind <strong>the</strong> glass, we<br />
next place our off-camera flash<br />
behind <strong>the</strong> diffusi<strong>on</strong> material. If<br />
you are using a white wall, point<br />
your light at <strong>the</strong> wall instead. You<br />
will need to use a boom in order<br />
to get <strong>the</strong> light placed correctly<br />
in this case, because if it is <strong>on</strong><br />
a light stand behind <strong>the</strong> glass,<br />
it will show in <strong>the</strong> photograph.<br />
Because we are using <strong>the</strong> diffusi<strong>on</strong><br />
sheet, <strong>the</strong> light is hidden and<br />
we can use a light stand easily.<br />
Place <strong>the</strong> camera so <strong>the</strong> background<br />
exactly fills <strong>the</strong> camera’s<br />
field of view. If background area<br />
(<strong>the</strong> lighted part) is too large, we<br />
Glass with offcamera<br />
flash behind<br />
diffusi<strong>on</strong> material<br />
and pointed at<br />
glass. An in-camera<br />
flash was used<br />
without neutral<br />
density material.<br />
Black cards were<br />
used to limit<br />
<strong>the</strong> size of <strong>the</strong><br />
background. This<br />
setup improved<br />
glass definiti<strong>on</strong> and<br />
brightness.<br />
can use black cards to reduce<br />
its size.<br />
In <strong>the</strong> image below, we now<br />
add <strong>the</strong> off-camera flash behind<br />
<strong>the</strong> diffusi<strong>on</strong> sheet. This causes<br />
substantial improvement. There<br />
are, however, still distracting<br />
small highlights from <strong>the</strong> undiffused<br />
popup flash.<br />
LittLe things matter<br />
In <strong>the</strong> photo <strong>on</strong> <strong>the</strong> left <strong>on</strong><br />
page 156, we added neutral<br />
density material in fr<strong>on</strong>t of <strong>the</strong><br />
in-camera flash. By diffusing<br />
this light and dimming it, we<br />
got rid of <strong>the</strong> distracting little<br />
speckles of light seen in <strong>the</strong><br />
photo at left. Because our black<br />
boards were carefully placed,<br />
we have good edge definiti<strong>on</strong><br />
while keeping <strong>the</strong> glass bright.<br />
For comparis<strong>on</strong>, note how<br />
<strong>the</strong> edges change when <strong>the</strong><br />
black cards are placed too far<br />
apart in <strong>the</strong> photo <strong>on</strong> <strong>the</strong> right<br />
(page 156). The edges lose<br />
<strong>the</strong>ir detail, especially at <strong>the</strong><br />
rim and <strong>the</strong> base of <strong>the</strong> glass.<br />
So bring <strong>the</strong> cards in closer as<br />
we did in <strong>the</strong> previous photograph<br />
or use a smaller white<br />
board, if you’re using that<br />
instead of diffusi<strong>on</strong> material.<br />
So, Where Do We Put This Light for Glass? 155
156<br />
<str<strong>on</strong>g>Focus</str<strong>on</strong>g> <str<strong>on</strong>g>On</str<strong>on</strong>g> <str<strong>on</strong>g>Lighting</str<strong>on</strong>g> <str<strong>on</strong>g>Photos</str<strong>on</strong>g><br />
Here <strong>the</strong> black<br />
boards were moved<br />
so <strong>the</strong> background<br />
was bigger. We<br />
lose <strong>the</strong> good edge<br />
definiti<strong>on</strong>.
A glass half full<br />
Interesting things happen when<br />
you add liquid to a glass. By<br />
adding liquid, <strong>the</strong> glass takes <strong>on</strong><br />
qualities of a lens. It starts to see<br />
things around it and <strong>the</strong> liquid<br />
allows <strong>the</strong>se things to become<br />
visible. In <strong>the</strong> photo below, we<br />
have a small white board behind<br />
<strong>the</strong> glass. It is far enough away<br />
that we can have <strong>the</strong> off-camera<br />
flash light <strong>the</strong> board. We used<br />
barn doors to block <strong>the</strong> light from<br />
<strong>the</strong> flash from lighting <strong>the</strong> glass.<br />
The liquid is acting as a lens and<br />
showing us <strong>the</strong> surroundings even<br />
though <strong>the</strong>re is a white board behind<br />
<strong>the</strong> glass that is big enough to fill <strong>the</strong><br />
viewfinder with white from edge to edge.<br />
The board is just big enough<br />
that when we look through <strong>the</strong><br />
viewfinder, we see white all<br />
around <strong>the</strong> glass, but just barely.<br />
Even though we have a board<br />
that fills <strong>the</strong> viewfinder, <strong>the</strong> liquid<br />
is seeing <strong>the</strong> room around it.<br />
<strong>the</strong> fix<br />
We might be inclined to simply<br />
use a bigger white board.<br />
That will certainly do, but <strong>the</strong><br />
edges of <strong>the</strong> glass will be not<br />
as well defined as we’d like.<br />
The better soluti<strong>on</strong> is to keep<br />
<strong>the</strong> small board but move <strong>the</strong><br />
camera closer and, if necessary,<br />
change to a shorter lens to get<br />
a comparably sized image. This<br />
way <strong>the</strong> background fills <strong>the</strong><br />
liquid porti<strong>on</strong> of <strong>the</strong> glass more<br />
pleasingly and retains good<br />
edge definiti<strong>on</strong>. In <strong>the</strong> photo<br />
<strong>on</strong> page 158, we switched to<br />
a shorter lens and moved <strong>the</strong><br />
camera to get a similar positi<strong>on</strong><br />
as in <strong>the</strong> photo <strong>on</strong> this page.<br />
So, Where Do We Put This Light for Glass? 157
158<br />
With <strong>the</strong> use of <strong>the</strong> shorter lens, <strong>the</strong>re will be some<br />
distorti<strong>on</strong>. Look at <strong>the</strong> top of <strong>the</strong> wineglass in both<br />
images of this glass. The shape of <strong>the</strong> lip is deeper in<br />
<strong>the</strong> short lens versi<strong>on</strong>. This is rarely a problem.<br />
Glass and paper<br />
At this point, we’ve learned that<br />
we need diffused light more<br />
often than not. So we’ll start this<br />
<str<strong>on</strong>g>Focus</str<strong>on</strong>g> <str<strong>on</strong>g>On</str<strong>on</strong>g> <str<strong>on</strong>g>Lighting</str<strong>on</strong>g> <str<strong>on</strong>g>Photos</str<strong>on</strong>g><br />
exercise using diffusi<strong>on</strong> material<br />
between <strong>the</strong> main light and<br />
<strong>the</strong> bottle, placed to <strong>the</strong> right of<br />
<strong>the</strong> bottle. Our challenge here<br />
is to get good lighting <strong>on</strong> <strong>the</strong><br />
glass bottle but also retain good<br />
definiti<strong>on</strong> in <strong>the</strong> paper label.
Bottle lit with off-camera<br />
flash through diffusi<strong>on</strong><br />
material. In-camera flash is<br />
used with neutral density<br />
material. We get a soft<br />
highlight <strong>on</strong> <strong>the</strong> bottle, but<br />
<strong>the</strong> label is too dark <strong>on</strong> <strong>on</strong>e<br />
side and too light <strong>on</strong> <strong>the</strong> o<strong>the</strong>r.<br />
By adding a white reflector to<br />
<strong>the</strong> left of <strong>the</strong> bottle, we’ve<br />
improved <strong>the</strong> left side of <strong>the</strong><br />
label and added dimensi<strong>on</strong> to<br />
<strong>the</strong> wine bottle. The right side<br />
of <strong>the</strong> bottle is okay, but <strong>the</strong><br />
label still lacks definiti<strong>on</strong>.<br />
So, Where Do We Put This Light for Glass? 159
Bottles and more<br />
The final image in this chapter<br />
will incorporate a bottle, a glass<br />
with wine, grapes, and an old<br />
wooden corkscrew. We need to<br />
keep <strong>the</strong> bottle and glass transparent<br />
while retaining definiti<strong>on</strong><br />
of <strong>the</strong> glass, <strong>the</strong> label’s legibility,<br />
and avoiding unwanted glare <strong>on</strong><br />
<strong>the</strong> corkscrew.<br />
160<br />
goBo to <strong>the</strong> rescue<br />
The final element is to add a<br />
gobo (black card) to <strong>the</strong> right<br />
of <strong>the</strong> label. It needs to be just<br />
tall and wide enough to block<br />
some of <strong>the</strong> light from <strong>the</strong> offcamera<br />
flash so that <strong>the</strong> label<br />
is now legible and both sides<br />
are evenly lit. We sacrifice<br />
some of <strong>the</strong> highlight <strong>on</strong> <strong>the</strong><br />
bottle, but this is acceptable,<br />
as we still have a highlight and<br />
shape to <strong>the</strong> bottle.<br />
<str<strong>on</strong>g>Focus</str<strong>on</strong>g> <str<strong>on</strong>g>On</str<strong>on</strong>g> <str<strong>on</strong>g>Lighting</str<strong>on</strong>g> <str<strong>on</strong>g>Photos</str<strong>on</strong>g><br />
Although we can do this with just<br />
two lights, this is <strong>on</strong>e of those times<br />
where we’d prefer to have a few<br />
more. So if you can, rent or borrow<br />
two more lights and stands.<br />
Our background is white seamless<br />
paper. The main light (offcamera)<br />
flash is placed to <strong>the</strong><br />
right of <strong>the</strong> bottle. In <strong>the</strong> photo<br />
<strong>on</strong> page 161, we omitted any<br />
diffusi<strong>on</strong> material between <strong>the</strong><br />
off-camera flash and <strong>the</strong> setup.<br />
We are using enough neutral<br />
density filtering <strong>on</strong> <strong>the</strong> popup<br />
flash to balance <strong>the</strong> light pleasingly.<br />
We know from <strong>the</strong> previous<br />
series of photographs that<br />
a reflector is likely to be helpful,<br />
so we’ve included it here to <strong>the</strong><br />
left of <strong>the</strong> setup. You can see
it reflected in <strong>the</strong> bottle. In this<br />
case, we also have an overhead<br />
light <strong>on</strong> a boom behind <strong>the</strong><br />
subjects, which is aiming at <strong>the</strong><br />
subjects, and we have a single<br />
light <strong>on</strong> <strong>the</strong> background (camera<br />
right), lighting fairly evenly but<br />
allowing a little drop-off at <strong>the</strong><br />
far (left) side. (If we wanted an<br />
evenly lit background, we could<br />
have placed <strong>the</strong> background light<br />
<strong>on</strong> an additi<strong>on</strong>al boom or we<br />
could have used an additi<strong>on</strong>al<br />
background light <strong>on</strong> <strong>the</strong> left.)<br />
In <strong>the</strong> photo at left <strong>on</strong> page 162,<br />
we added diffusi<strong>on</strong> material<br />
between <strong>the</strong> main light and <strong>the</strong><br />
setup. We get a better highlight<br />
<strong>on</strong> <strong>the</strong> bottle. In <strong>the</strong> photo at right<br />
(page 162), we moved <strong>the</strong> offcamera<br />
flash far<strong>the</strong>r away from<br />
<strong>the</strong> diffusi<strong>on</strong> material. As a result,<br />
we get a larger and softer-edged<br />
highlight <strong>on</strong> <strong>the</strong> bottle. Assuming<br />
we have a flash with adjustable<br />
power, we will want to up <strong>the</strong><br />
power a little to compensate for<br />
<strong>the</strong> light being far<strong>the</strong>r away. If<br />
your flash has <strong>on</strong>ly <strong>on</strong>e power,<br />
you’ll need to lessen <strong>the</strong> amount<br />
of neutral density material <strong>on</strong> <strong>the</strong><br />
<strong>on</strong>-camera flash to keep <strong>the</strong> light<br />
nicely balanced. You may <strong>the</strong>n<br />
need to amend your f-stop to<br />
maintain good exposure.<br />
Without diffusi<strong>on</strong><br />
material, <strong>the</strong> highlights <strong>on</strong><br />
<strong>the</strong> bottle are too small<br />
to give us a good sense of<br />
<strong>the</strong> bottle’s shape.<br />
So, Where Do We Put This Light for Glass? 161
So far, so good. But we’re missing<br />
something hugely important<br />
here, and that’s what we mean<br />
by diffusi<strong>on</strong>. Diffused light means<br />
<strong>the</strong> photographer scatters <strong>the</strong><br />
light into many different directi<strong>on</strong>s<br />
at <strong>on</strong>ce. Diffused reflecti<strong>on</strong><br />
means that <strong>the</strong> subject reflects <strong>the</strong><br />
light in many directi<strong>on</strong>s. Imagine<br />
n<strong>on</strong>glossy white paper. Diffused<br />
light means that <strong>the</strong> light strikes<br />
<strong>the</strong> subject from many directi<strong>on</strong>s.<br />
162<br />
<str<strong>on</strong>g>Focus</str<strong>on</strong>g> <str<strong>on</strong>g>On</str<strong>on</strong>g> <str<strong>on</strong>g>Lighting</str<strong>on</strong>g> <str<strong>on</strong>g>Photos</str<strong>on</strong>g><br />
Diffused lights are always big<br />
lights, at least compared to <strong>the</strong><br />
size of <strong>the</strong> subject. Putting a piece<br />
of translucent plastic over our<br />
flash diffuses it a little. Hanging a<br />
large piece of <strong>the</strong> same material<br />
a few feet in fr<strong>on</strong>t of <strong>the</strong> light diffuses<br />
it much more. As far as <strong>the</strong><br />
subject can see, <strong>the</strong> big diffusi<strong>on</strong><br />
sheet is <strong>the</strong> light, not our tiny little<br />
flash.<br />
Light pLacement matters<br />
As we’ve seen, placing <strong>the</strong><br />
main light far<strong>the</strong>r away from<br />
<strong>the</strong> diffusi<strong>on</strong> material makes<br />
a more pleasing highlight<br />
<strong>on</strong> <strong>the</strong> bottle. But raising <strong>the</strong><br />
light a bit gives us a highlight<br />
that runs <strong>the</strong> length of <strong>the</strong><br />
bottle instead of in bits. It’s<br />
a very small change but an<br />
important <strong>on</strong>e.
This page intenti<strong>on</strong>ally left blank
Okay, We Want to shoot a picture of<br />
something that isn’t holding still. Sometimes<br />
we want to freeze everything. To<br />
do that, we can just use a really fast<br />
shutter speed. We have to compensate<br />
for <strong>the</strong> faster shutter speed ei<strong>the</strong>r by<br />
opening up our f-stop or by increasing<br />
our ISO. Often, though, we want to<br />
capture some (or a lot!) of that moti<strong>on</strong>.<br />
A bit of moti<strong>on</strong><br />
In <strong>the</strong> image at left <strong>on</strong> page 166 is a clearcut<br />
example of <strong>the</strong> sec<strong>on</strong>d case. Who would<br />
ever want to photograph fireworks without<br />
moti<strong>on</strong>? The <strong>on</strong>ly piece of equipment we need<br />
bey<strong>on</strong>d <strong>the</strong> camera is a tripod. (Okay, some<br />
Chapter 9: Moti<strong>on</strong><br />
photographers are better than o<strong>the</strong>rs at leaning<br />
<strong>on</strong> something static and holding acceptably<br />
still, but “acceptably” is subjective—better<br />
photographers are tougher judges <strong>on</strong> what is<br />
acceptable.) The <strong>on</strong>ly light was provided by <strong>the</strong><br />
fireworks and <strong>the</strong> jetty lights. There is no <strong>on</strong>e<br />
right exposure setting for this type of image.<br />
You’ll have to experiment with <strong>the</strong> shutter<br />
speed and <strong>the</strong> f-stop to get <strong>the</strong> exposure right<br />
and freeze <strong>the</strong> fireworks as much as suits you.<br />
In <strong>the</strong> photo of <strong>the</strong> dancer (page 166),<br />
we have a dancer jumping. In this case,<br />
<strong>the</strong> photographer used white seamless as<br />
a background. A flash was camera right.<br />
No reflector or additi<strong>on</strong>al light was used.<br />
Despite all <strong>the</strong> times we usually try to lighten,<br />
soften, or minimize a shadow, sometimes it<br />
can be an active part of <strong>the</strong> image.<br />
Moti<strong>on</strong><br />
165
166<br />
<str<strong>on</strong>g>Focus</str<strong>on</strong>g> <str<strong>on</strong>g>On</str<strong>on</strong>g> <str<strong>on</strong>g>Lighting</str<strong>on</strong>g> <str<strong>on</strong>g>Photos</str<strong>on</strong>g><br />
Quartz-haLogen<br />
Quartz-halogen lights are good tools for photographers who often shoot<br />
moti<strong>on</strong>. They have ordinary tungsten filaments, but <strong>the</strong> glass has some<br />
quartz, unlike ordinary silic<strong>on</strong>-based glass. The inside of <strong>the</strong> lamp is<br />
filled with an inert halogen gas, which keeps <strong>the</strong> filament from oxidizing<br />
(burning up!). They typically produce about 60% to 70% more light than<br />
ordinary tungsten lights of <strong>the</strong> same wattage. Usually more expensive<br />
than ordinary household tungsten, but much less expensive than flash,<br />
<strong>the</strong>se c<strong>on</strong>tinuous lights are always <strong>on</strong>. The fact that <strong>the</strong>y d<strong>on</strong>’t flash<br />
allows seeing moti<strong>on</strong> over whatever exposure time we choose.
Lots of moti<strong>on</strong><br />
Sometimes we actually want a lot<br />
of moti<strong>on</strong>. In <strong>the</strong> photo below,<br />
we wanted a photograph that<br />
c<strong>on</strong>veyed activity. To accomplish<br />
this, we need a c<strong>on</strong>tinuous<br />
light source—could be sunlight,<br />
quartz-halogen, or a house<br />
lamp with a tungsten bulb. You’ll<br />
have to set your camera to a<br />
l<strong>on</strong>ger exposure. How l<strong>on</strong>g? That<br />
depends <strong>on</strong> <strong>the</strong> brightness of <strong>the</strong><br />
light source and <strong>the</strong> speed of <strong>the</strong><br />
tungsten<br />
As we write this, we have little<br />
predicti<strong>on</strong> of <strong>the</strong> future of tungsten<br />
lighting. Existing laws will<br />
prohibit manufacture within<br />
a few years in <strong>the</strong> United<br />
States, but <strong>the</strong> definiti<strong>on</strong> of<br />
“few years” could be modified.<br />
O<strong>the</strong>r countries have laws<br />
that d<strong>on</strong>’t specifically prohibit<br />
tungsten but prescribe energyefficiency<br />
standards. Can<br />
tungsten lighting be improved<br />
to meet those standards? We<br />
d<strong>on</strong>’t know. Whatever happens,<br />
<strong>the</strong>re are good alternatives<br />
to tungsten, but <strong>the</strong>y may be<br />
more expensive or may offer<br />
inferior color. When we say<br />
“tungsten,” adapt your thinking<br />
to whatever is available when<br />
and where you read this.<br />
moti<strong>on</strong>. For a ballroom dancer,<br />
we may decide that 1 ⁄30 sec<strong>on</strong>d<br />
is too short; for a bullet emerging<br />
from a pistol barrel, 1 ⁄1000 of a<br />
sec<strong>on</strong>d is way too l<strong>on</strong>g. The trick<br />
is to get your timing down for<br />
when you fire your flash. (Note: If<br />
you’re using a house lamp, you’ll<br />
probably need several for a shot<br />
encompassing this much space.)<br />
The room had very little ambient<br />
light. We set up a hot light<br />
at camera left. Our off-camera<br />
flash was placed behind <strong>the</strong> loom<br />
pretty much directly in fr<strong>on</strong>t of<br />
<strong>the</strong> camera. The flash was high<br />
enough and angled so it lit <strong>the</strong><br />
foreground. Our in-camera flash<br />
was covered with a bit of neutral<br />
density material. We attached<br />
a cable release to <strong>the</strong> camera<br />
and a homemade trigger to <strong>the</strong><br />
off-camera flash (l<strong>on</strong>g enough<br />
to reach from <strong>the</strong> flash to <strong>the</strong><br />
photographer). We locked open<br />
<strong>the</strong> shutter with <strong>the</strong> cable release,<br />
letting <strong>the</strong> moti<strong>on</strong> be recorded,<br />
and triggered <strong>the</strong> flash when we<br />
thought <strong>the</strong> hands were in <strong>the</strong><br />
right place; <strong>the</strong>n we unlocked<br />
<strong>the</strong> cable release to end <strong>the</strong><br />
exposure.<br />
Moti<strong>on</strong> 167
A homemade flash trigger. We make <strong>on</strong>e from whatever c<strong>on</strong>nector<br />
fits <strong>the</strong> flash; <strong>the</strong> o<strong>the</strong>r end is a piece of plastic tubing (from<br />
a hardware store) fitted with any sort of push butt<strong>on</strong> switch<br />
that fits (from an electr<strong>on</strong>ics supply store or maybe a hardware<br />
store). This allows us to manually trigger <strong>the</strong> flash at any point<br />
during <strong>the</strong> overall exposure, which is especially good if we’re<br />
musicians or video gamers with quick hands!<br />
168<br />
<str<strong>on</strong>g>Focus</str<strong>on</strong>g> <str<strong>on</strong>g>On</str<strong>on</strong>g> <str<strong>on</strong>g>Lighting</str<strong>on</strong>g> <str<strong>on</strong>g>Photos</str<strong>on</strong>g>
In <strong>the</strong> images <strong>on</strong> this and <strong>the</strong><br />
next page, we approached a<br />
moti<strong>on</strong> shot somewhat differently.<br />
In this case, we simply<br />
wanted hands moving through<br />
space. We had a black seamless<br />
background set up a l<strong>on</strong>g,<br />
l<strong>on</strong>g way from where <strong>the</strong> sitter<br />
and our lights were. We wanted<br />
<strong>the</strong> background to be absolutely<br />
black. (If we d<strong>on</strong>’t have a space<br />
big enough to allow this, we can<br />
change <strong>the</strong> background to black<br />
velvet.)<br />
We again had a c<strong>on</strong>tinuous<br />
tungsten light source. We had a<br />
flash positi<strong>on</strong>ed to <strong>the</strong> side so it<br />
would hit <strong>the</strong> hand not straight<br />
<strong>on</strong>, <strong>the</strong>reby giving shape to <strong>the</strong><br />
hand. No o<strong>the</strong>r lights were <strong>on</strong><br />
in <strong>the</strong> room except for <strong>the</strong> <strong>on</strong>e<br />
tungsten light source. The flash<br />
was attached to a synch cord<br />
but not attached to <strong>the</strong> camera.<br />
With <strong>the</strong> camera <strong>on</strong> a tripod,<br />
we locked <strong>the</strong> camera lens open<br />
using a cable release, told <strong>the</strong><br />
subject to move his hand, and<br />
<strong>the</strong>n triggered <strong>the</strong> flash by putting<br />
a straightened-out paper clip<br />
into <strong>the</strong> synch cord. In this case,<br />
we wanted <strong>the</strong> moti<strong>on</strong> to come<br />
first and finish with <strong>the</strong> hand in<br />
<strong>the</strong> gesture we were aiming to<br />
capture. Up<strong>on</strong> firing <strong>the</strong> flash, we<br />
unlocked <strong>the</strong> cable release and<br />
<strong>the</strong> image was captured.<br />
Admittedly, <strong>the</strong> photographer<br />
often wishes he or she had a<br />
few more hands to complete this<br />
process. It takes a bit of practice,<br />
but it actually isn’t too hard.<br />
Some photographers will get<br />
a friend (assistant) to help out<br />
by having <strong>the</strong> friend handle <strong>the</strong><br />
locking and unlocking of <strong>the</strong> lens.<br />
The photographer will always<br />
retain <strong>the</strong> decisi<strong>on</strong> of when to fire<br />
<strong>the</strong> flash. But <strong>the</strong> truth is, you can<br />
do this by yourself. The harder<br />
part is to get <strong>the</strong> timing of <strong>the</strong><br />
flash correct.<br />
Moti<strong>on</strong> 169
These photos are of a pianist<br />
known for his lightning fast<br />
fingers and particular hand<br />
gestures. He wore black clothing.<br />
We also covered his upper arm in<br />
black velvet to be sure <strong>the</strong> hands<br />
would float in space.<br />
We shot lots of versi<strong>on</strong>s, with<br />
different hand gestures, and in<br />
170<br />
<str<strong>on</strong>g>Focus</str<strong>on</strong>g> <str<strong>on</strong>g>On</str<strong>on</strong>g> <str<strong>on</strong>g>Lighting</str<strong>on</strong>g> <str<strong>on</strong>g>Photos</str<strong>on</strong>g><br />
each case we had to do our best<br />
to time <strong>the</strong> firing of <strong>the</strong> flash at<br />
<strong>the</strong> end point of <strong>the</strong> moti<strong>on</strong> to<br />
get <strong>the</strong> fingers where we wanted<br />
<strong>the</strong>m. (If you want to hear what<br />
<strong>the</strong>se hands can do, go to<br />
joshuarich.com!)<br />
manuaL triggering without<br />
any speciaL eQuipment<br />
Need to manually trigger <strong>the</strong><br />
flash? D<strong>on</strong>’t have a specially<br />
made external trigger? Use<br />
<strong>the</strong> simplest synch cord <strong>the</strong><br />
flash allows (ideally <strong>on</strong>ly two<br />
terminals). Unplug <strong>the</strong> camera<br />
end of <strong>the</strong> cable and stick in<br />
a bent paper clip when you<br />
want <strong>the</strong> flash. This is safe for<br />
simple camera-to-strobe c<strong>on</strong>necti<strong>on</strong>s,<br />
because we use very<br />
low-voltage signals to protect<br />
<strong>the</strong> shutter. It is not safe for<br />
o<strong>the</strong>r higher-voltage electrical<br />
circuits.<br />
<str<strong>on</strong>g>On</str<strong>on</strong>g>e warning, though: if we<br />
have a complex flash cable,<br />
we may not know which two<br />
terminals make <strong>the</strong> trigger<br />
circuit. C<strong>on</strong>ceivably, we could<br />
damage <strong>the</strong> flash by c<strong>on</strong>necting<br />
<strong>the</strong> wr<strong>on</strong>g terminals, even<br />
though we stand no chance<br />
of damaging ourselves. That’s<br />
why we suggest a simple synch<br />
cord with <strong>on</strong>ly two terminals<br />
for this procedure. Most flashes<br />
will accept such a cord.
Freezing moti<strong>on</strong><br />
We can shoot this photo of a strawberry<br />
splash manually. Musicians<br />
and athletes are probably better at<br />
this. Galileo, a professi<strong>on</strong>al-caliber<br />
musician, sang to time his gravitati<strong>on</strong>al<br />
accelerati<strong>on</strong> experiments.<br />
Every sprinter knows <strong>the</strong> rhythm<br />
of <strong>the</strong> start count beginning with<br />
“<strong>on</strong> your mark.” Paul Fuqua, <strong>on</strong>e<br />
of Fil’s co-authors <strong>on</strong> Light—<br />
Science & Magic, and Fil, <strong>on</strong>e of<br />
<strong>the</strong> co-authors of this book, <strong>on</strong>ce<br />
captured a bullet emerging from<br />
a pistol with a “<strong>on</strong>e, two, three”<br />
count. Any<strong>on</strong>e can do this without<br />
any new equipment. Still, if we<br />
have a special interest in freezing<br />
moti<strong>on</strong> and want to do this over<br />
and over, electr<strong>on</strong>ic devices are<br />
more reliable. We’ll talk about<br />
<strong>the</strong> more reliable, electr<strong>on</strong>ic way<br />
because that’s <strong>the</strong> way this picture<br />
was d<strong>on</strong>e, but be assured that<br />
we can do <strong>the</strong> same thing with<br />
simple equipment—plus a lot more<br />
patience.<br />
The image at right is not an easy<br />
<strong>on</strong>e to capture. Think of this as<br />
inspirati<strong>on</strong>. High-speed photography<br />
of this sort requires patience,<br />
and in this case a willingness to<br />
do some cleaning up afterward!<br />
Although it is possible to shoot<br />
this without additi<strong>on</strong>al equipment,<br />
we’d be relying <strong>on</strong> a lot of luck.<br />
Moti<strong>on</strong> 171
This picture uses two external<br />
flashes. Even though we’re trying<br />
to use <strong>on</strong>ly <strong>on</strong>e flash in this book,<br />
<strong>the</strong> picture is interesting enough<br />
that we want to talk about it. If<br />
<strong>the</strong> photographer had <strong>on</strong>ly <strong>on</strong>e<br />
flash, he could have also made a<br />
good picture with <strong>on</strong>ly <strong>on</strong>e flash<br />
<strong>on</strong> <strong>the</strong> subject, leaving <strong>the</strong> background<br />
black.<br />
Here <strong>the</strong> photographer used an<br />
electr<strong>on</strong>ically c<strong>on</strong>trolled triggering<br />
system to fire <strong>the</strong> flash. There<br />
are different systems to trigger<br />
<strong>the</strong> flash based <strong>on</strong> light to detect<br />
moti<strong>on</strong> or sound. The moti<strong>on</strong><br />
of <strong>the</strong> strawberry crossing an<br />
infrared beam triggers <strong>the</strong> flash.<br />
The room needs to be completely<br />
dark. It takes a little experimentati<strong>on</strong><br />
to determine where <strong>the</strong><br />
transmitter and receiver need to<br />
be placed, as well as <strong>the</strong> flash.<br />
The spo<strong>on</strong> was taped to a clamp.<br />
The photographer put a red<br />
seamless background behind<br />
it. A flash with a red gel was<br />
pointed at <strong>the</strong> background. The<br />
background is far enough away<br />
from <strong>the</strong> spo<strong>on</strong> that it remains<br />
somewhat dark. The flash with<br />
172<br />
<str<strong>on</strong>g>Focus</str<strong>on</strong>g> <str<strong>on</strong>g>On</str<strong>on</strong>g> <str<strong>on</strong>g>Lighting</str<strong>on</strong>g> <str<strong>on</strong>g>Photos</str<strong>on</strong>g><br />
<strong>the</strong> gel will brighten <strong>on</strong>ly <strong>the</strong> part<br />
of <strong>the</strong> background just behind<br />
<strong>the</strong> spo<strong>on</strong>.<br />
A sec<strong>on</strong>d flash was placed <strong>on</strong><br />
a light stand camera left, with a<br />
grid to restrict <strong>the</strong> light to just <strong>the</strong><br />
spo<strong>on</strong>. Several test shots were<br />
needed with <strong>the</strong> strawberry just<br />
resting <strong>on</strong> <strong>the</strong> spo<strong>on</strong> to determine<br />
exposure. In this case, <strong>the</strong><br />
distance from <strong>the</strong> beam to <strong>the</strong><br />
spo<strong>on</strong> was 9 inches.<br />
The shutter was set to bulb. A<br />
wired cable release was used to<br />
do some test shots. (Here you can<br />
use a small flashlight to see what<br />
you’re doing.) It will take some<br />
experimentati<strong>on</strong> with <strong>the</strong> time<br />
delay <strong>on</strong> <strong>the</strong> triggering device to<br />
get <strong>the</strong> timing right. We’re talking<br />
millisec<strong>on</strong>ds here! <str<strong>on</strong>g>On</str<strong>on</strong>g>ce we have<br />
<strong>the</strong> timing right, we’re good to<br />
go.<br />
After putting some cream into<br />
<strong>the</strong> spo<strong>on</strong> and locking <strong>the</strong> shutter<br />
open, <strong>the</strong> photographer dropped<br />
<strong>the</strong> strawberry. As <strong>the</strong> strawberry<br />
broke <strong>the</strong> infrared beam, it triggered<br />
<strong>the</strong> flash and <strong>the</strong> photographer<br />
immediately closed <strong>the</strong><br />
shutter.<br />
what is bulb?<br />
Bulb is completely manual<br />
c<strong>on</strong>trol of how l<strong>on</strong>g <strong>the</strong> shutter<br />
is open. The word <strong>on</strong>ce meant<br />
squeezing a rubber bulb to<br />
open and close <strong>the</strong> shutter,<br />
and, a hundred years ago,<br />
practiced photographers<br />
got pretty accurate shutter<br />
speeds this way. Today’s<br />
photographers with amazingly<br />
accurate electr<strong>on</strong>ic shutters<br />
still use this manual c<strong>on</strong>trol for<br />
l<strong>on</strong>ger shutter speeds.<br />
An event like this happens so<br />
quickly that <strong>the</strong>re’s no way to<br />
immediately know if we have <strong>the</strong><br />
shot we want. We have to look at<br />
<strong>the</strong> image and, almost always,<br />
shoot again. The pattern of <strong>the</strong><br />
splashing cream is random, and<br />
it may take two shots or a hundred<br />
to get it right. In this case,<br />
<strong>the</strong> photographer dropped <strong>the</strong><br />
strawberry by hand, in darkness,<br />
and frequently missed <strong>the</strong> spo<strong>on</strong><br />
entirely! The great thing is that<br />
we no l<strong>on</strong>ger have to wait for <strong>the</strong><br />
film to come back from <strong>the</strong> lab to<br />
find out when <strong>the</strong> picture is good.
Setup for <strong>the</strong><br />
image of <strong>the</strong><br />
strawberry dropping<br />
into cream. Note<br />
<strong>the</strong> plastic over<br />
<strong>the</strong> camera, always<br />
a good idea when<br />
photographing in<br />
bad wea<strong>the</strong>r or<br />
when liquids are<br />
splashing nearby.<br />
If you do<br />
photos like<br />
this <strong>on</strong>e, be<br />
prepared for<br />
some cleanup<br />
afterward!<br />
Moti<strong>on</strong> 173
<strong>the</strong> principles Of light remain <strong>the</strong> same,<br />
but <strong>the</strong> way we use it is ever changing.<br />
What we use and how we use it will<br />
c<strong>on</strong>tinue to evolve. Flash and strobes<br />
will c<strong>on</strong>tinue to get str<strong>on</strong>ger, without<br />
necessarily getting bigger or more cumbersome;<br />
<strong>the</strong>y’ll get “smarter.” Humans<br />
will c<strong>on</strong>tinue to come up with innovative<br />
approaches to both <strong>the</strong> technical and<br />
artistic elements of photography. Here<br />
are a few new things to be aware of.<br />
Some will turn out to be very important,<br />
some will be passing fads. The best<br />
crystal balls are cloudy.<br />
New light sources<br />
Chapter 10: The Future Is Now?<br />
Flashes will c<strong>on</strong>tinue to get smarter. Whe<strong>the</strong>r<br />
this is an improvement waits to be seen.<br />
At <strong>the</strong> moment, intelligent flash hugely<br />
improves <strong>the</strong> chance of a novice photographer<br />
getting a good picture. Still, an experienced<br />
photographer needs to study a pretty<br />
thick book to use that flash to be sure <strong>the</strong><br />
picture will be right. <str<strong>on</strong>g>On</str<strong>on</strong>g>ce, we could pick up<br />
any flash and learn to use it in minutes, if<br />
we already understood <strong>the</strong> basic principles.<br />
Will <strong>the</strong> flash-camera intelligence combinati<strong>on</strong><br />
ever be good enough that any<strong>on</strong>e can<br />
use <strong>the</strong> flash reliably without extensive study<br />
of each new piece of equipment? Certainly,<br />
but how so<strong>on</strong>?<br />
Tungsten is <strong>on</strong>e of <strong>the</strong> most beautiful light<br />
sources, but so<strong>on</strong> it may be illegal to manufacture<br />
it because of its energy inefficiency.<br />
Will <strong>the</strong>re be an adequate replacement?<br />
Read <strong>on</strong>.<br />
Fluorescent has traditi<strong>on</strong>ally been an awful<br />
light source because of its poor color and<br />
<strong>the</strong> inability to c<strong>on</strong>trol <strong>the</strong> size. Never<strong>the</strong>less,<br />
fluorescent lamps have become dramatically<br />
smaller. (We can always make a small light<br />
bigger; we cannot always make a big <strong>on</strong>e<br />
smaller.) The color is getting better, but most<br />
of <strong>the</strong>m still have “spikes” in certain colors<br />
to compensate for lost color between those<br />
spikes. We see c<strong>on</strong>tinuous improvement;<br />
your authors, Robin and Fil, now replace all<br />
used tungsten bulbs at home with compact<br />
fluorescent lamps, but we are not sure how<br />
l<strong>on</strong>g it will be before we want to use <strong>the</strong>m<br />
for photography.<br />
LEDs (light-emitting diodes) have a humble<br />
past. Originally designed for low-current<br />
displays in calculators and watches, <strong>the</strong>y are<br />
becoming powerful—literally popping up<br />
everywhere, from our car taillights to (so<strong>on</strong>,<br />
perhaps by <strong>the</strong> time this book comes out)<br />
household bulbs. Photographers are already<br />
The Future Is Now?<br />
175
combining <strong>the</strong>se little lights <strong>on</strong><br />
<strong>the</strong>ir own to make usable lighting<br />
for photographs. LEDs are<br />
really cheap. It doesn’t take<br />
rocket science to join <strong>the</strong>se little<br />
lights toge<strong>the</strong>r, <strong>the</strong>reby creating<br />
a bigger light. Today <strong>the</strong>ir color<br />
isn’t very pleasing for <strong>the</strong> most<br />
part, but that, too, is changing.<br />
(We can fix that current cool color<br />
with software, especially when<br />
we shoot in raw.) Depending <strong>on</strong><br />
how many we hook toge<strong>the</strong>r,<br />
we may just be able to light a<br />
small scene. The more that are<br />
joined toge<strong>the</strong>r, <strong>the</strong> bigger <strong>the</strong><br />
light and <strong>the</strong> str<strong>on</strong>ger <strong>the</strong> light<br />
source. Something for <strong>the</strong> do-ityourselfers<br />
to c<strong>on</strong>sider!<br />
The photo at <strong>the</strong> beginning of<br />
<strong>the</strong> chapter uses LEDs as <strong>the</strong> light<br />
source for <strong>the</strong> image. It isn’t your<br />
everyday setup, but, boy, is it fun.<br />
This photographer has a dryer<br />
atop a washing machine in her<br />
garage. She set <strong>the</strong> camera <strong>on</strong> a<br />
tripod in fr<strong>on</strong>t of <strong>the</strong> dryer’s open<br />
door. She powered <strong>on</strong> <strong>the</strong> washing<br />
machine, which turns <strong>on</strong> a lot<br />
of red LEDs. She used a mirror<br />
(under <strong>the</strong> camera) to reflect <strong>the</strong><br />
red light into <strong>the</strong> dryer drum. She<br />
<strong>the</strong>n turned off <strong>the</strong> light in <strong>the</strong><br />
garage so it was completely dark.<br />
Finally, she made a time exposure.<br />
D<strong>on</strong>e. Very cool. And what<br />
176<br />
<str<strong>on</strong>g>Focus</str<strong>on</strong>g> <str<strong>on</strong>g>On</str<strong>on</strong>g> <str<strong>on</strong>g>Lighting</str<strong>on</strong>g> <str<strong>on</strong>g>Photos</str<strong>on</strong>g><br />
was <strong>the</strong> result? Reflecti<strong>on</strong>s of <strong>the</strong><br />
little bumps inside <strong>the</strong> dryer. The<br />
technique was ever so simple,<br />
but it took some<strong>on</strong>e with curiosity<br />
and a good eye to even think of<br />
shooting a picture like this.<br />
Advanced sources include HMI,<br />
HID, CDM, and probably more<br />
to come. All of <strong>the</strong>se are too<br />
expensive for hobbyists. (Therefore,<br />
for now, let’s skip spelling<br />
out <strong>the</strong> acr<strong>on</strong>yms.) But wait! More<br />
than 20 years ago, in ano<strong>the</strong>r<br />
book, Fil wrote that HMI would<br />
probably never be affordable,<br />
even by professi<strong>on</strong>al standards.<br />
Fifteen years later he was asked<br />
to light a video about <strong>the</strong> major<br />
artifacts of a new museum and<br />
was given a generous assortment<br />
of HMI lights to use. The main<br />
job of a photographer is to have<br />
open eyes, not just for what’s in<br />
fr<strong>on</strong>t of us now but for what’s<br />
to come.<br />
Postproducti<strong>on</strong><br />
The world of photography has<br />
always been fluid. We used<br />
to chase new and better film,<br />
cameras, lenses, and lights.<br />
Today, <strong>the</strong> film part is fading in<br />
use, although it has capabilities<br />
that digital is still working to<br />
match. Size matters: <strong>the</strong> bigger<br />
<strong>the</strong> image, <strong>the</strong> more detail we<br />
record. Small digital sensors<br />
are affordable to all photographers,<br />
but <strong>the</strong> larger <strong>on</strong>es are<br />
affordable <strong>on</strong>ly to professi<strong>on</strong>als<br />
with <strong>the</strong> highest profit margins.<br />
However, digital is here to stay<br />
and is improving in leaps and<br />
bounds. So now we chase new<br />
cameras with more megapixels,<br />
and better lenses and lights, and,<br />
in additi<strong>on</strong>, software that lets us<br />
work with our images both more<br />
efficiently and with great creative<br />
capabilities.<br />
Postproducti<strong>on</strong> work has always<br />
been part of photography. Does<br />
post have anything to do with<br />
lighting? Should we even menti<strong>on</strong><br />
it in this book?<br />
Yes, to both questi<strong>on</strong>s. There are<br />
things we can do ei<strong>the</strong>r in lighting<br />
or in post, and <strong>the</strong> effect is<br />
about <strong>the</strong> same. Although <strong>the</strong>re<br />
have been purists who insisted<br />
<strong>on</strong> nothing but “straight prints,”<br />
most photographers for over a<br />
hundred years have insisted <strong>on</strong><br />
darkroom work to improve <strong>the</strong>ir<br />
lighting. Which way do we want<br />
to get <strong>the</strong> job d<strong>on</strong>e? Shooting?<br />
Post? Whatever is easier and<br />
more efficient. It is incompetent<br />
to spend hours <strong>on</strong> <strong>the</strong> computer<br />
trying to fix something we should<br />
have shot right in <strong>the</strong> first place;
it is silly to spend hours to perfect<br />
lighting we could correct in a few<br />
minutes with digital tools.<br />
The image we capture is seldom<br />
<strong>the</strong> final product. Should<br />
<strong>the</strong> image be cropped to make<br />
it more dynamic? Does it need<br />
color correcti<strong>on</strong>? Do porti<strong>on</strong>s<br />
need to be dodged (lightened)<br />
or burned (darkened) to draw<br />
<strong>the</strong> viewer’s eye to a spot or<br />
away from it? Should we blur<br />
<strong>the</strong> image a bit or sharpen a<br />
porti<strong>on</strong>?<br />
<str<strong>on</strong>g>On</str<strong>on</strong>g>ce, post was essential to all<br />
photography. We had to process<br />
<strong>the</strong> film. We had to make a<br />
print. While we were at it, why<br />
not make some improvements<br />
al<strong>on</strong>g <strong>the</strong> way. Now, with <strong>the</strong><br />
right equipment, we can send our<br />
pictures directly from <strong>the</strong> camera<br />
to <strong>the</strong> printer, with no darkroom,<br />
no real computer, no adjustment.<br />
In o<strong>the</strong>r words, no post. That’s<br />
<strong>on</strong>e of <strong>the</strong> biggest problems with<br />
novice photography today, but<br />
it’s also <strong>on</strong>e of <strong>the</strong> easiest problems<br />
to fix. Not every<strong>on</strong>e wants to<br />
invest in <strong>the</strong> most powerful computer<br />
or <strong>the</strong> latest versi<strong>on</strong> of <str<strong>on</strong>g>Photos</str<strong>on</strong>g>hop,<br />
nor should <strong>the</strong>y. (Serious<br />
professi<strong>on</strong>als should, however.)<br />
Still, most of us have computers<br />
now, and <strong>the</strong>re is cheap or public<br />
domain image editing software<br />
that, at a minimum, all photographers<br />
need to use in order to<br />
improve <strong>the</strong>ir lighting.<br />
In <strong>the</strong> days of film and before<br />
software got involved, we would<br />
do much of this processing in<br />
<strong>the</strong> darkroom and <strong>the</strong>n some<br />
additi<strong>on</strong>al work by hand, ei<strong>the</strong>r<br />
retouching with brush and<br />
photographic dyes or airbrushing.<br />
Today, most of us—even<br />
when shooting film, which we<br />
<strong>the</strong>n scan—make <strong>the</strong>se changes<br />
using software. Adobe <str<strong>on</strong>g>Photos</str<strong>on</strong>g>hop<br />
is probably <strong>the</strong> best known, but<br />
<strong>the</strong>re are o<strong>the</strong>rs out <strong>the</strong>re as well.<br />
We can now take a photograph<br />
and make it look as if it was<br />
d<strong>on</strong>e in oils or watercolor. We<br />
have a wide range of papers with<br />
different textures. We can selectively<br />
blur porti<strong>on</strong>s of a portrait,<br />
while keeping <strong>the</strong> eyes and<br />
mouth sharp.<br />
Ansel Adams not <strong>on</strong>ly shot<br />
images over and over again<br />
in <strong>the</strong> same spot seeking <strong>the</strong><br />
perfect light and angle, but he<br />
also printed <strong>the</strong> negatives over<br />
and over again over <strong>the</strong> course<br />
of many years, making different<br />
decisi<strong>on</strong>s as how to best bring<br />
out his visi<strong>on</strong> of <strong>the</strong> scene. As we<br />
age, we “see” things differently<br />
(hopefully as a result of growing<br />
knowledge). Life experience influences<br />
our decisi<strong>on</strong>s. We need to<br />
fight getting stuck in a rut. Using<br />
<strong>the</strong> software available today is<br />
incredibly fun and helpful, and as<br />
a result it not <strong>on</strong>ly helps us create<br />
better images but also keeps our<br />
eye fresh.<br />
The hardest part of using <strong>the</strong><br />
software is knowing when to stop.<br />
If we simply use <strong>the</strong> computer to<br />
do <strong>the</strong> same things we used to do<br />
in <strong>the</strong> darkroom, fine. If we come<br />
up with a whole new image that<br />
never could have been d<strong>on</strong>e with<br />
any previous techniques, better.<br />
If we use standard digital filters<br />
to make a photograph look like,<br />
say, an impressi<strong>on</strong>ist painting,<br />
stop right now. Ei<strong>the</strong>r get back to<br />
photography or go learn impressi<strong>on</strong>ist<br />
painting.<br />
High dynamic range<br />
imaging<br />
The best way to deal with a scene<br />
that has both extremely bright<br />
and extremely dark areas is to<br />
light it so that everything falls<br />
into <strong>the</strong> limited dynamic range<br />
of <strong>the</strong> camera. Still, sometimes<br />
we simply can’t do that. We can’t<br />
light a mountain above a valley.<br />
We may not even be able to light<br />
The Future Is Now? 177
a small room if it has a historic<br />
presence whose existing light<br />
already c<strong>on</strong>veys a mood we can’t<br />
easily duplicate with any number<br />
of portable flash units.<br />
High dynamic range imaging,<br />
known as HDR or HDRI, is growing<br />
in capability and popularity.<br />
It is a method of shooting images<br />
primarily when we are faced<br />
with trying to take a photograph<br />
where <strong>the</strong> lighting range is too<br />
broad for <strong>the</strong> digital camera<br />
or film to handle in a single<br />
exposure—that is, we have too<br />
much light in <strong>on</strong>e area and too<br />
little in ano<strong>the</strong>r. Our eyes are<br />
so incredibly capable. We can<br />
walk outside <strong>on</strong> a bright sunny<br />
day and see perfectly well. We<br />
can also walk down a dimly lit<br />
corridor and manage just fine.<br />
It might take a moment for our<br />
eyes to adapt when going from<br />
a bright scene to a dim <strong>on</strong>e,<br />
but <strong>the</strong>y do it and do it quickly.<br />
Cameras handle different light<br />
levels much like <strong>the</strong> eye in that<br />
we can change <strong>the</strong> aperture of<br />
<strong>the</strong> camera’s lens (just like <strong>the</strong><br />
eye does <strong>on</strong> its own). However,<br />
cameras d<strong>on</strong>’t handle low light<br />
levels as well as our eyes do.<br />
Even with lots of megapixels,<br />
low-light images are likely to<br />
178<br />
<str<strong>on</strong>g>Focus</str<strong>on</strong>g> <str<strong>on</strong>g>On</str<strong>on</strong>g> <str<strong>on</strong>g>Lighting</str<strong>on</strong>g> <str<strong>on</strong>g>Photos</str<strong>on</strong>g><br />
have noise (see Chapter 4.)<br />
Our eyes also manage to see<br />
detail in shadows even when<br />
much of <strong>the</strong> scene is brightly lit.<br />
Cameras are not as forgiving.<br />
Why can our eyes do this, while<br />
our cameras cannot? Actually,<br />
our eyes aren’t as good as we<br />
think <strong>the</strong>y are, but <strong>the</strong>y’re operated<br />
by a massively powerful<br />
computer—<strong>the</strong> brain—which<br />
weaves toge<strong>the</strong>r <strong>the</strong> lightest and<br />
darkest areas to make a whole<br />
scene. Right now, we can’t do<br />
this with our cameras: <strong>the</strong>y are<br />
not yet smart enough. Still, we<br />
can now do it <strong>on</strong> our desktop.<br />
The computer we have may take<br />
a few sec<strong>on</strong>ds or a few hours,<br />
depending <strong>on</strong> <strong>the</strong> processing<br />
speed and <strong>the</strong> amount of RAM<br />
we’ve paid for. In ei<strong>the</strong>r case,<br />
it can’t match <strong>the</strong> fracti<strong>on</strong> of a<br />
sec<strong>on</strong>d our brain needs, but it<br />
can get <strong>the</strong> job d<strong>on</strong>e.<br />
Normally when we want to take<br />
a photograph that has some<br />
porti<strong>on</strong> in very bright light and<br />
ano<strong>the</strong>r porti<strong>on</strong> in deep shadow<br />
(and it’s not a situati<strong>on</strong> where we<br />
can add light to <strong>the</strong> shadowed<br />
area with our flash), we have<br />
to make a decisi<strong>on</strong> to sacrifice<br />
some porti<strong>on</strong> of <strong>the</strong> image<br />
and let it have no detail. This<br />
might be <strong>the</strong> sky or <strong>the</strong> inside<br />
of a treasure chest in <strong>the</strong> corner<br />
of <strong>the</strong> basement. Using HDRI,<br />
we no l<strong>on</strong>ger need to lose this<br />
informati<strong>on</strong>.<br />
Now we can take <strong>the</strong> same<br />
photograph (<strong>on</strong> a tripod to avoid<br />
movement) over and over again,<br />
bracketing each exposure so<br />
we end up with <strong>the</strong> same image<br />
ranging from seriously overexposed<br />
to very underexposed. We<br />
<strong>the</strong>n selectively join <strong>the</strong> best bits<br />
toge<strong>the</strong>r. There is a variety of<br />
software out <strong>the</strong>re that will allow<br />
us to blend <strong>the</strong> parts we want into<br />
a single image, <strong>the</strong>reby ending<br />
up with an image that has detail<br />
wherever we want it, in whatever<br />
amount we deem appropriate.<br />
Obviously, this works best with<br />
images that are static. However,<br />
<strong>the</strong> software is improving, and<br />
we now can add people to <strong>the</strong><br />
images using this technique. It<br />
will still require some retouching<br />
after <strong>the</strong> blending, because<br />
people simply can’t hold still well<br />
enough over <strong>the</strong> time it takes to<br />
capture multiple images. The<br />
software available today does a<br />
great job of blending <strong>the</strong> multiple<br />
images toge<strong>the</strong>r, but we need to<br />
look carefully at edges and in
all likelihood do some selective<br />
retouching.<br />
In <strong>the</strong> photo above, we have a<br />
dark exposure of a c<strong>on</strong>ference<br />
room. We have detail in <strong>the</strong><br />
brighter elements of <strong>the</strong> room<br />
(like <strong>the</strong> lamp shades), but little<br />
detail in <strong>the</strong> darker areas. In<br />
<strong>the</strong> top photo <strong>on</strong> page 180, we<br />
have <strong>on</strong>e of <strong>the</strong> lighter exposures<br />
of <strong>the</strong> same room. It has good<br />
detail in <strong>the</strong> darker elements of<br />
<strong>the</strong> room, but <strong>the</strong> lamp shades<br />
are blown out (little or no detail).<br />
In <strong>the</strong> old days of film, we’d<br />
probably opt for negative film<br />
and <strong>the</strong>n selectively burn and<br />
dodge porti<strong>on</strong>s of <strong>the</strong> image<br />
to end up with an image that<br />
has detail everywhere we want.<br />
Today, with digital imaging, we<br />
can shoot a widely bracketed<br />
set of images and blend <strong>the</strong>m<br />
toge<strong>the</strong>r. By using software,<br />
we can take <strong>the</strong> best bits of<br />
various images and blend <strong>the</strong>m<br />
judiciously into <strong>on</strong>e “perfect”<br />
photo. As with so much of<br />
photography and postproducti<strong>on</strong><br />
work, a lot of judgment goes into<br />
making <strong>the</strong> decisi<strong>on</strong>s. In <strong>the</strong> bottom<br />
photo <strong>on</strong> page 180, we have<br />
an image where we blended porti<strong>on</strong>s<br />
of various images; <strong>the</strong> result<br />
was pleasing detail in both <strong>the</strong><br />
shadows and <strong>the</strong> highlights.<br />
The Future Is Now? 179
180<br />
<str<strong>on</strong>g>Focus</str<strong>on</strong>g> <str<strong>on</strong>g>On</str<strong>on</strong>g> <str<strong>on</strong>g>Lighting</str<strong>on</strong>g> <str<strong>on</strong>g>Photos</str<strong>on</strong>g><br />
Robin and Fil made this picture<br />
years ago, before <strong>the</strong>re was any<br />
software to automate <strong>the</strong> process.<br />
We used alpha channels to block<br />
<strong>the</strong> dark parts of <strong>the</strong> darkest<br />
porti<strong>on</strong>s of <strong>the</strong> dark pictures and<br />
<strong>the</strong> lightest porti<strong>on</strong>s of <strong>the</strong> light<br />
pictures to blend <strong>the</strong>m toge<strong>the</strong>r<br />
as a whole. Today, <strong>the</strong> most<br />
expensive versi<strong>on</strong>s of <str<strong>on</strong>g>Photos</str<strong>on</strong>g>hop<br />
can do HDR for us. We just give<br />
<strong>the</strong> images to <strong>the</strong> software, and<br />
tell <strong>the</strong> program what we want.<br />
O<strong>the</strong>r software can do <strong>the</strong> same,<br />
maybe better, but <str<strong>on</strong>g>Photos</str<strong>on</strong>g>hop is<br />
<strong>the</strong> <strong>on</strong>e stand-al<strong>on</strong>e image editor<br />
that comes closest to doing it all.<br />
We have that software now, and<br />
sometimes use it when <strong>the</strong> existing<br />
light in <strong>the</strong> scene is simply<br />
too beautiful to mess with. Still,<br />
we d<strong>on</strong>’t expect novice photographers<br />
to rush out and buy<br />
expensive software when what<br />
<strong>the</strong>y really need most is ano<strong>the</strong>r<br />
light or two (or six). The point of<br />
this dem<strong>on</strong>strati<strong>on</strong> is that we can<br />
still do some pretty advanced<br />
stuff with fairly primitive tools.<br />
This is a book about lighting,<br />
not about <str<strong>on</strong>g>Photos</str<strong>on</strong>g>hop. Still, <strong>the</strong><br />
technologies integrate. It is as<br />
impossible to divorce lighting<br />
from digital post as it <strong>on</strong>ce was to<br />
separate it from darkroom burning<br />
and dodging.
This page intenti<strong>on</strong>ally left blank
We’ve cOvered a lot of ground,<br />
and we hope <strong>the</strong>re’s something<br />
for every<strong>on</strong>e. We welcome<br />
your questi<strong>on</strong>s and comments<br />
at info@ moxieandmagic.com.<br />
Now go out and take some<br />
pictures. D<strong>on</strong>’t be a m<strong>on</strong>key;<br />
be a human. Use your brain.<br />
And while you’re at it, have<br />
some fun!<br />
C<strong>on</strong>clusi<strong>on</strong><br />
C<strong>on</strong>clusi<strong>on</strong> 183
Glossary<br />
this is an introductory book,<br />
but a few terms here go a<br />
little bey<strong>on</strong>d an introductory<br />
explanati<strong>on</strong>. Some readers<br />
will be eager for <strong>the</strong> extra<br />
detail, whereas o<strong>the</strong>rs will not<br />
yet want that detail, and <strong>the</strong>y<br />
are welcome to skip what <strong>the</strong>y<br />
d<strong>on</strong>’t need. Just remember<br />
that it’s here when you need it.<br />
Angle Ir<strong>on</strong>: Cheap bracket,<br />
often used for mounting shelves<br />
in storage areas. A flat metal<br />
rod bent to a 90-degree angle.<br />
Available in a variety of sizes.<br />
Reflectors can be leaned against<br />
angle ir<strong>on</strong>s, though it is more<br />
secure to use a spring clamp to<br />
prevent <strong>the</strong> reflector from slipping<br />
or falling over. Find it in any<br />
hardware store.<br />
Aperture: Simple answer: how<br />
open <strong>the</strong> lens diaphragm is.<br />
The more open, <strong>the</strong> more light<br />
that passes through <strong>the</strong> lens<br />
and <strong>the</strong> greater <strong>the</strong> exposure.<br />
Measured in f-stops. That’s all a<br />
novice really needs to know, but<br />
some will want more right now.<br />
184 Glossary<br />
Technical answer: <strong>the</strong> focal length<br />
of <strong>the</strong> lens divided by <strong>the</strong> effective<br />
diameter. That’s why a 100 mm<br />
lens set at, say, f/8 has a much<br />
bigger physical opening than<br />
a 25 mm lens set to <strong>the</strong> same<br />
aperture, even though <strong>the</strong>y both<br />
admit <strong>the</strong> same amount of light.<br />
Aperture doesn’t just c<strong>on</strong>trol <strong>the</strong><br />
amount of light; it is also <strong>on</strong>e of<br />
<strong>the</strong> two factors that c<strong>on</strong>trol depth<br />
of field.<br />
Background Light: A light used<br />
to brighten a background, often<br />
in c<strong>on</strong>juncti<strong>on</strong> with barn doors or<br />
a snoot to c<strong>on</strong>trol <strong>the</strong> width of <strong>the</strong><br />
beam.<br />
Baffle: An additi<strong>on</strong>al sheet of<br />
diffusi<strong>on</strong> inside a softbox. Usually<br />
removable, if less diffusi<strong>on</strong> is<br />
needed.<br />
Bar Clamp: An F-shaped<br />
clamp, similar to a C-clamp,<br />
but generally larger. A threaded<br />
screw is at <strong>the</strong> bottom and can<br />
be tightened to hold an item in<br />
place. Found in hardware stores.<br />
Barn Door: A tool used to<br />
block light; attaches directly to<br />
<strong>the</strong> light. Commercially made<br />
models generally have four<br />
doors, which can independently<br />
be opened as much or little<br />
as <strong>the</strong> photographer desires.<br />
Homemade versi<strong>on</strong>s will have a<br />
black board attached as needed.<br />
Beauty <str<strong>on</strong>g>Lighting</str<strong>on</strong>g>: Intended to<br />
minimize skin texture, it is flat<br />
lighting that uses a diffused light<br />
above <strong>the</strong> camera and usually<br />
a reflector, sometimes a sec<strong>on</strong>d<br />
diffused light source, beneath <strong>the</strong><br />
camera. Most effectively used for<br />
head-and-shoulder portraits.<br />
Blue Glue: Originally designed<br />
to seal refrigerator gaskets, it<br />
has been since marketed under<br />
many brand names as a way for<br />
parents to temporarily put up <strong>the</strong>ir<br />
children’s art without damaging<br />
<strong>the</strong> wall. In photography, it is<br />
used to hold lightweight items in<br />
place without worry of damage<br />
when removed. The term is<br />
photographers’ slang, so you<br />
may have to show store clerks<br />
<strong>the</strong> picture in this book to find it.<br />
Found in hardware, school supply,<br />
and art supply stores.
Boom: A stand with an adjustable<br />
arm that allows things to be<br />
placed over <strong>the</strong> subject without<br />
showing in <strong>the</strong> photograph.<br />
Heavy- to medium-weight booms<br />
support lights or, in video,<br />
microph<strong>on</strong>es. Lightweight, often<br />
homemade booms support<br />
reflector cards or gobos.<br />
Bounced Light: A lighting style<br />
that points a flash at a white<br />
ceiling or wall ra<strong>the</strong>r than directly<br />
at <strong>the</strong> subject. Produces a larger<br />
light source without additi<strong>on</strong>al<br />
equipment. If <strong>the</strong>re’s no white<br />
wall or ceiling nearby, we can<br />
also carry a large white card or<br />
an umbrella or tape up a white<br />
sheet.<br />
Bracketing: Making several<br />
exposures using different f-stops.<br />
This may be d<strong>on</strong>e to determine<br />
<strong>the</strong> best exposure for a given<br />
scene. (A technically “perfect”<br />
exposure is not always <strong>the</strong> best<br />
exposure from an artistic view.)<br />
Essential for high dynamic range<br />
imaging, where selective porti<strong>on</strong>s<br />
of each image will be blended<br />
into <strong>on</strong>e photo.<br />
Bright Field: Term used when<br />
photographing glass and <strong>the</strong>re<br />
is a light background and <strong>the</strong><br />
glass needs a dark outline. Also<br />
used in various scientific fields,<br />
including imaging with no visible<br />
light.<br />
Built-in Flash: Flash that is<br />
part of <strong>the</strong> camera. May pop up<br />
or may literally be built into <strong>the</strong><br />
camera body.<br />
Bulb (camera setting): Setting<br />
used for l<strong>on</strong>ger exposures than<br />
<strong>the</strong> camera has settings for and<br />
<strong>the</strong> photographer times <strong>the</strong><br />
exposure manually. Also used for<br />
l<strong>on</strong>g exposures where we need<br />
multiple flash exposures for a<br />
single image.<br />
Burn: To darken a porti<strong>on</strong> of an<br />
image. In <strong>the</strong> darkroom, burning<br />
was d<strong>on</strong>e by exposing porti<strong>on</strong>s of<br />
an image to additi<strong>on</strong>al light from<br />
<strong>the</strong> enlarger in order to darken<br />
an area of a print, using hands<br />
or cardboard wands to block <strong>the</strong><br />
light from certain areas. Today,<br />
we do this with software, but with<br />
radically different techniques.<br />
The digital burn and dodge tools<br />
do not work nearly as well as<br />
<strong>the</strong> older darkroom equivalents,<br />
but we can do much more<br />
using alpha channels and <strong>the</strong>ir<br />
powerful extensi<strong>on</strong>, layer masks,<br />
to select an area to burn. This<br />
goes bey<strong>on</strong>d simple lighting, so<br />
see o<strong>the</strong>r books, including books<br />
from Focal Press, for fur<strong>the</strong>r<br />
discussi<strong>on</strong>.<br />
Butterfly <str<strong>on</strong>g>Lighting</str<strong>on</strong>g>: <str<strong>on</strong>g>Lighting</str<strong>on</strong>g><br />
style similar to beauty lighting,<br />
except this technique uses <strong>on</strong>e<br />
diffused light above <strong>the</strong> subject’s<br />
head with ei<strong>the</strong>r no additi<strong>on</strong>al<br />
light or just a little fill, so that<br />
<strong>the</strong>re is a butterfly-shaped<br />
shadow under <strong>the</strong> subject’s nose.<br />
Cable Release: Cord that<br />
attaches to <strong>the</strong> camera, which<br />
is used to take a photograph<br />
by pressing a plunger <strong>on</strong> <strong>the</strong><br />
free end of <strong>the</strong> cable. Good for<br />
avoiding camera movement in<br />
almost any shot, essential for<br />
l<strong>on</strong>g exposures or when <strong>the</strong><br />
photographer cannot be near<br />
<strong>the</strong> camera (e.g., for a selfportrait).<br />
Available in a variety of<br />
lengths.<br />
Camera Left: Term used to<br />
indicate anything that is to <strong>the</strong><br />
left of <strong>the</strong> camera from <strong>the</strong><br />
photographer’s perspective<br />
from behind <strong>the</strong> camera. The<br />
opposite directi<strong>on</strong> from what <strong>the</strong><br />
subject may c<strong>on</strong>sider camera<br />
left. An arbitrary distincti<strong>on</strong>,<br />
but an essential <strong>on</strong>e when<br />
photographers are talking to <strong>on</strong>e<br />
ano<strong>the</strong>r about where <strong>the</strong>y put <strong>the</strong><br />
light.<br />
Camera Right: Term used to<br />
indicate anything that is to <strong>the</strong><br />
right of <strong>the</strong> camera from <strong>the</strong><br />
Glossary 185
photographer’s perspective<br />
from behind <strong>the</strong> camera.<br />
See camera left.<br />
Canvas Background:<br />
A photographic background made<br />
of canvas that is usually hand<br />
painted, sometimes screen printed.<br />
Frequently used in portraiture.<br />
Usually abstract with random,<br />
softly blended areas of similar<br />
colors, but it can also have scenes<br />
(such as a library full of books).<br />
Catchlights: Highlights in <strong>the</strong><br />
eyes.<br />
C-clamps: These steel clamps<br />
get <strong>the</strong>ir name from <strong>the</strong>ir shape.<br />
A threaded screw is at <strong>the</strong> bottom<br />
and can be tightened to hold an<br />
item in place.<br />
Circular Reflector: Used to<br />
bounce light. Commercially<br />
made, it is round and folds up for<br />
easy transport. Generally comes<br />
in two different sides (e.g., <strong>on</strong>e<br />
side is white and <strong>the</strong> o<strong>the</strong>r silver),<br />
so a photographer gets two<br />
different reflectors in <strong>on</strong>e. Also<br />
comes in o<strong>the</strong>r colors, such as<br />
gold and black. The black side,<br />
an obviously poor reflector,<br />
serves as a gobo.<br />
Color Temperature: Every<br />
light source has a particular<br />
temperature that determines<br />
<strong>the</strong> color of that light source.<br />
186 Glossary<br />
Matching <strong>the</strong> light source to<br />
<strong>the</strong> related setting <strong>on</strong> a digital<br />
camera results in a photograph<br />
that looks pretty much as we see<br />
<strong>the</strong> scene (i.e., fairly neutral).<br />
Mismatching <strong>the</strong> camera setting<br />
and <strong>the</strong> light source will result<br />
in images that have odd colors.<br />
(Not necessarily bad.) Measured<br />
in degrees Kelvin (K). Color<br />
temperature is always used to<br />
measure “white” light, meaning<br />
light with a reas<strong>on</strong>ably even<br />
mix of all colors in <strong>the</strong> visible<br />
spectrum. That “reas<strong>on</strong>ably even<br />
mix” can vary greatly from <strong>on</strong>e<br />
light to ano<strong>the</strong>r, however.<br />
C<strong>on</strong>trast: The difference<br />
between <strong>the</strong> lightest and darkest<br />
areas of a scene. In lighting,<br />
this often means <strong>the</strong> difference<br />
between <strong>the</strong> main light and <strong>the</strong><br />
fill, if any. Note, though, that <strong>the</strong><br />
subject can affect <strong>the</strong> c<strong>on</strong>trast as<br />
much as <strong>the</strong> lighting; a diam<strong>on</strong>d<br />
with bright facets, lying <strong>on</strong> black<br />
velvet, is likely to be a highc<strong>on</strong>trast<br />
scene no matter how we<br />
light it.<br />
Cookie: Short for cucoloris (with<br />
several spelling variati<strong>on</strong>s). To<br />
still photographers, usually a<br />
flat piece of cardboard or wood<br />
with holes in it, used to create<br />
uneven lighting. Some small<br />
metal cookies are used inside of<br />
highly focused <strong>the</strong>atrical lights for<br />
a similar effect.<br />
Cucoloris: See Cookie.<br />
Dark Field: Term used when<br />
photographing glass and <strong>the</strong>re is<br />
a dark background and <strong>the</strong> glass<br />
needs a bright outline. Also see<br />
bright field, its opposite.<br />
Daylight: In general terms,<br />
unclouded light any time during<br />
<strong>the</strong> brighter hours of <strong>the</strong> day<br />
or any photographic light that<br />
approximates <strong>the</strong> same color<br />
temperature. Daylight is used to<br />
describe light when sun is directly<br />
overhead <strong>on</strong> a clear day. In<br />
technical terms, light of 5500° K<br />
color temperature. Also used to<br />
describe <strong>the</strong> camera setting at<br />
which <strong>the</strong> camera assumes <strong>the</strong><br />
light source is daylight balanced.<br />
Dedicated Flash: Flash<br />
that can be c<strong>on</strong>trolled by <strong>the</strong><br />
camera’s programmable<br />
functi<strong>on</strong>s. Intelligent versi<strong>on</strong>s also<br />
communicate back to <strong>the</strong> camera<br />
what <strong>the</strong>y are seeing, allowing<br />
<strong>the</strong> camera to revise settings<br />
during <strong>the</strong> exposure.<br />
Depth of Field: The distance<br />
between <strong>the</strong> closest and <strong>the</strong><br />
far<strong>the</strong>st subject that we are<br />
willing to c<strong>on</strong>sider acceptably<br />
sharp. The words willing and<br />
acceptably are, of course,
judgment calls. They depend not<br />
<strong>on</strong>ly <strong>on</strong> <strong>the</strong> subjective opini<strong>on</strong> of<br />
<strong>the</strong> viewer but also <strong>on</strong> <strong>the</strong> size of<br />
<strong>the</strong> reproduced image; an image<br />
that appears sharp at a small<br />
size may appear unsharp when<br />
it is enlarged. The ma<strong>the</strong>matical<br />
formula for depth of field<br />
reflects this complexity and<br />
literally (we’re not joking here)<br />
includes a term representing<br />
<strong>the</strong> “circle of c<strong>on</strong>fusi<strong>on</strong>.” For<br />
practical purposes, depth of field<br />
is determined by two factors:<br />
aperture and image size. The<br />
smaller <strong>the</strong> aperture, <strong>the</strong> greater<br />
<strong>the</strong> depth of field; <strong>the</strong> smaller <strong>the</strong><br />
image size, <strong>the</strong> greater <strong>the</strong> depth<br />
of field. Many photographers<br />
already understand <strong>the</strong> effect of<br />
aperture: a picture shot at, say,<br />
f/16 will have a lot more depth<br />
of field than <strong>the</strong> same scene shot<br />
at f/2.8. The effect of image size<br />
is less apparent but still easy to<br />
understand. Many photographers<br />
believe that wide-angle lenses<br />
produce more depth of field.<br />
They really d<strong>on</strong>’t: <strong>the</strong>y simply<br />
produce smaller images and<br />
smaller images have greater<br />
depth of field. If we move <strong>the</strong><br />
wide-angle lens close enough to<br />
<strong>the</strong> subject to produce <strong>the</strong> same<br />
size image, <strong>the</strong> depth of field is<br />
<strong>the</strong> same as that of a l<strong>on</strong>ger lens<br />
from a greater distance.<br />
Diffuse Reflecti<strong>on</strong>: Light<br />
reflecting from <strong>the</strong> subject equally<br />
in all directi<strong>on</strong>s, regardless of<br />
<strong>the</strong> directi<strong>on</strong> from which <strong>the</strong><br />
light comes. Uncoated white<br />
paper and n<strong>on</strong>glossy white cloth<br />
produce a great deal of diffuse<br />
reflecti<strong>on</strong>. Diffuse reflecti<strong>on</strong> is a<br />
property of <strong>the</strong> subject itself and<br />
has nothing to do with whe<strong>the</strong>r<br />
<strong>the</strong> light source is in any way<br />
diffused. Compare with direct<br />
reflecti<strong>on</strong>.<br />
Diffusi<strong>on</strong>: The spread of light.<br />
The practical importance is that<br />
diffusi<strong>on</strong> turns a small light into<br />
a large <strong>on</strong>e. Photographers<br />
use both diffusi<strong>on</strong> material and<br />
bounced light to accomplish this.<br />
Diffusi<strong>on</strong> Material: Any of<br />
a variety of materials used to<br />
diffuse light: tracing paper, white<br />
cloth, or commercially produced<br />
translucent white plastic (which<br />
comes in a variety of densities).<br />
Diffusi<strong>on</strong> material makes little<br />
lights into bigger light sources,<br />
with resulting softer light.<br />
Professi<strong>on</strong>ally made diffusi<strong>on</strong><br />
material is available in both rolls<br />
and sheets.<br />
Direct Reflecti<strong>on</strong>: Direct<br />
reflecti<strong>on</strong> happens in <strong>on</strong>ly <strong>on</strong>e<br />
directi<strong>on</strong> and that directi<strong>on</strong><br />
is <strong>the</strong> opposite of <strong>the</strong> angle<br />
at which <strong>the</strong> light strikes it.<br />
Examples include mirrors, bright<br />
metal, and water. Compare with<br />
diffuse reflecti<strong>on</strong>.<br />
Distorti<strong>on</strong>: Proporti<strong>on</strong>s not<br />
being recorded “realistically.”<br />
Caused by ei<strong>the</strong>r <strong>the</strong> lens or <strong>the</strong><br />
camera viewpoint. Lens distorti<strong>on</strong><br />
is sometimes a result of defects in<br />
<strong>the</strong> lens. This is rarely noticeable<br />
in today’s lenses, except for very<br />
wide-angle lenses. Perspective<br />
distorti<strong>on</strong> happens with all<br />
lenses. Dependent <strong>on</strong> camera<br />
viewpoint: <strong>the</strong> closer <strong>the</strong> camera,<br />
<strong>the</strong> greater <strong>the</strong> perspective<br />
distorti<strong>on</strong>. This leads many<br />
photographers to mistakenly<br />
believe wide-angle lenses cause<br />
distorti<strong>on</strong>. They d<strong>on</strong>’t, but <strong>the</strong><br />
closer viewpoint <strong>the</strong>y allow does<br />
increase distorti<strong>on</strong>. The effect<br />
may be pleasing: a country road,<br />
becoming ever smaller in <strong>the</strong><br />
distance. However, it may be<br />
displeasing: a cityscape with tall<br />
buildings <strong>on</strong> <strong>the</strong> left and right<br />
leaning toward <strong>the</strong> center of <strong>the</strong><br />
picture. Displeasing perspective<br />
distorti<strong>on</strong> can be corrected<br />
with postproducti<strong>on</strong> software,<br />
sometimes with a significant<br />
loss of image quality; may also<br />
be corrected without significant<br />
loss of quality using perspective<br />
c<strong>on</strong>trol lenses or view cameras,<br />
both increasingly rarely used by<br />
current photographers.<br />
Glossary 187
Dodge: To lighten a porti<strong>on</strong><br />
of an image. <str<strong>on</strong>g>On</str<strong>on</strong>g>ce d<strong>on</strong>e in<br />
<strong>the</strong> darkroom by preventing<br />
light from <strong>the</strong> enlarger striking<br />
<strong>the</strong> paper during part of<br />
<strong>the</strong> exposure. Now d<strong>on</strong>e in<br />
postproducti<strong>on</strong> work using<br />
software. Also see burn.<br />
Duct Tape: Cheap, str<strong>on</strong>gly<br />
adhesive, easily removable<br />
tape used mostly for sealing<br />
heating and air c<strong>on</strong>diti<strong>on</strong>ing<br />
ducts. Photographers use it to<br />
hold things in place when no<br />
specialized clamp exists or is<br />
handy. Often used to tape cables<br />
to <strong>the</strong> floor in a public space to<br />
keep people from tripping. More<br />
likely to cause damage when<br />
removed. Also see gaffer tape.<br />
Electr<strong>on</strong>ically C<strong>on</strong>trolled<br />
Triggering System: Triggers a<br />
remote light not attached to <strong>the</strong><br />
camera by wire. <str<strong>on</strong>g>On</str<strong>on</strong>g>ce always<br />
used visible light from ano<strong>the</strong>r<br />
flash, now increasingly replaced<br />
by infrared or radio signals. The<br />
infrared and radio versi<strong>on</strong>s often<br />
also allow remote c<strong>on</strong>trol of <strong>the</strong><br />
power and o<strong>the</strong>r settings of an<br />
intelligent flash. A few specialized<br />
versi<strong>on</strong>s trigger <strong>the</strong> flash as<br />
<strong>the</strong> subject passes through a<br />
laser beam, allowing accurate<br />
photography of high-speed<br />
subjects.<br />
188 Glossary<br />
Exposure: The amount of light<br />
striking <strong>the</strong> electr<strong>on</strong>ic sensor<br />
(or sometimes, still, <strong>the</strong> film).<br />
C<strong>on</strong>trolled by both <strong>the</strong> aperture<br />
and <strong>the</strong> shutter speed. The wider<br />
<strong>the</strong> aperture, <strong>the</strong> faster <strong>the</strong><br />
shutter speed can be, and vice<br />
versa. Simple c<strong>on</strong>cept, but huge<br />
implicati<strong>on</strong>s bey<strong>on</strong>d <strong>the</strong> scope<br />
of a lighting book. Please seek<br />
o<strong>the</strong>r sources of informati<strong>on</strong>.<br />
Extensi<strong>on</strong> Rings: Tubes that<br />
attach between <strong>the</strong> lens and <strong>the</strong><br />
camera. They have no optics<br />
but do include <strong>the</strong> electrical<br />
c<strong>on</strong>necti<strong>on</strong>s that allow <strong>the</strong> lens<br />
to functi<strong>on</strong> as if it were attached<br />
directly to <strong>the</strong> camera. Used for<br />
macro photography by changing<br />
<strong>the</strong> distance of <strong>the</strong> lens to <strong>the</strong><br />
image plane, allowing for closer<br />
focusing.<br />
F-stop: Simply, <strong>the</strong> diameter of<br />
a lens: <strong>the</strong> greater <strong>the</strong> diameter,<br />
<strong>the</strong> more light. More technically<br />
correct, <strong>the</strong> focal length of <strong>the</strong><br />
lens divided by <strong>the</strong> diameter.<br />
Adjustable by <strong>the</strong> aperture, a<br />
sliding ring of thin blades that<br />
open and close to c<strong>on</strong>trol <strong>the</strong><br />
effective f-stop. But it can also<br />
refer to <strong>the</strong> change in lighting<br />
strength, as in, “We reduced <strong>the</strong><br />
power of <strong>the</strong> flash by <strong>on</strong>e-half<br />
stop.” Why <strong>the</strong> word stop?<br />
Originally <strong>the</strong> term referred to a<br />
thin metal sheet with a precisely<br />
drilled hole, which slid into a<br />
slot in <strong>the</strong> lens to stop part of <strong>the</strong><br />
light.<br />
Fill Light: Light from a variety of<br />
sources used to lighten shadows.<br />
Could be a white wall, a piece of<br />
white foam board, or a flash.<br />
Filters: Glass or plastic that can<br />
screw <strong>on</strong>to a lens or be placed<br />
in a lens hood. Depending <strong>on</strong><br />
<strong>the</strong> filter, can alter color, polarize<br />
light, soften an image, add<br />
starburst, and more. <str<strong>on</strong>g>On</str<strong>on</strong>g>e special<br />
filter, <strong>the</strong> close-up filter, allows<br />
<strong>the</strong> lens to focus <strong>on</strong> closer objects<br />
than <strong>the</strong> lens focusing mount<br />
o<strong>the</strong>rwise allows. Usually of lower<br />
optical quality than an extensi<strong>on</strong><br />
ring, but often acceptable,<br />
especially if we use a close-up<br />
filter from <strong>the</strong> same manufacturer<br />
that made <strong>the</strong> lens.<br />
Fluorescent: L<strong>on</strong>g hated by<br />
photographers because of<br />
unpredictable color variati<strong>on</strong><br />
by manufacturer and by age,<br />
<strong>the</strong>se are becoming a significant<br />
photographic light source.<br />
N<strong>on</strong>household, photographicspecialty<br />
fluorescent is no l<strong>on</strong>ger<br />
uncomm<strong>on</strong>.<br />
Foam Board: Lightweight<br />
plastic foam sandwiched between<br />
two pieces of heavy paper for
protecti<strong>on</strong> and rigidity. Cuts<br />
easily. Available in white, used<br />
frequently as a reflector, and<br />
black, used as a gobo.<br />
Fome-Cor: Trade name for<br />
foam board.<br />
Framed Diffusers: Items that<br />
will spread and enlarge light.<br />
Made with diffusi<strong>on</strong> material<br />
attached to a frame of wood<br />
or plastic plumbing pipe.<br />
Both are rigid; plastic pipe<br />
allows disassembly for greater<br />
portability in video, where<br />
c<strong>on</strong>tinuous sources are<br />
required.<br />
Gaffer Tape: Str<strong>on</strong>g cloth<br />
pressure-sensitive tape. It offers<br />
excellent adhesi<strong>on</strong> and removes<br />
more cleanly than duct tape.<br />
Gel: A thin colored transparent<br />
sheet used over a flash. Usually<br />
used for both color correcti<strong>on</strong><br />
and dramatic color shifting, we<br />
also use pure white for diffusi<strong>on</strong>,<br />
transparent gray for neutral<br />
density.<br />
Gobo: A piece of board that<br />
blocks light from striking <strong>the</strong> lens<br />
or restricts light from striking an<br />
item in a photograph.<br />
Grid: An assembly of short,<br />
small hexag<strong>on</strong>al or cylindrical<br />
black tubes that cover <strong>the</strong> fr<strong>on</strong>t<br />
of a light source to restrict <strong>the</strong><br />
spread of light.<br />
Guide Number: The guide<br />
number divided by <strong>the</strong> distance to<br />
<strong>the</strong> subject tells us <strong>the</strong> aperture.<br />
We have to determine <strong>the</strong><br />
guide number for each flash.<br />
Almost obsolete because of <strong>the</strong><br />
intelligence of today’s camera<br />
and flash, it may still be worth<br />
learning about; it’s extremely<br />
accurate when <strong>the</strong> intelligent<br />
misjudges.<br />
Hair Light: A light used to<br />
brighten <strong>the</strong> hair. May be a<br />
silver reflector, but more often<br />
it is a flash used in c<strong>on</strong>juncti<strong>on</strong><br />
with a softbox, grid, or umbrella.<br />
Hatchet <str<strong>on</strong>g>Lighting</str<strong>on</strong>g>: <str<strong>on</strong>g>Lighting</str<strong>on</strong>g><br />
style where <strong>the</strong> light source<br />
comes from <strong>the</strong> side of a subject.<br />
Also called split lighting. Can<br />
accentuate skin texture, but<br />
can also produce dramatic<br />
images.<br />
Haze: Caused by dirty air and<br />
ultraviolet light. It obscures<br />
detail in <strong>the</strong> distance of a scene.<br />
Depending <strong>on</strong> <strong>the</strong> scene, this<br />
can be a good or bad thing: it<br />
obscures detail but increases <strong>the</strong><br />
sense of distance.<br />
HDRI: See High Dynamic Range<br />
Imaging.<br />
High Dynamic Range<br />
Imaging: Known as HRD or<br />
HDRI, involves taking a series of<br />
images from <strong>the</strong> same viewpoint<br />
with different exposures, which<br />
we combine into a single image.<br />
Useful when faced with a scene<br />
that has a bigger range of light<br />
levels than <strong>the</strong> camera can<br />
accommodate without losing<br />
detail in ei<strong>the</strong>r <strong>the</strong> highlight,<br />
shadow, or both.<br />
High Key: Images with light<br />
backgrounds. In portraiture, <strong>the</strong><br />
people usually wear light-colored<br />
clothing.<br />
Histogram: A bar chart<br />
showing <strong>the</strong> range of t<strong>on</strong>es in<br />
an image, with <strong>the</strong> dark t<strong>on</strong>es<br />
<strong>on</strong> <strong>the</strong> left and <strong>the</strong> light t<strong>on</strong>es<br />
<strong>on</strong> <strong>the</strong> right. The height of each<br />
bar represents how much of<br />
that t<strong>on</strong>e is in <strong>the</strong> image. (In an<br />
unmanipulated image, <strong>the</strong> bars<br />
are so close toge<strong>the</strong>r that <strong>the</strong>y<br />
appear to be c<strong>on</strong>tinuous.) A look<br />
at <strong>the</strong> histogram helps to adjust<br />
exposure. Many histograms show<br />
t<strong>on</strong>al values from <strong>the</strong> darkest to<br />
<strong>the</strong> lightest areas, but not always.<br />
A dark scene has most of <strong>the</strong><br />
bars <strong>on</strong> <strong>the</strong> left of <strong>the</strong> graph,<br />
whereas a light scene has most of<br />
<strong>the</strong> bars <strong>on</strong> <strong>the</strong> right. This gives<br />
us <strong>the</strong> opportunity to manipulate<br />
exposure for better image quality.<br />
Glossary 189
Had we had camera histogram<br />
displays in <strong>the</strong> days of film, we<br />
would have adjusted exposure to<br />
put as much exposure as possible<br />
at <strong>the</strong> dark end of <strong>the</strong> histogram<br />
to reduce film grain. Today,<br />
we put as much of our t<strong>on</strong>al<br />
range as possible in <strong>the</strong> right<br />
side, highlighting areas of <strong>the</strong><br />
histogram to reduce <strong>the</strong> digital<br />
noise that happens in <strong>the</strong> shadow<br />
areas. Nei<strong>the</strong>r of <strong>the</strong>se acti<strong>on</strong>s<br />
produces an accurate exposure,<br />
but <strong>the</strong>y do produce exposures<br />
that we can lighten or darken<br />
in postproducti<strong>on</strong> to produce a<br />
higher-quality final image.<br />
Hot Lights: Tungsten, including<br />
quartz-halogen lights that are<br />
c<strong>on</strong>tinuously <strong>on</strong>, unlike flash,<br />
which <strong>on</strong>ly supplies light up<strong>on</strong><br />
triggering. Actually two slightly<br />
different color temperatures, both<br />
of which are yellowish orange.<br />
Both are scheduled to become<br />
illegal in <strong>the</strong> United States<br />
and probably Europe within a<br />
few years because of energy<br />
inefficiency. (The exact timing for<br />
that move is established but may<br />
be renegotiated.)<br />
Hot Shoe: Place where flash is<br />
attached to camera. Not a simple<br />
mechanical attachment, but<br />
always offers at least triggering<br />
of <strong>the</strong> flash. Increasingly, offers<br />
190 Glossary<br />
intelligent data transfer, allowing<br />
<strong>the</strong> camera to instruct <strong>the</strong> flash<br />
<strong>on</strong> power setting and more.<br />
Incandescent: Means light<br />
from a glowing filament, usually<br />
tungsten light. See Hot Lights.<br />
ISO (Internati<strong>on</strong>al Standards<br />
Organizati<strong>on</strong>): A measure of<br />
<strong>the</strong> light sensitivity of film and<br />
electr<strong>on</strong>ic sensors, a unificati<strong>on</strong><br />
of two slightly different older<br />
standards, ASA (American<br />
Standards Associati<strong>on</strong>) and DIN<br />
(Deutsches Institut für Normung).<br />
Increased film development<br />
allows a slight increase in ISO,<br />
sometimes producing <strong>the</strong> illusi<strong>on</strong><br />
of a much greater ISO. All<br />
digital cameras can amplify <strong>the</strong><br />
electr<strong>on</strong>ic signal to truly increase<br />
<strong>the</strong> ISO, allowing photos in much<br />
lower light. Both techniques<br />
significantly reduce <strong>the</strong> quality<br />
of <strong>the</strong> image by producing<br />
increased grain in <strong>the</strong> film and<br />
increased noise in <strong>the</strong> digital<br />
recording. See also noise. (Note<br />
that ISO, ASA, and DIN all have<br />
standardized measurement<br />
scales for many things. Here, we<br />
discuss <strong>on</strong>ly those most directly<br />
c<strong>on</strong>cerned with photography.)<br />
Kelvin: A temperature scale<br />
measuring <strong>the</strong> color of light.<br />
We could just as easily use<br />
Fahrenheit, Centigrade, or<br />
Celsius, but <strong>the</strong> Kelvin scale<br />
emphasizes higher temperatures<br />
where things begin to glow.<br />
The lower <strong>the</strong> temperature, <strong>the</strong><br />
“warmer” <strong>the</strong> color (orange,<br />
red); <strong>the</strong> higher <strong>the</strong> temperature,<br />
<strong>the</strong> “cooler” <strong>the</strong> color (blue,<br />
green). The traditi<strong>on</strong>al Kelvin<br />
scale depends entirely <strong>on</strong> heat<br />
to produce light. This produces a<br />
mix of all visible colors, although,<br />
clearly, any given temperature<br />
produces more of <strong>on</strong>e color, less<br />
of ano<strong>the</strong>r. Electrical sources not<br />
entirely dependent <strong>on</strong> heat, such<br />
as fluorescent, <strong>on</strong>ce had no true<br />
Kelvin measurement because <strong>the</strong>y<br />
lacked <strong>the</strong> full visible spectrum.<br />
However, improvements in<br />
those sources are beginning<br />
to produce a fuller spectrum,<br />
and <strong>the</strong> Kelvin measurement<br />
becomes more reas<strong>on</strong>able<br />
for <strong>the</strong>m. For example, while<br />
<strong>the</strong>re is no inexpensive 5000° K<br />
fluorescent lamp, <strong>the</strong> D50<br />
lamp comes close enough for<br />
many practical purposes. The<br />
hardware and electrical supply<br />
store versi<strong>on</strong>s of D50 cost very<br />
little more than <strong>the</strong> less calibrated<br />
lamps, so look for <strong>the</strong>m if you<br />
want to shoot with available<br />
light in your home or office.<br />
(There’s also some evidence that<br />
this more “naturally” colored
light may lead to psychological<br />
improvement am<strong>on</strong>g workers.)<br />
Key Light: Also known as <strong>the</strong><br />
main light, <strong>the</strong> brightest light<br />
used in making a photograph.<br />
Kicker: A light that strikes <strong>the</strong><br />
subject from <strong>the</strong> rear, but also<br />
slightly to <strong>the</strong> side.<br />
LED: Light-emitting diodes<br />
are extremely efficient lights,<br />
producing a great deal of light<br />
from very little electrical current.<br />
<str<strong>on</strong>g>On</str<strong>on</strong>g>ce practical <strong>on</strong>ly for very<br />
small lights such as calculator<br />
displays, <strong>the</strong>y are getting bigger,<br />
and large groupings of <strong>the</strong>m<br />
are now comm<strong>on</strong> for larger<br />
applicati<strong>on</strong>s such as automobile<br />
taillights. Some photographers<br />
are now experimenting with very<br />
large groupings for photographic<br />
lights. Likely to become a<br />
comm<strong>on</strong> photographic light<br />
source in <strong>the</strong> foreseeable future.<br />
Lens Hood: Also known as a<br />
lens shade. It is used <strong>on</strong> <strong>the</strong> end<br />
of a lens to block a light from<br />
outside <strong>the</strong> field of view from<br />
striking <strong>the</strong> lens to avoid camera<br />
flare and, to a lesser extent, lens<br />
flare.<br />
Light Modifiers: Barn doors,<br />
snoots, grids, bounce cards,<br />
umbrellas, softboxes, gobos: any<br />
of a variety of items that alter<br />
or amend <strong>the</strong> light source. Can<br />
diffuse <strong>the</strong> light or restrict it.<br />
Light Stands: Metal stands<br />
used to hold flash. Collapse<br />
for easy transport. Come in a<br />
variety of styles and sizes. For<br />
purely photographic purposes,<br />
<strong>the</strong> heavier, <strong>the</strong> better. Some<br />
of <strong>the</strong>se have dollies to make<br />
<strong>the</strong>m easy to roll around, and<br />
crank mechanisms for raising<br />
and lowering heavy lights. For<br />
easy travel, <strong>the</strong> lighter <strong>the</strong> better.<br />
Choose carefully, depending <strong>on</strong><br />
<strong>the</strong> features you need most. Most<br />
of us compromise between <strong>the</strong><br />
heaviest and <strong>the</strong> lightest.<br />
Line of Sight: Mainly c<strong>on</strong>cerned<br />
with whe<strong>the</strong>r a remote flash can<br />
“see” <strong>the</strong> light that triggers it.<br />
Optical triggers, using ei<strong>the</strong>r<br />
visible light or infrared, generally<br />
need to be visible to <strong>the</strong> camera<br />
to flash reliably, but not always.<br />
Sometimes <strong>the</strong> triggering light<br />
can bounce around corners<br />
and down hallways to put <strong>the</strong><br />
external flash in “line of sight” to<br />
<strong>the</strong> triggering light without being<br />
in line of sight with <strong>the</strong> camera.<br />
We can also use a synch cord<br />
between <strong>the</strong> light and <strong>the</strong> trigger<br />
to put a small, barely visible<br />
optical trigger in view of <strong>the</strong><br />
triggering light out of sight from<br />
<strong>the</strong> camera. A radio-c<strong>on</strong>trolled<br />
trigger offers maximum flexibility.<br />
The radio signal can sometimes<br />
travel right through barriers,<br />
which are opaque to visible and<br />
infrared light. “Line of sight”<br />
doesn’t always corresp<strong>on</strong>d with<br />
what our eyes can see.<br />
Low Key: Images with dark<br />
backgrounds. In portraiture,<br />
<strong>the</strong> people wear dark-colored<br />
clothing.<br />
Main Light: Also known as<br />
<strong>the</strong> key light. Almost always<br />
<strong>the</strong> single brightest light in a<br />
photograph.<br />
Masking Tape: Every<strong>on</strong>e<br />
knows about this thin, easy-totear<br />
paper tape, but we need<br />
to remind you that it is also an<br />
important photographic tool.<br />
Not very str<strong>on</strong>g, but adequate<br />
for many purposes, and less<br />
expensive than ei<strong>the</strong>r duct tape<br />
or gaffer tape. Also not very<br />
heat resistant and likely to leave<br />
an ugly residue <strong>on</strong> very hot<br />
lights. No inherent harm <strong>the</strong>re,<br />
but switch to gaffer tape if <strong>the</strong><br />
appearance of your equipment is<br />
important to your clients.<br />
Mylar: A thin, durable DuP<strong>on</strong>t<br />
plastic. Comm<strong>on</strong>ly used in tape,<br />
metallic sheets, and many o<strong>the</strong>r<br />
products. Photographers often<br />
use it as a silver, sometimes gold,<br />
Glossary 191
mirror reflector, often attached<br />
to foam board for rigidity. We<br />
also use translucent white Mylar<br />
as diffusi<strong>on</strong> material. Translucent<br />
Mylar tends to discolor in dirty<br />
air, so photographers who work<br />
in dusty industrial envir<strong>on</strong>ments<br />
or smoke in small studios need to<br />
replace it periodically.<br />
Neutral Density Material<br />
(ND): A filter that may be<br />
almost clear or varying degrees<br />
of neutral gray. It reduces <strong>the</strong><br />
intensity of light without changing<br />
<strong>the</strong> color of <strong>the</strong> light. We seldom<br />
use this with a sophisticated flash,<br />
which generally allows very low<br />
power settings. Still, it’s extremely<br />
useful <strong>on</strong> <strong>the</strong> <strong>on</strong>-camera flash<br />
when we want that flash to<br />
trigger an external flash, but want<br />
minimal or no visible light from<br />
<strong>the</strong> <strong>on</strong>-camera flash itself. We<br />
can often cover <strong>the</strong> <strong>on</strong>-camera<br />
flash with enough layers of ND<br />
that it has essentially no effect<br />
<strong>on</strong> <strong>the</strong> lighting of <strong>the</strong> scene, but<br />
<strong>the</strong> flash is still bright enough<br />
to trigger <strong>the</strong> external flash,<br />
especially in studio-like settings<br />
where <strong>the</strong> flash doesn’t have to<br />
compete with high ambient light.<br />
Noise: Noise is a meaningless<br />
random signal that interferes with<br />
meaningful data. All electr<strong>on</strong>ic<br />
circuits experience noise. We<br />
192 Glossary<br />
never notice it mixed in with a<br />
str<strong>on</strong>g signal—<strong>the</strong> brightest parts<br />
of a photograph, <strong>the</strong> loudest<br />
part of a symph<strong>on</strong>y—but it can<br />
be annoying in photographic<br />
shadows and soft solos in <strong>the</strong><br />
middle of <strong>the</strong> symph<strong>on</strong>y where<br />
<strong>the</strong> noise is str<strong>on</strong>g enough to<br />
compete with <strong>the</strong> primary signal.<br />
If you are an absolute beginner,<br />
you probably w<strong>on</strong>’t even notice<br />
this problem, but as you grow,<br />
you may become much less<br />
satisfied with what you can do.<br />
See Chapter 4 for how to reduce<br />
noise. The existence of noise<br />
may mean we’ve jumped into<br />
<strong>the</strong> digital age prematurely. Still,<br />
we can’t blame <strong>the</strong> pi<strong>on</strong>eers who<br />
got us here. Without <strong>the</strong>m, we<br />
wouldn’t be as far al<strong>on</strong>g as we<br />
now are.<br />
Off-Camera Flash: A flash<br />
not attached to <strong>the</strong> camera.<br />
Sometimes <strong>the</strong> best place to have<br />
<strong>the</strong> flash is right <strong>on</strong> top of <strong>the</strong><br />
camera, but this is more often<br />
a mechanical c<strong>on</strong>venience than<br />
good lighting. As photographers<br />
develop <strong>the</strong>ir eye and <strong>the</strong>ir skills,<br />
<strong>the</strong>y are more likely to want to<br />
put <strong>the</strong> light somewhere else.<br />
Plexiglas: Both a brand name<br />
and a generic name for similar<br />
products. A <strong>the</strong>rmoplastic that<br />
can be clear, translucent white,<br />
opaque white, black, or a variety<br />
of colors. Good for a variety of<br />
photographic backgrounds.<br />
Polarized Light: Too technically<br />
complex for any photographic<br />
book to thoroughly cover,<br />
especially a basic book like this<br />
<strong>on</strong>e, but essential enough that<br />
we can’t leave it out. The good<br />
news is that we d<strong>on</strong>’t need a<br />
physics degree to make good use<br />
of <strong>the</strong> c<strong>on</strong>cept. To be as simple<br />
as possible, light vibrates in two<br />
directi<strong>on</strong>s, up and down and side<br />
to side. <str<strong>on</strong>g>On</str<strong>on</strong>g>e directi<strong>on</strong> c<strong>on</strong>veys<br />
surface (especially glossy); <strong>the</strong><br />
o<strong>the</strong>r directi<strong>on</strong> c<strong>on</strong>veys color.<br />
When we look at a surface from<br />
a certain narrow family of angles,<br />
we see mostly polarized light;<br />
from o<strong>the</strong>r angles, we see no<br />
polarizati<strong>on</strong>. We can make use<br />
of this. If we look at a lake and<br />
like <strong>the</strong> reflecti<strong>on</strong> of <strong>the</strong> sunlight<br />
from its surface, that light is likely<br />
to be polarized. We shoot it as is,<br />
or add a polarizing filter. Turned<br />
at <strong>the</strong> proper angle, <strong>the</strong> filter<br />
eliminates <strong>the</strong> light that c<strong>on</strong>veys<br />
color detail, emphasizing <strong>the</strong><br />
direct reflecti<strong>on</strong> from <strong>the</strong> water.<br />
But suppose we’d ra<strong>the</strong>r see <strong>the</strong><br />
fish beneath <strong>the</strong> surface? Then<br />
we rotate <strong>the</strong> same filter 90<br />
degrees, eliminating <strong>the</strong> surface<br />
reflecti<strong>on</strong> so that we can see <strong>the</strong>
fish. This is just <strong>on</strong>e example,<br />
<strong>on</strong>e where we could equally<br />
well decide to capitalize <strong>on</strong> <strong>the</strong><br />
polarized reflecti<strong>on</strong> or get rid of<br />
it. Ano<strong>the</strong>r example is <strong>the</strong> blue<br />
sky. In bright sunlight, <strong>the</strong> sky has<br />
both polarized and unpolarized<br />
reflecti<strong>on</strong>. Remembering that <strong>the</strong><br />
unpolarized reflecti<strong>on</strong> c<strong>on</strong>veys<br />
color, we put <strong>the</strong> polarizing filter<br />
over our lens and rotate it for<br />
maximum color. This makes<br />
<strong>the</strong> sky much bluer without<br />
significantly affecting <strong>the</strong> color of<br />
<strong>the</strong> rest of <strong>the</strong> scene. Too brief a<br />
discussi<strong>on</strong>, but enough that we<br />
can start using <strong>the</strong> principle right<br />
away. For a slightly more detailed<br />
discussi<strong>on</strong> of polarized light, see<br />
<strong>the</strong> book Light—Science & Magic.<br />
Polarizer or Polarizing Filter:<br />
Depending <strong>on</strong> <strong>the</strong> angle of<br />
rotati<strong>on</strong>, can ei<strong>the</strong>r increase or<br />
decrease <strong>the</strong> amount of polarized<br />
light making <strong>the</strong> exposure. May<br />
be of high-quality optical glass<br />
to attach to <strong>the</strong> camera lens or of<br />
low optical-quality plastic to hang<br />
in fr<strong>on</strong>t of lights. (Beware of <strong>the</strong><br />
low-quality sheets; some work<br />
very well, o<strong>the</strong>rs offer hardly<br />
any polarizati<strong>on</strong> at all! Try to<br />
get a small sample piece before<br />
buying.) See Polarized Light.<br />
Popup Flash: Flash built into a<br />
camera that is generally out of<br />
sight when not needed but that<br />
can be opened when needed.<br />
Postproducti<strong>on</strong>: Work<br />
d<strong>on</strong>e <strong>on</strong> images after <strong>the</strong>y<br />
are captured. It may include<br />
burning, dodging, vignetting,<br />
color adjustments, and cropping.<br />
Used to all be d<strong>on</strong>e ei<strong>the</strong>r in<br />
<strong>the</strong> darkroom or by hand <strong>on</strong><br />
prints, but now almost always<br />
d<strong>on</strong>e with software. A very small<br />
percentage of this work can still<br />
be d<strong>on</strong>e better and more quickly<br />
<strong>on</strong> <strong>the</strong> print, however. Learning<br />
to work without <strong>the</strong> digital tools<br />
is a fairly tedious process most<br />
photographers d<strong>on</strong>’t want to<br />
master. Still, it’s a good idea<br />
to become acquainted with<br />
some<strong>on</strong>e who can do this, just in<br />
case you need him or her.<br />
RAM: Random access memory.<br />
Most people already know this<br />
c<strong>on</strong>cept, but we need to menti<strong>on</strong><br />
that digital image processing<br />
is extremely RAM intensive.<br />
Whatever RAM we need to<br />
rapidly operate word processing,<br />
spreadsheets, and presentati<strong>on</strong><br />
software simultaneously may<br />
become impractically slow when<br />
we start to process images. Equip<br />
your computer with all <strong>the</strong> RAM<br />
you can afford if you intend to<br />
process pictures <strong>on</strong> a regular<br />
basis.<br />
Raw: Often written “RAW,”<br />
because many photographers<br />
c<strong>on</strong>sider it to be a standard<br />
image format like TIFF or JPEG.<br />
Not so; <strong>on</strong>e camera maker’s<br />
raw can be totally different from<br />
ano<strong>the</strong>r’s, and <strong>the</strong> specificati<strong>on</strong>s<br />
may be proprietary and secret.<br />
A better format is Adobe’s DNG<br />
(digital negative) format, because<br />
its code is open to all. A few<br />
(almost always am<strong>on</strong>g <strong>the</strong><br />
better) camera manufacturers<br />
have adopted DNG ra<strong>the</strong>r than<br />
developing still ano<strong>the</strong>r raw<br />
format. O<strong>the</strong>r very good camera<br />
makers persist with <strong>the</strong>ir own<br />
proprietary raw formats, and<br />
<strong>the</strong>re’s no way to predict whe<strong>the</strong>r<br />
this Babel will c<strong>on</strong>tinue or evolve<br />
into a comm<strong>on</strong>, universally<br />
available format. All of <strong>the</strong>se<br />
file formats allow an image file<br />
with a wider dynamic range<br />
that can be used to produce,<br />
say, a TIFF. They preserve<br />
<strong>the</strong> data with minimal loss of<br />
informati<strong>on</strong>. (DNG compresses<br />
with no loss of informati<strong>on</strong>.)<br />
A resulting 24-bit TIFF, with its<br />
more limited dynamic range will,<br />
indeed, lose informati<strong>on</strong>, just as<br />
photographers have always lost<br />
informati<strong>on</strong> when <strong>the</strong>y made<br />
a silver-based print. Still, all of<br />
<strong>the</strong> raw formats and DNG allow<br />
photographers to change <strong>the</strong>ir<br />
Glossary 193
minds, return to <strong>the</strong> original file,<br />
and make a new print with a<br />
whole new interpretati<strong>on</strong>.<br />
Reflectors: Any of a variety of<br />
items that reflect light. Can be<br />
as simple as a white or silver<br />
board or can be manufactured<br />
metal reflectors that fit directly<br />
<strong>on</strong> <strong>the</strong> light source. Used ei<strong>the</strong>r<br />
to redirect <strong>the</strong> light or to enlarge<br />
<strong>the</strong> effective size of a small<br />
source.<br />
Rembrandt <str<strong>on</strong>g>Lighting</str<strong>on</strong>g>: <str<strong>on</strong>g>Lighting</str<strong>on</strong>g><br />
that is placed so a triangle of<br />
light appears <strong>on</strong> <strong>the</strong> shadow<br />
side of a face. Also called short<br />
lighting.<br />
Rim <str<strong>on</strong>g>Lighting</str<strong>on</strong>g>: <str<strong>on</strong>g>Lighting</str<strong>on</strong>g> behind<br />
but aimed at <strong>the</strong> subject that<br />
skims <strong>the</strong> back of a subject to<br />
delineate it from <strong>the</strong> background.<br />
Ring Light: A circular flash that<br />
fits <strong>on</strong> <strong>the</strong> lens of a camera and<br />
completely encircles it. Large<br />
versi<strong>on</strong>s are most used for beauty<br />
lighting. Smaller versi<strong>on</strong>s are<br />
used for medical photography<br />
where we want to see into a<br />
small opening (e.g., dental)<br />
and forensic photography (e.g.,<br />
nearly shadowless illuminati<strong>on</strong> of<br />
small crime scene evidence).<br />
Screw-<strong>on</strong> Filters: These screw<br />
directly <strong>on</strong>to a lens. Unlike gels<br />
used in fr<strong>on</strong>t of a light, <strong>the</strong>y are<br />
194 Glossary<br />
made with <strong>the</strong> highest optical<br />
quality.<br />
Seamless: Large, cheap paper<br />
background for photography.<br />
Available in a wide variety of<br />
colors.<br />
Seamless Stand: C<strong>on</strong>sists<br />
of two tri-legged adjustable<br />
stands and a crossbar that holds<br />
seamless paper. Allows for easy<br />
portability from place to place.<br />
Seamless unrolls from <strong>the</strong> top.<br />
There are o<strong>the</strong>r ways to support<br />
seamless, which are permanent<br />
and sturdier but lack mobility.<br />
These cost less than light stands,<br />
and, in a pinch, we can use <strong>on</strong>e<br />
for a light stand. Still, we’d ra<strong>the</strong>r<br />
use a sturdier stand for expensive<br />
lights and use <strong>the</strong> seamless<br />
stands <strong>on</strong>ly for cheap paper.<br />
Shade: Light in an area that<br />
does not receive direct sunlight,<br />
such as under a leafy tree.<br />
Because <strong>the</strong>re is no direct<br />
sunlight, <strong>the</strong> main light is often<br />
<strong>the</strong> open blue sky. Also, a setting<br />
<strong>on</strong> many digital cameras to adjust<br />
for <strong>the</strong> cooler light in shade.<br />
Silver Reflector: Mirror-like<br />
surface that reflects light. Could<br />
be a shell that fits around a<br />
light source, but this could just<br />
as easily refer to a foam board<br />
reflector with Mylar <strong>on</strong> it. Because<br />
of <strong>the</strong> shiny surface, more light<br />
is reflected back than if a white<br />
reflector is used.<br />
Softbox: A boxlike structure,<br />
most frequently rectangular, with<br />
diffusi<strong>on</strong> material in fr<strong>on</strong>t and<br />
enclosed sides and an opening<br />
<strong>on</strong>ly slightly bigger than <strong>the</strong> light<br />
attached at <strong>the</strong> back. It makes a<br />
little light bigger and produces<br />
soft light. The bigger <strong>the</strong> softbox<br />
and <strong>the</strong> more diffusi<strong>on</strong> material<br />
used, <strong>the</strong> softer <strong>the</strong> light areas.<br />
Slave: A trigger cell <strong>on</strong> a flash,<br />
usually sensitive to visible light,<br />
but, increasingly, infrared or<br />
radio. Slaves allow multiple<br />
flashes to fire simultaneously<br />
up<strong>on</strong> <strong>the</strong> triggering of a first<br />
flash. They are essential for<br />
use of multiple flash, because<br />
plugging multiple flash units into<br />
a single synch cord risks electrical<br />
damage to <strong>the</strong> camera.<br />
Snoot: Used to restrict light.<br />
A snoot generally provides a<br />
small circular opening for <strong>the</strong><br />
light to pass through. Restricts<br />
light more than barn doors, but<br />
usually less than a grid.<br />
Split <str<strong>on</strong>g>Lighting</str<strong>on</strong>g>: See hatchet<br />
lighting.<br />
Spring Clamp: Think of a<br />
big metal clo<strong>the</strong>spin. This is<br />
a general-purpose clamp,
available in several sizes. Can<br />
clamp diffusi<strong>on</strong> material to a<br />
stand, a reflector to an angle<br />
ir<strong>on</strong>, <strong>the</strong> back of a suit jacket for<br />
a better fit (though actual clo<strong>the</strong>spins<br />
often work better here), a<br />
gobo to shield a lens from flair,<br />
a piece of cloth not made to fit<br />
any background stand. Best of<br />
all, <strong>the</strong>se are not photographicspecialty<br />
clamps and <strong>the</strong>y’re<br />
available at any hardware store<br />
for low prices. We can even<br />
get super str<strong>on</strong>g versi<strong>on</strong>s when<br />
we need <strong>the</strong>m and very flimsy<br />
versi<strong>on</strong>s when those are good<br />
enough. These are a bargain<br />
that pays off in unexpected ways<br />
when we need <strong>the</strong>m. Get a<br />
handful.<br />
Strobe: Traditi<strong>on</strong>ally, any<br />
electr<strong>on</strong>ic flash. Increasingly<br />
today, an electr<strong>on</strong>ic flash that<br />
uses an incandescent modeling<br />
light to let us see approximately<br />
what <strong>the</strong> flash will do.<br />
Synch Cord: An electrical<br />
c<strong>on</strong>necti<strong>on</strong> between <strong>the</strong><br />
camera and a remote flash<br />
(and “remote” depends <strong>on</strong> <strong>the</strong><br />
length of <strong>the</strong> cord). The camera<br />
shutter triggers <strong>the</strong> flash. This is<br />
<strong>the</strong> cheapest and most reliable<br />
way to trigger <strong>the</strong> flash, but,<br />
for <strong>the</strong> safety of our camera,<br />
we can trigger <strong>on</strong>ly <strong>on</strong>e flash.<br />
Any additi<strong>on</strong>al flash needs to<br />
be triggered some o<strong>the</strong>r way.<br />
Also, very l<strong>on</strong>g cords increase<br />
<strong>the</strong> likelihood that some<strong>on</strong>e<br />
will trip over <strong>the</strong> cord. These<br />
are good tools, but use <strong>the</strong>m<br />
judiciously.<br />
T<strong>on</strong>al Range: The difference<br />
between <strong>the</strong> lightest and <strong>the</strong><br />
darkest area in a scene. If <strong>the</strong><br />
difference between <strong>the</strong> two is too<br />
great, we lose ei<strong>the</strong>r highlight<br />
detail or shadow detail or<br />
both. What is “too great”? That<br />
depends <strong>on</strong> <strong>the</strong> camera: some<br />
can record greater t<strong>on</strong>al ranges<br />
than o<strong>the</strong>rs. Recording a greater<br />
t<strong>on</strong>al range does not get us<br />
out of trouble though. So<strong>on</strong>er<br />
or later, we’re likely to want to<br />
print <strong>the</strong> image <strong>on</strong> a piece of<br />
paper that does not allow such<br />
a great t<strong>on</strong>al range. We have to<br />
make a judgment call. What do<br />
we need to keep? What are we<br />
willing to lose? Can we digitally<br />
compress <strong>the</strong> t<strong>on</strong>al range of<br />
<strong>the</strong> scene to fit <strong>the</strong> t<strong>on</strong>al range<br />
of <strong>the</strong> paper? Of course, we<br />
can, always, if we recorded <strong>the</strong><br />
full t<strong>on</strong>al range when we shot<br />
it. Still, too much compressi<strong>on</strong><br />
can make <strong>the</strong> image look flat.<br />
Ansel Adams’s The Negative is<br />
a good guide for beginning to<br />
make <strong>the</strong>se judgments, even if<br />
we never intend to shoot a piece<br />
of film.<br />
Tripod: Three-legged support<br />
for a camera. Generally, <strong>the</strong><br />
sturdier <strong>the</strong> better.<br />
Tungsten: See incandescent.<br />
Produces yellowish orange light,<br />
but with a full visible spectrum.<br />
Some colors are brighter than<br />
o<strong>the</strong>rs, but <strong>the</strong>y are all <strong>the</strong>re.<br />
Umbrella: Umbrella-shaped<br />
reflectors that are used with light<br />
sources to spread and diffuse<br />
<strong>the</strong> light. Come in a variety of<br />
sizes and styles (white/shoot-thru,<br />
silver, and black-lined). Easily<br />
portable because <strong>the</strong>y fold up.<br />
Glossary 195
Index<br />
Page numbers followed by f indicates a figure.<br />
A<br />
Alpha channels, 76, 180<br />
Antiglare-coated lenses, 128, 129<br />
Aperture, 96<br />
adjustment, 178<br />
background and, 96<br />
star effect, 105<br />
Automatic color adjustment, 33, 62,<br />
see also Color adjustment<br />
B<br />
Background light, 55, see also Main<br />
light<br />
barn door, 51<br />
bottle, 161<br />
and flash, 55<br />
gobos, 126<br />
and grid, 54, 56<br />
high key images, 125<br />
reflector, 115<br />
Background shadow, 94<br />
Barn door, 51, see also Gobo<br />
background light c<strong>on</strong>trol, 115, 125<br />
glass, 157<br />
Velcro, 52<br />
Beauty lighting, 26, 118, 119f,<br />
see also <str<strong>on</strong>g>Lighting</str<strong>on</strong>g><br />
Black-and-white images, 58, 105f,<br />
see Grayscale images<br />
Blue glue, 7, 8f<br />
Bounce, 32, 82, see also Light, sizing<br />
card, 35, 37<br />
ceiling, 33<br />
diffuser <strong>on</strong> flash, 41<br />
fill card and, 34<br />
reflector, 35<br />
196 Index<br />
umbrella, use of, 35<br />
wall, 32–33<br />
from white ceiling, 32f<br />
Bracketing, 178<br />
Bright-field lighting, 154<br />
Broad lighting, 112<br />
Built-in flash, 5f<br />
shot with, 5f<br />
Bulb, 172<br />
Butterfly lighting, 118<br />
C<br />
Camera<br />
focus, 98<br />
placement, 98<br />
camera-right business, 4<br />
Catchlights, 13<br />
Circular reflector, 39, 39f<br />
advantage, 39<br />
folded, 39f<br />
Color adjustment, see also Color<br />
temperature<br />
auto balance setting, 62<br />
automatic, 33<br />
in camera, 62<br />
custom white balance, 62<br />
manual, 33<br />
night time photo, 87f<br />
tungsten and daylight white<br />
balance, 67–68f, 70–71f<br />
Color temperature, 61, see also<br />
Kelvin<br />
cool colors, 62<br />
daylight, 61<br />
tungsten, 61<br />
warm colors, 62<br />
Commercial photographers, 15<br />
C<strong>on</strong>tinuous light source, 167<br />
C<strong>on</strong>vert to blue (CTB), 74<br />
C<strong>on</strong>vert to orange (CTO), 73<br />
use of, 74f<br />
Cookies, 49, see also Gobo<br />
homemade, 49f<br />
wooden, 50f<br />
Cropping, 114<br />
CTB, see C<strong>on</strong>vert to blue (CTB)<br />
CTO, see C<strong>on</strong>vert to orange (CTO)<br />
D<br />
Dark-field lighting, 152<br />
Depth of field, 96<br />
Developing photographers, 15<br />
Diffuse reflecti<strong>on</strong>, 86, 141<br />
Diffused light, 162<br />
Diffusi<strong>on</strong>, 42<br />
gobo, 46<br />
Roscoe sample pack, 42–43, 42f<br />
Strobist pack, 43<br />
Diffusi<strong>on</strong> material, 19, 44, 82,<br />
see also Diffusi<strong>on</strong><br />
duct tape, 44<br />
framed diffusers, 45–46<br />
gaffer tape, 44<br />
positi<strong>on</strong>, 44<br />
umbrella, 46–47<br />
Direct reflecti<strong>on</strong>, 86, 141–142<br />
unpolarized, 142<br />
Directors of lighting (DLs or LDs), 47<br />
DLs or LDs, see Directors of lighting<br />
(DLs or LDs)<br />
Duct tape, 44<br />
Dynamic range, 177
E<br />
Electr<strong>on</strong>ically c<strong>on</strong>trolled triggering<br />
system, 172<br />
Eyeglasses, 128–130<br />
F<br />
Family of angles, 142–144<br />
Feminine vs. masculine, 115<br />
Fill card, 34<br />
Fill light, 11–12, 26, see also Main<br />
light<br />
Flare, 126<br />
Flash, 16, 175, see also Profile<br />
lighting<br />
adjustable flash coverage, 47<br />
automated systems, 16, 17<br />
diffuser with, 102<br />
flat background and, 55f<br />
homemade grid <strong>on</strong>, 53f<br />
selecting right, 17<br />
small diffuser <strong>on</strong>, 41f<br />
trigger, 27–31<br />
Fluorescent lights, 71–72, 175<br />
Foam board, 36f<br />
Fome-Cor, 35<br />
Mylar, 35, 36f<br />
Fome-Cor, 9, 35, see also Mylar<br />
Found light, 92<br />
Framed diffuser, 144<br />
Framed diffusers, 45–46<br />
G<br />
Gaffer tape, 44<br />
Gels, 42<br />
applicati<strong>on</strong>, 74f, 75f<br />
CTO, 73<br />
for dramatic color, 73<br />
Roscolux colored, 43f<br />
Strobist gel collecti<strong>on</strong>, 72<br />
Glass, 151<br />
background, 153, 156<br />
bright-field lighting, 154<br />
camera positi<strong>on</strong>, 153<br />
dark-field lighting, 152<br />
without diffusi<strong>on</strong> material, 161f<br />
light placement, 162<br />
with liquid, 157<br />
off-camera flash, 155f<br />
with paper label, 158, 159f<br />
<strong>on</strong> Plexiglas, 152f, 154f<br />
shorter lens, 158<br />
Gobo, 46, 47, 105, see also<br />
Diffusi<strong>on</strong><br />
barn door, 51<br />
black card, 48f<br />
cookies, 49<br />
glass with paper label, 160<br />
homemade, 49<br />
between main light and glass, 152<br />
Gradient neutral density filter, 75–76<br />
Grayscale images, 110<br />
Grids, 51, see also Homemade grid;<br />
Snoot<br />
background light, 56<br />
uses, 54<br />
H<br />
Hair light, 11, 113–114<br />
Hard shadow, 79<br />
small lights, 80<br />
texture, 80<br />
Hatchet lighting, 109<br />
Haze, 103<br />
Haze filter, see UV filter<br />
HDRI, see High dynamic range<br />
imaging (HDRI)<br />
High dynamic range imaging<br />
(HDRI), 177<br />
High key lighting, 120<br />
flare, 126<br />
High-speed photography, 171<br />
Homemade grid, 53f, see also Grids<br />
<strong>on</strong> flash, 53f<br />
making, 52<br />
supplies for, 52f<br />
Household bulbs, 69<br />
I<br />
In-camera flash<br />
glass <strong>on</strong> white Plexiglas, 154f<br />
neutral density material, 154f, 155<br />
undiffused, 152<br />
Incandescent light, see Tungsten light<br />
Infrared trigger, 30, 30f, see also<br />
Trigger, flash<br />
disadvantages, 31<br />
Intelligent flash, 16, 25<br />
J<br />
Journalistic photographers, 15<br />
K<br />
Kelvin, 62, see also Color temperature<br />
Kelvin temperature scale, 62<br />
Key light, see Main light<br />
Kicker lighting, 116<br />
L<br />
LEDs, see Light-emitting diodes<br />
(LEDs)<br />
Lens and light placement, 146<br />
Lens filters, 58<br />
gradient neutral density filter, 75<br />
polarizing filter, 58, 75<br />
size, 58<br />
UV filter, 58<br />
Index<br />
197
Lens hood, 99<br />
Light<br />
amending or mixing, 97<br />
screw-<strong>on</strong> polarizer, 98<br />
sunlight, 63<br />
types, 61<br />
Light, sizing, 32, 47<br />
bounce, 32<br />
circular reflector, 39, 39f<br />
diffusi<strong>on</strong>, 42<br />
foam board, 36f<br />
Fome-Cor, 35<br />
Mylar, 35, 36f<br />
softboxes, 40<br />
umbrella, 35, 37<br />
Light and shadow, 79<br />
black vs. white, 86<br />
diffusi<strong>on</strong> material and subject, 82<br />
distant lights, 80<br />
hard shadows, 80<br />
hard-edged shadows, 81<br />
reflecti<strong>on</strong>, 86<br />
small lights, 80<br />
smaller light and texture, 84<br />
soft-edged shadows, 81f<br />
Light blockers, 47<br />
Light meters, 126<br />
Light modifiers, 6<br />
fill light, 11<br />
hair light, 11<br />
mirror, 7<br />
white reflector, 8<br />
Light sources, 175<br />
advanced, 176<br />
flashes, 175<br />
florescent, 175<br />
LEDs, 175–176<br />
tungsten, 175<br />
Light-emitting diodes (LEDs), 175–176<br />
198 Index<br />
<str<strong>on</strong>g>Lighting</str<strong>on</strong>g>, see also Profile lighting<br />
background light, 115<br />
beauty, 118<br />
bright-field, 154<br />
broad, 112<br />
butterflies, 94, 95f<br />
butterfly, 118<br />
children, 95<br />
dark-field, 152<br />
diffuser with flash, 102<br />
eyeglasses and, 128–130<br />
flat, 100<br />
groups, 131–134, 132–133f<br />
hair light, 113–114<br />
kicker, 116<br />
for kids and adults, 125<br />
low key vs. high key, 120<br />
metal, 146<br />
pets, 135–139<br />
portraiture, 107–108<br />
rim, 116<br />
short, 111<br />
split, 109–110<br />
wrinkles, 127<br />
Light-sensitive trigger, 28, see also<br />
Trigger, flash<br />
disadvantages, 29–30<br />
infrared trigger, 30, 30f<br />
Low key lighting, 120<br />
M<br />
Main light, 9, 12, see also Light<br />
modifiers<br />
Manual color balance, 33<br />
Metal, 141<br />
diffusi<strong>on</strong> material positi<strong>on</strong>, 143<br />
family of angles, 142–144<br />
flat, 144–146<br />
polished, 142<br />
reflecti<strong>on</strong>, 141<br />
round, 147–149f<br />
saw, 144–145f<br />
Mirror, 7<br />
Modern flashes, 10<br />
Moti<strong>on</strong>, 165<br />
dancer, jumping, 166f<br />
fireworks, 166f<br />
freezing, 171, 171f<br />
hands moving through space,<br />
169–170f<br />
light source, 167<br />
setup, 173f<br />
Mylar, 7, 35, 36f, see also<br />
Fome-Cor<br />
advantage, 37<br />
N<br />
Night time photo<br />
in mixed light, 87f<br />
Noise, 87<br />
high megapixels, 88f<br />
increase exposure, 88<br />
low cost camera, 88f<br />
software packages, 88<br />
O<br />
Off-Camera flash, 13, 25<br />
away from diffusi<strong>on</strong> material,<br />
123<br />
benefit, 26<br />
and built-in flash, 26<br />
diffusi<strong>on</strong> material as main<br />
light, 121<br />
fill light, 26<br />
<strong>on</strong> light stand, 26f<br />
main light, 25<br />
manual and automatic, 25<br />
metal, 147
neutral density material and<br />
popup, 124<br />
popup flash, blocking, 122<br />
undiffused, 152<br />
<str<strong>on</strong>g>On</str<strong>on</strong>g>e-flash setup, 13<br />
Open shade, 94<br />
P<br />
Photographic boom, 59, 114, 155<br />
Photographic store, 23<br />
Photography<br />
adults, 121–122<br />
architecture, 104–105<br />
butterflies, 94, 95f<br />
children, 95<br />
flowers, 101<br />
glass, 151<br />
groups, 131–134, 132–133f<br />
metal, 141<br />
moti<strong>on</strong>, 165<br />
pets, 135–139<br />
portraiture, 107<br />
postproducti<strong>on</strong> work, 117<br />
Photography tools, 24<br />
bounce, 32<br />
bounce card, 35, 37<br />
circular reflector, 39, 39f<br />
clamps, 59<br />
diffusi<strong>on</strong> material, 44<br />
flash trigger, 27–31<br />
foam board, 36f<br />
gels, 42<br />
need for, 57<br />
off-camera flash, 25<br />
softboxes, 40, 40f<br />
stand, 59<br />
<str<strong>on</strong>g>Photos</str<strong>on</strong>g>hop, 180<br />
Polarizing filter, 58, see also Lens<br />
filters<br />
Portrait photographers, 15<br />
Portraiture, 107<br />
camera heights, 120<br />
catchlight, 121<br />
Postproducti<strong>on</strong>, 117, 138,<br />
176<br />
lighting, 176–177<br />
softwares, 177<br />
Profile lighting, 3<br />
diffusi<strong>on</strong> material, 19<br />
face and light, 19–20<br />
flash, 16–17<br />
light additi<strong>on</strong>, 16<br />
light modifiers, 6<br />
model, 3<br />
paper and light, 20<br />
positi<strong>on</strong>, 3<br />
size and picture quality, 18<br />
size c<strong>on</strong>trol, 13<br />
Q<br />
Quartz-halogen lights, 68, 166<br />
R<br />
Radio trigger, 31, 31f, see also<br />
Trigger, flash<br />
advantage, 31<br />
disadvantage, 31<br />
Reflecti<strong>on</strong>, 86<br />
Reflector, 149, see also Bounce<br />
circular, 39, 39f<br />
shade background, 97<br />
umbrella, 38, 38f<br />
Refracti<strong>on</strong>, 64<br />
warm t<strong>on</strong>es by, 64f<br />
Rembrandt lighting, 111<br />
Rim lighting, 116<br />
Roscoe sample pack, 42–43, 42f<br />
S<br />
Shadow, 79, see also Light and<br />
shadow<br />
face shape, 121<br />
hard-edged, 79, 81<br />
sharp edge, 80<br />
soft-edged, 81f<br />
within subject, 83<br />
Short lighting, 111<br />
Silver reflector, 10, see also White<br />
reflector<br />
Sitter wear solid colors, 120<br />
Slimming effect, 133<br />
Snoot, 57, see also Grids<br />
homemade, 57<br />
Soft shadow, 80<br />
Softboxes, 40<br />
homemade, 13, 14f<br />
medium manufactured, 40f<br />
small manufactured, 41f<br />
Split lighting, 109–110<br />
Stage-right, 4<br />
Star effect, 105<br />
Still life, 25<br />
Strobist gel collecti<strong>on</strong>, 72<br />
Strobist pack, 43–44<br />
Studio portrait, 107<br />
Sun light, 12, 79, 91, see also Main<br />
light<br />
advantage, 17<br />
advantages, 91<br />
air polluti<strong>on</strong> impact <strong>on</strong>, 64<br />
color, 64<br />
color adjustment, 62<br />
dappled light, 93<br />
disadvantages, 91<br />
early afterno<strong>on</strong> light, 63f<br />
early evening, 65f<br />
early morning, 64f<br />
Index<br />
199
Sun light, (C<strong>on</strong>tinued)<br />
sunrise and sunset colors, 63<br />
sunset, 66f<br />
white building, 67<br />
Synch cord, 27, see also Trigger,<br />
flash<br />
disadvantages, 27–28<br />
T<br />
Test light, 143<br />
Texture, 83<br />
black subject, 85f, 86f<br />
reflecti<strong>on</strong>, 86<br />
smaller light, 84<br />
sunlight and household lamps, 83<br />
white lace, 83f, 84f<br />
Transiti<strong>on</strong> lenses, 130<br />
Translucent, 19<br />
Transparent, 19<br />
Trigger, flash, see also Flash<br />
homemade, 168<br />
200 Index<br />
inexpensive, 28f<br />
infrared, 30, 30f<br />
light-sensitive, 28<br />
manually trigger, 170<br />
radio, 31, 31f<br />
sensitive, 29f<br />
synch cord, 27<br />
Tripod, 108, 165<br />
Tungsten light, 67f, 68, 167, 175<br />
CTB, 74<br />
CTO, 73<br />
daylight vs., 69<br />
vs.daylight white balance, 67f<br />
vs.household lamp, 68f<br />
temperature, 61, 62<br />
U<br />
Ultraviolet, 58<br />
Umbrella, 35, 37, see also Bounce<br />
black-backed, 38f, 39<br />
as diffuser, 46–47<br />
as reflector, 38<br />
silver, 38<br />
white, 38, 38f<br />
UV filter, 58, 103<br />
V<br />
Vignette images, 14<br />
W<br />
White board, 149<br />
White foam board<br />
alternative, 14<br />
White reflector, 8, 10<br />
White shower curtain, 19, 42,<br />
see also Diffusi<strong>on</strong> material<br />
White translucent white filter, 44<br />
Wireless flash trigger<br />
alternative, 14<br />
Wireless radio c<strong>on</strong>trol, 98<br />
Wrinkle, 127<br />
soft focus filters, 127
This page intenti<strong>on</strong>ally left blank
This page intenti<strong>on</strong>ally left blank