THE FLYING LADY - Rolls-Royce Owners' Club
THE FLYING LADY - Rolls-Royce Owners' Club
THE FLYING LADY - Rolls-Royce Owners' Club

Create successful ePaper yourself
Turn your PDF publications into a flip-book with our unique Google optimized e-Paper software.
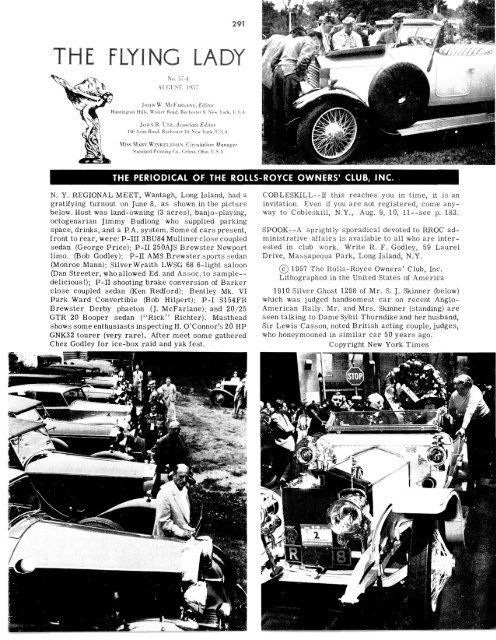
291<br />
<strong>THE</strong> <strong>FLYING</strong> <strong>LADY</strong><br />
No. 57-4<br />
AUGUST, 1957<br />
JOHN W. MCFARLANE, Editor<br />
Huntington Hills, Wisner Road, Rochester 9. New York, U.S.A.<br />
JOIIN R. UTZ, Associate Editor<br />
140 Avon Road. Rochester 10, New York. U.S.A.<br />
MISS MARY WINKELJOHN, Circulation Manager<br />
Standard Printing Co., Celina. Ohio, U.S.A.<br />
<strong>THE</strong> PERIODICAL OF <strong>THE</strong> ROLLS-ROYCE OWNERS' CLUB, INC.<br />
N. Y. REGIONAL MEET, Wantagh, Long Island, had a<br />
gratifying turnout on June 8, as shown in the picture<br />
below. Host was land-owning (3 acres), banjo-playing,<br />
octogenarian Jimmy Budlong who supplied parking<br />
space, drinks, and a P.A. system. Some of cars present,<br />
front to rear, were: P-III 3BU84 Mulliner close coupled<br />
sedan (George Price); P-II 250AJS Brewster Newport<br />
limo. (Bob Godley); P-II AMS Brewster sports sedan<br />
(Monroe Mann); Silver Wraith LWSG 68 6-light saloon<br />
(Dan Streeter, who allowed Ed. and Assoc. to sample-delicious!);<br />
P-II shooting brake conversion of Barker<br />
close coupled sedan (Ken Redford); Bentley Mk. VI<br />
Park Ward Convertible (Bob Hilpert); P-I S154FR<br />
Brewster Derby phaeton (J. McFarlane); and 20/25<br />
GTR 20 Hooper sedan ("Rick" Richter). Masthead<br />
shows some enthusiasts inspecting H. O'Connor's 20 HP<br />
GNK32 tourer (very rare). After meet some gathered<br />
Chez Godley for ice-box raid and yak fest.<br />
COBLESKILL--H this reaches you in time, it is an<br />
invitation. Even if you are not registered, come anyway<br />
to Cobleskill, N.Y., Aug. 9, 10, ll--see p. 183.<br />
SPOOK--A sprightly sporadical devoted to RROC administrative<br />
affairs is available to all who are interested<br />
in club work. Write R. F. Godley, 59 Laurel<br />
Drive, Massapequa Park, Long Island, N.Y.<br />
1957 The <strong>Rolls</strong>-<strong>Royce</strong> <strong>Owners'</strong> <strong>Club</strong>, Inc.<br />
Lithographed in the United States of America<br />
1910 Silver Ghost 1298 of Mr. S. J. Skinner (below)<br />
which was judged handsomest car on recent Anglo-<br />
American Rally. Mr. and Mrs. Skinner (standing) are<br />
seen talking to Dame Sybil Thorndike and her husband,<br />
Sir Lewis Casson, noted British acting couple, judges,<br />
who honeymooned in similar car 50 years ago.<br />
Copyright New York Times
292<br />
MEXICO BY PHANTOM II<br />
by Fred Kelly<br />
Probably the severest service, other than racing<br />
competition, that a passenger auto can undergo is pulling<br />
a heavy house trailer in hot weather over rough,<br />
twisty, mountainous roads. The drag of the trailer<br />
forces the engine to operate under constant load for<br />
long periods; the gears must be used to pull up steep<br />
hills; brakes receive the severest service on the downgrade;<br />
and the weight of the trailer on the rear of the<br />
car overloads tires and wheel bearings as well as<br />
stressing springs to their maximum.<br />
This is the kind of ordeal through which I put my<br />
1930 Phantom II early this year when I towed a 5000pound<br />
house trailer from Scarsdale, N.Y., to Mexico<br />
City, lived in it with my family for three months, then<br />
made the return trip with trailer as far as Hot Springs,<br />
Arkansas and soloed home for a total distance travelled<br />
of 9850 miles.<br />
The P-II is GN151, a right hand drive model which<br />
had 38,000 miles on the speedometer at the start of<br />
the trip. When I acquired the car as a chassis in 1954,<br />
I completely disassembled the engine, thoroughly<br />
cleaned all parts, renewed the top compression ring<br />
of each piston, replaced the slipper flywheel linings<br />
and Hardy flexible coupling, ground the valves, and<br />
added a by-pass Purolator oil filter to the engine oiling<br />
system. Subsequent to the trip a water-heated type<br />
of intake manifold riser was put in place of the exhaust<br />
heated variety which usually scales up and cracks after<br />
a few months' service. A rather odd-appearing body<br />
for the chassis was assembled from surplus Brewster<br />
body sections discovered on the premises of Sam<br />
Adelman.<br />
The car was fitted with 21-inch wheels, ideal for<br />
clearing the obstructions found on Mexican roads, and<br />
five almost new Dunlop tires and reinforced tubes. A<br />
massive trailer hitch was constructed on the rear of<br />
the chassis but no overload springs, ride leveling de-<br />
vices or other trailer hauling accessories were added<br />
except connections for lights and electric brakes. The<br />
ball of the hitch is 45 inches behind the rear axle of<br />
the car.<br />
The trailer is a 22-foot 1948 Travelo having one<br />
axle and electric brakes with an unladen weight of<br />
4200 pounds and an estimated laden weight of 4900<br />
pounds. The trailer is 80 inches wide and stands almost<br />
100 inches off the ground. Obviously the vehicle has<br />
sufficient frontal area to offer considerable wind resistance.<br />
It is not the ideal trailer for long, fast trips.<br />
Top speed of car and trailer on a good level road<br />
was about 65 mph but gas consumption was prohibitive<br />
at such a speed. Most of our level travel was at 45 mph<br />
at which speed we obtained a gas mileage of 7.8 mpg.<br />
In the 3100 miles of roundabout travel from Scarsdale<br />
to Mexico City, most of it in cold weather, we used<br />
six quarts of No. 30 high detergent oil--an almost<br />
miraculous lack of oil consumption for a car operating<br />
under heavy load. Oil pressure never dropped below<br />
22.5 psi even when engine was operating close to the<br />
boiling point. Running at high speed (over 60 mph) on<br />
the return trip from Hot Springs to Scarsdale, a distance<br />
of 1398 miles, without trailer our oil consumption<br />
was a quart for every 280 miles and we made 10.2<br />
miles per gallon of low test gasoline.<br />
Before leaving the United States to cross the border<br />
at Laredo, Texas, we detected an engine "miss" which<br />
was found to be caused by a no-clearance No. 6 exhaust<br />
valve. All valves were readjusted as they had very<br />
little clearance although a liberal setting of .003 inch<br />
had been made before the start of the trip. This condition<br />
recalled to mind the warning I had received<br />
previously that P-I and P-II valves have a tendency to<br />
"tulip" or stretch under hard, hot driving conditions<br />
thus reducing the rocker arm clearance. With readjustment,<br />
however, mine seemed to work satisfactorily<br />
so we set off for the 760-mile trip from the<br />
border to the Mexican capital.<br />
The Pan American Highway has 114 miles of the<br />
twistiest, steepest mountain road of any paved Mexican<br />
highway (a new road has just been opened from Monterey<br />
to Mexico City which by-passes the mountains).<br />
What an opportunity for the mighty <strong>Rolls</strong> to show its<br />
stuff. From a point only 300 feet above sea level, we<br />
climbed to 6500 feet altitude in one 25-mile stretch.<br />
Of course, with the trailer on behind, the <strong>Rolls</strong> could<br />
not make this ascent in high gear—even in third speed<br />
it would reach the boiling point and we would have to<br />
drop to second to obtain enough rpm for water circulation.<br />
(Drivers of American cars pulling trailers in<br />
hot mountainous country employ an evaporative cooling<br />
system in which water in a separate tank is sprayed<br />
slowly over the front of the radiator to obtain sufficient<br />
cooling.) But the <strong>Rolls</strong> handled the load masterfully.<br />
The great weight of the car prevented the swaying and<br />
jerking which characterizes a heavy trailer haul with<br />
the conventional car. Unfortunately, the engine again<br />
developed a miss near the end of the ascent and I knew
As everywhere, Mexican boys admire P-II plumbing.<br />
that the exhaust valve which had been holding open had<br />
been burned and would need regrinding. As we gained<br />
altitude, the carburetor mixture lever was moved<br />
toward the lean position and at 8000 feet, the best combustion<br />
was obtained with the lever to the extreme left.<br />
Paked in a beautiful trailer camp in Mexico City,<br />
it as not an onerous chore to regrind valves and be<br />
ready for many adverturesome side trips without the<br />
trailer. (Incidentally, in Mexico City trailer parking<br />
is $1.25 a day which includes all utilities, food in the<br />
native market is about one quarter of the cost at home,<br />
and low test gas for the <strong>Rolls</strong> costs 16 cents a gallon.<br />
And the sun shines every day.) No car could be more<br />
ideally suited for rough going than the P-II. The high<br />
clearance allowed us to explore roads off the beaten<br />
path that only trucks might traverse. Without the<br />
trailer, the P-II could master any climb without overheating<br />
and the use of gears for long descents was a<br />
Godsend which the owners of automatic transmission<br />
cars could not fully experience.<br />
Valve grinding compound (walled, that is!).<br />
Headed home, we again crossed the Mexican border<br />
at Laredo and filled up with low test American gasoline.<br />
It was a hot day in April and we had not gone 10 miles<br />
before the <strong>Rolls</strong> came to a stop with a violent case of<br />
vapor lock. The Mexican gas which has much less<br />
volatility than its American counterpart had never<br />
caused vapor lock under the most torrid operating<br />
conditions. What to do? Suddenly I recalled the benefits<br />
of evaporative cooling in low humidity climates. I took<br />
a pan of water from the trailer, stuck one end of a bath<br />
towel in the water and wrapped the remainder of the<br />
towel around the end of the vacuum tank that protrudes<br />
through the firewall into the driver's compartment.<br />
The evaporative cooling produced by the water soaked<br />
towel cured my vapor lock and we continued on our way.<br />
No story of taking a trailer to Mexico behind a P-II<br />
can be completely meaningful without some reference<br />
to the experiences of other less fortunate motorists<br />
•who pulled their trailers with conventional passenger<br />
cars. Those who employed Chevy, Dodge, GMC, or<br />
P-II resident in Mexican trailer camp.<br />
International 1/2 or 3/4-tontrucks made out reasonably<br />
well but those driving late model passenger cars were<br />
in a pitiful state. Hydramatic transmission bands<br />
burned out on the long mountain grades; hydraulic<br />
automatic transmissions broke their seals and lost<br />
their oil from overheating; 10 to 1 compression ratio<br />
engines knocked themselves to pieces on heavy climbs<br />
using low octane gas. Rear axles and rear wheel bearings<br />
broke from the extra load of the trailers and all<br />
late model cars left mufflers and other under-chassis<br />
parts along the highways where they could not clear<br />
obstructions.<br />
Sturdy trailer hitch mounting.<br />
Only serious shortcoming of GN151 was insufficient<br />
power at high altitude. This engine has only a 4.75 to<br />
1 compression ratio and it becomes very sluggish and<br />
lazy at altitudes over 5000 feet with a heavy trailer<br />
load. I would like to take the same trip with one of the<br />
last model P-II's which had a higher compression ratio<br />
and other refinements. As a matter of fact, to pull a<br />
heavy trailer properly in mountainous regions, an<br />
engine with upward of 200 hp is needed. The new<br />
American cars turn out the horsepower when the engines<br />
buzz at 3000 rpm but the carriage is quite hopeless<br />
for trailer work. The <strong>Rolls</strong> has everything but a<br />
few horses--maybe a little supercharging and higher<br />
compression will still make these 27-year-old marvels<br />
superior to anything offered today.<br />
Mexican version of a hot doggery.<br />
293
PHANTOM II PILOT JET STICKING<br />
Difficult starting is sometimes caused by the starting<br />
carburetter piston sticking, particularly if the car<br />
hasn't been used for a few days. The piston moves part<br />
of the way, so the carburetter makes the proper hissing<br />
noise, but not far enough to admit sufficient fuel. Cure:<br />
If dressed in overalls, remove starting carburetter<br />
and clean out. If dressed in a suit, push a small screwdriver<br />
through one of the holes in the starting carburetter<br />
and push the piston down, then remove screwdriver<br />
and start engine. W. R. Matthews, England<br />
CHROME PLATING<br />
All U.S. built cars starting with S151FR had chrome<br />
plated trim. Some earlier ones which were returned<br />
to the factory for reconditioning, were also chrome<br />
trimmed. Probably all the P-I's 'up dated' with Hall<br />
(bowl shaped) headlamps were so treated. Some Ghosts<br />
may have been refinished in chrome. It therefore seems<br />
authentic to use chrome on some of these cars, at least<br />
the factory would have done so.<br />
Chroming has its problems. The worst is finding a<br />
really good plater. Steel, even brass, should first be<br />
copper, then nickel plated for best chrome plating.<br />
While later P-I's had a removable radiator shell,<br />
earlier cars had none. Therefore the radiator has to<br />
be disassembled for plating, at about $100 - $150.<br />
While we have not heard of it being done, it might be<br />
possible to mask the front and rear of the radiator core<br />
with asphalt, then plate, then dissolve the asphalt.<br />
In plating a radiator shell, idiots will hang it on a<br />
plater's hook--result, a 'burned' pitted area, very<br />
obvious. Be very emphatic about avoiding this.<br />
Another problem is how to remove a hood--er,<br />
bonnet--hinge, plate, and replace it in a workmanlike<br />
manner. Has anyone done this?<br />
Consider carefully before plating wheels. They<br />
must be completely disassembled (spokes may be<br />
294<br />
20 H.P. 1928 GFN39 Hooper drophead with Dr. Eric<br />
Budden, former owner and Capt. C. K. Wildman, in England.<br />
This chassis type is reputed quietest ever made.<br />
GHOST THROTTLE AIR LEAK--MORE (see p. 289)<br />
It is possible to materially reduce, or even completely<br />
prevent over-run backfiring by richening the<br />
slow-running jet slightly, and driving the car with the<br />
governor lever well up, so that the engine idles at<br />
5-600 RPM. It can, of course, be shut down when car<br />
is stationary. This cuts down the inlet manifold vacuum,<br />
and the engine therefore draws a mixture of proper<br />
strength which it can fire, instead of an excessively<br />
weak mixture. This is, of course, only a palliative; the<br />
boring and new piston as previously recommended is<br />
the only real cure. It is also essential for avoidance<br />
of this trouble that both ignitions are correctly adjusted<br />
and 100% efficient, and that there are no leaks<br />
in the exhaust. In this connection, cut-outs can sometimes<br />
be troublesome; many British Ghosts have had<br />
the cut-out sealed off by R-R, for example, Bob Ley's<br />
33CE, once mine. W. R. Matthews, England<br />
rusted into nipples) and prepared. Unless the plater<br />
has special electrodes, plating will not "throw" into<br />
hollow areas on the rim.<br />
Preparing any part for plating means disassembly,<br />
and making the part almost as smooth as you expect<br />
the plating to be. Nicks and corrosion pits will be still<br />
there. Use a file, emery paper, etc. Don't send in<br />
rusty nuts or bolts, it is a waste of time. The plater's<br />
solutions will clean off the rust but not replace it with<br />
chrome nor make the surface smooth.<br />
Good nuts and bolts, with snug-fitting threads will<br />
be too tight when plated. The plating does add thickness.<br />
Either chase the threads beforehand to allow for the<br />
extra metal, or chase them after plating so they will<br />
fit. This requires taps and dies for Whitworth threads.<br />
Plating the lady mascot is quite a ticklish job. A<br />
ham-fisted buffer may easily buff the features right off.<br />
A plater familiar with silver tableware may do better.<br />
Unless the plater positions a special electrode down<br />
between the wings, no chrome goes there. Mr. Don<br />
Clairmonte, creator of excellent mascot replicas (p.64),<br />
recommends as a plater of mascots the Clermont Electroplating<br />
Works, 480 Clermont Ave., Brooklyn, N. Y.<br />
Before committing any work to a plater, get some<br />
references to his work. The best references will be<br />
from another R-R owner who has had similar parts<br />
done. When you take parts to a plater, give him a detailed<br />
list and keep a duplicate. Good luck! J. W. McF.<br />
Space left over, dammit.<br />
CAN ANYONE MAKE <strong>THE</strong>SE?<br />
This is the soft rubber bushing<br />
for the bumper supports on<br />
late U.S. Ghost and early P-I.<br />
Most owners of these cars<br />
need four each. Editor has an<br />
unused sample.<br />
Mascots from Frederic C. Palmer
R R BRAKES - U.S. HUBS<br />
by A.W. Soutter<br />
The instructions for removing hubs and drums by<br />
V. C. Allen, p. 246-7-8 apply to Springfield built R.H.<br />
drive Silver Ghosts which are fitted with Dunlop wheels.<br />
These are all chassis of the CE, NE, AG, LG, MG, JG,<br />
UG, and SG series, and chassis 4TG thru 36TG. All<br />
other Springfield built Silver Ghosts and P-I's were<br />
fitted with American wire wheels and hub caps having<br />
integral locking plates as shown in the attached sketch<br />
of the rear hub and drum.<br />
Comparison of this sketch with Fig. 4, p. 247, will<br />
reveal that the essential difference between British<br />
and American cars, which influences removal of the<br />
hub, is that removal of the American hub cap directly<br />
exposes the inner oil retaining cap, whereas the removal<br />
of an additional locking ring and sliding barrel<br />
is required on the British car. Sequence of removal<br />
of components is as follows:<br />
1. Hub cap, using wheel wrench supplied in kit.<br />
2. Spring locking ring which secures inner oil retaining<br />
cap to inner hub, using screwdriver.<br />
3. Inner oil retaining cap, using socket wrench<br />
supplied in kit. (No. F6955 on p. 174, 1½" socket will<br />
fit.) (R.H. thread on L.H. wheel, L.H. thread on R.H.<br />
wheel.)<br />
4. Cotter pin and castellated nut on rear axle shaft,<br />
using socket wrench supplied in kit. (Same wrench.)<br />
(R.H. thread on L.H. wheel, L.H. thread on R.H. wheel.)<br />
or cotter pin and castellated nut on front axle pivot,<br />
using socket wrench supplied in kit. (F6955) (R.H.<br />
thread on R.H. wheel, L.H. thread on L.H. wheel.)<br />
5. Front hub and drum including bearings will now<br />
slide off axle pivot.<br />
Rear hub requires further operations as follows:<br />
6. Rear axle driving dog, using any available bolt<br />
screwed loosely into tapped hole for withdrawing tool.<br />
7. Rear axle tube locking plate, using 2BA socket<br />
wrench to remove three hex nuts.<br />
8. Rear axle tube locking nuts, using special pin<br />
spanner supplied in tool kit. (G2899 on p. 174.) (R.H.<br />
thread on R.H. wheel, L.H. thread on L.H. wheel.)<br />
9. The rear hub and drums, including bearings will<br />
now slide off axle tube, use babbit hammer on inner<br />
face of brake drum.<br />
If Fig. 2, p. 246 were revised to show the hub cap<br />
and inner oil retaining cap pictured in the rear hub<br />
sketch above, the result would be a very close repre-<br />
Mr. and Mrs. Wm. R. O'Connor of Conn, with their<br />
P-I Ascot tourer S-178FR restored by H. C. Wire-<br />
295<br />
Fig. 1<br />
Fig. 2<br />
sentation of the front hub and drum assumbly fitted to<br />
all American P-I's. There is one further difference,<br />
however, and this is of the utmost importance in selecting<br />
replacement hub caps. All Americanfront brake<br />
axles, whether originally fitted to P-I's or to Silver<br />
Ghost front brake conversion jobs, have hub caps with<br />
locking plates which engage slots on the ends of the<br />
inner hubs as shown in Fig. 2. These may be identified<br />
by the overall length of 2.800 and the shoulder length<br />
of 3/8".<br />
The earlier type of hub caps, as shown in Fig. 1,<br />
have locking plates which engage internal serrations<br />
in the inner hubs. These may be identified by the overall<br />
length of 2 1/2" and shoulder length of 1/8".<br />
The important consideration is that while it is not<br />
possible to fit the earlier type hub cap to the later type<br />
hub, it is possible to fit the later type hub cap to the<br />
earlier type hub in such a manner as to thoroughly<br />
tighten the wheel and, yet, not lock it.<br />
Persons willing to shed wheels may disregard this<br />
warning.<br />
The later type hub cap was used on the rear hubs<br />
of all American P-I's of the RP, FP, KP, FR, KR, LR,<br />
MR, and PR series, 288RM, 301 thru 303FM, 310FM,<br />
311FM, 313FM, 314FM, 316FM, and 318 thru 399FM.<br />
Unique right drive Springfield P-I converted from<br />
LHD for movie. Note '34 Pontiac louvres. (D. Wynne)
296<br />
COOLING SYSTEM TROUBLES - PART III<br />
Acid Cleaning of Cylinder Blocks and Heads<br />
bv V.C. Allen<br />
The acid cleaning solution is commercial hydrochloric<br />
acid (32%) used without dilution. It is available<br />
from chemical supply houses.<br />
Hydrochloric acid can be very dangerous for inexperienced<br />
handlers. It can burn the skin, is very corrosive<br />
and is a deadly poison. Use rubber gloves.<br />
This treatment assumes the block or head is removed<br />
from the car. Leaks, especially in water tubes,<br />
may result as the removed scale may be sealing holes.<br />
Retubing will be described later.<br />
Important Note: The following instructions are<br />
applicable in general to all pre-war <strong>Rolls</strong>-<strong>Royce</strong> cars,<br />
i.e., Silver Ghost, 20 H.P., 20/25 H.P., 25/30 H.P.,<br />
25/30 H.P. "Wraith," Bentley as noted, British and<br />
U.S. Phantom I (with cast iron cylinder head), but do<br />
not apply to aluminium cylinder blocks or heads.<br />
PHANTOM I. An aluminium head was introduced<br />
commencing at British chassis No. 1-CL and onwards,<br />
i.e., at F2B series to end of H2 series. The cylinder<br />
blocks being of cast iron can be treated with acid but<br />
not the cylinder head. U.S. series FR, KR, LR, MR,<br />
and PR have aluminium heads.<br />
PHANTOM II. All Phantom II cylinder heads are of<br />
aluminium. The cylinder blocks are of cast iron and<br />
can therefore be treated with acid.<br />
WATER JACKET COVERS (ALL CARS). In all cases<br />
the water jacket covers, whether they are of cast iron<br />
or aluminium, must be removed from the side of the<br />
cylinder block prior to pouring in the acid through the<br />
water jacket apertures.<br />
It will be observed from the above that acid must<br />
not be used to clean the interior of an aluminium cylinder<br />
head (or a strong alkaline solution such as soda)<br />
because this would be dangerous to the operator and<br />
would cause extensive damage to the cylinder head.<br />
INTERNAL CLEANING OF P-I, P-II, AND P-III.<br />
With the cylinder heads removed from the engine, remove<br />
the front and rear end covers and direct a jet<br />
of air under high pressure alternatively through the<br />
front and rear end cover apertures to loosen as far as<br />
possible the corrosion product. Next, direct a jet of<br />
cold water into the cylinder head in a similar manner<br />
to thoroughly flush it out.<br />
Refit the front and rear end covers.<br />
INTERNAL CLEANING OF A PHANTOM III BLOCK<br />
If a P-III engine is due for a complete overhaul and<br />
where a rebore is necessary, we (The London Repair<br />
Depot) remove the wet cylinder liners and the water<br />
and oil sealing rings and hand scrape all the walls of<br />
the block to remove the corrosion product. A jet of air<br />
under high pressure is then directed around the walls<br />
after which the block is thoroughly flushed out with<br />
cold water under pressure before the liners and new<br />
oil and water sealing rings are fitted. It should be noted<br />
that this work should only be undertaken by a main<br />
<strong>Rolls</strong>-<strong>Royce</strong> Repair Depot having the special tools for<br />
removing and refitting the liners, etc.<br />
It is not possible to remove the corrosion product<br />
from a Phantom III cylinder block in any other way.<br />
The following is the only effective way of removing<br />
all scale accumulation especially when a car has been<br />
in service a number of years and covered a large mileage<br />
and where the scale has solidified. Scaling-upwill,<br />
of course, cause overheating of the cooling system and<br />
severe localised overheating of the cylinder head.<br />
A. IRON CYLINDER HEAD<br />
I. To Remove Scale:<br />
(i) Remove the valves and valve springs.<br />
(ii) Remove from the side of the head the two gland<br />
nuts together with the rubber packing glands and the<br />
gland seatings and seal off the two water passage holes<br />
by tapping in two suitably shaped (taper) wooden plugs.<br />
Also seal off with a plug the orifice of the thermometer<br />
union.<br />
(iii) Remove the front end cover, turn it upside down<br />
and refit complete with joint washer.<br />
Note: On Bentley M series chassis (B-2-MR to B-<br />
203-MX) a combined front end cover and thermostat<br />
casing is fitted in which case it should be removed and<br />
the aperture in the head blanked off by means of a suitable<br />
plate and joint washer.<br />
(iv) Coat the whole of the head with a thick layer of<br />
heavy grease to prevent acid contact.<br />
(v) Place the cylinder head on a level plane in a tank<br />
or container with the gasket joint face uppermost and<br />
Bentley 1948 Mk VI sedan by James Young and 1920 Silver Ghost 106FW Pall Mall tourer owned by C. S. Hoyt, Mass.
297<br />
pour slowly (to prevent frothing as far as possible) the<br />
acid through the orifice of the front end cover; (if an<br />
M series Bentley chassis see note below) continue to<br />
pour until it is seen, upon looking at the water passage<br />
holes, that the acid has risen almost to the level<br />
of the gasket joint face. The action of the acid will of<br />
course cause a certain amount of frothing and when<br />
this has subsided top up as necessary with acid to restore<br />
the level. Leave the head in this condition for<br />
not less than 16 hours but after it has been standing<br />
from 3 to 4 hours check the level of the acid and top<br />
up if necessary.<br />
Note: If an M series Bentley chassis pour in the<br />
acid very slowly (with the aid of a small funnel) through<br />
either the front or rear dowel locating hole on the<br />
gasket joint face of the head. These dowel holes have<br />
a diameter of .4375" and are situated near the front<br />
and rear end of the joint face.<br />
(vi) Next, turn the head on its side and allow the<br />
acid and residue to drain off. Restore the head to the<br />
previous level position. Remove the wooden plugs.<br />
(vii) Pour through the orifice of the front end cover<br />
(or through one of the two dowel pin holes) a strong<br />
solution of hot water and caustic soda (1/2 lb. soda to<br />
2 gallons of water) to neutralise remaining traces of<br />
acid. Repeat this operation until the solution has a<br />
clear colour. Next, allow a stream of cold tap water<br />
to pass through the head in a similar manner for a<br />
few minutes.<br />
(viii) Refit the three wooden plugs and with a hose<br />
again allow water to pass through the head and if the<br />
acid has fully disintegrated the scale a good flow of<br />
water should escape past all the water passage holes.<br />
II. Water (Air) Testing of Head:<br />
(i) Remove the front end cover (or blanking plate)<br />
and apply a thin coating of jointing compound to the<br />
joint face of the cover and the corresponding face of<br />
the head and using a new joint washer refit the cover<br />
in its normal position.<br />
(ii) Remove the rear end cover and fit a new joint<br />
washer in a similar manner. After removal of the<br />
cover a visual inspection can be made to assess the<br />
inner cleanliness of the head.<br />
(iii) Plug up with suitable shaped (taper) wooden<br />
plugs all the water passage holes on the gasket joint<br />
face and also seal off the outlet of the front end cover<br />
with a piece of hose, wooden plug and hose clamps.<br />
(iv) Make a suitable threaded air connection adaptor<br />
for screwing on to the thermometer union on the cylinder<br />
head. There are two different types of thermometer<br />
unions having threads as below (for Bentley and<br />
small <strong>Rolls</strong>):<br />
a. .375" GAS x 19 T.P.I. (R.H.). The external dia.<br />
of the thread is .648".<br />
b. .875" dia. x 20 T.P.I. (R.H.).<br />
Connect an air pressure line to the adaptor and lower<br />
and submerge the cylinder head in a tank of water<br />
having a temperature of 80°-85°C. Apply an air pressure<br />
of 12 lbs sq/ins and note if there are any air<br />
leakages and cure as necessary.<br />
(v) Remove the wooden plugs and the grease.<br />
(vi) Fit a new rubber packing gland (Part No. EB.654)<br />
to each of the two gland nuts.<br />
Controls of 20H.P. shown on masthead. Instrument<br />
at left measures gradient.<br />
B. IRON CYLINDER BLOCK<br />
I. To Remove Scale:<br />
(i) Remove all water jacket covers from the side of<br />
the block.<br />
(ii) Plug up with suitably shaped (taper) wooden<br />
plugs all water passage holes at the top of the block.<br />
(iii) To prevent the acid from accidentally contacting<br />
any of the machined surfaces of the block such<br />
as the cylinder bores and the gasket joint face and so<br />
causing "acid etch" they should all be painted with a<br />
double coat of "temporary rust preventative" (such<br />
as is used on machined parts prior to storage or dispatch)<br />
and when dry and as a further protection a thick<br />
coat of heavy grease should be applied.<br />
(iv) Lay the block level on its side with the water<br />
jacket apertures facing upwards. Slowly (to prevent<br />
frothing), pour about an equal amount of acid through<br />
each of the jacket apertures (to equally distribute it)<br />
until the level of the acid just covers the cylinder walls.<br />
Leave the block in this condition for not less than 16<br />
hours but after it has been standing from 3 to 4 hours<br />
check the level of the acid and top up if necessary to<br />
restore the level.<br />
(v) After the block has stood for 16 hours remove<br />
the lower row of wooden plugs and allow the acid and<br />
residue to run out into a container.<br />
(vi) Pour through the water jacket apertures a<br />
strong solution of hot water and caustic soda (1/2 lb<br />
soda to 2 gal. of water) to neutralise remaining traces<br />
of acid. Repeat this operation until the solution has a<br />
clear colour. Remove remaining wooden plugs. Next,<br />
allow a stream of cold tap water to pass through the<br />
block in a similar manner for a few minutes.<br />
(vii) With a hose again allow water to pass through<br />
the block and if the acid has fully disintegrated the silt<br />
a good flow of water should escape past all the water<br />
passage holes.<br />
(viii) Apply a thin coating of jointing compound to<br />
the faces of the water jacket covers and the corresponding<br />
faces of the block and using new joint washers<br />
refit the covers.<br />
II. Water (Air) Testing of Block:<br />
(i) Refit the wooden plugs.<br />
(ii) Make a suitable air connection adaptor for fitting<br />
to the orifice of the water pump elbow on the block and<br />
connect an air pressure line to it and lower and submerge<br />
the block in a tank of water having a temperature<br />
of 80°-85° C. Apply an air pressure of 12 lbs<br />
sq/ins and note if there are any air leakages and cure<br />
as necessary.<br />
(iii) Remove the wooden plugs.
298<br />
PHANTOM III, 3 BT 151, Hooper Sedanca DeVille. Genuine 6,700 miles, mint inside and out, chauffeurmaintained.<br />
Sanderson and Holmes Limited (Leicester), Bentley House, London Road, Leicester, England.<br />
ROLLS-ROYCE BAZAAR<br />
RR's and Bentleys from England. Reputable English<br />
source known to RROC will look for specific models<br />
and body types at English prices. All models 1919 to<br />
1957. No pre-1919 cars. Inquiries to R. H. Goldberg,<br />
16 Clare Terrace, Crestwood, Tuckahoe 7, N.Y.<br />
ROLLS-ROYCE Silver Ghost - 1911. Engine like new<br />
after complete overhaul. Have limousine and touring<br />
car bodies. Completely intact, wooden wheels. Only<br />
need paint job. Will accept investment of $4000. Dr.<br />
S. L. Scher, 1100 Park Avenue, New York, N.Y.<br />
SILVER GHOST 1926 Drophead Coupe. Authentic restoration<br />
partially completed. Running condition. Good<br />
investment at $925.00. William D. Small, 3458 Shenandoah<br />
Ave., St. Louis, Mo. PR1-4449.<br />
PHANTOM II Continental 29TA, 1934 Thrupp & Maberly<br />
sports saloon. Pictures on pages 111 and 177. $3500.<br />
L. Ross Sine, 12111 Nandell Lane, Los Altos, Calif.<br />
PHANTOM I (Br.) 70LF Limousine. Mechanically very<br />
good, body very good, paint fair to good. Original<br />
mascot, instruments, wheel discs, roof ventilator,<br />
occasional seats. $750 f.o.b. England, but will deliver<br />
in N.Y. State. Barrie Gillings, Edgehill, London Rd.,<br />
Harrow on the Hill, Middlesex, England.<br />
BENTLEY, Mk VI Std. steel saloon. Engine overhauled,<br />
new brakes, new paint, new leather in front seat. $3950.<br />
W.A.Anderson, Jr., 9891 Santa Monica Blvd., Beverly<br />
Hills, Cal.<br />
PHANTOM III Town Car; unique Inskip body, maroon<br />
lacquer; interior mint; engine completely rebuilt, all<br />
bills available. Owner's handbook, RR maintenance<br />
data, some tools and spares with the car. Photo, details,<br />
to interested purchasers. Price firm $1950.00.<br />
Lt. Col. John Macken, 25 Davis Ave., Warwick, Va.<br />
PHANTOM III, 3DL116, convertible with automatic top<br />
by Hooper. 2-door, 5-passenger, completely redone<br />
from bumper to bumper. I have $5000 invested. Price<br />
$5000. SILVER DAWN, 1954 Park Ward convertible.<br />
2-door, 5-passenger. 8000 miles, white with red leather<br />
like new. Automatic gear box and top. Cost $18,000.<br />
Price $9000. Dr. S. L. Scher, 1100 Park Ave., N.Y., N.Y.<br />
PHANTOM I (Br.) 1929 7-seater Barker limousine.<br />
First-class mechanical condition, running daily, good<br />
tires. Full specification and photos available. Accept<br />
$1,950, includes delivery any part of U.S.A. D. A.<br />
Russell, 321 South Sunset Place, Monrovia, California.<br />
WANTED<br />
INFORMATION. Am fully aware of availability of new<br />
Dunlops, but wish to know where I can have my 7.00 x<br />
21 tires recapped in my vicinity. Henwar Rodakiewicz,<br />
400 East 50th St., New York 22, N.Y.<br />
P-II Convertible coupe, in good condition. Harold H.<br />
Walther, RR 1, Cedar Falls, Iowa.<br />
P-II Croydon convertible or other <strong>Rolls</strong> with similar<br />
coachwork. Good condition. <strong>Royce</strong> J. Noble, 21 Woodland<br />
Road, Maiden 48, Massachusetts.<br />
SILVER GHOST, 4-speed gear box, open coachwork.<br />
All pictures will be returned. Wm. Schreiber, 12857<br />
Maple Ave., Blue Island, III.<br />
BENTLEY Standard Steel Saloon, '47 to '51. Prefer<br />
low-mileage, sunshine-roof model. Description, price,<br />
and photo to William D. Small, 3458 Shenandoah Ave.,<br />
St. Louis, Mo.<br />
PARTS AND SERVICE<br />
INFORMATION as to source of English maker of spring<br />
gaiters. Inquire Wm. Schreiber, 12857 Maple Ave.,<br />
Blue Island, III. who is satisfied customer.<br />
FOUR tires 650-19; in excellent condition, heavy tread.<br />
$100.00 shipped prepaid east of Miss. Clinton D. Keagy<br />
P. O. Box 115, New Castle, Pa.<br />
750x16 - $42.00<br />
700x17 - $47.00<br />
750x17 - $52.00<br />
NEW WHITEWALL TIRES<br />
700x18 - $56.00<br />
700x20 - $49.00<br />
650x19 - $49.00<br />
550x17 - $23.50<br />
550x18 - $21.50<br />
475x19 - $24.35<br />
450x21 - $24.15<br />
Send check or money order to Obsolete Tire Co., 159<br />
Truman Street, New Haven, Conn.<br />
FOREIGN CAR CENTER<br />
SALES * NEW CAR * SERVICE<br />
Restorers of the 1954 "<strong>Rolls</strong>-<strong>Royce</strong> Trophy" Car<br />
P. H. Shavney, Jr., Pres.<br />
Germantown Pike at Route 202, Norristown, Pa.<br />
Cable Address "ROLLS"<br />
LARGE ASSORTMENT of R-R parts for most models.<br />
S. Adelman, 635 Columbus Ave., Mt. Vernon, N.Y.<br />
Messrs Schaler and Waters<br />
Official <strong>Rolls</strong>-<strong>Royce</strong> Representatives<br />
26 West 27th Street<br />
Indianapolis Indiana<br />
Exclusively <strong>Rolls</strong>-<strong>Royce</strong> and Bentley