tiptronic 6270.pdf - Pfaff
tiptronic 6270.pdf - Pfaff tiptronic 6270.pdf - Pfaff
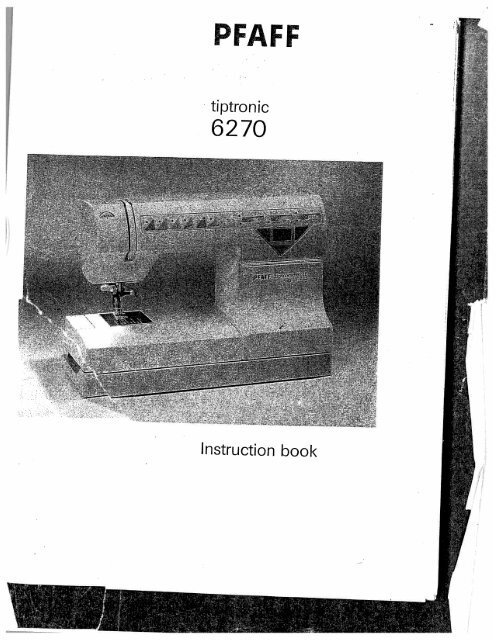
PFAFF tiptronic 6270 Instruction book
- Page 2 and 3: ;afety rules r the United Kingdom o
- Page 4 and 5: Parts of the sewing machine (1) Key
- Page 6 and 7: 2 Notes on safety Notes on safety f
- Page 8 and 9: i& Index Accessories and needles 1
- Page 10 and 11: index Oiling Open appliqué foot Op
- Page 12 and 13: 8 Utility stitch table 000102l03 05
- Page 14 and 15: _____________ _____________ o - —
- Page 16 and 17: V. -- • .• •V.)
- Page 18 and 19: Contents Detachable work Support Bo
- Page 20 and 21: J Connecting the foot control Conne
- Page 22 and 23: I .‘ Preparing the machine for bo
- Page 24 and 25: - PFAFF [-;; r’ 1 Jr - Switch j 1
- Page 26 and 27: Hook cover Switch off the master sw
- Page 28 and 29: 17 PFAFF 1 20: 22 ‘::. Threading
- Page 30 and 31: Presser bar lifter The sewing foot
- Page 32 and 33: — fed - solution: - the .1 The bu
- Page 34 and 35: JA 11 Changing the needle Switch of
- Page 36 and 37: I If 1 Electron. Sewj 2 Patter,tCti
- Page 38 and 39: Sewing function keys Backward sewin
- Page 40 and 41: I 38 Setting the stitch width/patte
- Page 42 and 43: 40 Setting the balance Appearance a
- Page 44: ii I I I By pressing key m the sele
- Page 48 and 49: Press the m)-key (1 5). Program 60
- Page 50 and 51: I I fl I j - f+ 0) CD Co o 0 0 0 CD
PFAFF<br />
<strong>tiptronic</strong><br />
6270<br />
Instruction book
;afety rules<br />
r the United Kingdom only<br />
For easier understanding of this instruction book<br />
please unfold this page when reading it.<br />
he leads must definitely not be connected to the safety-lead terminal I nor to<br />
plug with three pins.<br />
ie wires in the mains lead are coloured according to the following code:<br />
Blue: Neutral<br />
Brown: Live<br />
3 the colours of the wires in the mains lead of this appliance may not correspond<br />
ith the colour coding of the terminals in your plug, proceed as follows:<br />
ie wire which is coloured blue must be connected to the terminal which is mar<br />
d with the letter N or coloured black.<br />
e wire which is coloured brown must be connected to the terminal which is<br />
rked with the letter L or coloured red.<br />
t off mains plugs are definitely not to be used, but disposed of immediately.<br />
fective mains leads must be replaced complete.<br />
ly 3 A spare fuses must be used as approved by ASTA according to BS 1362<br />
I the fuse cover must be marked 3 A or with the corresponding colour code.<br />
plug must never be used without fuse cover. Spare fuse covers are available<br />
electrical suppliers or the PFAFF agencies.<br />
e also observe the general safety notes on page 2.<br />
I
35<br />
J7<br />
-<br />
___________<br />
-<br />
jr<br />
:. .-<br />
34 -<br />
PFAFF<br />
PFAF: ptronc6<br />
-- -<br />
27O<br />
— 4 —<br />
-----<br />
-<br />
-<br />
10<br />
- —11<br />
33<br />
—j<br />
I<br />
I<br />
1;<br />
I<br />
[
Parts of the sewing machine<br />
(1) Key for “reverse sewing”<br />
(2) Key for “needle up/down position”<br />
(3) Key for “buttonhole/tacking/Single pattern”<br />
(4) Key for “slow sewing”<br />
(5) Clear key “pattern start”<br />
(6) Twin needle indicator<br />
(7) Stitch width slide key/needle positions<br />
(8) Stitch length slide key/buttonhole length/stitch density<br />
(9) Balance slide key/pattern length I<br />
(10) Carrying handle<br />
(11) Handwheel<br />
(12) Handwheel release disk<br />
(13) Program keyfor unitdigits<br />
(1 4) Liquid crystal display<br />
(1 5) Clear key “beginning of pattern”<br />
(16) Master switch<br />
(1 7) Accessory box<br />
(1 8> Sewing foot holder with sewing foot<br />
(1 9) Needle threader<br />
(20) Thread guides<br />
(21) Threading slot<br />
(22> Needle thread tension<br />
(23> Take-up lever<br />
(24) Presser bar lifter<br />
(25) Needle holder with set screw<br />
(26) Program key for tens digits<br />
(27) Thread guide for bobbin winding<br />
(28) Program table<br />
(29) Spool holder with unwinding disk<br />
(30) Second spare spool holder<br />
(31) Bobbin winder<br />
(32) Connection socket “lead cord”<br />
(33) Connection socket “foot controller”<br />
(34) Base plate<br />
(35) Hook cover<br />
(36) Free arm<br />
(37) Sewing lamp<br />
(38) Thread trimmer<br />
(39) Top cover<br />
(40) Dual Feed/IDT system (top feed)<br />
(41) Needle plate<br />
I
F<br />
IMPORTANT SAFETY INSTRUCTIONS<br />
For the United States only<br />
When you use an electric appliance, basic safety precautions should always be adhered to as follows:<br />
Read all instructions before using this sewing machine.<br />
D/LF%IGER To reduce the risk of electric shock<br />
1. The sewing machine should never be left unattended when plugged in. Always unplug this appliance<br />
from the electric outlet immediately after using and before cleaning.<br />
2. Always unplug sewing machine before replacing bulb. Replace bulb with same type rated 1 5 watts.<br />
3. Do not reach for a sewing machine that has fallen into water. Unplug immediately.<br />
4. Do not place or store a sewing machine where it can fall or be pulled into a tub or sink Do not place<br />
red.<br />
in or drop into water or other liquid.<br />
l!ARI\IING<br />
8. To disconnect, turn all controls to off (O”) position, then remove plug from outlet<br />
9. Never operate on a soft surface such as a bed or couch where the air openings may be blocked.<br />
1 0. Do not unplug by pulling on cord. To unplug, grasp the plug, not the cord.<br />
11. Keep fingers away from all moving parts. Special care is required around the sewing machine needle.<br />
1 2. Always use the proper needle plate. The wrong plate can cause the needle to break<br />
1 3. Do not use bent or blunt needles. Use needles recommended by the manufacturer only.<br />
1 4. Do not pull or push fabric while stitching. It may deflect the needle, causing it to break.<br />
1 5. Switch the sewing machine off (“0”> when making any adjustments in the needle area, such as<br />
threading needle, changing needle, threading bobbin, or changing presser foot etc.<br />
1 6. Always unplug sewing machine from the electric outlet when removing covers, lubricating, or when<br />
making any other user servicing adjustments mentioned in the instruction manual.<br />
1 7. Hold plug when rewinding into cord reel. Do not allow plug to whip when rewinding.<br />
Please also observe the general safety notes on page 2.<br />
To reduce the risk of burns, fire, electric shock, or injury to persons:<br />
1. Do not allow to be used as a toy. Close attention is necessary when this sewing machine is used by<br />
or near children.<br />
2. Use this sewing machine only for its intended use as described in this manual. Use only attachments<br />
recommended by the manufacturer as contained in this manual.<br />
3. Never operate this sewing machine if it has a damaged cord or plug, if it is not working properly, if it<br />
has been dropped or damaged, or dropped into water. Return the appliance to the nearest authorized<br />
dealer or service center for examination, repair, electrical or mechanical adjustment<br />
4. Never operate the sewing machine with any air openings blocked. Keep ventilation openings of the<br />
sewing machine and foot control free from the accumulation of lint dust and loose cloth.<br />
5. Never drop or insert any object into any opening.<br />
6. Do not use out-of-doors.<br />
7. Do not operate where aerosol (spray> products are being used or where oxygen is being administe<br />
SAVE THESE INSTRUCTIONS<br />
This sewing machine is designed and manufactured for HOUSEHOLD use only.<br />
1
2<br />
Notes on safety<br />
Notes on safety for household sewing machi<br />
nes in accordance with EN 60 335-2-28 and<br />
IEC 60 335-2-28<br />
1. The user must exercise adequate caution<br />
with regard to the up and down move<br />
ment of the needle and must constantly<br />
observe the sewing area while, sewing.<br />
2. When leaving the machine unattended,<br />
during maintenance work or when<br />
replacing mechanical parts or accesso<br />
ries, always disconnect the machine<br />
from the mains by pulling out the mains<br />
plug.<br />
3. The maximum permissible wattage for the<br />
sewing lamp is 1 5 watts.<br />
4. The tension of the drive belt must only be<br />
adjusted by a PFAFF mechanic.<br />
5. The machine must be operated in<br />
accordance with the indications on the<br />
specification plate.<br />
6. Do not insert any objects into openings on<br />
the machine.<br />
7. Do not use the sewing machine if:<br />
— there<br />
— its<br />
— it<br />
is visible damage<br />
function is disturbed<br />
is wet e.g. with condensation which<br />
can occur when a cold machine is<br />
brought into a warm room.<br />
8. Do not pull the mains plug out of the<br />
socket by its cord.<br />
9. If this appliance is used for another pur<br />
pose than that for which it is intended or if<br />
it is wrongly operated, we cannot accept<br />
any liability for any damage caused.<br />
1 0. To avoid the risk of electric shock, do not<br />
open the machine. There are no parts<br />
inside the machine which the user can<br />
repair. Repairs are solely the responsibility<br />
of our qualified service staff.<br />
11. Be sure to use only original PFAFF parts.<br />
1 2. The machine is designed for a mains<br />
supply with a nominal voltage of<br />
+1—10 % and a rated frequency of<br />
+1-4 %.<br />
1 3. When used properly, the temperature of the<br />
outer components of a non-electronically<br />
controlled foot control can reach up to<br />
85 °C. Constant use at a low speed is<br />
therefore not permitted in order to avoid<br />
damage.<br />
Environment<br />
The recommended environment is:<br />
Ambient temperature 1 0 °C to 40 °C<br />
Humidity 20 % to 80 %<br />
Storage temperature: —25 °C to +60 °C<br />
The machine is suppressed and immune to<br />
interference; however, it should not be operated<br />
near electronic devices such as radios, TVs, PCs,<br />
broadcasting transmitters etc.<br />
This sewing machine is a high-quality electro<br />
nic-mechanical device. It is a machine for<br />
supervised use in the home. It should not be<br />
subjected to: dust dampness, direct sunlight<br />
static electricity, heat-radiating objects, corrosive<br />
chemicals or liquids.<br />
For ventilation purposes the machine must only<br />
be operated on an open surface which is both<br />
firm and horizontal.<br />
Care of the machine<br />
Always protect the machine from damage<br />
which may be caused by it being hit or drop-<br />
ped.<br />
Cleaning<br />
Housing and display<br />
To clean the housing, use only a clean, dry, soft,<br />
lint-free cloth. To remove any stubborn dirt use a<br />
soft cloth with alcohol.<br />
Please note!<br />
Do not use any insecticides or chemical pro<br />
ducts such as petrol or liquid chemicals to clean<br />
the housing.
Modern, uncomplicated<br />
— Computerized sewing —<br />
Congratulations!<br />
You have bought a high-quality product<br />
that offers unique advantages.<br />
Your new sewing machine can take any<br />
material in its stride and will sew<br />
through thick and thin for you.<br />
ft features the very latest in design and<br />
technology, and this instruction book is<br />
just as uncomplicated as your PFAFF<br />
sewing machine.<br />
If you now take time enough to study<br />
the instruction book, nothing can go<br />
wrong.<br />
After all, this is the only way to learn all<br />
the things the machine can do, and to<br />
make full use of them.<br />
If you have any further questions, that is<br />
no problem!<br />
Your PFAFF dealer will be at your service<br />
with any help or advice you need.<br />
So now you can get started! We wish<br />
you many enjoyable hours of creating<br />
your fashion ideas.<br />
3
i&<br />
Index<br />
Accessories and needles 1 03—il 9<br />
Accessory compartment 1 8<br />
Adjusting slide keys 37—40<br />
Alphabet 90<br />
Appliqués<br />
Appliquefoot ioi<br />
Applying patches 75<br />
Automatic darning<br />
Page<br />
92<br />
54+74<br />
Balance 40<br />
Balance slide key 37<br />
Bartack 54<br />
Basting stitch 51<br />
Bias tape binder 11 2<br />
Blind stitch 53<br />
Bobbin case 23<br />
Bobbin thread, raising the 27<br />
Bobbin thread tension 23, 24<br />
Bobbin winding 19—21<br />
Bobbin winding through the needle 22<br />
Borders 85, 86<br />
Braces 89<br />
Buttonhole balance 66<br />
Buttonholes 64—67’<br />
Buttonhole, fully automatic 65<br />
Buttonhole with gimp thread 67<br />
Buttonhole, programmable 65<br />
Buttonhole/tacking/single pattern 36<br />
Carrycase 16<br />
Changing a sewing foot 28<br />
Changing the needle<br />
Changing the needle plate 124<br />
Cleaning and oiling 1 24<br />
Clear key 36<br />
Closed overlock stitch 60<br />
Closed overlock stitch with edge thread<br />
Combined borders 85<br />
Cording foot 11 3<br />
Couching foot 114<br />
Cross hem stitch 63<br />
Cross stitch 87<br />
Darning 73—75<br />
Darning tears<br />
Darning with zigzag stitch 74, 75<br />
Darning with straight stitch<br />
Decorative stitches ,<br />
Detachable work support<br />
31<br />
61<br />
75<br />
81—101<br />
Dual Feed 29, 30<br />
4<br />
1 8
Index Page<br />
Elastic stitch 59<br />
Electrical connection 1 6, 1 7<br />
Electronics 33—45<br />
Embroidery stitch programs 10<br />
J Embroiderytechniques 81—101<br />
Explanation for sewing recommendations table 50<br />
Eyelet embroidery<br />
98, 99<br />
Eyelets 56<br />
Fagoting stitch 62<br />
Fancy elastic stitch 62<br />
Faults 1 26<br />
Felling foot 1 09<br />
Foot control 1 7<br />
Free arm 18<br />
Fringe foot 11 3<br />
Function keys 36, 37<br />
Gathering with elastic threads 71<br />
Gathering with straight stitch 70<br />
Handwheel release disk 1 9<br />
Hemstitching 95—97<br />
Hem with the twin needle 69<br />
Honeycomb stitch sg<br />
Inserting the bobbin<br />
Inserting zippers 76, 77<br />
Knit-edge foot 111<br />
Lacework 79<br />
Large-area embroidery 87<br />
Leather embroidery 88<br />
Left needle position 38, 68<br />
Lightbulb<br />
Light knit mending stitch 63<br />
Linen embroidery 93<br />
Lowering the feed dog 32<br />
Maintenance and sewing faults 121—126<br />
Master switch 1 7<br />
Monograms<br />
Needle chart<br />
24<br />
125<br />
91<br />
118,119<br />
Needle positions<br />
Needle thread tension<br />
Needle threader 26<br />
Needle up/down position 36<br />
38<br />
68<br />
5
index<br />
Oiling<br />
Open appliqué foot<br />
Open overlook stitch.<br />
Overlock stitches<br />
Pattern length<br />
Pattern sequence<br />
Pattern sequence memory key<br />
Pattern start (clear key)<br />
Pattern width<br />
Pintuck foot<br />
Plain stem stitch<br />
Practical sewing<br />
Presser bar lifter<br />
Program keys unit digits<br />
Program keys tens digits<br />
Pullover stitch<br />
Quilting 100, 101<br />
Quilting and patchwork foot 11 5<br />
Reverse sewing<br />
Richelieu<br />
Right needle position<br />
Roll-hemming<br />
Ruffler<br />
Safety notes<br />
Seam finishing stitches<br />
Semiautomatic processing of 2nd tack (buttonhole)<br />
Serging with the overlook foot<br />
Serging with zigzag stitch<br />
7/9 hole foot<br />
Sewing aids<br />
Sewing chart<br />
Sewing faults and their remedies<br />
Sewing feet (special accessories)<br />
Sewing feet (standard accessories)<br />
Sewing-function keys<br />
Sewing lamp<br />
Sewing on buttons<br />
Sewing with zigzag stitch<br />
Shell edging<br />
Shirring foot<br />
Single pattern<br />
Slow sewing<br />
Smocking effect<br />
Special accessory table<br />
Stitch density<br />
Stitch length<br />
6<br />
Page<br />
124<br />
117<br />
60<br />
60, 61<br />
40<br />
41 —45<br />
37<br />
36<br />
38<br />
110<br />
58<br />
47-80<br />
27<br />
37<br />
37<br />
61<br />
36<br />
94<br />
38, 68<br />
78<br />
112<br />
I<br />
57—63<br />
66<br />
52. 53<br />
52<br />
114<br />
68<br />
50<br />
126<br />
108<br />
106,107<br />
36, 37<br />
1 25<br />
55<br />
52<br />
80<br />
111<br />
36<br />
36<br />
72<br />
108<br />
39<br />
39<br />
I<br />
ii<br />
ti<br />
ci<br />
I
Index Page<br />
Stitch length slide key 37<br />
Stitch width 38<br />
Stitch width slide key 37<br />
Straight stitch 51<br />
Fi’ Stretch buttonhole 67<br />
Stretch triple straight stitch 57<br />
Stretch triple zigzag stitch 58<br />
I Suspenders 89<br />
r Tacking 36<br />
Technical section 1 3—32<br />
Thread spool 20<br />
r Thread tension 23, 24, 32<br />
Thread cutter 27<br />
Threading 25<br />
- Threading the needle thread 25<br />
Threading the sewing machine 24<br />
Top cover 16<br />
Top feed 30<br />
Topstitching 68<br />
Twin needle 69, 86<br />
I Twin-needle cording foot 11 6<br />
Twin needle indicator 36<br />
Utility and decorative stitches 47—80<br />
Utility stitches 51 —56<br />
Utility stitch table 8, 9<br />
Winding from a second spool holder 21<br />
Zigzag stitch 52<br />
7
8<br />
Utility stitch table<br />
000102l03 05O6l07lO8I09 10 13!<br />
‘ I 1 ‘ IA I :‘<br />
I I III III I i I<br />
J I i I I ,,, III ill I I —><br />
GD I El) I I I I I I ><br />
Pro<br />
gram<br />
No.<br />
Description Application<br />
00 Straight stitch For straight stitch and lockstitch sewling. —<br />
Middle needle position 6 mm stitch length.<br />
01 Straight stitch For sewing and topstitching work requiring left —<br />
Left needle position needle position.<br />
02 Straight stitch with For sewing requiring other needle positions, —<br />
1 3 needle positions i.e. zipper insertion, and special topstitching work.<br />
03 Quilting stitch with For top-stitching when quilting. —<br />
1 3 needle positions<br />
04 Plain stem stitch Durable elastic seam, i.e. for sewing leggings, 3<br />
and for embroidery work.<br />
05 Triple stem stitch Ornamental utility stitch. —<br />
06 Stretch triple straight stitch,<br />
stitch length 1 .5 to 45 mm<br />
with 1 1 needle positions For highly durable seams, i.e. for inseams, —<br />
07 Stretch triple straight stitch, topstitching<br />
stitch length 3 to 6 mm<br />
sportswear, work wear, and decorative<br />
14<br />
Width<br />
up to<br />
mm<br />
with 1 1 needle positions I<br />
08 Basting stitch For basting your sewing. —<br />
09 Quilting or appliqué stitch For appliqués when quilting or pinstitching. 6<br />
1 0 Zigzag stitch For serging and appliqué work 6<br />
1 1 Zigzag stitch,<br />
needle position changeable<br />
from right to left<br />
1 2 Zigzag stitch,<br />
needle position changeable<br />
from left to right<br />
For eyelet embroidery and cording work 6<br />
1 3 Elastic stitch For sewing on elastic, darning tears, 6<br />
and applying patches.<br />
1 4 Blind stitch For securing hems invisibly. 6
Utility stitch table<br />
:><br />
I<br />
ii<br />
17=1<br />
171 I<br />
ii16 17 18 19 I 20 21 I 22 23 24 25 I 26 I 27 29<br />
Pro-<br />
I(<br />
:>
_____________<br />
_____________<br />
o -<br />
—<br />
rn<br />
0) 11111111 III<br />
CD<br />
CA) %Z<br />
%,J co<br />
11111 00 C)<br />
Is,.)<br />
.“lII”J‘lItliii.<br />
0<br />
0<br />
C;,<br />
hII1(tl,fttIIIIIljIIP’ C1<br />
C)<br />
C)<br />
i;t<br />
ILEL.<br />
,- (A)<br />
..1I1IllhI1,_.411111111<br />
cJ,<br />
P.<br />
r..<br />
01<br />
C)<br />
C)<br />
II1IIIIH*— 0)<br />
-I<br />
c2<br />
c*5Co<br />
0<br />
pp co<br />
C.1<br />
0)<br />
%J<br />
a.<br />
€(* (0<br />
‘idllflllfIIIIIi’u”<br />
C’s,<br />
01<br />
(.1<br />
6j<br />
0<br />
“i’I”IIIIIIIIlIII<br />
Co<br />
“IIItIIII”IIIIIIlIi’,<br />
i511L51’<br />
1111<br />
iiiiiiiiiiiII1Ill<br />
C;1<br />
CD<br />
‘IjIIIjIIIIr’IIIIfI,fl;r<br />
= 1= = = 0)<br />
= = = =<br />
rY<br />
J<br />
C)<br />
tII’jI’ (7!<br />
k)<br />
“IIIII”lIIIl”<br />
cji<br />
“m’I”31’ol’h’m<br />
0)<br />
(‘3<br />
-<br />
.IqIIIIIIIrI9IIIIlII.<br />
-* 01<br />
-<br />
—<br />
-<br />
.- J [ 4<br />
r ic p1: F1 1 ——4- —-L ! c—4
Buttonholes/iUphabetlM memory<br />
70 71 72 73 74 A 0<br />
H fl8t9<br />
Pro- Width<br />
gram Description Application up to<br />
No. mm<br />
70 Fully automatic linen The buttonhole is stored in three default lengths, 5,5<br />
buttonhole i.e. for linen and blouses.<br />
71 Linen buttonhole Stitch density and width can be changed, 5,5<br />
therefore particularly well suited for difficult<br />
materials, e.g. silk, rayon.<br />
72 Stretch buttonhole For stretchable material. 5,5<br />
73 Fully automatic eyelets Stored in two sizes. 6<br />
74 Button attaching program Attaching buttons of various sizes fully automatic. 6<br />
A Alphabet from A to Z<br />
0 Numbers from 0 to 9<br />
m M memory for creating a pattern sequence<br />
11<br />
4<br />
I Yêc
V.<br />
--<br />
• .• •V.)
(00<br />
Co :,-<br />
0 —<br />
0C<br />
C’,<br />
CD<br />
z<br />
crz<br />
0,<br />
CD<br />
()<br />
Tech,ijcat section
Contents<br />
Detachable work Support<br />
Bobbin winding<br />
Bobbin winding through<br />
the needle<br />
Bobbin case<br />
Bobbin thread tension<br />
Threading the needle thread<br />
Needle threader<br />
Presser foot lifter<br />
Drawing up the bobbin thread<br />
Thread trimmer<br />
Changing the sewing foot<br />
Dual feed (IDT)<br />
i<br />
Electrical connection<br />
Changing the needle<br />
Needle thread tension<br />
Lowering the feed dog<br />
tJ Ji :i zr d3<br />
— —<br />
Pages 16,17<br />
Page 18<br />
Pages 19—21<br />
Page 22<br />
Page 23<br />
Page 24<br />
Page 25<br />
Page 25<br />
Page 27<br />
Page 27<br />
Page 27<br />
Page 28<br />
Pages 29, 30<br />
Page 31<br />
Page 32<br />
Page 32<br />
PIAFF bptronc 6270 I<br />
15
4<br />
I<br />
Carrying case<br />
Place the enclosed lead cord, foot control and<br />
instruction book in the compartment of the carrying<br />
case.<br />
Programs<br />
The programs of the sewing machine are illustrated<br />
on the inside of the top cover.<br />
Electrical connection<br />
Connect the lead cord between the socket (32) of<br />
the sewing machine and the wall socket.<br />
This appliance has a polarized plug (one blade wider than the other). To reduce the risk of electric<br />
shock, this plug is intended to fit in a polarized outlet only one way. If the plug does not fit fully<br />
in the outlet reverse the plug. If it still does not fit, contact a qualified electrican to install the<br />
proper outlet Do not modify the plug in any way.<br />
For this sewing machine has to be used foot controller typ ATK 0060 or ATIK 0033<br />
16<br />
Top cover<br />
Open the folding cover (39) upwards.<br />
— -220<br />
V<br />
120 V<br />
(frJI
J<br />
Connecting the foot control<br />
Connect the plug of the foot control with the<br />
connection socket (33) of the sewing machine.<br />
The sewing speed is regulated by pressing the<br />
pedal.<br />
Fot this sewing machine has to be used foot<br />
controller typ ATK 0033 or ATI( 0060<br />
Master switch<br />
When the master switch (1 6) is switched on, the<br />
sewing lamp lights up.<br />
The sewing machine is now ready to use.<br />
17
‘7<br />
.<br />
0.<br />
0.-C<br />
c 0..<br />
L 18<br />
Detachable work support Accessory compartment<br />
Swing out the detachable work support (1 7) to the<br />
left using both hands.<br />
The enclosed accessories are marked with num<br />
bers. Sort them into the corresponding compart<br />
ments of the accessory box.<br />
V<br />
Open the accessory compartment (1 7).<br />
Sorting the accessories Removing the detachable work support<br />
(free arm)<br />
In order to sew using the free arm, swing the<br />
detachable work support to the left and lift it<br />
upwards out of the hole.<br />
When you replace and swing it in again make sure<br />
the detachable work support is flush with the free<br />
arm of the sewing machine.<br />
U<br />
— Pla<br />
-j*<br />
Sw<br />
— Pla<br />
bol<br />
bol<br />
r<br />
Pr<br />
Hr<br />
rel<br />
Th<br />
wc
I<br />
.‘ Preparing the machine for bobbin winding<br />
— release<br />
Hold the handwheel (11) firmly and turn the<br />
disk (1 2) fully in the direction of the arrow.<br />
The needle will not move while the bobbin is being<br />
wound.<br />
Placing the bobbin<br />
Switch off the master switch.<br />
‘ Place the empty bobbin so that the black pin of the<br />
bobbin winder (31) snaps into the slot of the<br />
bobbin.<br />
Push the bobbin to the right<br />
Note:<br />
The bobbin can only be wound if it is moved fully<br />
to the right<br />
19<br />
C)<br />
• 0•<br />
£0
fr<br />
20<br />
11<br />
A<br />
; . i... .<br />
- ,,-,, .,<br />
PFAFF -i ‘4<br />
.<br />
----—<br />
Winding the bobbin from the spool holder<br />
Place the sewing thread on the spool holder (29).<br />
To obtain free movement of the thread and hold<br />
the thread spool firmly, fit an unwinding disk of the<br />
right size for the thread spool.<br />
Threading<br />
Place the thread into guide A from behind, pull it<br />
through opening B to the right, and guide it under<br />
neatl the bracket. Wind the thread clockwise a few<br />
times around the bobbin and press the bobbin to<br />
the right.<br />
Switch on the master switch (1 6)<br />
Hold the end of the thread firmly and press the foot<br />
control. As soon as the bobbin is full, the winding<br />
action will stop automatically. Cut the thread, push<br />
the bobbin to the left and take it off.<br />
Do not forget;<br />
Turn the release disk (12) fully back again. Then<br />
turn the handwheel (11) towards you until it snaps<br />
in place.<br />
Ew I ns€<br />
‘ inte<br />
r‘Thr<br />
.1<br />
Pla<br />
op€<br />
bra<br />
1 aro<br />
rigi<br />
i Ho<br />
co’<br />
aol<br />
i thr<br />
Dc<br />
Tu<br />
tu<br />
in<br />
Til<br />
wi<br />
W
- PFAFF<br />
[-;;<br />
r’<br />
1<br />
Jr<br />
- Switch<br />
j<br />
11. -<br />
Winding from the second spool holder<br />
Insert the second spool holder (30) in the hole<br />
intended for it and place a spool of thread on it.<br />
Threading<br />
Place the thread into guide C, pull it through<br />
opening S to the right, and guide it under the<br />
bracket Wind the thread clockwise a few times<br />
around the bobbin and press the bobbin to the<br />
right.<br />
on the master switch (1 6)<br />
JJ Hold the end of the thread firmly and press the foot<br />
control. As soon as the bobbin is full, the winding<br />
action will he stopped automatically. Cut the<br />
thread, push the bobbin to the left and take it off.<br />
Do not forget:<br />
Turn the release disk (12) fully back again. Then<br />
turn the hand wheel (11) towards you until it snaps<br />
— in place.<br />
TIP: If the machine is already threaded, you can<br />
wind the bobbin from the second thread spool<br />
without having to unthread the machine.<br />
1.’ -, J<br />
• 4.<br />
:<br />
21<br />
-c<br />
C)<br />
:J<br />
L
t<br />
Bobbin winding through the needle<br />
You can wind bobbins even when the machine is<br />
fully threaded. Raise sewing foot lever (24). Pull the<br />
needle thread underneath the sewing foot and<br />
trough the right-hand threadng slot (21) upwards.<br />
Then pull the thread to the right under guide hook<br />
C and wind it a few times around the bobbin. Press<br />
the foot control to start bobbin winding through<br />
the needle.<br />
Now insert the thread in take-up lever (23) left to<br />
right.<br />
The take-up lever must be in its highest position.<br />
r
Hook cover<br />
Switch off the master switch<br />
Hold the hook cover (35) at the side and open i to<br />
the front.<br />
Thread tension<br />
Taking out the bobbin case<br />
Lift the latch of the bobbin case and pull the<br />
bobbin case out Release the latch and take out<br />
the empty bobbin.<br />
To obtain optimum seam appearance and durability make sure the needle and bobbin thread tensions are<br />
correctly adjusted with regard to each other, i.e. the threads are interlaced between the two fabric layers.<br />
For fancy seams and buttonholes the thread interlace should be visible on the underside of the fabric.<br />
23<br />
I<br />
LII
I<br />
Inserting the bobbin<br />
Insert the full bobbin in the bobbin case. When<br />
doing so, pull the thread sideways through slot A,<br />
then under tension spring B so that it rests in the<br />
opening (see arrow).<br />
Check:<br />
When you pull the thread, the bobbin must turn<br />
clockwise.<br />
Checking the bobbin thread tension<br />
Hold the bobbin case by the thread and move your<br />
hand sharply upwards, The bobbin case must slip<br />
downwards a little with each hand movement.<br />
Correcting the tension:<br />
Turn adjusting screw C just a littleto the left to<br />
decrease the bobbin thread tension,<br />
Turn screw C just a little to the right to increase the<br />
tension.<br />
Inserting the bobbin case<br />
Lift latch F and push the bobbin case fully onto<br />
pin D of the sewing hook Opening E of the bobbin<br />
case must face upwards.<br />
Check:<br />
Pull the bobbin thread sharply; the bobbin case<br />
must not fall out of the hook.<br />
ti:<br />
[I<br />
[E<br />
I
17<br />
PFAFF<br />
1<br />
20: 22<br />
‘::.<br />
Threading the needle thread<br />
Switch off the master switch.<br />
Raise the presser foot Turn handwheel to bring<br />
take-up lever (23) to highest position. Place the<br />
thread on the spool holder (29) and fit an unwin<br />
ding disk of the right size.<br />
Now, using both hands, pull the thread into guide<br />
A and under thread guide hook D. Pass the thread<br />
through the threading slot (21) and downwards,<br />
Pull the thread around stop E into the right-hand<br />
threading slot and upwards to the take-up lever<br />
(23). The thread must be pulled into the take-up<br />
lever from left to right. Then pass the thread<br />
downwards again in the right-hand threading slot.<br />
Finally pull the thread from the side between one<br />
of the two thread guides (20).<br />
To thread the needle, please refer to the next page.<br />
25
ii<br />
• ‘• +‘-•<br />
26<br />
Needle threader<br />
In order to make threading of the needle easier and<br />
quicker the PFAFF needle threader is provided.<br />
Lower the sewing foot (see next page). Take one<br />
stitch to bring the needle to its highest position.<br />
Place the needle thread under hook 0 and hold it<br />
taut Move the threader (1 9) fully downwards and<br />
turn it towards the needle so that the small hook R<br />
goes through the needle eye. Place the thread into<br />
the hook from the underside.<br />
Turn the threader towards the rear, releasing the<br />
thread carefully, and allow the threader to move<br />
upwards. You can now pull the end of the thread<br />
through the needle eye.<br />
1<br />
‘V
Presser bar lifter<br />
The sewing foot is raised or lowered with the<br />
presser bar lifter (24).<br />
For darning the sewing foot lifter must be set at<br />
darning position (see page 73).<br />
Bobbin thread<br />
\<br />
\ —<br />
Close the hook cover (35) and pull the thread<br />
J under the sewing foot to the left.<br />
Drawing up the bobbin thread<br />
Raise the sewing foot Hold the needle thread and<br />
tap the foot control once, taking one stitch. Pull the<br />
needle thread to draw up the bobbin thread.<br />
I Z<br />
Thread cutter<br />
Pull the threads from the back to the front over the<br />
thread trimmer (38).<br />
27
S..<br />
--<br />
--<br />
- _..-x..<br />
Set the needle at its highest point Raise the sewing<br />
foot Press the sewing foot upwards at the front<br />
and downwards at the back at the same time so<br />
that it disengages from the sewing foot holder (1 8)<br />
In the case of the buttonhole foot 5, push the strip<br />
backwards and press it upwards.<br />
Check:<br />
Please check that the sewing foot is properly<br />
attached by raising the presser bar lifter.<br />
‘)Q<br />
Removing the sewing foot Attaching the sewing foot<br />
Turn off the master switch<br />
Place the sewing foot under the sewing foot holder<br />
(18) so that when the presser bar lifter (24)is<br />
lowered, the pins of the foot engage in the sewing<br />
foot holder,<br />
The Dual Feed must be disengaged (see page 30).<br />
Li:<br />
Li<br />
L<br />
1:1.<br />
L4 J<br />
Ei<br />
[11<br />
ri
— fed<br />
- solution:<br />
- the<br />
.1<br />
The built-in dual fabric feed (IDT system)<br />
For sewing difficult materials PFAFF offers the ideal<br />
built-in Dual Feed. The sSrne as on<br />
industrial sewing machines, it feeds the fabric from<br />
top and bottom at the same time. The fabric is<br />
accurately. On light or difficult fabrics such as<br />
silk and rayon fabrics the dual fabric feed prevents<br />
seam pucker. The even feeding action also ensures<br />
perfect matching of checked and striped fabrics<br />
(see next page).<br />
29
I<br />
I<br />
Engaging the Dual Feed<br />
Raise the sewing foot Now push the Dual Feed<br />
(40> so that it snaps in place.<br />
Important!<br />
Disengaging the Dual Feed<br />
Hold the Dual Feed with two fingers at the marked<br />
places. Pull the Dual Feed (40) down a little and<br />
out to the rear, and let it move slowly upwards (see<br />
also the illustration on page 29).<br />
For all sewing jobs with the Dual Feed, only use sewing feet that are cutout at the back (0. 1, 3, 4).<br />
30<br />
C1<br />
C<br />
jiL<br />
I
JA<br />
11<br />
Changing the needle<br />
Switch off master switch<br />
To remove: Lower the sewing foot and set the<br />
needle at its highest point. Now looserj the set<br />
screw (25) and pull the needle out downwards.<br />
To insert: The flat side A of the needle must face<br />
to the rear. Lower the sewing foot and insert the<br />
needle, pushing it up as far as it will go. Hold the<br />
needle and tighten the set screw (25) firmly.<br />
31<br />
I<br />
p<br />
I<br />
I<br />
F I.
M’<br />
Set the required amount on the needle thread<br />
tension (22) using mark A.<br />
The normal setting for sewing is 4 to 5. For<br />
embroidering and buttonhole sewing between 2<br />
and 3.<br />
1<br />
Setting the needle thread tension<br />
-, \<br />
Lowering the feed dog<br />
S..<br />
For certain sewing work, i.e. darning, the feed dog<br />
has to be dropped. To do this, open the hook cover<br />
(35) and meve slide C fully to the right Now the<br />
feed dog is lowered.<br />
32<br />
F<br />
I<br />
[.<br />
ii<br />
r
I<br />
If<br />
1<br />
Electron.<br />
Sewj 2<br />
Patter,tCtions /<br />
Pages<br />
5<br />
‘3to4<br />
mflhinatjo I.<br />
:1 / I<br />
/<br />
I<br />
I<br />
I<br />
I<br />
I<br />
I I<br />
iii<br />
/1<br />
L
1 , —<br />
Contents<br />
Sewing function keys<br />
Slide keys/Program keys<br />
Stitch width/Needle positions<br />
Stitch width!<br />
buttonhole length!<br />
stitch density<br />
Balance/Pattern length<br />
Pattern sequence<br />
Page 36<br />
Page 37<br />
Page 38<br />
Page 35<br />
Page 40<br />
Pages 41 to 45<br />
35<br />
4<br />
4 ;f
Sewing function keys<br />
Backward sewing key (1)<br />
When pressing the backward sewing key the green<br />
amp lights up and the machine will sew back<br />
wards. To continue forward sewing, press the key<br />
again.<br />
If the key is pressed while sewing, the machine will<br />
sew backwards until the key is released. In this<br />
case the green lamp does not light up.<br />
Needle stop (2)<br />
With this key you can determine whether the<br />
needle is to be in the fabric or in the up-position<br />
when the foot control is released.<br />
Buttonhole/Tacking/Single Pattern (3)<br />
This key has three functions.<br />
1. In programs 71/72 you can determine the<br />
buttonhole length yourself and save it<br />
2. If the key is pressed before sewing start, a tack is<br />
sewn automatically at the beginning of the seam<br />
• or the pattern.<br />
• 3. If the key is pressed while sewing, a tack is sewn<br />
36<br />
immediately in a utility stitch and at the end of<br />
a fancy stitch.<br />
Slow sewing (4)<br />
When this key is pressed the sewing speed is<br />
reduced.<br />
Clear key (5)<br />
With this key it is possible to return to the begin<br />
ning of a program which has already been started.<br />
In the case of buttonhole and darning programs<br />
the programmed length can be deleted.<br />
Twin-needle key (6)<br />
In some programs the red lamp lights up. In this<br />
case you must not use a twin needle. If the stitch<br />
width is reduced and the lamp goes out, it is<br />
possible to sew with the twin needle.<br />
F T<br />
C:<br />
Sti<br />
foi<br />
W<br />
or
Slide keys/program keys<br />
Any time a new program is selected the machine<br />
adjusts itself to the corresponding default setting.<br />
Stitch width slide key (7)<br />
Stitch width and needle position are determined by<br />
means of this slide key.<br />
Stitch length slide key (8)<br />
With this slide key you can determine stitch length<br />
or stitch density. In case of program 70 this key is<br />
for determining the buttonhole length.<br />
Balance slide key (9)<br />
With this slide key you can determine the balance<br />
or the pattern length.<br />
± Program key tens digits (26)<br />
With toggle switch “+“ you can browse through<br />
the program jumping 1 0 programs at a time. The<br />
same goes for the alphabet, the numbers and the<br />
pattern sequence. With toggle switch “-“ the<br />
selection can be carried out in reverse order.<br />
± Program key for unit digits (0 to 9) (1 3)<br />
With toggle switch “+“ you select a pattern num<br />
ber from 00 to 74. After 74 the selection starts<br />
again from 00. With toggle switch you select a<br />
pattern number in reverse order starting from 00<br />
and continuing with 74, 73 etc. With toggle<br />
switches ‘+/—“ it is also possible to switch inside a<br />
selected group (alphabet or numbers) from one<br />
item to another.<br />
ni) Patten sequence memory key (1 5)<br />
With this key the pattern, alpha-numeric or special<br />
character shown on the display are saved in the<br />
memory. When saving the symbol m lights up<br />
for a short time.<br />
37
I<br />
38<br />
Setting the stitch width/pattern width<br />
Any time a new program is selected the machine -<br />
adjusts itself to a specific default value for the stitch<br />
or pattern width.<br />
The stitch or pattern width is shown in the display<br />
in the top line on the left, i.e. 3.0 mm for program<br />
10,<br />
When the upper lamp of the stitch width slide key<br />
(7) lights up, you can infinitely adjust the desired<br />
stitch or pattern width within a range from 0 to 6<br />
mm.<br />
When the bottom light of the stitch width slide key<br />
(7) has lit up, you can set up to 1 3 needle positi<br />
ons. This is possible in programs 02, 03, 06 and<br />
07.<br />
—-—<br />
— 1<br />
Adjusting the needle position<br />
When selecting one of these programs the symbol<br />
‘1-” is shown in the upper display line. This means<br />
that the needle is in center position. Now you can<br />
change the needle position.<br />
If the default setting had been altered, it can be<br />
recalled by pressing the “+1—” toggle switches of<br />
the program keys for both unit digits and tens<br />
digits, thus reselecting the pattern.<br />
The display shows i.e.<br />
L6 2,5<br />
02<br />
i.e. the needle moves 6 positions<br />
to the left<br />
3J 2,5<br />
02<br />
i.e. the needle moves three positions<br />
to the right<br />
1<br />
[1j<br />
rFj<br />
iii<br />
I’ —_i<br />
11<br />
Cl
-ii<br />
Setting the stitch length/buttonhole length<br />
Any time a new program is selected the machine<br />
adjusts itself to a specific default value for the stitch<br />
length or buttonhole length.<br />
When the upper lamp of the stitch length slide key<br />
(8> lights up, you can infinitely adjust the desired<br />
stitch length within a range from 0.5 to 6 mm. The<br />
stitch length, 6,0 mm in this case, is shown in the<br />
upper line of the display in center position.<br />
In program 70 three different buttonhole lengths<br />
(8, 1 2, 1 6 mm) can be adjusted with slide key (8).<br />
Setting the stitch density<br />
Any time a new program is selected the machine<br />
adjusts itself to a specific default value for the stitch<br />
density.<br />
When the upper lamp of the stitch length slide key<br />
(8) lights up, you can infinitely adjust the desired<br />
stitch density within a range from 0.2 to 1 mm.<br />
The stitch density, 0.30 mm in this. case, is shown<br />
in the upper line of the display in center position.<br />
7<br />
If the default setting has been altered, it can be<br />
recalled by pressing the “+/—“ toggle switches of<br />
the program keys for both unit digits and tens<br />
digits, thus reselecting the pattern.<br />
If the default setting has been altered, it can be<br />
recalled by pressing the “+1—” toggle switches of<br />
the program keys for both unit digits and tens<br />
digits, thus reselecting the pattern.<br />
39
40<br />
Setting the balance<br />
Appearance and size of an embroidery pattern<br />
depend on the material it is embroidered on — i.e.<br />
wool is fed in a different way as silk. In order for<br />
you to reach optimum embroidery pattern quality<br />
the <strong>tiptronic</strong> is provided with a correction system<br />
called balance to change the backwards feed. The<br />
default setting of the balance is 0. When the upper<br />
lamp of the balance slide key (9) has lit up, you<br />
can alter the balance within a range from —7 to +7<br />
The balance setting is shown in the upper display<br />
line on the right<br />
The more the slide key is pushed to the left the<br />
shorter are the backwards stitches, i.e. the stitches<br />
of the pattern are set less densely.<br />
Any time a new program is selected the machine<br />
adjusts itself to a specific default value for the<br />
pattern length.<br />
When the lower lamp of the balance slide key (9)<br />
has lit up, you can adjust the desired pattern length<br />
for fancy stitches.<br />
The selected pattern length is shown in the top<br />
display line on the right<br />
The more the slide key is pushed to the right the<br />
longer are the backwards stitches, i.e. the stitches<br />
of the pattern are set more densely.<br />
Any time a new program is selected the machine<br />
adjusts itself to a specific default value for the<br />
balance.<br />
If the default setting has been altered, it can be<br />
recalled by pressing the “+1—” toggle switches of<br />
the program keys for both unit digits and tens<br />
digits, thus reselecting the pattern.<br />
,.- . —i-. ‘- . ——‘.—— -4——.-—--—--_—,<br />
Setting the pattern length<br />
If the default setting has been altered, it can be<br />
recalled by pressing the “+1—” toggle switches of<br />
the program keys for both unit digits and tens<br />
digits, thus reselecting the pattern.<br />
I<br />
j<br />
ci<br />
c.<br />
[1<br />
I<br />
t
—<br />
. . alphanumeric characters can be stored. The pattern<br />
In order to create a pattern sequence you must<br />
combine several patterns or alphanumeric charac<br />
Li ters in the M memory. Your <strong>tiptronic</strong> has an M<br />
L<br />
Pattern sequence<br />
memory where a maximum of 10 patterns or 30<br />
sequence is lost when the machine is switched off.<br />
The M memory is selected by pressing the program<br />
key for tens digits (26).<br />
The display shows:<br />
L<br />
J<br />
00<br />
Creating a pattern sequence<br />
Select the alphabet with the program key for tens<br />
digits (26). Select the desired alphanumeric charac<br />
ter with the program key for unit digits (1 3), i.e. P.<br />
The number of stored patterns is indicated in the<br />
left position of the upper display line. The pattern<br />
shown in the display is indicated in the right posi<br />
tion. If m is shown next to the symbol this means<br />
that there is no programmed pattern sequence.<br />
I<br />
p
ii<br />
I<br />
I<br />
I<br />
By pressing key m the selected character is stored<br />
into the pattern sequence. The following appears in<br />
the display for a short time:<br />
11<br />
This indication in the upper display line shows the<br />
number of patterns stored in the pattern sequence<br />
—1 in this case.<br />
P<br />
The top line on the right indicates the position of<br />
the pattern shown in the display; in this case P is at<br />
position one. The bottom line on the left shows you<br />
m) that you are in the m) memory. Next to the right<br />
L,ç •.<br />
Input the entire text, i.e. “PFAFF”.<br />
-<br />
LI_iC<br />
Select the m Memory with the program key for<br />
tens digits; the pattern sequence is now ready to<br />
be sewn.<br />
42<br />
you can see the most recently entered pattern, in<br />
this case P.<br />
C]<br />
IT<br />
/<br />
The stitch width set for the last character is valid for<br />
all characters of the word. In any case the stitch<br />
width must he altered when storing the last<br />
character.<br />
FE<br />
ri :<br />
[jE<br />
L<br />
rZ<br />
IL
It you wish to tack a pattern sequence, press key<br />
“Buttonhole/Tacking/Single pattern (3) before<br />
starting to sew. If you wish a tack also at the end of<br />
the pattern sequence, press key (3) again while<br />
sewing.<br />
Deleting a pattern sequence<br />
To delete a character (pattern) from the pattern<br />
sequence select the pattern sequence and press<br />
the clear key (5). It is always the last character<br />
(pattern) which is deleted.<br />
In order to delete the entire pattern sequence,<br />
switch off the sewing machine and then on again.<br />
J Now the pattern sequence is deleted.<br />
If you wish to reset an already started pattern<br />
sequence, press the “+/—“ toggle switches of the<br />
program keys for tens digits, thus reselecting the<br />
pattern sequence.<br />
51<br />
m)P<br />
43
Press the m)-key (1 5). Program 60 is stored in the<br />
pattern sequence. Input the entire pattern<br />
sequence, i.e. 60, 61 and 53.<br />
Any time a pattern is stored a message appears for<br />
a short time to inform you that your pattern has<br />
been added to the pattern sequence. After the last<br />
input the foBowing message appears for a short<br />
time:<br />
44<br />
Apart from characters it is also possible to combine<br />
patterns in a pattern sequence. Use the program<br />
keys for tens digits (26) and forunit digits (13) to<br />
select the number of the desired pattern (i.e. 60).<br />
m) 3 3<br />
53<br />
Width, length and balance can still be altered.<br />
To check the sequence, select the patterns anew.<br />
In the top line on the left the number of patterns<br />
stored in the pattern sequence is indicated, three in<br />
this example. In the top line on the right the posi<br />
tion of the pattern shown in the display is indica<br />
ted; in this case program 60 is at the first position.<br />
The bottom line on the left tells you that you are in<br />
the m memory.<br />
r<br />
-f<br />
F.<br />
F<br />
I<br />
-j
I<br />
1<br />
<<br />
You can recall the pattern sequence with the<br />
program key for unit digits (13) backwards or<br />
forwards. Thus, you can always check what you<br />
have already stored.<br />
The pattern sequence is full<br />
If you have stored more than 1 0 patterns or 30<br />
I. 1-<br />
- - -<br />
characters in your pattern sequence the following<br />
j is shown in the display for a short time:<br />
I<br />
J<br />
1<br />
10 10<br />
m)---<br />
This means that the pattern sequence is full.<br />
I-.<br />
________<br />
7*<br />
L<br />
1<br />
45<br />
I<br />
p1<br />
ilj<br />
:i<br />
I I fl<br />
I j -<br />
f+<br />
0)<br />
CD<br />
Co<br />
o<br />
0<br />
0<br />
0<br />
CD<br />
C’,<br />
UtNity and fancy<br />
stitches
1<br />
11<br />
1j<br />
1<br />
j<br />
Contents<br />
Sewing table<br />
Nonelastic stitches<br />
Elastic stitches<br />
Overlock stitches<br />
Covering stitches<br />
Buttonholes<br />
Sewing aids<br />
Hem with twin needle<br />
Gathering<br />
Smocking effect<br />
Darning<br />
Inserting zippers<br />
Rofl-hemming<br />
Lace processing<br />
Shell edging<br />
\ 4r<br />
-<br />
Page 50<br />
Pages 51 to 56<br />
Pages 57 to 63<br />
Pages 60 and 61<br />
Pages 62 and 63<br />
Pages 64 to 67<br />
Pages 68<br />
Page 69<br />
Pages 70 and 71<br />
Page 72<br />
Pages 73 to 75<br />
Pages 76 and 77<br />
Page 78<br />
Page 79<br />
Page 80<br />
-<br />
49
!<br />
I I<br />
I<br />
50<br />
Explanation of the table for sewing<br />
recommendations<br />
Whenever a program is selected, the machine sets<br />
a basic stitch length, stitch width and balance<br />
automatically.<br />
You can change these settings according to fabric<br />
and sewing purpose using slide keys 7, 8 and 9.<br />
In the following tables you will find the settings we<br />
recommend for different sewing purposes.<br />
These tables give you further information required<br />
for sewing the selected programs:<br />
The type of sewing foot you need, the needle<br />
thread tension setting, and whether you should<br />
sew with the Dual Feed engaged or disengaged.<br />
prog Program number<br />
Stitch width in mm<br />
Stitch length in mm<br />
Dual Feed engaged •<br />
disengaged 0<br />
Needle thread tension<br />
Sewing foot number<br />
Th<br />
[1<br />
C<br />
1<br />
[1
- ]<br />
‘ Ii<br />
-<br />
Basting stitch<br />
- J With Program 08 you can baste a garment before<br />
F<br />
1—.<br />
J I<br />
i-i<br />
J machine<br />
J TIP:<br />
trying it on. When you press the foot control the<br />
will only make one stitch. For each further<br />
stitch you have to press the foot control each time.<br />
• Place the fabric under the sewing foot<br />
• Sew one stitch, then pull the fabric to the rear by<br />
the required amount<br />
• Repeat this as many times as you need to finish<br />
the work.<br />
To prevent the fabric layers from shifting,<br />
insert dress pins crosswise to the basting direction.<br />
Light fabrics are easier to baste with long straight<br />
stitches (6 mm). Then you do not need to lower the<br />
J1-J feed dog.<br />
J<br />
.1<br />
j<br />
prog<br />
08<br />
> 5!’<br />
- 6,0<br />
‘S El<br />
-- £ [j prog<br />
• 3 0/1 00-02 2,5 0/1<br />
Straight stitch<br />
e 3—5<br />
Program 00 is the basic straight stitch with center<br />
needle position. The stitch length can be increased<br />
up to 6 mm as required.<br />
Some sewing jobs can be done easier by changing<br />
the needle position, i.e. topstitching a collar or<br />
sewing in a zipper. To change the needle position,<br />
use Program 02. Before you change its position,<br />
always make sure the needle is at its highest point<br />
You can set up to 1 3 different needle positions<br />
with slide key (7). Program 01 is a straight stitch<br />
with left needle position that cannot he changed.
-_fr_<br />
7’ - 7’-<br />
52<br />
>!<br />
lprog > %<br />
-% I<br />
-I<br />
1O-12 3-6 1-2 3-5 0/1<br />
Zigzag stitch<br />
Zigzag stitch 1 0 can he used for trouble-free<br />
finishing of all edges. While finishing an edge,<br />
always make sure the needle goes into the fabric<br />
and over the edge alternately.<br />
In Program 1 0 the width of the zigzag stitch<br />
changes from the middle outwards. In Program 11<br />
the needle position changes toward the left, and in<br />
program 12 toward the right, i.e. the stitch width<br />
can be regulated to one side, i.e. for eyelet em<br />
broidery and cording work.<br />
For finishing difficult fabrics, blind stitch foot No. 3<br />
is very useful. During sewing, the thread lies over<br />
pin C, thus preventing curling of the fabric edge. In<br />
this way you can sew beautiful smooth seams.<br />
The edge of the cutting has to be guided along<br />
edge guide B. You can adjust this edge guide with<br />
adjusting screw A.<br />
Important: Only use the blind stitch foot in Pro<br />
gram 11.<br />
Programs 50 to 52 are zigzag stitches which can<br />
be set particularly dense. Therefore they are well<br />
suited for appliqué work,<br />
[1<br />
[1<br />
[ji<br />
[1<br />
n1<br />
[21<br />
1<br />
[1<br />
LI<br />
- J
jz,<br />
U<br />
=L I<br />
1j<br />
i1<br />
‘I<br />
c 1<br />
—<br />
— ....‘ —<br />
I—.-— —<br />
I •<br />
k L_1. —<br />
- - I— —<br />
:•-;r<br />
41 .<br />
., I<br />
)i Al<br />
.II —<br />
* .— ‘IL .<br />
il. ._ —<br />
L..<br />
prog j<br />
-<br />
I —<br />
- -<br />
•<br />
14, 15 4,5 2,5 3-5 3<br />
Blind stitch<br />
Blind stitch 14 is best suited for invisible hems;<br />
sewing by hand is no longer necessary.<br />
• Serge the edge of the hem.<br />
• Fold up hem allowance and pin parallel to and a<br />
quarter of an inch away from the bottom fold.<br />
• Now turn the hem to the left leaving about half<br />
an inch of finished hem edge exposed.<br />
• Now place the fabric under th sewing foot with<br />
told against edge guide B.<br />
• When the needle enters the fold it must only pic<br />
up one thread of the fabric.<br />
—<br />
1I_ [i—<br />
‘ ‘ 4<br />
t:<br />
If the stitches are visible on the right side, adjust<br />
edge guide B by turning adjusting screw A.<br />
Prog. 15<br />
--<br />
1<<br />
Prog. 14<br />
Program 1 5 is a blind stitch for stretchy fabrics.<br />
The hem is sewn and serged at the same time, i.e.<br />
it is not necessary to serge the fabric edge.<br />
A<br />
53<br />
h
14<br />
:,,<br />
4i<br />
54<br />
prog ><br />
_______<br />
> ,‘ %1jA ri<br />
29 6 1,5 3 0/1/5<br />
Automatic darning<br />
Program 29 is mainly intended for strengthening<br />
damaged areas of fabric.<br />
• Stitch over the damaged area at the required<br />
length.<br />
• Press the reverse key; the machine finishes<br />
sewing the darning program and the darning<br />
length is thus saved.<br />
The saved darning length can now be repeated as<br />
often as you need.<br />
The program is cancelled by pressing the clear key<br />
(5), i.e. ,,auto” is cancelled from the display.<br />
IIiiII<br />
riiii1!<br />
Illhllhll<br />
III lull 11(11 itI<br />
IIuIlI<br />
litJ(j<br />
IIlIIflI<br />
1 2<br />
Depending on the type of fabric, the darning<br />
pattern may shift to one side. You can straighten<br />
the pattern again using the balance key (8).<br />
Fig. 1: If the pattern shifts this way you have to<br />
move the balance key right.<br />
Fig. 2: In this case you have to move the balance<br />
Bartack<br />
key left<br />
Program 1 3 allows you to sew bartacks on extre<br />
mely thick fabrics.<br />
• Lower the feed dog (see page 32).<br />
• Sew on the bartack with program 1 3. If the<br />
bartaclc is not sewn in its entire width, leave the<br />
needle in the fabric, turn the fabric, and repeat<br />
the operation once again.<br />
— I<br />
F<br />
1_i<br />
I<br />
F<br />
C’:<br />
FLi<br />
—
t<br />
1.J<br />
iii<br />
1<br />
ii<br />
I 1-1<br />
Ji<br />
uEjj<br />
Sewing on buttons<br />
With Program 74 you can sew on two and four<br />
hole buttons with no problem at all.<br />
• Remove the sewing foot.<br />
• Place the button on the place marked.<br />
• Turn the handwheel towards you and position<br />
the button so that the needle enters the left hole<br />
in the button.<br />
• Now lower the presser bar lifter; the button is<br />
now held by the shank of the foot<br />
• Make sure that the needle also enters the right<br />
hole in the button. Now sew on the button.<br />
• The machine sews a tack and the program is<br />
completed.<br />
TIP: You can sew on buttons easier still if you<br />
lower the feed dog.<br />
Sewing on buttons with stems<br />
a Attach sewing foot no. 2.<br />
Place a match between the holes of the button<br />
and sew it on as described at left.<br />
• Remove the match and pull the button and fabric<br />
apart<br />
• Wrap the stem with sewing thread and knot it
Eyelets<br />
You can sew eyelets with Program 73 of the<br />
<strong>tiptronic</strong> very quickly and simply.<br />
• Place the fabric under the sewing foot<br />
• During sewing, press the “single pattern” key (3).<br />
The machine now sews only one eyelet and<br />
tacks it at the end.<br />
• Cut the eyelet open.<br />
The machine has two different eyelet sizes to<br />
choose from, which you can change using slide<br />
key (8).<br />
56<br />
0<br />
I<br />
ri<br />
r1i<br />
r:,i<br />
r”1<br />
[j1<br />
L
L<br />
I<br />
[Z<br />
Li<br />
Li<br />
U<br />
11<br />
og<br />
06 -<br />
3<br />
Stretch triple straight stitch<br />
A’<br />
• 3-5 0/1<br />
This program is used for sewing all seams where<br />
great strength is needed, i.e. inside trouser seams<br />
and sleeve seams. The heavier the fabric, the longer<br />
the stitch length you need.<br />
Program 06 can be lengthened up to 4.5 mm, and<br />
Program 07 up to 6 mm. This is why Program 07<br />
at the longest stitch length is suitable for fancy<br />
topstitching edges or lapels on classic jackets and<br />
coats.<br />
TIP: It you wish to topstitch a collar edge with<br />
Program 07, use the functions “needle down” and<br />
“single pattern”. Do not press the single pattern key<br />
until you reach the last stitch before the corner, the<br />
machine will stop after the stitch, and the needle<br />
stays in the material. Now turn the fabric; the<br />
“single pattern” function switches itself off.<br />
/<br />
7/<br />
/<br />
,2<br />
1’ ?<br />
/ -<br />
.0 —<br />
‘_<br />
-.:<br />
0<br />
2I1<br />
With program 03 also elastic fabrics for leggings<br />
or body suits can be processed.<br />
Unlike the stretch triple straight stitch, in this<br />
program only every other stitch is sewn threefold.<br />
Therefore it is also well suited for topstitching<br />
jackets and coats.<br />
/<br />
2<br />
/<br />
57
58<br />
prog<br />
, A—I l1<br />
,,<br />
[;j<br />
04 1,5 2,5 • 3-5 0/1<br />
Plain stem stitch<br />
This zigzag-like stitch is very suitable for sewing<br />
seams on stretchy fabrics, i.e. for leggings and<br />
sportswear.<br />
TIP: This stitch is also suitable for sewing seams<br />
subjected to great strain, i.e. crotch seams on<br />
trousers.<br />
prog<br />
‘i’ i;i<br />
19 4—6 2—3 • 3—5 0/1<br />
Stretch triple zigzag stitch<br />
The stretch triple zigzag stitch is a highly elastic<br />
and decorative seam which is very suitable for<br />
hems on T-shirts and underwear.<br />
• Serge the edge of the hem.<br />
• Fold up hem allowance.<br />
• Topstitch the hem from the right side.<br />
[:1<br />
F<br />
rim<br />
Ci<br />
r1jl<br />
pi<br />
E:J<br />
[i
[!]<br />
Li<br />
J1j<br />
Jj<br />
A/\/\/\t ‘iA /JANvV<br />
Elastic stitch<br />
This highly elastic stitch is used for sewing on<br />
LJ • Mark elastic and fabric into quarters.<br />
j<br />
ii<br />
di<br />
U<br />
r<br />
j]<br />
uJ<br />
elastic, i.e. on underwear.<br />
• Lap ends of elastic by half an inch and stitch to<br />
secure.<br />
• Stitch elastic onto fabric matching quarter marks<br />
and stretching elastic while sewing.<br />
• On skirts or trousers the elastic is sewn pnto the<br />
prepared edge with elastic stitch.<br />
Honeycomb stitch<br />
Honeycomb stitch is used for elastic and decorative<br />
hemming, and is very suitable for hems on under<br />
wear and T-shirts.<br />
• Fold the edge of the hem over double and over-<br />
stitch it.<br />
59<br />
I<br />
I<br />
I<br />
H<br />
I
fr _;<br />
60<br />
What is an overlock stitch?<br />
N<br />
N<br />
N<br />
N<br />
For knit and other stretch fabrics the <strong>tiptronic</strong> offers<br />
a selection of overlock stitches. These join two<br />
layers of fabric and finish them in one operation.<br />
They have a high elasticity, are more durable, and<br />
you can sew them fast, too.<br />
TIP: When you sew overlock seams, we recom<br />
mend you use blind stitch foot No. 3. It guides the<br />
fabric better and prevents tunneling of the seam at<br />
wider stitch widths.<br />
prog > %!<br />
>)AcIA_<br />
20 6 3 0 3-5 0/1/3<br />
Open overlock stitch<br />
With this stitch it is no problem to join firm materi<br />
als or fabrics which do not fray too much.<br />
TIP: Make sure that the needle in its right-hand<br />
position just misses the edge of the fabric.<br />
> A l%/dl-<br />
prog > 1<br />
L<br />
25 6 3 0 3-5 0/1I3<br />
Closed overlock stitch<br />
Program 25 is ideal for sewing jersey knit fabrics.<br />
You can also use it for sewing on sleeve cuffs or<br />
knitted collars durably.<br />
TIP: Make sure that the cuff is stretched during<br />
sewing.<br />
I<br />
i1r<br />
riJrI<br />
r
1.<br />
[ Program 21. With this stitch an additional edge accessory) this stitch can even be used for sewing<br />
I<br />
]<br />
prog j H-a<br />
J 21 6 3 C 3-5 OI1/3 23<br />
Closed overlock stitch with edge thread Pullover stitch<br />
jJ it you wish to use a fabric that frays easily, select Used together with the knit-edge foot (special<br />
L thread protects the fabric edge against fraying. open-knit fabrics.<br />
TIP: To prevent the seam from stretching during<br />
joining, it is advisable to add a woolly thread with<br />
slight tension.<br />
6 3 0 3—S 0/1<br />
II. 61<br />
I<br />
0 -<br />
Cs.-..<br />
:Q1.<br />
I-r<br />
C<br />
H<br />
.1<br />
-I<br />
I
•<br />
- :-<br />
• z-<br />
;•-•<br />
m T1<br />
(DO’ O’<br />
CD 0 O<br />
M<br />
ci<<br />
0<br />
CD C)<br />
CD CCD<br />
CD<br />
Q.C) C)<br />
0)<br />
—h!• CD<br />
cD<br />
C<br />
D<br />
< -h D)<br />
ctCDg<br />
D<br />
o 0<br />
0<br />
• 00<br />
‘ A’ vA<br />
OCD<br />
—<br />
/<br />
(DC?)<br />
D(D<br />
0 0<br />
D<br />
TCD<br />
0 —<br />
C CD<br />
-+<br />
CD<br />
03<br />
0—-<br />
0; c0<br />
0<br />
.CD 0)0<br />
o<br />
-E 0)0<br />
0)<br />
o_<br />
a’<br />
0<br />
o-<br />
a<br />
CD -<br />
0<br />
—r — —
1’<br />
Baste hem to the left<br />
• Stitch over the hem from the right side. When<br />
doing so, make sure the fabric edge is fufly over<br />
J stitched.<br />
I A lV%A’Aa. I A<br />
prog J prog<br />
I Cross hem stitch Light knit mending stitch<br />
J This highly elastic stitch is very suitable for decora- Light knit mending stitch is a stretchable covering<br />
J •<br />
tive hems, i.e. on T-shirts and underwear, stitch. It is very suitable for over-stitching cuffs in<br />
• Serge the fabric edge.<br />
stretch fabrics, i.e. sweat shirts or sportswear.<br />
• Sew the cuff on with an overlock stitch.<br />
• Now the seam margin can be over-stitched from<br />
the right side of the fabric. Make sure that the<br />
needle enters close against the seam.<br />
63<br />
/
Buttonholes<br />
The <strong>tiptronic</strong> 6270 offers you different buttonhole<br />
sewing programs to choose from.<br />
Depending on the fabric and type of work, you can<br />
choose between three different buttonhole pro<br />
grams.<br />
Buttonholes are generally sewn onto a piece of<br />
doubled fabric. However, for some materials, i.e<br />
silk, organza and rayon fabric, it is necessary to use<br />
a paper backing to prevent the material from<br />
tunneling during sewing.<br />
To produce beautiful seams, good embroidery<br />
threads are ideally suitable.<br />
Mark the starting point of the buttonhole with a<br />
disappearing-ink pen and always sew a sample<br />
buttonhole first<br />
64<br />
Note: Before starting any buttonhole, always push<br />
the guide of the buttonhole foot fully to the front,<br />
i.e. so that the red arrow is at the first red mark.<br />
r;’iI<br />
!i<br />
r •1<br />
I ji:<br />
ii<br />
ho<br />
•Ei.;1 pr<br />
[<br />
I<br />
12<br />
1 T<br />
ri<br />
Ii<br />
[1<br />
L<br />
[El<br />
r
1<br />
J s<br />
- However,<br />
. Place fabric under the sewing foot and sew the<br />
J buttonhole. The machine will automatically<br />
1<br />
11<br />
-_>I,% I I<br />
lvI<br />
prog 5, ..1’ E1<br />
Fully automatic linen buttonhole sewing<br />
-p J Program 70 is very suitable for sewing button In Program 71 you can determine the length and<br />
width of the buttonhole yourself.<br />
1 _program is selected, a buttonhole with a length of • Push the buttonhole slide fully to the front.<br />
12 mm and a width of 4 mm is sewn autornati<br />
.L cally. You can change the length of the buttonhole<br />
• Sew the right-hand bead the required length.<br />
using the slide keys (7 and 8). • Press the “buttonhole key (3). Now the machine<br />
ST<br />
the stitch density cannot be altered. This<br />
sews the first bartack and the second buttonhole<br />
how it is done:<br />
bead. Shortly before the second bartack the<br />
machine automatically sews slower.<br />
• Mark the buttonholes and push the buttonhole<br />
slide fully forward.<br />
• As soon as the two buttonhole beads are the<br />
same length, press key (3) again. The machine<br />
now sews the second buttonhole bartack and<br />
secures it automatically.<br />
secure the beginning and end of the buttonhole.<br />
The buttonhole length is now stored. All<br />
• Trim<br />
further<br />
the threads.<br />
buttonholes are now sewn automatically at the<br />
Cut open the buttonhole with a scissors or a same length. “auto” appears in the display next to<br />
seam ripper.<br />
the program number. You can cancel the saved<br />
length by pressing the clear key (5), then “auto”<br />
is also cancelled.<br />
J holes in shirts, blouses and bed linen. When a<br />
Programmable buttonholes<br />
65<br />
F
66<br />
Self-defined second bartack (semiautomatic)<br />
On difficult fabrics such as silk it may happen that<br />
the machine feeds differently and the buttonhole<br />
beads do not turn out the same length.<br />
With stored buttonholes you can correct this with<br />
the help of the semiautomatic control. To define<br />
the length of the second bartack yourself, press key<br />
(3) “buttonhole”. ‘Auto” disappears from the<br />
display.<br />
The machine will now sew slowly just before the<br />
end of the second buttonhole bead. As soon as the<br />
two beads are of equal length, press the key again.<br />
The machine will now sew the second bartack and<br />
secure it<br />
If you wish to sew the next buttonhole fully auto<br />
matically again, switch to fully automatic mode by<br />
pressing key 3.<br />
+<br />
The point then disappears. In Programs 71 and 72<br />
you cannot use semiautomatic control until the<br />
buttonhole has been stored.<br />
b<br />
Compensating the buttonhole bead length with<br />
the balance key (9)<br />
A further correction possibility is offered by the<br />
balance key. With this you can also correct une<br />
qually long buttonhole beads,<br />
If the left bead is too short (Fig. a), push the<br />
balance slide key (9) to the right The farther you<br />
move the slide key right, the more reverse stitches<br />
the machine sews, i.e. the Left bead will automati<br />
cally he made longer.<br />
If the left bead is too long (Fig. b), push the<br />
balance slide key (9) to the left The farther you<br />
move the slide key left, the fewer reverse stitches<br />
the machine sews, i.e. the left bead will automati<br />
cally he made shorter.<br />
Ii<br />
j1<br />
[T
LJ<br />
LZ]<br />
[TJ<br />
[ J<br />
ButtonhoJe with gimp thread<br />
To produce highly durable buttonholes, i.e.. for<br />
sportswear, we recommend using a gimp thread.<br />
For all stretchable fabrics, too, a gimp thread is very<br />
important, in order to avoid overstretching of the<br />
buttonhole.<br />
• Place the gimp thread over the back ridge A and<br />
pull the thread ends under the sewing foot to the<br />
front<br />
• Pull the threads in to the left and right of ridge B.<br />
• Push the buttonhole slide fully forward, then sew<br />
the buttonhole.<br />
• Pull the loop of the girnp thread into the<br />
buttonhole and cut off the loose thread ends.<br />
Stretch buttonhole<br />
Program 72 is very useful for sewing buttonholes<br />
in stretchable materials, i.e. in jogging suits. It can<br />
also he used for making decorative buttonholes,<br />
i.e. in national costume blouses.<br />
You can determine the length and width of the<br />
buttonhole yourself.<br />
• Push the butonhole slide fully to the front<br />
• Sew the first buttonhole bead at the required<br />
length.<br />
• Press the buttonhole key (3). The machine now<br />
sews the first bartack and the second bead.<br />
Shortly before the second bartack the machine<br />
automatically sews slower.<br />
• As soon as the two buttonhole beads are the<br />
same length, press key (3) again. The machine<br />
now sews the second buttonhole bartack and<br />
secures it automatically.<br />
The buttonhole length is now stored. All further<br />
buttonholes are now sewn automatically at the<br />
same length. “Auto” appears in the display. You can<br />
cancel the saved length by pressing the clear key,<br />
then “Auto” is also deleted.<br />
67<br />
2
68<br />
Needle thread tension Topstitching<br />
In order to obtain perfect sewing results, the needle<br />
and bobbin thread tensions must be correctly<br />
adapted to each other. The normal setting for utility<br />
stitches is 3 to 5.<br />
Check the tension using a wide zigzag stitch. The<br />
interlace of the two threads must lie in the middle<br />
of the two fabric layers.<br />
If the interlace lies on the top side of the fabric, this<br />
means the needle thread tension is too tight If it<br />
lies on the underside, the needle thread tension is<br />
set too loose.<br />
To adjust the bobbin thread tension please refer to<br />
page 24.<br />
With Program 02 you can change the needle<br />
position so that you can always guide the sewing<br />
foot along the fabric edge for topstitching work. If<br />
you wish to topstitch at a wider width than this,<br />
simply guide the fabric along the guide marks on<br />
the needle plate, or use edge guide 8. The edge<br />
guide is inserted into hole C and is secured with<br />
screw F.<br />
Sewing aid for thick seams<br />
To ensure correct feeding at the beginning of the<br />
seam we recommend placing a piece of fabric of<br />
the same thickness as the workpiece under the<br />
sewing foot to support it<br />
11<br />
1:41<br />
r<br />
F<br />
[<br />
Jr<br />
I<br />
1
1<br />
•i<br />
E1<br />
Sewing hems with the twin needle<br />
With the twin needle you can not only embroider,<br />
but also make topstitch seams.<br />
Using the twin needle you can lend a professional<br />
touch to hems on stretch materials such as T-shirts,<br />
knitted articles or cycling shorts both quickly and<br />
easily. Twin needles are available in different<br />
widths. The most common is 2.5 mm.<br />
Threading the twin needle<br />
Replace the sewing needle with a twin needle.<br />
• Push on the second spool holder and place a<br />
spool on each holder.<br />
• Tension disk C is inside the left-hand threading<br />
slot (21). Make sure that one thread is guided<br />
along the disk to the left and one thread to the<br />
right<br />
• First fold up hem allowance and press.<br />
• Then stitch the hem from the right side of the<br />
fabric.<br />
• Finally, trim the overlapping hem edge back to<br />
the seam.<br />
TIP: On difficult fabrics such as rib knits it is easier<br />
to baste the hem before topstitching.<br />
• Continue to insert the threads in the normal way<br />
making sure that the threads do not become<br />
tangled.<br />
20<br />
Pull the threads to the right and to the left<br />
through thread guide (20) and thread the<br />
needles.<br />
.
prog<br />
> -‘<br />
><br />
A<br />
00 6 3-5<br />
0/1<br />
Gathering with straight stitch<br />
With Program 00 at a stitch length of 6 mm you<br />
can gather sleeves, skirts or valances. To obtain<br />
neat and even gathers you should sew two or three<br />
gathering seams.<br />
• Mark the first line on the right side of the fabric<br />
and stitch along it. Leave about four or five<br />
inches of thread at the end.<br />
a You can now stitch the other row at a sewingfoot<br />
width away using the first one as a guide.<br />
70<br />
• Now gather the fabric by pulling the bottom<br />
threads. You determine the amount of gather<br />
yourself.<br />
• Finally, knot the thread ends together to secure<br />
the gather.
Gathering with elastic threads<br />
athering sleeves or waist seams is no problem at<br />
II with elastic threads. The elastic thread must not<br />
a wound onto the bobbin.<br />
Mark the first gathering row on the wrong side of<br />
the fabric.<br />
I Make a few staing stitches using Program 24,<br />
then leave the needle down in the fabric. The<br />
needle must be at the middle of the sewing foot.<br />
Raise the sewing foot and place the elastic<br />
thread around the needle.<br />
Lower the sewing foot again and sew a few more<br />
stitches, but do not pull the ends of the elastic<br />
thread until these are sewn.<br />
From then on you determine the amount of<br />
gather by the amount you pull on the elastic<br />
thread.<br />
After sewing you can still change the amount of<br />
gather by pulling both elastic threads.<br />
Finally, knot the threads and the elastic.<br />
7<br />
TIP: The pintuck foot (special accessory) is also<br />
ideal for gathering. The grooves in this foot guide<br />
the elastic evenly during the sewing action.<br />
71
C)<br />
C.)<br />
0<br />
2<br />
U,<br />
prog<br />
00 -<br />
3—4<br />
Shirring with &astic threads<br />
__<br />
3—5 0/1<br />
With fine and light materials such as batiste, ruyon<br />
or silk fabrics you can make beautiful shirring For<br />
shirring with elastic thread you should use an<br />
additional bobbin case and wind the elastic thread<br />
oy hand. Since elastic threads are nucli thicker<br />
than normal bobuin threads, the tension on tIre<br />
bobbin case must be set very loose. However, the<br />
tighter you set the bobbin thread tension the<br />
greater the shirring effect you obtain.<br />
72<br />
• First sew a test row to determine the amount ci<br />
gather.<br />
• Mark the first ne on the right side of the fubi ic<br />
and stitch along it.<br />
• You can now stitch the ether row at e sewing<br />
fool width away using the Iirst one as a urIc.<br />
• If you sew several rows, one beside the other,<br />
you have to stretch the fabric to its oi iginal<br />
length during sewiilcj, otherwise the shining will<br />
be irregular<br />
• Knot the threads at beginning and end of the<br />
seam on the reverse side.<br />
—<br />
[<br />
I:<br />
1”<br />
F<br />
I,<br />
Ii<br />
U<br />
-,fl<br />
[I
t -i—_ - - -..<br />
zZ<br />
prog<br />
Darning with straight stitch<br />
Attach the darning foot:<br />
Set the needle at its highest position and push tne<br />
pin of the darning foot fully into hole C. When<br />
you do this, guide fork G places itself around the<br />
presser bar. Wire E must be behind set screw F.<br />
Now tighten screw D.<br />
Darning position:<br />
Lower the presser bar lifter A and push it lightly to<br />
the rear. This positions the presser bar lifter into<br />
notch B (darning position).<br />
• Place the darning work in the darning hoop.<br />
• Lower the feed dog (see page 32).<br />
• Draw up the bobbin thread and hold the threads<br />
when you start sewing.<br />
• Darn over the damaged area by moving the<br />
fabric evenly in the required direction. When<br />
doing so, move the fabric in shallow curves. This<br />
prevents tearing of the darn Inter.<br />
• When you have stitched evenly over the darning<br />
area, turn the fabric 90 degrees and darn over<br />
the damaged area again.<br />
You determine the stitch length for this work<br />
yourself by moving the fabric back and forth.<br />
TIP: If small knots appear on the underside, this<br />
means you have been moving the fabric too slowly.<br />
I<br />
73
;,<br />
l t/”ye; .<br />
ttyt<br />
prog<br />
29 6 1,5 • 3 0/1<br />
Automatic darning<br />
i :‘j<br />
Program 29 is mainly intended for strengthening<br />
damaged areas of fabric.<br />
• Stitch over the damaged area at the required<br />
I en gth.<br />
• Press the reveise key, the machine finishes<br />
sewing the darning program and the darning<br />
length is thus saved.<br />
The saved darning length can now be regealed as<br />
often as you need.<br />
The program is cancelled by piessin the clear key.<br />
Denending on the type of material, the darning<br />
pattern may shift to one side. You can stiaighten<br />
the pattern again using the balance key (9).<br />
Fig. 1: It the pattern shifts this way you have to<br />
move the balance ke right. r<br />
Fig. 2: In this case you iav to move the balance<br />
key left.<br />
74<br />
II II<br />
I’ I ‘ii I<br />
‘ii<br />
n Iii<br />
Iii Il<br />
I I<br />
1<br />
‘illi’<br />
liJ<br />
1 2<br />
13<br />
6 0,2—1 • 3—5 ,<br />
Darning with elastic stitch<br />
0;<br />
Darning with elastic stitch is also a very SUitable<br />
means of repairing damaged fabric<br />
• Sew over the damacred area with rows of stitches<br />
until it is well covered, Wher i doing SC), make<br />
sure the stitch rows overlap each other<br />
3r<br />
jfr<br />
:<br />
ELI<br />
C
prog<br />
13 6 0,2-1 • 3—5 0’l<br />
Sewing on patches<br />
‘4. I<br />
i—- S<br />
The best way to darn larger holes is to cover the<br />
damaged area with a piece of new material.<br />
• Baste the piece of new material onto the<br />
damaged area from tne right side.<br />
• Over-stitch its edges with elastic stitch.<br />
• Now cut back the damaged material up to the<br />
seam on the reverse side.<br />
TIP: In order to turn at the corners more easily. use<br />
the ‘needle down” function.<br />
prog<br />
13 6 0,2-1 • 3—5<br />
Darning tears<br />
A<br />
Oil<br />
For tears, frayed edges or smaller holes it is easier<br />
to place a piece of material on the underside of the<br />
fabric. This strengthens the fabric and provides a<br />
much better darn.<br />
• Place a piece of material on the underside of the<br />
fabric. The piece must always be a little bigger<br />
than the damaged area.<br />
• Now over-stitch the damaged area by the length<br />
of the tear.<br />
• Cut back the material on the underside close to<br />
the edge.<br />
75<br />
“90
- Sewing<br />
pro<br />
00 -<br />
in zippers<br />
___<br />
_____<br />
[ ---1<br />
3 . 3-5 4<br />
There are different ways to sew in zippers. For skirts<br />
we recommend inserting the zipper concealed on<br />
• •: both sides, and for men’s or ladies slacks concea<br />
led on one side. Difierent types of zippers are<br />
avaiinble in shops and stores. For fir ii ateriels<br />
such as jeans we recommend metal zippers, and<br />
plastic zippers for all other materials.<br />
For all types of zippers it is important to sew right<br />
up close to the teeth of the zipper. This is why the<br />
zipper foot can be attached to the foot mIner to<br />
the left or right, aepending or toe n inthod of<br />
insertion.<br />
Using one of the 1 3 needle positions vot car also<br />
set the needie so that it enters close to the edue of<br />
the zipper teeth. It the sewing foot is engaged on<br />
the right side, the needle position must only he<br />
changed to the right. If the foot is attached left, the<br />
needle must only be moved to the left<br />
76<br />
Inserting zippers conceaied on both sides<br />
• Attach the zipper foot to the right side.<br />
• Place the zipper Linder the sewing foot so that<br />
the teeth run at the side of the root. Uninq<br />
Program 02 fun can set the needie a’, tin’<br />
required positon<br />
• Sew in half of the zipper, leave the needle in the<br />
fabric, raise the sewing foot and close the zipper<br />
• Now you can sew the rest of the seam to the end<br />
of the zipper and stitch the crosswise scan<br />
/<br />
/<br />
/<br />
/<br />
I
• Sew the second half of the zipper parallel at the<br />
same distance.<br />
• Stop shortly before the end of the seam and<br />
leave thu needle in the fabric. Raise the sewing<br />
foot arid open the zipper.<br />
• You can now sew to the end of the seam. N<br />
Trouser zippers<br />
• Iron the seam margin over, making sure there is<br />
an overlap of about 1/8’.<br />
• Baste the zipper under the overlapping edge so<br />
that the teeth are still visible.<br />
• Attach the zipper toot on the right and set the<br />
needle at the required position.<br />
• Stitch close along the edge of the zipper.<br />
• Shortly before the end of the seanr open the<br />
zipper and finish sewing the seam.<br />
I,<br />
• Close the zipper and baste the overlap evenly<br />
onto the other zipper half<br />
• Afterwards stitch along tIre basted seam,<br />
TIP: To achieve accurate seams we recumniend<br />
using the euge guide.<br />
77<br />
C)<br />
-
E EC)<br />
0<br />
75<br />
__ ____<br />
1 I1 -<br />
prog<br />
oo -<br />
Roll hemming<br />
With the hemmer foot you can roll hem blouses<br />
silk fabrics or valances with no proolem at all and<br />
without hainq to roil the ecicics ucforehan<br />
Hemming secures the edges against frayinq and<br />
produces a neat and durable ecige finish<br />
• Fold the fabric edge over twice cibout 1 1 6”<br />
per foid>.<br />
=<br />
• Place the folded fabric edge under the heroine<br />
toot and sew a few sttclles<br />
• Leave the needle in the tam c. Kdise the sewn<br />
foot and push tue fabric into tile scroll of the<br />
hemmer foot.<br />
• Lower the sewing foot and guide the fabric edqe<br />
evenly into the hemmer Toot. When doing so,<br />
make sure the tabric does not run under the rqhf<br />
side of the sewinq feet.<br />
TIP: For silk avon or chiffon fabrics, a i oiled em<br />
iooks belier wtn zigzag sutcnes.<br />
I<br />
3-5.7 I<br />
iF<br />
HLE<br />
- r<br />
r<br />
- L<br />
‘ L[<br />
r<br />
1
S<br />
—<br />
•<br />
(<br />
_,I ‘1’ 4<br />
41<br />
4.<br />
-(1.1<br />
V<br />
‘“.4<br />
I<br />
i i -<br />
—‘I’.<br />
I<br />
‘;:‘ .‘ ‘.‘•. ....<br />
— 4<br />
- ,.<br />
-<br />
— —-.<br />
!r:;: .,.,, .L<br />
— I •‘<br />
,-<br />
— ;,<br />
‘V<br />
prog t J<br />
00 2,5 • 3-5 0 /]<br />
Lace inserts<br />
You can produce a beautiful effect on christening<br />
wear or other childrens clotries witri lace inserts.<br />
• First haste the lace to the riqht side of the fabric<br />
• Stitch both edges of the lace at a narrow width.<br />
• Cut open the fabric under the lace at the middle<br />
and iron it over to the side.<br />
• Stitch over both edges of the lace with small and<br />
dense zigzag stitches<br />
• Trim the excess fabric.<br />
Lace edges<br />
Lace trimmings provide many new ways of<br />
designing arid enhancing home decor faurics.<br />
This is the way to do it:<br />
• First serge the raw edges.<br />
• Stitch the lace onto the right side up to tire first<br />
corner.<br />
• Fold the corner and stitch over it diagonally.<br />
• All other sides are clone in the same way.<br />
79
C,<br />
_________<br />
prog __<br />
________________<br />
‘, I w<br />
TIP: If you add a colored pearl cotton thread at the<br />
edge you can strengthen the suet edging and<br />
obtain a pretty contrast at the same time Instead of<br />
a pearl cotton thiead yet can aiso place a difierent<br />
16 4,5 1.5 • 4—5 0 / 1 colored light fabi ic underneath<br />
Shell edging<br />
Shell edging is very effective for thin, soft fabrics<br />
such as silk and rayon materials. It is frequently<br />
used as an edge finish on underwesi. too. The<br />
gntei you set tIre needle threaci tension the farther<br />
tne shell edging is pulled in.<br />
• Serge the raw edge and roil the seam allowance<br />
over to the left.<br />
• During sewing, make sure that the fabric runs<br />
under the sewing toot at half the foot width only<br />
This provides a more proirment shell edging<br />
ettect.<br />
on<br />
-L<br />
--rj<br />
I
Appicaton exarnpes<br />
Decorative stitches and<br />
traditiona ernbrode’ techniques<br />
Pages 81 o 101<br />
2<br />
C!)
Contents<br />
General notes<br />
Combined borders<br />
Embroidery with twin needle<br />
Large-area embroidery,<br />
cross stitch<br />
Leather embroidery<br />
Suspenders (braces)<br />
Alphabet<br />
Monograms<br />
Appliqué work<br />
Linen embroidery<br />
Ri cli eli e u<br />
Hem stitching<br />
Eyelet embroidery<br />
Quilting<br />
rV :‘<br />
Page 84<br />
Page 85<br />
Page 86<br />
Page 87<br />
Page 88<br />
Page 89<br />
Page 90<br />
Page 91<br />
Page 92<br />
Page 93<br />
Page 94<br />
Pages 95—97<br />
Pages 98, 99<br />
Pages 100, 101
C<br />
General notes on embroidery<br />
Embroidery too, is an art that must be earned first.<br />
With tie right tips a id tricks re v.’ovu, it is unite<br />
easy to come up with benutifLil embroidery resLilts,<br />
Thread tension<br />
In general the thread tension fur emla cminr<br />
be looser than for sowing (± 3><br />
1 must<br />
In cuicitiou the bobbin thread tension I inst he<br />
tihtenecl by turning the large knu rIch screw on the<br />
nobum case a little to the right. This will result m a<br />
censistent qualty and a three hmensinnil oppea<br />
rance of the embroidery design Isee page 21<br />
Sewing feet<br />
Sewing foot no 2 is nest suited for cmlii oidnrv<br />
Cactioni be Dual Feed must I’ hrsenqaged during<br />
ioihr eideR’ snice otherwise the ci iibr oilieR pat<br />
turns ni gilt Ut; shifted.<br />
I’-’<br />
Ralance<br />
Every embroidery pattern is stored witl i its opti<br />
ira ni length and width setting ii tbc’ rnac’l uric<br />
However, if you embroider on ditlicult mater als i.e.<br />
jersey, silk or heavy wnol it may he rrucessar to ru<br />
adjust the settings wih r tIre balance slide key (sue<br />
page 10). in mant cases oatturn icucrtl stitch<br />
density nid pattern width can hc altered<br />
Reinforcing the material<br />
Errilrroiciery on any material, no nratler whether toe<br />
or U urck, is easier when the n inter cil is reinforced.<br />
Marry materials tend to corer act, especially wner i<br />
tIre embroidered stitches are set very dense.<br />
Therefore we reconrmend to glnce a niec 01 rear<br />
away paper u rider tIre iii ea to he enrbr ordered on<br />
In this way ritnterra<br />
a<br />
1 sb Its cci ri In’ avoided After<br />
enihroiderrrrg it can hi’ rerlinved very easily<br />
Wate—solihic stabilizer is a trarrspcureirr gniiittnie<br />
vyinne wbicl i you place ur’i the iruaterral and<br />
embroider on Alter eriihrorrlerrnq the water snlrulilr<br />
stal’iilizer can be removed easily nSnio i rrioistenrril<br />
cloth. Alternatively the riraterual can be r erriforcr ‘ii<br />
with the ci “Sew Perfect” The reIn’ ts nI tIe’ gil<br />
can be coriiparecl to those ot stabilizinci spray. Let<br />
ory after cipplyirru it on tin’ niatc,rir It hecorncrs<br />
very frrni and for most r’riaten ials you can emhon<br />
cider without placing paper underneath After<br />
er’nt)roldierr ng, tire gel can be washed out eanily<br />
El<br />
r<br />
_,L<br />
__1<br />
-<br />
r<br />
-J<br />
L
Ci<br />
ill<br />
•0nibined borders<br />
he following we give you a few examples of<br />
v VOU con create borders o any width bt<br />
iibining different embroidery piograms. Coats<br />
nzai rayon embroidery threads are ve’ suitable<br />
- are available in many colors and different<br />
s. Howevet, only use one throao size for one<br />
ce of embruider work.<br />
• :‘<br />
.*/ :-<br />
-41 I t<br />
f<br />
-<br />
‘<br />
j, ! o<br />
-t /‘ ,i . . i. r., Ci<br />
/ H V<br />
jAt •,/tt\ J -<br />
a /fl H A A<br />
C - - y<br />
- , -<br />
Ai\ 4. -<br />
-<br />
\. -<br />
zA1 ‘-<br />
A- — -- - y -yr<br />
additional effects use metallic embroidery<br />
—an This is avaiiable bore your Ptaff deale’ in a<br />
1’ variety of hades<br />
-<br />
-k<br />
85
4-<br />
‘1)<br />
I... —<br />
) .<br />
F<br />
ii1 ‘. r ci<br />
!: e<br />
I tf. ?<br />
r 9. .<br />
I<br />
I’. ‘<br />
it 05;<br />
I -<br />
- ;<br />
TI<br />
i-i IL<br />
‘Ii<br />
:<br />
It ?<br />
i1<br />
I<br />
ii<br />
41<br />
Ii<br />
iHI 20<br />
UI J/<br />
/ I<br />
ii<br />
Embroidering with the twin needle<br />
ou can achieve additional embroider-v effects by<br />
using the twin needle. The illustrations show what<br />
beautiful borders can be made with a little imaqi<br />
nation.<br />
Only use a twin needle with a width of 2.5 mm for<br />
these embroidery designs.<br />
Note:<br />
As soon as embroidery programs are selected the<br />
twin needle indicator (6) lights up. in this case do<br />
not use the twin needle. If you reduce the stitch<br />
width using the stitch width slide key (7), indicator<br />
(6) will go out in some programs. Then an opti<br />
mum stitch width has been set and ‘/011 can sew<br />
the pattern using the twin needle.<br />
Threading the twin needle<br />
• Insert the twin needle.<br />
• Attach tIre second spool holder and place one<br />
spool of thread on each holder.<br />
• In the left threading slot (21) you will find<br />
tension disk C During threading. nial.e sure tl rat<br />
YOLI pass one thread left and one tin end i iqht<br />
over tension ciisk C<br />
• Continue threading in the usual way, but make<br />
sure the threads are not twisted with each other.<br />
• Pull the threads right and left into thread guide<br />
(20) and thread the needles.<br />
86 — I<br />
.11<br />
El,<br />
J1<br />
I<br />
El<br />
Er<br />
: ri<br />
EL1<br />
—t
:<br />
Large-area embroidery<br />
,i- ,,<br />
•1<br />
By combining individual programs you can aso<br />
embroider large-area borders. Geometric shapes<br />
iC very suitable for this.<br />
Transfer the embroidery pattern to the fabric using<br />
stencil. The embroidery illustrated above was<br />
)ased on an equal-sided pentagon.<br />
• Apply iron-on or tear-away stabilizei to the wrong<br />
side of the fabric.<br />
• Transfer the embroidery pattern.<br />
• Eniijroioor the pentagon wit. Pr’ieran 48 tnd<br />
the dots with Program 64.<br />
liP; Embroider the pentagon using the keys foi<br />
single pattern and ‘needle down”. In this way you<br />
easily make up the pentagon by simply turning the<br />
3attern.<br />
a’<br />
a.<br />
• j<br />
Cross-stitch<br />
No matter whether you embroider tapes as critts,<br />
blouses or home decor, graphic border desiqns are<br />
simple to make with the cross-stitch program of<br />
the <strong>tiptronic</strong>, and they look as if they are sewn by<br />
hand. Even if you have never done cross-stitch<br />
work before, these borders can be made with on<br />
problem at all. Since the program can be set at<br />
different sizes, you can achieve different effects<br />
with little effort.<br />
• Place stabilizer under the linen border.<br />
• Mark the pattern as shown in tire illustration with<br />
tailoring chalk or disappear mg-ink pen, nncl<br />
embroider it iii the desired color using Pioqiani<br />
69. Press the “single pattern’ key at the end of<br />
each pahlern,<br />
• Pull the threads to the back and knot them<br />
tog eti or.<br />
TIP: The border embroidery on the wide border can<br />
be clone with a wide cioss stitci i 81 to 5 nind and<br />
on the i arrow border with o narrower ci oss-stitch<br />
(3 miii).<br />
87<br />
C)<br />
0 I<br />
.0<br />
E<br />
C)<br />
cQ<br />
‘- 4<br />
i0<br />
-Ju
4-.<br />
0<br />
0<br />
C<br />
2<br />
w<br />
Embroidering leather<br />
t’\/ith the <strong>tiptronic</strong> you can embroider leather with<br />
no oroblem at all.<br />
Since leather stretches easily, you should use an<br />
iron-on backing or place two layers of stabilizer<br />
under it, The stitch length should not be set too<br />
short, because leather tears between stitcl holes<br />
easily.<br />
Embroidering leather can be made even easier by<br />
using a Teflon sewing foot (special accessory). The<br />
Teflon covering allows the foot to shoe easily over<br />
the leather. Depending on the thickness of the<br />
leather and thread, we recommend rising a special<br />
needle or a needle with a large eye li 30 Nl.<br />
Please note that needle penetration holes in leather<br />
remain visible when ripping out tire thread.<br />
Tins is the way to do it:<br />
• Apply iron-on or tear-awn stabilizer as an<br />
menacing.<br />
• Embroider Program 62 (extended) over the<br />
center of the belt.<br />
• Sew the clots with program 64 (do not forget the<br />
single pattern key).<br />
• Attach tire cording foot and over-stitch the omp<br />
thread with Proqram 50 (reduced in stitch width<br />
and riensity)<br />
• Finally, embroider the triangular border parallel To<br />
the cordinci seam with Program 61 -<br />
TIP: Leave enough space in the embroidery for the<br />
eyelets which are punched m later.<br />
• II<br />
—<br />
H 1<br />
E LI<br />
F<br />
LI
suspenders with a difference<br />
::n no custom make a parr o sssponders and<br />
_mbroider tlmm exactly to yoir own taste<br />
2<br />
• Cur the suspenders to shape. To strengthen the<br />
suspenders we recommend applyrng an ron-on<br />
or tear-away stabilizer as an interfacrng.<br />
• Embroider over the middle of the sLispendors<br />
with Progranr 50.<br />
• [niuroider the row of triangles parallel to this<br />
with Program 61<br />
• Eirrbroider the circles with eyelet Program 73<br />
and the cope finish with Program 55<br />
• Now finish the suspenders and sew on the strap<br />
fasteners.<br />
——<br />
89
Cl)<br />
I<br />
0)<br />
a)<br />
a<br />
U,<br />
U,<br />
With your <strong>tiptronic</strong> you can ‘wi te” initials, names<br />
or even entire texts in a piotessional manner<br />
without any problem at all in this way you can give<br />
a personal touch not only to your clothes but also<br />
make unmistakable presents out of terry cloth<br />
towels, scarves etc<br />
The alphabet also contains numbers and punclul<br />
tion marks<br />
90<br />
Alphabet<br />
Use the program key for tens diqits to select the<br />
alphabet. The letter “A” is rlisplayed and con lie<br />
sewn immediately.<br />
Use the p ograni key [or unit digits to select the<br />
chesi red a Iphan umeric cha i actei Ni mber 0 is<br />
selected with the prograni key [or tens digits, till<br />
othei numbers are selected with the program key<br />
for unit digits.<br />
Letter size can he altered using slide key (7).<br />
The otters can be sewn with a pattern width of up<br />
to 6 mm They can be combined to a word<br />
sequence in [lie M memory tsee pages 41 —43).<br />
El<br />
-1<br />
El<br />
El<br />
rf<br />
-î
Mo iiog rams<br />
NO matter whether you work on terry cloth or woven<br />
ebric, with the darning foot and Program 50 you<br />
an monogram any initials of your own design.<br />
tree-hand guiding however needs a little practice<br />
1 the beginning.<br />
• Transfer the initials with the disappearing—ink pen<br />
to the area to be embroidered.<br />
• Lowei the feed dog and attach the darning foot<br />
see pages 32 and 73).<br />
• 01500 a pi000 of writer-soluble stabilizer on thr<br />
rabric.<br />
• Frame the faorio in an enthroicler’ hoop and em<br />
uroider it vith Program 50. Do riot forget to LISO<br />
the darning position.<br />
• Knot the threads and pull off the stabilizer<br />
Any remaining stabilizer is dissolved ii waterL<br />
TIP: If you sew fast but move the materia sow:<br />
“ stitches wii be more dense.<br />
Di terry clotn the monogrum niList first be pro<br />
lawn with narrow zigzag stitches and then ovei<br />
srwn wth a wider zigzag stitch. This makes sure<br />
:ht terry cloTh oops are properly covered.<br />
Block capitals are a little easier to embroider. The<br />
feed dog does not need to be lowered, i.e. rio free<br />
hand guiding is required. All you have to rIo is<br />
stitch along the marked lines using Program 50<br />
• Apply iron on backing or place stabilizer undci<br />
neat h<br />
• Mark the monogram on the fabric.<br />
• Now embroider the marked lines with Program<br />
50<br />
91<br />
0<br />
E<br />
I<br />
0<br />
0
0<br />
9-<br />
0.<br />
Appliqué foot<br />
Apphques are quickl<br />
1 niade and always produce a<br />
beautiful effect You can n akc a perfect, densely<br />
stitched seam with tIre aenlique foot special<br />
accessory), because it has a special cutout on the<br />
underside for the zigzag seam. Curves and corners<br />
can also be Sewn witl rout any problem at alL<br />
Prepare your applique woi Ic as folloWS.<br />
SketcI r the motif teat you wish to attach on your<br />
base materral. Iron paper backed frisible web on<br />
the base material and on the appliqué material<br />
Removc the paper hackinq from the applique<br />
material and iron it onto tIre base fabric.<br />
Now you carr start sewrnq over-stitch all outside<br />
ertrs wrth the ziqzag stitch The thinner the<br />
U rread the smaller the stitch lenqth settrr rq sI cold<br />
be WI run you ft ad i a curve lrS( tIre needle<br />
down ‘<br />
function<br />
to I dli you turn toe fabric arid sew<br />
an even sean r. Also rr rake sure tire needle passes<br />
tire omer edqr’ Sn U rat no In ayirrcr occr irs later.<br />
TIP: Stitch no. 50 is oartrcularlv line utriul appli<br />
clue stitcl<br />
Air orrdn a r,l r’fl ‘ct S a crt lirit viol l din Ire<br />
reached by rrsrrrq tin quilt and applrqrre stitch no<br />
09 Thrs strtct srrorrkr rave a ninth of rnuuhly<br />
1 5 riur aird a eirdtlr of approxrnrcrtelt 3.0 nrrrr<br />
Usrrrc: tire open ai rlvre lout tspr clot ;lcce:,srrn<br />
sirr r,lrtrr., lOis penuroi even rue (See rtirj 1 71.<br />
— It’<br />
I<br />
ci<br />
:i
LineI enibroidery<br />
1pn en uroiciery IS C \JCP web-
Richel ieu<br />
This vet’<br />
7 artiste form of ba and c-’ulrt embroider’<br />
is easy to make with OLH sewmq machine.<br />
1<br />
• Transfer your pattern onto the right side of the<br />
fahr’1c using the disappearing-ink pen.<br />
• Then place two layers of waler soluble stabilizer<br />
•<br />
under the area to be embroidered and tiqhc’n<br />
the fabric and stabilizer in air ernhuider’<br />
1 hoop<br />
To mae the embi oider’,’ 11010 stable, sew<br />
around all contours twice wit! straight stitch 00<br />
(at about 1 nm stitch tenctlr it<br />
• Ca efull’1 cut nut the Is! mc troll i the a c’, s that<br />
will form the cutouts, but do not cut awal tIe’<br />
stabilizer.<br />
• Embroider the contours with a dense 7igzaq<br />
strtch.<br />
• Till’ sb lii i/El ii ovides th part ut Ill WOl I will I<br />
much more shape and stability<br />
• Finally dissolve the stahrliznr in water, 1111! voi ii<br />
piece of emhrordery is finished.<br />
F<br />
L1<br />
r<br />
I
emstitching<br />
is embroidery technique is very well lnowu.<br />
wever, only for hand-made em br nidery Hem<br />
titching with the <strong>tiptronic</strong> 6270 is 1HLICi1 qLuckei<br />
iid easier.<br />
There are two specific hemstitching proqranis at<br />
o u disposal; and you can obtain new ehocts by<br />
anging stitch length and width For hemstitchiuq<br />
on need a wing needle. For very thin fabric a<br />
iormal needle, size 80, can be used Best ci hod as<br />
1 hemstilching material is coarse-weave linen h oin<br />
ohich you can remove single thieads easily. Cotton<br />
:iiead is very suitable, i.e. embioicic or darning<br />
‘tread With the hemstitching programs of your<br />
:otronic 6270 you can produce hemstitrhing with<br />
various techniques.<br />
95<br />
0
C.)<br />
Cl)<br />
I<br />
90<br />
Fagoting:<br />
• Draw the threads at the required width the same<br />
as in hand hemstitchinq<br />
• Embroider with Program 67 or 68 along both<br />
fabric edges. When you do this the needle mUst<br />
enter at the side of the edges into the diawn<br />
threads: this will bunch the threads.<br />
Traditiona’ hemstitching<br />
• Using “single pattern’ sedU Erogrom 67 c 68 uP<br />
a piece of scrap fabric<br />
• Now von can count ott the tllrr’dds on the nsa he<br />
and draw the required nunibur of thieacl U ii<br />
your hiemstitch work.<br />
• Oveostitch the remaining threads v,ith tpo<br />
selected program. When you do this, the needle<br />
must enter close to the udgea in hi’’ draw<br />
thieads at both sides.<br />
I.”*’ 1e;.øu:$<br />
El<br />
i<br />
‘I
a hem with a hemstitch seam<br />
the hem over twice and rain<br />
ch along the hem with Program 67 or 68<br />
tile right side. V\ihen you do this the needle<br />
5st enter the hem to the right dnd eaton only<br />
base Taboo to the left.<br />
Hemstitching as an edge finish<br />
This edoe finish is used for very ligat and thin<br />
fahrrcs. It is very suitable fur Ti ills r rugles<br />
• Sew usinq Program 67 or 68 at loot wiutii uioii<br />
the edge of the fabric.<br />
(, /<br />
C-,<br />
0<br />
2<br />
C)
1<br />
0<br />
.0<br />
a)<br />
>-<br />
w<br />
a<br />
Eyelet embroidery<br />
aditional eyoet embroidery Whcn 000 agO naP<br />
to 1w niade laboriously he nra P can hr niarh quitE<br />
easily with the help of an eyelet elate (special<br />
accessory).<br />
This is very effective on hlouses. bed or tabie linen.<br />
Practically all stitch types o the <strong>tiptronic</strong> arc<br />
suitable for this zgzag stitch, blind stitch, elastic<br />
StitCh or fancy stitches.<br />
eor classic eyeet embroidery, Proqrnin 1 2 is vry<br />
1e. Set the ocedie at its left nositiun select tin<br />
suitab<br />
stitch width, and the macInn’ stitches nvenly<br />
--around Ui” cut-ri portion<br />
98<br />
I a<br />
——1<br />
-I
hfld this is the way to do it:<br />
Remove the sewing foot.<br />
place the eyelet plate on the needle elate,<br />
aaking sure pin A fits in the middle cutout of the<br />
peedle plate. Then push the plate down at the<br />
front<br />
place the marked fabric tightly in an embroidery<br />
hoop.<br />
TIP: If you choose another program. i.e. 55 or 57,<br />
the cut will only be partly stitched around, or not at<br />
all. To complete this, just select Program 1 2 after<br />
iards and stitch evenly around the cut. This is how<br />
beautiful blossoms can he made, too.<br />
• Cut one or two of the fabric threads and push the<br />
fabric over the pin in the eyelet plate. The fabric<br />
must fit snugly around the pin.<br />
• Set the presser bar lifter at the darning position.<br />
• Draw up the bobbin thread and hold it for the<br />
first few stitches.<br />
• You can now stitch around the cut with the<br />
selected program. When you do this it is impor<br />
tant to turn the fabric slowly and evenly. The<br />
stitches should be close to each other.<br />
• Afterwards secure with a few straight stitches.<br />
99<br />
a,<br />
e0<br />
2 a,<br />
C,<br />
a)<br />
>-
Quilting<br />
Qmhing vvas c traditional hand sewing technique.<br />
The method that the wives of American setbers<br />
developed to make use of material remnants has<br />
become very popular.<br />
A quilt consists of three layers. The quilt top is<br />
tacker! onto the middle layer made of padding and<br />
the back layer of the quilt that usually consists ot<br />
one an iforn piece of fabric.<br />
The quilt edges arc bound aften using tI ic baci<br />
aver as binding. Of course, the work ol piecing the<br />
patches together most IDe V1J’’ precise. In order to<br />
prevcnt the parts from slitting and to make them hr<br />
together precisely we recommend to usc the Dual<br />
Feed (IDT svsteml. Tlic Dual Feed wili also prnve<br />
very usetoc when sewn iq or ernbroidering oven the<br />
quilt which in the end will consist of three layers<br />
Thc quilt or patchworl. foot (special riccessotte is<br />
part rularlv well sunted for quilting 7h onstauci<br />
I ietween the riced Ic arid the outer .dqe nt 11cr’ loot<br />
is 1 4 inch a nd betwoen the need in and the 1w i<br />
1 F, inch<br />
1 00<br />
Moreover the <strong>tiptronic</strong> 6270 I as the quilt stitch 03<br />
which enables you to quilt quick and easy whiie<br />
the seams still seem to be hand-made. Use inivisi<br />
Ne sewing thread (nylon monofilanmenr( as the<br />
needle thread rind wind the bobbin with cotton<br />
thread accordinq to the color of the rniateriu I<br />
Choose a very right needler thread tension, in 8 tn<br />
9, and a rather loose bobbin thread tousion IA/lin i<br />
you tI ion cow the stitch onto thìe thi en lay rs of tI<br />
qLult, unIv the cottnnr—tlcread triple stitch is visil dc’,<br />
tIc intermeclialu stitch disappears Sc) mat Ii Dr ni<br />
ii iLide cook is obtained lsee page 1 1 51<br />
Tip: Keep playnnig with the tensions to achieve thin<br />
look you wart Cotton u nborrded huttin s wnrt<br />
11
this is what you do:<br />
jt out the patches of your quilt with templates<br />
oU have bought or made yourself. A seam<br />
iowance of a ciua.rtei Of an inch should already<br />
e included in the templates<br />
• sew the patches together following the design to<br />
>iece the quilt top.<br />
• The seam allowances of quilts are never sergeci<br />
5nd always pressed to the darker fanric side.<br />
- --:<br />
. •_t.<br />
ter on you can use your quilt to cover up your<br />
jed linens on to make pillows or wall nanginqs<br />
it.<br />
• Baste the finished top sine of thn rmilt to tile<br />
padding layei and rio the same with thn wronq<br />
side of the quilt<br />
In traditional quilts tlui.sc three layers of tahi ic nrc<br />
sown together by na cl with sn mu stitci es out it<br />
is quicker and more pratical with the sewinq<br />
machine. i.e. with Program 03. Emhroiclce l<br />
stitches look very good on solid colomd mmcl print<br />
fabric.<br />
-<br />
:-<br />
f .q<br />
t.trz’r’.4•”zfl %_?.7 flTE<br />
- S<br />
4•1<br />
W7 :<br />
Emhroider stitches or I re motion machoe<br />
niuiltinq arm vcr’ suitablE’ “chniques fur seP SilJd<br />
Pmurics In fror_ rimotic,r macnmiJ ririltmg the rInili<br />
quidecl thi ciug h [lie roacnine li hand Use qrr<br />
nromm 00 cud dcrimin foot no P ccl lower the<br />
teen dog see paq 27 mu can also muse teriqila<br />
tes to sketch your num it ni the rubric.<br />
1 01<br />
C
--:<br />
3<br />
)<br />
- L — .<br />
-<br />
I. 71 ? LJ LA
CD<br />
Ci)<br />
- Cd) —<br />
(DO<br />
C) 1<br />
_ j<br />
—<br />
D<br />
0<br />
0<br />
CD<br />
U,<br />
Accessories and<br />
iced Ic s
‘<br />
\<br />
‘<br />
[1<br />
—<br />
Accessories and need’es<br />
Sewing feet<br />
(standard accessories)<br />
Special accessory table<br />
Appliqué/felling foot<br />
Pintuck foot<br />
Gathering/knit-edge foot<br />
Bias tape binder/ruttier<br />
Cording/fringe foot<br />
7/9 hole footlbraiding toot<br />
Quilt and patchwork foot<br />
Twin-needle cording foot<br />
Open appliqué foot<br />
Needle table<br />
‘4<br />
Pages 106, 107<br />
Page 108<br />
Page 109<br />
Page 110<br />
Page 111<br />
Page 112<br />
Page 113<br />
Page 114<br />
Page 115<br />
Page 116<br />
Page 117<br />
Pages 118, 119<br />
105
LI)<br />
.<br />
U<br />
U<br />
O6<br />
-<br />
Sewj, lee! (stalldarci dCcesser)<br />
Nor,j SCWj<br />
119 ft no. 0<br />
Pan No 98-694 87 6-Op<br />
Fancy stitch foot for Dual Feed no. 1<br />
Pan No 98-694 87400<br />
Fancy Stitch foot<br />
(not suitable for Du Feed) no. 2<br />
Pa No 98-694 89y 00<br />
Iinj stitcj aj overloOk fOot no. 3<br />
Pan No 98694 8900p<br />
Zipper nd edge stjtc, foot no 4<br />
Pan N0, 98-694 8840p<br />
I
L<br />
!—: :çJ<br />
Buttonhole foot, no. 5<br />
-art No 98-694 882 00<br />
Darning foot, no. 6<br />
Part No. 93-035 960-9 1<br />
Hemmer foot, no. 7<br />
Part No. 98-694 818-00<br />
Edge guide, no. 8<br />
Part No. 98-802 422 00<br />
Second spool holder<br />
Seam ripper<br />
Soft brush<br />
Oil tube<br />
1 07<br />
C!)
C.)<br />
0.)<br />
Cl)<br />
C)<br />
C)<br />
0<br />
C)C.)<br />
Sewing feet (special accessory)<br />
Special accessoires are intended for special sewing work<br />
They are available at a charge from your PFAFF dealei.<br />
Accessory<br />
Appliqué foot<br />
Open applique foot<br />
Pintuck foot, 5 grooves<br />
(twin needle with needle spacing 1 .6 to 20)<br />
1 30/705 H-ZWI<br />
Pintuck foot 7 grooves<br />
(twin needle with needle spacing 1 .6 to 2.0)<br />
1 30/705 H-ZWI<br />
Cording blade 12 pcs.)<br />
Fancy-seam pintuck foot<br />
Part nimber<br />
93-042941-91<br />
98-036 931 91<br />
93-042 950-91<br />
Sewinq work<br />
For apeliqué worl.<br />
For applique work in connection<br />
wel. preqram 9<br />
93-042 953-9 For pintuck work ineedle size 80<br />
93-035 952-45<br />
93-036 942-91 Additional effect due to emb oitfering<br />
I<br />
with fancy stitches<br />
Fringe foot 93-042 943-91 For sewing loop eniornide<br />
2 fit-on spool holcleis 93-033 063-44 For sewing with tne twin needle<br />
Straight stitch foot with i ourid hole 98-694 821 -00 Caution! Only use straight stitch in<br />
__(for Dual Feed) , middte needle position<br />
Filin<br />
9 foot, 4,5 mm 42946-91t<br />
Felling font, 6.5 mm 93-042 948 91<br />
-<br />
1<br />
For flat-felled seams<br />
Single needle cording toot 93-036 91 5-91 For cording<br />
Shirrmg foot 93-036 998 91 For gathering I ills, etc.<br />
Braiding foot 9 3-036 936 91 For sewing ovei cords and<br />
thick threads<br />
7/9 hole foot 3-036 946-91 To sew on threads and tapes<br />
Eyelet plate 93-036 976-45 Fm eyelet embroidery<br />
Ruffler 98-999 650-00 For placing ruffles at even distances<br />
Quilt and patchwork foot I<br />
(for Dual Feed)<br />
93-036 927 91 Foi quilt work<br />
Roll-hemming foot, 2 inni 98-694 873-00 For lremniing edges<br />
;- ——-— .——- . ——--—<br />
Hemmer foot, 4 mm (for Dual Feed) 98-694 823-00 For heninunq edges<br />
h-z--——-—---------------—--————----— ,<br />
Bias tape binder ‘<br />
98-05<br />
u .4 91 .<br />
-<br />
- —--<br />
f—n<br />
bindn ig edger; witl r bias taf ic<br />
. — —.<br />
Needle plate with round hole , 98-694 422-00 Fnr topstitching seamc and for sewing<br />
very fine and soft tabm cs<br />
l<br />
I (silk ersey etc.><br />
Knit edge foot 93-042 957 91 I For sewing kiiittvcl fabrics<br />
Teflon foot (for Dual Feedi<br />
lip to a stitch length of 6 mm<br />
I<br />
036 917 91 Fom sewinq leather arid syntheucs<br />
Teflon fancy stitch foot, 93-036 922-9 1 For embroidnrinq on eathor<br />
up to a stitch length of 9 nm<br />
The following pages contain application exaniples of snme special accessories.<br />
108
,rogi_<br />
00<br />
pliqUé foot<br />
n- o35-<br />
,‘e<br />
.::“,.t,i-.’<br />
ohques are quickly made and alvvay. produce a<br />
3jtifui effect. By using different mate als and<br />
terns you can obtain variations galore You can<br />
a perfect, densely stitched scan wth tire<br />
que foot because t has a special cutout on<br />
underside for the zigzag seam.<br />
rtach tie app clue foot in the sewir p machine.<br />
‘ransfer your drafted pattern to the ri iht side,<br />
saper side, of the paper-backed Tush ‘q web.<br />
emernber that any letters or numbers have to<br />
drawn in mirrored fashion.<br />
L-ErLa<br />
‘ow iron tire bacl’:rrrg fabric onto th ‘<br />
app<br />
pee<br />
uteriar. Cut toe motif out and pull t re paper off<br />
-tace and iron tire appique onto thi ‘<br />
Dase<br />
fabric<br />
Doer-stitch all contours with narrow and dense<br />
gzag stitches When you reach a curve, usct1rc<br />
reedle down” function to help you tuide the<br />
,‘ork more easni. Also make sure lii’ needle<br />
Anl<br />
‘asses tire outer edqe so that no lia mg occurs<br />
qu 00 ,<br />
Felling foot<br />
Flat-felled seams arc’ not only ornamental but<br />
strong too. This makes them very suitable for<br />
sportswear, children’s wear, men’s shirts and Jeans.<br />
You can make these seams very prominent if you<br />
use a sewirrg thread of a contrasting color.<br />
• Place tire fabrics’ wroir sides together<br />
• Overlap the ra edge of the lower fabric by<br />
about 38” to 58’.<br />
— Now place this overlapping edge over tire tongue<br />
of the fellirrg foot. The fabric must be placed frilit<br />
under tire sewing foot<br />
• Sew aiorrg tOe edge with a straight stitch<br />
• Pull the fabric apart and feed the seam into tire<br />
Telling foot. Ti in rem is turned ovei by the Toni<br />
arrcl is over stitched aioi ig tire edge. Pull tire two<br />
fabric layers apart during sew’r p.<br />
JJii<br />
“elirnq<br />
it<br />
1 09<br />
C<br />
‘0 0<br />
0
C<br />
C<br />
4-<br />
C)<br />
_1<br />
progl i: i<br />
QQ -<br />
Pintuck foot<br />
2,5<br />
2 5<br />
Pintuci’,<br />
The classic pintuck sewing techniciue can be used<br />
without any problems on fabrics such as cotton<br />
and light woolens. Underclothing and children’s<br />
wear can be given a tradrional look with ointucks.<br />
• Attacb me pintuck foot<br />
• Replace the needle with a twin needlo 1 .6 or<br />
2 mm).<br />
• Thread with two needle threads (see page 69).<br />
• Now set the needle thread tension quite tight<br />
(at about 5) to make the soarn more prominent.<br />
TIP: If you wish to emphasize the pintuck effect,<br />
you can fit a ‘cording blade” on the front edge 01<br />
the needle plate. This shapes the fabric, during<br />
sewing and gives the pintuck nor e volume.<br />
110<br />
You can obtain a similar effect by using a pimp<br />
thread; this makes the pintuck look wirier<br />
In this case, however, do riot use a cording blade.<br />
• To do this, remove the needle plate<br />
• Thread the gimp thread through the role of the<br />
noodle plate from the underside.<br />
• Replace the needle plate. Tire notch between the<br />
needle plate and the Sewing machine provides<br />
space for the gimp thread. TIns thread rirust be<br />
fed under the needle plate, so that it does riot<br />
become tangled during sewinq<br />
• While sewing the pintuck, pull the fabric lightly.<br />
• You can use the grooves in the pintucl foot to<br />
guide the work along an already sewn pintrick.<br />
This ensures that the distance between pintucks<br />
is always constant.<br />
TIP: There are two different prituck feet: a five-<br />
groove and a seven groove toot (sec table on page<br />
1 08>.<br />
Wrtl i the seveni—qroove foot ti sn’wrr prntucks are<br />
closer together than with the five-groove foot<br />
You car r obtain an addrtrcrria I efli’ci rising tire twirl<br />
needle cordrricj foot Isee Page 1 1 6>.<br />
• r<br />
I<br />
-t<br />
r
prog 1 ‘--<br />
00<br />
3-5<br />
— to_J<br />
hirriflg foot<br />
autiful shirring effects, re. on cliildrens wear or<br />
0rtains, can he made quickly and easily with the<br />
.rrin foot, This eliminates shirrinq by hand.<br />
• ttach the shirrinq foot by hookin the rear bar of<br />
the foot into the rear groove of the foot holder.<br />
nush the toot upwards until it snaps into the front<br />
bar.<br />
Place the fabric to be shirred under the sewinq<br />
h)ot, and the shir-tree fabric from the top througi<br />
lie toot cutout. The fabric is riqht sides together<br />
During stitching you have to pull the top fabric a<br />
tUe. The harder you pull, the greater the shirring<br />
ttect you achieve.<br />
Be sure you guide the fabric edges evenly<br />
:flrOLlgi’l the foot.<br />
emove the shirring foot by pushing it down at<br />
ne front, and take it out to the hack over the<br />
roove of the sewing foot holder.<br />
P: You can also regulate the amount of shirrinq<br />
adjusting the needle thread tension and the<br />
oh lcnqth.<br />
prog<br />
25<br />
-.7 -<br />
:i;<br />
_____<br />
I(nit edge foot<br />
T30 35<br />
The knit edge foot is provided with shoes of<br />
different height, which makes it very simple to sew<br />
thick seams on knitted fabrics To obtain a perfect<br />
seam or bias pieces. we recominuiid addinq a<br />
wool thread under slight tension and over-stitching<br />
it at the same time.<br />
- •4 ‘ -H:<br />
edçpi<br />
foot<br />
‘iii<br />
—o<br />
4-<br />
— 0)<br />
0,0<br />
C,<br />
I<br />
I... —<br />
(1)
C)<br />
C)<br />
+C)<br />
LQO2_ZZS<br />
Bias tape binder<br />
Binding with bias tape is a very’ easy method of<br />
giving fabric edges a smooth and neat appearance.<br />
For this you need unfolded bias tape about an rich<br />
WI d e<br />
• Remove the foot homer with sewing foot and<br />
screw on the binder.<br />
• Cut the beginning of tile bras tape at a diagonal.<br />
• Pusn tIre tape into the scroll of the hinuer and<br />
pull it out to the back.<br />
• Adjust the binder so that the needle enters at<br />
about 1 /1 6’ from the folded-in edge of tie bias<br />
tape, or adj List the needle position.<br />
• Stitch about an inch or so along the bids tape<br />
before you insert the edge to be bound into the<br />
slot of the binder. The raw edge must be placr’cl<br />
between the bias tape edges. During sewing, tI ie<br />
bias tape will enclose the raw edge aritomati<br />
cally.<br />
TIP: You can obtain an adrntionai -dir ‘ci bt using a<br />
zigzag stitch or a fancy stitch.<br />
prog<br />
00<br />
Ruffler<br />
This is a really classic sewing foot<br />
1 You Cil make<br />
closely or widely spaced pleats as ii by ilirelic.<br />
The ruffler can be used in three differ ent ways<br />
I Folding the fabric in pleats.<br />
2. Foirlirig the fabric in pleats and sewing tlieni on<br />
in one step.<br />
><br />
— 3<br />
.<br />
3. Folding the fabric in pleats, sewing them on and<br />
sewing on lace at the same time<br />
When you buy the ruffler from youi Piaff dealei a<br />
frill rinser iption is provided with it.<br />
.%/.,1 n<br />
:‘ 3—5<br />
RulEs”<br />
——
3’ ZE1[ LO<br />
5152 1,5-2 0,35-1<br />
5ingIe needle cording foot<br />
orcIing is a technique in which pearl thread or a<br />
‘ cord is over-stitched to produce a purl seam.<br />
th this you can obtain an effect similar to<br />
• rriing Appliques can also he made more<br />
•‘i essive by this seam.<br />
• Mark the required motif on the fabric, avoiding<br />
too tight curves or angles if possible.<br />
tttach the cording toot and place the filling<br />
‘read in one of the front grooves of the fcot.<br />
then place lire filling thread in the bach groove<br />
nder the foot.<br />
Now over stitch tire filling thread with narrow<br />
and cieuse ziqzag stitches. Now you have made a<br />
so-called purl seam.<br />
SP: You can also obtain a special effect by over<br />
Icuing a medium pear I thread with a thread of a<br />
berent color<br />
3<br />
cordiig foot<br />
Fringe foot<br />
_ __<br />
50 1,5-2,5 0,35-1 .<br />
With this special foot for loop embroidery you can<br />
produce fantastic effects in no time. This fool is<br />
very useful for terry cloth.<br />
• Draw any pattern you wish will the disappeci<br />
ring ink pen.<br />
• Use a stabilizer and attach tIre fringe foot.<br />
• Embroider the motif, row by row. For circles you<br />
have to work from the outside inward.<br />
• For thicker threads you may have to choose a<br />
longer stitch length; it is best to sew a test seam<br />
first.<br />
C<br />
• When ‘you have fi nisired, pull the woi Ic out 01 the<br />
incichine carefully. becaus’-’ if you putt too Orsi<br />
you will pull the last loops tight.<br />
• knot tire threads on the reverse side.<br />
Fr rune<br />
2—3 -.<br />
foot<br />
11 3<br />
0<br />
a,<br />
C<br />
ClL
cc<br />
— e<br />
prog ; E1 prog<br />
34 6,0 .<br />
7/9 hole foot<br />
This sewing foot enables you to obtain stunning<br />
sewing effects with no problem at all.<br />
7 threads or mercerized cotton can he sewn over<br />
with various fancy stitches Pearl thread and<br />
embroidery twist are very suitable.<br />
• The <strong>tiptronic</strong> 6270 offers fancy stitches with a<br />
width of 6 mm. Therefore only thread tne seven<br />
center holes.<br />
• Cut the thread to the desired length and thread<br />
the holes from top to bottom. Then ay the thread<br />
under the sewing foot so that toe thread ci ids<br />
protrude 4 to 5 cm behind the sewinq foot.<br />
• Engage the sewing foot<br />
• Choose a fancy stitch to sew over the 7 threads,<br />
i.e. program 34.<br />
114<br />
—1<br />
A ç’-<br />
I -_-<br />
42 6,0 10 • 3-5 ‘_T<br />
Couching foot<br />
This special foot is best suited for overstitching<br />
cording (i.e. loosely twisted wool( or a narrow tape,<br />
or ribbon,<br />
• Thread tim cording or tape from the front into the<br />
eyelet-type guide and pull it tiiruinqh the front<br />
hole behind the sewinq foot<br />
• Engage the couching foot.<br />
• Select program 42, i.e., and embroider ovei the<br />
cording or tape.<br />
r<br />
L<br />
r<br />
F L.<br />
T
— 2.5<br />
1—-<br />
t and patchwork foot<br />
quIt consists of thre layers. The top iayir is<br />
of many pieces in qeometrical forms, which<br />
e con bined together in ma ry new ye na its<br />
op layer is tacked onto the middle layer macfe<br />
1ddiiig and the hack layer of the quilt that<br />
I y consists of a uniform piece of fabric.<br />
Lift and patchwork fool ‘s very suitable to<br />
dine the pieces of fabric. The distance between<br />
eedle and the ociter erige of the foot is a<br />
iei of an men and an eighth of an inch hot<br />
the needle and tire inner edge of the foot.<br />
gage the quilt and patchwork foot.<br />
Oil; t<br />
• : a:clivJorK 03 -<br />
w the pieces of fabric together cising proqrani<br />
With a seam allowance of a quarter of an<br />
the pieces of fabric must be guided along<br />
outer edge of the foot’ with a seam allow<br />
cc of an eighth of an inch the pieces of tahnic<br />
id he guided along the inner edge of the loot<br />
“ %A El<br />
s!.. Lj.<br />
3—4 , 9 i]tC’i”L’[<br />
in traditional qcnlts thc three layers are sewn<br />
together hy hand with small stitches but it is<br />
quickei croci more practical with toe sewing<br />
nraclnire, i.e. with program 03<br />
• Use invisible sewing tIn end (nylon monofilameot)<br />
as the needle thread and wind the bobbin with<br />
cotton thr cad according to the color of the<br />
inatenal<br />
• Choose 9 as the needle threcici tension settrnq<br />
o id sot a rallier loose hobbir tirreoci tension<br />
(see page 24). We recommend to bciy a second<br />
bobbin case.<br />
• When yoci then sew the stitch onto tire three<br />
lovers of tire quilt only the triple stitch of yocir<br />
bobbin thread is visible; the intermediate stitcl i<br />
disappears so that a hooch made tools is obtained<br />
115<br />
C<br />
C-)<br />
cc<br />
.2<br />
cc<br />
ci2
C.)<br />
c;.<br />
a)<br />
r1<br />
Fancy seam pintuck foot<br />
You can use this toot to sew pintucks with a wider<br />
distance to each other and to sew fancy stitches<br />
with a width of 6 mm inbetween.<br />
• Engage the fancy seam pintuck foot. The foot can<br />
be engaged in both directions. Therefore the side<br />
where the second pintuck is to be sewn is<br />
variable.<br />
• Replace the sewing needle by a twin needle<br />
(1 .6 or 2 mm needle qange).<br />
• Then thread two needle threads (see page 69).<br />
• Choose a tight needle thread tension (i.e. 5) arid<br />
116<br />
sew a pintuck (also see page 1 1 0, with or<br />
without gimp thread).<br />
prog<br />
0114C3<br />
• if you sew a second cordinq ynu can let the<br />
finished pintuck run inside the qurding groove<br />
which is protruding on one side of tire foot. This<br />
results ri the wide clearance where the fancy<br />
stitch can be placed.<br />
• Top-stitch all cordings,<br />
• Replace thc twin needle by a normal needle.<br />
Fiocy seni)<br />
pintuck<br />
• Sew a fancy stitch of your taste on the wide - —<br />
clearance, i.e. program 35. While sewing, let the<br />
pintuck run inside the grooves of the sewing foot<br />
Out<br />
-‘.<br />
I
prog<br />
Open<br />
09 3,0 1,5 • 3—5 app ciue<br />
Open appliqué foot<br />
ppliques are quickly made and always produce a<br />
eautifLil effect fsee page 92) By using program 09<br />
• connection with the open appliqué toot you can<br />
:btaln an additional effect i.e. the applique looks as<br />
overcast by hand.<br />
• Cut the pieces to shape without any seam<br />
allowance, n case of very fraying material we<br />
recomniunci howevei to iron the seam allowance<br />
under using a template.<br />
Iron paper-backed fLisinq web onto the motif.<br />
Tear the paper backing away and iron the<br />
appliqué fabric onto the base material,<br />
Engage the open appliqué foot.<br />
* Select program 09 and guide the motif edge<br />
along the inner edge on the right side of the foot.<br />
This way you make sure that the seam runs<br />
evenly along the motif edqe, thus hiding the<br />
straight stitch in the shadow of the seam so that<br />
a hand—made look is obtained .2<br />
‘0<br />
117<br />
0<br />
0
t<br />
0<br />
z<br />
0<br />
118<br />
Needle chart<br />
Using the correct needle guarantees belier stitching results.<br />
130/705 H<br />
Needle size;<br />
70/80<br />
Fabric weight<br />
light<br />
Needle size<br />
60, 70, 75<br />
Needle points<br />
Fabric weight<br />
medium<br />
Needle size<br />
80, 90<br />
System & No. Profile Point and eye Suitable for<br />
Light ball point<br />
Fabric weight<br />
heavy<br />
Needle size<br />
100,110,120<br />
Universal needle for fine-meshed synthetics,<br />
fine linen, chiffon, batiste, organdy, wool<br />
fabrics, velvet, fancy seams and embroidery<br />
1 30/705 H-SUI( Medium ball Coarse knitted fabrics, Lycra, double-knit<br />
Needle size; point jersey fabrics and Quiana.<br />
70/1 10<br />
1 30/705 H-PS Medium ball Stretch-fabric needle developed especially for<br />
Needle size; point <strong>Pfaff</strong>, paicularly suitable for delicate stretch<br />
75 + 90 ,<br />
and<br />
knitted fabrics<br />
1 30/705 H-SKF Heavy ball point Wide-meshed corsetry, Lycra, Simplex,<br />
Needle size; —<br />
70/110<br />
— Lastex.<br />
‘ 1 30/705 H-JSharp point Twill, work wear, heavy linen fabrics, blue<br />
Needle size:<br />
90-110<br />
jeans, light canvas.<br />
1 30/705 H-LR Narrow twist Leather, suede, calf and qoatskin leathers.<br />
Needle size; lright><br />
1 30/705 H—PCL Narrow wedge Imitation leather, plastics, foils and oilcloth.<br />
Needle size; point with left<br />
80—1 10 twist groove<br />
1 30 H-N Light ball point Topstitching with buttonhole twist or<br />
Needle size; with long eye synthetic threads 3013.<br />
70-110<br />
1 30/705 H-WING Heiiistitchinq Ehective hernstitching on batisto, organdy and<br />
Needle size; point glass cambric.<br />
100<br />
IL<br />
F<br />
j
,edle chart<br />
System & No. Stitch length Stitch width Needle spacing Suitable for<br />
i 1 30/705 H-ZWI 2.5 mm —<br />
Needle size: 80 2.5 mm —<br />
130/705 Ff-ZWI<br />
Needle size: 80 2.5 mm —<br />
Needle size: 90 2,5 mm —<br />
Needle size: 1 00 3.0 mm —<br />
iecorative designs sewn with twin needles<br />
1.6<br />
2.0<br />
2.5<br />
3.0<br />
4.0<br />
mm Medium wide<br />
mm Medium wide<br />
mm Wide pintucks<br />
mm Extra wide<br />
mm pintucks<br />
:fore you sew a decorative pattern, check by turning the handwheel that the needles enter without<br />
ny obstruction. This is a means of preventing needle breakage.<br />
n<br />
I:<br />
I<br />
Decorative and zigzag patterns<br />
1 30/705 H-ZWI<br />
Needle size: 80 0.5—1 .5 mm wide .6 1 mm Ornamentations<br />
Needle size: 80 0.5—1.5 mm narrow 2.0 mm Ornamentations<br />
2.5 mm Ornamentations<br />
H Needle size: 80 0.5_i .5 mm —<br />
P<br />
Hemstitching with special twin needle<br />
130/705<br />
H-ZWI-HO<br />
Needle size: 80 2.0—3.0 mm very narrow —<br />
Needle size: 1 00 2.0—3.0 mm very narrow —<br />
narrow<br />
Decorative<br />
effect<br />
hemstitching<br />
Heavily finished<br />
fabrics and<br />
glass cambric<br />
are particularly<br />
well suited<br />
119<br />
C)<br />
C)<br />
C)<br />
z
,<br />
N<br />
— L
Care<br />
Maintenance and troubleshooting<br />
Pages 121 to 126<br />
)C)
—<br />
Maintenance and troubleshooting<br />
Changing the needle plate<br />
Cleaning and oiling<br />
Sewing lamp<br />
Sewing faults<br />
Page 124<br />
Page 124<br />
Page 125<br />
Page 126
U)<br />
C)<br />
C<br />
Sewing faults and their remedy<br />
Faultlcause: Remedy:<br />
1. The machine skips stitches<br />
Needle is not properly inserted.<br />
Wrong needle is in use.<br />
Needle is bent or blunt<br />
Machine is not properly threaded.<br />
Needle is too small for thread.<br />
2. Needle thread breaks<br />
See reasons above.<br />
Thread tension is too tight.<br />
Thread is poor or has slubs in it, or<br />
has become dry after toolong storage.<br />
Thread is too thick.<br />
3. Needle breaks off<br />
Needle is not pushed fully in.<br />
Needle is bent.<br />
Needle is too thick or too thin.<br />
Needle is bent and has hit the needle plate<br />
because you are pulling or pushing the fabric.<br />
The bobbin case is not properly inserted.<br />
4. Seam is sewn unevenly<br />
The tension needs adjusting.<br />
Thread is too thick, slubbed or hard.<br />
The bobbin thread is unevenly wound.<br />
Thread bunching at top or bottom side of fabric.<br />
5. Machine does not feed or feeds irregularly<br />
Sewing lint has collected between the feed dog<br />
teeth.<br />
Feed dog is lowered, slide B (see page 32) is at<br />
right.<br />
6. Machine binds<br />
Loose threads in the hook race<br />
7. Machine does not sew the input program<br />
Push needle fully upwards,<br />
flat side facing the back.<br />
Use needle system 1 30/705 H.<br />
Insert a new needle.<br />
Check how machine is threaded.<br />
Use a larger needle.<br />
See 1.<br />
Adjust thread tension.<br />
Only use good threads.<br />
Use needle with large eye (System 1 30 N).<br />
Insert new needle and push fully in.<br />
Insert new needle.<br />
See needle chart (page 1 1 8/11 9).<br />
Let the machine feed the fabric.<br />
Only guide the fabric lightly.<br />
When you insert the bobbin case, push it fully in<br />
until it clicks in place.<br />
Check top and bottom tensions.<br />
Only use perfect threads.<br />
Do not wind thread free hand, but run it on through<br />
the winding tension.<br />
Thread correctly. Check needle and<br />
bobbin thread tensions.<br />
Remove needle plate. remove lint with brush,<br />
Push slide B (see page 32) to left.<br />
Remove loose thread and apply one drop of oil to<br />
hook.<br />
Switch machine off and back on again after about 1 0 seconds. Input required program again.<br />
important notes:<br />
Before you change sewing feet or needles, you must switch oft master switch 1 5.<br />
Do not start the threaded machine without fabric in it.<br />
If you leave the machine, even for a short time, do not forget to switch off the master switch. This is<br />
important if children are nearby.
1<br />
jing the light bulb Removal<br />
h off the master switch<br />
onnect the lead cord plug and the foot<br />
trol plug from the machine.<br />
off the detachable work support.<br />
ewing light bulb is located inside the needle<br />
of the sewing machine.<br />
To make it easier to change the bulb we recom<br />
mend placing the sewing machine on the handwheel<br />
as illustrated.<br />
• Hold the sewing machine tightly.<br />
• Push the bulb into its holder as far as it will go,<br />
and turn it counterclockwise to remove it.<br />
Insertion<br />
• Insert the bulb in the diagonal holder and turn it<br />
so that both stops of the bulb engage.<br />
• Now push the bulb fully into the holder and turn<br />
it clockwise so that it is held firmly.<br />
Important!<br />
.7<br />
The maximum permissible bulb wattage is 1 5<br />
watts!<br />
r
C)<br />
C) .E<br />
C) = 0<br />
4-<br />
Changing the needle plate<br />
-<br />
It is very important to clean and oil the sewing<br />
machine because it will reward you with a longer<br />
service life. The more often you use the machine,<br />
the more care it needs.<br />
Removal:<br />
Switch off the master switch<br />
• Raise the sewing foot and remove the needle<br />
plate.<br />
• Push the point of a small screwdriver into the<br />
opening between needle plate and sewing<br />
macnine. Twist it lightly to the right and the<br />
needle plate will snap halfway out of its moun—<br />
ting. Now push the screwdriver underneath the<br />
needle plate on the left side, turn it to the right<br />
and take the entire needle plate oLit.<br />
Replacing<br />
• Place the needle plate on flat at the hack and<br />
push it down with both hands at the front until<br />
you hear it snap in place. Before you start<br />
sewing, check that the needle plate is lying flat.<br />
. - -<br />
Cleaning and oHing<br />
Switch off the master switch<br />
• Remove the needle plate and lower the feed dog.<br />
• Clean the feed dog and hook area with the brush.<br />
• Then apply a drop of oil (every 1 5 to 20 hours of<br />
operation) to the hook. You can see where to<br />
apply the oil in the illustration and on the provi—<br />
ded oil bottle.<br />
The machine is otherwise maintenance free and<br />
must not he oiled.<br />
‘N..<br />
Cleaning the display<br />
\ .-<br />
When necessary, use a soft lint free and dry cloth<br />
to wipe the display. Never use eiiy aggressive<br />
cleaning agents or solvents.<br />
El<br />
-ii<br />
‘lL<br />
V<br />
-r<br />
La<br />
—n


