Taste lesson plan - National STEM Centre
Taste lesson plan - National STEM Centre
Taste lesson plan - National STEM Centre

You also want an ePaper? Increase the reach of your titles
YUMPU automatically turns print PDFs into web optimized ePapers that Google loves.
© Chilled Food Association in conjunction with Inspire2Exceed<br />
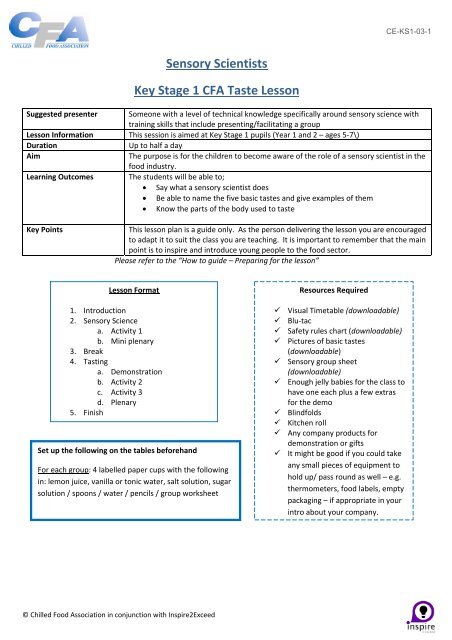
Sensory Scientists<br />
Key Stage 1 CFA <strong>Taste</strong> Lesson<br />
CE-KS1-03-1<br />
Suggested presenter Someone with a level of technical knowledge specifically around sensory science with<br />
training skills that include presenting/facilitating a group<br />
Lesson Information This session is aimed at Key Stage 1 pupils (Year 1 and 2 – ages 5‐7\)<br />
Duration Up to half a day<br />
Aim The purpose is for the children to become aware of the role of a sensory scientist in the<br />
food industry.<br />
Learning Outcomes The students will be able to;<br />
Say what a sensory scientist does<br />
Be able to name the five basic tastes and give examples of them<br />
Know the parts of the body used to taste<br />
Key Points This <strong>lesson</strong> <strong>plan</strong> is a guide only. As the person delivering the <strong>lesson</strong> you are encouraged<br />
to adapt it to suit the class you are teaching. It is important to remember that the main<br />
point is to inspire and introduce young people to the food sector.<br />
Please refer to the “How to guide – Preparing for the <strong>lesson</strong>”<br />
Lesson Format<br />
1. Introduction<br />
2. Sensory Science<br />
a. Activity 1<br />
b. Mini plenary<br />
3. Break<br />
4. Tasting<br />
a. Demonstration<br />
b. Activity 2<br />
c. Activity 3<br />
d. Plenary<br />
5. Finish<br />
Set up the following on the tables beforehand<br />
For each group: 4 labelled paper cups with the following<br />
in: lemon juice, vanilla or tonic water, salt solution, sugar<br />
solution / spoons / water / pencils / group worksheet<br />
Resources Required<br />
Visual Timetable (downloadable)<br />
Blu‐tac<br />
Safety rules chart (downloadable)<br />
Pictures of basic tastes<br />
(downloadable)<br />
Sensory group sheet<br />
(downloadable)<br />
Enough jelly babies for the class to<br />
have one each plus a few extras<br />
for the demo<br />
Blindfolds<br />
Kitchen roll<br />
Any company products for<br />
demonstration or gifts<br />
It might be good if you could take<br />
any small pieces of equipment to<br />
hold up/ pass round as well – e.g.<br />
thermometers, food labels, empty<br />
packaging – if appropriate in your<br />
intro about your company.
Introduction (5 minutes)<br />
Introduce yourself and give your company name (only tell them where it is at this<br />
stage)<br />
It’s really important for children to have the big picture/ overview of the session<br />
and what they can expect in the time that you are there. Putting up a visual<br />
timetable (see downloadable resources) on the board is a useful way to engage all<br />
children but particularly those with special needs such as Aspergers / Autism<br />
because they feel safe and are able to behave better when they know what is<br />
going to happen.<br />
Giving the Big Picture (30 seconds!)<br />
Stick up the visual timetable<br />
First, I’m going to tell you about the exciting job I do and the company I<br />
work for. (Import or stick on a picture of your place of work or company<br />
logo onto the visual timetable)<br />
Then I will show you some of the ways are able to taste food and I will<br />
need some volunteers. (I’ll be choosing children who sit nicely and listen<br />
carefully.)<br />
Then you are going to get into groups and have a go yourselves.<br />
Then we will have a chat about what we found out<br />
Then it will be break time.<br />
After break we will do some more tasting activities in groups and talk<br />
about what we have learned today.<br />
At the end you can ask me any questions you have about what we have<br />
done today or about my job and where I work.<br />
By the end of our session you should know all about my job and my factory<br />
and some of the things a Sensory Scientist does.<br />
Your job and your company (no more than 2 mins)<br />
Put it in context of where they might have seen or eaten your chilled<br />
product.<br />
Try to make everything you say relevant to the children. Take into<br />
consideration their age and possible life experiences but stay flexible and<br />
expand or reduce the information you give depending on the ability, level<br />
of understanding and concentration they are showing.<br />
If they appear to fidget and get restless, it’s probably time to stop talking<br />
even if you haven’t finished all of what you <strong>plan</strong>ned to say. Tell them you<br />
can see that they are excited to start and go on with the next bit. You can<br />
come back to anything important you needed to say later.<br />
NOTE: Pupils you work with will be of different abilities. Key Stage 1 pupils range<br />
between the ages of 5 to 7 but you will need to gauge their ability and possibly<br />
adapt how technical/scientific you make each session.<br />
© Chilled Food Association in conjunction with Inspire2Exceed<br />
CE-KS1-03-1<br />
NOTES
Sensory Science (5 mins)<br />
Explain that there are different types of scientists who work in the food<br />
industry and that one of them is called a Sensory Scientist. They have a great<br />
job finding out about how things taste, smell, look and feel and whether<br />
customers, like you, would like to eat the things that other scientists in the<br />
factory have invented.<br />
Today you are going to see if you can use your senses especially your sense of<br />
taste and smell.<br />
What part of our body do we taste with? The tongue is only partly true<br />
because we need our nose to help too.<br />
There are five basic tastes – one is ‘sweet’ can you name the others? Salty /<br />
bitter/ sour / umami (If/when they start to name flavours rather than tastes<br />
explain that it is the nose that helps you to ‘taste’ flavours and that they are<br />
going to test whether that is true in a little while.)<br />
Stick up the taste pictures in a prominent place as they name them and then<br />
explain the ones they don’t name. Make a point of getting them to read the<br />
words with you as some may still be non‐readers.<br />
Activity 1<br />
Explain that the children are going to find out how good their tongues are at<br />
tasting the basic tastes and that they need to taste the things on their tables<br />
and try to decide which food is which taste. They only have sweet, sour, bitter<br />
and salty. When they have decided they need to write the name of the food<br />
on the sheet to match the type of taste. Give an example and tell them the<br />
pots are labelled so that they can copy the words.<br />
Read the safety rules chart and explain that they don’t have to taste anything<br />
if they don’t want to but it would be useful if they had a go as there is nothing<br />
to hurt them.<br />
Ask the teacher to split them into groups and send them to their tables to<br />
complete the task.<br />
As the groups complete their sheet, get them to then try mixing tastes<br />
together<br />
1. Salt and sugar – what does it taste like?<br />
2. Lemon and water. <strong>Taste</strong>, then add sugar to it. <strong>Taste</strong> again.<br />
Which tasted nicer?<br />
3. Sugar and vanilla. <strong>Taste</strong>. What is the difference when the<br />
sugar is added?<br />
Leave food samples of salt and sugar on tables for use later. Replenish at<br />
break time if necessary. Take away the vanilla and lemon.<br />
© Chilled Food Association in conjunction with Inspire2Exceed<br />
CE-KS1-03-1<br />
NOTES
Mini plenary (10 minutes)<br />
When finished come back together as a class and for each group to bring their<br />
sheets. Go through what they should have written and see if they all agreed.<br />
Talk about favourite and least favourite type of taste and then what happened<br />
when they mixed the tastes together.<br />
Talk about the role of the Food Technologists in creating new recipes and<br />
foods which mix different tastes and flavours together like they did when they<br />
mixed the sugar with the lemon and the role of the Sensory Scientists in<br />
testing it out on the public to see if they like it.<br />
Ask for any questions about what they have done so far. Remind them that a<br />
question is something that they want to know or find out ‐ be prepared for<br />
little ones to ask irrelevant questions and don’t feel you have to answer them.<br />
If you are not comfortable or don’t have time, tell them that it’s not a<br />
question about what you do and ask them to think of a question about that, if<br />
they can, and you’ll come back to them. (Do try to remember to ask them<br />
again if you can).<br />
Demonstration (5 mins)<br />
This is a good point at which to break for playtime/ assembly or<br />
however the timetable allows.<br />
Tasting<br />
This is the part where we test the job the nose has in tasting flavours.<br />
Ask for two volunteers to help you who like to eat sweets! (Tell them you will<br />
only choose those sitting on their bottom quietly with their hand up!)<br />
Blind fold one of them and tell them you are giving them a jelly baby but they<br />
must hold their nose while eating it and tell you what flavour it is. If done<br />
correctly, they shouldn’t be able to tell you because the nose needs to<br />
function to be able to work out the flavour.<br />
Activity 2 (10 mins)<br />
Ask the children to get into pairs. One must shut their eyes (they mustn’t<br />
cheat or it won’t work!) and hold their nose while the other feeds them a jelly<br />
baby. Can they tell the flavour?<br />
Swap over.<br />
When finished bring the children back together.<br />
© Chilled Food Association in conjunction with Inspire2Exceed<br />
CE-KS1-03-1<br />
NOTES
Activity 3 (30 mins)<br />
What else do we need to be able to taste? Saliva! For the food to have taste,<br />
molecules in the food must first dissolve in saliva. If there is no saliva you<br />
shouldn’t be able to taste anything.<br />
How could we test whether this is true? Take their ideas, if they have any, and<br />
ask the class to evaluate whether they think they would work or not.<br />
If none suggest drying the tongue, tell them that’s what they’re going to do.<br />
Ask them to go back to their group tables where they will find a piece of<br />
kitchen roll to dry their tongues and ask them to try the salt or the sugar<br />
(make sure they use clean spoons). Can they taste it?<br />
When finished bring the class back together.<br />
Plenary (5 mins)<br />
What have they learned today about how we taste our food? (Tongue, taste<br />
buds, nose and saliva) Recap if they miss anything out.<br />
What have they learned about the job Food and Sensory Scientists do?<br />
Finish (5 minutes)<br />
Ask for any questions. Remind them that a question is something that they<br />
want to know or find out ‐ be prepared for little ones to ask irrelevant<br />
questions and don’t feel you have to answer them. If you are not comfortable<br />
or don’t have time, tell them that it’s not a question about what you do and<br />
ask them to think of a question about that, if they can, and you’ll come back<br />
to them. (Do try to remember to ask them again if you can)<br />
Thank them for working so hard and leave any appropriate company<br />
information, handouts for the children to take home.<br />
© Chilled Food Association in conjunction with Inspire2Exceed<br />
CE-KS1-03-1<br />
NOTES